

Daring to keep it simple can also produce great results…
Klik hier voor de Nederlandse versie
We started this recipe as a one-off experiment, thinking the result would not be that interesting, compared to the other bread recipes we already know and love. But the end result really surprised us. As you might expect, knowing some of our other favorite recipes, the key factors for this one are the same: time, timing and really good flour!
This recipe is the first to have a ‘dough calculator’ (see ingredients list). Other recipes will follow soon!
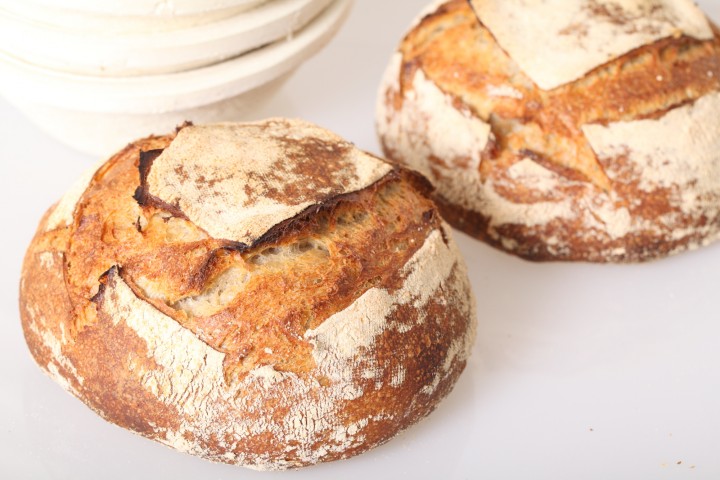
Although there does not seem to be strict definitions about French bread terminology, we simply call this bread ‘Pain Naturel’ or abbreviated PN. We chose this name because it stands for a basic yet full flavored sourdough bread, made just from ‘white’ bread flour. Using our own sourdough culture we found the bread gets a pleasant hint of sourness, which combines very well with the sweet flavor of the flour we use.
And especially because this bread is made with ‘white flour’ only, it is important to get the best quality, organic, stone ground flour you can get your hands on. When you do, we truly believe you will be rewarded with amazing taste and depth of flavor, better crumb structure and the crustiest of crusts.
Enjoy the recipe and let us know what you think. Also check out our handy sourdough tips to get the most out of your sourdough baking!
Before you start

For this recipe we are going to make a starter named a poolish. A poolish is a type of wet sponge usually made with an equal weight of water and flour and a small amount of sourdough starter culture or yeast and NO salt. Making a poolish helps bring more taste and strength to your bread.
We use a sourdough culture which is made with 100% whole grain rye flour. A sourdough culture based on rye flour is easier to maintain, does not go into a slurry when you forget about it, is easier to stir because it has almost no gluten and smells very nice, a bit like fruit. It is also very forgiving in the amount you feed it, everything seems to be alright. Normally we only feed it once a week, after our weekend baking we give it a few table spoons of water and rye flour, stir, ready!

| Ingredients for the Poolish | ||||
|---|---|---|---|---|
| 115 | g | wheat (bread) flour | ||
| 115 | g | water (room temperature) | ||
| 15 | g | sourdough culture | ||
| Ingredients for the Pain Naturel | ||||
|---|---|---|---|---|
| makes 1 loaf | ||||
| the poolish from step 1 | ||||
| 340 | g | wheat (bread) flour | ||
| 180 | g | water | ||
| 7.5 | g | (sea) salt | ||
Making the Poolish
In a bowl stir together the 115 g flour, 115 g water at room temperature with the 15 g sourdough culture. Mix it well until you have a homogeneous slurry that looks like very thick batter. Cover the bowl with clingfilm and let the prefermenting begin. After 12 hours at room temperature it should be bubbly, light and ready for use. So if you want to begin your bread making in the morning, you should make your poolish at 9 in the evening.

Note: We use European flour which absorbs a few % less water than American type flour. People using American type of flour should add 5-15 ml water to the final dough.
Making the Pain Naturel
Put the poolish starter and flour in the mixing bowl of your standing mixer and add 2/3 of the water (do NOT add the salt yet). Now start mixing and gradually add the rest of the water and let the dough come together. Knead for only 1 minute, leave it in your mixing bowl, cover with clingfilm and rest for 20 minutes (this technique is also referred to as autolyse).
Now add the salt and knead for another 4 minutes. Transfer the dough to a greased bowl, cover and leave to rest for 50 minutes.

Ideally the temperature of your dough after mixing should be around 24-25 ºC / 75 ºF. You should adjust the temperature of the water you add, so the total dough reaches this temperature. For us this means in summer adding cold water to this recipe and in winter (when our little bakery gets much colder then the rest of our house) adding water up to 50 ºC /122 ºF. You can measure the temperature of water and dough with a food thermometer. These measurements are important because they correspond with the proving times in the recipe.
After the first 50 minutes rest take the dough out of the bowl and onto a floured work surface and do one stretch and fold (a full letter fold, left over right, right over left, bottom over top, top over bottom; watch our bread movie or our stretch and fold method video to observe this technique if you are not familiar with it). Transfer to the bowl, cover and again leave to rest for 50 minutes. Repeat the stretch and fold (full letter fold) one more time (so 2 times in total) and leave to rest for 50 minutes (so this is the third and last of your three 50 minutes resting periods). During each stretch and fold the dough should feel firmer and less wet.
Now it’s time to shape. Shaping is a tricky subject. It’s something for which everybody develops his or her own favorite technique over time. You can make a batard or loaf shape or a boule (ball) shape like you see in the pictures. If necessary you can learn more on shaping from a good bread book, like the ones by Hamelman or Reinhart, or the Tartine Bread book. Or take a look at our boule shaping video.
Preheat your oven to 230 ºC / 445 ºF conventional setting (at what stage you preheat your oven depends on how long it takes for your oven to heat through, some take 30 minutes, some, like ours, with stone floors take a lot longer, up to two hours).


Transfer the shaped dough to a proofing basket / banneton, cover and leave to proof for 2 hours and 30 minutes (provided your dough has a temperature of around 24-25 ºC / 75 ºF, also check our tips on dough temperature). When you think it has risen enough, use your finger to carefully make a very small dent in the dough. If the dent remains, the bread is ready to bake, if the indentation totally disappears, the dough needs a little bit more time.

Now your loaf is ready for the oven. Slash the top of the loaf with a lame or bread scoring tool. To get a nice crust, try to create some steam in your oven by putting a small metal baking tray on your oven floor when you preheat the oven, and pour in half a cup of hot water immediately after putting the bread in the oven. Release some steam by setting your oven door ajar (perhaps with the help of a wooden spoon or oven mitt) 5 minutes before the bread is ready. If you are going to create steam with a baking tray, you may also want to turn your oven temperature a bit higher, because you are going to lose some heat in the process.
After 45 minutes of baking your loaf should be ready. Transfer onto a rack and leave to cool. This loaf also keeps very well in the freezer. But please make sure to eat at least some of it while fresh. This bread is great with just about anything, but also very tasty on its own.

Pain Naturel Time Table
Day 1 21.00 Make starter let ferment for 12 hours at room temperature
Day 2 0.900 Make final dough
- 09:00 – Add flour and water to starter, mix for 1 minute
- 20 minutes rest (autolyse)
- 09:20 – Add salt
- Knead for 4 minutes
- Rest for 50 minutes
- 10:14 – First stretch and fold
- Rest for 50 minutes
- 11:04 – Second stretch and fold
- Rest for 50 minutes
- 11:54 – Shape
- 12:00 Final proofing 150 minutes (2.5 hours)
- 14.30 – Bake for 45 minutes at 230ºC / 445ºF
- 15:15 – Your loaf is ready!


clarysse bart says
beste,
ik heb dit eens geprobeerd op 80% vochtigheid(coronabezigheidstherapie)maar ik heb het probleem dat bij het omkeren uit het mandje mijn brood erg uitloopt. mijn desem is sterk genoeg en ik vraag mij af of dit aan mijn stretch&fold techniek ligt of aan de bloem.
Wat bepaalt de wateropname van de bloem?;eiwit, uitmalingsgraad ,droging.
zou dit graag eens weten om zo’n grote-gaten-brood te maken. momenteel heb ik de beste resultaten door het brood in de koelkast te laten rijzen en s’morgens vanuit de frigo meteen de oven in te plaatsen. hopelijk kunnen jullie me wat helpen. alvast bedankt
Weekend Bakers says
Beste Bart,
Het is helemaal geen wonder dat dit deeg gaat lopen met dit percentage vocht daar kan geen desem tegenop. Er is heel veel over te zeggen en het antwoord is dat er diverse factoren zijn die de opname bepalen van de gluten / proteïne en het zetmeel en de hoeveelheid vezels tot aan de methode van verwerking, het kneden en s&f. 80% vocht is in de regel meer iets dat geschikt is voor ciabatta en eventueel stokbrood.
Zie ook: www.weekendbakery.com/posts…-baguette/
Gemiddeld zal het, is onze ervaring, al minder lukken na rond de 70% hydratatie voor dit specifieke brood.
Deze informatie is nog wel aardig om even tot u te nemen:
bakerpedia.com/proce…bsorption/
Dus ons advies zou zijn om toch iets terug te gaan in vocht. Ook zou het zo kunnen zijn dat het deeg uit de frigo nog niet optimaal gerezen is en dat u na een periode erbij op kamertemperatuur een nog mooier resultaat krijgt.
clarysse bart says
bedankt voor het advies,jammer dat hier in belgie geen (moeilijk)molenbloem te krijgen met hoog proteinegehalte.de frigomethode werkte wel redelijk goed.had redelijke kruim met vingerdikke gaten.de ovenspring in mijn dutch oven was super.
we zullen blijven experimenteren en proberen.
Weekend Bakers says
Mocht het weer eens mogelijk zijn en er komt een molen op uw pad, dan zou een bezoekje de moeite waard zijn. Zie ook ons overzicht: www.weekendbakery.com/posts…r-je-meel/
Verder verstuurt de Zuidmolen ook naar België, zij hebben een heel ruim assortiment en de webshop is net weer ‘open’: www.de-zuidmolen.nl/
Jess says
Hi there,
I am about to attempt the pain naturel for the first time, using a new rye starter I made from your instructions. Fingers crossed!
I don’t have a stand mixer so intend to mix and knead by hand. Is this possible with such a wet dough? If so, what kneading times should I use and what should I be looking for at each stage to know it is kneaded enough?
Also a question about shaping – I don’t have a proofing basket. Are these essential? Can I just use a bowl or do the last proof on a baking sheet?
Weekend Bakers says
Hello Jess,
It is challenging to work this dough by hand. You can google and look for the ‘slap and fold technique’ (Richard Bertinet) that might be a good option to handle this dough. As for time you should (at least) double the kneading times given and develop the dough to moderate gluten, which means it does not have to be a full window pane but something halfway to it, so look for some elasticity before the dough tares when you pull it with your fingers.
Yes, you can use a bowl or other basket lined with cloth for instance or you can just let the shaped loaf proof on a baking sheet, that will work too.
Mark Rochkind says
I just started bread making as a hobby. I really like Artisan” breads but do not like to sour taste of sourdough. A lot of your more interesting breads call for using a sourdough culture. If I don’t want that sour taste, can I omit the couture, and if so how should I adjust the recipe proportions?
Weekend Bakers says
Hello Mark,
A sourdough loaf is very different from a yeast-based loaf. If you want to convert it is easiest to do so with our Pain Rustique for instance, which is already a hybrid between yeast and sourdough.
See: www.weekendbakery.com/posts…-rustique/
In the poolish, just use 0.5 grams (or a quart of a teaspoon) instant yeast instead of the sourdough and for the rest stick to the recipe as described.
Enjoy your baking!
Stephen Marshall says
The paint rustique is barely sour in my opinion.
Weekend Bakers says
Yes it is a very mild light sour note, but it can be different depending on the composition of the culture used and mix of lactic and acetic acid bacteria and which ones have the upper hand.
Andrew says
Thanks, this will help me a lot. I will post results as my bread is made.
Weekend Bakers says
Always looking forward to read about your results.
Chris Morris says
Hi guys
I have already tried your Tartine method sourdough and it turned out beautifully – great crust and crumb and good flavour.
I now want to try this Pain Naturel recipe and have a couple of questions:
Firstly, you use a rye starter but 100% wholegrain rye is difficult to obtain where I live so I have a hybrid wheat flour starter (50% stoneground wholemeal wheat flour and 50% stoneground bread flour). It is now almost a year old and is quite vigorous – it doubles in less than 4 hours when fed. Could I use this instead of the rye starter?
Secondly, I used to live in France quite a few years ago and have fond memories of Pain de Campagne from our local boulangerie. I’m sure it was made with commercial yeast but I’d like to adapt your recipe to try to bake a sourdough version. I think it contained about 20% wholemeal flour (and, in some cases a small amount of rye flour). Could I simply substitute wholemeal flour for the same quantity of bread flour? Presumably this would make the dough slightly stiffer as wholemeal flour absorbs more water and I might need to adjust the water.
I’m enjoying your website by the way.
Chris
Weekend Bakers says
Hello Chris,
Yes the your first question, we see no problem with that at all.
As for the second question, you are correct, you might need to adjust the water quantity, as this can vary very much, depending on your particular flour, you need to do a few test runs to get it right. But we would suggest at starting with 5% extra.
Hope it will be great!
Michael says
Hi,
I love your site. It’s become the main source of my bread recipes.
I make this bread often and have a problem. I get nice large holes in the crumb. But the rest of the crumb is too dense. I don’t have that problem when I use instant yeast, so I don’t think it’s my shaping/folding that’s doing it.
I’ve had the rye starter going for a couple of months.
Do you have any ideas about what I could do to fix this problem.
Michael
Weekend Bakers says
Hello Michael,
This is hard for us to judge so we would suggest looking at the proofing process at the right temperature first (so maybe longer proofing if possible). So you get the large holes by handling and shaping the dough correctly, but did not give it enough time to develop.
Enjoy your sourdough baking,
Ed & Marieke
Aram says
Hallo Nederland!
Bedankt voor jullie site en recepten.
Dit weekeind voor het eerst met jullie (na 5 dagen lekker actieve) zuurdesem 2 stuks pain naturel gebakken. Prima resultaat, partner tevreden, lekker chewy brood, genuanceerde zuurgraad door de roggedesem. Roomboter en beetje zout volstaan. Heerlijk.
Nu zou ik alleen graag de gaten in het brood groter maken. Meer zoals op jullie foto´s, zeg maar.
Ik rijs de boel op ca 25 graden in de oven bij de warmte van het lampje. Meer warmte kan ik niet creeren hier. Ik gebruik reeds een (bescheiden) pizzaplaat, en een bakje kokend water voor de stoom. De inkepingen waren wat dieper dan bij eerdere pogingen, dat leek ook de rijsmogelijkheid te vergroten.
Hebben jullie nog tips over hoe ik de bollen harder zou kunnen laten rijzen voor meer luchtgaten?
Met vriendelijke groet,
Aram – Zweden
Weekend Bakers says
Hallo Aram,
Dank voor je leuke comment en sorry voor de late reactie. Wat heel goed werkt (vooral als je de temperatuur met infrarood meter kunt meten) is de oven heel even 30 seconden te verwarmen en dan weer uit te schakelen, dan kun je bv rond de 27 graden gaan zitten en dat werkt heel prima.
Verder kunnen we als tips nog meegeven om ook eens een paar verschillende merken bloem en meel te gebruiken, want ook dat kan enorm verschil maken. Daarnaast zo min mogelijk aan het deeg zitten om de opgebouwde bubbels niet te verstoren en vooral zo weinig mogelijk bloem toevoegen tijdens het proces. Ook kun je nog experimenteren met net een paar % meer water, omdat je bloem bv meer zou kunnen absorberen dan die van ons.
Geniet van het bakken en experimenteren en ga zo door!
Groetjes uit Holland,
Ed & Marieke
Mert Bower says
I made this bread yesterday. While I was not able to develop the holes in the structure of the bread from the fermenting sourdough starter as shown in the picture, I developed beautiful loaves of bread with great height and shape. And, most importantly, the bread is delicious. Thank you for sharing this recipe.
Weekend Bakers says
Thank you very much for sharing Mert. As you make the bread more often and get to know the dough better you will very probably see improvement in the structure too. Trying a different flour can also give a different result. We also have tips for you on handling this type of dough and keep the structure:
www.weekendbakery.com/posts…ion-dough/
Enjoy your baking and sharing,
Marieke & Ed
Nick Baker says
I tried this recipe for the first time, and for taste it’s really good! But it did come out flat (as described in your hints on sourdough), and I wanted to ask your opinion about two points: firstly, the poolish after about 15 hours did not show any bubbles (like for instance I get every time I make a poolish with a tiny amount of yeast, such as in your everyday bread recipe). Is that a problem with the sourdough I’m using, should I use more, or leave it longer?) I got the holes in the loaf as in your picture, however the bread was slightly spongy and didn’t expand as in the picture. The height of the loaf at its thickest was less than 5 cm, using the same quantities as in your recipe. Any ideas?
Weekend Bakers says
Hi Nick,
You should always make sure your sourdough culture is active when adding it to the poolish. So if needed refresh it the day before you use it in the poolish, leave it overnight on your counter at room temp, then use it the following day. It should be visibly active after 12 hours, so if not after 15, we guess something is the matter with the sourdough. Did you use it for something else already and did it work well?
Natalie Boon says
Thank you for your informative website. I made your rye starter and followed this recipe and it turned out great on the first try. The only difference was that I cooked the bread in a cold oven. I scored the dough and sprayed It with water. I put it in the enameled pot, covered it and put it in the cold oven. After the oven preheated I continued to bake for 30 minutes with the lid on and an additional 8 with the lid off.
Weekend Bakers says
Thank you Natalie, for sharing your method with use of the cold oven. That is actually something we have never tried.
Enjoy your sourdough baking!
Lisette van den Einde says
Hoi
Ik ben totaal nieuw met zuurdesem brood bakken. Kwam op jullie site en is lekker overzichtelijk. Nu heb ik een aantal vragen en hoop dat jullie me kunnen helpen. Ik heb vorige week een 40 jaar oude organic starter gekocht en die heb ik tot nu 2 keer gevoed. Hij staat gewoon in de keuken, is geen warme keuken dus nadat ik de starter gevoed had heb ik m ergens warm gezet. Kwam mooi omhoog en borrelde. De geur ik weet niet of het goed is, best sterk maar kan ook niet zeggen dat hij naar nagellakremover ruikt ofzo. In ieder geval was ik een beetje bang om te beginnen met bakken, maar heb net de poolish gemaakt en hem wat warmer gezet. Ik heb wit organic mail gebruikt hoop dat dit gaat. De starter is wholemeal. Nu heb ik ook twee van die bannetons. Een ronde en langwerpige voor ieder tot een kilo. Kan ik deze gebruiken voor dit brood? En ik heb natuurlijk maar 15 gram van de starter gebruikt, moet ik nu de rest bijna weggooien van de starter. Dank alvast voor jullie antwoord!,
Groetjes Lisette
Weekend Bakers says
Hallo Lisette,
Leuk te lezen over je starter. We nemen aan dat je de pain naturel aan het maken bent / of was. Je kunt de rijsmandjes natuurlijk gebruiken (zijn het rieten mandjes dan moet je ze goed prepareren voor gebruik. Zie:
www.weekendbakery.com/posts…jsmandjes/)
Iedereen heeft zo zijn eigen methode voor het onderhouden en verversen en ook gebruiken van een desemcultuur.
Wij vullen weer aan wat we er uit genomen hebben zodat de hoeveelheid op peil blijft, roeren goed en laten hem dan een nachtje op het aanrecht staan zodat hij weer actief kan worden. Daarna gaat hij de koelkast in tot de volgende bakronde. Wij raden aan om je desem minimaal elke drie weken te verversen als je het in de koelkast bewaart (ook als je niet bakt). Als je het wilt gebruiken haal het desem dan één dag voor gebruik uit de koelkast. Als het langer dan een week in de koelkast heeft gestaan moet je het ook eerst verversen voor je het de volgende dag gaat gebruiken. Dat verversen houdt in dat je 2/3 van je cultuur weggooit en weer aanvult met vers meel en water. Als je desem dan de volgende dag actief is, kun je het weer gebruiken in je voordeeg. Je vult dan weer aan wat je hebt gebruikt, laat weer actief worden en plaats een dag later weer terug in de koelkast.
Wij gebruiken rogge volkorenmeel voor ons desem zoals je al gezien hebt in het recept.
Je kunt er ook meer over lezen in deze post:
www.weekendbakery.com/posts…asy-steps/
Veel succes en plezier met je desem!
François says
Great recipe/method!
I tried it yesterday and the result was phenomenal! Great oven spring. Fluffy silky soft open crumb. Beautiful crispy ears and the most wonderful aroma.
Could I proof this over night in the fridge right after I put the dough in the proofing basket? That would make the schedule more flexible so I can bake it early in the morning for breakfast.
Thanks,
François
Weekend Bakers says
Hello François,
Thank you for your enthusiast comment. And yes, it is possible to proof it in the fridge overnight. Make sure you prepare your basket well so the dough will not stick and to cover it (maybe put the basket in a bin bag that you inflate so it will not touch the dough). It is a bit trial and ‘error’ to know how much fridge time you need / can take because it depends on how your sourdough behaves and also the fridge temp, but with a few tries you will get it right. The main thing is your dough must not over-proof, so on the first try keep it shorter rather than longer.
Hope it will be great!
Francois says
Thanks for the suggestions. I already did a few tries. At the current room and fridge temperatures I notices it is better to let it proof about 1 hour at room temperature before putting it in a 4-6 deg. C fridge. Otherwise I had to let it proof at room temp the next morning a few hours more because it was not properly risen yet.
Just as a note for people who would like to have more understanding about controlling the final dough temperature, here is an extract form Jeffrey Hamelman’s Bread on the King Arthur website:
www.kingarthurflour.com/profe…tures.html
Have a great weekend!
François
Weekend Bakers says
Thank you too François, for your feedback and sharing your experience and the link.
Enrico says
Hi,
I enjoy reading this site for the knowledge.
My question is regarding sourdough preferment calculations. Assuming my dough is 1700 grams of flour and liter of water(about 60% final hydration) How do I determine my poolish amounts? Not sure how calculate starter % vs flour and water poolish %. I’m using 100% hydration starter.
Thanks.
Weekend Bakers says
Hello Enrico,
You can decide the % of poolish you want to use. This can be anywhere between 20 and 50 %. What % did you want to use for your recipe?
When you know these % you know the amounts. The amounts of water and flour used in the poolish are subtracted from the total amounts for the recipe.
So if you use 1700 flour and you use 500 grams of it in your poolish (close to 30%) you use 1200 grams in the final do (so the total is again 1700). Same with the water.
The percentage of culture you add also depends on how it behaves and how active it is and times you take to ferment, but a good starting point is somewhere between 3 and 4 %.
Piling says
After the third 50 minutes rest, I found the dough have so many bubbles when shaping. Why this happened and how to avoid it?
Weekend Bakers says
Hello Piling,
We assume you mean large bubbles / balloons on top of the dough. Do not worry, it is just the formation of gas and active dough, if you see very big bubbles on top of the shaped loaf, you can pinch the air out with your fingers, small ones you just leave.
Wendy says
Is there an upper limit for the poolish creation time? Is there an issue if I leave it for 18-24 hours instead of just 12?
By the way, this recipe is my favorite one I’ve found so far. It’s so easy to follow.
Piling says
I would like to know too.
Weekend Bakers says
Hi Wendy and Piling,
Yes, there is a limit, because the poolish is active and developing and the yeast inside it is multiplying. What you need to avoid is the poolish getting over-ripe which means that the gluten break down and you will not get a strong dough. So it is best to use the poolish just below or at its peak. There is some leeway if you want or need to take a bit longer than the 12 hours. But if you want to leave it for much longer (like double the period), you either need to reduce the amount of culture or use the fridge to slow down the development process (or a combination of both).
Olivier says
Hello!
I am in the process of making your sourdough starter. It is going great and I plan do this bread receipt this weekend. Some receipt calls for using the starter when it’s at its maximum height, or just starting to fall. Is this needed for the poolish?
Thanks!
Weekend Bakers says
Hello Olivier,
We are not that exact or particular but we would prefer to use it when it is slightly under the maximum, because when ‘just over’ the gluten start to deteriorate. An under-ripe poolish is always less of a problem and the final dough will still be good, over-ripe and the structure and strength if the dough start to suffer.
Elizabeth says
Many thanks for such a quick response. I am studying everything on your site and I think I am following most of it but am I right in thinking that all rest periods for this bread should be in an environment of 86 degrees F approx. I have a dehydrator which uses a fan and I think I can get pretty close to that.
Thank you
Weekend Bakers says
Hello Elizabeth,
Your welcome, glad to help. About he dough and environment temperature: To get consistent bulk fermentation and proofing times, we aim for a dough temperature around 24ºC/75ºF. This is a temperature which gives you a nice balance between speed and taste. It also depends what is possible regarding the actual situation for you, when developing your dough. A just warmed up oven may function as a proofing cabinet if it is cold. 86ºF is of course a very warm surroundings temp which in general is not the room temp for many bakers. But if it is in your case, it will still be alright for proofing your dough, the process will just be a bit faster than the proofing times given in the recipe (but also depending on other factors and the way your sourdough culture functions).
Hope this helps you a bit!
Elizabeth says
I am a real beginner and would like to try this recipe but I would like to know what size round basket to use. I see that 8, 9, 10 inch baskets are available.
Thank you
Weekend Bakers says
Hello Elizabeth,
Around 8 inch is right for this recipe and also many other recipes on our site. But recipes are easily converted to a bigger size (also with our dough calculator) if you would prefer to make bigger loaves. But this is the one we use and the best sold basket if looking at round bannetons:
www.weekendbakery.com/websh…round.html
Enjoy your baking journey!
Brenda says
Making my second loaf of bread. I’m new to bread making so thank you for sharing your knowledge. The starter is nice and bubbly, finally, and smells nice and sweet. A few questions: Can the recipe be doubled with success? Can the salt be reduced? (I found the 1st loaf to be a bit too salty for my taste). And, can the starter be mixed with the water and then added to the poolish? Thanks! Can’t wait to bake tomorrow ‘s loaves!
Weekend Bakers says
Hi Brenda,
Yes and yes! As you can see when you open the dough calculator you can make any number of batches of this loaf, 2 or 3 or 4 or 6, no problem. And the salt can be reduced. We already use less salt than average (also see our post about the subject: www.weekendbakery.com/posts…h-and-why/)
You can reduce the salt with 1/3 to 1/2 without any problem for the end result, there will only be a difference in taste of course.
We do not really understand your last question…adding starter to the poolish?
Enjoy your baking!
April says
I’ve made this a couple of times now and it’s turned out beautifully every time. I’d love to add a picture to show you but I can’t do that here so you’ll just have to take my word for it – it looks JUST like yours. Thank you for such detailed instruction.
Weekend Bakers says
Hi April,
Sorry the program we use does not provide uploading pictures with comments. That is why we made this special showcase section where everybody can present pictures of their loaves and bakes with comments and other information you would like to share.
See here: www.weekendbakery.com/send-…your-loaf/
Hope you will show us your excellent result of the pain naturel!
Greetings and happy baking weekend,
Ed & Marieke
Terry Butwell says
I intend to make 2 Loaves of this bread as it suits my schedule to make two at a time. Really appreciate the dough calculator. I have a question regarding dough retarding. Is it possible in using this recipe to retard the dough after final shaping and placing in the banatons and then placing the banatons in plastic bags in the refrigerator overnight for say 12 hours. Would there be any changes to your recipe needed to accomodate dough retarding.
Love your web site and recipes and video’s. Many Thanks Terry B
April says
I’d love to know this as well! I hope they will reply.
Weekend Bakers says
Hi April, see our answer to Terry we just posted.
Weekend Bakers says
Hello Terry and April,
Yes, that is very well possible. The amount of hours is key. It could be 12 hours but also less to get to the optimal proofing point. So you need to test it a few times and see where the sweet spot is for your loaf. This depends on the fridge temp and also on the way your own culture works.
So you can start without any changes to the recipe, but if possible plan it so the period of retarding is shorter and check how the loaf is doing. Could be it needs more time (you could take it out of the fridge and let it proof at room temp for one or two hours). If it seems sort of perfect (bit harder to judge when cold) you can also take it straight from the fridge to the oven.
So it is all possible, but make sure it is well covered in the fridge to avoid drying out and test a few different options to get the perfect timing for your conditions.
Hope it works out well!
Yuki says
Hi there,
We love our sourdough! Thank you for the wonderful recipe. We’ve been making this bread for almost 2 years now. I just want to know how you keep the bread soft. The bread is soft only for a day or two, but after that it gets hard. Still nice to have it toasted though. But we would like the bread be soft for a bit longer.
Weekend Bakers says
Hello Yuki,
Yes we understand. We slice the bread and keep it (in airtight bag or container) in the freezer. We take out what we need and let it thaw or even put a slice quickly in the microwave (this works because the bread contains lots of moisture) and sometimes also in the toaster. You can also put one halve of a loaf in the freezer and take it out when you need it.
If possible give it a try and test what you like best.
Enjoy your sourdough baking and thank you for your kind words!
Marieke & Ed
Holland
Yuki says
Thank you for the tip, Marieke and Ed! We will give it a try. (but first, we have to make a room in the freezer…). We are also loving wholemeal bread and walnut & fig recipe.
Arigatou and Ngā mihi,
Yuki (New Zealand)
Weekend Bakers says
Graag gedaan / you are welcome 🙂
Groetjes uit Holland
Danny O'Connor says
This is an incredible recipe. I was struggling to make my rye starter work until I found this recipe. I still cannot believe it works with so little starter and so little kneading. But it works everytime. Fantastic. Thank you!
Weekend Bakers says
Thank you Danny,
We think it’s wonderful you love this method too and have such good results with the recipe.
Wishing you many excellent loaves!
Ed & Marieke
Weekend Bakers
Gloria W says
I began this loaf, and was called away. I took it with me, to complete stretch and folds, and it was feeling and looking fine. I had to drop it off home, and was unable to shape it after bulk, needed to put into the fridge. Came home this evening, and it seems to have lost the ability to shape. I’ve done what I feel I can, with boule shape, put it into a banneton, but have no real hope it will turn out. It’s in banneton now, dough is still cool, will give it extra time to respond, and may bake it anyway. Do you have any experience or recommendations in the event of retarding needed? How might I have treated this situation better? Thanks, Gloria.
Weekend Bakers says
Hello Gloria,
Your dough had quite an adventure and if you still produce a well enough loaf, that will be a small miracle. You can retard dough before or after shaping, but you need to know your aim before you start. Shaping is best done after the dough has been out of the fridge for an hour or so. The most important thing is the dough does not over-proof. Under-proof is not a problem because you can indeed fix it by letting it proof longer after you take it out. You need to give this a try with your conditions and see how the dough reacts (with your sourdough and your fridge temp). Usually it is a good start to try it so you can do this overnight, check early in the morning. Another factor to change to get it right for your schedule is the amount of sourdough culture you add to the dough.
Kelly says
Hi, I’m new to sourdough, but have been baking with commercial yeast for about 15 years. I’m just working on my first sourdough loaf, and I’m wondering what to look for in my dough after each proof? My first 50-min prove yielded a very tightly-structured dough with no rise to it at all. I accidentally used some tap water when making the dough this morning; could the chlorine in the water inhibit the yeast that much? I’m sure my starter was good; it smelled yeasty and lovely and looked bubbly and fluffy.
I have kids and baking is just for my family, so I didn’t want to scrap it; I tried kneading in some more of the rye starter and proving it at a warmer temperature for the second rise (not very professional, I suppose, but I hate wasted time and ingredients, and I had plenty of starter to work with). It gets quite cool here in Boston during winter, so I guess that could also be a factor. After the second prove, it seems much lighter and more relaxed, but doesn’t really look like it’s risen much, and there aren’t many visible air bubbles.
I’m giving it a good 2-3 hours to rise before attempting to bake it off, so we’ll see how that goes. I guess my biggest question is: what exactly am I looking for after each of the proving times, regarding the appearance of my dough?
Weekend Bakers says
Hello Kelly,
We understand your questions about what to expect from a sourdough loaf. About the stages of proofing. The first 50 minute rest may not be a dramatic change, but you must see definite activity during the second 50 minute period and even more so the third. For the final proof, your bread should reach a volume that is as good as or close to a commercial yeast based loaf.
We are wondering about two things: First of all the age of your culture. Maybe it is still very young and needs to mature a bit further so keep on refreshing and feeding it! And just as important, the mentioning of the temperature. Does the quite cool also go for the temperature of your dough?
We just want to repeat this piece of the recipe because it stresses the importance of the dough temperature in relation to the proofing time:
Ideally the temperature of your dough after mixing should be around 24-25 ºC / 75 ºF. You should adjust the temperature of the water you add, so the total dough reaches this temperature. For us this means in summer adding cold water to this recipe and in winter (when our little bakery gets much colder then the rest of our house) adding water up to 50 ºC /122 ºF. You can measure the temperature of water and dough with a food thermometer. These measurements are important because they correspond with the proving times in the recipe.
If you are not sure about this and have not read our tips, please do so because it is one of the key factors for you we think:
www.weekendbakery.com/posts…mperature/
Good luck with it and just keep baking and practicing and with the gained experience it will get better and better!
Oli says
I tried this recipe again today and ended up with a very slack dough that struggled to hold shape that ended up sticking to my banneton (even though it was dusted with rice flour). I’m pretty sure the preferment wasn’t over-developed as there was no signs of it shrinking back (if anything it was under developed) so the only other thing i can think of is that the dough got too warm after mixing?
I’ve had a bit of a nightmare the last few times baking this and the tartine bread recipe and i’m really puzzled, i’m starting to wonder if there’s something up with my starter
Weekend Bakers says
Sorry to ‘hear’ this Oli,
Did you perhaps change your brand or bag of flour recently? This could make a difference. We assume you read our sourdough tips already: www.weekendbakery.com/posts…ough-tips/
It’s indeed a good idea to look into your starter. Maybe start up a second new one and see how that goes. Examine the first one carefully, smell, look, maybe some extra refreshing and stirring. Make sure it is active before use.
Measure the temperature of the dough if you think it is getting too warm, add colder water to the final dough.
You are not alone, we all have days with less perfect results and sometimes hard to explain results. But trace your steps and we are sure you will have excellent results again soon!
Good luck with it,
Marieke & Ed
Philip Gormley says
Pain Natural Bread
Thanks for a great recipe.
Easy to follow and don’t have to make a kilo of dough.
So many formula suggest that making 500g dough will not give consistent results.
Used rye starter with wholemeal for Poolish and strong white for dough.
Thanks again!
Weekend Bakers says
Thanks for your kind comment Philip. We agree, so many people want to bake just one 500 g or 750 g dough bread because of oven space or it’s just what they need.
Enjoy your bread baking!
Max says
This bread will freeze just fine, so personally I bake two loaves at a time. The next day, I put the second loaf in a plastic bag and freeze it. HTH!
Weekend Bakers says
Thank you Max for your advice. We do put a lot of freshly baked loaves and buns in the freezer. Especially with this higher hydration dough, it keeps really well and still tastes great after defrosting.
Ömer Seyfi Salur says
I have tried making this bread and they were sucsesfull. Every morning I am making this PN bread. Due to the time that I have to deliver the breads I am starting 02:00 hr in the morning.
Questin is is it posible to use “hybrid” in making this bread ?
Weekend Bakers says
Hello Mr. Salur,
Yes, maybe you can find a schedule that will give you some more sleep.
You can take the method / schedule from our pain rustique and the ingredients from this recipe.
www.weekendbakery.com/posts…-rustique/
You could also experiment with making the final dough in the evening and let it develop (retarding) overnight in the fridge. Next morning shaping and proofing.
Hope with some experimenting you can find the right method for your needs.
Lots of success!
Marieke & Ed
May says
I recently discovered your site and find your tips on how to improve baking are so helpful.
I want add in thyme & olive oil, but don’t know when is the right time to add these in. Your comments are greatly appreciated.
May
Weekend Bakers says
Hello May,
Thank you for your kind words. If you want to add olive oil you need to keep in mind that this is a form of liquid and if you add on top of the liquid it will make the dough very wet. So you have to use less water if you use oil. Start with just a little bit, like 20 grams to replace around 15 grams of water and see how this goes. You can add the oil and thyme to the final dough, after you add the salt.
But above all, we advice you to always make the recipe as described first, before you change anything. This way you will learn much more about the effect of your changes!
Greetings,
Marieke & Ed
Jakob White says
Hi.
I am new to baking but have started. I am looking forward to pulling out a bread that is thicker than two fingers and more fluffy inside 😉 so I’m trying this recipe and have a couple of questions.
Autolyse: could I extend time up to and hour or even more and would it be beneficial?
Is there some kind of thumb rule for proofing time with lower or higher air temperatures?
Thank you for this website! Very inspiring to read!
Jakob
Weekend Bakers says
Hello Jakob,
Thank you for your comment. Great you are giving this recipe a try. About that, you should really stick to the recipe to begin with, otherwise you will not be able to get the best results. You need to have a base to start from and after that deviate from it with good reasons. So, the autolyse period, we would recommend to keep it close to the 20 minutes if possible, but if you need to you can prolong it to one hour, but not much more than that, because the period is a sort of good optimum and much longer will not be better for the dough development.
And yes there is a connection between proofing time and temperature. You can read some theory with tips about it here: www.weekendbakery.com/posts…mperature/
That is also why we indicate the right temperature for the dough, combined with the proofing time we give for each recipe.
Enjoy your baking and hope the results will be great!
Ed & Marieke
Weekend Bakers
John Hobson says
What would be really nice would a printable version of this recipe. I don’t want page after page of comments and/or photographs if I print it out.
Weekend Bakers says
Hello John,
If you print the recipe from the printer option in your browser (to be found in the upper right hand corner of your screen), you get the basic recipe without any pictures or comments.
Hope it works!
Andreas says
Hi,
I recently discovered your site and I should thank you for all these hints how to improve baking, and especially for making available to us the dough calculator.
I have a question regarding the poolish.
When is the poolish ready? The 12-hr period is just an indication, because it depends on the temperature of the room.
I did the usual floating test by dipping a spoon of poolish in some cold water.
Unfortunately, it doesn’t float 🙁 .
I have tried several times and it has never floated.
Is the floating test really necessary to determine , if the poolish is ready to be used in making bread?
I should mention that eventually the breads are quite good, not as good as yours . (but perhaps it’s because I use higher %percentage of rye flour my recipe)
I am just curious, if the floating test of the poolish is a really necessary criterion .
Thank you.
Weekend Bakers says
Hello Andreas,
Sorry for the late reply first of all. We must say we never ever use the floating test. First of all it is no absolute exact science with the use of a poolish, you can use it under-ripe (and it will further ferment and proof along with the rest of the dough later of course) as long as it is not over-ripe because this weakens the gluten structure for your dough. So make sure you check that it is nice and bubbly and you don’t see a rim where the poolish has been before it retracted in the bowl (that’s collapse indicative). So stay a bit on the safe side of the schedule and all will be well. Practice will also teach you how far you can take it under your own specific conditions. We presume you have seen our poolish schedule in this article plus tips that might be helpful?! www.weekendbakery.com/posts…lish-biga/
And yes, a higher percentage of rye flour gives a different result (less gluten, heavier etc).
Enjoy your baking!
Jacobim says
Hi friends – have any of you tried this recipe in a food processor instead of a mixer? Generally from reading recipes around the web (and even your own pita recipe) it seems like a food processor is as good as a mixer these days, it just suffers from looking less “cool”. Please let me know your thoughts, and thanks as always for the endless free recipes and instructions!
Weekend Bakers says
Hello Jacobim,
We have never tried this, but we think you will find this article very interesting:
www.americastestkitchen.com/artic…-processor
Being able to develop the dough to the right stage is key of course, without damaging the gluten structure or over-developing it.
Hopefully it will work great. And thank you for your kind words about our bread work 🙂
Glenys Barratt says
Some great information here. I have been baking sourdough for about six months and enjoy the whole process. I still have failures and have not found the perfect recipe yet. I use a high protein flour from Canada and now think I need a food thermometer to help me. Thank you you for all this wonderful information.
Weekend Bakers says
Thank you Glenys for your kind comment. Enjoying the process and all the while making progress! A digital thermometer is a great tool to aid you toward consistency in baking. You can also read some more about this subject and get some tips here: www.weekendbakery.com/posts…mperature/
Greetings from Holland,
Ed & Marieke
Tim says
Hi. First, I found your site recently and it has helped me a lot. I’m new to sourdough. I started my (rye) sourdough starter about 1 month ago, and have tried a couple of recipes since then, with less-than-stellar results. I tried this “easy” recipe (sourdough pain naturel), and it is by far by best result. But, it still has some serious issues.
It tastes wonderful, and I’m going to make it again for my next try. But, the rising is very, very uneven. I mean extreme. I will add link to the photo. It has some very dense parts, and some super big holes, like the entire bottom is one big hole, between the crust and the middle of the bread.
i67.tinypic.com/256haf6.jpg
I followed the recipe to a tee, with exactly 75 deg F for everything until baking. I used a pre-heated dutch oven to bake. Otherwise, everything seemed spot on. My starter seems very active and consistent. Times seemed good, and everything looked and felt as it should (from my inexperienced view).
I believe it is one of two things: either a proofing issue, or a shaping issue. My shaping technique is in its infancy, so I probably used too much flour thrown around during shaping, and didn’t fold well. Did I just get a very uneven dough, with air pockets or more yeast in certain areas?
Is it more likely to be shaping, or proofing, in your opinion. I ask, because in my next attempt, I want to attack my biggest weakness. I don’t want to give up!
Thanks!
Tim
Weekend Bakers says
Hello Tim,
You are a master analyzer of your own baking issues ;). You are spot on in both cases. First of all your loaf is very under-proofed. This is not hard to fix and mainly a case of giving it more time and also being aware of the temperature of your dough and surroundings while proofing. See our tips here:
www.weekendbakery.com/posts…mperature/
So, on to the issue that needs some more practice: The shaping! Yes it will get better as you bake more often. And yes it is very important not to keep adding flour during the process. We do have some great tips for handling high hydration dough that will come in handy:
www.weekendbakery.com/posts…ion-dough/
The shaping itself has a lot to do with getting a feel for the dough, handling it with care and yet creating surface tension. There are many ways to shape round and oval breads and you will have your own favorite in time.
We only have a small clip from quite a while ago for making a round loaf, but it can help you on your way: www.weekendbakery.com/posts…g-a-boule/
Hope this helps and we are sure your next bread will already be a big leap forward!
Greetings,
Ed & Marieke
(PS: Also make sure your bread flour is of good quality and has the right amount of gluten (aim for 12 to 13%). Maybe try a different brand or type if needed. it can make a difference!)
Tim says
Thank you so much, for your helpful comments!
I have already improved my sourdough leaps and bounds from last time … practice definitely helps. 🙂 Any lingering thoughts of my giving up have all but vanished!
By the way, I’ve been using King Arthur Bread Flour (12.7%) because it’s so easy to find here in the States, but I’m going to explore other options as well. Thanks for the advice!
-Tim
Tim says
Sorry, I may have incorrectly supplied the image link for the last post. I will try again.
i64.tinypic.com/10p116r.jpg
Weekend Bakers says
Great to see your result Tim. Excellent! And glad we could be of assistance.
Wishing you many more crusty loaves and wonderful baking moments!