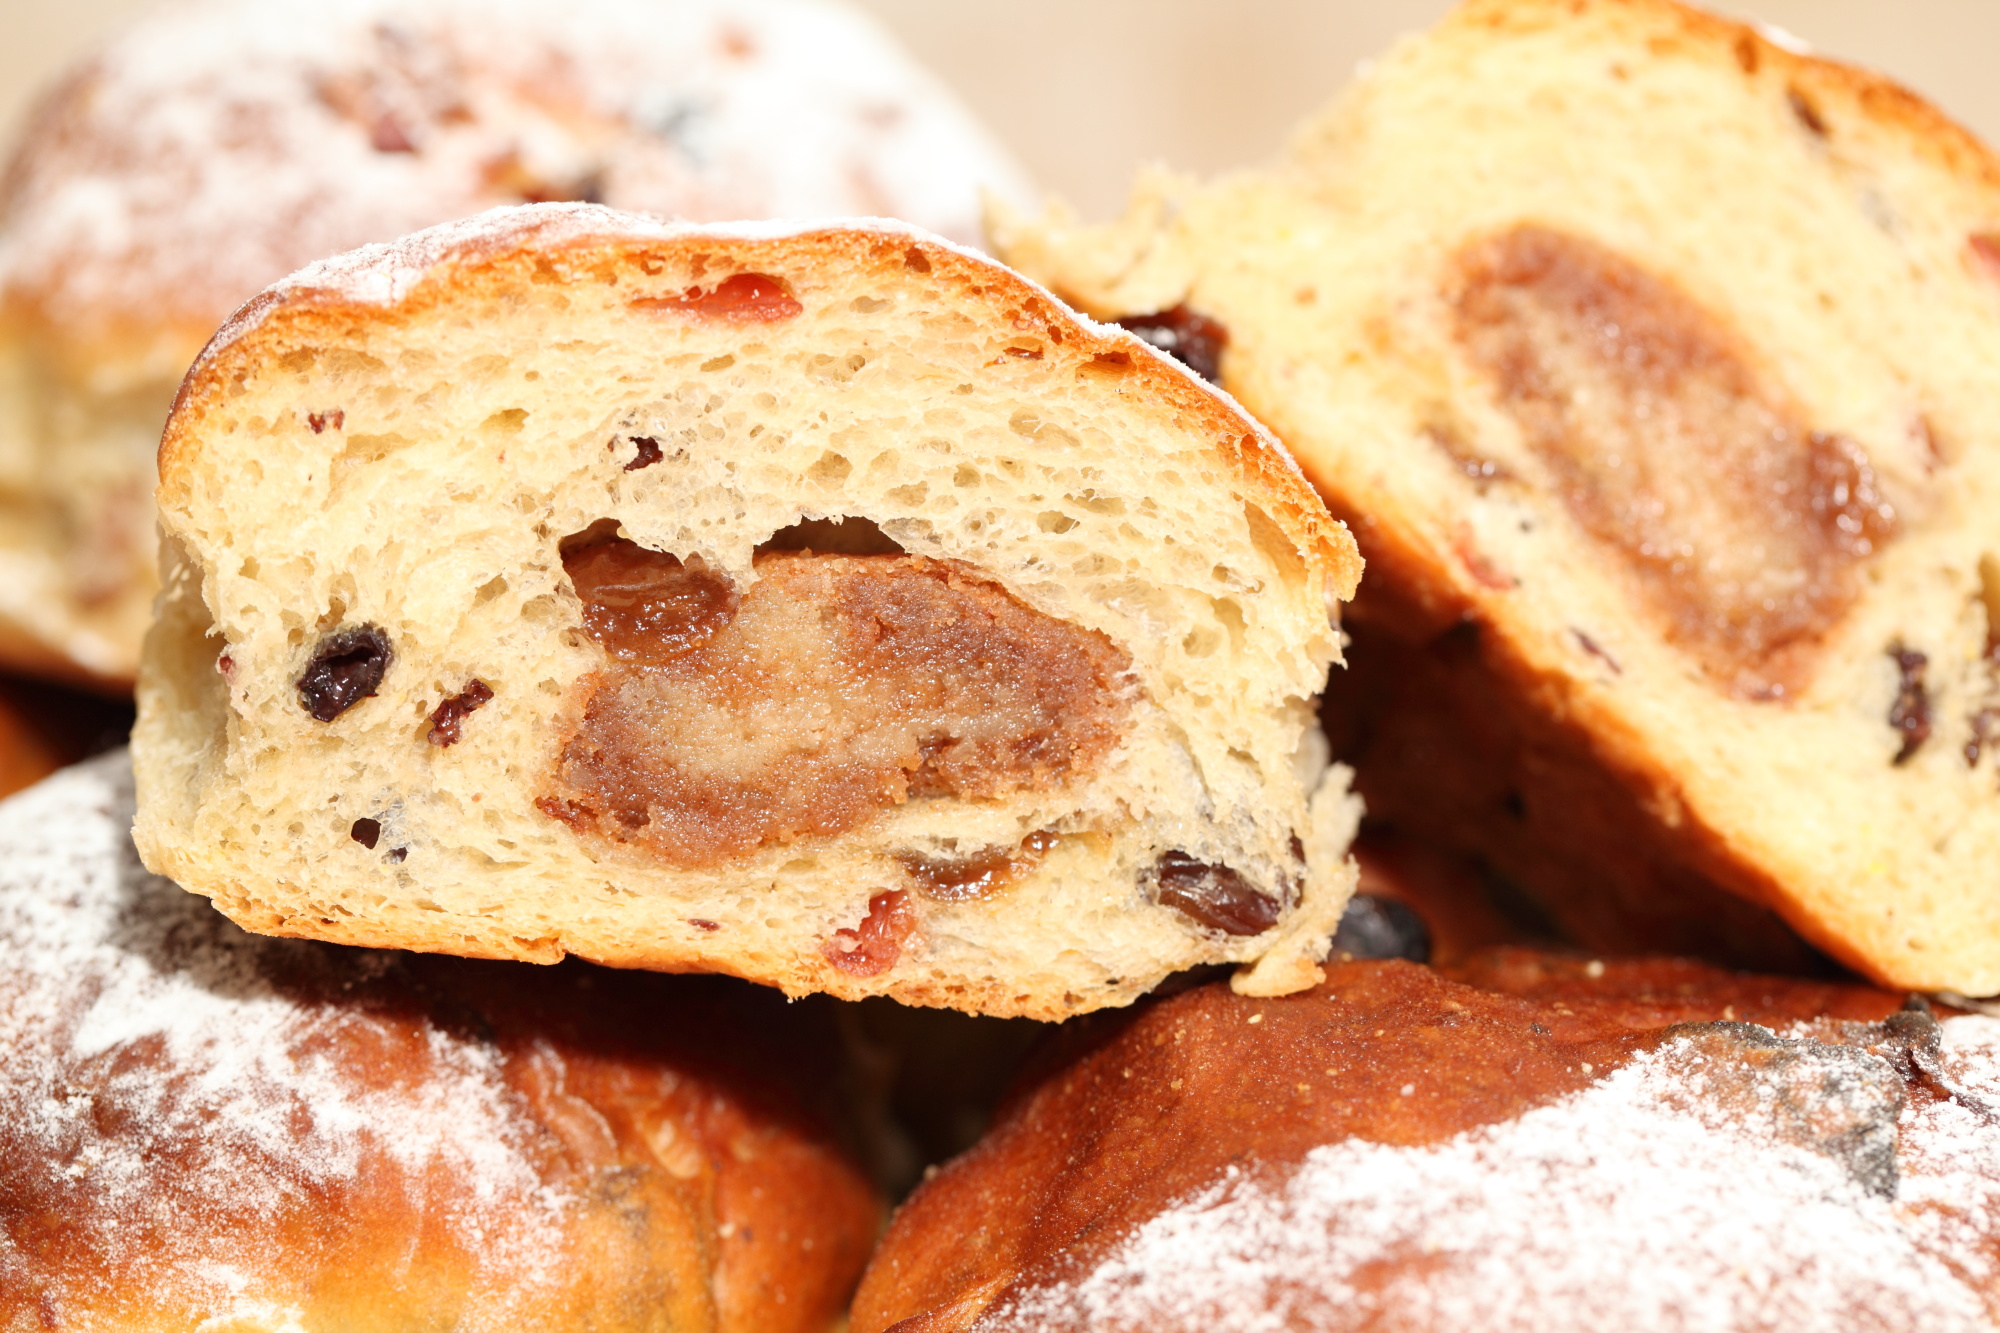
Raisin bun meets Christmas stollen with delicious results!
Always secretly sorry the Holiday season is over so soon? Well I always am, because I so love to bake my stollen! That is why I came up with these ‘stollen bollen’. They are a deluxe version of our much loved raisin buns with a lovely ‘almondy’ surprise in the center. It is a mini stollen in disguise. Nobody needs to know…until they take a bite!
But also a great recipe to get in the Holiday baking mood.
For my stollen and raisin buns I like using fresh yeast because it seems to be more enthusiastic when it comes to proofing this enriched dough, and somehow it smells even better too. I also love adding the drunken cherries as an extra over the top surprise, but you can leave them out of course.
Making a recipe your own is one of the great delights of baking so by all means give these buns your own twist.
Happy baking!
Marieke


Ingredients for the Stollen bollen
makes 12
200 g bread flour
200 g all purpose flour (or French type 55 flour)
40 g fresh yeast or 14 grams instant yeast
8 g salt
50 g fresh softened butter
1 egg yolk
220 g milk*
20 g orange rubbed sugar (see ‘before you start’))
360 g mix of raisins, currants and cranberries, washed and soaked
180 g almond paste (see ‘before you start’)
1 egg yolk and 1 tsp cinnamon to add to the almond paste
12 drunken cherries (optional, see ‘before you start’)
30 g melted butter for brushing after baking
*Depending on the flour you use, it could be you need to add a few % extra milk to your dough. But remember the fruit you are going to add will also give some extra moisture.
Before you start!
For this recipe it is really handy if you have three things ready and prepared in advance, the cherries, orange rubbed sugar and cinnamon almond paste.
The cinnamon almond paste
You can find our recipe for homemade almond paste here. For this recipe you need 180 grams of it and add an egg yolk plus a teaspoon of cinnamon and work this through the paste until smooth. If you do not want to make almond paste you can also use marzipan.
The drunken cherries
You need to make these cherries well in advance so the cherries can soak up the liqueur, at least two days in advance but longer is even better. If you do not have the time or not want to add them, you can very easily leave them out without spoiling the recipe. But they are very easy to make and good with many other recipes (see our Christmas brownies for example). This is how it works: Put good quality dried cherries in a clean jar until the jar is almost full. Top off with almond liqueur (or a liqueur of your choice, use rum if you prefer) and wait for the cherries to soak up the liquid and get plumb. Check after a while if the cherries need topping off with more liqueur, because they need to be ‘under water’.
The orange rubbed sugar
For the orange rubbed sugar mix 20 grams of sugar with the zest of 1 unwaxed orange. You can store this mixture in your fridge, it will keep for a long time.
Soaking the raisins
You also have to wash and soak your raisins, currants and cranberries. First wash them and then leave them in warm water for 15 minutes. Rinse with cold water and leave to dry on a plate for up to two days (cover them against dust). If you do not want to wait two days, or you forgot, just drain them well and roll them lightly in flour before using. The amount of raisins used in this recipe is almost the same as the amount of flour used. It seems like a lot, but you need this amount to not ‘have to bicycle from one raisin to the next’ as we say. As you make these ‘stollen bollen’ more often, you will come to your own preferred amount.
Making the stollen bollen
Put flour, salt, orange sugar, egg yolk, yeast and most of the milk in the bowl of your standing mixer. If you are using fresh yeast, first dissolve it in some of the milk, before adding it to the other ingredients. Let everything come together by mixing slowly and gradually add the rest of the milk, then add the soft butter and knead the dough until well developed. With a KitchenAid type mixer, the kneading takes 8 to 10 minutes, by hand it will take about 15 minutes of good kneading. Make sure the dough is not too sticky or too dry. Aim for a bit tacky, which means that when you poke the dough with your dry finger it should stick for a second but then peel off as you remove your finger. Remember, there can be a lot of difference in the required amount of liquid, depending on the flour you use! Now Leave the dough to rest for 5 minutes.
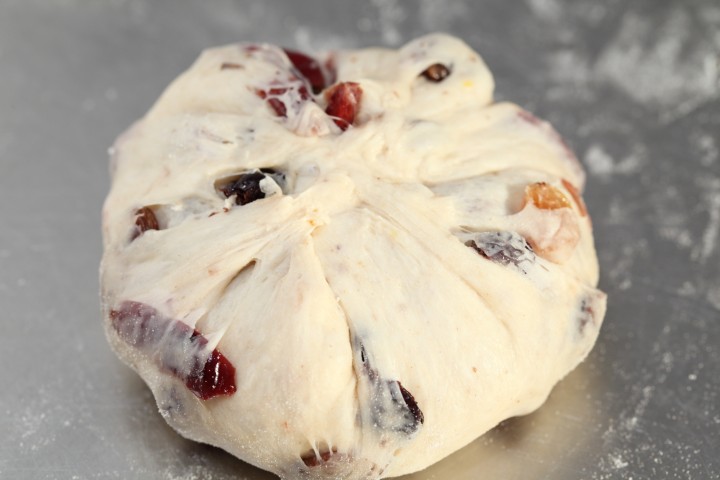
Next add the raisins and ‘pinch’ them through the dough very carefully by hand, so they are evenly distributed. If you are lucky enough to own a spiral mixer, you can use the mixer instead and it will only take up to one minute to distribute the raisins. If not, just do the work by hand.
Shape the dough into a ball, transfer to a greased bowl, cover and leave to rest for 15 minutes.
Now press the dough down with both hands into a flat disc, roll it up tightly, cover it and leave to rest for 15 minutes.
Divide the dough into 12 equal parts and shape into balls. Leave to rest for about 10 minutes.
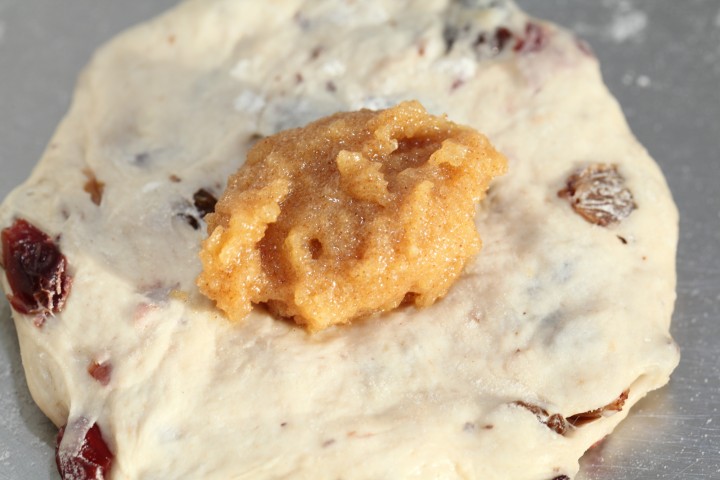
Now press the balls with your hand until slightly flat and put 15 grams of the almond paste, also rolled into a ball, on top of it. If you want to add the drunken cherries, you can now put one on top of each heap of almond paste and slightly press it in the paste. Seal the dough around the past and round the dough again into a smooth ball.
Place the rolls on a baking tray lined with a baking sheet or paper.
Now the rolls are ready for their final proofing. Loosely cover them with plastic wrap dusted with flour. Depending on your room temperature and the temperature of the dough this should take at least 1.5 hours, but more likely 2 hours. Just be patient and check regularly. When you think it has risen enough, use your finger to carefully make a very small dent in the dough. If the dent remains, the bread is ready to bake, if the indentation disappears, the dough needs a little bit more time (check every 15 minutes).
During the proofing process preheat your oven to 200 ºC /390 ºF conventional setting.
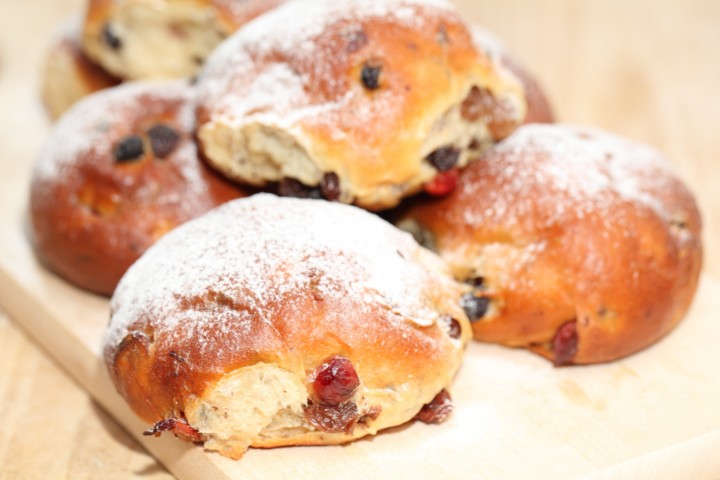
When ready place the buns in the oven and bake for around 18-20 minutes, also depending on your oven. They should have a nice golden brown shine. Temper the oven to 160 ºC /320 ºF when the crust has the desired color (with some ovens this is needed, otherwise the tops of the buns will burn, so keep your eyes on the buns). Take the buns out of the oven. Brush the tops with some melted butter while the buns are still warm, this way they also stay soft and get extra taste. Leave to cool. If you place them in a bag while still slightly warm, they will stay nice and soft too. Eat with fresh butter and a dusting of powdered sugar. The buns also keep well in the freezer and you can give them a quick blast in the microwave until they are slightly warm again.
Do you have a cookbook?
Hello Carol,
No, unfortunately not. In the past we have talk about it with people who have published cookbooks and baking books, but it is not easy. Plus there are already a lot out there, so you would need to be very original and have the right connections to make it a success.
For this year, we hope to get some more good recipes on our website and improve some things too. If you like baking buns, we can really recommend our latest recipe the Greek Yoghurt Buns:
www.weekendbakery.com/posts...gurt-buns/
Enjoy your baking!
Dear Marieke
Gelukkig nieuwjaar! This recipe is absolutely fabulous! I always make more almond paste than I need for my Christmas cake and end up freezing it. This is the perfect use for it and better than making large stollen loaves which I find have to be eaten quickly or they go dry – not a terrible hardship(!) but not always ideal. These buns are the best solution – partly because the ratio of almond paste to dough in each bun is just perfect (which isn’t always the case in every slice of a large stollen loaf) and partly because the baked stollen bollen freeze beautifully so you can enjoy them equally on the day of baking and any time afterwards. They defrost best for a couple of hours at room temperature rather than in a microwave, I think. I have made them twice already this Christmas and my family are requesting more! Thank you so much. I use a teaspoonful of dried naartje powder instead of the orange rubbed sugar because I always have a jar of it. (Dry pieces of unwaxed tangerine / clementine peel completely in a dehydrator or a very low oven and then blitz to a fine powder in a clean coffee grinder. Store in a screw-top jar and use as required in place of fresh zest – very economical and works brilliantly in baking!)
Elizabeth x
Hello Elizabeth,
Such joy you bring with your comment and sharing your experience with the recipe. This is exactly my way of thinking about it, the way you describe it! How wonderful to read about the naartje powder too. We did not know the word or the process, but we love it. In Dutch the word is ‘mandarijntje’ for a mandarin. If we see a word like Naartje, even though we do not know it, we immediately know it must be of Dutch origin or with a connection to our language.
Thank you for the inspiration for us and other bakers.
Hope you have a very happy 2020 with lots of baking joy!
Greetings from the low countries,
Marieke & Ed
Greetings from Montreal,
I followed your recipe for stollen bollen with a few changes: adding a table spoon of Matcha green tea and orange water. oh, I also used sweet red been paste and a mixture of roasted sesame and sugar for stuffing. They look great and taste divine! Your recipes are my go to for baking breads. I learned so much about the bread making techniques and type of flours by reading up your blog. Thank you so much for sharing them!
Cheers,
Maryam
Hello Maryam,
Thank you for your excellent comment. Wow, you sure are inventive and original with your version of our recipe. Thank you for your inspiration and wishing you lots of happy baking moments and great bakes to share!
Greetings from Holland,
Marieke & Ed
Hi,
I sadly cannot eat dried fruit (I am fructose intolerant), could I use candied peel and nuts instead? If yes, than do I need to adjust the amount of flour or milk, as peel and nuts won’t soak up as much liquid?
Thanks!
Hello Hannah,
Yes you can, just stick to the total amount of filling. As the died fruit is pre-soaked, it does not soak up much liquid, but rather (if not drained enough) adds some moisture when added to the dough (in which case you can sprinkle some flour on the fruit before adding it to the dough). As the amount of liquid needed also depends on the absorption of the flour you yourself use (they all react different) we would suggest to take the amounts in our recipe as a starting point for your first try and see how you need to adapt for your situation. You can always keep a small amount of the liquid back and see how the initial dough comes together. As we say in the recipe: aim for a bit tacky, which means that when you poke the dough with your dry finger it should stick for a second but then peel off as you remove your finger. This is how it should be before you add your peel and nuts.
Good luck with it and happy bun baking!
I am also wondering at what speed in the kitchenAid type mixer are you assuming when you say “knead for -10 minutes”. Thank you again!
Hello Elizabeth,
We would suggest a medium speed, around 6 we think for a KitchenAid.
The dough should be smooth and supple with good gluten development.
Hello: By “bread flour” in this recipe do you mean high gluten? Thank you.
Hi again Elizabeth,
It is not necessary to use a extra high gluten flour, just a regular bread flour. Our bread flour has a gluten percentage of around 12.5%.
Where do the drunken cherries go?
Hi Elisabeth,
When we use them we put them in the middle of the almond paste (push them in the paste a bit). Sorry it was not clear in the recipe.
Happy bollen baking!
You’ve done it again! Stollen was another thing that I was very hit and miss about, but thanks to your wonderful instructions, after tasting your stollen bollen, my Bavarian husband declared “That’s a winner! Wonderful flavour. Absolutely top notch …” Thank you again for all the input and I’ll be trying many many more of your recipes.
Baie dankie / Vielen dank from Holland for your nice comment! So glad the recipe is such a success and makes both you and your husband happy 🙂
Hi, I have just made these and they are fabulous – as my husband quotes “this is one thing in life worth living for” 🥰
I had a quick question, could prove the dough overnight before shaping? I will give it a try but wanted to know if this was something you have done/tried. Thanks
Those are truly wonderful words coming from your husband! My husband (Ed) is the biggest fan of these ‘bollen’ ever since I first dreamed them up. After spending a Holiday in Italy and taking some hazelnuts home from Piemonte, I now made a combination almond and hazelnut paste, which I am also going to try in these stollen bollen. I make a combination of 70% almonds and 30% hazelnuts.
As for your question, the answer is that we did not (yet) proof this enriched dough overnight. Normally you would take the amount of yeast down quite a bit. If we were to try it ourselves, we would overnight proof this particular dough in the fridge and reduce the amount of yeast by 1/2 (based on about 8 to 12 hours proofing in the fridge) and make sure to check the dough early in the morning to establish it is not over-proofing. Maybe it can do with even less yeast (also depending on the temp of your fridge). It is always better to have a longer final proof than risking the chance of over-proofing.
Hope it will work out. Let us know how it goes please!
Seasons greetings,
Ed & Marieke
Thank you Marieke. The hazelnut paste sounds lovely. I did try overnight and whilst taste was good I struggled with shaping. I added the fruit before the prove and I think this may have been wrong – also need to improve massively on pinching the fruit in. I will keep persevering as they at worth it 🥰😋
Hi again Fiona,
I think you did not make a mistake by adding the fruit before the proof. But I need to give this a try myself to better advice you. It is a challenge to get all the fruit in by hand. You really need to persevere as you say. It is much easier to do this on a low speed with your Kitchenaid or Bear Teddy machine if you would have one.
But it is worth it, getting the fruit in, because after the proofing of the dough the ratio of fruit to crumb really starts making sense. As you can see in the pictures, it is not too much fruit.
Leuk en lekker recept. Ik heb het geprobeerd te maken met 30% desem (100% patentbloem/water). De rijstijden waren nog te kort waardoor de bolletjes erg compact zijn.
Hebben jullie nog andere tips als ik het met desem wil maken behalve rijstijden verlengen? Misschien krenten/rozijen/… later toevoegen?
Hallo Michiel,
Onze suggesties: Zorgen dat de deegtemperatuur rond de 28 graden komt, laten rijzen in een vorm van rijskast (in een iets voorverwarmde oven die je weer uit zet). We zouden geen extra desem meer toevoegen, 30% is al best hoog. Je kunt natuurlijk ook een hybride vorm maken door een klein beetje gist aan het uiteindelijke deeg toe te voegen, mocht je het proces toch iets willen versnellen.
I made these twice over the Christmas Holiday, and they were fantastic, and turned out just right. One thing that I did the second time, and which was a lot easier, was to just add the raisin mix through the dry ingredients, the flour, salt, and orange sugar, before I added the wet ingredients. That way I did not have to “pinch” them through one by one, which was a lot of work.
I may have to make them again for Easter!
Hello Alisa,
Thank you for your nice comment. Glad you had such good results. There are reasons why the raisins are added after the kneading and initial development of the dough. One is that the whole kneading process can break them up. But if your result is fine and it works for you then that is no problem of course!
Happy Easter baking!