Just briefly toast a slice. Even more delicious!
Klik hier voor de Nederlandse versie van dit recept
You might already know the earlier version of this recipe, which was yeast-based. Now we’ve also developed the sourdough version, because it’s just as delicious, if not more.
For this recipe, we were inspired by the expression “Ouwe jongens krentenbrood” (Old boys’ currant bread). This catchphrase originated in the 1980s and is thanks to the satirical duo Van Kooten & De Bie (check out old episodes; they’re still relevant and almost predictive). It has a lovely, original meaning that everyone can immediately relate to. You see a dear old friend after many years, go for a drink together, and it’s just like old times. Comfortable and easy!
We hope baking, sharing, and eating this sourdough version of the recipe will give you that same feeling!
Enjoy your baking!
Before you start
For this recipe, we’re using a combination of raisins and cranberries, with added spices. Of course, you can use just raisins and/or currants, or alternatively, cinnamon, pumpkin or gingerbread spices. We also use date syrup and olive oil instead of (too much) butter and sugar. Feel free to make your own version, but try this one first!
Use our dough calculator
Below the ingredients list, you’ll see a button labeled “Open WKB dough calculator.” Click it to open the calculator. Now it’s easy to adjust the total number of loaves and the amount of flour to make smaller or larger loaves. You can also adjust the baker’s percentages to change the ratio of ingredients, such as water or salt. Finally, you can calculate the dough temperature.
We work with a two step system for our preferment. When using a preferment we use between 15-30 grams of sourdough for each sourdough loaf. With this small amount of sourdough you create a fully active sourdough preferment which you then use to build the final dough. This way you can keep a small starter culture and still have the full sourdough flavor and development. Big advantage for home and hobby bakers is you are wasting far less precious flour when refreshing your culture than you would maintaining a big one!
If you always have large quantities of active sourdough on hand, you can skip the pre-dough step and go straight to the point in the recipe where the final dough is made and use your active sourdough starter. You can also still add the oat bran and 20 grams of water.
We use a sourdough culture which is made with 100% whole grain rye flour. A sourdough culture based on rye flour is easier to maintain, does not form hooch or turn into a slurry when you forget about. It is easier to stir because it has almost no gluten and smells very nice, a bit like fruit. It is also very forgiving in the amount you feed it. Normally we only feed it once or twice a week, after our weekend baking we give it a few table spoons of water and rye flour, stir, ready!
Important! Ideally, the temperature of your dough after mixing should be around 24 to 25ºC (77ºF), and you should keep it at this temperature until the shaped loaf is placed in the refrigerator for its final rise. Adjust the water temperature so the dough reaches this temperature. You can then keep the dough at the correct temperature in a slightly preheated oven (don’t forget to turn it off again!) or use a proofing cabinet if you have one. You can measure the water and dough temperatures with a food thermometer/infrared thermometer.

| Ingredients for the preferment | ||||
|---|---|---|---|---|
| 50 | g | bread flour | ||
| 50 | g | whole rye flour | ||
| 120 | g | water | ||
| 20 | g | Oat bran | ||
| 20 | g | sourdough culture | ||
| Ingredients for the final dough | ||||
|---|---|---|---|---|
| preferment from step 1 | ||||
| 400 | g | bread flour | ||
| 180 | g | water | ||
| 7.5 | g | salt | ||
| 20 | g | olive oil | ||
| 30 | g | date syrup or honey | ||
| 50 | g | 1 egg (50-55g or use egg substitute) | ||
| 7 | g | speculaas spices (2 teaspoons) | ||
| 200 | g | soaked raisin/cranberry mix (200 grams is dry weight) (plus some extra flour for sprinkling over the mix after soaking) | ||
DAY 1
The Preferment
Combine the bread flour, whole rye flour, oat bran, and water with the sourdough culture. Mix well until a smooth mass, resembling a very thick batter. Cover the bowl and let the fermentation begin. After 10 to 12 hours at room temperature, it should bubble and be ready to use.
DAY 2
Also see our time table at the bottom of the recipe to help you with your planning.
The Final Dough
Spoon the preferment from day 1 into the bowl of your stand mixer. Add the flour, salt, olive oil, date syrup, egg, speculaas spices, and most of the water. Combine everything by mixing slowly at first and gradually adding the last bit of water. Then increase the speed and let the mixer knead the dough until it is well combined. With a KitchenAid mixer, kneading takes 9 to 10 minutes on medium speed; by hand, it takes about 15 to 20 minutes, depending on your technique. The dough should be shiny and sticky. Initially, the dough will stick to the sides and bottom of the bowl; towards the end of the kneading process, it will stick primarily to the bottom.


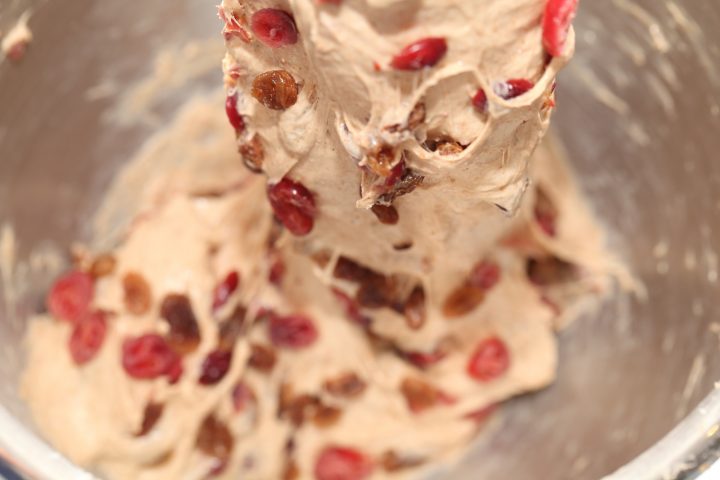
Add the soaked and drained raisins and cranberries, sprinkled with some flour to absorb excess moisture, to the dough and mix until well incorporated. With a mixer, this will take 1 minute; by hand, you’ll need to work them into the dough with your fingers, which will take a little longer.
Shape the dough into a ball, place it in your lightly oiled bowl, cover and let it rest for 30 minutes.
Developing the dough: ‘Stretching & Folding’
During bulk fermentation, you’ll perform 4 complete stretches and folds, stretching and folding the dough to give it structure and strength. Wet your hands slightly before starting; this makes handling the dough easier.
Now do your first stretch and fold. Push your hand under the dough and stretch it, then fold it inward. Turn the bowl a quarter turn and repeat. Do this a total of 4 times; more times is fine, but do not continue when the dough starts to resist.
Cover and let it rest for another 30 minutes. Repeat this process 3 more times (for a total of 4), letting the dough rest for 30 minutes after each stretch and fold.
You can also remove the dough from the bowl and perform the stretch and fold on your work surface. Watch our video to see the general technique if you’re not familiar with it.
To keep track, take a piece of paper and write down the numbers 1 through 4, plus the start time, and cross out each time you’ve done a set of Stretches & Folds.


Shaping & Proofing
After the final 30 minutes of rest, it’s time to pre-shape the dough. Form the dough into a ball, cover, and let it rest on your work surface for 15 minutes.
Now shape the bread into its final shape, round or oval.
We like a round shape for this bread, so we shape it again into a tight ball. For inspiration or instructions, you can consult a good bread book or watch the short video on our website.
Place the shaped dough in a proofing basket / banneton, cover and leave it in the refrigerator overnight.
Baking on a baking sheet / tray
You can bake this bread straight from the fridge the next morning. Check to see if it has risen enough and has really increased in volume. If not, you can let it rise further at room temperature or in a warm oven. If you think it has risen enough, use your finger to gently make a small indentation in the dough. If the indentation remains, the bread is ready to bake; if it disappears, the dough needs a little more time. Check again after 10 to 15 minutes.
Preheat the oven to 220°C (425°F). Make sure it’s heated through and stable before placing the bread in the oven.
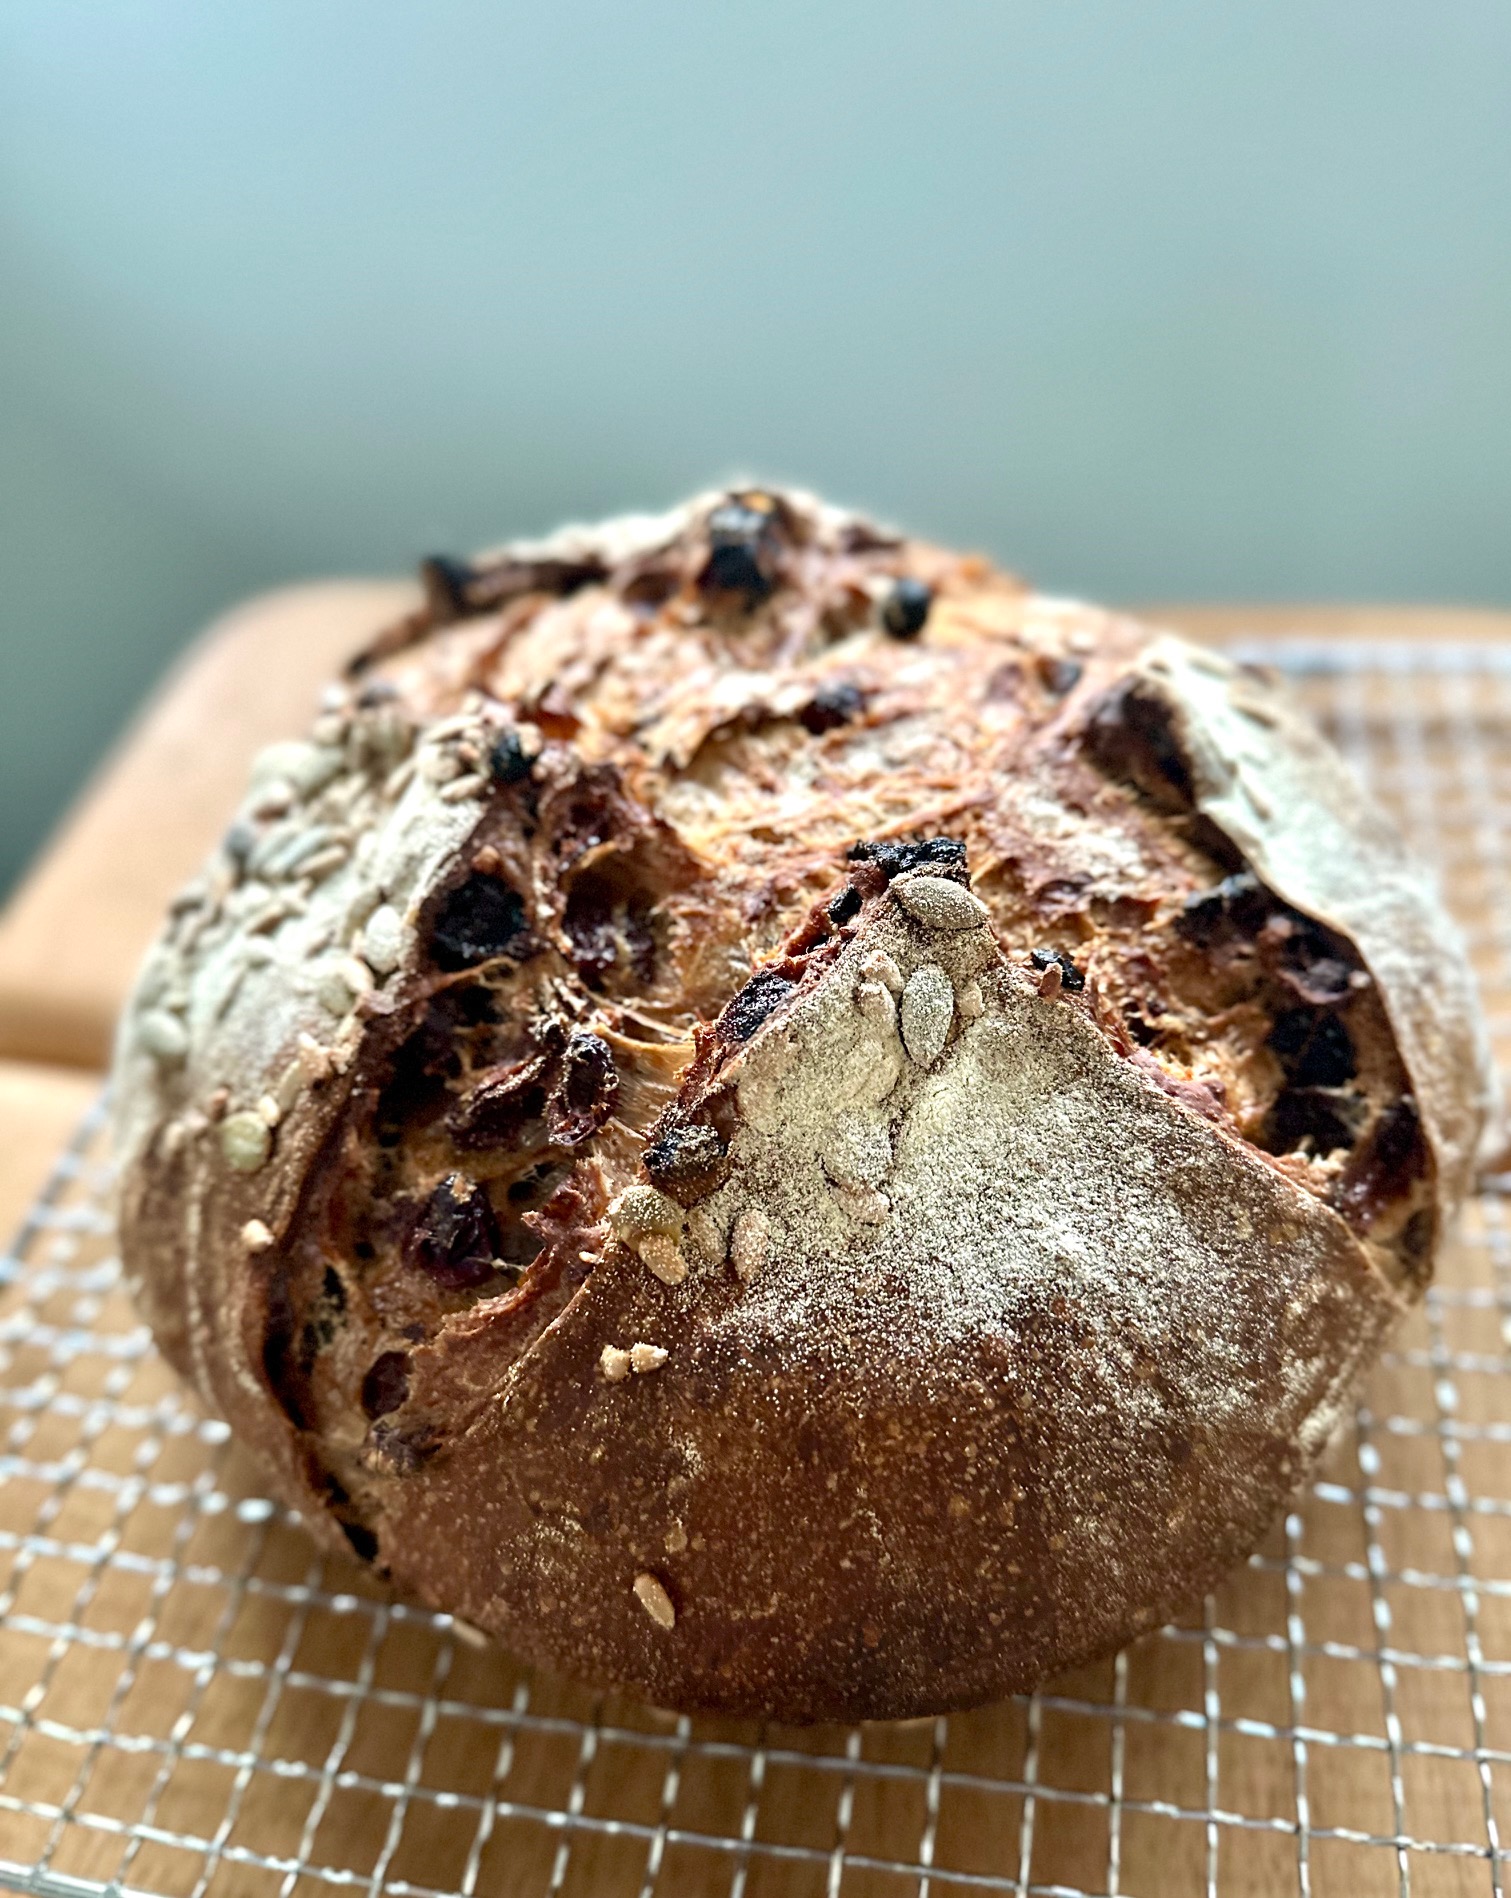
When your bread is ready to bake, invert the proofing basket directly over a baking sheet lined with parchment paper and gently let the dough settle. You can also moisten the bread with a little water at this point and sprinkle it with semolina, pumpkin seeds, and sunflower seeds for an extra crunch on the crust.
Score the top of your bread with your bread knife / lame.
To get a good result, you can create steam in your oven by, for example, placing a small metal baking pan on the oven floor while preheating the oven. Pour half a cup of water into the baking pan immediately after placing the bread in the oven. Let the remaining steam escape 5 minutes before the bread is done.
Baking time is about 40 minutes, depending on your oven. Check regularly to see how quickly the bread is browning. When you think the crust has reached the desired color, you can lower your oven to 170°C (330°F) for the remainder of the baking time. Let the bread cool on a rack.
Of course, it’s best to eat this bread fresh! You can also store the (sliced) bread in the freezer and thaw or toast the slices, or quickly reheat them in the microwave. We divide the round loaf in 4 equal parts, then slice the parts. Delicious plain, but also with fresh butter or favorite cheese.

Baking: The Dutch oven method
If you want to bake this bread in a Dutch oven or large cast iron pan, you’ll need a pan large enough to hold the bread, approximately 28 (11 inches) to 30 cm (11.8 inches) in diameter and at least 12 cm ( 4.8 inches) high. If you only have a smaller cast iron pan, you can also divide the dough in half, make two smaller loaves, and bake them one at a time. Leave the second loaf in the refrigerator until it’s time to bake this one.
Preheat the oven with the cast iron pan inside to 230°C (456°F). Make sure the oven is well heated through before you start baking.
Remove your dough from the refrigerator and turn your proofing basket upside down so the dough falls right-side up onto a baking mat (you can use lots of things as a baking mat; there are many different options available. The original is the Bread Mat from Wiremonkey, but there are many more options, including making your own).
Score the top of your bread with your bread knife / lame. You can also moisten the bread with a little water at this point and sprinkle it with semolina, pumpkin seeds, and sunflower seeds for an extra crunch on the crust.
Remember to wear your oven mitts at all times when handling the hot pan! Carefully remove the Dutch oven from the oven using your thick oven mitts. Lower the scored loaf into the pan. Cover and return the pan to the oven.
Baking time and temperature:
Bake for 20 minutes with the lid on at 230°C.
Bake for 10 minutes uncovered at 210°C.
Bake for the last 10 minutes uncovered at 170°C.
Wear your oven mitts again when removing the baked bread from the oven! We leave the hot pan in the oven and only remove the lid and place it on a wire rack to cool. Then we lift the bread out of the pan and place it on a wire rack to cool as well.
It’s best to let this bread cool completely before slicing.
Time Table- Indication for making & baking
Day 1 – 9:00 PM: Make the preferment and let it rise overnight for approximately 12 hours at room temperature.
Day 2 – 8:45 AM: Make the final dough.
- 08.45-09:00 – Make final dough as described
- 30 minutes rest
- 09:30 – Stretch & Fold (1)
- 30 minutes rest
- 10:00 – Stretch & Fold (2)
- 30 minutes rest
- 10:30 – Stretch & Fold (3)
- 30 minutes rest
- 11:00 – Stretch & Fold (4)
- 30 minutes rest
- 11:30 – Preshape
- 15 minutes rest
- 11:45 – Shape
- 11:50 – Proof in fridge
- Next morning – Bake 40 minutes
- Your bread is ready!
