
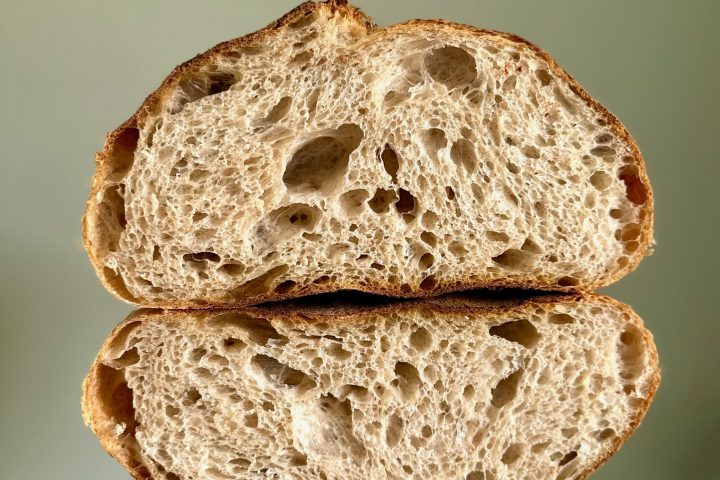
This is a favorite Weekend Bakers loaf. Thin crust, full of flavor, open creamy crumb!
Klik hier voor de Nederlandse versie van dit recept


We have been making no knead sourdough loaves in many variations for a long time. We wanted to add a straightforward version, giving you weekend options for a freshly baked loaf on Saturday or Sunday morning.
With this recipe we provide two alternative time tables for making your loaf.
Version 1 suggest you make your preferment in the evening, build your dough the next day and bake your loaf on the morning of day 3.
Version 2 suggest you make your preferment in the early morning, build your dough in the evening and bake your loaf in the morning on day 2.
So both go in the fridge overnight, version 1 has a longer fridge time, but because yeast activity is very much slowed down in the cold, the loaf will not keep on growing very much we know from experience.
You decide what works for you, depending on your preferred schedule and other activities.
We also give direction for baking this loaf in a Dutch oven, which works really well with this type of bread.
Enjoy your baking!
No need to knead
No need for a kneader or mixer with this recipe, but there is stretching and folding to be done. Everything is done by hand. You feel the dough changing under your hands.
Use our Dough Calculator
Below the ingredients lists you will see a ‘dough calculator’ button. Click on the button to open. Now it is very easy to change the total amount of loaves and amounts of flour to make smaller or larger breads. You can also change the bakers percentages to adjust the ratio between the ingredients like water or salt. And last but not least you can calculate the exact temperature of the dough.
Before you start
We work with a two step system for our preferment. When using a preferment we use between 15-30 grams of sourdough for each sourdough loaf. With this small amount of sourdough you create a fully active sourdough preferment which you then use to build the final dough. This way you can keep a small starter culture and still have the full sourdough flavor and development. Big advantage for home and hobby bakers is you are wasting far less precious flour when refreshing your culture than you would maintaining a big one!
If you have great big quantities of active sourdough always at the ready, you can skip the preferment step and go to the final dough making stage and use your 130 grams of already active sourdough
We use a sourdough culture which is made with 100% whole grain rye flour. A sourdough culture based on rye flour is easier to maintain, does not form hooch or turn into a slurry when you forget about. It is easier to stir because it has almost no gluten and smells very nice, a bit like fruit. It is also very forgiving in the amount you feed it. Normally we only feed it once or twice a week, after our weekend baking we give it a few table spoons of water and rye flour, stir, ready!
Ideally the temperature of your dough after mixing should be around 25 ºC / 75 ºF and you should keep the dough at this temperature until the shaped loaf goes to the fridge for final proofing. You should adjust the temperature of the water you add, so the total dough reaches this temperature. You can keep the dough at the right temperature in an ever so slightly warmed up oven (don’t forget to turn it off!). You can measure the temperature of water and dough with a food thermometer / infrared thermometer. These measurements are important because they correspond with the proofing times in the recipe.
| Ingredients for the Preferment | ||||
|---|---|---|---|---|
| 40 | g | bread flour | ||
| 20 | g | whole rye flour | ||
| 15 | g | sourdough culture | ||
| 55 | g | water (room temperature) | ||
| Ingredients for the No Knead Sourdough Loaf | ||||
|---|---|---|---|---|
| makes 1 loaf | ||||
| the preferment from step 1 | ||||
| 370 | g | bread flour | ||
| 100 | g | whole wheat flour | ||
| 290 | g | water part 1 | ||
| 30 | g | water part 2 | ||
| 9 | g | (sea) salt* | ||
*We use a lower percentage salt in our bread. For this recipe it is 1.7% in total. Of course you can decide if you want to use more. You can read about the how and why of salt in bread making here.
Making the Preferment
Stir together the bread flour, whole rye flour and the water at room temperature with the sourdough culture. Mix it well until you have a homogeneous slurry that looks like very thick batter. Cover the bowl and let the prefermenting begin. After 10 to 12 hours at room temperature it should be bubbly and ready for use. If you have a big active quantity of sourdough preferment at the ready, you can use 130 grams of it, skip this step and directly to the next step of making the final dough.
Making the No Knead Sourdough Loaf
Take your bowl with the preferment and add water part one plus all of the flour but NO SALT. Combine with your hands or a dough whisk until all the water is incorporated.
Leave the dough in your bowl, cover and let rest for 30 minutes (this technique is also referred to as autolyse or fermentolyse for sourdough).
Now add the salt on top of the dough and then add water part two, making sure the salt gets wet. Squeeze the dough with your hands to combine water and dough until smooth and all water has been absorbed. This should take about 2 minutes.
Again leave the dough in your bowl, cover and let rest for 30 minutes.
Stretching and Folding Stage – Creating structure
During the bulk fermentation you are going to do 5 Stretch & Folds. Wet your hands a bit before you start to stretch and fold, this will make it easier to handle the dough. Now do your first stretch and fold while leaving your dough in the bowl. Do a full letter fold, left over right, right over left, bottom over top, top over bottom. Watch our stretch and fold method video to observe the general technique if you are not familiar with it.
The idea of the method is to develop the dough during bulk fermentation to about 70 to 75% and the rest during the overnight proofing in the fridge.
Cover and again leave to rest for 30 minutes. Repeat the stretch and fold (full letter fold) 4 more time (so 5 times in total) each time leaving the dough to rest for 30 minutes. To keep track, take a piece of paper and write down numbers 1 to 5 and the time you start and cross off each time you do a S&F.
Shaping and Proofing
After the last 30 minutes rest it is time to preshape your dough. If you make several loaves this is also the point where you divide the dough. Shape the dough into a ball and leave it on your worktop, for 15 minutes. No need to cover the dough for this.
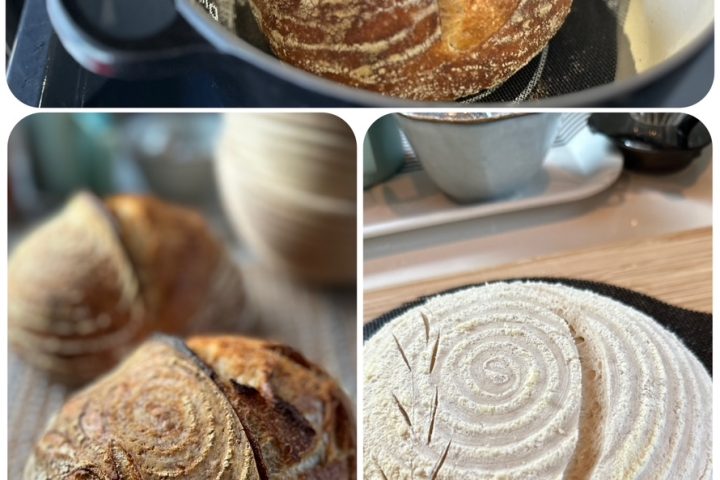
Now it’s time for the final shape. You can make an oblong (batard) or round (boule) loaf, whichever you prefer. For instructions on how to shape a boule, take a look at our boule shaping video.
Transfer the shaped dough to a proofing basket / banneton, cover and leave to final proof overnight in the fridge. We place our baskets in reusable bioplastic bags and blow some air into them, then seal them with a small piece of string or a clothespin. This is a great way to protect the dough against dehydration in the fridge, plus the dough has room to expand.
Bake:
Preheat your oven to 230 ºC / 445 ºF conventional setting (at what stage you preheat your oven depends on how long it takes for your oven to heat through).
Take your loaf out of the fridge. You can bake the loaf straight out of the fridge. Depending on the temperature of your loaf going into the fridge and the actual temperature of your fridge, your dough has proofed to the point where it is ready for the oven.
Score the top of the loaf with a lame or bread scoring tool and take it to the oven. You can bake the loaf on a lined baking sheet or on a pizza stone or use the Dutch oven method as described below.
To get a nice crust, try to create some steam in your oven by putting a small metal baking tray on your oven floor when you preheat the oven, and pour in half a cup of hot water immediately after putting the bread in the oven. Release some steam by setting your oven door ajar (perhaps with the help of a wooden spoon or oven mitt) 5 minutes before the bread is ready. If you are going to create steam with a baking tray, you may also want to turn your oven temperature a bit higher, because you are going to lose some heat in the process.
If you think your loaf has the desired color or is browning too fast, you can temper your oven somewhere during the second part of the baking to about 180 ºC / 356 ºF.
After 42-45 minutes of baking your loaf should be ready. Transfer onto a rack and leave to cool. This loaf also keeps very well in the freezer.
Bake: Dutch oven method
If you want to bake this loaf in a Dutch oven in your oven, you need a cast iron pan that is big enough to accommodate this big loaf (indication ⌀ 28 to 30 cm and at least 12 cm height). If you only have a smaller cast iron pan you can also divide the dough in two and make to smaller loaves and bake them one after the other.
Preheat your oven with the Dutch oven inside at 240 ºC / 464 ºF, making sure it is super hot before you start your baking.
Take your dough out of the fridge and transfer it to a baking mat / bread mat.
Score the top of the loaf with a lame or bread scoring tool.
Carefully and wearing thick oven gloves, take your dutch oven out of the oven. Lower the scored loaf into the pan. With gloves on!!! put the lid on and place back into the oven. Please be very careful not to burn yourself!
Indication baking time and temperature:
Bake for 22 minutes with the lid on at 240 ºC / 464 ºF
Bake for 10 minutes with the lid off at 240 ºC / 464 ºF
Bake for the last 10 minutes with the lid off at 180 ºC / 356 ºF
When taking the baked loaf out of the oven, be sure to wear your oven gloves again! We leave the hot pan in the oven, we only take the lid off and place this on a cooling rack and lift the loaf out of the pan and place this on a cooling rack too.
It is best to let your sourdough bread cool completely before cutting.
Time Table Version 1: Day time loaf build
Day 1 – 21:00 h Make preferment let ferment for 12 hours at room temperature
Day 2 – 09:00 h Make final dough
- 09:00 – Add flour and water part 1 to starter, combine
- 30 minutes rest (autolyse / fermentolyse)
- 09:30 – Add water part 2 and salt, combine
- Rest for 30 minutes
- 10:00 – Stretch and fold 1
- Rest for 30 minutes
- 10:30 – Stretch and fold 2
- Rest for 30 minutes
- 11:00 – Stretch and fold 3
- Rest for 30 minutes
- 11:30 – Stretch and fold 4
- Rest for 30 minutes
- 12:00 – Stretch and fold 5
- Rest for 30 minutes
- 12:30 – Preshape
- Rest for 15 minutes
- 12:45 – Shape
- 12:50 – Final proofing overnight in fridge
- Next morning – Bake for 42 minutes (32 min. at 240 ºC / 464 ºF / 10 min. at 180 ºC / 356 ºF)
- Your bread is ready!
Time Table Version 2: Evening loaf build
Day 1 – 08:00 h Make preferment let ferment for 10 hours at room temperature
Day 1 continue – 18:00 h Make final dough
- 18:00 – Add flour and water part 1 to starter, combine
- 30 minutes rest (autolyse / fermentolyse)
- 18:30 – Add water part 2 and salt, combine
- Rest for 30 minutes
- 19:00 – Stretch and fold 1
- Rest for 30 minutes
- 19:30 – Stretch and fold 2
- Rest for 30 minutes
- 20:00 – Stretch and fold 3
- Rest for 30 minutes
- 20:30 – Stretch and fold 4
- Rest for 30 minutes
- 21:00 – Stretch and fold 5
- Rest for 30 minutes
- 21:30 – Preshape
- Rest for 15 minutes
- 21:45 – Shape
- 21:50 – Final proofing overnight in fridge
- Next morning – Bake for 42 minutes (32 min. at 240 ºC / 464 ºF / 10 min. at 180 ºC / 356 ºF)
- Your bread is ready!
Proofing Baskets for this Recipe
We mainly use the 22 x 14 cm oval proofing baskets for this recipe. According to the official specifications, these baskets are suitable for 500 to 750 grams of dough, but they’re also perfectly suitable for the 900 grams of dough in this recipe. If the dough protrudes slightly above the basket after the final rise, that’s no problem.
Suggestion for two smaller loaves
If you divide the dough into two equal pieces just before the final rise to make two smaller loaves, the 16 cm high round proofing baskets are perfect for the slightly over 450 grams of dough per boule. Indication baking time for these 450 gram loaves is 32 to 37 minutes, again depending on your oven.
Hi! You pointed me in the direction of this recipe after I had tried your pain naturel. My first effort is just out of the oven and it looks and smells lovely! The only question I have is that I always see reference to the sourdough ‘ear’! It doesn’t have that. Should it?
When you score the dough at a shallow angle and the loaf has enough tension and gas, the cut flap lifts upward and curls back as steam pushes it open. The ear is essentially that lifted flap.
The main reasons you’re not getting one
Scoring angle — this is the biggest factor. Most people score straight down (90°), but you need to hold the blade at a very shallow angle, almost parallel to the loaf (around 20–30°). Tilt the lame or razor nearly flat against the surface and slice decisively in one motion.
Scoring depth — too shallow and it won’t open; too deep and the flap collapses. Aim for about ½ inch (1.2 cm).
Surface tension — a slack or under-tensioned dough won’t push the flap up. Make sure your final shaping builds a tight skin on the outside of the loaf.
Proofing level — slightly under-proofed dough tends to produce a better ear than over-proofed, because it still has energy to push upward in the oven. Over-proofed loaves tend to spread rather than spring.
Oven temperature — you need a very hot oven (475–500°F / 245–260°C) with steam in the first 15–20 minutes. A Dutch oven does this perfectly by trapping the steam from the dough itself.
Cold dough — scoring a cold dough (straight from the fridge) tends to give cleaner, more defined ears than scoring room-temperature dough.
Our quick checklist
Use a sharp razor blade or lame (a dull blade drags and deflates)
Score at a 30° shallow angle in one confident, swift stroke
Make sure your shaping created a tight outer skin
Try the Dutch oven if you have not done so yet
Score cold dough straight from the fridge for best results
Once you get the angle right, the ear tends to appear reliably — it’s usually that one change that makes the biggest difference.
Keep baking and practicing and rest assured you are not alone in getting less than impressive ears on loaves. The ear is mostly aesthetic — it’s a visual hallmark that bakers are proud of, but its absence doesn’t mean your bread is inferior. If your bread tastes good and has a crumb you’re happy with, the ear is just the cherry on top!
Enjoy your sourdough baking
The loaf was for breakfast his morning – crumb and tast lovely, so it was the aesthetic. I’d followed your recipe carefully and used a Dutch oven, so I suspect it’s in the shaping – greater tension, and the angle of the cut. Will be doing another loaf tomorrow, so we’ll see! Thank you.
Ola,boa tarde! escrevendo do Brasil para agradecer por todas as receitas incríveis aqui no site,eu faço muitas e todas dão super certo! obrigado por compartilhar!
Olá Julia,
Muito obrigada por gostar do nosso site e das nossas receitas e por dedicar um tempo para escrever este comentário tão gentil!
Desejo a você muitas horas felizes na cozinha e muitos pães crocantes!
Saudações da Holanda / Greetings from Holland / Groetjes uit Holland
Hi, I tried your mini boules today and they were great so thank you for the alternative two smaller loaves idea here. Can you confirm how long these typically take compared to the one ~900g loaf?
Hello Nicole,
Glad it turned out great. You are right, I shall add a baking time indication which is 32 to 37 minutes per 450 gram boule. We always temper the oven somewhere during the second halve of baking with these boules, when we think the bread has the right color.
Enjoy your sourdough baking
I found your website years ago and I regularly make croissant, Ficelle, cherry and almond buns, stollen and your white loaf. My husband used your No Knead Brioche recipe this Christmas and it was amazing. All the recipes are so detailed and I am always confident they will work, so thank you so much.
Having made sourdough for years I have finally decided to try your No Knead Sourdough recipe. I have always struggled at the stage of transferral from the banneton to the Le Creuset casserole (Dutch oven equivalent) I use to cook it in. I tend to tip it in which isn’t always successful as it’s difficult to get a proved loaf exactly into the centre. If I decided not to put it in a Dutch oven and just onto a baking sheet how do you transfer yours after you have scored it? On the Dutch oven method you talk about transferring it to a baking mat/bread mat. What is this? I’m assuming you don’t tip in out of the banneton otherwise the scored top is underneath so do you just lift it out of the banneton? I would be very grateful if you could expand on this area please. Many thanks Debbie
Hello Debbie,
First of all thank you for your kind words and for using and liking so many of our recipes 💛
As for the transferal when using a baking sheet:
When your bread is ready to bake, invert the proofing basket directly over a baking sheet lined with parchment paper and gently let the dough settle. Then score the bread and take it to the oven. Alternatively you can invert the basket on a bread peel, score the loaf and use the peel to bring the bread to the oven. This is especially handy when you want to use a pizza stone on a sheet in the oven (the stone has to warm up with the oven).
Next the Dutch oven: We understand it is tricky to land a bread in the Dutch oven straight from the basket. That is why lots of bakers are using the bread mats or bread slings. It is basically a round or oval shaped silicon type material with two handles. This is as far as we know the original one: wiremonkey.com/produ...e-breadmat
You could also make something yourself, there are lots of video’s at cetera if you google ‘making a bread mat or bread sling’.
You will see it is much easier, first turning the basket out onto the bread mat, so the right side is up and can be scored, then taking the mat to the hot pan and putting it in. Also look at some video’s on how people use these mats.
Hope this helps, otherwise just ask away!
Wishing you many happy baking moments now and in the New Year! 🍾
Thank you so much for getting back to me so quickly. That’s really helpful😊
Best wishes to you too for 2026
Not specific to this article, but you should write a book, I have tried many recipes from all over the place, some good some bad… but in the end Weekendbakery always ends up in my trusted/go to recipes. I’d be the first to buy your book 🙂
Anyway, just wanted to say thank you for sharing!
Hello Joachim,
We humbly accept your compliments 🙂. Thank you very much for taking the time to write such a lovely comment. Due to life and other things that get in the way, we know we do not post one recipe after another. But we do make sure we truly know the recipe works for us and very probably for other bakers.
As for a book, we think it would be the greatest challenge to come up with something that has not been done yet and has added value and a chance of success.
We wish you a wonderful December baking month and lots of crusty loaves!
Ed & Marieke
Hello from AL, USA. I maintain a stiff starter with 84% organic bread & 16% organic whole grain rye @ 75% hydration. She gets fed every 12-24 hours. It never goes in the fridge. She produces nice breads.
If I want to convert a portion of her to a 100% rye starter, so I can make this recipe, would you know how many feeds I need to make to get a true 100% rye starter?
Thank You !
Hello Jeanette!
We think about 3 times / feeds and it will be almost all rye. But for this recipe, starting out with just 15 grams of your sourdough culture, you really do not need to worry about it being a combination of wheat and rye (if that is why you would want to make a 100% rye starter). It is such a small amount compared to the total.
Hope the recipe is clear. Let us know if you have any questions.
Enjoy your sourdough baking and greetings from the Low Countries 🙂
Marieke & Ed
🙏