

After all those years, who would have thought, but I ♥ you whole wheat!
Klik hier voor Nederlandse versie
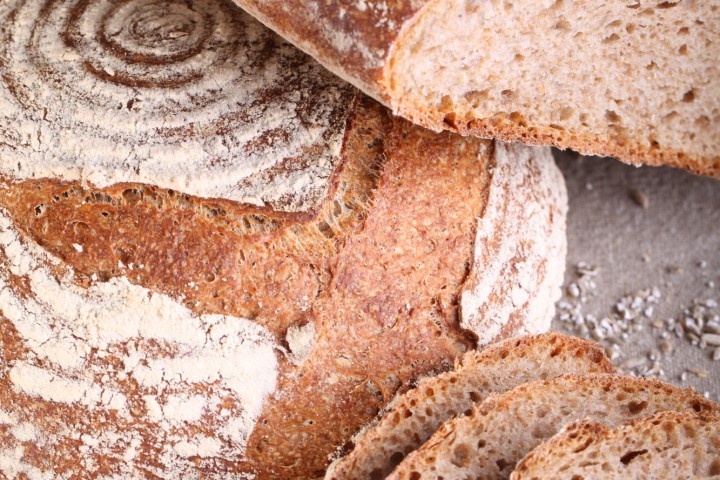
Do you need a bit of encouragement to start making a super healthy whole wheat loaf? Awful childhood memories like me of stale and even rancid bread? Get out and buy the best fresh! organic whole wheat you can find and give this loaf a chance! It is nothing like your memories, it is about 1000 times better, or frankly incomparable, with an intense flavor that is the opposite of bland. Close your eyes and you can see the wheat fields gently swaying in the wind.
This recipe is not highly original of course, there are many whole wheat levain recipes and they are all more or less the same. But it is a great loaf to have in your bread repertoire. This is our version of it and the recipe contains the exact details on how we create our loaf. People have told us (and we believe them) that they really work for them so here it is.
We started out by making a 55% whole wheat loaf. Gradually we started making more of this 65% loaf, the one described in this recipe, and people just love it. You can compare the two versions by looking at the first (65%) and second (55%) gallery of pictures below. The thing we love most about the recipe is you end up with a bread still very much crusty and creamy crumb, with a complex, sweet taste, while having this high percentage of whole wheat goodness in it.


For this recipe we are going to make a starter named a poolish. A poolish is a type of wet sponge usually made with an equal weight of water and flour and a small amount of sourdough starter culture or yeast and NO salt. Making a poolish helps bring more taste and strength to your bread.
We use a sourdough culture which is made with 100% whole grain rye flour. A sourdough culture based on rye flour is easier to maintain, does not go into a slurry when you forget about it, is easier to stir because it has almost no gluten and smells very nice, a bit like fruit. It is also very forgiving in the amount you feed it, everything seems to be alright. Normally we only feed it once a week, after our weekend baking we give it a few table spoons of water and rye flour, stir, ready!
Making the poolish
In a bowl stir together the 65 g whole wheat flour, 65 grams of water at room temperature with 15 grams of sourdough culture. Mix it well until you have a homogeneous slurry that looks like very thick batter. Cover the bowl with clingfilm and let the prefermenting begin. After 12 hours at room temperature it should be bubbly, light and ready for use. So if you want to begin your bread making in the morning, you should make your poolish at 9 in the evening.


| Ingredients for the poolish | ||||
|---|---|---|---|---|
| 65 | g | whole wheat (bread) flour | ||
| 65 | g | water (room temperature) | ||
| 15 | g | sourdough culture | ||
| Ingredients for the whole wheat loaf | ||||
|---|---|---|---|---|
| makes 1 loaf | ||||
| the poolish from step 1 | ||||
| 225 | g | whole wheat (bread) flour | ||
| 160 | g | wheat (bread) flour | ||
| 250 | g | water | ||
| 7 | g | (sea) salt | ||
Making the loaf
Put the poolish starter, flour and salt in the mixing bowl of your standing mixer and add 2/3 of the water. Now start mixing and gradually add the rest of the water and let the dough come together. We use European flour which absorbs a few % less water than American type flour. People using American type of flour should add 5-15 ml water to the final dough. Knead for 6 minutes, leave it in your mixing bowl, cover with clingfilm and rest for 50 minutes. The dough should feel a bit wet and even a little bit sloppy or tacky, there should be moderate gluten development.

Ideally the temperature of your dough after mixing should be around 24-25 ºC / 75ºF. You should adjust the temperature of the water you add, so the total dough reaches this temperature. For us this means in summer adding cold water to this recipe and in winter (when our little bakery gets much colder then the rest of our house) adding water up to 50ºC /122 F. You can measure the temperature of water and dough with a food thermometer. These measurements are important because they correspond with the proving times in the recipe.
After the first rest take the dough out of the bowl and onto a floured work surface and do one stretch and fold (a full letter fold, left over right, right over left, bottom over top, top over bottom; watch our bread movie to observe this technique if you are not familiar with it). Transfer to the bowl, cover and again leave to rest for 50 minutes. Repeat the stretch and fold (full letter fold) one more time (so 2 times in total) and again leave to rest for 50 minutes. During each stretch and fold the dough should feel firmer and less wet.

Now it’s time to shape. Shaping is a tricky subject. It’s something for which everybody develops his or her own technique over time. You can make a batard or loaf shape or a boule (ball). If necessary you can learn more on shaping from a good bread book, like the ones by Hamelman or Reinhart, or the Tartine Bread book. You can also check out our video on how to shape a boule.
Preheat your oven to 230 ºC / 445 ºF (at what stage you preheat your oven depends on how long it takes for your oven to heat through, some take 30 minutes, some, like ours, with stone floors take a lot longer, up to two hours.
Transfer the shaped dough in a proofing basket or baking pan, cover and leave to proof for 2 hours and 15 minutes (provided your dough has a temperature of around 24-25 ºC / 75ºF). When you think it has risen enough, use your finger to carefully make a very small dent in the dough. If the dent remains, the bread is ready to bake, if the indentation totally disappears, the dough needs a little bit more time.
Now your loaf is ready for the oven. Slash the top of the loaf with a lame or bread scoring knife. To get a nice crust, try to create some steam in your oven by putting a small metal baking tray on your oven floor when you preheat the oven, and pour in half a cup of hot water immediately after putting the bread in the oven. Release some steam by setting your oven door ajar (perhaps with the help of a wooden spoon or oven mitt) 5 minutes before the bread is ready. If you are going to create steam with a baking tray, you maybe also want to turn your oven temperature a bit higher, because you are going to lose some heat in the process.
After 48 minutes of baking your loaf should be ready. Transfer onto a rack and leave to cool. This loaf also keeps very well in the freezer. But please make sure to eat at least some of it while fresh!

Whole wheat levain time table
day 1 21.00 h Make poolish and let ferment for 12 hours at room temperature
day 2 0.900 h Make final dough
- Starter + all other ingredients 6 minute mixing
- 50 minutes rest
- Stretch and fold nr. 1
- 50 minutes rest
- Stretch and fold nr. 2
- 50 minutes rest
- Shape
- final proofing 2 hours and 15 minutes
- bake for 48 minutes at 230ºC / 445ºF
PS: A lot of people still believe the a whole wheat loaf should be very dark in color. The darker the bread, the healthier. This is a big misconception. These factory breads are filled with burned malt to give them that ‘healthy’ dark appearance. Don’t let them fool you…Just buy the best fresh flour you can find, take your time to make a good loaf and you’ll never look back!
PPS:Like with all the recipes you find on our website, this one was tried and tested by us at least 8 to 10 times before we published it.


Jiggy says
if I am not using sourdough culture in the poolish, how do I incorporate active dry yeast instead?
Cheryl says
Thank you so much for this recipe! I am just getting back into sourdough again after a 4-year break. I had a recipe that I had used before, and it just didn’t work well for me. This time I decided to try this recipe which had been sitting in my collection of sourdough recipes all this time. I converted the grams into cups using an online calculator, and went for it. I’m so glad I did! It’s such a simple recipe and I can work off of it to experiment and do all kinds of other fun stuff.
Heimo (Mo) Scheer says
Just sending you a note to thank you for a wonderful, nay, fantastic recipe. I had a white sourdough starter, but that would go bad on me fairly often, so I have now been using a rye starter for years. Call me lazy, call me cheap, but I just cannot get myself to feed the sourdough with the accompanying tossing out of much of the sourdough. I have left it untouched in the fridge for several weeks, maybe as much as 8 on occasion due to travel, but try as I might, I cannot kill it. I live in the Boston area, and a decent rye cannot be found anywhere. Being of Austrian decent, I just need a half-decent rye every now and then, so I did not care I could not bake much else with the rye starter. So when I saw your recipe using the rye starter, I was as thrilled as much as I was doubtful it would work. I mean, how can 15g SD starter work when I am used to using maybe 20x that for my rye bread? I tend to drift to EU sites for recipes, and I figured that this would be another flour-based recipe that just won’t work well with US flour, at least that has been my experience on a variety of Christmas cookie recipes. And when I put the first batch in the oven (a countertop Breville with a pizza stone, so hardly anything fancy), I was certain I was going to a thickish pancake of a bread. Wrong. I have been a doubting Thomas three times now, “Come on, this just cannot work”, but every bread has come out tasting wonderful with a very decent crumb (my daughter bakes a better bread than I, so I cannot say “excellent crumb” by her standards, but by my standards, pretty much the best crumb I have done with this kind of bread). So I am here only to thank you for giving me an additional and outstanding use to my rye starter.
Prachtige Feestdagen!
Janine says
Hallo Ed en Marieke,
Mooie site en geweldige recepten!
Dit brood heb ik nu een keer of wat gebakken en de smaak is heerlijk en eigenlijk ben ik al best tevreden. Alleen maak ik mij zorgen over het volgende: het deeg is en blijft zo slap. Het resultaat ziet er uiteindelijk goed uit en het brood heeft flinke gaten. Alleen wanneer ik het uit het mandje stort, zakt het flink uit en in de oven komt het wel iets omhoog, maar niet veel. Het wordt dus een lage brede bol. Liever heb ik een stevige bol die ik mooi kan insnijden. Bij het opbollen al plakt het enorm en is het onhandelbaar. Wat zou dit kunnen zijn, wat kan ik hieraan doen?
Hoop dat jullie een tip hebben, dank vast!
Groet,
Janine
Deb says
Hi,
I have a great healthy looking starter now. I got so excited I made my poolish straight away but probably won’t start to make my first loaf at 9pm tonight! So, can I leave the poolish 24 hours instead of the recommended 12??
Weekend Bakers says
Hello Deb,
It is really best to follow the recipe. We do not know what you did in the end, but doubling the time of the poolish will probably result in an over-proofed preferment unless you put it in the fridge!
Ilona says
Perfecte recept!!! Heerlijk brood, al 3 x gebakken afgelopen week. Ik heb al veel verschillende recepten uitgeprobeert maar deze is zeker mijn favorite en de lekkerst brood! Bedankt voor de recept 🙂
Weekend Bakers says
Dank je wel Ilona, wat fijn om deze feedback te krijgen.
Geniet van het bakken en smullen 🙂
LiLian says
Hi Ed & Marieke –
Another great recipe! It’s as you described: ‘crusty and creamy crumb, with a complex, sweet taste’. I was a bit surprised! I confess that I autolysed before adding the salt. I have posted a picture.
Thanks again – just love your site.
Weekend Bakers says
We love your results with our recipes LiLian! And thank you for sharing pictures of your bakes: www.weekendbakery.com/your-loafs/
Great we can be a part of your baking success in this way.
Lots of loaves,
Ed & Marieke
Henrike says
Beste Ed en Marieke,
Ik heb met veel plezier dit recept gebakken. Het brood smaakt heerlijk, echter zitten er weinig gaten in bij mij. Tijdens het ontwikkelen viel mij op dat het deeg bij mij niet heel plakkerig was, in tegenstelling tot wat ik lees in de commentaren. Kan het zijn dat de verhouding water en meel (bij het meel dat ik heb gebruikt) niet ‘nat genoeg’ is? En zou ik de volgende keer dan water moeten toevoegen tot het plakkeriger voelt? Of zit het in het rijzen?
Ik kon deze comment niet kwijt bij de Nederlandse versie, vandaar onder een Engelstalige post in het Nederlands.
Met vriendelijke groet,
Henrike
Weekend Bakers says
Hello Henrike,
Ja dat kan heel goed. Wij zouden een volgende keer zeker een paar % extra water toevoegen en even kijken hoe het deeg aanvoelt. Ook het rijzen speelt een rol. Vaak zien wij dat mensen niet ver genoeg (durven) gaan met het proces. Het meten van de temperatuur van het deeg in verhouding tot de tijd is belangrijk om dit proces te sturen.
Ook het minimaal gebruiken van bloem tijdens het vouwen en vormen van het deeg is belangrijk. Soms loont het ook om verschillende (merken) bloem en meel uit te proberen. Wij hebben echt onze favorieten voor het beste resultaat.
Zie ook: www.weekendbakery.com/posts…ent-mills/
Het is een proces waarbij je met elk baksel vorderingen maakt en meer leert (en soms ook een stapje terug doet). Ondertussen eet je toch heel goed en lekker brood, ook al zijn de gaten kleiner!
Veel bakplezier,
Ed & Marieke
WKB
Amelia says
If I wanted to add seeds, would the amount of ingredients be the same? How can I add some seeds?
Weekend Bakers says
Hello Amelia,
You can add seeds to the dough and keep the rest the same, no problem.
Stick to a total of around 10 to 15% of the total flour amount to begin with and go up to 20% if you like the method and result. You can add dry seeds to the dough with the rest of the ingredients for this recipe, or you can use the soaker method by soaking the seeds in water the evening before use for example. Usually you take double the weight of the seeds for the water. The next day you add this to the dough. People also do this at various stages of the process, in the beginning or even folding them in during the first stretch and fold. You can also lightly toast them before adding. So lots of options and things to experiment with.
A good ratio for a popular 4 seed loaf is 2-2-1-1 for pumpkin, sunflower, flax and sesame seeds.
Enjoy the process and the baking!
Fiona Branagh says
Thanks for this. I used it as my starter recipe and then made my substitutions for extra nutrition and flavour. Substituted 1/4 cup of rye flour, 1/4 cup of flax meal,1/2 cup of cooked steel cut oats. Added 1/4 of sunflower seeds and sprinkled pumpkin seeds on top. It turned out great. I’m learning that sourdoughs need to be pretty wet — high hydration I think the professionals call it. I find kneading by hand to sticky. Any tips for dealing with that? Should I be adding more flour? Thanks again, yours in sourdough baking.
Weekend Bakers says
Hello Fiona,
Thank you for adding your variations on the recipe. You should not add more flour to the dough unless it is a tiny bit if you can judge your dough for a given recipe is on the very wet side, but here are some tips to help you:
www.weekendbakery.com/posts…ion-dough/
Above all, it is something to get used to and practice and somehow the dough that seemed too sticky is not that sticky anymore!
Enjoy your baking!
aura stratu says
Hi! If I chose to leave the bread fridge to retard, how much time I would need to allocate for the final proofing (average NL temperature).
aura stratu says
and secondly if I use spelt flour can I use the same proportions? Or should I adjust something? Thanks a lot
Weekend Bakers says
Hi Aura,
Well it depends on the temperature of your fridge, but you can almost depend on it that you would need several hours still to get it to the right proofing stage, so keep this in mind. The only way to be sure for your specific conditions is to just give it a go.
If you want to use only spelt as a substitute for wheat, then be prepared that it is challenging to get a good loaf. The dough is much more fragile and the gluten structure weaker. We would suggest to start with a % spelt and build it from there. If you want to use spelt, partially or 100%, you do need to adjust the water amount too. It can range from 5% to close to 20%, also depending on the way the flour behaves and absorbs. You need to judge the texture, look and feel of the dough, this also comes with experience, so just give it a try with a little less water. Handle the dough carefully, gentle kneading with spelt is always advisable.
Hope it will be good!
Reine Carre says
Hi – Your website has been such an inspiration! After having lived many years in France and Italy, I really wanted to attempt a mild tasting “pain au levain”. Until finding your site, however, I found books or other recipes for sourdough breads to be awfully complicated with cumbersome methods often resulting in quite “sour” breads. This bread was my first attempt following your instructions and three successful loaves later has quickly become a family favorite! I tend to bake in cast iron pots – 30 min covered at 485F followed by 10 min uncovered at 450F, which seems to work well, but I have not been very successful with the lame on the wetter dough (have read your tips and will continue practicing). I am excited to try some of your others now and have a question. I love including bulgur or freekeh in my breads (ratio of 1:6 grain:flour). Have you had any success adding seeds/grains into your breads? As bulgur is pre-soaked would you also recomend holding back on the water a little? Sorry for such a long post! Reine
Weekend Bakers says
Hello Reine,
Excellent to get your comment on this recipe. So happy it aided in your newfound enthusiasm for baking sourdough bread.
We have never used bulgur in our bread (yet) but if the water is soaked into the grain we would not hold back on the water you would normally add. But what we prefer to do is always look at the dough when kneading, that is even more important. First hold back some liquid and add it if needed to get the consistency you are looking for (which comes with practice when you learn what to look for). The amount of liquid will always vary anyway, just a bit, depending on the flour you use and also the season.
Enjoy your sourdough journey and loaves!
Marieke & Ed
WKB
Pat Wong says
Hello, after final shaping can I keep dough in fridge, bake next morning ? Thank u Very Much for sharing n guiding
Weekend Bakers says
Hello Pat,
Yes you can do that. Just make sure you check the dough early in the morning to avoid over-proofing and also cover it well (an inflated bag over the basket works well) so the dough does not dry out.
Naomi says
Hi!
Last time I made the little sourdough breads. Now I want to make this recipe. I’m very curious about the different kind of poolish, the other one was very stiff and this one is way more liquid. Wat is the porpuse of this differents?
Weekend Bakers says
Hello Naomi,
They are all just variations on a theme. So, you must not look at it as if one would be better than the other. With different methods will come differences in taste and texture of a bread. A poolish is a wet type of preferment and a very dry preferment is also called a biga. In general bigas can be held longer at their peak than wetter preferments, while a poolish is one known technique to increase a dough’s extensibility.
With our recipes we want to show and use different methods that all result in good bread. You learn to use them and discover what your personal preference is and what suits you when timing your bake for instance.
Enjoy your baking!
CHUA WEN NING says
Hi.. For this recipe, what is the recommended size for the proofing basket?
Weekend Bakers says
Hello Chua Wen Ning,
Choose a basket for around 750 grams total dough capacity. The total amount of dough for this bread is 787 grams but that is OK for these baskets too. A round basket should have a diameter of around 20 cm 7.8 inches.
Chrystal says
I absolutely love this recipe.
This recipe has the best ovenspring of any of my loafs.
my fave, thank you!
Weekend Bakers says
Thanks Chrystal, wonderful to read your comment. This is a firm favorite of ours precisely because of this point, even though it has such a large amount of whole wheat, the crumb and crust are fantastic.
Maarten says
Very nice guidance again, thanks alot! I tweaked this version a bit by adding seeds to the dough, based on Eric Kayser his ‘Larousse de Pain’, fantastic book really. He has a multi cereal bread where he adds the seeds (a variation of a few types), first by roasting and soaking them so it does’t “steal” the water / humidity contents from the dough itself…
Weekend Bakers says
Thank you Maarten, that sounds very good, and thank you for the inspiration too!
Alistair says
Absolutely delicious & beautiful bread 🙂
Weekend Bakers says
Great the recipe works well for you too 🙂
Nuno says
it seems the fermentation time is only 3h,
in that time does it double? if i increase fermentation to 6-10h at room temperature (20-22ºc) is to much time? and 1h proofing?
what does it sound to you?
Weekend Bakers says
Hello Nuno,
At the bottom of this posting under ‘So what is the answer’ you can read exactly what you need to do to make sure your loaf is proofed fully before baking:
www.weekendbakery.com/posts…e-in-size/
So looking for ‘double in size’ is not the answer. If you stick to the recipe and temperatures and times given in this recipe, then you should be close to a good proof. But if you need more time after checking your loaf, you should always take it.
Charles says
48 min. !!! ? @ 445*F
Weekend Bakers says
If you think your bread has the right crust colour during the baking process, you can temper your oven (to 350F) for the rest of the baking process to stop the browning.
Also see our tips: www.weekendbakery.com/posts…your-oven/
mbss says
Wonderful looking recipe! So sorry if this has already been asked or is a silly question, but are whole wheat *bread* flour and wheat *bread* flour the same as whole wheat flour and all purpose flour? or entirely different ? I have a bag of “bread flour”, and also bags of “whole wheat flour” “all purpose flour”. Is there a place one can purchase whole wheat/wheat bread flour (I am in the U.S.), or do you think it would work out with the flours I have on hand? Thanks so much for your time!
Weekend Bakers says
Hello M,
No they are not the same. Whole wheat flour usually has all of the original grain left in the flour, so all the bran and germs (so ground up whole wheat grains). Bread flour usually is a type of strong (high in protein) ‘white’ wheat flour with (part of) the bran and germ sifted out.
You can read all about it in this post: www.weekendbakery.com/posts…our-types/
For this recipe you use the whole wheat flour in the poolish and the bread flour and again whole wheat flour in the final dough.
In general all purpose flour is less suitable for bread baking, mainly because of the lower protein content.
Enjoy your whole wheat baking!
Michael says
Oops,
I se you already answered that one!
Michael
Weekend Bakers says
Glad you found the answer a few comments below we guess 🙂
Enjoy your baking weekend!
Ed & Marieke
Michael says
Greetings,
I have made many of your recipes with great success and they are on my “go to” list for weekly baking. These days I no longer keep a starter because I am just plain negligent in caring for them. Can I make this wheat levain (or any) loaf by substituting a small amount of yeast in the poolish for a different starter? If so, is there a way to calculate the amount needed.
Thanks,
Michael
Weekend Bakers says
You can use the table in this pizza dough recipe as your guidance:
www.weekendbakery.com/posts…gh-recipe/
Mimi says
Hi Weekendbakery,
I made a sourdough following this recipe and the ovenspring was like volcano eruption! 😅😅😅
I guess it is a good thing though. I haven’t cut it yet cause it was still hot and I have a meeting. It sounded hollow when I tapped it though😁
Thank you for sharing this recipe. This recipe definitely is a keeper.
Wish I can show you the picture here😁
Weekend Bakers says
Hi Mimi,
Hope you enjoyed the eating after the fun you had with the baking part!
Thank you and if you want you can share your pictures here:
www.weekendbakery.com/send-…your-loaf/
Always love to see them!
Greetings,
Marieke & Ed
Molly says
Everything I ever wanted to know about bread is on your website! Thank you! I believe I have found the perfect whole wheat sourdough recipe. 💯 The best thing is, with all the detailed info and advice, I won’t be hiding bad bread in the compost. 🤫
Weekend Bakers says
Thank you Molly, glad we can be a part of what is hopefully a skill for life 🙂
Anna Gerard says
Hi! It’s me again 🙂 I was wondering if you could extend the time between stretch and folds longer. An hour and a half or up to two hours? I am trying to adjust the recipes to have the final dough “soured” for 7 hours for improved health/better digestion.
Weekend Bakers says
Hello Anna,
A recipe has a certain balance between ingredients, time and method and that is what makes it work. So if you change one thing, you need to keep an eye on other things. In this case, because we are talking about sourdough, you do have some room to stretch the times between s&f’s, but we would advice you to keep an eye on the development of the dough, start with 1.5 hours at most and see if the final proofing needs to be shortened.
Good luck with it!
Anna says
Yes..my loaves were definitely over proofed. Will try again. Thank you!
Ese says
For the poolish, how much (mg) yeast should I add if I don’t want to use sourdough starter? Thank you
Weekend Bakers says
Hello Ese,
If you use instant dry yeast you must add a very, very tiny amount of it to the mixture of 65 g flour and 65 g water. In fact you cannot weigh it without a precision scale. It’s about one tenth of a gram (yes it is really!) So, if you have a quarter teaspoon, you can fill a quart of it with yeast and that is about the amount we are talking about. More important even, looking at the rest of the procedure of this recipe, are the resting times and final proofing. Because times are based on the use of sourdough, you see longer periods for the development of the dough. Yeast will act faster, so an indication for the rests will be closer to 30 minutes, final proof between 45 minutes and 1.5 hours, all depending on the temperature of the dough and room of course. We have not made this exact recipe this way, so you have to experiment a bit to get it right.
Daniel Batten says
Hey there! I have gotten into baking bread over the last few months, and thank you for this great recipe. I tried it this way a few times. It’s not perfect yet, but here are my takes.
· 0.1g yeast (1/16th-ish teaspoon) gave very little rise, but 0.2g (about 1/8th teaspoon) worked very well. I have a precision scale that was important. There are reasonable ones online that help out my normal kitchen scale. The two of them together are probably the best $40 I’ve spent in the kitchen.
· I am using the American flour (I assume based on being in America), and adding about 10ml water made the dough too wet early on. The next time I went exactly with the volumes listed, BUT I misted the dough with dough regularly as I kneaded/folded and put it up to rise.
· The 445F seems to high for me: the crust on top forms too fast and it limits the ovenspring even with the pan of water in there. I am going to try like 400F next time.
Weekend Bakers says
Sounds like you are making the recipe your own with a nice hybrid version. There’s always adjustment needed, especially with flour there can even be the need to add or hold back liquid from one sack of flour to the next. The same with ovens, they all have their own ‘quirks’ and you must get to know them. The most important factor is to establish the true temperature of your oven to know if it deviates from what the display is indicating. Maybe you have already seen our tips on the subject: www.weekendbakery.com/posts…your-oven/
If needed you can temper your oven or if possible you can choose a lower tier so the top is not so close to a heating element.
Enjoy your baking and be safe!
Ed & Marieke
Ömer Seyfi Salur says
After reading other bakers problemsIunderstood my mistake. I switched my bread flour to enincore flour so that is why it comes out like a brick.
Weekend Bakers says
Hello mr. Salur,
Yes the choice of flour (like Einkorn) makes a big difference for the end result. We can ensure you that if you stick to the flour types and proportions in the recipe, it will be much more like our result in the pictures.
Enjoy your baking in Turkey!
Ömer Seyfi Salur says
I am trying according to your time schedule and recepie but my breads are like brick they do not have wholes like yours why?
Hans van Splunter says
Hello bakers,
Love this bread. It’s our favorite.
Question: would it benefit from half an hour of autolyse?
Or is it going to be overdevelopped?
Hans
Weekend Bakers says
Hello Hans,
Thank you very much! Of course you can introduce autolyse for this recipe. We want to show different recipes with different methods, all with good results, but that doesn’t mean you cannot take any other route. When using the autolyse method, we would also reduce the kneading by one or two minutes.
Hope it will be great too!
Marieke & Ed
Noa says
Hello,
Wonderful site! I’ve made a beautiful starter thanks to your tutorial.
I would like to bake breads, using as much whole grain flour as possible. We don’t mind heavy breads 🙂
Any guide line I can work by? Flour-water ratio, proofing time, number of stretch & folds? anything?
I’ve done 2 unsuccesful bakes (although the second was much better than the first) and for the third try, I’m going to do exactly what you write in this recipe and hope for the best.
All my breads so far, cracked at the bottom. I read it may be under proofing or temperature differences of the baking dish (I don’t have a closed baking dish so I’m working with boiling water to create steam).
Any way to combat these cracks?
One last question, if I knead by hand, for how long to do so?
Thank you!
Weekend Bakers says
Hello Noa,
Thank you for your kind comment. Have you tried the recipe as described? It already has 65% whole wheat flour, which is a quite high percentage and you can stick to the instructions. If this goes well we would suggest going a bit further to 75% or over. Indeed the bread will get heavier and less airy as you go up. Because this is already a high hydration loaf, it will not need much changing, maybe a few % more water (also depending on how your specific whole grain is reacting, because they are all different, practice will teach you this). The S&F can also be done the same way. See how the dough reacts and if it can take an extra set of S&F in round one or 2 to build up the dough. We like the combination 65 whole / 35 wheat flour because of the structure of the crumb. We do not like the 100% whole wheat as much because of the heavier and compact result.
If your bread cracks at the bottom or side, try and score it deeper on the top, because it will crack at the ‘weakest’ spot, so make sure to slash the tops well and make longer slashes from side to side.
Kneading by hand will take around 12 to 15 minutes, depending on the technique, you do not need ‘window pane’ just moderate gluten development at this stage, because time and the S&F will develop the dough further.
Good luck and happy sourdough baking!
Margaret Duncan says
I love this recipe (thank you) and have been making it for a while and mostly get a good, delicious loaf. I use Defiance baker’s flour. However, I struggle with the final proofing time once the dough is in the banneton. The dough seems to be too soft and after an hour and a half, the dough is over proved and collapses once in the oven never to recover. I live in Brisbane Australia and have more trouble in summer. Could high humidity be the problem?
Weekend Bakers says
First; It is probably a difference in room temperature and/or in sourdough. Trust your instincts by reducing the time to proof to your environment. When the bread is proofed, it is proofed regarding what our recipe says. You can reduce the amount of sourdough or you can use colder water to stretch the proofing times. Second; Also when the dough is really too soft you can play with reducing the amount of water. Different brands of flour need different amounts of water.
Joseph Chiha says
Hello
I love your site and your recipes.
How easy is it to do a long proofing in the fridge to obtain more depth of flavour or is that a myth?? I find it difficult sometimes to be home the hours needed to bake and thought I’d get a lot of the prep done the night before and then the final proofing on the day of baking. Look forward to your input.
Weekend Bakers says
Hello Joseph,
No it is not a myth. One important aspect of retarding is it slows down the yeast activity and lets the bacteria dominate and produce more sour acids. So longer proofing times in the fridge will very probably mean your loaf gets more sour notes.
So yes, you can do the final proofing overnight in the fridge and bake the next morning. It will be a bit of a trial and error to get the process and times right. It is dependent on the temperature of your fridge and the amount of culture used in the recipe and the hours in the fridge (factors you can all adjust to your needs).
So one possibility is to try this during the weekend and do the retarding during the day, so you can check development.
Hope it will work out!
Joseph Chiha says
Thank you!
Can I shape the dough and put it in the fridge and bake it directly from the fridge? Or should I put it in the fridge after the 3 stretch and folds before I shape it and do the final proofing when it’s on the bench top? What are your experiences?
Weekend Bakers says
We would prefer and suggest to start with the first option. And if the bread has proofed well enough in the fridge you can indeed bake it directly – from fridge to oven. In our experience (we do not do this a lot because of lack of fridge space and too many loaves), that is to say what works best for us, is to take the loaf from the fridge, check its progress of course, and give it some time at room temperature and then bake it. But like we said it all depends on how things come together with amounts, temperatures and time. You just have to start and very probably make small adjustments to get it right.
Tammy Burke says
I just purchased a stoneware bakers cloche. How can i adapt the baking part using the cloche?
Weekend Bakers says
You preheat the oven with the cloche inside and when warm you place the dough in the cloche and then back in the oven. Careful with the hot cloche!
Arjan Gerritsen says
Just made this bread, LOVE IT!!!
Maybe a bit impatient with the final proofing, but the Bread was amazing.
Weekend Bakers says
Thanks Arjan, for trying and liking the recipe. The second bake will only get better with a little extra proofing time.
Enjoy the baking and eating!
Emily says
Hi Ed & Marieke,
I just want to thank you for having this blog and detailed posts . I love to cook and make my own food from scratch but i never could bake. I know this post is old but i was looking at making my own sourdough starter and bread and i think your blog is the best so far. i only incorporated some other tips and consolidate and test it out. My starter was 6 days old before i started to use it, it might have been a bit weak since some days i only feed it after 30hrs because its winter here and temp outside is sometimes 9 degrees C. i do try to put it near the radiator to get some warmth but it is still growing less than desirable. Anyway, i tried my first bread with this recipe except that i didnt add salt until the first mix and autolyse for 50 mins. i read some things about salt inhibiting autolysing and also read some of your recipes not adding the salt until later. I diluted the last 10ml of water with 7g salt and pinch it into the dough after the 1st 50 mins before folding. The 1st and 2nd Folding was great, the dough was stretchy and easy to manage. but once it tried to take it out the 3rd time to shape, it was tacky and slack. I couldnt shape it and tried to fold it again and rest for 20 mins. Then i proofed it and it didnt rise as much and decided to bake it because it was late. the bread turned out flavorful and with some air holes and it bounce back when i press it so it has a nice chewy consistency but it didnt rise enough. It it because my starter is weak that is why it got too slack after the 2nd folding and thus didnt rise enough during proofing? anyway. i love the bread and i feel incredible how i can make something out of air water and flour. Thank you both so much!
Weekend Bakers says
Hi Emily,
Thank you for sharing your experience. You are right, your starter needs to mature and you just have to keep on baking and practicing. So keep on feeding, refreshing and using it. The most important thing next to that is the challenge of your climate and the temperature of your dough. It is very well possible your dough was too cold. It would be ideal if you could measure it with a digital thermometer ( a great gift maybe for the holidays). Make sure your dough is warm enough to get a good rise and use warmer water for instance to compensate and use your just warmed up oven to proof. So, compensate where needed and keep in mind that it is important to take your time with sourdough, sometimes the proofing just takes a bit longer, so check your dough and give it some extra time if it is not ready for the oven.
You can read our tips here:
www.weekendbakery.com/posts…mperature/
You are on your way and with the above in mind the next bakes will get better and better, we are sure!
Happy sourdough baking!
JaiVes says
Dear,
I am a home baker with some 5 years experience but always baked with baker’s yeast (fresh yeast). Now I wanted to try baking with fermented yeast (Vemont type sourdough bread/pure wheat sourdough). I toke your recipe for whole wheat bread to make the trial.
The problem I faced twice is that my dough is (in my opinion) too wet.
I use a Rofco kneader (home model: type KN4) and as the bowl is fixed to the kneader it is very difficult to get the dough out of the bowl once kneaded (still very stiky and not firm enough to get it decently out of the kneader.
Formerly, with baker’s yeast I used 55% hydration. Is 70% not too much?
What would be the consequence if next time I lower the hydration to somewhat like 60%?
Weekend Bakers says
Hi JaiVes,
If you are used to 55% and go to 70% it will feel very wet and different of course and it takes some getting used to. We do have a lot of tips for handling these wetter does and we advice you to take a look at them before the next bake: www.weekendbakery.com/posts…ion-dough/
Factors that also play a part in the end result are the absorption of the flour you use and the protein content of the flour. because there can be differences, you might need to adjust a bit and use slightly less moisture for example. Of course it is no problem to start at a lower hydration level and work your way up a bit if possible. We would suggest going for 65% after reading our tips and see how that turns out. With practice you will get used to the sticky, but we agree it is less handy to clean your bowl when it is fixed to the mixer…
Hope this helps,
Ed & Marieke