

Daring to keep it simple can also produce great results…
Klik hier voor de Nederlandse versie
We started this recipe as a one-off experiment, thinking the result would not be that interesting, compared to the other bread recipes we already know and love. But the end result really surprised us. As you might expect, knowing some of our other favorite recipes, the key factors for this one are the same: time, timing and really good flour!
This recipe is the first to have a ‘dough calculator’ (see ingredients list). Other recipes will follow soon!
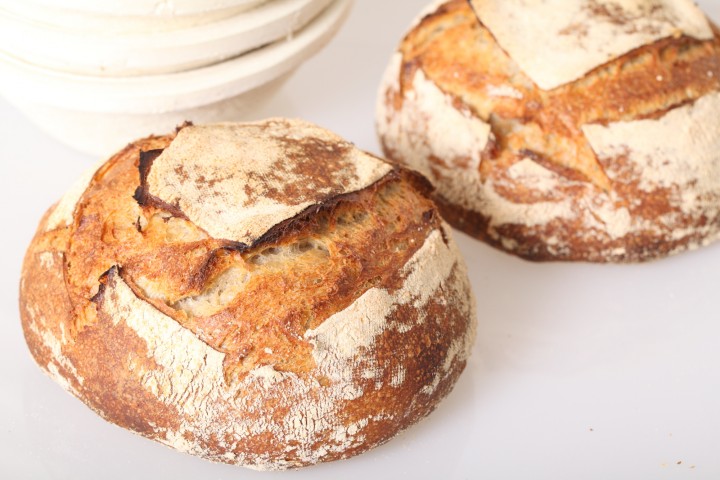
Although there does not seem to be strict definitions about French bread terminology, we simply call this bread ‘Pain Naturel’ or abbreviated PN. We chose this name because it stands for a basic yet full flavored sourdough bread, made just from ‘white’ bread flour. Using our own sourdough culture we found the bread gets a pleasant hint of sourness, which combines very well with the sweet flavor of the flour we use.
And especially because this bread is made with ‘white flour’ only, it is important to get the best quality, organic, stone ground flour you can get your hands on. When you do, we truly believe you will be rewarded with amazing taste and depth of flavor, better crumb structure and the crustiest of crusts.
Enjoy the recipe and let us know what you think. Also check out our handy sourdough tips to get the most out of your sourdough baking!
Before you start

For this recipe we are going to make a starter named a poolish. A poolish is a type of wet sponge usually made with an equal weight of water and flour and a small amount of sourdough starter culture or yeast and NO salt. Making a poolish helps bring more taste and strength to your bread.
We use a sourdough culture which is made with 100% whole grain rye flour. A sourdough culture based on rye flour is easier to maintain, does not go into a slurry when you forget about it, is easier to stir because it has almost no gluten and smells very nice, a bit like fruit. It is also very forgiving in the amount you feed it, everything seems to be alright. Normally we only feed it once a week, after our weekend baking we give it a few table spoons of water and rye flour, stir, ready!

| Ingredients for the Poolish | ||||
|---|---|---|---|---|
| 115 | g | wheat (bread) flour | ||
| 115 | g | water (room temperature) | ||
| 15 | g | sourdough culture | ||
| Ingredients for the Pain Naturel | ||||
|---|---|---|---|---|
| makes 1 loaf | ||||
| the poolish from step 1 | ||||
| 340 | g | wheat (bread) flour | ||
| 180 | g | water | ||
| 7.5 | g | (sea) salt | ||
Making the Poolish
In a bowl stir together the 115 g flour, 115 g water at room temperature with the 15 g sourdough culture. Mix it well until you have a homogeneous slurry that looks like very thick batter. Cover the bowl with clingfilm and let the prefermenting begin. After 12 hours at room temperature it should be bubbly, light and ready for use. So if you want to begin your bread making in the morning, you should make your poolish at 9 in the evening.

Note: We use European flour which absorbs a few % less water than American type flour. People using American type of flour should add 5-15 ml water to the final dough.
Making the Pain Naturel
Put the poolish starter and flour in the mixing bowl of your standing mixer and add 2/3 of the water (do NOT add the salt yet). Now start mixing and gradually add the rest of the water and let the dough come together. Knead for only 1 minute, leave it in your mixing bowl, cover with clingfilm and rest for 20 minutes (this technique is also referred to as autolyse).
Now add the salt and knead for another 4 minutes. Transfer the dough to a greased bowl, cover and leave to rest for 50 minutes.

Ideally the temperature of your dough after mixing should be around 24-25 ºC / 75 ºF. You should adjust the temperature of the water you add, so the total dough reaches this temperature. For us this means in summer adding cold water to this recipe and in winter (when our little bakery gets much colder then the rest of our house) adding water up to 50 ºC /122 ºF. You can measure the temperature of water and dough with a food thermometer. These measurements are important because they correspond with the proving times in the recipe.
After the first 50 minutes rest take the dough out of the bowl and onto a floured work surface and do one stretch and fold (a full letter fold, left over right, right over left, bottom over top, top over bottom; watch our bread movie or our stretch and fold method video to observe this technique if you are not familiar with it). Transfer to the bowl, cover and again leave to rest for 50 minutes. Repeat the stretch and fold (full letter fold) one more time (so 2 times in total) and leave to rest for 50 minutes (so this is the third and last of your three 50 minutes resting periods). During each stretch and fold the dough should feel firmer and less wet.
Now it’s time to shape. Shaping is a tricky subject. It’s something for which everybody develops his or her own favorite technique over time. You can make a batard or loaf shape or a boule (ball) shape like you see in the pictures. If necessary you can learn more on shaping from a good bread book, like the ones by Hamelman or Reinhart, or the Tartine Bread book. Or take a look at our boule shaping video.
Preheat your oven to 230 ºC / 445 ºF conventional setting (at what stage you preheat your oven depends on how long it takes for your oven to heat through, some take 30 minutes, some, like ours, with stone floors take a lot longer, up to two hours).


Transfer the shaped dough to a proofing basket / banneton, cover and leave to proof for 2 hours and 30 minutes (provided your dough has a temperature of around 24-25 ºC / 75 ºF, also check our tips on dough temperature). When you think it has risen enough, use your finger to carefully make a very small dent in the dough. If the dent remains, the bread is ready to bake, if the indentation totally disappears, the dough needs a little bit more time.

Now your loaf is ready for the oven. Slash the top of the loaf with a lame or bread scoring tool. To get a nice crust, try to create some steam in your oven by putting a small metal baking tray on your oven floor when you preheat the oven, and pour in half a cup of hot water immediately after putting the bread in the oven. Release some steam by setting your oven door ajar (perhaps with the help of a wooden spoon or oven mitt) 5 minutes before the bread is ready. If you are going to create steam with a baking tray, you may also want to turn your oven temperature a bit higher, because you are going to lose some heat in the process.
After 45 minutes of baking your loaf should be ready. Transfer onto a rack and leave to cool. This loaf also keeps very well in the freezer. But please make sure to eat at least some of it while fresh. This bread is great with just about anything, but also very tasty on its own.

Pain Naturel Time Table
Day 1 21.00 Make starter let ferment for 12 hours at room temperature
Day 2 0.900 Make final dough
- 09:00 – Add flour and water to starter, mix for 1 minute
- 20 minutes rest (autolyse)
- 09:20 – Add salt
- Knead for 4 minutes
- Rest for 50 minutes
- 10:14 – First stretch and fold
- Rest for 50 minutes
- 11:04 – Second stretch and fold
- Rest for 50 minutes
- 11:54 – Shape
- 12:00 Final proofing 150 minutes (2.5 hours)
- 14.30 – Bake for 45 minutes at 230ºC / 445ºF
- 15:15 – Your loaf is ready!


Michael says
Hi I have been using your recipes for making sourdough bread and these have proved better than following the Tartine book because as you say the american flour does absorb more water and the mix followed in Tartine produced a very wet dough. My main problem is that the bread still does not rise as high as in the photos. I am now using a Cloche and that helps but it still seems a little flat. When I come to shape the dough it still seems to be a little to wet to work with compared to your video.
I am based in England and wondered whether I should use less water for a stiffer dough or am I doing something wrong?
Weekend Bakers says
Hi Michael,
It sounds like you are on the right track. A suggestion from us would be to take a look at our tips on dough temperature (see: www.weekendbakery.com/posts…mperature/) to really make sure you get to the right proofing point with your loaves. You can try to cut back on the water a few % and compare the result. Next to that the quality and protein content of the flour is also very important. (see: www.weekendbakery.com/posts…nt-part-1/)
Good luck with it and keep on baking!
Ed & Marieke
Stevyn McDonald says
this is the holy grail! I’m so excited about this.
I tried this recipe today. I’ve had a sourdough starter for a year or so, and all the recipes I’ve used hitherto have all been ok, some not so good, some disasters. This is the real deal. this is the bread I’ve always wanted to make.
the bread was really delicious. I was worried that the dough was a bit wet. It seemed to flop on the stone, but it puffed up loads in the oven and the holes in it were MASSIVE. chock full of holes like a swiss cheese. Love it. will make another one tomorrow.
question is this: As well as strong bread flour, I also have a bag of very strong Canadian bread flour. If i swapped a small percentage of the regular bread flour for the v strong flour, might the loaf hold its shape a little more when it comes out of the proving basket?
Weekend Bakers says
Hello Stevyn,
First of all thanks very much for your praise and enthusiasm! And the answer is yes, it will be no problem to use some of the Canadian bread flour. The result will probably also be very good, we expect and indeed it could aid with the holding of the shape. Otherwise you could also try to use a few % less water and see how that turns out.
Good luck with it and very happy baking and lots of loaves!
Ed & Marieke
Francesca says
I’ve baked this bread three times now and every time I get a BEAUTIFUL loaf. I have doubles the recipe and bake for 70 min. Foto
fbcdn-sphotos-d-a.akamaihd.net/hphot…6264_n.jpg
Francesca says
this is a photo of the cut loaf
scontent-b-mxp.xx.fbcdn.net/hphot…9012_n.jpg
Weekend Bakers says
Thanks for sharing Francesca. A wonderful and impressive result and great crumb structure!
Happy sourdough baking 🙂
Marieke
Maggie says
Pain Naturel Time Table. There is an error in the math of the timetable – about an hour short. Hopefully your bread recipe will turn out anyway. M.
Weekend Bakers says
Hi Maggie,
Sorry, but we both checked just now and cannot find the error you mention….it all adds up to us.
Ed & Marieke
Robert Stollar says
Hello everyone,
First of all, thank you guys for making this information available and for presenting it in such an understandable way. Fantastic job. So I’ve done my first sourdough bread following the Pain Naturel instructions and using the recommended sourdough starter for which I patiently waited for 5 days as recommended. The bread is not exactly the way I expected it to be. Colour looks good. It is crunchy, perhaps even a bit too dry – I used the water to steam the oven but then I realised it is a fan forced oven so all the steam is coming right out, but I kept topping up the baking tray at the bottom of the oven with water till the last 5 minutes of the bake. But at the thickest part of the loaf it is only 25mm thick. It does taste quite nice (of course I am slightly biased here) but it looks a bit “muddy”. What could I do differently to improve it? I posted the images here: www.masterclass.figuredrawingonline.com/bread.html
Many thanks for any advice.
Robert
Weekend Bakers says
Well Robert, actually there are several things you could do different to get a better result.
The first one being not to add steam until 5 minutes before end of bake. Steam is needed at the beginning and after that it’s function is no longer needed and gets counterproductive. We would suggest what our yoga teacher used to tell us: Come back tomorrow and repeat. Your sourdough gets better and stronger as it gets older too and with more bakes under your belt you will get to know your dough better and get better loaves. With your type of oven we would also suggest baking your loaf in a cast iron ‘le Creusset’ type pan to create an oven in an oven. This way you get steam without having to add any and direct heat without the bread drying out. Make sure to check out our tips, especially on dough temperature, sourdough and consistency in baking: www.weekendbakery.com/posts…king-tips/ Keep baking, each time picking a different subject to improve and learn more about. Baking is exact science, so make notes and also write down what went wrong and why and what you want to change. Above all we can really recommend sticking with one recipe for a while and baking it 10 to 20 times, before moving on to the next.
Hope this helps you. Keep on baking!
Marieke & Ed
Robert Stollar says
Dear Marieke & Ed,
Thank you for your reply. Appreciate it. With the ‘le Creusset’ type of pan, would you get one that is intended for roasting with the sides being about 10 cm high or a casserole type with sides of 20cm or higher? Also, would you use a lid on it when baking? I know these questions may seem odd but I have no concept of baking as yet. Thanks again, you’re being a great help!
Robert
Weekend Bakers says
Hi Robert,
It is the casserole type that is a bit higher..to accommodate the loaf rising. Check out the web for lots of no knead recipes that are made in a Dutch oven as they call it. The original being the one featured in the New York times by Sullivan street baker Jim Lahey.
Good luck with it!
Marieke
Lesley Broadbent says
Hi Marieke
Having made this loaf a number of times now and becoming quite successful at it I asked my husband to buy me Hamelman’s book for my birthday. I still follow your instructions as you’ve converted everything into metric ibut I’m interested to see that he mentions that you could add some yeast to your loaf after the autolyse phase as it speeds up the development of the dough in winter. I have tried this, adding just 0.7g of yeast to the mixture last time and the results were still as impressive. It meant that I didn’t need to find a warm spot for proofing and only took 1.5 hours in the banneton before I baked it.
What are your thoughts on using sourdough AND yeast together?
Thanks
Lesley Broadbent
Weekend Bakers says
Hi Lesley,
You have found the benefits of the hybrid loaf. We also use this method with several of our recipes, like the pain rustique, the ‘fluitjes’ and the loaf with walnuts, prunes and figs which is great for this season: www.weekendbakery.com/posts…nd-prunes/
This way you get the best of the sourdough and a sometimes much needed boost on baking day.
So, we are and have been for some time, fans of this method.
Happy baking and very happy Holidays with your family and friends!
Ed & Marieke
Lesley Broadbent says
Hi
I’ve only just seen your reply to my message! Yes I am having great success now with the hybrid loaf as you call it. The rise is just better and you lose none of the flavour. Just one question though. I’m starting to double up when baking this loaf. So when mixing, should I need to double the time as I’ve noticed that it takes more than 5 minutes after the autolyse phase. I don’t want to overdo it.
Thanks again for your wonderful website. It’s always my No. 1 port of call.
Lesley Broadbent
Weekend Bakers says
Thanks Lesley!
No, you do not need or want to double your kneading time. If you knead by hand you would have to put more effort in to get the same result and more time, but if your mixer is up to the job it should take about the same time. If not, we would recommend kneading it a bit further by hand. You need only medium development at this stage, the rest is done with the S&F’s later on. You can always give it an extra S&F if your dough is cooperating.
Good luck with it,
Ed & Marieke
Frida Merrill says
Hi! Thanks for a great website with great resources!
I am having problems getting the dough out of my bannetons. It sticks, and I feel the dough is deflated in the process. It is very annoying because everything is going well up to the very last step. For a few months I got fed up with the sticking and lined it with a cloth, but now I decided I would give it another try… only to fail again. I have broken in the banneton just like you suggested in the video. Maybe a stupid question, but just how easy do you get yours out if it would start sticking? Do you leave it upside down for a minute to let gravity bring it down, or does it always come straight out for you? Any help would be appreciated!!!
Weekend Bakers says
Hi Frida,
We dough between up to about 67% hydration and two ours hours proofing time in the banneton they just come out in under 1 second. With wetter dough or longer proofing time, using the cane bannetons, we sometimes need a small wiggle and then they drop out in 2 to 3 seconds. With the wood-fibre version they always drop out instantaneously.
Our suggestion for you is, next to, at first, exaggerating the flour coating of the banneton a bit, to also sprinkle some flour on top of the shaped loaf that then goes head first in the basket. Then you will probably gradually need to use a little less flour over time, but it will very probably help you on your way.
If you are retarding loafs in a cane banneton in the fridge (overnight) then it is much harder to get them out, that is why bakers also use the wood-fibre version when they wnat to leave the dough in the basket for many hours.
To help you with the right dough proofing times you can also read these tips: www.weekendbakery.com/posts…e-in-size/
Hope you will give it another try!
Good luck and happy baking,
Marieke & Ed
Gingi says
I had the same problem. The idea is to sprinkle flour that is not able to be added to the dough like rice flower or messa flour.
Michael says
I had the same problem but using Rice flour cures the dough sticking and its not absorbed into the dough
Bridie Howe says
I just love your website and have been making several of your recipes with success. I love this sourdough pain natural, but today I went out in the afternoon after the second stretch and fold, and left it for hours. I came back and gave it another stretch and fold and 50 minute rest, then shaped it, but it isn’t rising as it usually does. On previous occasions I have also left it too long to rise. Do you have any tips on how to rescue over risen sourdough?
Many thanks
Bridie
Denmark
Weekend Bakers says
Hi Bridie,
I am sorry to have to tell you that your dough might be a bit beyond help to make a good loaf (you can try to give it a quick knead, reshape and see if it will re-rise). The first thing that comes to mind that could explain the difference with previous bakes is the difference in weather and temperature, as in it being warmer now. Your living yeast cells had no more life in them left maybe. Next time, if you know you will be away for quite some time, we would advice to leave the dough in the fridge (retarding or slowing down the process). Another thing to look at is your sourdough culture, maybe it wasn’t fully active when you used it?
But, easily fixed and your next bake will be great again I’m sure.
Happy Baking,
Marieke
Bridie Howe says
Many thanks Marieke. It is all part of the learning experience and getting to know about dough and bread.
Bridie
Lesley Broadbent says
Hi, just wanted to say that having practised this loaf about 5 times, I had real success this time. I managed to keep the rise when I tipped it out of the banneton, even though it had stuck very slightly. The crumb is fantastic too. Thanks for showing me how to make real bread. I’m starting to feel much more confident about the process. I just need to master the wholewhat pain levain now as it always comes out flatter than the white bread version. Can I upload a photo of it to show you?
Lesley
Tomas Sardinha says
Hello Marieke and Ed
Just some heartfelt gratitude in taking time to respond and appreciation
once again on an informative website.
Less serious in life, and more fun baking 🙂
Regards
Tomas
Weekend Bakers says
Thanks and we agree 🙂
Doris says
Hi Marieke & Ed,
I love this bread and keep trying to bake the perfect one. But I have a problem for the final step, I use cane for final proofing after shape the dough, but the dough stick on cane, even I try to put a lot of flour before I transfer the dough in, or the flour I put it is not enough!? Please advice what should I do to avoid the dough stick on cane. I always so excited to see the dough proof so well and can’t wait to bake it. But once it comes out from cane, the dough stick and destroy on it, It makes me so sad and disappointed, I cannot make a perfect bread because of it! 🙁
Thank you so much in advance!
Best regards,
Doris
Weekend Bakers says
Hi Doris,
We work with very wet dough and it does not stick so this must be possible for you too! We must make it happen because we cannot have you make beautiful bread and then be so disappointed in the end!
First of all the important question is did you prepare your bannetons well like we show in the instruction video?
See: www.weekendbakery.com/posts…-banneton/
After this prepping you should have a good layer on the bannetons and then on top of this you apply a fresh coat of flour each time you use them. You also sprinkle some flour on the side of the loaf that comes into contact with the basket when you put it in.
We would suggest you just exaggerate with the flour the first few times so you will get your loaf out well and then gradually use less flour when it all goes to plan. After baking you can always brush off some of the excess flour.
You should be doing OK in no time now we are sure 🙂
Good luck with it and from now on Happy Baking!
Ed & Marieke
tomas sardinha says
Hi Marieke & Ed
I want to add sweet potato to the and not replace flour.
The tradition is to boil the sweet potato and than mash it and add it to the flour!
It is a family tradition to make sweet potato bread which needs a lot of kneading
therefore I am experimenting with no knead methods as well as wanting to try
and use a sourdough culture.Unfortunetly the web has little reference to sweet potato bread recipes.
I would like to know if sweet potato has a hydration factor(if this makes any sense??:) and how sweet potato affects the
overall hydration!
Are the hydration factors you have given for this recipe standard for all bread recipes and what are bakers percentages??
(just thought I would throw this in as an extra question 🙂
My expeiments have not quite worked and that is why I am enquiring!
Thankyou once again for a wonderful website.
Regards
Tomas
Weekend Bakers says
Hello Tomas,
It is really difficult for us to say something truly useful to you without having ever attempted to make anything like this ourselves. It will boil down to educated guesses at best. When you say you want to add sweet potato to the recipe as an extra ingredient it will mean changes to the baking times and probably proofing times too. This is basically going to be a whole other recipe.
We do not know the hydration/water content of sweet potato, but of course there will be water /liquid in it. We know that potatoes contain about 75% of water before cooking and think sweet potato will be in this region too.
The hydration in this bread is not a standard for all breads. Each recipe has its own hydration percentage which can vary from 50 to over 100% depending on the type of bread.
Baker’s percentage: is a convention for listing the ingredients in a dough in which the quantity of each ingredient is expressed as a percentage of the total amount of flour. at the moment we are writing a posting on the subject with some examples which you might find interesting. But you do not really need to use this as a home baker baking not too many loaves in one go.
We think our advice would be to start with a good potato bread recipe like the one I found for you here:
www.thefreshloaf.com/node/…tato-bread
We would give that a try with the sweet potato and then tweak it if needed.
Hope it will work out for you.
Happy (potato bread) Baking!,
Marieke & Ed
Gingi says
I have a culture which is equal parts of water and flour. I have been feeding it for a couple of months… I am not sure if it’s considered sourdough culture…. How would I know? Thanks
Weekend Bakers says
A sourdough culture is nothing but flour and water, often in the ratio you use yourself that over time develops an environment with the natural yeast cells that come with the flour you but in and certain bacteria. You can recognize a good culture by its smell (yogurty, tangy or even fruity) and above all by baking with it. It needs to be active for the dough to proof properly. But if you have baked good bread with it that tastes good in your opinion, than that is the best proof you can have.
Happy Baking!
Marieke & Ed
tomas sardinha says
Hi Marieke
I have been experimenting with baking bread for a short while only and having come accross your website which I would absolutely recomend to anyone starting off as the instructions are given meticulously.
I have a question with regards to how to calculate the hydration if I am adding sweet potato to a recipe.
For instance with the sourdough pain naturel if I added sweet potato how would i work out how much flour or water I would need to add or subtract if I used sweet potato, to keep the hydartion formula correct.Thankyou for an informative website.
Regards Tomas
Weekend Bakers says
Hello Tomas,
Just to make sure we understand correctly: Do you want to add the sweet potato or do you want to replace some of the flour by sweet potato and if so how much of it and in what form (is it a puree or …).
We have never tried bread with sweet potato before, it sounds interesting,
Marieke & Ed
Rose says
Similar to Chris, had my first attempt with my rye starter today with your recipe. Had a few hiccups along the way – too many phone calls – but the dough seemed to be forgiving. I’ve never really had real sourdough before so I can’t tell whether aye or nay, but to me it tasted super. Thank you for the recipe!
Weekend Bakers says
Distractions while baking are always a challenge. But even if it is not perfectly executed it will still be good most of the time. And as you bake the recipe more often you will get really comfortable with it. Seeing progress and sometimes baking that perfect loaf, is one of the great joys of baking for us. We regularly jump up and down in front of our oven 😉 glad something worked out like we planned.
Happy Baking,
Marieke
Chris says
First attempt to bake with the rye sourdough starter. Phew, result is not to bad, considering I had to minimize resting and proofing time to accomodate other dishes (like moussaka) requiring oven-time. The dough is extremely forgiving: taste is excellent, oven rise excellent, crumb has large holes but lacks a bit in fluffyness due to reduced proofing time. Given all that…, the taste is great, it looks great and it is done right in time to accompany the moussaka, salad, cheese and wine. What else do you want? 🙂
All in all, it is a definite candidate to try again real soon!
Cheers,
Chris
Weekend Bakers says
Hi Chris,
Sounds very promising, even though (dough :)) you could not give it your full attention. And home made mousaka…Love it!
Tim says
Hi,
Thank you for this wonderful website!!!
I am having a few problems with this recipe. I used my rye flour starter once it became very bubbly (on the 5th day).
However, the poolish that I created using the starter, even after 12 hours in room temperature, was not stringy or foamy.
The bread turned out to have a very dense crumb.
Should I use (instead of 15g of starter) more sourdough starter in my poolish? Will that result in a lighter and more airy crumb?
Thanks,
Tim
Weekend Bakers says
Hello Tim,
You can use a bit more starter, no problem or otherwise / also give it a bit more time. Another important thing for you to keep an eye on is the temperature of your dough during resting and proofing. Please make sure it is around 24 to 25 degrees C for this is really important…this corresponds with the proofing times given and otherwise you have a big chance of under-proofing .
Also see our tips on the subject: www.weekendbakery.com/posts…mperature/
Hope the next bread will be more airy!
Happy baking,
Ed & Marieke
Adrian says
Hi there!
I’m thinking of trying out this recipe in the coming weekend. I’ve tried baking boules before but I find that the crust tends to come out of the oven perfect and sings back to me just fine but it softens and turns chewy very quickly within an hour or so. I’ve tried letting the steam escape and leave the door ajar for more than half the baking time and whilst some improvement has been noted the crust still eventually turned chewy. That’s not a problem for me in terms of eating it because I can always refresh it in the oven and it would turn perfectly crusty. I just wonder if the bread is meant to stay crusty on its own without reheating for a longer period of time or if I should have baked them at lower temperature for a longer time etc
Your help is much appreciated!
Warmest Regards
Adrian
Weekend Bakers says
Hi again,
I think you should definitely play some more with your baking time (and maybe temperature) and leave the bread in for a bit longer by the sound of it. The crust of bread eventually softens, but how quickly this happens also has to do with the humidity of the surrounding environment. That is something to take into account too.
There is also the process of the crust somewhat softening during the first one to two hours of cooling (because of moisture from the bread travels from the center to the surface. After this period the crust will get crustier again for a certain period and eventually (depending on moisture surroundings) go soft(er) again.
Good luck with it!
Ed & Marieke
Adrian says
Cheers Ed and Marieke! Having read through all the comments made by your other readers I think I might also check the core temperature and make sure it’s around 94C at the end of baking just to extra safe. Also I noticed that in your bread video you didn’t explicitly degassed the dough prior to shaping. Is that intentional or was it just missed out in the video? I’ve previously made boules that were degassed prior to shaping and the crumb structure was extremely compact and so the bread tasted dense. Obviously it could’ve been due to other reasons but I wonder if I should just shape the dough as it is after the final proof to retain the natural gases produced by the yeast?
Many thanks for your help in advance!
Adrian
Maggie says
hello Marieke, I stumbled across your wonderful site a few weeks ago, and I felt I was in heaven! Hd just come back from doing a Bread Course, and I was looking for some info when I found you! I love sourdough that is not too sour, and I had an amount of rye starter that I had been given, and that I had kept alive, and so I tried this recipe. I followed the instructions to the letter, and my loaf had excellent oven spring, and tasted just so good. But I had very large holes in it, and i know your picture showed holes in yours, but mine were much larger!! Please could you tell me why! I must have done something or not?? What causes the holes??? Thank you very much.
Weekend Bakers says
Hello Maggie,
First of all thank you so much for your kind words. About the large holes: they can be due to shaping errors where you ‘fold in’ air pockets (but we would have to see a picture to judge if this could be the case). If the holes are caused by a natural process that has to do with the dough you could make them smaller by degassing the dough by pressing the dough into a (flat) disc before shaping it into a ball.
Hope this helps,
Happy baking!
Ed & Marieke
Maggie says
Thank you very much for suggestions. I am going to make 2 loaves tomorrow, may as well as it was soooo delicious, thank you! I will try the degassing, I did wonder if I had not pressed enough before shaping. The recipe is very delicious , not too sour. I have not used a rye starter for a white sourdough before, and I am amazed that so little starter (15g) makes such a good loaf, but I guess it is because we leave the poolish for a long while , then make the loaf. So not too much sour stuff, but enough to make it rise, and not taste too sour!
Maggie says
Sorry, another question please, I have a domestic electric oven, I have been using my pizza stone to replicate your stone shelves, but of course the pizza stones are round and clearly only bake 1 loaf at a time, whereas if I could buy, find an oblong one, that would fit on a shelf, I could do 2 at a time! Do you have any suggestions as to what I cld buy please? maybe a tile, but what would be the type? What are the shelves made of in your ovens please? many thanks again.
Weekend Bakers says
Hi Maggie,
The shelves in our oven are made of thick chamotte stone (refractory brick, it is really a type of baked clay). It is very good in retaining heat. I do not know if these are readily available where you live.
Weekend Bakers says
You are describing exactly the reasons why we love it so much ourselves 🙂
Anna says
Thanks for the encouragement and all your advice. I will just experiment more and ask less:-)
I want to go to a mill and by me some good flours. We used to live in Heemstede and Haarlem, I studied in Bloemendaal (Academie voor natuurgeneeswijzen Hypocrates) so the Zandhaas was nearby. Now, living in Zeist, I have to look for another mill with good biological products. Or drive to Santpoort sometime.
Have a nice weekeind and thanks again.
Anna
Anna says
Good afternoon!
I tried this recipe (and more) from your site. I followed the steps , but…. my bread does not rise in the oven, as it should. Strange. I’ ve checked the dough-, oven-, and bread temperature and also the firmness of the dough to determine if it was ready for baking. This factors were all ok I think.
Any ideas as to what I could have done wrong?
Bye,
Anna
Weekend Bakers says
Hello Anna,
For bread to have oven spring there is a complex of factors to consider. If you bake in a normal household oven and do not use (enough) steam and do not bake on a stone, it is much harder to get this result. Next to that, the flour used for baking the bread also plays an important role. You can see this for yourself by checking out the flour tests we did a while ago. Look at the different results with the exact same recipe, the only difference being the flour used:
www.weekendbakery.com/posts…nt-part-1/
www.weekendbakery.com/posts…ent-mills/
On top of that sourdough baking is extra challenging because of the nature of the culture and the time it takes. Conditions of the culture, flour and surroundings will not always be the same.
Please do not be discouraged if a loaf is not perfect the first few times you try it. Before we post a recipe we have baked these breads ourselves many times to get it right. And when you take up this recipe you have to adjust it to your specific conditions.
Marieke
Raluca says
It did! The oven spring was amazing and the bottom is definitely baked now! Will send you guys a picture with the new one.
Thank you!
Raluca says
Hi Marieke,
thank you for the reply. Yes it tastes divine! I think I didn’t heat the oven properly as you say…I will give it another try today! not giving up until it looks perfect, like yours!
Weekend Bakers says
That sounds great Raluca 🙂 Let us know if the extra heating of the oven / stone works better…
Happy Baking!
Marieke
Raluca says
Hi guys,
It’s me again.
I’ve baked the sourdough bread in my oven using a baking stone that I left to heat up together with the oven. I’ve also created some steam.
The top of the bread looks better than it ever looked, but the bottom has a lot of cracks and is as white as it was when I’ve put it in the oven…
Any ideas what I’ve done wrong?
I am thinking the cracks could come from poorly shaping the bread..but how can I get a golden crust on the bottom as well?
Thank you very very much!
Raluca
Weekend Bakers says
Hi Raluca,
You are right that shaping can have something to do with the cracks, but the bottom being white is a bit of a puzzle. The first thing that comes to mind is that heating up your oven together with a stone should take considerably longer than without for the stone to be heated enough to do its work properly. The bread looks perfect from above though and I hope it tasted good anyway!
Marieke
Gingi says
is there a way to make the poolish without the culture?
Weekend Bakers says
Hi Gigi,
Yes that is possible, you can use yeast but they are not interchangeable, doing this also means you are going to have to change the timing of the recipe. In short, as a yeast bread, it would become a totally different bread and different recipe. I would advice to start out with a yeast bread recipe like this one: www.weekendbakery.com/posts…hite-loaf/ and combine that with a poolish. You can make a 100 g flour / 100ml water with 0.5g yeast and make it 12 hours in advance. You add this to the recipe the next day (do not forget to subtract 100 g flour and 100 ml from the final ingredients list because they are already in the poolish, and use 5 g yeast instead of the 7 g indicated because you are using the poolish.
Another option would be to try our baguette boules, also a yeast bread and a lot of fun to make: www.weekendbakery.com/posts…he-recipe/
Good luck with it!
Marieke
Gingi says
Thank you Marieke. Will do. Love your site, btw!
Weekend Bakers says
Thanks very much, and your welcome.
Happy Baking!
Marieke
Oleg says
Marieke,
Baked two loafs yesterday. What a great bread!!!!!!
Thanks a lot for your recipe and all help, again!!! You are the best source for all bread trusted tips/recipes!!!
Good luck,
Oleg
Weekend Bakers says
Hi Oleg,
Thank you so much for sharing this again. We will not easily get tired of hearing about it!!
Happy December Baking!
Marieke
Wil says
Hi,
This bread is soooooooooooooooo good!
Since this summer I am practising my baking skills in our wood-fired clay oven. In the mean time I checked several bread baking sites, and I really enjoyed yours!. Very detailed instructions, and beautiful pictures.
Your sourdough starter instructions really inspired me. I didn’t realize it was so easy.
I made this bread with organic white flour from Molen de Vlijt in Wageningen. I think my bread has a more greyish appearance, and I had some troubles with shaping. Maybe this wat due to our improvised bannetons, but I wonder if you notice any difference between flour from different mills. Maybe something to try for another post?
Thanks for the wonderfull site, and if you want you can check out my wood fired oven stories at http://www.lekkermelig.nl. You really don’t need an _expensive_ woodoven!
Thanks,
Wil
Weekend Bakers says
Hi Wil,
Thank you very much for liking the recipe and glad it turned out well in the wood-fired oven.
As a matter of fact last Wednesday we did another flour test and tested 5 bread flours from 5 different mills, one of them is Woudrichem, which has the same miller as Wageningen. We will report about it shortly on our website.
We are going to take a look at your website now!
Happy baking,
Marieke & Ed
James T. says
The instructions given in your site to make bread is so simple and precise making it a pleasure to follow. The explanation in each step help to steer away from trouble which most home bakers usually run into. There is this problem I come across from time to time and I think you will be able to help: in general, is there a standard amount on how much starter to use for making sourdough bread? In the example above, you are using about 32% starter (245g/765g). Is this a standard and can be applied across to other breads? Another question is the baking time. Say if I want a smaller size bread, how do I scale down the baking time?
Thanks!
Weekend Bakers says
Hello James,
Here we are again to answer your questions.
First about the percentage of starter. The 32% given in this recipe would be a good starting point for other recipes too.
You can look at it like this: anything between 10 and 60% will give you a working result. But you will more definitely ‘hit the great bread spot’ by using something between 20 and 40%.
Our suggestion, when trying out a recipe, would be to start with around 30% and see how you like the structure and taste of the result. Depending on this result you can make changes and go a bit lower or higher, until you have something completely to your taste. Because it is very personal of course what crumb structure and (more or less sour for example) taste you prefer and it is very interesting and helps a lot for your bread baking skills to play around with it a bit. We say this often but we do make a lot of different versions of a bread before we think, this is the ultimate one for a recipe. After that, we still play around with it and make minor changes, also to do with weather or maybe things like slight changes to oven settings or mixing times. The result is even influenced by how you feel on a given baking day yourself. It is always funny to see how (in a cooking show) 12 people make exactly the same recipe and you get 12 different versions. So ‘the hand of the master’ also plays a key role in baking results.
Your other question was about baking times. The given times are guidelines based on our baking experiences, so keep in mind you could have to adjust a bit for your oven (if you haven’t seen them yet, check out our oven tips www.weekendbakery.com/posts…your-oven/:
Times can also vary, depending on how many breads are in your oven at one time (more cold mass, longer baking time because oven temp drops)
The average oven temp for all these examples is 230 Celsius /445 Fahrenheit
weight of dough —- time
250 —- 25 minutes (our sourdough mini boules for example)
500 —- 35 minutes (our ‘fluitje’ recipe for example)
750 —- 45 minutes (standard bread, like this recipe)
Miche (1.5kg) —- 75 minutes
Baguette (350) —- 27 minutes
Hope this helps you on your way.
Wishing you lots of wonderful loaves,
Ed & Marieke
James T says
Ed & Marieke
You guys prove it once again how awesome this site really is! It is a most informative and helpful piece of explanation to an issue that I am having trouble with. As suggested, I will try a different percentage of sourdough starter in the recipe and see how it changes the result in my next few baking tries. Basically, you are saying there is no magical number to the amount of starter use, just a range to work with. The right amount to use would be depending on the ultimate goal of personal taste. This really helps straightening up my line of thought in baking.
About the baking time issue, I see that you set a range of 10 minutes per 250g of dough. I wonder if the hydration level will also play a role here. Is it fair to say the wetter the dough, the more baking time is required?
Thanks again for such a generous and thoughtful response!
Weekend Bakers says
Glad you find it helpful James! And you are right about the hydration level playing a role. So these times are indications and they will not be that far off the mark for a lot of bread recipes with hydration levels of around 60 to 65% but again it will take some ‘tweaking’ to get it right for your conditions. For us, for example, the ideal oven time for some breads is exactly 46 minutes (with a given amount of breads in the oven) for other recipes 44 minutes is best. But before you think you have to be this exact otherwise the bread will be a failure, normally your bread will be very edible between 40 and 45 minutes for a loaf of around 750g dough. The only way to be very sure a bread is cooked is to measure its core temperature. The ideal average bread core temperature should read 93.3C / 200F. For very wet (think ciabatta) doughs it can be 96C/ 205F. You have to get rid of the excess moisture still present in the dough. The excess moisture in the core would otherwise soften the crust while cooling, and with a too low core temperature, the crumb will not get the chance to fully stabilize. The way you measure this is with a digital thermometer.
Plus, if we can give you one good tip it would be to please keep a notebook and write things down.
You will forget what you did the other day! So writing down you baked 45 min at 230 and thought maybe it could have an extra minute, or want the dough to be slightly less sticky you add this to your notes ( plus one minute?! next time or -10ml next time?!) and when you give it another try you get your notes and know exactly where you stand with this recipe. The best way to do it, to really learn, we found, is to take a recipe by the horns and stick with it for a while and make it until you can dream it. All the things you learn this way you can apply to your other baking projects.
Thank you for your very kind words and enjoy the baking!
James T says
What more is there to say but a big THANK YOU! You guys are marvelous!
Happy baking.
Oleg says
Marieke,
After I mastered:) your Miche I will try this white bread this coming weekend.
I think 1 loaf will not be enough for my family and friends, so the questions about 2 loafs at the same time:
1. Your calculation- is it for 1 or for 2 loafs? Looks like for one, but on picture you have 2 loafs.
2. If I will make the 2 loaf would you recommend me to keep the double size dough together untill shaping or work with two normal size dough in parallel?
Thanks a lot,
Oleg
Weekend Bakers says
Hello Oleg,
Yes the recipe is for one loaf. In the pic you see two on one shelf, but actually we are making 6 because we have two more stones in this oven.
We always keep the dough together until shaping, it works very well, plus you need only one bowl 😉
We divide the dough with a dough scraper (so ‘cut’ it and not ‘pull’ it when dividing, so you will not damage it)
Happy Baking!
Marieke
Magda says
Such useful information. Thank you again, Marieke.
Magda says
This bread looks amazing! I will be trying it for sure. I’m smitten. 🙂
I can use tarwebloem, right?
Weekend Bakers says
Thanks Magda. Yes, tarwebloem is right, preferably one with a higher protein content (12.5 to 13%). But it is hard to find this information in Holland, so if you go to a mill for example, you could ask about it. But maybe your current tarwebloem is already doing fine making great bread. Otherwise you could try out different brands, because it can make a big difference in the end result.
Happy baking!
Marieke
Magda says
Thanks for the reply Marieke. The thing is that the whole time that I have been living in Holland, I have been using English strong white bread flour bought from an English shop near where I live and it works beautifully for bread and various types of dough. I’m having trouble finding the equivalent in Dutch flour at the super markets, I can only find regular tarwebloem, and there’s no indication of the percentage of gluten. It is highly frustrating, to be honest. I can try a mill as you suggested and see the results.
I’m very curious as to why this happens in Holland though. You’d think that with so many flour mills, there would be an abundance of all types of flour available in the super markets and yet, it’s a struggle to find the proper flour. If I could ask you one more thing: is patent bloem really all-purpose flour or not? I’m currently having a debate with a friend about that 🙂
Weekend Bakers says
Hi again Magda,
Yes, it is a challenge and the channels of supermarkets and windmills seem to be separate. You are more likely to find flour from windmills at organic stores. Understandable as they usually do not produce enough to stock supermarkets probably. Supermarkets in Holland always seem to be looking for the bigger suppliers that can supply all their stores in one go, but maybe that will change.
But it pays to find a good mill in your area and get your flour from them. You can find a list with some suggestions here: www.weekendbakery.com/posts…n-holland/.
The miller usually also can tell you about the protein content of the flour.
About the patentbloem: it could probably be closer to pastry flour than it is to all purpose. But we cannot be sure because the protein content is (almost) never mentioned. I have also seen patentbloem with higher glutencontent (12%). As a rule pastry flour should be around the 9% and all purpose around 11%. So the only thing we can say is that Dutch patentbloem is flour that only contains the white (endosperm) inside of the grain and no germ or bran (it can also be made from softer wheat but again we do not know because of the ‘no information on the package’). Windmills usually do not mill the very fine patentbloem, this is mainly done in factories. We use our stone milled tarwebloem more as an all purpose flour really, because it has more taste and still a percentage of fiber in it.