

Oui, oui, iet ies see famoes Baguette Boule!
Klik hier voor de Nederlandse versie
For people who, for various reasons, cannot or will not make baguettes, this bread is a great alternative! And you do not need a mixer…
This recipe will yield two breads of about 675 g each. We advice you to make this recipe as stated. You could divide all the ingredients in half and end up with one boule. But because of the lengthy process and the fact that the piece of dough for one boule will be a bit too small to handle during stretch and folds, we would urge you (provided you have the oven space) to make the two breads in one go.


From baguette to baguette boule
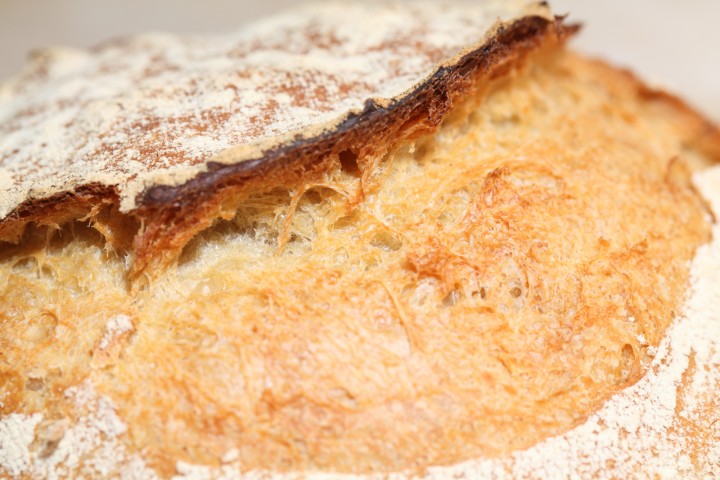
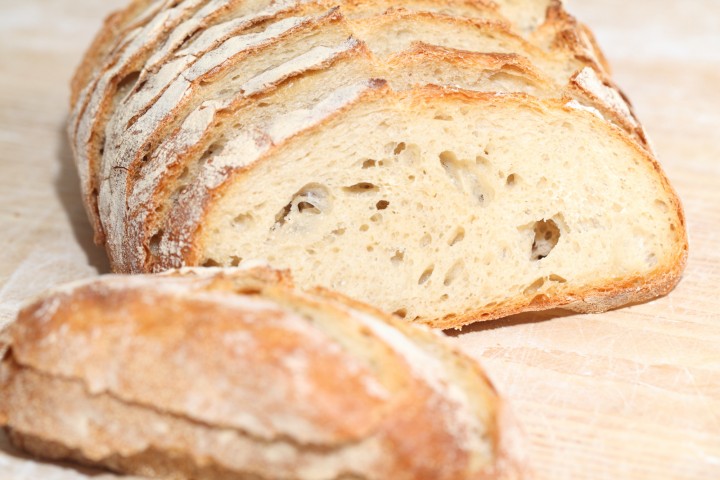
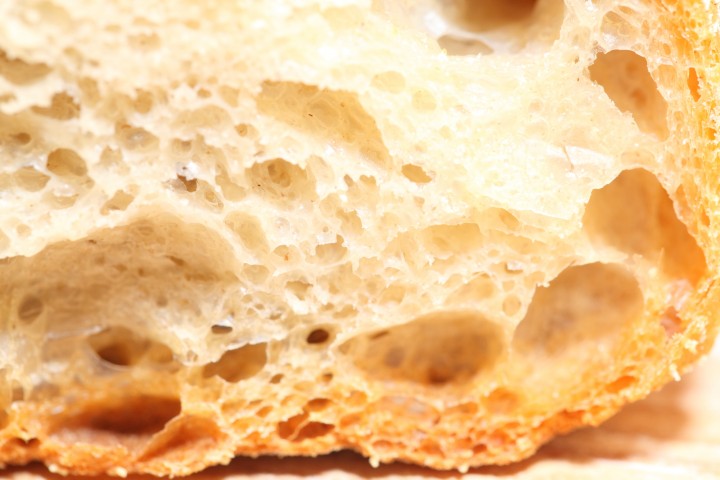
So what’s the difference from our original 80% hydration baguette recipe ? The most important step was we only used 75% hydration instead of 80%, estimating we could shape a good loaf this way. So for the two baguette boules in this recipe we reduced the amount of water in the final dough from 304 g to 266 g. The amount of water in the poolish stays the same as in the original baguette recipe. The end result is great, the crumb is moist, lovely and sweet like the baguette, but the shape allows you to have a nice sandwich (we Dutch love our sandwiches). The oven spring was a joy to watch, the crust is much like the crust of a baguette. We also really like the color of this bread, you can see how beautiful it has caramelized.
So in honor of this successful experiment we decided that this bread is a keeper and should have a name. So next to the PR (Pain Rustique), PL (Pain au Levain), SF (San Francisco Style Sour Dough) and the MB (Mini Boules) we now have the BB (which either stands for Baguette Batard or Baguette Boule, depending on the shape you choose).
Before you start, you might also want to check our tips for scoring bread with confidence and handling wet dough. You can check out the stretching and folding technique used for this dough in our baguette making video.

| Ingredients for the poolish | ||||
|---|---|---|---|---|
| 380 | g | wheat (bread) flour (around 12% protein) | ||
| 304 | g | water (room temperature) | ||
| 3 | g | instant yeast | ||
| Ingredients for the Baguette Boules | ||||
|---|---|---|---|---|
| makes 2 boules of 673 g each | ||||
| the poolish from step 1 | ||||
| 380 | g | wheat (bread) flour | ||
| 266 | g | water | ||
| 12 | g | (sea) salt | ||
| 1.5 | g | instant yeast | ||
Making the ‘Poolish’
Normally a poolish has equal parts of water and flour, however this time we make a preferment of 80% water which is in between a biga and a poolish. So it is less wet and much less slurry than an actual poolish. In a bowl stir together 380 grams of bread flour with 304 grams of cold water 3 grams of instant dry yeast. Mix it until you have a consistency that looks like very very thick dough-like batter. Cover the bowl and leave for one hour at room temperature. After this hour at room temperature you put the poolish in the fridge for 10 to 17 hours. So if you want to begin your bread making in the morning, you can make your poolish the evening before.
Making the BB’s
The times given in this recipe work best if your room temperature is between 19ºC / 66ºF and 23ºC / 73ºF. If your room is colder, use room temperature water instead of cold water (straight from tap) in the final dough.
Please note: There is no real mixing or kneading in this recipe. It’s all stretch and fold. In a bowl, combine the poolish (directly taken from the fridge!) with all the other ingredients until you have a shaggy mass. Cover your bowl and let it rest for 10 minutes to let the flour absorb the water. Turn out the mass onto your work surface and stretch and fold for 2 minutes in a steady pace. Keep on at it because it doesn’t look like it’s going anywhere but it will be OK. Put the dough in a greased bowl, cover and leave to rest for 45 minutes.


Stretch and fold a second time, doing two sets ( letter fold: right over left, left over right, bottom over top, top over bottom, repeat)
But back in your bowl, cover and again leave for 45 minutes.
Repeat the above stage another 3 times, but now each time doing only one set of stretch and fold.
Every stretch and fold is followed by a 45 minutes rest in a covered bowl except for the last one. After the last stretch and fold you leave the dough covered with some clingfilm (now looking nice and plump) on your bench for a 10 minute rest (bench rest).
Preheat your oven to 235ºC / 455ºF (at what stage you preheat your oven depends on how long it takes for your oven to heat through, some take 30 minutes, some, like ours, with stone floors take a lot longer, up to two hours.)
Now divide the dough into 2 equal parts and shape into boules or batards or your preferred bread shape.
Cover and leave to proof. This final proof should take about 40 minutes. To check if it is ready, dip your finger in some flour and gently poke in your dough.
If the hole disappears completely: under-proofed
If the hole dent pops half way back out: proofing is just right
If the hole stays entirely dented in: over-proofed
Now Score the top of the loaves with a lame/bread scoring tool. Bake in the preheated oven for 45 minutes.
To get a nice crust, try to create some steam in your oven by putting a small metal baking tray on your oven floor when you preheat the oven and pouring in half a cup of hot water immediately after putting the bread in the oven. Release some steam by setting your oven door ajar (perhaps with the help of a wooden spoon or oven mitt) 5 minutes before the bread is ready. If you are going to create steam with a baking tray, you maybe also want to turn your oven temperature a bit higher, because you are going to lose some heat in the process.
After 45 minutes take your loaves out of the oven and leave to cool on a rack.
Baguette Boules Time Table
Day 1
Make ‘poolish’
Day 2
Mix ingredients until shaggy mass
00:00- 10 minutes rest
00:10 – 2 minutes stretch and fold
45 minute rest
00:57 – 2 letter folds
45 minute rest
01:42 – 1 letter fold
45 minute rest
02:27 – 1 letter fold
45 minute rest
03:12 – 1 letter fold
10 minute bench rest
03:22 – divide + shape
03:27 – proof
40 minutes final proofing time
04:07 – into the oven
45 minutes baking time
04:52 – take out and leave to cool


JEANNE CULLEN says
Followed your recipe exactly as written and had my greatest success thus far in my bread baking journey! I divided the dough into 2/3 for a boule, 1/3 for a baguette. By shaping time I knew I had a good thing–very puffy and light but strong enough to hold shape and rise without a dutch oven. (After scoring & spritzing I did put an aluminum roasting pan over each and got beautiful, golden, blistery crusts). I was further rewarded with very open, light, moist crumb and great chew. The baguette was so “holey” it could pass as ciabatta! I usually use a cheaper bread flour but used KA this time and have to think it makes a difference. This is a forever recipe for me. Thank you!
Louise Lalande says
Hello, wonderful recipe but the two breads were very large and with my oven at 455F they only took 30 minutes to be completely cooked.
Ed says
I have a fan oven, what temp do you recommend?
which shelf in the oven?
ML says
I’m sort of new to making artisan bread, without success:( I started last year but quit and now picking it up again. Baguette boules is the recipe I was looking for but my dough never look so smooth during the stretch and pull as pictured (problem 1.) I followed the recipe as is and baked my loaves. My loaves came out without ears (problem 2.) I haven’t cut it, so I don’t know how airy it is. Please help me with my problem 1 and 2.
My flour only has 3 grams of protein for every 30 grams (10%). To remedy that, I bought wheat gluten and added about 3 tablespoon of that to the dough above. Is that wrong?
Any suggestion as to how much wheat gluten to add to my flour?
Kyle says
Cheers for the recipe. I was wondering if it would be possible to make one boule of 1kg (fits in my proving basket). And if so, how I should change the baking time accordingly.
Thanks in advance!
Louise says
Hello, not sure if my oven heats up more but it only took 28 minutes to bake these loaves to an internal temperature of 190 F, otherwise a really great recipe!
Katherine says
Any tips for making this bread at 8000 ft of altitude?
Lili says
Hi Ed & Marieke!
I’ve now made this bread twice and it is by far the best bread I’ve made – I don’t have a sourdough starter and don’t really have the patience and commitment needed to keep it going, so it’s been exciting to try a recipe with a poolish for the first time.
The first time I made the bread, it was exactly according to your recipe and turned out beautifully (both in taste and look!).
I thought you would like to know that even after realising after taking my poolish out of the fridge that I didn’t have enough white bread flour, it still turned out wonderfully!
I had already substituted 80g of the poolish for a mix of spelt and wholewheat bread flour based on a previous comment so was very nervous about needing to use more wholewheat flour instead of white flour. This is the proportions I ended up using:
– 300g white bread flour + 80g spelt/wholewheat bread flour mix in poolish
– 160g white bread flour + 140g wholewheat bread flour + 60g plain flour in the portion of flour added to the poolish. I had to add a tiny bit more water as well.
It still turned out deliciously! It is a bit less beautiful as I think the dough was a little too wet so it didn’t shape as nicely, but the texture is bubbly and chewy with a really nice nutty taste.
Thank you for making such a wonderful recipe that is actually very adaptable, even for a baking novice who doesn’t check their ingredients first 🙂
Best wishes,
Lili
Lili says
Unfortunately I still have not quite aced scoring – I’m going to get a proper lame to try and improve 😉
Weekend Bakers says
Thank you so much Lili, for sharing your experience and making us part of your baking journey this way. You did very well with the tools and ingredients you had at hand.
And scoring is something you can keep practicing and get a chance to improve with each bake. A sharp blade and maybe a few of our tips will surely give you better results!
www.weekendbakery.com/posts…onfidence/
You can also experiment with the proofing, brand of flour you use, amount of steam..al these things can have impact on your scored loaf and the way it opens.
Above all, enjoy your baking moments and your home made bread.
It’s the best! 🙂
Melinda says
Hello,
Since this makes two loaves I am wondering if one loaf could be frozen after baking. I could cut the recipe in half but with the time involved it would be nice to be able to tuck one into the freezer for later.
Thanks!
Weekend Bakers says
Hello Melinda,
Yes, that is a great option. In fact, it is our preferred method and we keep bread in the freezer all the time. With this high hydration bread it is no problem at all. You can even slice it and take the slices you need out of the freezer.
Enjoy your baking!
Heidibella says
Love this recipe, but just wondering how I could print a shorter version??
Am I missing the link?
THANK YOU
Weekend Bakers says
Hello Heidi,
You can use the print option in your browser and then you will get the version without pictures and so on.
Enjoy your baking!
Yusra Yusoff says
Loaves just came out of the oven and they’re gorgeous! Swapped out some flour for Spelt and Wholewheat. The dough was really easy to handle. Thanks so much for the great recipe! It’s going to be my go to while I try to use up my massive pack of instant yeast 🙂
Weekend Bakers says
Hello Yusra,
That sounds excellent. Very happy the recipe is such a success, also with the addition of spelt and wholewheat. Very good to know, because we actually never do this.
Enjoy your crusty boules!
Pierre-Alain says
Dear bakers,
I’ve been lurking on your site for a few years and your no knead brioche and ciabatta-focaccia are foolproof staples of mine so thank you so much for them!
This particular bread is my nemesis and I am still to get to grips with it! Part of my issues is that I am an incompetent scorer. I have read that scoring cold bread is easier; is it possible to incorporate a fridge retard instead of the final 40 min prove? If so, how long would you recommend I leave it in there for?
All the best,
Weekend Bakers says
Haha, we love your comment. We must conquer this nemesis of course :)!
First have you seen our tips on scoring with confidence?
www.weekendbakery.com/posts…onfidence/
We often see that the main problem is not scoring deep enough and especially not enough toward the edges of the bread. Also keep this in mind maybe. There are several options you can try. The first is to do part of the final proof as described but a bit shorter, then put the loaf in the fridge for an hour or so and then score. Another is to retard the loaf after shaping, directly in the fridge, but it is hard to say how long this will take to proof, you need to give it a few turns to test this and work out a schedule too, but the proofing time could be anywhere between 4 and 24 hours or longer. You can play with this by adjusting the amount of yeast too. You can get an indication of amounts of yeast and proofing times with our pizza dough recipe % table that you can find here:
www.weekendbakery.com/posts…gh-recipe/
Another easy suggestion would be to, at the end stage of the proofing time, leave the loaf uncovered and let the other skin dry out a bit. But with practice of the scoring and our tips and a really sharp scoring knife of course, we are sure you will get there. Just see every loaf as a chance to improve your skill.
If possible also experiment with different (brands of) flour and add enough steam. This can make a big difference too!
Above all enjoy it, this will bug your nemesis to no end 😉
Pierre-Alain says
Thanks for your reply!
I am in fact making a batch as we speak (there have to be some benefits to the lockdown!). Thanks for the tips, I do think my biggest issue is not going deep enough, but that is because my knife isn’t sharp enough and the bread is being flattened and tearing. I will sharpen it today and I have a lame on order so fingers crossed.
As it makes two, I might try one the usual method and I’ll put the other in the fridge straight after shaping and check how long it takes and if it scores better!
I read your flour guide recently and I do think that will make a difference- I have been using a supermarket bread flour (12% protein). I managed to order some stoneground flour last night from a local windmill: very strong canadian, strong UK/continental mix and t55. With those options available, do you have a recommendation for a flour mix?
I possibly add too much steam, so that is probably not my problem. The kitchen ends up like a hammam 😀
Thank you for taking the time to reply and your encouragement, and for giving me the bread baking bug, it gives me such pleasure.
Weekend Bakers says
We think it will definitely get better with the lame and as for the flour, we would recommend trying a mix with the strong flour and type 55, equal amounts to start.
Have fun with this ‘mere a boire’ of possibilities!
LC says
I’m a newbie in making bread and this says wheat (bread) flour – i used wheat flour and not bread flour. Did you mean to use bread flour?
Weekend Bakers says
Hi LC,
Bread flour is wheat flour, but of a certain quality. It is also called strong flour, mainly because the amount / % of protein is high enough to build a strong gluten-network to make a good bread dough that proofs well.
In Holland we do not use the term bread flour and so we indicate with the wheat flour that they should use ‘tarwebloem’ (wheat).
You can read more about flour types in this post:
www.weekendbakery.com/posts…our-types/
LC says
this makes 2 boules but i can only bake this one at a time using a dutch oven. Is it okay if i proof the one dough longer while the other one is baking?
Weekend Bakers says
Hi LC,
Yes, that is possible, but we would suggest to put the second one in the fridge to slow down the proofing while the other is baking to avoid over-proofing. You can also divide the recipe / ingredients in two and make just one boule.
Hope it will be great!
Dini says
Dear Weekendbakery,
I have tried this a couple of times and it produces a nice tasting loaf. I usually do a 10% whole wheat in my poolish.
I would like to know how you incorporate the poolish with the other ingredients or if you have any trouble mixing the poolish with the rest? My poolish seems to be very extensible that when I mix with the other ingredients it seems to not want to break up evenly in the dough mass… is there a way to solve this? I hand mix the dough. Should I cut the poolish up in to small pieces then add to to the other ingredients?
Weekend Bakers says
Hello Dini,
If you have not tried it yet, we would suggest the following. Take the poolish and the water (266 g or most of it) of the end dough and combine them and stir until you have a smooth watery consistency. Take the flour, make a well in the middle and poor the mixture in and start incorporating.
We hope this will work for you.
Enjoy your baking and eating!
John Rizzo says
Ok, looking at the dough calculator it has 380 grams of flour for the poolish with 3grams of yeast. This does not seem right after reading this.
Poolish up to 8 hours in advance – 0.23% – 0.33%
Poolish up to 12 hours in advance – 0.1% – 0.2%
Poolish up to 16 hours in advance – 0.03% – 0.08%
Will someone please explain why there is 3 grams of yeast to 380 grams of flour. When I calculate it out it comes to .4grams.
Weekend Bakers says
Hello John,
This is because the poolish is going into the fridge.
Your calculation would be correct of course if you ferment at room temperature.
Tanvi says
Hi what would be the difference if ising an equivalent amount of active dry yeast
Weekend Bakers says
Hi Tanvi,
You usually use a bit more of the active dry yeast (you multiply by 1.2 to convert). So in this case 3 grams of instant means 3.6 of active dry yeast.
You can also use our conversion tools for yeast and temperature and many other things like ingredients, volume and weight. Find it here:
www.weekendbakery.com/cooki…nversions/