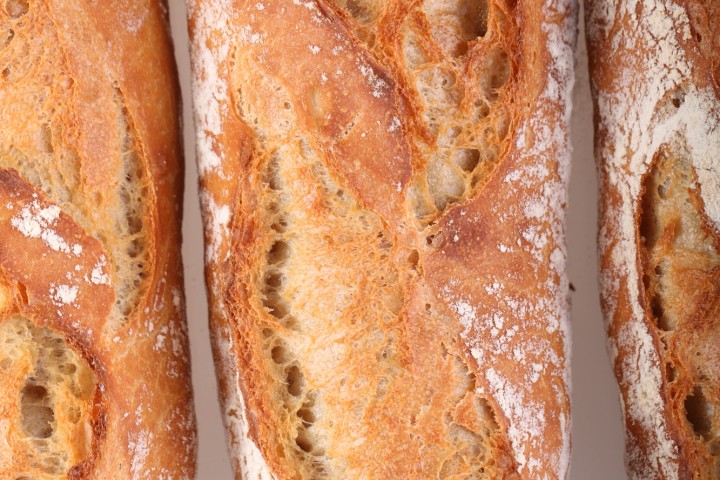
Even if the shaping is not perfect, this is the best baguette I have ever tasted!
I was very intrigued when I saw the baguette recipe that Akiko posted on the Fresh Loaf, both by her pictures of the baguettes and by the mentioning of the 80% hydration (Thank you Akiko, you are truly inventive and inspiring!). I liked it immediately and could not wait to try it. Several tries and tweakings further, with lots of sharing and baguette debating with Akiko, I can say from the heart that this recipe lives up to it’s expectations.
So give this recipe a try too and let me know what you think!
Do not forget to watch me take on the 80% baguette dough and see me stretch and fold on my video; Watch it here…
Take a look at our baguette log and follow our baguette baking progress and learn from our experiences and mistakes!
If you consider yourself a novice baguette baker our ‘easy’ baguette recipe might be a great place to start for you!
Before you start, you might also want to check our tips for bread scoring with confidence and handling wet dough.

Making the ‘Poolish’
Normally a poolish has equal parts of water and flour, however this time we make a poolish of 80% water which will give you a preferment resembling something between a biga and a poolish. So it is less wet and much less slurry than an actual poolish. In a bowl stir together 380 grams of bread flour with 304 grams of cold water 3 grams of instant dry yeast. Mix it until you have a consistency that looks like very very thick dough-like batter. Cover the bowl and leave for one hour at room temperature. After this hour at room temperature you put the poolish in the fridge for 10 to 17 hours. So if you want to begin your bread making in the morning, you can make your poolish the evening before.
| Ingredients for the Poolish | ||||
|---|---|---|---|---|
| 380 | g | wheat (bread) flour | ||
| 304 | ml | water | ||
| 3 | g | instant yeast | ||
| Ingredients for the Baguettes | ||||
|---|---|---|---|---|
| makes 4 baguettes (346 g each) | ||||
| 380 | g | wheat (bread) flour | ||
| 304 | ml | water | ||
| 12 | g | sea salt | ||
| 1.5 | g | instant yeast | ||
| the poolish from step 1 | ||||
Making the Baguettes
The times given in this recipe work best if your room temperature is between 19ºC / 66ºF and 23ºC / 73ºF. If your room is colder, use room temperature water instead of cold water (straight from tap) in the final dough.
Please note: There is no real mixing or kneading in this recipe. It’s all stretch and fold. In a bowl, combine the poolish (directly taken from the fridge) with all the other baguette ingredients until you have a shaggy mass. Cover and leave to rest for 10 minutes. Now turn out the mass onto your working surface and stretch and fold for 2 minutes. Keep on at it because it doesn’t look like it’s going anywhere but it will be OK. Put the dough in a greased bowl, cover and leave to rest for 45 minutes.
Stretch and fold a second time, doing two sets ( letter fold: right over left, left over right, bottom over top, top over bottom, repeat)
But back in your bowl, cover and again leave for 45 minutes.
Repeat the above stage another 3 times, but now each time doing only one set of stretch and fold.
Every stretch and fold is followed by a 45 minutes rest in a covered bowl except for the last one. After the last stretch and fold you leave the dough covered with some clingfilm (now looking nice and plump) on your bench for only a 10 minute rest (bench rest).
Preheat your oven to 240ºC / 465ºF (at what stage you preheat your oven depends on how long it takes for your oven to heat through, some take 30 minutes, some, like ours, with stone floors take a lot longer, up to two hours.)
Now divide the dough into 4 equal parts. You are going to pre-shape the dough parts one by one by carefully stretching the corners making a rectangle of each of the 4 pieces and rolling them up. Try to make your rectangle and roll as even as possible without fussing too much with the dough. Use enough flour to handle the dough, but try to keep it to a minimum because you don’t want too much extra flour in the carefully build up 80% hydration dough. Cover and leave to rest for 15 minutes.
Take a roll of dough (which has flattened a little bit during the bench rest) and gently shape it into a baguette shape. My way of shaping this high hydration dough is to sprinkle it with a little flour and press it softly down into a rectangle with a short and a long side. The more even the rectangle the nicer the baguette will look in the end. With a plastic dough scraper you flip 1/3 of the long side onto itself and tuck it in to get some tension on the outside of the dough, now repeat it two more times until you have a roll shape. Make a rolling motion with your cupped hands from the center to the side with a soft touch to make the baguette a bit longer and to make nice pointy ends on both sides of the baguette. Practice makes perfect, do not be hard on yourself, it is not an easy job with a dough as sticky as this.
Place the baguettes in a couche made of proofing linen or in a baguette pan, or something of your own invention, but make sure the baguettes have enough side support to hold their shape. Cover them and leave to proof for 25 minutes.
To check if the baguettes are ready, dip your finger in some flour and gently poke in your dough.
If the hole disappears completely: under-proofed
If the hole dent pops half way back out: proofing is just right
If the hole stays entirely dented in: over-proofed
Score the top of the baguettes with a lame/bread scoring tool. Cut as straight along the long axis of the loaf as possible. Mentally divide the baguette into lengthwise thirds, and keep the cuts within the middle third. You can practice the scoring on a piece of paper or a kitchen paper roll first. Overlap the cuts by about one third of their length,while holding the knife at a 30 degree angle. Also check out this very useful video on proper baguette scoring.
Bake in the preheated oven for 25 minutes. Leave to cool on a wire rack.
To get a nice crust, try to create some steam in your oven by putting a small metal baking tray on your oven floor when you preheat the oven and pouring a half cup of hot water immediately after putting the bread in the oven. Release some steam by setting your oven door ajar (perhaps with the help of a wooden spoon or oven mitt) 5 minutes before the bread is ready. If you are going to create steam with a baking tray, you maybe also want to turn your oven temperature a bit higher, because you are going to lose some heat in the process.
Baguette Time Table
Day 1
Make ‘poolish’
Day 2
Mix ingredients until shaggy mass
00:00- 10 minutes rest
00:10 – 2 minutes stretch and fold
45 minute rest
00:57 – 2 letter folds
45 minute rest
01:42 – 1 letter fold
45 minute rest
02:27 – 1 letter fold
45 minute rest
03:12 – 1 letter fold + bench rest
03:22 – divide + pre-shape
03:37 – shape + proof
04:02 – into the oven
04:27 – take out and leave to cool
PS: If you are interested in linen couches / proofing cloths like we use ourselves, you can find them in our WKB webshop.


Hi,
Lovely video, loved your procedure, but for those of us that do not have the elaborate equipment that you have (two digital scales) some of us are forced to use the “spoons” method. I also have to improvise with some cardboard (accordion style) proofing gadgets.
Here are the quantities expressed in volume for us poor folks:
Poolish
Flour (100%): 380 g | 13.4 oz | 0.84 lbs
Water (80%): 304 g | 10.72 oz | 0.67 lbs
IDY (.79%): 3 g | 0.11 oz | 0.01 lbs | 1 tsp | 0.33 tbsp
Total (180.79%): 687 g | 24.23 oz | 1.51 lbs |
====
Dough
Flour (100%): 380 g | 13.4 oz | 0.84 lbs
Water (80%): 304 g | 10.72 oz | 0.67 lbs
IDY (0.394%): 1.5 g | 0.05 oz | 0 lbs | 0.5 tsp | 0.17 tbsp
Salt (3.157%): 12 g | 0.42 oz | 0.03 lbs | 2.15 tsp | 0.72 tbsp
Total (183.551%): 697.5 g | 24.6 oz | 1.54 lbs
Calculations graciously provided by a wonderful little tool located here:
http://www.pizzamaking.com/dough_tools.html
cheers
Hi guys, how’s it going?
Can i replace the IDY with my very active sourdough? And if yes, how much S.D do you suggest i add to the ingredients? And does the same principle of S & F apply here or must i leave the bread dough to preferment for some time before shaping?
Thanksm
Mike
Hello Mike,
Completely switching yeast for sourdough will change all the timings of the recipe and will also change the taste profile and crumb structure of the baguette. In other words, it will be a totally different recipe. However, if you only switch yeast for sourdough (suggest 30 g) in the ‘poolish’ and use yeast in the final dough the recipe will probably work as described (including the S&F) and you still have the added sour back note of the sourdough. If you only want to use only sourdough there are recipes on The Fresh Loaf you could check out.
We want to add that the baguettes we know and love (also the good ones we tasted in France) always have that sweet taste of the wheat without the sour after note of the sourdough and we really prefer that in our own baguettes too. We like sourdough in many types of bread, but not so much the baguettes.
Wishing you wonderful results and happy baking,
Ed & Marieke
Thanks guys, i’ll take your advice into account. I will add 30gr. SD to the Poolish and yeast to bread dough, and follow same instructions as described and let you know.
Wish me luck
Good luck Mike
!
My dough is proofing now getting ready to go into the oven. It was a nice and new experience to handle such high hydration sort of dough.
Hope the end result would be worth the effort.
I shall keep you posted with what i get.
Cheers.
Guys,
One question: is it usual for this kind of dough to get that much of air bubbles in it?
My dough was about to fly in the air because of that unprecedented amount of bubbles in it!! I hope the result would be good, keeping my fingers crossed.
Yes, the air bubbles are very much a part of it.
No worries I think.
Marieke
Dear Drummer,
Thank you very much for your addition. I want to add that we Europeans cannot live without scales and we so hope that American people are going to warm to the idea of using them because it makes your baking life so much easier (we don’t know how you would measure o.72 tbsp?). I don’t now what they cost in America but our largest scale that weighs to 5 kilo’s with accuracy to 1.0 grams cost 19 euro’s, and we use it almost every day. The ones that way more precise (0.1 grams) are more expensive.
Very creative with the cardboard accordion!
Wishing you good baking results,
Marieke
I am wondering about how much flour needs to be used when the poolish is added to the baguette recipe. After I added the poolish, I had to double the amount of flour in the recipe because I did not have a shaggy mess, I had a liquid. I double checked the amount of water and flour used and it was correct. But the dough literally poured out of the bowl and there was no such thing as stretch and fold. So I did a French fold for two minutes and am now letting the dough rest, but I really doubt it will become doughy enough to continue with any envelope fold. The poolish was not in the fridge for 17 hours, because my fridge is too cold for anything to rise, so it sat out for about 20 hours and got all nice and bubbly.
I also could not weigh my ingredients, so I used a grams to cups converter and that may be part of the problem. I used this converter here:
http://southernfood.about.com/library/info/blconv.htm
I have been told a scale here can be had for about $30, or the amount of money I pay for one month’s electric (in summer) or one week of food. I am baking bread to save money, not spend it and for $30, I could go out and buy 6 loaves of artisan bread, so I also wish that recipes would include both the grams and the cups measurements, as wizarddrummer said. And having been brought up on recipes that called for a dash of this and a pinch of that, I would probably consider .72 of a teaspoon to be slightly less than 3/4 of a teaspoon. Not exact, I know, but to me, certainly doable.
At any rate, if this baguette doesn’t turn out, I will redo it and just make sure I put in more flour next time. The poolish itself smells absolutely wonderful – it smells like I’m making wine in my kitchen and I can only imagine what the bread will taste like!
Duerrr……I have a red face. It’s not a lack of flour, it’s an excess of water. I had done the conversion right, but I had halved the recipe and apparently I can’t divide by 2. Converted and halved correctly, the amount of water I should have used was 2/3 of a cup. I actually used almost an entire cup in both the poolish and the recipe and that extra water makes all the difference. So try, try again. *goes to start another poolish*
Hi Kelly,
!
A very recognizable baking mistake, we all make along the way, right up there with forgetting the salt or the egg whites.
About scales: Give a man 6 artisan breads and he’ll eat for 6 days, give a man an electric scale and he’ll bake and eat forever
Yes, we are fan of our scales because it’s so fitted for the precision that baking (both bread and patisserie) requires and doesn’t leave room for discussion (100 g is 100 g if you pack it or not). They’re great for repeating the exact same results bake after bake.
I hope you are not too disappointed and that you will try the recipe again!
I did try it again and the bread came out wonderful, although this time I tried to stretch and fold the poolish for 2 minutes – that’s what I get when I try to make bread right after I get up in the morning. *sigh* I was amazed at the crumb, though – I never thought I would get a crumb like that. I could still work on the crust a little, so I will attempt to improve that. I am making another batch today to have some ready for tomorrow and it’s the whole recipe today, not just half. I have some friends that want to try the bread, but I want enough to save for myself as well. Yeah, I’m kind of selfish that way!
Thank you so much for posting the recipe!
i have a question: how do you transfer the baguettes from the couche onto baking sheet? every time i do it, the baguette is losing its beautiful shape.
(
Hi Codruta,
I use a ‘transferring board’ that I have myself made especially for this purpose. I transfer the baguettes onto the board and from this board onto another board I use to shove the baguettes into the oven. You can see me do this when you watch the baguette movie:
http://www.weekendbakery.com/posts/baguette-movie/
it starts at about 4 minutes 25.
You can see that I hold the board at an angle and pull a bit on the couche to help the baguette roll more easily onto the board.
Hope this helps,
Ed
hi Ed. it helped a lot. I make bread for almost 3 years, i’ve experienced a lot during this time, from almost disastrous breads to magnificent ones, never really knowing what i did wrong or right. your blog gave me simple answers to my incertitudes. thank you, codruta
Hi Ed,
I tried your baguette recipe & it came out very well with an excellent crumb. Using the same dough i made some boules too(small ones), but they were not that airy. More specifically, when i cut the boule horizontally through the middle, the edges have nice large holes, but the centre is dense! Probably a shaping fault but i have tried a few times and failed.
Do you have any suggestions, have you made airy boules. A recipe or shaping video would be great.
br,
kallol.
Hello Kallol,
Have you seen this posting? : http://www.weekendbakery.com/posts/birth-of-the-bb-loaf/
Maybe this is what you are referring to. Yes, shaping can be an issue (maybe too tight?). Another tip is using a (pizza) stone in your oven and setting the temperature a bit higher at the beginning of the baking process so you create a lot of initial heat conduction from the stone into the bread. Most home ovens can not hold the temperature after you have loaded the bread, so the increase in heat and a pizza stone can help. My experience is that the batard (oval) shape works better than a boule shape, if you are looking for a nice even, airy result. Maybe you can try this shape next time and see how it goes.
Success,
Ed
Just wanted to let you know that I’ve made this recipe this weekend. I was the first time I ever made it, first time to work with such wet dough but it turned out beautifully! A thin, cripy crust, soft but strong crumb with nice holes in it. because it was my wife’s birthday we a friend from France visiting and she doesn’t like the French baguettes at all, but she just kept eating from it
All the proof I need to know to keep this one on the recipe radar!
The only mistake I made was overestimating the size of my Rofco B30
I just bent the sticks to a “U” shape just before putting them in the oven, problem solved!
Thanks for sharing this wonderful recipe!
Menno
Ede, The Netherlands
What a great story! Glad you like the recipe. Did you make a picture (did you post on bakkerswereld forum?) because I would love to see that U-bend
. Would also like to collect pictures of other home bakers baguette making efforts and showcase them on our website. And I know how you feel trying to fit the baguettes in the Rofco, I sometimes give them a little nudge to fit them in. It would be great to have an oven that can handle 60 cm baguettes. For us it’s a wish for the future, but no hurry.
I was planning to take pics, but someone let loose the birthday guests a little too early
I’ll make pics next time and post them on TFL and bakkerswereld. I’ll be trying some other recipes this week and I have to bake some whole wheat bread my neighbors have ordered
Just wondering: how do you get steam in your Rofco? The old fashioned water spraying way or do you use a real Rofco steamer?
I use a Gardena pump garden water sprayer
I made the poolish this morning according to measurements and it was very much like a dough, not a slurry?? the measurements were accurate, can I just add more water to get the consistency needed??
You are correct. The recipe consists of two times a 80% dough put together and separated by time. So the ‘poolish’ (please note the quotes around the word poolish) is not an actual poolish and so it appears more dough like. Please do not add more water, it will work out in the end!
I just found your site and I am hoping to try this recipe soon. It looks fabulous! I wanted to ask if it’s possible to use fed sourdough starter instead of making the ‘polish’ described above. If so, how much should I use (by weight)? Also, are there any additional changes that I need to make by using a sourdough starter?
Hello Carolyn,
We haven’t tried this one ourselves yet but will do so very soon (one of the weekends to come). It requires an adaptation of the recipe, also in things like resting and proofing times. So it’s best we first work it out until we are satisfied with the result and then we will post it of course. I know there are many sourdough baguette recipes but I am not sure about the 80% hydration ones.
If you find anything in the meantime or try out another recipe we would be very interested to hear about it and your results and experiences!
Marieke and Ed
Thank you so much for your response. I’m pretty much a novice at this, so it’s best I wait for your instructions on sourdough. I will definitely try the recipe as posted, though. Thank you again for the recipe and your advice. Have a great weekend!
Carolyn
I would also like to see your adaptation of this recipe for a sourdough starter. In the meantime I will try this one.
It’s in the planning to do a sourdough adaptation of this recipe. This is going to take some adapting and testing for us to get it just right, but when we do we will surely post it on our website.
This recipe works but I added just a slight *tweak*. See I watched Peter Reinhart’s video at amazon for one of his bread books. We have literally been trying to make holes in our baguettes for about a decade but not having any luck. In Reinhart’s video he used olive oil on his hands and on the counter where he was making the bread.
That, along with your recipe seems to work. And I don’t use a lot of oil, I just wipe the bowl with oil before I put it in there, wipe the counter with olive oil and wipe my hands with olive oil. We get the big holes in our bread now. The only thing we haven’t been able to do yet so far really is score the bread, I guess because it’s too “wet” but that’s fine, though I love scored bread.
Another thing we do since we have an electric oven is use our bbq on HIGH for bit to get the oven spring, then turn it down after a bit. Today we really don’t want to go outside due to the weather so we’re going to try to put this in the oven, with ice cubes to get it to steam properly and get the oven spring that makes these so light and airy.
My husband just said “it’s more of a crumpet” type of bread or a “ciabatta” type but he said “I love crumpets”. So, just wanted to add this in.
Hello Mrs. Edwards,
Thank you for your lovely bread story. So good to hear that mister Reinhart’s video in combination with our recipe gave you what you were looking for. As for the scoring, have you seen our tips for bread scoring with confidence?
http://www.weekendbakery.com/posts/bread-scoring-with-confidence/
Maybe these can help you with the scoring of wetter doughs.
Hope you will bake many more loafs, baguettes and crumpets!
Marieke
I tried this recipe after very carefully studying the video several times. I really think this recipe “Rocks”. The only thing I will change the next time is to up the kosher salt to 13 grams ……..Also, where can one find a lame? I think the hardest thing I ever face with making baguettes is the proper depth of scoring without depressing the loaf. I have tried razor blades without success.
Thanks, glad you like the recipe. Ed makes his own lames and we always have a few extra ‘lying around’. You can see it here: http://www.weekendbakery.com/webshop/
It is also equipped with a razor blade but the way it is placed in the handle makes it easier to score swift and precise and at the right angle. He made it himself because he could not find anything he liked either.
We can send you one for € 5 / £ 5 for shipping and material costs if you want. (if so you can send us your details via our contact form).
Have you seen our tips on scoring with confidence? http://www.weekendbakery.com/posts/bread-scoring-with-confidence/ Hope they are of use to you too! One of the tips people find really useful is the controlling the dough with one hand (not pinching but lightly guiding) and scoring with the other hand.
Happy Baking!
Marieke
Did you know there is a link to this post on a French website for professional bakers ?
http://www.boulangerie.net/post238751.html#p238751
In the comments section, they seem to like it a lot !!
I do too. Your baguettes look nicer than many I have seen in bakeries here in Paris. Well done !
Phil,
Baker in Paris.
Hi Phil the French baker,
! We are going to check it out, but it seems we have to register before we can see the comments. We will try tomorrow and see how far we get with our very basic understanding of the French language…
That is a big compliment indeed
Ed & Marieke
hello
the french traditional baguette is born in 1930 hydratation 70 per cent
this year the best baguette in paris is made with an autolyse of 24 hours the minimum is 1 hour
just mixing water and wheat floor
after this time you mix yeast and after salt proof 1 hour and half at 20 degree c
each 30 min you make a fold
and let proof 24 hours to cool 3 degree c
after this time you divide proof 20 min
you shape proof 20 min
this is the real baguette
Thanks for this Jerome, I would love to taste the best baguette in Paris!
Hi!
I bake quite a lot of sourdough bread but have not yet succeeded with baguettes. The recipe contains instant yeast, however, I cannot find this is Sweden. We have active dry yeast or fresh yeast. How would you convert instant yeast to dry or fresh?
Thanks,
Josefin
Hello Josefin,
Yes baguettes take a lot of practice, but are also fun to make and even though they do not look the part yet, they can taste it most of the time.
As for the yeast question, here is our answer:
When using fresh yeast multiple the amounts in our recipes by 3
When using active dry yeast multiple the amount in our recipes by 1.2
Hope this helps.
Lots of loaf,
Marieke
My family loves French baguettes. I just got the ‘poolish’ started and continue with the recipe in the morning. I was concerned the the ‘poolish’ was like a dough and not a very very batter and added an extra 1/4 cup of water (hope that will still turn out alright–keeping my fingers crossed). How you you adjust the measurements if you were to make whole wheat baguette? Thanks in advance for your response.–Kim
Hello Kim,
I hope the extra water will not be a problem! It needs to be very very thick, so it does not really look like a poolish as we say in the recipe. We would suggest you HOLD BACK this 1/4 cup when you go on with the next stage of the recipe, because the dough is already very wet, and when making it for the first time, it would even be better to make it a little less wet, so it can be handled easier.
When working with whole wheat, as a rule of thumb, add 15 to 20 ml of extra water to every 100 g of flour. (about 4-5 teaspoons for every cup). But you have to see how your particular type and brand of flour reacts, it can differ a lot, so in the end it is the experience with the recipe and the dough that will teach you what is the right amount in your case.
Hope this information helps.
Lots of loaf (and baguettes!)
Marieke
Thank you Marieke for your great advice, it worked out alright!! The baguettes turned out wonderfully (my standard)! There was definitely room for improvement. The crusts where rustic and crunchy. There were some details that I neglected such as scorching the top (was preparing dinner at the same time, not a good idea). I had some leftover dough because the loaves didn’t fit across my sheet that I attempted some mini loaves of epi baguettes. They were wonderful!! The crusts and dough were perfect. I am already going to start my second attempt in which I will mix 1/2 white and 1/2 whole wheat flour and adjust the water according to your advise above. I love this recipe! I gotta say — it was fun handling the sticky dough!!
I meant scoring – not scorching – the top of the baguettes.
Hi Kim,
That sounds great! You will see you will make progress with every new batch you bake, as you can see we did in our baguette log: http://www.weekendbakery.com/posts/baguettes-my-home-bakers-log/
Scoring and using steam will also make a big difference, but like I said, even without it looking perfect that can still taste wonderful!
Happy baguette baking!
Marieke
I just made another batch of baguettes, they are gorgeous!!! I wish I can send you a picture of what they look like.
We would love to see a picture!
Must make some baguettes soon again and I’m going to try your way next. What a great post you’ve put together here! I was wondering if you guys had ever tried making knackebrod or had come across any good recipes/techniques in your travels. Kindest regards, Joanna
Hey Joanna,
Thanks! Please let us know what you think of the recipe if and when you make it.
I was actually looking for a good knackebrod recipe myself (I have this flatbread book with a lot of recipes but it does not contain a recipe either). I have made the soft style Scandinavian flatbread but never this famous crispy one. I have been making a lot of Italian crackers more recently called ciappe and I will post a recipe for them soon.
Lots of Loaf,
Marieke
I think I have the flatbread book too…. There is a baker in Edinburgh who makes beautiful swedish style knackebrod. Peters Yard. There are lovely, interesting ingredients in there like honey. We need to find a Swedish baker/blogger and ask them I suspect.
Floury hugs,
Joanna
Yes I have heard of them, never tasted it though. I have found this blog by Anne from Stockholm, maybe it is a good starting point: http://annesfood.blogspot.com/2007/10/swedish-crisp-bread-with-sunflower.html
She actually has two recipes, one with honey.
For years I have been baking 80% hydration baguette. While this type of bread has a very open crumb structure one has to realize that the texture of baguette in France is very different. Recently I have been searching the internet in order to find a more authentic french baguette recipe.
I was successful and found a recipe “Baguette de tradition française sur poolish” from the INBP(Institut National de la Boulangerie Pâtisserie) website.
This baguette has a hydration of 65% and is actually really easy to make and has a surprisingly open crumb structure. The crust and crumb of the bread is the closest to the real baguette that I have had many many times in France.
The link to the recipe: http://www.cannelle.com/RECETTES/boulangerie/tradipool/tradipool.html
I used Bing(right click and select”Translate with Bing”) to translate the recipe into English.
Bake the baguette on a pizza stone to get the expected oven spring and open crumb structure. Baking the baguette on a baking sheet won’t work.
Cheers and happy baking.
Just a couple of points that I forgot to mention in my post.
I have tried many types of yeast throughout the years, fresh yeast is by far the best. However because I don’t bake every day which makes keeping a big block of fresh yeast in my fridge not very practical. OK so I am back to dried yeast. I found the “Fleischmann’s Traditional yeast” to be the closest thing to fresh yeast in terms of color, taste and texture of the resulting bread. I did not like the bread when using fast rising/instant yeast.
One thing I do is that I use about twice as much yeast as the recipe calls for in the final dough about 1% in terms of bakers percentage. This is because my kitchen is a bit on the cool side and because I have to use dried yeast and not fresh yeast as french bakers do. Just to say that getting the amount of yeast right depends on local condition and one might have to experiment a bit.
Another component that is critical is the flour. I used white all purpose from “Baker’s Hood” and was surprised how good the bread came out. I tried the bread also with about 10% whole wheat flour but the resulting bread was entirely different and I went back to using 100% white flour.
Just one more thing. The recipe calls for resting the divided dough pieces for 30 minutes before shaping the final baguettes. Don’t cut that resting period short! This 30 minute period allows the dough to really relax which makes shaping the baguettes much easier and maintains the desired open crumb structure of the final loaf.
Cheers and happy baking
Hello,
Thank you very much for your contribution. We recognize what you are saying. We will check out the recipe for sure!
Marieke
Hallo Marieke
I’ve been making baguettes with a poolish from the day before for some time but have only recently discovered the stretch and f0ld method. I was really turned on by your demo video so I tried it out and I was very impressed by the result. So much so that I’ve decided to try your recipe too. The thing that bothers me about it though, is that you mix the poolish with cold water, put it in the fridge over night and complete the dough the next day again with cold water. I start the poolish with warm water, leave it at room temperature over night to ferment and complete the dough the next day again with warm water. Have I understood you right with the cold water because it’s hard for me to believe that you can get a good rise that way when the dogh is kept so cold?
Colin
Hi Colin,
Yes, the recipe is correct. I know it is a little different with everything being cold, but the amount of yeast and the time for resting and proofing in the recipe is tuned to that. You should just give it a try and see if and how it works for you.
Happy baking!
Marieke
Well I tried your recipe and it came out fantastic – what a revelation! The only thing was, was that my dough at the end was wetter than yours looked in your video although I measured everything exactly. It made it more difficult to move the formed baguettes onto the board prior to putting them in the oven. Maybe my flour is different to yours or something like that. Anyway they were the best baguettes I’ve ever made so thanks for sharing!
Bye, Colin
That is so great Colin,
And different types and brands of flour, and even different batches of flour can act differently and absorb more or less water. So next time, with a little adjusting it will be even more perfect!
Pingback: French baguette – high hydration bread » Carl Legge
Do you recommend steaming or spraying the oven when introducing the baguettes? Also, do you leave the bread in with the oven door open for 5 min at end of bake as some authors recommend? I can’t wait to try this recipe…
Hello Jack,
Yes we spray our oven walls with water, but you have to be careful and know if your particular oven will not be damaged by doing this! If in doubt it is better to create steam by using a tray like we suggest in the recipe. We also put our oven door ajar the last 5 to 7 minutes of the baking process to make sure all steam is released again.
Hope the recipe will turn out great for you!
Happy baking,
Marieke
Im pretty new to the baking scene(i just figured out what crumb is and landed here). Why do you recommend releasing the steam? Also is a large tray of water on the bottom rack good enough for steam production during the baking process? Im planning on bringing it up to boil on the stove then into the over and give it a few minutes to come back up to temp. Once i see the water boiling i know i can start baking yeah?
Hello Chris,
Exiting to begin your bread baking journey, lots to discover and learn. We can recommend getting your hands on a good bread book like ‘Bread’ by Jeffrey Hamelman.
Steam is used to allow the dough to expand at the beginning of the baking process (oven spring). It is released at a later stage to allow the crust to form, retaining moisture would mean the crust stays soft.
The method you describe is partly right but you have to make sure your bread is in the oven together with the steam and closing the oven door very quickly to make sure the steam stays in. I understand you want to bring it to boil and then open the oven to put the bread in. This way you would lose a lot of the steam again. Best is to have the tray in the oven, put bread in the oven, poor the hot water on the tray and quickly close the door so the steam is trapped. You can also try putting (sauna) stones in the tray in your oven on which to poor the water. The hot stones will create a lot of steam. Another option is to spray the oven walls with water but you have to make absolutely sure your oven is not damaged by doing this (electronics, oven window, ceramic walls can all damage from water or sudden temperature shock , the simpler your oven, the less stuff can get damaged).
Hope this information is helpful to you.
Happy baking!
Following your email to me in June, I have bought a Rofco B30 with the steamers. The baguettes as your recipe was one of the first breads to try. Great result, thanks very much.
Hi Andy,
So great to hear about your results. Very glad you are off to a flying baking start!
Many happy baking days with your Rofco!
Ed & Marieke
Hi,
I gotta tell y’all. I love this recipe! Perfect instructions and pictures. Prior to this I never made a high hydration dough and the first time results were delicious. Made it again today and turned it into a sage, provolone, and black pepper focaccia. I still have more in the refrigerator for tomorrow.
Thanks again,
John
Hello John,
Thank you so much! And we are very much inspired by your sage, provolone, and black pepper combination!
We have recently been experimenting with a focaccia based on a wet ciabatta dough and it turned out great.
Happy baking,
Ed and Marieke
Marieke & Ed,
Hallo! Had too many things on my mind & so made the silly mistake of not reading the instructions completely. I’m used to making ‘poolish’ with warm water so warmed my water up. Then I read the instruction to use cold water….I keep my flour in the freezer so I’m hoping it cooled the water down. We’ll see, I guess! I’ll keep you posted.
For future reference, why cold water?
Thanks!
Nicole
ps. Quite fond of your site, glad it exists!
Hi Nicole,
)
Thanks for the fondness
The temperature of the water has to do with the timing of the recipe. If you use warmer water for example, you can place the poolish immediately in the fridge, without leaving it at room temp for an hour. There are more ways than one to tackle a recipe and you can play with times and temperatures but you have to remember that there is a balance to everything. This recipe works and has the final result in taste and texture because of the way it is made. Changing it can give different results, although they do not have to be bad. We went through. lot of iterations to develop this recipe, together with our baking friend Akiko, who also tried many different versions. This recipe is the end result of those efforts and the one we liked most, no surprise of course.
Good luck with the baking and Happy New Year!
Hello,
First, thank you for posting such a great recipe, I really like the results you’re getting. I have a question: what temperature is your “room temperature”?
Thanks!
Hello Jean-Sebastien,
Room temperature can usually be read as anything between 20 ºC /68 ºF and 22 ºC /71.6 ºF. The temperature of the room we use most for our poolishes and preferments is about that temperature most of the year.
Maybe you’ve already seen our tips on dough temperature but if not, you can find them here: http://www.weekendbakery.com/posts/a-few-tips-on-dough-temperature/
Happy baking and happy new year!
Thank you.
Happy new year to yourselves,
What a delicious bread! Great instructions, easy to follow and many good pictures to show the way!
Just a question from a beginner-breadbaker: How should i store my bread once it’s cooled from the oven?
Regards from Sweden!
Hello Oskar,
Thank you so much!
I think you will agree you should always try and eat some of it fresh of course, no surprise there.
We like to store our bread in the freezer as soon as it is cooled, because we found that this is the best way to keep it as close to fresh as possible. From the freezer it is best to consume the bread within a few weeks. We have found that defrosting it in the micro wave, very short time on high wattage, works best for us.
If you do not store it in the freezer, some bread, like the pain rustique type of loaf, will be very edible for a couple of days, stored in a bread bin or a (paper) bag. We also make toasties with older baguette halves in a big toaster type thingy, it works great. Do NOT put bread in the fridge, it will dry out very quickly that way.
You can also revive stale bread by dipping it in water and baking it at 175ºC / 350ºF degrees for 7-10 minutes. You can do this only ones, because your bread will still dry out from this exercise.
Just try out different things and see what suits you. It can be different methods for different types of bread.
Once your bread is stale you can still do nice things with it. See our tips: http://www.weekendbakery.com/posts/stale-bread-do-not-throw-it-away/
Happy Baking and Eating,
Marieke & Ed
Hi!
Very nice video and cute song.
Question for the “Poolish”, after the hour of rest is it possible to use it immediately? and can I not put in the fridge to rest?
Happy New Year.
Jasmine
Hello Jasmine,
Thank you very much.
We would not advise to do that. First of all the poolish has to slowly ferment to develop taste, this takes some time and will certainly not be done in an hour. Secondly the fridge is used to assure the slow fermentation, so not putting it in the fridge will again defeat the object. If you are going to change the temperature (by using dough that is not fridge cold but room temp) to begin with, you have to change times and amounts of yeast as well. This is possible, but the end result will also be different.
Good luck with the baking and have a nice weekend,
Marieke & Ed
Pingback: Feria: Baguettes | Artisan's Culture
Hello my European friends!
I have made your baguettes and posted about them on my baking blog:
http://artisansculture.wordpress.com/2012/02/20/baguettes/
Thanks for the hard work you put into making this recipe. I’m extremely excited to taste them (so is the Bible class I am making them for!).
Russ
Hello Russell,
Thank you for your kind words. Just now read your post and saw your pictures. How wonderful and very entertaining, especially the bit about the amount of ‘down time’ you get with this recipe. Very recognizable.
Not such a daunting prospect if the bread you are eating the coming period is this great.
Keep up the good baking
Marieke & Ed
Is it possible to break up the steps in midst of all the folding by refrigerating it at some point overnight and picking back up for the last fold or two the next day? I’m a passionate baker, but its difficult to find this long chunk of time for a bread I’d love to try.
Hi Chris,
Yes, that is possible but you have to take into consideration that the 4 hours you are busy with the dough it is also warming up, if you put it back in the fridge again it has to warm up again for the final proofing (cool dough will not rise) so in the end you will probably need more time to get the job done. I think for the result it would be better if you could stick to the recipe, but if that is not possible, I suggest you take your brake and finish the following day. I hope the result will be great anyway.
Happy baking,
Marieke
Well, I tried it – except I replaced the poolish with a sourdough starter of the same hydration and I adjusted the times a bit because of it. I’ve been baking for about 6 years and this was the most ‘satisfying’ dough to work with. It just really feels like you’re accomplishing something. Very tasty – one of the top 3 lean breads I’ve made. Picture here: http://a3.sphotos.ak.fbcdn.net/hphotos-ak-ash4/429325_285525268180115_100001679334236_671790_591897943_n.jpg
Hi Chris,
That is a quick and very satisfying result!
Thanks for showing us the great result in the pic, lovely crumb.
Very good to learn from you that with your alterations you still get that tasty baguette!
Have a great Sunday,
Marieke
Pingback: Bagette recipie | Kerilaborntera
Pingback: Tired of Compositing? « Corner 3d
Thank you so much for this recipe! It is amazing! I still can improve my baguette-forming technique, but you guys helped me out a lot. I have entered the land of big holes and crunchy crusts!
Thanks,
Benjamin
Hi Benjamin,
Very pleased to hear it! Once you’ve entered that wonderful place, there is no turning back!
Happy baking!
Marieke & Ed
Hi,
(
I would like to ask if I can use T65 flour in this recipe? or maybe I will mix T55 and T65? If ever, should I use 50%/50%? Since I live here in France I am confused with the the type of flour you use in all your recipes…
Thank you so much!
Hi Again,
Just answered your question on the flour and the pain rustique recipe.
In addition we like the type 65 / wheat flour also for this baguette recipe because it gives more taste (and it also is a little bit healthier).
Wishing you may happy baking days in France,
Marieke
Hello,
In the ingredients for the poolish, is it possible to substitute the instant yeast for levain?
Roberto von
Hi Roberto,
Yes, if you only switch yeast for sourdough (suggest 30 g) in the ‘poolish’ and use yeast in the final dough the recipe will probably work as described and you still have the added sour back note of the sourdough. We have not done this ourselves with this recipe, but others have with good result so we are told.
Hope it works out great,
Marieke
Is there anyway you can make the dough and save half to bake the next day? I just don’t need 4 baguette at a time.
Thank you for the amazing demo in your video.
Tamanna
Thanks Tamanna,
We would suggest you make half of the recipe or make two baguettes and one (small) loaf with the other half, like we did here: http://www.weekendbakery.com/posts/birth-of-the-bb-loaf/
Happy baking and good luck with it,
Marieke & Ed
Hi,
Just thought I’d mention that I found your website yesterday, having been searching for better baguette recipes having previously been disappointed with results from recipes in books etc. I have to say this has been a revelation today, I’ve had great fun, made a mess of my kitchen but produced 2 of the most successful baguettes ever! I was amazed how well they’ve come out (ok, the slashes didn’t work brilliantly – must try harder next time) and I’m sure it will get even better with practice.
I can’t wait to try the other recipes from your website now!
Hello Paul,
We are very delighted with your enthusiasm and great result! And as far for the slashing it is also a matter of practice, practice, practice. Maybe these tips can help you too: http://www.weekendbakery.com/posts/bread-scoring-with-confidence/
And may we suggest our ‘pain rustique’ recipe, it is our staple bread we make it every week (doing little variations with spelt and whole wheat and rye) and, judging by the reactions, the recipe seems to be working for many other home bakers: http://www.weekendbakery.com/posts/our-version-of-a-pain-rustique/
Thanks again and happy baking!
Ed & Marieke
Pingback: Bread!?! Yup. | Musings of a Summer
Hi Marieke and Ed
As I mentioned in another post, I’m making baguettes tomorrow for the first time (Poolish is now sitting in the fridge). I am thinking of just using parchment paper in place of the proofing couch for my baguettes, is that advisable? I really don’t have anything else other than tea towels. I might also cut strips from cardboard and slide it in between the parchment paper folds to help it hold its shape better.
Also, what’s the best way to keep the baked baguettes? I doubt I can finish two sticks in a day!
Our ‘leftover’ baguettes go into the freezer the same day, or basically within a few hours. Some we cut in half before freezing because we make baguette toasties with them under our big toasty maker / grill thingy. For us it works best to put the bread in the microwave and give it a quick blast on high wattage, it comes out slightly warm and some moisture evaporates but after that it is rather perfect to eat. You can only do this with higher hydration dough that can take loosing some water otherwise your bread would dry out too much. Just try what works for you.
We are of the fresh loaf school, some people say (esp. sourdough) only bread gets better one or two days after baking but we do not agree with this ourselves. And baguettes will never get better just lying around. You can always give it a bit of a kick putting it in a warm oven for 5 minutes.
Last resort is turning stale bread into something else: http://www.weekendbakery.com/posts/stale-bread-do-not-throw-it-away/
Stale baguettes make great dumplings believe it or not…
YOUR 8O% IS THE BOMB. CANT GO WRONG
I LOVE SLOSHING THAT WET DOUGH AROUND
THE SMELL — THE TASTE. YOUSA!!!!
Hi Jim,
Thanks, we hear you man! Great word ‘sloshing’…
Happy Baking,
Ed & Marieke
Pingback: Why stretch and fold vs traditional kneading of bread dough? | Q&A System
Goededag!
I have been having trouble making this baguette have enough texture and holes on the inside. I want my baguette to be very porous (like in your pictures and videos), but at the moment I have a bread that feels like it has been squished together, making it extremely dense. Also, I have noticed that the bottoms of my baguettes are extremely tough and “chewy”, thus very hard to cut even with a serrated knife. I assumed the problem for all of this was that I didn’t bake it long enough, as the outside of the baguette is very white (not brown like in your pictures), only a shade tanner than the flour. Should I now proceed to raising my oven heat? or leaving the loaves in longer? Other suggestions would help!
Dank u zeer!!!
Hello Luke,
Well, a number of things could be going a bit wrong here. First of all we would recommend trying a different brand of flour (high quality organic stone ground bread flour would be best if you can find it).
About your oven: Are you sure the temperature on your dial is the real temperature? See these tips to help you further with this subject: http://www.weekendbakery.com/posts/bread-baking-tips-making-the-most-of-your-oven/
Trying to create steam is important for you too.
And last but not least take a closer look at the proofing of your dough. Your words indicate either under-proofing or extreme over-proofing (bread collapsed on itself). See these tips to help you :
http://www.weekendbakery.com/posts/a-few-tips-on-dough-temperature/
http://www.weekendbakery.com/posts/the-myth-of-double-in-size/
Good luck with the baguette baking!
Ed & Marieke
I made this bread for the first time today. Thanks so much for the extraordinarily thorough and helpful instructions, photographs, and video. The time table at the end is surprisingly helpful in keeping up with where you are in the process. I never could have done it without all that help – I wouldn’t even have tried – but WITH that help it went a lot more smoothly than I expected it to. You do that better than anybody else in the world, as far as I know (better than Jeffrey Hamelman, anyway – I can’t get anything at all from his videos; he seems to assume only professional bakers watch them, and he does stuff too fast with too little description of what he’s doing).
I followed your instructions EXACTLY, like a good robot, even setting the temperature in my kitchen to match yours. The only time I ran into a problem was in pre-shaping the dough rolls and then forming them into baguettes. I couldn’t get the dough to roll up as nicely as you do – one third, then two more, with the dough doing exactly what you tell it to do – but the bread turned out okay anyway. Even the scoring went okay.
The bread looks great, but the taste surprised me. It’s sweet. I used exactly the same ingredients I’ve been using for the past several months to make King Arthur Flour’s Classic Baguettes recipe (http://www.kingarthurflour.com/recipes/classic-baguettes-and-stuffed-baguettes-recipe): their bread flour, salt and instant yeast from the supermarket, and my tap water that comes from Lake Ontario. This 80% hydration recipe makes a much better looking baguette than the KAF recipe, so I expected it to taste better too, but it doesn’t: I don’t like the sweetness.
Besides the extra water and the different way the dough is handled, the main difference between the two recipes seems to be the way the poolish is made: the time is roughly the same, and the ingredient ratios are even very close, but theirs stays at room temperature while yours goes in the refrigerator. The hydration of the poolish is close to the same, with a pretty stiff dough-like mass to start with (the KAF recipe adds much less water to the final dough).
The KAF recipe specifies 14 hours for the poolish, but I’ve had consistent results with anything from 12 to 20 hours. For this recipe, I left it in the fridge for a little over 16 hours, within the 10-17 hours you call for but near the top end. I’m wondering if the sweetness developed during that phase, and if maybe cutting the time back to 10 hours would eliminate the sweetness. (The poolish was at 37°F when I took it out this morning, if that tells you anything; you don’t say how cold your fridge is, so the good robot had to make do with what he had.)
I did notice a dramatic difference in the appearance and texture of the poolish, by the way. The KAF poolish is bubbly and stringy but fluid, and it roughly triples in size overnight; the poolish I had today had hardly any bubbles in it, was about the same size it was when I mixed it up last night, and the texture was like rubber, or like a huge wad of chewing gum. I’d never seen anything like it – it really did remind me of documentaries about rubber production in tropical jungles, and thought I’d NEVER get the additional flour and even the water mixed into it. In fact, I didn’t, but the stretching and folding seems to have done it. Is that normal, for the poolish to be so… I don’t know what word to use except rubbery, and that really isn’t much of an exaggeration.
If sweetness is a known characteristic of this recipe, I don’t think I’ll bother trying it again, but if you think I just let the poolish ripen too long (or if my fridge is at the wrong temperature) I’ll give it another try. I made that KAF recipe 32 times before I got it so it’s just about perfect for me, so I figured this was a good time to try something different. I’m not sure I’ll try this recipe that many times, especially if it comes out sweet again the next time, because I really do love the taste of the KAF baguette and can almost make it in my sleep now.
This recipe is really no harder or more time-consuming than the KAF recipe, it’s just a different technique, and I’m sure it’d get to be as easy as the KAF recipe is for me now. If I can end up with a baguette that looks like what this recipe gave me but tastes like what the KAF recipe gives me, I’ll have the best from both sides of the Atlantic, but if I have to choose between a great tasting baguette with tiny holes and a sweet baguette with dramatic holes, I’ll choose tiny holes. I’m making this bread just for myself, and I care a lot more about taste than looks.
Hello Jim,
Thank you very much for your kind words and elaborate analyses. It makes for very interesting reading.
When we make this recipe ourselves it turns out with a sweet note, but we would not call it overly sweet and it also has a more complex taste than that. We do like the difference in taste between the different breads we make, some with a more sour back note, others more sweet or nutty. But we talked about it together and we think we can understand what you mean and if you give it another try exactly like you did, you might very likely end up with the (too) sweet result again. So it is good you already have a recipe that you made completely your own and very much to your liking. We do have one suggestion for a slight modification and another recipe. We also made this recipe and our alternative baguette recipe (find it here: http://www.weekendbakery.com/posts/our-easy-french-baguette-recipe/) and added a small scoop of our rye sourdough to the poolish (2 g per baguette) and we also liked this result very much. The baguettes had just that little bit of extra ‘kick’. But we have to add that it was very subtle, eating the baguette with cheese it would be harder to discern of course. With the alternative baguette the poolish does also not go in the fridge, so maybe you could give that one a try (maybe with some sourdough added) and the taste would be more to your liking.
Thank you very much again and wishing you many wonderful baguettes,
Ed & Marieke
Ed and Marieke,
Thanks for the fast and very helpful reply. It really is only a slight sweetness, so slight that most people might not even notice it, but for some reason I’m overly sensitive to it. And there are other complex flavors that I can’t describe besides the slight sweetness, but the overall effect just doesn’t appeal to me.
I think I don’t like complex flavors in bread, which may be one reason I don’t like sourdough bread in any form. I like a simple, toasty wheat flavor, and that’s all. I had thought about trying your other baguette recipe, but since its flavor isn’t a lot different from this recipe I guess I’ll stay with the KAF recipe.
I’m going to try your Sticky Cinnamon Buns next. My mouth starts watering every time I look at that picture, and it’ll be nice to try something that takes less than 24 hours to make for a change. I got into baking less than six months ago entirely by accident and actually against my will, but now I love it so much I do it almost every day. The process is so much fun that if the result is good at all that’s just a bonus.
This really is not only an extraordinarily helpful website, but it’s beautiful. The photography, the layout, everything about it is lovely to look at and an unusually pleasant overall experience. I was trying to remember last night how I got here the first time, but I couldn’t remember. I’m very glad I did, though. It’s a real treat in many ways. You two are very gifted and very generous to share your gifts with us.
Thanks for all of it.
Jim
Thank you Jim, for your very kind words about our website and for your honest and very much appreciated comment. It encourages us even more to keep on sharing our recipes and tips and many other ideas we have (but not always have to time for I must say).
And I guess that’s another thing that makes home baking so rewarding, you can make something completely to your own liking, ‘made to measure’.
Hope the cinnamon buns will be to your liking.
Have a lovely Sunday,
Marieke
Hi,
What an amazing bread! The first time i made it, i was terrified, honestly. I had never worked with such a wet dough, and throughout the whole process, i kept thinking that it would be just about the worst bread i had ever made, because the S&F’s was close to being impossible for me. But when it got out of the oven… Oh my god. I would say it is the best bread i have ever baked.
But, during the process, i came up with a new technique for doing the S&F, and i would like to hear your opinion about it. Instead of doing the S&F on a table (i only have a wooden table, which is kind of hard to work with a very wet dough at), i would just let the dough stay in the bowl, and then do the S&F in the bowl, which makes it a lot easier. But, by doing this I am also afraid that i would prevent the dough from getting all the air inside of it. What do you think?
Best regards, Joachim.
Hi Joachim,
Great to hear it turned out so well, that is amazing when making a recipe for the first time. And your technique is perfectly OK. In fact bakers do this all the time, otherwise they would have to lift large quantities of dough, which is heavy work, it is much easier to leave it in the box. The reason we did not do that is of course that our piece of dough is not that heavy and we have a good worktop and it also (in the clip) gives a better view on the S&F itself.
So, just keep doing what you do because it is clearly working!
Have a great Sunday,
Ed & Marieke
Hello,
Thank you for this recipe and video, the tutorial is so thorough I enjoyed it very much and is certainly the best I have so far found online.
I have a white/rye sourdough starter that’s around 6 months old. I substituted the poolish yeast with 30g of the starter, as you previously suggested to another poster, and left the poolish at room temp (18c in Yorkshire, UK) for an hour before I went ahead and followed your recipe. I simply couldn’t wait a day for a poolish, so I chanced it!
I should mention that I don’t have much in the way of equipment, so I improvised my way through (scraper = plastic chopping board, etc) and that I’m only a novice baker, so I may well have made mistakes along the way that hindered the outcome.
Also, I may have missed it, but I didn’t see how hot to set the oven, so it went on full blast (250c) as I would with any other bread.
The results were very… interesting, but edible nonetheless! There wasn’t a great deal of rise, and the crumb had the density associated with SD, though very little of the sour note. There was also nothing like the coverage of large bubbles in the crumb I was hoping for. The odd one or two aside, it was filled with little bubbles.
All in all, I wasn’t convinced with the SD, so I would recommend to anyone thinking of using one to think again. Just make a long, thin pain de campagne instead!
Many thanks again, I’ll do the recipe with the poolish from now on.
Hello Thomas,
Thanks for your comment and sharing your baking experiences with us. The recipe says the temp should be 240C. More important, replacing yeast with sourdough is something you can do, but you would have to adjust the recipe and allow for more time to give the dough the chance to develop properly. You cannot just replace and stick to this recipe without the result at least being different and probably not so good I am afraid. It is no problem wanting to change a recipe, but in order to know what you are doing and where you are coming from, we would suggest (unless you have a problem with using yeast of course) to at least once make the recipe as it is presented to you. The recipe is the result of many baking sessions and you must not give up after making something once, but just practice and stick with it for a while. At least that is the way we both learn a lot. On the other hand, it is great, even though you maybe strayed a bit and your oven may have been too hot, you got an acceptable piece of bread out of it, that you could enjoy anyway, so that is good and something to build on. Way more satisfying than buying we guess and hope.
Hope you will keep on baking and let us know about your other results!
Ed & Marieke
Hello
Thank you for the great video and the recipe. I have the convection oven what temperature should I bake at? Do I use 465 F. Thank you.
Hello Mylinh,
Thank you very much! I would set the temperature at 440F and keep the baking time about the same as mentioned in the recipe (25 minutes). I can also recommend reading our tips about making the most of your oven for bread baking: http://www.weekendbakery.com/posts/bread-baking-tips-making-the-most-of-your-oven/
Good luck with the baking!
Marieke
Hi Ed and Marieke
I’m going to try this recipe of yours tomorrow. Just wondering if I should leave the dough to rest in my room or leave it in my cold kitchen during the 45 minute rest period? Does the rest period serve solely to allow the gluten to relax or is it intended to get some fermentation going on as well?
Hope to hear from you soon!
Regards
Adrian
Dear Ed and Marieke
I’m sorry to be a pain again. I just tried this recipe today and somehow my dough was super sticky and could hardly hold its shape when I finished the last turn. It was certainly very stretchy but just floppy somehow. I’m not sure if this was due to over-proofing. My dough did sort of double in volume when I rested it for 45 minutes in between the folds. The crumbs did not have any distinct holes like what you’ve got in your picture but there are lots of mini holes interspersed throughout. I could send you a picture if that helps.
The thing that worried me the most was the fact that my dough never became as smooth as the one shown in your video and it remained really sticky throughout. I could only get hold of the generic supermarket bread flour in the UK and it contains 13+% protein. Also the scoring was near impossible perhaps partly due to my blunt knife (I didn’t have a razor blade nor scalpel) and the knife was literally dragging along the surface bringing the dough with it.
Looking on the bright side the bread still tasted great with a bit of butter and I’ll have a baguette sandwich with brie and Italian ham for dinner tonight. Can’t wait!
Hi Adrian,
First advice: buy flour from a mill, go back to 70% water to get a feel for the recipe and easier handling of the dough, get a hold of a sharp scoring tool, breath in and out and give it a few more tries. Practice makes perfect and like you said, in the mean time, you are still eating very tasty bread
).
Off to celebrate old and new as we say over here.
Have a great evening and good start of the New Year!!!
Ed & Marieke
Happy belated New Year to both of you Ed and Marieke! I tried making the 80% hydration baguettes again today and it went so well until I was about to shove them into the oven. I realised that the transfer board was too large for my oven so I tried to pull the baguettes into the oven from within. Ended up burning my arm against the 250C heating element and dropped the baguettes on the floor.
Luckily no one was around me when that happened or else I’d have had to dial 999 because I was absolutely furious at the time. Anyway I’m determined to get it right this weekend so my new poolish is now brewing nicely in the corner of my room. I’ll make sure I don’t use an oversized transfer board this time. Lesson learned. The painful way.
Adrian
Sorry Adrian, a painful experience with the small consolation that it happens to every baker at some point.
Ed made his best looking baguettes only to find out after tasting that he forgot the salt. A friend recently got a very nasty burn from the oven light while in a hurry baking croissants. Baker’s tattoos…
But the good news is we just saw you picked yourself up and baked again and had fantastic results! Congratulations!
What a wonderful web site!…Thank you for all the time that you have put into such an inspirational resource.
Only one question…When are you going to write a book? The quality of the information here and your writing style are much better than many existing, successful, already published books.
Have a great weekend
John
Help needed….
Hi Marieke & Ed,
I really, really love this baguette! It’s easy, tasty and we love bread with a crunchy crumb and big holes inside!
Just good olive oil for dipping, some French and Italian cheese and wine, our weekly Friday evening!
But now to the ‘help’ part…. I made the poolish yesterday at 23.00 hours, but unfortunately I cannot make my bread today.
And I don’t wanna throw it away! Can I make my baguettes tomorrow??? And what do I have to change? Less yeast or resting time?
Groetjes Nathalie
Hi Nathalie,
You can just leave the poolish in the fridge and make your baguettes tomorrow. You do not have to change anything, it should still be fine. If necessary you can add some extra flour to compensate for the little bit more weakened structure of the poolish. The longer you wait, the more the structure in the poolish will be weakened, but one more day will very likely not be a problem.
Groetjes & Happy Baking
Ed & Marieke
Hi Ed and Marieke,
Thanks a lot for your replay, I couldn’t bake on Friday, but everything changed this weekend (sometimes that happens…). So I couldn’t bake at all!
Now I’m gonna try it, as a test, if it’s still as delicious as before after staying in the fridge since Friday evening!
If necessary I will ad some extra flour.
The poolish still smells good, lots of bubbles, but the volume isn’t that much as it was.
Keep you posted!
Groetjes Nathalie
It worked!!! The baguettes turned out great!
I only added 30 gram extra flour, the structure of the dough was a bit ‘softer’ so I did a little extra stretch and fold.
So now we’re eating the bread with home made rocket pesto and mini pizza’s.
Have a nice evening!
Nathalie
Hi Nathalie,
Very good to hear it still worked after this longer period of time, but it also sounds like you did exactly the right amount of tweaking (added flour some extra S&F) to get it just right. And rocket pesto and pizza…what’s not to like!
Marieke
Just tried this recipe too, using all parameters provided
Unfortunately, after all the waits and folds, the dough is still very liquid and shapeless.
I feel it’s increasing strength, but it doesn’t keep a shape.
Less water I suppose?
Would this mean that using this flour, it’s technically impossible to create a 80% hydration dough?
How to best “correct” such a dough?
Just wait and fold some extra 45mins?
Thanks
Hi Geert,
Starting with less water (try this 75% version maybe: http://www.weekendbakery.com/posts/our-easy-french-baguette-recipe/) would be a good idea and build from there. But flour could be the source of the problem. Do you know the protein content of the flour you use?
Ed
Pingback: To Bake List | Lemons & Vanilla
Pingback: Why stretch and fold vs traditional kneading of bread dough? | Question and Answer
Hi my name Maggie I am trying to use your recipe for baguettes 80% hydration but my scales are not working. Can you give me ingredient quantities by volume instead of weight? Either millilitres or cups/spoons would be great. Thank you.
Hello Maggie,
Yes, I converted it for you as follows:
Ingredients for the Poolish
3 cups bread flour
304 ml water
1 teaspoon instant yeast
Ingredients for the final dough
The poolish
3 cups bread flour
304 ml water
2 teaspoons salt
1/2 teaspoon instant yeast
You can also check out our baking conversion page for some more conversions if needed for other recipes:
http://www.weekendbakery.com/cooking-conversions/
These converted amounts will not be as accurate as the version done with a scale but I hope it will work out fine anyway.
The video can also help you in showing how the dough is supposed to look and feel.
Happy Baking!
Marieke