

Daring to keep it simple can also produce great results…
Klik hier voor de Nederlandse versie
We started this recipe as a one-off experiment, thinking the result would not be that interesting, compared to the other bread recipes we already know and love. But the end result really surprised us. As you might expect, knowing some of our other favorite recipes, the key factors for this one are the same: time, timing and really good flour!
This recipe is the first to have a ‘dough calculator’ (see ingredients list). Other recipes will follow soon!
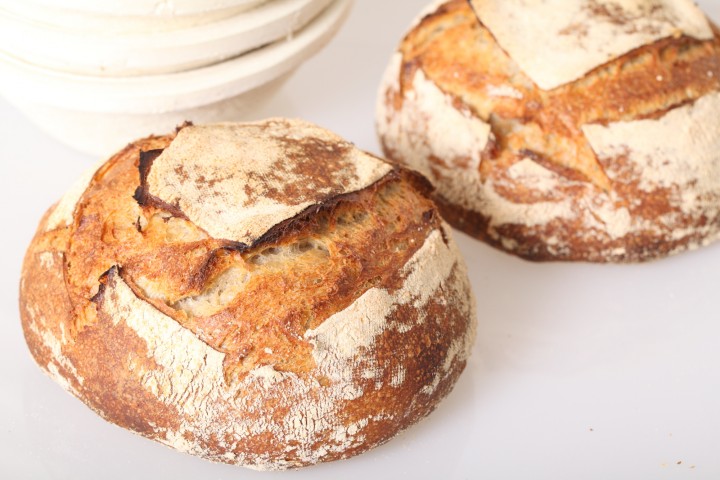
Although there does not seem to be strict definitions about French bread terminology, we simply call this bread ‘Pain Naturel’ or abbreviated PN. We chose this name because it stands for a basic yet full flavored sourdough bread, made just from ‘white’ bread flour. Using our own sourdough culture we found the bread gets a pleasant hint of sourness, which combines very well with the sweet flavor of the flour we use.
And especially because this bread is made with ‘white flour’ only, it is important to get the best quality, organic, stone ground flour you can get your hands on. When you do, we truly believe you will be rewarded with amazing taste and depth of flavor, better crumb structure and the crustiest of crusts.
Enjoy the recipe and let us know what you think. Also check out our handy sourdough tips to get the most out of your sourdough baking!
Before you start

For this recipe we are going to make a starter named a poolish. A poolish is a type of wet sponge usually made with an equal weight of water and flour and a small amount of sourdough starter culture or yeast and NO salt. Making a poolish helps bring more taste and strength to your bread.
We use a sourdough culture which is made with 100% whole grain rye flour. A sourdough culture based on rye flour is easier to maintain, does not go into a slurry when you forget about it, is easier to stir because it has almost no gluten and smells very nice, a bit like fruit. It is also very forgiving in the amount you feed it, everything seems to be alright. Normally we only feed it once a week, after our weekend baking we give it a few table spoons of water and rye flour, stir, ready!

| Ingredients for the Poolish | ||||
|---|---|---|---|---|
| 115 | g | wheat (bread) flour | ||
| 115 | g | water (room temperature) | ||
| 15 | g | sourdough culture | ||
| Ingredients for the Pain Naturel | ||||
|---|---|---|---|---|
| makes 1 loaf | ||||
| the poolish from step 1 | ||||
| 340 | g | wheat (bread) flour | ||
| 180 | g | water | ||
| 7.5 | g | (sea) salt | ||
Making the Poolish
In a bowl stir together the 115 g flour, 115 g water at room temperature with the 15 g sourdough culture. Mix it well until you have a homogeneous slurry that looks like very thick batter. Cover the bowl with clingfilm and let the prefermenting begin. After 12 hours at room temperature it should be bubbly, light and ready for use. So if you want to begin your bread making in the morning, you should make your poolish at 9 in the evening.

Note: We use European flour which absorbs a few % less water than American type flour. People using American type of flour should add 5-15 ml water to the final dough.
Making the Pain Naturel
Put the poolish starter and flour in the mixing bowl of your standing mixer and add 2/3 of the water (do NOT add the salt yet). Now start mixing and gradually add the rest of the water and let the dough come together. Knead for only 1 minute, leave it in your mixing bowl, cover with clingfilm and rest for 20 minutes (this technique is also referred to as autolyse).
Now add the salt and knead for another 4 minutes. Transfer the dough to a greased bowl, cover and leave to rest for 50 minutes.

Ideally the temperature of your dough after mixing should be around 24-25 ºC / 75 ºF. You should adjust the temperature of the water you add, so the total dough reaches this temperature. For us this means in summer adding cold water to this recipe and in winter (when our little bakery gets much colder then the rest of our house) adding water up to 50 ºC /122 ºF. You can measure the temperature of water and dough with a food thermometer. These measurements are important because they correspond with the proving times in the recipe.
After the first 50 minutes rest take the dough out of the bowl and onto a floured work surface and do one stretch and fold (a full letter fold, left over right, right over left, bottom over top, top over bottom; watch our bread movie or our stretch and fold method video to observe this technique if you are not familiar with it). Transfer to the bowl, cover and again leave to rest for 50 minutes. Repeat the stretch and fold (full letter fold) one more time (so 2 times in total) and leave to rest for 50 minutes (so this is the third and last of your three 50 minutes resting periods). During each stretch and fold the dough should feel firmer and less wet.
Now it’s time to shape. Shaping is a tricky subject. It’s something for which everybody develops his or her own favorite technique over time. You can make a batard or loaf shape or a boule (ball) shape like you see in the pictures. If necessary you can learn more on shaping from a good bread book, like the ones by Hamelman or Reinhart, or the Tartine Bread book. Or take a look at our boule shaping video.
Preheat your oven to 230 ºC / 445 ºF conventional setting (at what stage you preheat your oven depends on how long it takes for your oven to heat through, some take 30 minutes, some, like ours, with stone floors take a lot longer, up to two hours).


Transfer the shaped dough to a proofing basket / banneton, cover and leave to proof for 2 hours and 30 minutes (provided your dough has a temperature of around 24-25 ºC / 75 ºF, also check our tips on dough temperature). When you think it has risen enough, use your finger to carefully make a very small dent in the dough. If the dent remains, the bread is ready to bake, if the indentation totally disappears, the dough needs a little bit more time.

Now your loaf is ready for the oven. Slash the top of the loaf with a lame or bread scoring tool. To get a nice crust, try to create some steam in your oven by putting a small metal baking tray on your oven floor when you preheat the oven, and pour in half a cup of hot water immediately after putting the bread in the oven. Release some steam by setting your oven door ajar (perhaps with the help of a wooden spoon or oven mitt) 5 minutes before the bread is ready. If you are going to create steam with a baking tray, you may also want to turn your oven temperature a bit higher, because you are going to lose some heat in the process.
After 45 minutes of baking your loaf should be ready. Transfer onto a rack and leave to cool. This loaf also keeps very well in the freezer. But please make sure to eat at least some of it while fresh. This bread is great with just about anything, but also very tasty on its own.

Pain Naturel Time Table
Day 1 21.00 Make starter let ferment for 12 hours at room temperature
Day 2 0.900 Make final dough
- 09:00 – Add flour and water to starter, mix for 1 minute
- 20 minutes rest (autolyse)
- 09:20 – Add salt
- Knead for 4 minutes
- Rest for 50 minutes
- 10:14 – First stretch and fold
- Rest for 50 minutes
- 11:04 – Second stretch and fold
- Rest for 50 minutes
- 11:54 – Shape
- 12:00 Final proofing 150 minutes (2.5 hours)
- 14.30 – Bake for 45 minutes at 230ºC / 445ºF
- 15:15 – Your loaf is ready!


Cristina Mihaela Parker says
Today is the second time I make this bread and it turn amazing!! Thank you for recipe and all the sid ecomments that really help me!!
Bonita vanP says
Thanks for your great recipes!!!
Is there a way to do an overnight proof in the fridge and next morning or evening bake after shaping and putting boules in proofing baskets…with this recipe?
Thanks
Paula says
Delicious!!! I followed the instructions complete with video links for greater clarity for a beginner like me. My very first sourdough turned out beautiful and absolutely delicious. Thank you for making it so easy , Merry Christmas 🙂
Liz C says
I am wondering about these wait times…12hrs for the poolish, 2.5hrs for proofing. They are basically carved in stone with no variations, such as room temp, etc. I am making this dough now, and my poolish did not look ready at 12 hrs (68-72 degree room temp) and I let it go for 15hrs. Since the information on the web regarding poolish is commercial yeast based, I’m asking if your timing is set for this poolish, or I should be looking for signs such as lots of bubbles, etc.
Snoop says
It’s for this poolish, made with the specified amount of sourdough starter. Sometimes mine takes longer due to a cooler room temperature. My kitchen is quite cool at this time of year, so 14 hours isn’t unusual for me. The instructions above say the poolish is ready when it’s “bubbly and light”.
John_E says
Hi, Is the recipe and timings for 2 loves or one?
Mike says
This makes one/single loaf
Mark Wesner says
I got stumped at step one. Do I use 15 grams of my sourdough starter to make the poolish, mixing it with 115 grams of flour and 115 grams of water or do I use 245 grams of my sourdough starter as my poolish?
Mike says
You use 15G of your starter
Keith Epstein says
I’ve tried this recipe several times, each time producing an attractive crusty loaf with good oven spring and nice crumb. I’m using excellent locally-produced white wheat flour with high protein content. The process recommended worked great for my schedule, and the dough was very easy to work with (due, in part, to the low moisture content). I made minor variations to the process, which didn’t really have any discernable effect on the final product. The taste, however, is mediocre. Just a hint of sour, but otherwise bland. I’m going to try a few more times with higher hydration and little more salt to see if I can draw out more taste. Maybe do the final proof in the fridge overnight? My regular recipe and process using the same flour and the same sourdough starter produces a much more tasty bread. I’d welcome any suggestions.
Gino says
Hello, am I reading the comments here as my first loaf is rising (2.5h) before baking and I wanted to comment here on the taste as I saw a video yesterday explaining this.
If you let sourdough rise at room temperature, it will be not very sour, just a little, like your describe. It is a great way for your first loaf however, or if you haven’t acquired the taste of sourdough yet.
If you want a more sour taste, you can play with the temperature at which you let your dough rise. Increased heat means less time rising but a more tart taste. If you let is rise overnight in the fridge, the taste will be more sour.
It has to do with the bacteria and the yeast. Lower heat means the yeast is less active, so the bacteria will develop more during the rise, creating a sour taste.
I hope this helps 🙂
happy baking!
Sandro says
Hi,
The bread I make with this recipe is always delicious! Thanks!
However I have the following problem:
After 2hour proofing and just before putting the loaf in the oven, the loaf is very, very sticky! Almost impossible to transfer into the oven!
So the shape is always a bit messy!
Any idea why this becomes so sticky?
Ps, I leave the loaf to rest under a wet towel.
Thanks for your help
Sandro
Snoop says
Do you leave it to prove in a banneton? If so, it should be a simple matter of turning the basket upside down onto your baking surface, so very little handling required. Also, don’t cover with a wet towel. A dry towel or plate resting on the edge of the banneton, not on top of the dough, would be better.
Joe says
I just wanted to thank you for your recipes. For many years now (Since 2016? maybe before) I’ve maintained a rye starter based on your instructions and baked weekly loaves of your pain naturel. Fantastic.
Wilhelmien says
Mijn eerste pain rustique gebakken, afgezien van het feit dat ik het niet voor elkaar kreeg het deeg in te snijden en dus geen mooie “scheur” kreeg is het wel goed gelukt. Nu heb ik echter een vraag over de te gebruiken desem. Ik heb een bakje zuurdesem in de koelkast staan. Voor dit recept (en ook voor andere recepten zag ik, wordt maar 15 gr. desem gebruikt. Gebruik ik dan 15 gr desem rechtstreeks uit de koelkast voor het voordeeg of moet ik dat eerst weer activeren door een kleine hoeveelheid uit de koelkast te pakken en deze weer te voeden? Maar als je maar 15 gr. nodig hebt, kun je dan 5 gr uit de koelkast halen en aanvullen 5 gr bloem en 5 gr water? Als je een grotere hoeveelheid pakt houd je steeds weer over………….. ik hoop dat iemand mij dit kan verhelderen?
Martijn says
In feite maak je met je voor deeg een nieuwe portie desem. Dus de 15 gram kan rechtstreeks uit de koelkast je voordeeg in. En als deze dan lekker warm is heb je een mooie portie actieve desem voor je brood.
Majella says
My first loaf has just come out of the oven now and, so far, looking good. I ran a bit late yesterday so for the final proof I put it in the fridge overnight (3.30pm – 5.30am – woke early). I took it out and left on the counter for hour and a half.
Just took it out after 25mins and checked after a comment below saying hers was done (mine looked done). My base sounds hollow so going to keep it out…. maybe bakes faster in fan oven?
Cooling on a rack and can’t wait to slice but I must be patient.
Ricardo says
45 min of baking at 230 is to much in my oven, after 25 min my 2 loaves were showing small edges of burning around the ear.
Not every oven is the same so watch it closely, when in doubt take out the loaf and tap it on the bottom if the sound is hollow, it is done.
Nice recipe, but had to adjust baking time.
Susan says
From researching sourdough the timing for final proofing is vital to achieve depth of flavor and tanginess (acetic acid development) 1 day up to 5 days in the refrigerator. This is worth looking into for tangy & tasty bread.
Beth says
Total disaster, something not right. Poolish looked perfect, added flour and water, so so wet, didn’t turn into a ‘dough’ after 50 min rest way too wet to pour out???
Laura Johnson says
My first attempt with 180g also turned out overly sticky. A friend of mine recommended using 160g of water instead of 180g. This worked out better for me.
Karin says
Every flour act different and some will need 180 and some will need less ir even more. There for every recipe will give you average amounts of liquid.
Fred says
Funny…I always use 190 water, slightly sticky in the beginning but comes together very nice along the way.
Did you use white flour or whole grain?
Gail Gregory says
Could you tell me, is this recipe (which I’ve had great success with! Thank you!) a low hydration dough? And do you have a recipe for an overnight proofed dough?
Mibo says
You can do the math to figure out if it is low hydration- just divide water by flour. 180 / 340 = 53 percent. So yes it is relatively low hydration.
Weekend Bakers says
Please open the dough calculator to see the calculation and total % of the recipe which is 64.8%
laura fuller says
Also, I have a proofing option on my oven. At what stage do I use that in this recipe?
Mibo says
You can use it the entire time you are resting the dough. Proofing setting just means that you can keep the environment in a warm temperature, but not too hot. That’s great you have that option, especially in the winter when it gets so cold in many of our homes!
laura fuller says
Uh, am I missing something? When time for oven, what do I put the bread in? I have a cast iron Dutch oven , yet I don’t see it mentioned here. It has a lid. Lid or,no lid. Pls explain
Mibo says
Generally speaking, heat the Dutch oven in your oven thoroughly. It takes about 30 minutes to do that. Bake with the lid ON for 25-30 minutes. Remove the lid and continue baking for 10-15 minutes. You can play around with those numbers,
Adrienne says
Hi there! I’m wondering if the culture has to be from room temperature and fed or if it can come directly from the fridge. Also, what is the setting for the stand mixer?
Thanks
Adrienne
Liz C says
You will want your starter to be bubbly and active. I would bring it to room temp because it’s going to wake up and get active. Try a spoonful in a glass of water and if it floats, it’s ready. I use #2 setting on my mixer, trying to match the speed of my hands during manual mixing. I’m an experienced beginner.
Robin Watkinson says
This recipe was recommended to me and i was really pleased with the results. Easy to follow instructions and timing. Can’t wait try others
Patricia says
I’m new to sourdough baking but Covid provided an opportunity to get started. After a few months of nurturing starter and failed loaves, I ran across this recipe. Success with the first loaf! I’m hooked! I’m in the U.S. so I needed to add extra water to the poolish. Today baking my 3rd loaf and even got a banneton. Thanks so much for this wonderful recipe!
Pat
Abe says
Hi Marieke & Ed,
Happy New Year.
I’ve been recommending this recipe as a great first sourdough for the newbie sourdough baker. I like it’s simplicity and the very well explained instructions. However they all seem to be making the same mistake. For some reason all too often they think wheat (bread) flour is whole wheat flour. Think it would be a great idea to alter it to just Bread Flour as that seems to be universal and we’ll understood.
Thank you.
Cassey says
Thanks for sharing. I have baked and I love it!
Do u have sourdough bread recipe that use other preferment, like biga and sponge for your us to try? Thanks so much.
Jo says
I would like to print this recipe. Can I do that?
Marija Atanaskovic says
Hi,
Can you retard overnight? How long should you proof before putting at 4 deg C?
And when baking can you put straight into oven, or need to bring to RT?
Thanks,
Marija.
Rebecca says
Hi, I am thinking of making this recipe; it would be my first attempt at sourdough bread. As I am just starting out, I don’t have any specialized tools. I do not have a proofing basket. What should I use instead? Thanks!
Robin says
I use a glass bowl, I have made this recipe several times and it’s easy and turns out great every time. Good luck
Bonita vanP says
I use glass bowls lined with parchment which I can then lift right into my hot Dutch oven to bake. Easy and clean removal from Dutch Oven to cooling rack as well!
Happy baking!
Linda says
Thanks so much for this step by step recipe. My bread turned out amazing!!! There is so many versions of sourdough bread on the web that it can begin to make your head spin. This recipe simplified it and by bread arose big and proud and the taste was out of this world!!!
Guillaume Richard says
I really liked Ken Forkish’s poolish recipe, it made bread that tasted very close to baguettes in France and I wanted to find out how to make poolish with sourdough, if possible.
I tried this recipe twice but there’s something i must not understand as I knead for 5 minutes, went with three fold in the first hour, let it rest, Pre shaped and shaped to keep good structure and it goes “splouch”, freesbee!
Guillaume Richard says
Water at 50C… 🤦♂️🤦♂️🤦♂️ Nit quite sure I read that part
Guillaume Richard says
No luck the third time, I’ve got the hot water, I’ve put a longer time (4h) of bulk fermentation because my starter is still young and around ~1h of proofing, the dent test show good response but still, the dough once turned (I’m going with a natural crack instead of using a grigne) show it was still too soft and once in the oven, no spring at all.
Ken Forkish decribe this recipe with one addition of .4g of instant dried yeast in the poolish and then, when mixing, add 3g ,ore of instant dried yeast so I’m wondering if there’s a missing step in your recipe 🙁
Weekend Bakers says
Hello Guillaume,
Thank you for your feedback. We think there might be something to do with the sourdough culture that is not yet up to the task and /or the type of flour you use in combination with the amount of water. We cannot be sure, but we can assure you that this recipe can be made with only the use of sourdough, no added instant yeast needed.
We do have a great hybrid version bread that might be worth a try and a good method to work with your starter culture and get good results: www.weekendbakery.com/posts…-rustique/
Hope you will keep enjoying your baking!
Guillaume Richard says
Thanks for your answer, it’s probably the sourdough culture being very young, it only started recently to rise well, with 6h of wait for the levain to double and 4h30 of bulk fermentation. I will retry this recipe later in the year 🙂
Sarah says
Amazong recipe but the parchment paper is becoming part of my bottom crust! Is it the heat? Over spritzing? Any tips for avoiding this?
Weekend Bakers says
Hello Sarah,
Maybe coat the bottom of the loaf in some (coarse) semolina for instance or other coarser flour. We never have this issue with the kind of parchment paper we use, but maybe there are different types..
Try to peel it away from the bread, keeping it close to the surface of the bread. Normally it would be possible to gently ease it off this way, unless the paper is stuck in creases in the loaf, so also look at your shaping maybe.
Claire Dungworth says
Hi, we have a bread baking setting on our oven and I put it on the recommended temp and the crust looks burnt. Any tips??
Weekend Bakers says
Hello Claire,
We would advice to temper the oven manually as soon as the crust has the desired color. It is important to bake /cook the bread for the complete duration, but the tempering can stop the radiation of the heating elements, so the browning is slowed down or (almost) stopped.
Coni says
what happens if I put the dough in my Dutch oven after scoring and start it in a cold oven? Then remove the lid after 30 min and finish baking
Weekend Bakers says
Hello Coni,
We never do this, but you should give it a try because there are many people who are enthusiastic about this cold oven method.
Hope it will be great!
Beth says
This formula is outstanding, works well in my weekend schedule and makes a just nice enough size loaf for a meal or three for my family of 4. I did have an unfortunate mishap with my 15 year old, gorgeously seasoned baking stone in between stretches 1 and 2 (insert hysterical crying emoji), so I called an audible and used the dutch oven baking method. But I look forward to trying this just as written once I replace the stone and get it seasoned a little.
Weekend Bakers says
Hi Beth,
Baking with obstacles and still a satisfying result!
Wishing you smooth baking for the next batches and enjoy the eating and sharing,
Marieke & Ed
WKB
Suja says
I baked this bread today after an overnight second proof and it’s the best loaf of sourdough I have made.
Thank you for your generosity in sharing the recipe. My timings weren’t the same as yours, but my kitchen is a few degrees colder and my options to warm things up a bit have always resulted in over proofed loaves. I will be making this again, thank you!
Weekend Bakers says
Thank you Suja, that sounds wonderful. Always better to take a bit more time like you did than to over-proof. Time is taste like we say.
Great the recipe works so well for you too!
Amy L Rundstrom says
Oh my gosh – what a GORGEOUS LOAF! I had to add a bit of flour (it was a bit runny in the beginning) but I followed the techiques and mostly the measurements to a T. This was a fantastic recipe to try for my first fully-sourdough-leavened loaf. It’s hot and crackling on the counter just waiting for it to be cool enough to cut and scarf down. Kensington Market Sourdough posted this recipe as a good one to try with their starter, and they were right!
Thank you for the wonderful recipe.
Weekend Bakers says
Thank you Amy,
How wonderful and excellent our recipe worked so well for you too.
Glad we could be part of your sourdough baking success.
Enjoy the baking and sharing!
Emily says
Tried this recipe for my second ever sourdough loaf! Quite yummy and very simple recipe to follow! I do have a question though, I used whole wheat flour in my poolish and the dough, when I cut into the loaf the bread was very dense with little to no air holes like sourdough would normally have. I followed everything in the recipe just wasn’t sure if maybe I’m using the wrong type of flour. Any suggestions?
Looking forward to practicing this recipe a few more times to perfect it!
Weekend Bakers says
Hello Emily,
Thank you for your comment and kind words. You already answered your own question. The recipe states to use bread flour and you used whole wheat for the poolish (do not know why?) so this (in part) can explain your result. Use strong bread flour for everything in this recipe and also make sure you proof the dough to perfection at the right temperature like we indicate.
Enjoy the process and the bread!
Jeff Howerton says
I believe it is because you stipulated Wheat (Bread Flour). I think we have an issue of two countries separated by a common language. Had you simply said bread flour, all would have been well. When we hear wheat, we think whole grain, which would result in a dense loaf. This is an “us” thing, not a you thing.
I’m just about to bake my first loaf, and I could tell from the pictures , this was not whole wheat. I’ll let you know how it works.
John says
I would like to ask a question about the correct banneton size for this recipe. I am new to bannetons but not to baking bread. I have made this recipe about a dozen times to get a feel for sourdough. I have been using 9.5 by 3.5 inch round banneton and wonder if this size is too large for this recipe. During the 2.5 hour rising time the loaf will rise by one ring of the banneton only. This leaves a whole lot of space in the banneton between the bottom of the loaf and the top of the banneton. I am hoping that your answer will help me to troubleshoot my process, is that amount of rise is normal, or if I should be using a smaller banneton and if so what size. Thanks in advance!
Weekend Bakers says
Hello John,
We would use a basket that has a diameter of between 7.5 and 8 inches, the height is less important, but somewhere between 3.1 and 3.5 inches is sort of standard. So for the right shape and size corresponding with the amount of dough per loaf in this recipe, we would definitely advise using a smaller basket. We would advice 8.6 inches for 1 kg dough and 9.5 for 1.3 to 1.5 kg of dough, depending on the recipe and flour used, but definitely for this recipe.
Enjoy your baking!
Heidi Kostrey says
This is probably a dumb question, but when should the starter be fed prior to making the poolish?
Weekend Bakers says
You always best get it out one day in advance to get to room temperature. If it has been left in the fridge for over a week you need to refresh it first so it will be ready and active the following day to use in the poolish. If shorter than a week, you can use it without refreshing first.