

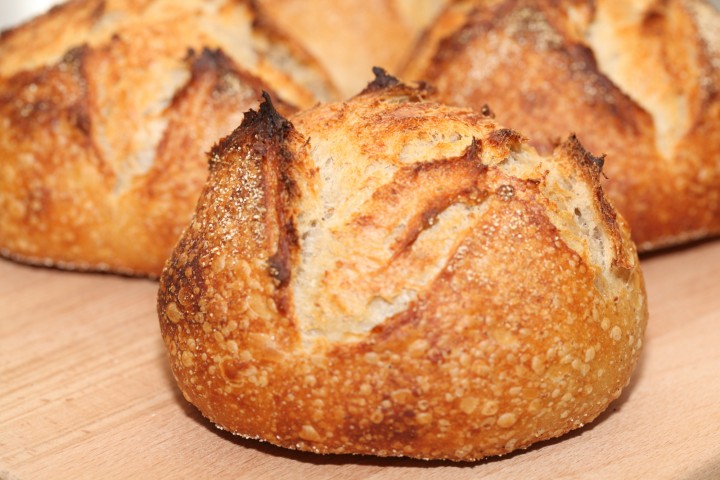
This recipe yields 6 mini boules. We usually triple it and end up with 18 boules…
Klik hier voor de Nederlandse versie
I find these mini boules are the perfect little breads for two or to accompany a nice family meal or dinner with friends. You can share one with some soup or dip it in a gooey Camembert out of the oven. They also make an original little present. Another advantage mentioned by one of our bread friends: there’s more crust to enjoy!
See what fun you can have sharing these boules and read how versatile they are (cheese fondue anyone?)!


Ingredients for the starter
100 g bread flour
80 g wholewheat flour
106 g water
36 g sourdough culture
Making the starter
These mini boules (little round breads) are made with a stiff sourdough starter dough and no added yeast. You make the starter the evening before you make the boules provided you want to bake the next morning (it takes 12 hours to ferment). Make the starter by dissolving 36 grams of your active sourdough culture in 106 grams of water and add 100 grams of bread flour and 80 grams wholewheat flour. Stir until it comes together and finish by kneading the dough by hand until you have a ball (about one minute tops). Put the dough ball in a bowl and cover with clingfilm and let it ferment for 12 hours at room temperature.
Ingredients for the mini boules
makes 6 boules of around 250 g each
Sourdough starter from day 1 – 322 g in total
720 g bread flour
470 g water
15 g salt
Making the mini boules
Preheat your oven to 235 ºC / 455 ºF (at what stage you preheat your oven depends on how long it takes your oven to heat through, some take 30 minutes, some with stone floors take a lot longer, up to two hours. The preparation time from this point until the bread actually goes into the oven is about 4.5 hours! So you might want to preheat your oven at the later stages of this recipe but make sure it’s well heated).
Dissolve the sourdough starter a little bit in some of the water you are going to use. This makes it easier for the ingredients to combine. Put the sourdough starter and flour in your mixing bowl and add 2/3 of the water. Now start mixing and gradually add the rest of the water and let the dough come together (see if you need all of the water or even a bit more, depending on the flour you use). Mix for only 1 minute until you have a shaggy mass (as Hamelman calls it). Leave it in your mixing bowl, cover and leave for 30 minutes. This process is called ‘autolyse’.
After the autolyse phase distribute the salt evenly on top of the dough and knead the mass for another 5 minutes and watch it turning into something much more resembling bread dough.
Transfer to a greased bowl and leave to rest for 50 minutes.
Ideally the temperature of your dough after mixing should be around 24-25 ºC / 75 ºF. You should adjust the temperature of the water you add, so the total dough reaches this temperature. For us this means in summer adding cold water to this recipe and in winter (when our little bakery gets much colder then the rest of our house) adding water up to 50 ºC /122 ºF. You can measure the temperature of water and dough with a food thermometer. These measurements are important because they correspond with the proving times in the recipe.
Now take the dough out of the mixing bowl and onto a floured work surface and do one stretch and fold (see our video to observe this technique if you are not familiar with it). Transfer to the bowl, cover and leave to rest for 50 minutes. After the 50 minutes again transfer it to the floured work surface and do another stretch and fold. Transfer to the bowl, cover and again leave for 50 minutes. This is your second stretch and fold.
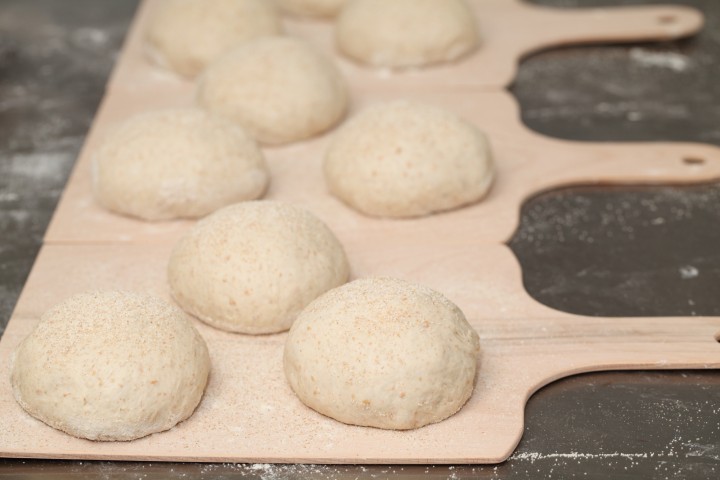
Now it’s time to shape. Shaping is something for which everybody develops his or her own technique over time. If necessary you can learn more on shaping from a good bread book, like the ones by Hamelman or Reinhart. You can also check out our short video on shaping boules.
Divide the dough into 6 equal parts and make boule shapes. They do not need proofing baskets. Lay them on a floured (semolina or rice flour works well) tray or peel that you are going to use for transferring them into the oven, or place them directly on a baking sheet /tray covered with parchment paper. Now cover and leave to proof for 50 minutes. When you think the boules have risen enough, use your finger to carefully make a very small dent in the dough. If the dent remains, the bread is ready to bake, if the indentation disappears, the dough needs a little bit more time.
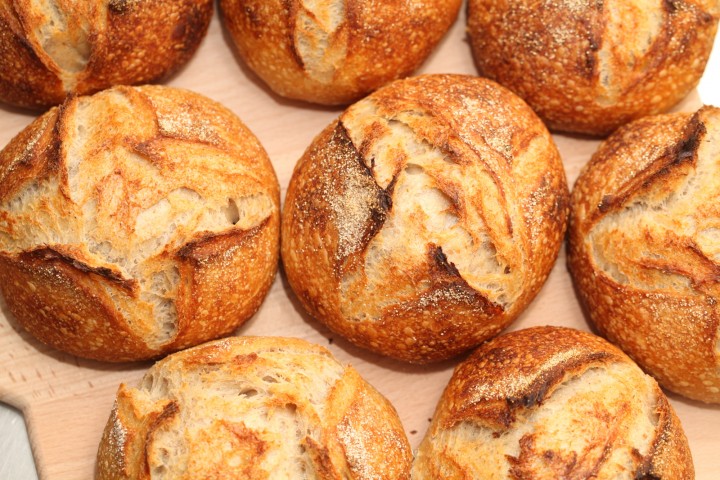
Now your boules are ready for the oven (Preheated to 235 ºC / 455 ºF). Slash the top of the boules with a lame or bread scoring knife. To get a nice crust, try to create some steam in your oven by putting a small metal baking tray on your oven floor when you preheat the oven and pouring in half a cup of hot water immediately after putting the bread in the oven. Release some steam by setting your oven door ajar (perhaps with the help of a wooden spoon) 5 minutes before the bread is ready. If you are going to create steam with a baking tray, you maybe also want to turn your oven temperature a bit higher, because you are going to lose some heat in the process.
After 25 minutes of baking your little sourdough boules should be ready. Transfer onto a rack and leave to cool. These boules also keep well in the freezer and are quickly thawed in the microwave if needed.

Sourdough mini boules time table
day 1 22.00 h Make starter let ferment for 12 hours at room temperature
day 2 10.00 h Make the final dough
- 10.00 h Dissolve starter in some of the water
- Add flour and water and knead 1 minute
- autolyse for 30 minutes
- 10.30 h Add salt and knead for 5 minutes
- Leave to rest for 50 minutes
- 11.25 h 1 st Stretch and Fold
- Leave to rest for 50 minutes
- 12.15 h 2nd Stretch and fold
- Leave to rest for 50 minutes
- 13.05 h Shape
- approx 50 minutes final proofing at room temperature
- 13.55 h Into the oven, (235 ºC / 455 ºF) for 25 minutes
- 14.20 h Out of the oven and leave to cool


Dannielle says
Hello,
I’m not sure if this is normal but after the 12 hour room temperature fermentation the “starter” had a tough film/outer coat. It was covered with plastic wrap the whole 12 hours. I added the water and “broke” up the starter as best I could. After the autolysis phase, when kneading in the salt I noticed quite a few “stiff” pieces of what I assume where the tough outer coat of the starter in the dough ball. I’m on the first 50 min proof. Guess we will have to see what happens.
Weekend Bakers says
Hello Dannielle,
This should not happen. Seems like there somehow was ‘room’ for the starter to dry out. So next time make sure the cover really seals off the bowl.
Hope the stiff pieces did dissolve and where not noticeable in the end product!
Virginia Tiernan says
Hi,
This recipe looks wonderful and I am excited to try it! I have a timing question – I’m wondering if it’s possible to overnight the boules in the refrigerator after shaping and bake in the morning?
Thank you for your guidance,
Virginia
Weekend Bakers says
Thank you Virginia,
Yes that is possible, depending on the fridge temp how long it will take, so make sure they do not over proof, so check them first thing in the morning.
Hope it will be great!
Virginia Tiernan says
Thanks so much! I’m excited to try this tonight! Will watch the proofing.
Best,
Virginia
Nicole says
Does the sourdough culture that you make the starter with need to be recently fed? Can I just use sourdough culture that has been sitting in the fridge?
Weekend Bakers says
Hello Nicole,
We use it directly from the fridge if it has been fed less than a week ago. Otherwise, if it has been over a week since the last feed / refresh we refresh it the day before use.
Nicole says
Thanks so much! That helps a lot.
Kate says
First batch I made I used the steam method but they didn’t brown. Inside bread temp was right and they tasted good. Second attempt I didn’t use the steam, still not brown, and at the end I finally just turned on the broiler to give them some color. I’m fast running out of freezer space! I figured next time I’ll increase the oven temperature. How high do you think? And do you think I should go back to the steam? What does that do for the crust?
Weekend Bakers says
Hello Kate,
The first thing you need to do is check your oven temperature.
You can see how this works with our oven tips:
www.weekendbakery.com/posts…your-oven/
It seems your oven can indeed be set higher.
Using steam can have different functions in the beginning of the baking process. It can help with the oven spring and color and shine and thickness of the crust. Yes we would recommend using it.
The place of the bread in the oven and the size of the oven compared to what is places inside also plays a roll. If you place a lot of cold dough in a small oven, the temperature will drop sometimes quite dramatically. You can counter this by starting at a very high temperature and tempering the oven when the crust has the desired color.
Good luck with it!
Kate says
I use a banneton for a regular size loaf, but what to do with the minis?
Weekend Bakers says
Hello Kate,
You do not need any bannetons for these mini boulles. They are free standing, you can proof them on the baking sheet that goes into the oven for example.
Hope it will be good!
Elise says
I was excited to try this recipe – love the idea of giving these small loaves as gifts to friends who live alone! But I had a sticky/tacky dough, that I suspect overproofed, which when baked, had a crumb denser than I’d want or expect.
Here were my deviations from your recipe:
(1)WATER – I used a little less – roughly 80g less – because the dough was a little too wet.
(2)MIXING/KNEADING – I used a stand mixer, for the recommended times. At the end of the 5 minutes kneading, the dough looked more like bread dough than cake batter, but didn’t hold together like a “ball” of dough.
(3)TEMPERATURE – the dough temperature right after mixing was 78 deg F.
Here were the “problems”
When it came time to divide and shape the dough was quite sticky/tacky. They were difficult to shape & create the taut “skin” because the dough stuck to my fingers/hands quite a bit. Once I did get them shaped & on the baking sheet they started to slowly flatten, not rise.
I got to wondering if the dough had over-proofed?
I reshaped each of the loaves, (gently) but I’m not sure that really did the trick.
They baked just fine – the crust is good (could have been darker, but that was my own doing)……when I took them out of the oven they were 211 deg F inside.
Flavor is good – gently tangy.
Crumb is too dense – smallish holes about the diameter of a pencil, and only a few. Mostly a pretty uniform crumb.
I’m toying with the question of (1)did I not develop the dough enough during kneading or (2)did I overproof.
I’d love your input.
Elise
Weekend Bakers says
Hello Elise,
What flour type did you use and what was the protein content in that flour? We think this might be a key factor in your result.
Would it be possible the starter was over-fermented and soupy when you added it to the final dough?
Elise says
The Bread Flour was not organic, King Arthur brand, 12.7% (per their packaging). The Whole Wheat Flour was also non-organic, unknown brand from a local health foods store – so I’m unsure of it’s protein content. (I don’t have the label anymore so I can’t tell you which kind of wheat it is)
Also – my starter was a whole wheat flour starter. I’m actually starting to wonder if the starter is the problem. Despite the fact t’s so easy to mix & smells so good, and gets wonderful bubbles; I’m switching to a bread flour/rye combination for my starter to see if I get different results.
I will appreciate any further input!
Kindest regards-
Elise
Weekend Bakers says
Hello Elise,
We have tried many, many flour brands and types and we do have a distinct favorite that works best for us.
We still find there can be a lot of difference in organic and non organic flour (we get better results with organic and better taste and crust and crumb quality).
The bread flour from KA with 12.7% is the right type of flour for this recipe.
Try not to deviate from the recipe too much, and try to get used to the stickiness of the dough.
We can recommend an organic rye flour starter, works very well for us.
If you think your kneading and dough development is not what it should be, take a look at our tips on the subject too:
www.weekendbakery.com/posts…gh-mixing/
Getting to the right balance between all the components can be quite a journey, just take your time and enjoy it and the bread it yields!
Jacqui says
I made these yesterday and they came out great! I did have to cook them quite a bit longer, probably twice as long. I think I let too much heat out putting the boules in. I’ll definitely be making these again and will start the oven much higher to compensate for how slow I am at loading the oven!
Weekend Bakers says
Hello Jaqui,
Yes, some ovens can drop in temperature dramatically when you open them. So you are right in starting at a higher temperature and working quick and close the oven door directly after loading.
So next time you will hopefully be much closer to the actual cooking time.
Enjoy the process!
Brooke says
Looks like a nice recipe. The proving time seems very short though, for sourdough. How come?
Weekend Bakers says
Hello Brooke,
The proofing times are correct, as long as you stick to the recipe, it should be OK. But it depends on your own conditions (also temp, humidity, elevation) if your dough needs extra proofing time. So if, some extra time is needed, especially for the final proofing, you just give it some more time, like we suggest.
Hope you will give it a try!
PatsyKB says
PLEASE reply ASAP as I’m hoping to make these tomorrow.
I already have good sourdough starter (it’s about 4 months old and I’ve used it several times) which I keep fed and active.
Can I just use MY starter and skip the ‘night before starter fermentation’ step?
Weekend Bakers says
Hello Patsy,
If you have the 322 grams of sourdough starter ready for use and the hydration ratio is the same, then yes you can use it and skip the first step.
For a next time, we would still suggest making the recipe as described to compare the two methods.
Enjoy your sourdough baking!
LiLian says
Hi –
Tried making three loaves instead of mini boules out of this, as suggested in a reply to another person, and they came out well ( I’ve posted photos). I had previously upped the hydration a tiny bit to 66% so stuck to that. I also used whole spelt instead of the wholemeal but I think perhaps the wholemeal version was nicer.
Once again, thanks for a great site. I’ve looked at other sites but always come back here – it’s the best!
Weekend Bakers says
Hi Lilian,
Loved your result of the ‘mini boules loaves’ and thank you again for your kind words and sharing the excellent pictures: www.weekendbakery.com/your-loafs/
Enjoy your baking!
Ed & Marieke
WKB
Patricia Brunner says
Would love an answer asap as I wish to make these this weekend as gifts. Maybe I missed something in the instructions, but what does one bake the mini boules ON? Do they bake directly on the wire oven racks? Or on a stone? (We have a large pizza stone.) Or on a baking sheet?
Weekend Bakers says
Hello Patricia,
You can bake them as you would any free standing loaf. The ones you see in the pictures are baked in our stone oven, so directly on a stone. The pizza stone would come closest to that. But a baking sheet / tray covered with parchment paper would be OK too. We will make it more clear in the recipe too.
Hope the boules will be great!
Marieke & Ed
WKB
Susan says
Just made these for the second time and have come out beautifully! How long do you think they can last without being frozen ?
Weekend Bakers says
Hello Susan,
Personally we would say it would be best to eat the bread within 2 days. The opinions about this vary a lot. Some bakers claim the bread only gets better after one or two days, but this is not what we find. We like our bread fresh and the best way to achieve this is to store it in the freezer. This high hydration bread can take it very well. If you want to keep it at room temperature, store it in an airtight container. If the crust is not that ‘crusty’ anymore after a while, you can use the toaster to give it a quick boost. This bread is delicious toasted or used to make toasties / grilled cheese sandwiches.
Enjoy your baking and eating!
Jackie Brown says
I have been baking bread since the lockdown approximately 3 month and love it.`This is my favourite so far ‘mini boules’ Nice easy to follow recipe and lovely results every time. Freeze so well too. Thank you!
Weekend Bakers says
Thank you Jackie, great the recipe is a success and always glad to hear good things can come to us and are discovered during difficult times.
Enjoy your new found skills and lots of loaves!
Ed & Marieke
WKB
Rafa says
hi, it’ gonna be my first time trying to bake a sourdough and i’m so excited!
a question though, I only got 500 grams of A.P flour left, and it seems that the recipe called for 720 grams of it. luckily, i got tons of whole wheat flour. can i use half A.P flour and half whole wheat? and should I add more water as well?
thanks!
Weekend Bakers says
Hi Rafa,
Maybe it is an idea to make 2/3 of the recipe. Your suggestion can work too, but we would use all the AP flour and the rest whole wheat. The differences between flours and their absorption levels are so different that it is always hard to tell what the best hydration % for you will be. This recipe is around 65%. Maybe you can up it a few %, but for a first try of this recipe and handling of the dough the 65% would also be a good starting point for you we think.
Hope it will be a success. Enjoy the baking!
Johannah Bearg says
Hi, this recipe looks awesome! I have been using a 73% hydration and a little rye in my larger boules and the taste is amazing. Do you think the mini boules could handle that high of hydration/rye? Or will they just fall flat? Curious about your thought on this? Thank you!
Weekend Bakers says
Hi Johannah,
Well it depends on your flour really. For us and our Dutch (European) flour the close to 65% hydration of this recipe works well to get a perky little boule and dough that is great to handle. But if you use American flour for instance, then it would already be a good idea to increase the hydration with 2 to 5%. Seeing you already had good results with larger boules, and we assume with similar method, we think that it will be possible with this recipe too.
Hope it will be great!
Neil Brand says
12 hour cement time for starter is a problem for me. Can I retard time by placing starter in refrigerator?
Will try as soon as I receive reply. Thanks for the recipe
Weekend Bakers says
Yes, Neil, you can do that, this gives you extra time, but it depends on your fridge time how long, there is a limit of course because development will go on, if slower. Keep an eye on it if possible, because you do not want it to over-proof. Using the starter slightly under-proofed is no problem.
Hope it will be great!
Mrs Shah says
Request you to please share whether there would any variations In the time and steps whike following the recipe in the tropical climate .. Please let me know how many hours it will require to make starter too in hot and humid climate or shall I stick to 12 hrs routine .. Thank You
dini says
Hi Mrs Shah! I’m in Malaysia and I’ve tried this recipe. When I made my starter I used cold water and placed it overnight on a shelf in an open space. If I remember correctly I made my starter at around 10pm and by 7am it was ready 🙂 Hope this helps!
Mrs shah says
Noted and thankyou Dini for the revert . can u plz share too , did U stick too 50 mins routine for stretch & fold or reduced the time intervals ..
Weekend Bakers says
We would advice to also keep this shorter. But Dini can give the best advice based on the same experience!
Mrs Shah says
Noted and Thanku Weekend Bakery for the revert 👍
Cathy says
My favorite sourdough bread recipe so far- these are delicious!!!
Weekend Bakers says
Great Cathy, thank you. They are so cute and delicious at the same time. What’s not to love 🙂
Flora says
Hi! I am in day 3 in my sourdough starter and cannot wait to use it after day 7! Your starter calls for 80g of whole-wheat flour. May I know which type of whole-wheat flour you are referring to? I have stone ground whole-wheat flour which has a protein content of 13-15%. From my previous experience it’s quite thirsty and dough comes out to the dryer side. Should I add more water than you stated above (106g)? What kind of consistency should I be looking for when making this starter? Thank you!!
Weekend Bakers says
Hello Flora,
Great to get your comment. Our flour is organic stone ground but with a lower protein content. Our starter for this recipe is like a thick paste but if you think it is even thicker, just add a bit of extra water, that is no problem. If necessary you can always compensate a tiny bit with the final dough. Just give it a go and see if you need to adjust with your second bake. It always takes a few turns with a new recipe to get it right for your situation, climate, ingredients, equipment and hands.
Hope it will be great to make and eat!
Flora says
Thank you so much for your reply!
Sally Hill says
How do I cook using a dutch oven? The amount of time with lid on then off?
Thank you.
Weekend Bakers says
Hi Sally,
We have never made these in a Dutch oven. Do you want to make only one small boule or do you want to bake several together in one big pan?
In general you would stick to the cooking time of the recipe and take the lid of somewhere halfway or slightly over, maybe around the 15 minute mark.
Anne says
Hi Ed & Marieke,
Would it be possible to “half-bake” these so I can give them to people and they can pop them in the oven for a little while? How long and at what temperature should I bake them? Thank you in advance!
Weekend Bakers says
Hi Anne,
We never do this ourselves, but if you google for par-bake bread you can get good instructions. Always think about food safety and use your freezer (or the receiver should do so) if they are keeping it for longer before baking it (again).
Good luck with it!
Sebastian says
Amazing – first time sourdough maker and were unbelievable. Cooked for 22min and a little soft / moist inside how I like it.
Weekend Bakers says
Thank you Sebastian for your cheery feedback and for choosing our recipe as your starting point. Hope you will be able to try some of our other sourdough and maybe other recipes too!
Stefan Gunnarsson says
Thanks for a very inspiring site on baking!
A question before I have a go at the mini boules: I have some very nice stone ground spelt, both wholemeal and “white” (never quite white when stone ground), would it be possible to use that instead of the wheat?
/Stefan
Weekend Bakers says
Hello Stefan,
The challenge with spelt is that it is more delicate (gluten are different) and behaves different than wheat flour. So you can try and use it, but it will be more of a challenge to get the result you see in the pictures. If possible we would use a combination of wheat flour / bread flour and a smaller amount of spelt for your first bake.
Stefan G says
I just tried and realised exactly that. Very nice taste but not at all the rise you got, so rather a completely different bread. So, next time it will be just wheat. Btw, what is bread flour, just a special kind of wheat?
Another problem/question is that the top surface of the bread tends to go dry during the final proofing and restricts the rising in the oven. How can I avoid that? I succeded fairly well with scoring, the first time in my 63 years that I used an old fashioned razor, not just a blade. It did the job well but I was a bit to cautious and did not cut deep enough in places. But the dried surface restricted the rise even where I got a good cut. I thought of spraying or brushing with water but that would also have a cooling effect and possibly interfere with proofing. Suggestions?
/Stefan
Weekend Bakers says
Bread flour in general is strong wheat flour with enough protein to build a strong gluten-network to get a good rise. Also see our post about gluten and their function if you want to learn more:
www.weekendbakery.com/posts…ut-gluten/
You need to cover your bread during proofing so it does not dry out. You can use a floured lightweight cloth or floured clingfilm or if you have a big bowl you can place this over the bread, or inflate a big bag and place them inside. See what option works for you.
We can also recommend taking a look at our scoring with confidence tips:
www.weekendbakery.com/posts…onfidence/
Enjoy the process and the bread!
Marcy says
I made these today and they taste great but it looks like my scoring didn’t work or it wasn’t deep enough- they kind of exploded on the side to release the air. Any suggestions?
Weekend Bakers says
Hello Marcy,
We think you made the right assessment yourself. You need to score deeper, maybe also longer, really from side to side, so the boulles will not tear at the sides. If your scoring is good, you created the weakest spot in the dough and you will not get tearing anywhere else.
Marguerite says
My first attempt at sour dough and making the boules today, and the crust came out good! The bread, however, seems somewhat dense and did not have as many holes compared to yours. Should I have done more stretch and fold and more proofing? Your input would be much appreciated.
Weekend Bakers says
Hello Marguerite,
This would definitely be a proofing issue. If possible measure the temperature of your dough and take more time if the dough needs it.
As you get more practice you will also see that you fumble around less with the dough and this will also promote larger holes. Also try different flours / brands whenever possible, because the difference between results can be substantial.
David Mills says
Fantastic results and the taste is amazing. Unfortunately my bread stuck to my baking tray, so a little disappointed to lose the base. Is this because I didn’t use enough flour on the tray with the final proving?
Weekend Bakers says
Great to get your comment David, sorry to hear about the stuck bit. We would advice to use a paper or silicon baking sheet next time and you will see they do not stick. Alternatively, if possible, you could place a baking stone in your oven. No need for any cover, but you would need to transfer the bread to the oven, so what you would do is proof them on a bread peel (as you can see in the picture), dusted with coarse flour / semolina and transfer to the stone. Maybe an idea for the future.
Thank you and enjoy your sourdough baking!
Ed & Marieke
WKB
David Mills says
Hi, thanks for getting back to me.
I used baking paper and success.
Your recipe is excellent and I’ve been passing it on to family and friends who have all got the sourdough baking bug during lockdown.
Thanks again
David
Weekend Bakers says
Thank you David, it is so nice to read good things can spread too during this challenging period.
Lots of loaves and crusty bread!
Greetings from Holland,
Marieke & Ed
Lili says
Do you think I can make medium boules, and getting 3 instead of 6? What would be the baking time?
Weekend Bakers says
Yes, Lili that is no problem. The baking time will be around 35 minutes. Keep an eye on the browning and you can always temper your oven during the second halve of the baking period if needed.
Enjoy your sourdough baking!
Bryson says
What roughly is the weight of each boule?
Weekend Bakers says
Hello Bryson, the boules are around 250 grams each.
Enjoy your baking!
Mark Rochkind says
If I wanted to make them without the culture, how woluld the proportions in the started change, and much yeast should I add, and when.
Weekend Bakers says
Hello Mark,
Sorry, but this would mean a whole different recipe with different proofing times too and a different result.
If you want to make a yeast based mini boule we would suggest taking the baguette boule recipe as a base and make 6 mini versions with this dough: www.weekendbakery.com/posts…he-recipe/
Make sure when you do to also reduce the baking time to around 25 minutes!
Mark R says
I apologize for not replying sooner, but I have been preoccupied with various health issues. Thank you for responding to my question and making the suggestion. I will be attempting to make the BB’s and will report my results
Weekend Bakers says
We wish you the best and always love to hear about your results.
Take care,
Marieke
Cathy says
What is it with grams in so many bread recipes!
Weekend Bakers says
Baking is an exact science and measuring with cups and spoons can lead you to diverge by as much as 10 to 20%. So, we offer our recipes in grams, using the metric system and offer people our baking conversion tools if they want to convert and do not have scales (you can buy a scale for the same amount as a sack of flour these days): www.weekendbakery.com/cooki…nversions/
All for free and from our heart!
Leia Spencer says
What do you bake them in or on?
Weekend Bakers says
Hello Leia,
They are placed on a baking tray or sheet, without any mold or support. So free standing.
Frannie says
Thank you for this wonderful resource! I’ve been making my own sourdough for a few years now. I wanted to figure out to make mini loaves so I can give them to my neighbors for Christmas. The first round turned out perfectly! I followed your instructions to a “t”.
Weekend Bakers says
Hello Frannie,
Glad you found and liked our recipe. It is such a favorite of ours and everybody we share them with loves them. Great the recipe and instructions work so well for you.
Enjoy your baking and sharing this Christmas and in the New Year too!
Marc says
Hi,
First of all thank you for sharing all of these wonderful recipes!
I would love to make these mini boules coming Sunday ready to be served around lunch time. However as it takes approximately 4h20 of preparation (+ cooling) I wondered if it would be possible to partially prepare them the night before, let proof in the fridge over night and continue with the final preparation Sunday morning?
Kind regards,
Marc
Weekend Bakers says
Hello Marc,
Sorry for the probably too late reply, but your suggestion is possible of course and we hope it has been a success, but sometimes it takes a few tries to get it right, also depending on your fridge temp and enthusiasm of sourdough culture. Let us know how it went maybe?
Jeanne says
This is exactly what I was looking for – thank you for a great recipe! I would love to bake these in mini cast iron dutch ovens – do you think the baking time should be adjusted for that?
Weekend Bakers says
Hello Jeanne,
Sorry for the late reply and thank you for your comment. We think the baking time would be about the same, it could be that a slight adjustment is needed, also based on the workings of your own oven. So try a few rounds to get the perfect result for you, but just start at 25 minutes.
Enjoy your baking this fall!
Beth says
Is this a firm dough? My boules tend to spread out. I want these to get taller not flatter.
Weekend Bakers says
Hello Beth,
If your dough is slack , maybe you can experiment with the amount of liquid in the recipe, use a few % less and see how that turns out. Also very important, make sure your flour is strong enough with the right amount of protein (we use flour with around 12.5% protein) and make sure the dough is well developed and proofed.
Christine says
Could these be made 100% whole grain?
Weekend Bakers says
Hello Christine,
Yes you can, but it will be more challenging to get a good result, because the ‘heavy whole grain will make the end result much more compact. So we would advice to increase the amount of whole grain first in stages and see how that goes.
Sharyn Haines says
These look fantastic! Do you think they would work if I made them smaller (that is, make 12 boules instead of 6 from the recipe)?
Weekend Bakers says
Hi Sharyn,
Yes, no problem, 12 boules of around 125 grams each. The baking time will be shorter too, we estimate (without knowing your oven so you need to test!) around 18 to 20 minutes.
Enjoy the boule baking 🙂
Sharyn Haines says
thanks so much for the quick response