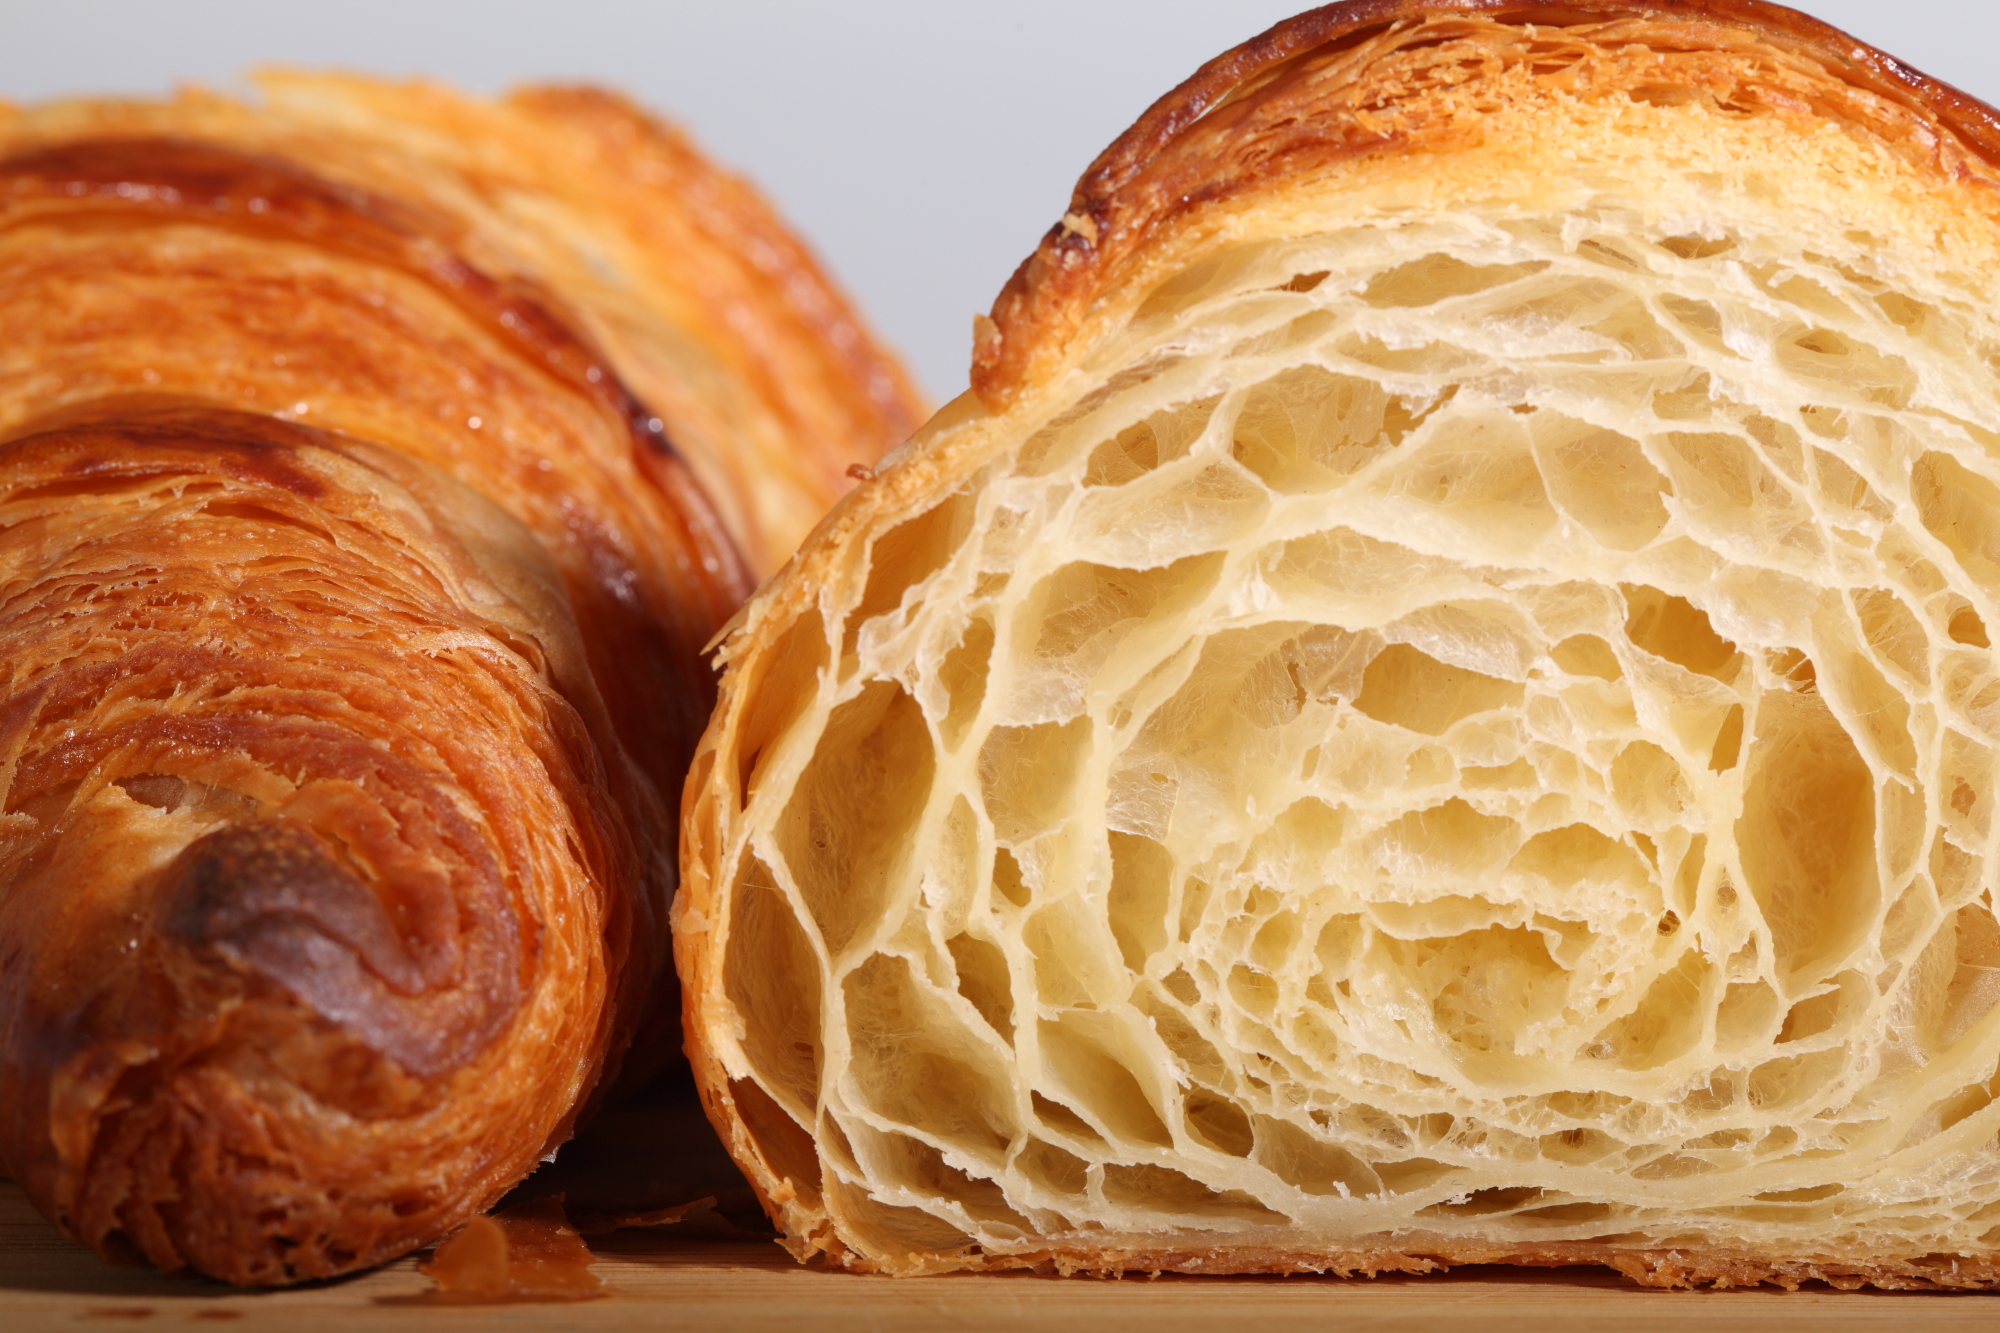
It’s all about the layers…
Klik hier voor Nederlandse versie
With this recipe we want to give you the exact directions on how we go about making classic French croissants. The recipe is an adaptation from the recipe for Classic Croissants by Jeffrey Hamelman. We started out largely following the instructions for his recipe, changed everything to our beloved metric system and found out some worthwhile croissant knowledge of our own along the way. Hopefully enough to justify sharing it all with you and inspiring you to give croissant baking a shot yourself.
Before you start we can recommend watching our croissant making video to get a general feel for the recipe. You can also check out our croissant making log where we keep track of our own croissant baking adventures. For answers to your croissant questions you can check out the Frequently Asked Croissant Questions section.
This recipe will yield about 15 good croissants plus some leftover bits which you can use to make a few, slightly odd shaped ones, or other inventive croissant-like creations.
If at first you don’t succeed, maybe you can take comfort from the fact that our first efforts were not very ‘croissant worthy’. But as you can see we persevered and got better…But we have to admit it is and always will be a tricky process. You have to work precise and be focused to get good results. So away with screaming children, hyperactive animals and all other things distracting! Put on some appropriate croissant making music and lets get to it…
Please read the following tips;


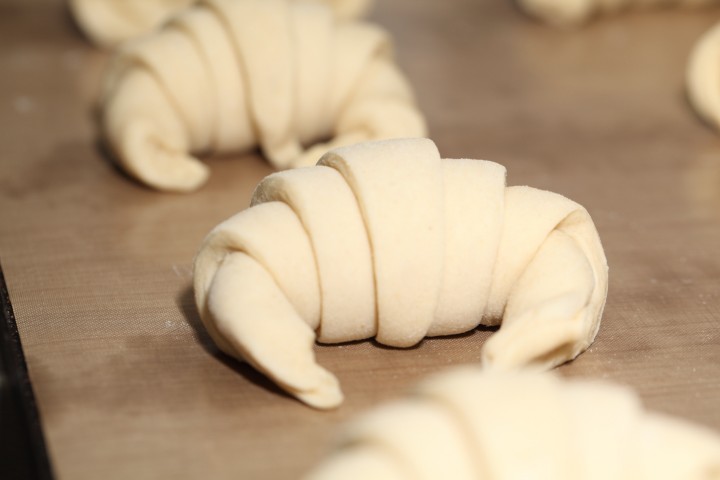
According to Raymond Calvel croissants laminated with margarine are formed into the crescent shape, while croissants laminated with butter are left in the straight form. We say, use whichever shape you like best, but do use butter!
The croissant recipe

Ingredients for the croissant dough
500 g French Type 55 flour or unbleached all-purpose flour / plain flour (extra for dusting)
140 g water
140 g whole milk (you can take it straight from the fridge)
55 g sugar
40 g soft unsalted butter
11 g instant yeast
12 g salt
Other ingredients
makes 15
280 g cold unsalted butter for laminating
1 egg + 1 tsp water for the egg wash
Day 1
Making the croissant dough
We usually do this part in the evening. Combine the dough ingredients and knead for 3 minutes, at low to medium speed, until the dough comes together and you’ve reached the stage of low to moderate gluten development. You do not want too much gluten development because you will struggle with the dough fighting back during laminating. Shape the dough like a disc, not a ball, before you refrigerate it, so it will be easier to roll it into a square shape the following day. Place the disc on a plate, cover with clingfilm and leave in the fridge overnight.


Day 2
Laminating the dough
Cut the cold butter (directly from the fridge) lengthwise into 1,25 cm thick slabs. Arrange the pieces of butter on waxed paper to form a square of about 15 cm x 15 cm. Cover the butter with another layer of waxed paper and with a rolling pin pound butter until it’s about 19 cm x 19 cm. Trim / straighten the edges of the butter and put the trimmings on top of the square. Now pound lightly until you have a final square of 17 cm x 17 cm. Wrap in paper and refrigerate the butter slab until needed.


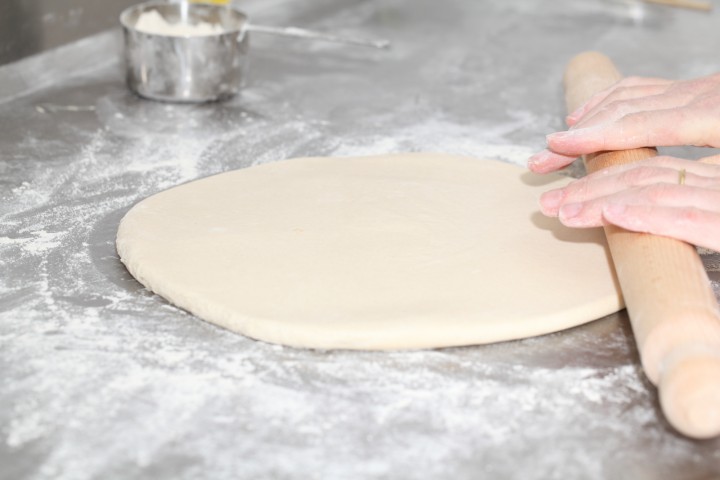
Take the dough out of the fridge. With a rolling pin roll out the dough disc into a 26 cm x 26 cm square. Try to get the square as perfect as possible and with an even thickness. Get the slab of butter from the fridge. Place the dough square so one of the sides of the square is facing you and place the butter slab on it with a 45 degree angle to the dough so a point of the butter square is facing you. Fold a flap of dough over the butter, so the point of the dough reaches the center of the butter. Do the same with the three other flaps. The edges of the dough flaps should slightly overlap to fully enclose the butter. With the palm of your hand lightly press the edges to seal the seams.
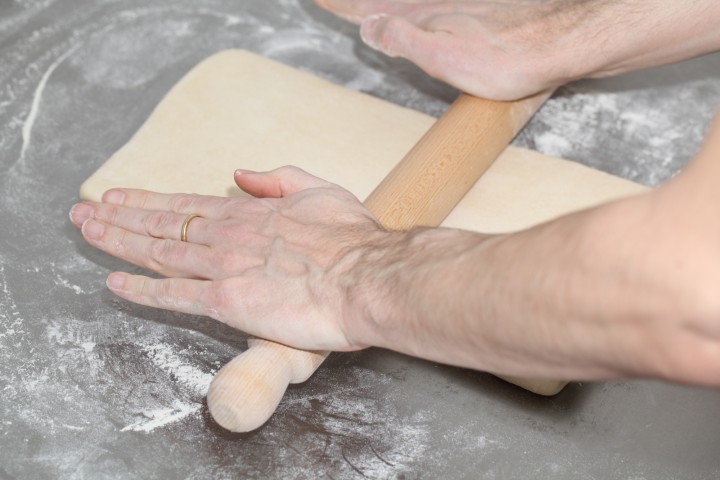
Now the dough with the sealed in butter needs to be rolled out. With a lightly floured rolling pin start rolling out, on a lightly flour dusted surface, the dough to a rectangle of 20 x 60 cm. Start rolling from the center of the dough towards the edges, and not from one side of the dough all the way to the other side. This technique helps you to keep the dough at an even thickness. You can also rotate your dough 180 degrees to keep it more even, because you tend to use more pressure when rolling away from you than towards yourself. You can use these techniques during all the rolling steps of this recipe. Aim at lengthening the dough instead of making it wider and try to keep all edges as straight as possible.
Fold the dough letter style, cover with clingfilm and refrigerate for 30 minutes (fold one third of the dough on top of itself and then fold the other side over it). Repeat the rolling and folding two more times (ending up with 27 layers of butter in total), each time rolling until the dough is about 20 cm x 60 cm. After each fold you should turn the dough 90 degrees before rolling again. The open ‘end’ of the dough should be towards you every time when rolling out the dough (you can see this in our croissant making video at around 3:40 minutes). After the second turn, again give it a 30 minute rest in the fridge. After the third turn you leave the dough in the fridge overnight until day 3, the actual croissant making day!
- Roll out to 20 cm x 60 cm
- Fold
- Refrigerate 30 minutes
- Rotate 90 degrees
- Roll out to 20 cm x 60 cm
- Fold
- Refrigerate 30 minutes
- Rotate 90 degrees
- Roll out to 20 cm x 60 cm
- Fold
- Refrigerate until day 3
- Rotate 90 degrees
- Roll out to 20 cm x 110 cm
Also see complete time table at bottom of page


Day 3
Dividing the dough
Take the dough from the fridge. Lightly flour your work surface. Now very gently roll the dough into a long and narrow strip of 20 cm x 110 cm. If the dough starts to resist too much or shrink back during this process you can fold it in thirds and give it a rest in the fridge for 10 to 20 minutes before continuing. Do not fight the dough, when the dough refuses to get any longer, rest it in the fridge! It is such a shame to ruin two days of work.
When your dough has reached its intended shape, carefully lift it a few centimeters to allow it to naturally shrink back from both sides. This way it will not shrink when you cut it. Your strip of dough should be long enough to allow you to trim the ends to make them straight and still be left with a length of about 100 cm.


Shaping the croissants
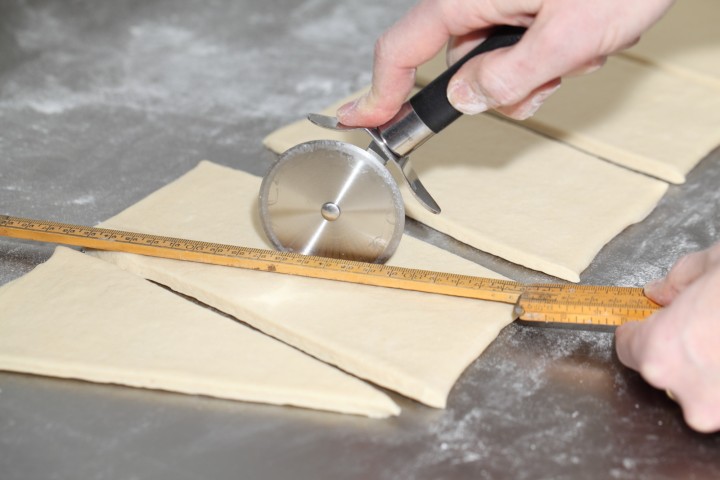
For the next stage you will need a tape measure and a pizza wheel. Lay a tape measure along the top of the dough. With the wheel you mark the top of the dough at 12,5 cm intervals along the length (7 marks total). Now lay the tape measure along the bottom of the dough and make a mark at 6,25 cm. Then continue to make marks at 12,5 cm intervals from this point (8 marks total). So the bottom and the top marks do not align with each other and form the basis for your triangles.
Now make diagonal cuts starting from the top corner cutting down to the first bottom mark. Make diagonal cuts along the entire length of the dough. Then change the angle and make cuts from the other top corner to the bottom mark to create triangles. Again repeat this along the length of the dough. This way you will end up with 15 triangles and a few end pieces of dough.
Using your pizza wheel, make 1.5 cm long notches in the center of the short side of each dough triangle.
Now very gently elongate each triangle to about 25 cm. This is often done by hand, but we have found that elongating with a rolling pin, very carefully, almost without putting pressure on the dough triangle, works better for us. You can try both methods and see what you think gives the best result.
After you cut a notch in the middle of the short end of the triangle, try and roll the two wings by moving your hands outwards from the center, creating the desired shape with a thinner, longer point. Also try and roll the dough very tightly at the beginning and put enough pressure on the dough to make the layers stick together (but not so much as to damage the layers of course).
Proofing and baking
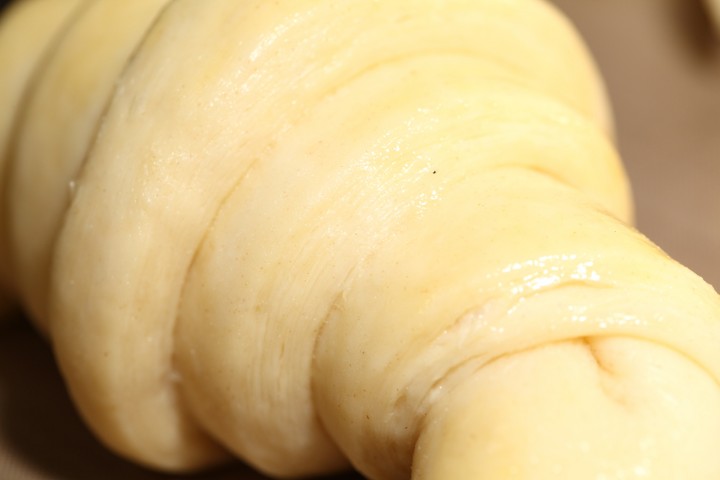
Arrange the shaped croissants on baking sheets, making sure to keep enough space between them so they will not touch when proofing and baking. Combine the egg with a teaspoon of water and whisk until smooth. Give the croissants their first thin coating of egg wash. You do not need to cover the croissants with anything, the egg wash will prevent the dough from drying out.
Proof the croissants draft-free at an ideal temperature of 24ºC to 26.5ºC / 76ºF to 79ºF (above that temperature there is a big chance butter will leak out!). We use our small Rofco B20 stone oven as a croissant proofing cabinet by preheating it for a minute to 25ºC / 77ºF. It retains this temperature for a long time because of the oven stones and isolation. The proofing should take about 2 hours. You should be able to tell if they are ready by carefully shaking the baking sheet and see if the croissants slightly wiggle. You should also be able to see the layers of dough when looking at your croissants from the side.


Preheat the oven at 200ºC / 390ºF convection or 220ºC / 430ºF conventional oven.

Right before baking, give the croissants their second thin coat of egg wash. We bake the croissants in our big convection oven for 6 minutes at 195ºC / 385ºF, then lowering the temperature to 165ºC / 330ºF, and bake them for another 9 minutes. Hamelman suggest baking the croissants for 18 to 20 minutes at 200ºC / 390ºF , turning your oven down a notch if you think the browning goes too quickly. But you really have to learn from experience and by baking several batches what the ideal time and temperature is for your own oven. Take out of the oven, leave for a few minutes on the baking sheet, then transfer to a cooling rack.
Latest way of baking; We heat up our double fan big convection oven at 200ºC, when heated up put the croissants in the oven and directly lower it to 175ºC. We bake them for 10 minutes at 175ºC, they will have a nice brown color by now, then lower the temperature to 150ºC, and bake them for another 6 minutes.
Best eaten while warm and fresh of course. Croissant we don’t eat or share within a day we freeze. We put them in the preheated oven (180ºC / 355ºF) for 8 minutes straight from the freezer. Nothing wrong with that, croissants eaten nice and warm, almost as good as the fresh ones…almost!
Croissant Time Table
Times are an indication and also depend on your experience with the recipe
Try to work swift but precise and take extra fridge time if needed!
Day 1 – Make initial dough
- 21.00 h – Knead for 3 minutes and store in fridge for 12 hours
Day 2 – Laminate the dough
- 09.00 h – Make butter slab and refrigerate till needed
- 09.05 h – Roll dough disc into square
- 09.10 h – Seal butter in dough
- 09.15 h – Roll out to 20 cm x 60 cm and fold
- Refrigerate 30 minutes
- 09.50 h – Rotate 90 degrees
- Roll out to 20 cm x 60 cm and fold
- Refrigerate 30 minutes
- 10.25 h – Rotate 90 degrees
- Roll out to 20 cm x 60 cm and fold
- 11.00 h – Refrigerate until day 3
Day 3 – Dividing, Shaping, proofing and baking
- 09.00 h – Roll out to 20 cm x 110 cm – part 1
- 09.05 h – Often needed! Take 20 min. fridge time if length not in one go
- 09.25 h – Roll out to 20 cm x 110 cm – part 2
- 09.30 h – Divide and shape the croissants
- 09.40 h – First coat of egg wash
- 09.45 h – Proof to perfection (indication 2 hours)
- 11.45 h – Second coat of egg wash
- 11.50 h – Bake for 15-18 minutes
- 12.10 h – Ready!
I just don’t do nor like metric. And Im an F not a C in baking. Your recipes look fun but I wont try them. Would it hurt to put both measurements down? Yours Judy Brezina.
Hello Judy,
You can use the measurements given in this recipe by mr. Hamelman:
www.finecooking.com/recip...croissants
———————————————————————————–
We are advocates of metric and we advice the following to every baker:
We very much recommend weighing your ingredients. Professional bakers use scales (also in the US) and in Europe home bakers do too. A scale will give you the exact same weight every time. Which is absolutely needed if you consistently want to make good bread and especially good pastry. You can get a scale for the same price as a few sacks of good flour and less than a lot of baking tools you already own, so if possible, go and get one!
Hi there,
So, I do not have enough counter space to roll out the dough to 110cm.
When doing the final roll out would it be ok to divide the dough into 2 pieces? So rolling out 2 20cm by 55cm pieces.
Hello Eli,
We advice the following:
Roll out the slab as far as even and as far as you can (so if you have 80 cm space use this). Then divide this say 80 cm in two slabs of both 40 cm and continue rolling them both out to 55 cm. This way you have the best chance of two equal, evenly rolled out slabs.
You can also make halve a batch:
If you halve the recipe, the dough square should be 18.4 x 18.4 cm and the butter slab 12 x 12 cm. The same for the laminated dough, you must shorten only one side (otherwise you get a quarter of the original), so you end up with a 20 x 30 rectangle. The size of the final dough, right before cutting, should be 20 x 55 cm.
Hope it will work out well for you!
Hi there.
Thank you for sharing the recipe full of details and tips. After reading the recipe, watching the video was very helpful. How can I make the colorful croissants? Thanks, Paula
Hello Paula,
Thank you for your very kind comment. We must admit we are not the experts on making colorful croissants. You can find many examples on the web, for instance this one: ny.eater.com/2015/...-croissant
Hope you will find the inspiration you need.
Would it be ok if I preshaped them and put them in the fridge overnight? This is my first time making croissants.
Hi Kaitlyn,
Yes it would.
After shaping leave your croissants to proof for one hour at room temperature to kick start the proofing process. Then place them in the fridge overnight. Make sure no air can reach the croissants, otherwise they will dry out! It is best to place them in an airtight container on a piece of baking paper. Make sure the container is big enough to allow the croissants to expand without touching each other.
More on this subject of retarding and freezing at the bottom of this article including the one day version of our croissant recipe:
www.weekendbakery.com/posts...nt-recipe/
Good luck with it!
Hi! Thanks for this recipe. I am Italian and I have tried several recipes. They all worked (all porpose, bread flour, OO, etc) but I am looking for something flakier.
So I want to try yours :’)
Can I make half a batch? If so, what size should the square/rectangoles be?
Grazie 🙂
Ciao Giulia,
Thanks you and yes we can help you with the halve a batch dimensions.
If you halve the recipe, the dough square should be 18.4 x 18.4 cm and the butter slab 12 x 12 cm. The same for the laminated dough, you must shorten only one side (otherwise you get a quarter of the original), so you end up with a 20 x 30 rectangle. The size of the final dough, right before cutting, should be 20 x 55 cm.
You can also read our page with Frequently asked croissant questions for extra tips and suggestions that might be helpful:
www.weekendbakery.com/posts...questions/
Enjoy your pastry baking!
Groetjes,
Ed & Marieke
I do love it
♥ for pastry is not uncommon 🙂
I feel hopeful after reading this
Let us know if and when you are taking the next step…
hi!
can i use superfine flour instead of all purpose flour?
have a nice day!
deanna
Hello Deanna,
It depends on the protein content of the flour, so if it is close to 11% you can use your flour, but under 10% we would certainly not advice to use it for the croissants.
Thank you for the recipe. I will definately give it a try.
Always love to hear about your first results!
Hi,
May I ask you how to calculate the length of dough that it is enough to do single turns? Or that depends on the thickness of dough? Thank you!
Have a nice day
Kelvin
Hello Kelvin,Yes, it mainly depends on the thickness of the dough, for a good croissant you need to keep in mind to roll it out to a thickness of between 3 and 5 mm and certainly not too thin.
Thank you so much for this recipe!
I’m in the process of making my first ever batch of croissants and not quite sure how they will turn out yet. Folding seems to have gone well but I now noticed the dough increasing in volume quite a bit in the fridge to the point it’s starting to tear a bit in one side. Should I have just covered it in cling film more tightly or did something else go wrong?
Maybe the folding didn’t go as well as I thought and I put too much pressure/didn’t finish fast enough… Definitely still excited for baking tomorrow though!
Hello Max,
It can puff up somewhat but it sounds like yours puffs up a bit too much. Our assessment of your situation is that because of your ‘lack of speed’ with the process the dough warmed up a bit too much which gave the yeast a change to become more active. The solution for next time would be to use the fridge a bit more to keep the dough cool, and (in time, with practice) work a bit faster and /or also reduce the amount of yeast slightly (but mainly try first two suggestions and this last one only as a backup plan after a few more tries).
So the slight puffing of the dough is no problem, just carefully and gently roll out the dough, pressing the air out to the ends.
Hope your earlier bake still made you enthusiastic enough to give it another try!
Hi,
This is the second time I made a croissant. First with Julia Child recipe and I made a mistake to make it during summer.
This time its perfect coz its autumn. Anyway. I made this and followed the 3 day process. I used plain flour and dried active yeast which I proof in 140g warm water and added 1 tbsp sugar from the 55g. Then I put everything in the bread maker and knead for 5 minutes (carpal tunnel issue). I tried my very best to reach the required length of the dough.
I made 15 pieces croissant and followed the steps below:
“Latest way of baking; We heat up our double fan big convection oven at 200ºC, when heated up put the croissants in the oven and directly lower it to 175ºC. We bake them for 10 minutes at 175ºC, they will have a nice brown color by now, then lower the temperature to 150ºC, and bake them for another 6 minutes.”
Anyway, I noticed that the dough inside is a bit soggy like it’s not yet cooked or not baked properly. The outside dough is flaky and crisp it’s just the dough inside. Apart from that, I am very happy! Thank you!
Any suggestions?
Regards,
Anne
Hello Anne,
Thanks for sharing your experience with the recipe. May we ask, did you use the confection setting on your oven?
It is also important to know the ‘true temperature’ of your oven to know if maybe you need to adjust the setting (maybe a bit higher).
You can find tips on this subject from us here:
www.weekendbakery.com/posts...your-oven/
Hello,
No, worries. Just want to share the joy and achivement of making croissants.
Anyway, yes I do have a convection oven.
Thanks,
Anne
Hi! I’ve made your croissant dough a number of times and i’m finally getting the hang of it! I was super keen to make pain au chocolat (I always make a half batch of your croissant dough) and wondered if you knew the dimensions that it would need to be rolled out to?
Hi Charlotte,
You could roll the slab out to 20 x 55 cm and make one big cut over the length, then you get two slaps of 10 x 55 and divide each slab in 5 equal rectangular pieces of 10 x 11 cm, with a rolling pin, elongate each of 11 cm to around 14 to 15 cm, add chocolate and roll up. Of course there are other possibilities / sizes, but this could be a starting point.
Hope it will be great!
Thank you for the great recipe! I made them today and they turn out perfect. I follow the recipe but used 400 grams bread flour and 100 grams of pie and pastry flour. Can’t wait to make them again!
Wonderful Rita, thanks for the feedback and you may want to check out our one day version with tips on freezing and retarding too:
www.weekendbakery.com/posts...nt-recipe/
Enjoy the pastry baking and eating!
Hi there!
Great recipe, I’ve tried following it.
There are two things however, that I do not seem to master yet.
1) After baking, the laminated definition is lost. The butter seems to be infused with the dough. Even though before baking them, I can see layered definition if I look closely at the side of the rolled croissants while they’re still proofing.
2) During baking, butter leaks out and seeps over the oven / tray floor. By your pictures, I guess this should not happen. I’m using an unsalted butter with 82% fat.
Any tips?
Hello Grassant,
Loosing the definition in your case is definitely the cause of not getting any layering. It is no problem if just a bit of butter is leaking, but we are guessing most of your butter leaked out. This is almost certain a sign of under-proofing. Let them proof a bit longer and make sure they get very wobbly and increase visually in size (see our pictures and video). When under-proofed the butter tends to leak out from in between the layers and you end up with a butter puddle like you saw.
For more suggestions and frequently asked questions and answers you might want to check this page too:
www.weekendbakery.com/posts...questions/
You are very close, because your layering seems to be right, so give it another try! Good luck with it.
Thanks for the recipe and pictures. They are lovely.
Monique
Hope you will enjoy the pastry baking Monique!
Great Website. Love it.
So first time making these, infact first time really baking. They came out incredible and i added bars of chocolate along the top which worked out well.
I used lurpack unsalted butter but I dont know if this is the best one to use. I live in the UK.
Also proofing, I am not clear on what to do with this, we have normal ovens and i didnt have two additional hours. Any advise?
Thank you Yaron,
We heard people using this butter had good results and so did you by the ‘read’ of it.
As for the proofing, you need to find a space that has the most optimal conditions for proofing your croissants. So if you can use your oven as a slightly warmed up space that is great, otherwise use room / space that is as close to the ideal proofing temperature as possible. If the temp of the room and dough is lower, then the proofing time will get longer and you have to be more patient to get to that point.
Alternatively you can use the fridge to proof your croissants overnight. See how this works at the bottom of this recipe:
www.weekendbakery.com/posts...nt-recipe/
Enjoy your pastry baking!
Found a probing mode on the oven!! Still love it. Wish we could share photos!!
Hi again Yaron, it is not possible to add pictures to a comment unfortunately (you can put in a link to instagram or something like that) but we did create an option for you to showcase your results.
See: www.weekendbakery.com/send-...your-loaf/
So, hope you will be able to!
Great post, thanks for sharing. I’ve a Rofco b20 oven – would the stones be too hot for baking croissants and is it advisable to still use a fan oven instead (we have one, too)? Thanks!
Hello Alex,
We must say we never use our Rofco for croissants baking. We use a fan oven and have also used a household fan assisted oven with good results. We know there are bakers who bake croissants and pastry in a Rofco, but it is a bit of a challenge to get it right we understand, because of the temperature control.
You can try both but we think the fan oven will give better results with less ‘hassle’.
Enjoy your pastry baking!
Very nicely explained
I’m a professional baker and work with a sheeter
However the technique described here is good
I normally complete the laminating and cut/roll process all in one day but 3 days total is good
When you wish to freeze for longer than a few days i’d recommend 2 days total as the yeast can lose some ‘activity’ on that 2nd night in the fridge(its still active to a degree)
Great instructions for the first time viennoisserie student 🙂
Thank you Simon, really appreciate your feedback and sharing of pastry chef knowledge!
Hello, thank you for this detailed recipe. I have two question:
1) can I wait longer between the three folds? For example doing the first at 9am, the second at 1pm and the last at 7pm? Or it’s better to stick to the timetable?
2) after the last fold I leave the dough I refrigerate overnight and the dough still rises quite a lot. So lots of air comes out when I roll out for the last time (just before cutting). Is that normal? My fridge is set at about 5 degrees Celsius.
Thank you!
Oh there’s something I forgot to ask: after kneading the dough I rolled into a parfect 26×26 square enclosing the dough in a folded piece of waxed paper and filling any space with the rolling pin (I saw this technique on YouTube). Then I leave it overnight in the fridge. It helps me to have a more regular rolling later. Do you think it’s ok doing so before the dough has rested?
Hi Miles,
Thanks for sharing this technique, we think this sounds excellent and do not think it will be a problem to do so before the resting of the dough.
Good luck and enjoy the process.
Hi Miles,
For good laminating, especially if you are not that experienced, it is better for the end result to stick to the time table.
It is no problem if the dough rises during resting (ours does too, just gently role out the air to the edges), but if you think it is getting too much you could try using a little less yeast in the dough and / or keep this period shorter. Also
You could also try this one day version, or make a combination of the two recipes to fit your schedule and the way your dough behaves. www.weekendbakery.com/posts...nt-recipe/
Hello, thankyou for ur receipe. I have tried to following the step. But when i roll out the dough, some of the butter is out from the dough. Is it ok? How can i handle it?
Thankyou.
Hello Yara,
You have to try and avoid that from happening. You maybe have not sealed in the butter well enough and have pressed too hard on the dough. Especially in the first stages you need to roll and elongate with a gentle touch as not to damage the layers.
Good luck with it!
can I use less sugar?
if yes
then how many gm?
thanks
Hello Asadnoor,
Yes you can. You can use halve if you want to use less. But you could also use no sugar at all and still get a good croissant.
I don’t know if you have answered this question, sorry if you covered this already. Is there a reason for not adding an egg to the dough?
Ive followed the steps, and after a couple tries I still get stuck with my dough being stiff.
1- When I make the dough, do I need to proof it any before refrigerating it overnight?
2- When I do the folds with the butter and let it rest between then, my dough always get stiff (even with the butter already getting warm) and starts stretching back. I have to put a lot of strength to roll it. And it appears it doesn’t matter how long I leave it in the fridge for the gluten to rest, it’s still stiff and hard do roll. Any thoughts on what I could been doing wrong?
Thank you so much!
Marcella
Hi Marcella,
1. The dough goes straight into the fridge after you have made it.
2. Can we ask what flour you are using with what protein content?
Hey Guys! Thanks for the reply. I’ve used unbleached bread flour 12% protein. Could that be the reason?
Yes, Marcella,
We would advice to try a different, whiter flour with around 11% protein. You can use the other flour, but it would need a little less development and probably some more liquids too.
Best of luck with it and enjoy!
Hi there! I am about to undertake my first try at croissant making. I live at 5600 feet and wondered if I should make any adjustments for altitude? TIA
Hi Kim,
Living in the low countries almost all below sea level, we do not have hand on experience to guide you. We do know you will have to alter things and know about higher oven temps, decreasing of oven time and adding of more liquid. You will need to start somewhere and probably need to adjust even more variables (depending on what ingredients you use too) to get it right.
We think information in this post might help you further:
www.wheatmontana.com/conte...-mountains
Hope this helps and good luck with the pastry baking!
I have made the croissants about five or six times following your recipe. They are delicious, but I’d like to get better separation between the layers and make them more uniform in size. The ones cut from the center of the dough are thicker than those along the ends. I have trouble reaching the final length of 110 cm without multiple rests in the refrigerator. The dough ends up wider than I want it to be. I’ve also noticed that after my first “turn” trends of the dough gets creases and don’t neatly overlap. Do you have any suggestions.
Sincerely,
Henry
D
Hello!!
This is the first time Ive commited myself to learn making croissants. And for a beginner like me, the recipe is described step by step and so easy to follow. Ive tried the recipe 4times now and have learnt from my mistakes along the way.
But one thing I couldnt figure out is the butter cracking in between the folds. I thought it was the using of several small pieces of butter and replaced it with a whole block of butter which I elongated with a rolling pin. Still no luck with it. I always relax the butter and dough for 2 minutes after taking it out from the fridge, before rolling. Would that be because of the room temperature? It is mostly between 74 to 76 degrees.
And I used butter the European kind(plugra) . Thank you!
European style butter in North America still has a lower percentage of fat than the butter used in France for these pastries. I would suggest beating the butter, this should remove some othe water from the butter dry it with some paper towel and repeat.
We thank you for your excellent advice Steve. We understand that it is harder with the plugra butter still.
Hope you can give this a try Monisha. Let us know how that goes and if you need some more advice.
Enjoy your pastry baking!
Thanks both of you for responding to my query.
And by beating did you mean to beat up the butter with a stand mixer or with a rolling pin?
Hi Monisha,
With a rolling pin, like in the video. Take a look 15 seconds into the clip: www.weekendbakery.com/posts...roissants/
Hello!
What a lovely, comprehensive croissant guide you’ve made, it does a great job of breaking this difficult pastry down into manageable pieces.
I was wondering about the second leavening and whether it is absolutely necessary for gluten development etc. or if you could make this recipe in two days instead of three.
Thank you!
Hello Lottie,
Yes, you could make the recipe in two days or even in one day if you want.
You could combine the first two days in one. Also, see what works best for you, and your planning, with the recommendations we have with our one day recipe and our tips for retarding the dough:
www.weekendbakery.com/posts...nt-recipe/
Happy pastry baking!
What is the best way to measure your ingredients? Do you use a scale to get exact grams?
I live in the U.S. so using grams is new to me! Should I follow the measurements used by Jeffrey Hamelman in the recipe you linked at the beginning of this article? Thank you!
Yes, we use a scale and very much advice to use a scale to weigh ingredients including liquids exactly. If your scale can indicate grams you can use that and stick to our recipe.
Alternatively you can use the measurements and weights given in the Hamelman recipe and use the US scale settings for pounds and ounces.
Hope this helps you.
Thank you very much!
Hu dear weekend bakery
Thanks for your recipes, i tried croissants recipes and the taste is the best but i have problems with final product . After proofing the croissants geting big in height and width but after baking in oven they rise in width rather than height ( they are almist flattened ) . Could u help me how i can solve this problem? I want to send a photo to you have a better understanding
Tnx and regards
Hello Ali,
It could be the flour you use is part of the cause (maybe it is different from the ones we suggest) as well as not yet perfect laminating (maybe butter too much incorporated in the dough). You could try a different flour and next to this make sure you work very precise during lamination to build up the layers and get a good inside structure.
If you want to send pictures you can do so here:
www.weekendbakery.com/send-...your-loaf/
You may be OVER proofing your croissants, which tends to make them deflate in the oven. Try not proofing them for quite as long. They do not need to be excessively puffy at end of proofing. If you can press an indentation in your proofed croissant and it stays the depth that you poked, it is most likely over proofed, creating deflation during baking.
Hi! I baked your croissants twice and they were delicious. The dough had nice elasticity. However, although they had puffed considerably during the 2 hour proofing period, during baking the croissants deflated, lacked the honeycomb structure I was seeking to achieve and did not have the crispy multiple layers visible. The interior was delicious nonetheless and the exterior had crispiness. They looked like Sara Lee croissants, although tasted better. Any thoughts what I may be doing wrong? I did use European style butter.
Hi! You overproofed your croissants. High fat doughs should not be allowed to truly double in bulk during the proofing process, to allow them to do so overstretched the gluten strands and they will not be able to tolerate the change in atmospheric pressure as you move them from the hot oven to the cool kitchen. Proofing croissants is one of the most difficult and important aspects of croissant making and relying on a time from a recipe is a terrible idea. Every kitchen is a different temperature and humidity level, therefore they will take varying times to proof. Watch that last rising like a hawk! I measure my croissants in height before beginning the proofing, if they are say, 7 centimeters tall I would let them get no taller than 12 centimeters before baking. Underproofing is less of a sin than overproofing.
Thank you Madeline, for your very helpful advice.
Thank you!
Hi,
Thank you for your great croissant recipe. I saw many bakers (on youtube) trimming the top and bottom ends before each folding. Do you recommend doing that? Thanks.
Hello Gary,
We would rather recommend focusing on practicing your rolling technique (also see our video) to get the edges as straight as possible and only trim when absolutely necessary, because you lose a lot of precious dough this way. A lot of people roll the end parts to a pointy shape, and making that straight again means cutting off a lot of dough.
Thank you Chef!
Hello, thanks for the excellent recipe! I am on my fourth attempt and getting better slowly. What temperature is your fridge when chilling the dough? Mine is 4 degrees celsius and I think it means the butter is too hard and it makes the rolling difficult, as the better doesn’t really elongate it just stays in a big block. Thanks!
Hello Darren,
Hope you were able to get the right kind of butter like we suggested in the recipe, with the high fat content of around 82% that becomes pliable and does not break up. If your dough is very cold after fridge time, just give it ten minutes or so at room temp before you start rolling. Our fridge is just a bit less cold at around 5 C. We start rolling almost immediately after taking it out of the fridge, but you should never force the dough when it is not working with you. So wait a while and then gently try again.
I live in a tropical climate, and always had problems making croissants.
I tried your 3-days recipe, and it worked perfectly from the first try!
Thank you 🙂
Any suggestion to have the croissants ready by 8am instead of noon? Like maybe proofing in the fridge for the night?
Great to read your comment Alki. Excellent!
And yes, we do have tips for you and suggestions for altering the recipe to your needs. You can check them out here:
Tips for retarding are at the bottom of the article:
www.weekendbakery.com/posts...nt-recipe/
Thanks for the recipe! I had pretty good success in my first attempt.
I live in US, so thought I’d share my variations. I used 300g King Arthur AP flour and 200g King Arthur Bread flour. I used unsalted Kerrygold butter.
Since the room was chilly, I preheated my oven for 30 sec and left the trays in there with the door cracked open. The top sheet did leak a bit of butter but I soaked up what I could with a napkin and they still turned out great. Baked at 390 F convection for 15 min, and the 360 F convection for another 8min or so. They didn’t brown as quickly as I expected, I was using a friends oven.
Here’s a pic! ibb.co/85CfpnC
Bonne année!
Thanks for sharing Owen! You did very well. Always an extra challenge to bake in a strange kitchen with unfamiliar equipment. So extra credit points for you for pulling off such a great result. You probably had no way of measuring the oven temp while proofing and it was a bit too warm in there, so butter started leaking. Easily fixed if you can measure and control the temp not to go above the 78-to 80 F max.
Hope you can give it another go with your own oven too.
Enjoy a whole new and fresh baking year!
I love this recipe! However, I live in the US, but I live in Florida and I can only make this recipe a couple of times a year when it gets cold enough. But when I do use the recipe, I cannot use Kerrygold because the butterfat is too low, and It always incorporates into the dough when I don’t want it to. I use the Plugra salted because it has a higher butterfat content and in our family unsalted butter is sacrilegious and we don’t get it. We don’t taste the salt too much in it and I love it. I will use the recipe for the King Arthur flour, too. Thanks
Thank you Andy, for sharing your experience. You did well to use this high fat content butter and you can always compensate a bit by using less or no salt with the rest of the ingredients.