
It’s all about the layers…
Klik hier voor Nederlandse versie
With this recipe we want to give you the exact directions on how we go about making classic French croissants. The recipe is an adaptation from the recipe for Classic Croissants by Jeffrey Hamelman. We started out largely following the instructions for his recipe, changed everything to our beloved metric system and found out some worthwhile croissant knowledge of our own along the way. Hopefully enough to justify sharing it all with you and inspiring you to give croissant baking a shot yourself.
Before you start we can recommend watching our croissant making video to get a general feel for the recipe. You can also check out our croissant making log where we keep track of our own croissant baking adventures. For answers to your croissant questions you can check out the Frequently Asked Croissant Questions section.
This recipe will yield about 15 good croissants plus some leftover bits which you can use to make a few, slightly odd shaped ones, or other inventive croissant-like creations.
If at first you don’t succeed, maybe you can take comfort from the fact that our first efforts were not very ‘croissant worthy’. But as you can see we persevered and got better…But we have to admit it is and always will be a tricky process. You have to work precise and be focused to get good results. So away with screaming children, hyperactive animals and all other things distracting! Put on some appropriate croissant making music and lets get to it…
Please read the following tips;


According to Raymond Calvel croissants laminated with margarine are formed into the crescent shape, while croissants laminated with butter are left in the straight form. We say, use whichever shape you like best, but do use butter!
The croissant recipe

Ingredients for the croissant dough
500 g French Type 55 flour or unbleached all-purpose flour / plain flour (extra for dusting)
140 g water
140 g whole milk (you can take it straight from the fridge)
55 g sugar
40 g soft unsalted butter
11 g instant yeast
12 g salt
Other ingredients
makes 15
280 g cold unsalted butter for laminating
1 egg + 1 tsp water for the egg wash
Day 1
Making the croissant dough
We usually do this part in the evening. Combine the dough ingredients and knead for 3 minutes, at low to medium speed, until the dough comes together and you’ve reached the stage of low to moderate gluten development. You do not want too much gluten development because you will struggle with the dough fighting back during laminating. Shape the dough like a disc, not a ball, before you refrigerate it, so it will be easier to roll it into a square shape the following day. Place the disc on a plate, cover with clingfilm and leave in the fridge overnight.


Day 2
Laminating the dough
Cut the cold butter (directly from the fridge) lengthwise into 1,25 cm thick slabs. Arrange the pieces of butter on waxed paper to form a square of about 15 cm x 15 cm. Cover the butter with another layer of waxed paper and with a rolling pin pound butter until it’s about 19 cm x 19 cm. Trim / straighten the edges of the butter and put the trimmings on top of the square. Now pound lightly until you have a final square of 17 cm x 17 cm. Wrap in paper and refrigerate the butter slab until needed.


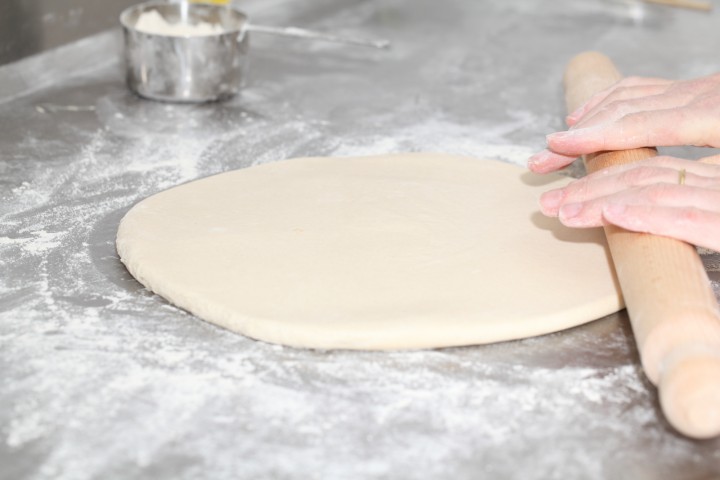
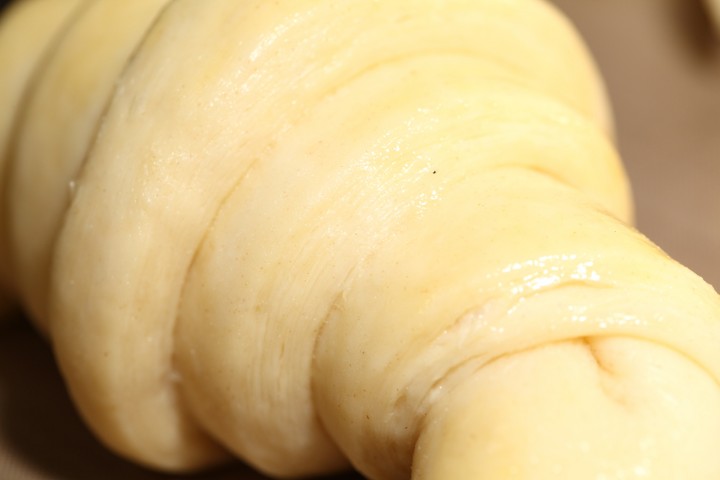
Take the dough out of the fridge. With a rolling pin roll out the dough disc into a 26 cm x 26 cm square. Try to get the square as perfect as possible and with an even thickness. Get the slab of butter from the fridge. Place the dough square so one of the sides of the square is facing you and place the butter slab on it with a 45 degree angle to the dough so a point of the butter square is facing you. Fold a flap of dough over the butter, so the point of the dough reaches the center of the butter. Do the same with the three other flaps. The edges of the dough flaps should slightly overlap to fully enclose the butter. With the palm of your hand lightly press the edges to seal the seams.
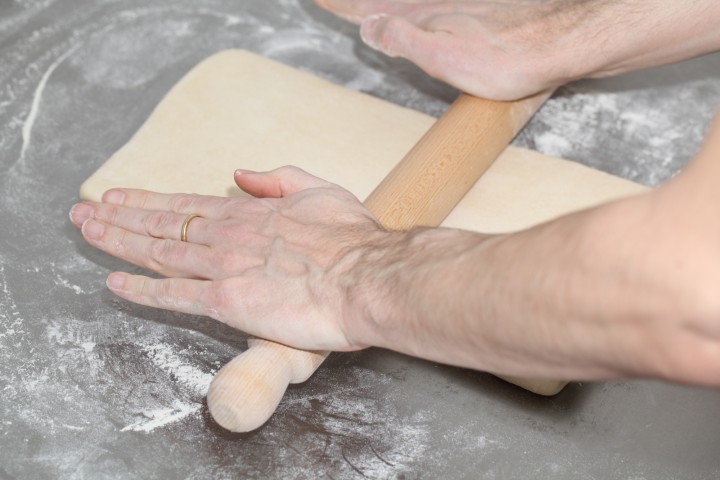
Now the dough with the sealed in butter needs to be rolled out. With a lightly floured rolling pin start rolling out, on a lightly flour dusted surface, the dough to a rectangle of 20 x 60 cm. Start rolling from the center of the dough towards the edges, and not from one side of the dough all the way to the other side. This technique helps you to keep the dough at an even thickness. You can also rotate your dough 180 degrees to keep it more even, because you tend to use more pressure when rolling away from you than towards yourself. You can use these techniques during all the rolling steps of this recipe. Aim at lengthening the dough instead of making it wider and try to keep all edges as straight as possible.
Fold the dough letter style, cover with clingfilm and refrigerate for 30 minutes (fold one third of the dough on top of itself and then fold the other side over it). Repeat the rolling and folding two more times (ending up with 27 layers of butter in total), each time rolling until the dough is about 20 cm x 60 cm. After each fold you should turn the dough 90 degrees before rolling again. The open ‘end’ of the dough should be towards you every time when rolling out the dough (you can see this in our croissant making video at around 3:40 minutes). After the second turn, again give it a 30 minute rest in the fridge. After the third turn you leave the dough in the fridge overnight until day 3, the actual croissant making day!
- Roll out to 20 cm x 60 cm
- Fold
- Refrigerate 30 minutes
- Rotate 90 degrees
- Roll out to 20 cm x 60 cm
- Fold
- Refrigerate 30 minutes
- Rotate 90 degrees
- Roll out to 20 cm x 60 cm
- Fold
- Refrigerate until day 3
- Rotate 90 degrees
- Roll out to 20 cm x 110 cm
Also see complete time table at bottom of page


Day 3
Dividing the dough
Take the dough from the fridge. Lightly flour your work surface. Now very gently roll the dough into a long and narrow strip of 20 cm x 110 cm. If the dough starts to resist too much or shrink back during this process you can fold it in thirds and give it a rest in the fridge for 10 to 20 minutes before continuing. Do not fight the dough, when the dough refuses to get any longer, rest it in the fridge! It is such a shame to ruin two days of work.
When your dough has reached its intended shape, carefully lift it a few centimeters to allow it to naturally shrink back from both sides. This way it will not shrink when you cut it. Your strip of dough should be long enough to allow you to trim the ends to make them straight and still be left with a length of about 100 cm.


Shaping the croissants
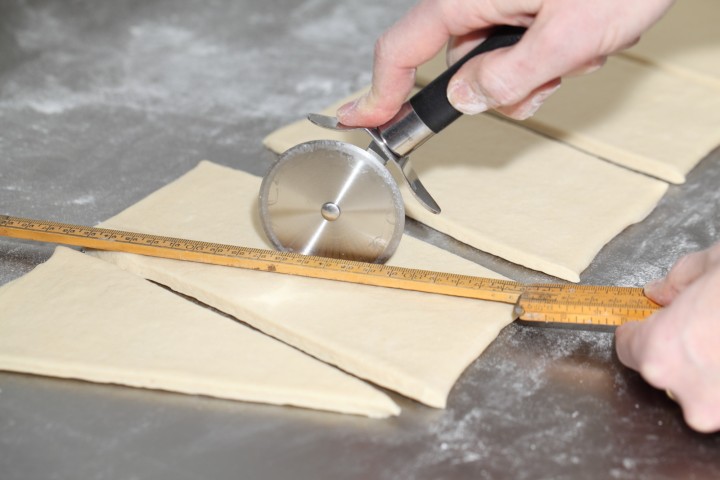
For the next stage you will need a tape measure and a pizza wheel. Lay a tape measure along the top of the dough. With the wheel you mark the top of the dough at 12,5 cm intervals along the length (7 marks total). Now lay the tape measure along the bottom of the dough and make a mark at 6,25 cm. Then continue to make marks at 12,5 cm intervals from this point (8 marks total). So the bottom and the top marks do not align with each other and form the basis for your triangles.
Now make diagonal cuts starting from the top corner cutting down to the first bottom mark. Make diagonal cuts along the entire length of the dough. Then change the angle and make cuts from the other top corner to the bottom mark to create triangles. Again repeat this along the length of the dough. This way you will end up with 15 triangles and a few end pieces of dough.
Using your pizza wheel, make 1.5 cm long notches in the center of the short side of each dough triangle.
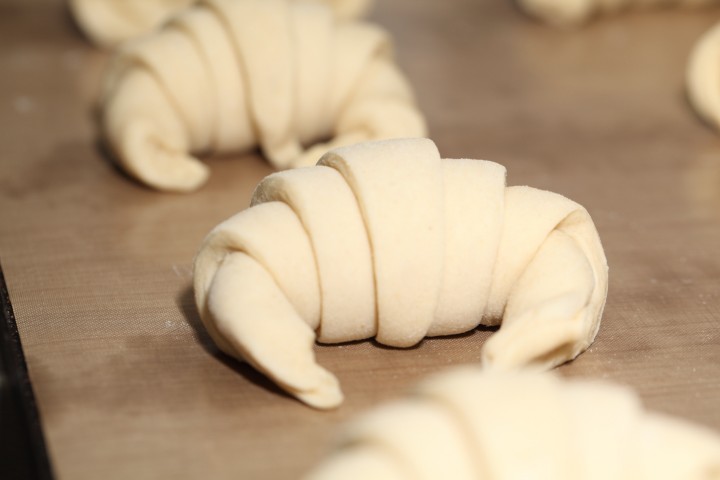
Now very gently elongate each triangle to about 25 cm. This is often done by hand, but we have found that elongating with a rolling pin, very carefully, almost without putting pressure on the dough triangle, works better for us. You can try both methods and see what you think gives the best result.
After you cut a notch in the middle of the short end of the triangle, try and roll the two wings by moving your hands outwards from the center, creating the desired shape with a thinner, longer point. Also try and roll the dough very tightly at the beginning and put enough pressure on the dough to make the layers stick together (but not so much as to damage the layers of course).
Proofing and baking
Arrange the shaped croissants on baking sheets, making sure to keep enough space between them so they will not touch when proofing and baking. Combine the egg with a teaspoon of water and whisk until smooth. Give the croissants their first thin coating of egg wash. You do not need to cover the croissants with anything, the egg wash will prevent the dough from drying out.
Proof the croissants draft-free at an ideal temperature of 24ºC to 26.5ºC / 76ºF to 79ºF (above that temperature there is a big chance butter will leak out!). We use our small Rofco B20 stone oven as a croissant proofing cabinet by preheating it for a minute to 25ºC / 77ºF. It retains this temperature for a long time because of the oven stones and isolation. The proofing should take about 2 hours. You should be able to tell if they are ready by carefully shaking the baking sheet and see if the croissants slightly wiggle. You should also be able to see the layers of dough when looking at your croissants from the side.


Preheat the oven at 200ºC / 390ºF convection or 220ºC / 430ºF conventional oven.

Right before baking, give the croissants their second thin coat of egg wash. We bake the croissants in our big convection oven for 6 minutes at 195ºC / 385ºF, then lowering the temperature to 165ºC / 330ºF, and bake them for another 9 minutes. Hamelman suggest baking the croissants for 18 to 20 minutes at 200ºC / 390ºF , turning your oven down a notch if you think the browning goes too quickly. But you really have to learn from experience and by baking several batches what the ideal time and temperature is for your own oven. Take out of the oven, leave for a few minutes on the baking sheet, then transfer to a cooling rack.
Latest way of baking; We heat up our double fan big convection oven at 200ºC, when heated up put the croissants in the oven and directly lower it to 175ºC. We bake them for 10 minutes at 175ºC, they will have a nice brown color by now, then lower the temperature to 150ºC, and bake them for another 6 minutes.
Best eaten while warm and fresh of course. Croissant we don’t eat or share within a day we freeze. We put them in the preheated oven (180ºC / 355ºF) for 8 minutes straight from the freezer. Nothing wrong with that, croissants eaten nice and warm, almost as good as the fresh ones…almost!
Croissant Time Table
Times are an indication and also depend on your experience with the recipe
Try to work swift but precise and take extra fridge time if needed!
Day 1 – Make initial dough
- 21.00 h – Knead for 3 minutes and store in fridge for 12 hours
Day 2 – Laminate the dough
- 09.00 h – Make butter slab and refrigerate till needed
- 09.05 h – Roll dough disc into square
- 09.10 h – Seal butter in dough
- 09.15 h – Roll out to 20 cm x 60 cm and fold
- Refrigerate 30 minutes
- 09.50 h – Rotate 90 degrees
- Roll out to 20 cm x 60 cm and fold
- Refrigerate 30 minutes
- 10.25 h – Rotate 90 degrees
- Roll out to 20 cm x 60 cm and fold
- 11.00 h – Refrigerate until day 3
Day 3 – Dividing, Shaping, proofing and baking
- 09.00 h – Roll out to 20 cm x 110 cm – part 1
- 09.05 h – Often needed! Take 20 min. fridge time if length not in one go
- 09.25 h – Roll out to 20 cm x 110 cm – part 2
- 09.30 h – Divide and shape the croissants
- 09.40 h – First coat of egg wash
- 09.45 h – Proof to perfection (indication 2 hours)
- 11.45 h – Second coat of egg wash
- 11.50 h – Bake for 15-18 minutes
- 12.10 h – Ready!
I’m planning on making these for Christmas morning, so my question is will they be okay proving overnight in the fridge so we can just get up and bake them on the day? Also, I may be being a little blind here, but I can’t tell how many this will make!
Hello Frances,
Yes you can do that, if you are a bit of an experienced (croissant) baker, because you need to judge when the proofing is perfect to get a good croissant. They might need some more proofing time after a night in the fridge, also depending on your fridge temp. So give them the time they need and only bring them to the oven when ready and wiggling!
With this recipe and the measurements given you get 15 good croissants plus some leftover / cut away pieces of dough which you can also roll and fill with some chocolate for example. They will not look that impressive but will still taste very good, so it would be a shame not to use them!
Hope they turn out great.
Happy baking and a wonderful Christmas time!
Ed & Marieke
Hello Ed and Marieke
I have been making your recipe for croissant very well about six times.Pretty perfect with strong bread flour( English 13.2protein)I wanted to get a even more perfect croissant ( i am french living in the uk so i wanted a even more french testing one)so I decided to get on line French type 55 flour. The result was not so good.
The dough was very soft I wondered if it was to much water. may be type 55 flour need less water.
The result was a croissant a bit flatter a bit softer. It also needed much more time to cook. The first tray was a bit underdone.
If it was my first attempt,I will have been very happy with them. May be they were a bit more like a French croissant but not perfect. I was expecting to get a better result with the right flour.What can I do to perfect it or should I stick to my English flour.
Could you also help me with a little problem i get when I laminate the dough I can see the butter separated at the joints.
(I am very careful when shaping the butter)
I thank you in advance for your help and your other amazing recipes. Wonderful website
Nicole
PS. You are right when you said. Croissant making is not easy. Sometime they are a 9/10 other 8/10for no reason. Still pretty good. Never a flop so I am happy.
Previously I was using Michel Roux recipe. Very respected but I had to give up after poor result until I found your wonderful website.
Hi Nicole,
We also think the use of the type 55 flour might need some adjusting in the shape of a bit less water. We do have the best result with this flour, but then there probably are differences too between type 55 flours from different sources. We would suggest giving it another try with adjusted moisture, but otherwise, if the other flour works perfect, stick with that!.
Can you explain a bit more what you mean exactly with ‘butter separated at the joints?’
Thanks for liking this recipe and our website, we really appreciate it!
Happy baking!
Ed & Marieke
Hello
When I start laminating I can see the butter under the first layer of the dough, and is is not in one piece maybe it is a bit hard and is separating at the seems. ( of the block of butter cut to form a rectangle )
I get a bit nervous to have my butter to soft.
I hope you can understand what I mean.
Thanks for your help.
Hi Nicole,
The obvious thing to try is just to be brave and work with butter that is just a little bit softer. Ed really pounds on the butter and that way it gets supple pretty fast. We do have to say that our butter is of a consistency that is already a bit pliable from the fridge. There might be a difference with different brands of butter, or things maybe added to butter that make it different. In the end there’s no substitute for experience, so….your first few attempts will probably be less than perfect and so it was with us too. So it could be that you go from too hard to a bit too soft..but next time you will know from experience exactly how it should look and feel.
Good luck with it and happy croissant baking and eating!
Marieke & Ed
I like very much
Hi
Iv baked croissant lastnight ,the taste of croissants were good but they had not puffed,they were flated
does somebody have idea for this problem?
Thanks
The first thing to look at is the flour itself. We use French type 55 flour with a protein content of around 11%. This works really well. Maybe your flour is a bit too ‘heavy’, resulting in a flatter croissant. So maybe try the recipe with a different flour.
Good luck with it!
Marieke & Ed
Dear Ed and Marieki,
Just discover your website, I’m very excited to see wonderful recipe, planning to follow it by heart.
Looking forward for more sweet indulgence. Well done and thank you.
Dorothy
Thank YOU Dorothy and lots of baking fun to you!
Ed & Marieke
Hi
I have a question for Day1,some people say its better stir sugar and milk and yeast and after this step mix another ingredients ,do you agree on this way?
thanks
Hello Mehdi,
We never do this and we do not think it is necessary. Within minutes the other ingredients follow so we do not see the point of doing this first. The yeast will have more than time enough to develop in this recipe, so there is no need for these extra steps.
Happy croissant baking!
Marieke & Ed
Can anyone please answer this guestion.When I take my croissants out of the oven they look amazing then within minutes they go flat!!!what am i doing wrong? Lori
We have two suggestions: bake them a bit longer, maybe they are not yet completely stable inside. The other thing is to turn of the oven after baking but leave them in the oven for a few minutes with the oven door ajar so they can cool slowly.
Hope this helps,
Marieke & Ed
i like this website and easy and nice presentation..
Thank you so much Tonnie. Hope you enjoy the recipes too.
Happy baking,
Marieke
I have been trying many recipes and this one is absolutely the best ever. On my first attempt the came out fantastic. Thank you guys. How can I post a picture of mine?
Hello Giselle,
We love to hear about great baking results and we love to see them even more!
You can send us your pictures via this page: www.weekendbakery.com/send-...your-loaf/ and then they will also be featured on our website.
Happy baking!
Marieke
I made this recipe for my first time ever making croissants and it worked perfectly. Light, fluffy and soft on the inside and crispy and flaky on the outside. I will definitely be making them again. Thank you so much
Great to have such a fantastic result the first time you made the recipe. Sounds exactly like they should be.
Happy baking & eating!
Ed & Marieke
good
Hi,
I am going to be making them tonight. How many does the recipe make?
Hello Darci,
If you stick to the measurements of the recipe you will get 15 or 16 good croissants plus there will be some left over pieces of dough that you cut away but you can also use and bake.
Happy baking!
Marieke
Dear both, thank you for this great recipe… I have tried it once so far, and the croissants were nice, but far from perfect.
I am working on the second try right now, and I have a question: after laminating the dough and putting it into the fridge, I have noticed that the dough is proofing quite a bit. The last time it did not proof that much, but this time it seems to grow a lot. Is there anything I can do? Did I do something wrong?
Thank you for your help…
Jens
Never mind… Just saw some of the other comments and questions posted. Should have read them before more carefully 🙂
Hello Jens,
We do have one other remark on the subject. As you get more familiar with the recipe you also will work faster and more efficient and the dough will be in the fridge sooner, allowing less time out of the fridge to already proof, so this way it will also get a bit less hopefully.
Happy croissant baking!
Ed & Marieke
Dear Ed and Marieke
Thank you for your repice and very useful tips. ^^.But i have a question, did you wait the dough double inside then put in to the fridge or put in fridge when you kneaed ?..i’ve seen many vids and some people wait the dough double inside then put in to fridge, i’m still confusing about this can u explain…thanks you very much 🙂
i like this website i learned about the bread procedure,
Thank you Tonnie,
Lots of loaves,
Ed & Marieke
Hello and greetings from Romania! I have just discovered your website and I am amazed by the quantity and quality of informations you have here. I see it comes from a lot of work and experimenting so thank you for sharing. Since visiting France I have been wishing to replicate the croissants I had there so finding your website is such a lucky thing. I will start on making the croissants today so I am pretty excited. Also saw your video with croissants making and it’s brilliant. Love to see the path from pure ingredients coming to life into perfectly croissants. So cheers and keep you posted with the results.
Thank you Ana-Maria and love to hear about your results.
Greetings from Holland &
Happy croissant baking!
Ed & Marieke
PS: The pictures on your website are beautiful and everything looks delicious and inviting!
Thank you for the appreciation! 🙂 🙂 So glad you like the pictures! The croissants turned out nice but I will try again until perfect! 🙂
Best from Bucharest,
Ana-Maria
Great Ana-Maria,
Keep up the good baking and enjoy the croissants!
Hi….I just made this croissant recipe yesterday for the very first time and im so happy and surprise that my croissant turns out perfectly exactly like your picture. I used king arthur bread flour instead of all purpose flour. It just I think its a little too salty for my taste other than that its delicious. Perhaps next time I just use less salt. Thank you so much for your tutorial step by step. It is a really yummy croissant. I’m planning to make pain au chocolat and pain au raisins 2 more weeks. Can I use this recipe and method too? Are they the same? Do you have the special recipe for pain au raisin?
Thank you Linda, for liking it so much!
Yes, you can use the dough for making pain au chocolat and pain au raisins no problem. Also Danish with creme patissiere are very nice (see picture from us in our croissant log file: www.weekendbakery.com/posts...aking-log/).
We do not have a recipe for pain au raisin. But you roll the dough into a log and cut it lengthwise into slices. Most add frangipane or creme pat. Raisins are sometimes soaked in cognac. you also see versions made with brioche dough. There are recipes to be found on the web but we cannot recommend one from our own experience at the moment unfortunately.
Happy croissant baking!
Marieke & Ed
Hi guys! First of all, thank you for a wonderful and detailed receipe. I only have one serious problem after I am done with Day 2. Dough is increasing in volume threefold after is put in a refrigarator with constant temperature of 6 degrees Celsius. So on Day 3, I start with ball of dough literally. I am also very careful with temperatures during the whole process as advised in your receipe. I am using dry yeast also. What could be wrong? Please advise.
Hello Matt,
We think there is nothing really wrong except that your yeast is a bit too happy maybe. You could cut down on the yeast a bit, but it should not be a problem that the dough has increased this much as long as you very carefully degas it.
Hope this helps you.
Happy Baking,
Ed
Hi,
I had the same problem…after several batches i think I finally improved the problem. The dough was always rising too much…so the next day I had something like a blown up ball…and it blew the layers and quite destroyed them. Now instead of using a kitchen scale for the yeast i use a spoon scale, they measure much more accurate to 0,1g. I also forgot many times to dissolve the yeast with the sugar and salt in the liquid, that has changed too. The salt acts on the yeast!
Also I tried to make them in two days. First day – making the dough. Second day – laminating and then i form and bake them. They turn out perfectly. I could not tell the difference between a croissant made three days and that which was made in two days, neither in taste, nor look. So you get rid of the laminated dough blowing up like a ball breaking all the layers. Greetings.
Dear Ed and Marieke
I have been making your croissant recipe four times. All very successfuly. Beautifully crisp sweet buttery flavour pretty perfect. My last bake looked perfect too exept they did not have the sweet buttery taste.I wonder what could be the cause. I made the recipe the same way. The only thing the butter was not so hard. The lamination was good the butter did not leak out or escape. I can not beleave the softer butter could affect just the flavour and nothing else.
I hope you can help.
Thank you so much for your croissant log. Best recipe ever for croissant.
Regards.Nicole.
Hello Nicole,
We do not think you butter was too soft otherwise the bake would not be this good. There is a slight chance that the butter may have ‘oxidized’ slightly or it also could have picked up odors from other food while stored. The oxidation happens when butter comes into contact with air and light, it turns a darker yellow and the taste alters. The picking up of odors can also happen in the fridge when butter is stored with other products. Both happen when butter is not properly wrapped / sealed. Oxidation can also be seen when butter is not that fresh anymore.
Otherwise we would not have any other explanation. The only suggestion we can give is to give it another go (with fresh butter batch) and check the result.
Good luck with it,
Marieke & Ed
do you mean 500g for dough 55g for dusting??
Hello Huiwen,
No, the ‘type 55’ is the name or type indication of the French flour we use for this recipe, not the amount of grams. The extra flour for dusting is not indicated in grams. You just have to take a minimal amount of flour for dusting, needed to handle the dough. So you just give a dusting of flour, and brush of the excess. You should not see any flour and especially no white spots of flour on the dough once you start to fold it again. So in short, try to keep this flour for dusting to a workable minimum.
Happy baking,
Ed & Marieke
Oh, I see thank you very much!^^
Hi, Ed & Marieke! I’m so excited to do the croissants and to make cronut! And I very thank you for the recipe and the step. I just want to ask you in the process of laminate can I fold the dough over 3 times? And also the butter (for laminate) can change to pastry margarine or not? ?that will affected the texture?
P/s my English is bad , sorry!
Hello Huiwen,
Yes, that is no problem. As for the margarine, we do not have any experience using it so we do not know what the effect will be. We think it will definitely effect the taste but are not sure what it will do to the texture.
Only one way to find out!
Let us know how it goes?
Marieke
Hello everyone,
I tried to do croisssnts several times and found the laminating to be a painful job. So I came up with my way of doing it. Insted of shaping the butter and folding it into the dough try to mix it with a little flour and live it at room temperature, put the gough to the fridge, after 30 min rest, take it out and roll out, put on a layer of butter mixture, fold, rotate 90 d and live it in the fridge for 30 min to rest, repeat the process untill you used all the butter mixture. For me it turned out to be a great way to make the most delicious croissants.
Sounds very interesting Ivanna. Very inventive of you.
Happy croissant baking!
Marieke
good
Dear Ed and Marieke,
Im Kevin from Indonesia. First, sorry if my english bad 🙁
i want ask.
what happen if im change ( water + cold whole milk) into only cold water or only cold milk?
can convectional oven make a flaky croissant?
ive gone to singapore, and there’s a bakery there named ” Tiong bahru bakery by Gontran Cherrier”
Its croissants is so flaky and have so super obvious layer outside
i have done several trials, like baking at higher temp ( about 240c )
or add about 50g milk powder for every 1kg of flour.
and 1 more question,
you do the croissant in 3 day
i have tried it too, but im failed
the dough rise in the fridge although im already wrap it with clingfilm tightly.
so that the final croissant after i bake it, really small 🙁
help me.
Thank you,
Kevin
Hello Kevin,
Thank you for your comment. We would suggest if you want to use only water or milk to choose the milk because there are some things like proteins and fats and sugars in it that aid the baking. Your other question about the oven is really hard to answer because it depends on the oven. But yes it is possible. 240 C is really high for croissants unless the real temperature of your oven is in fact lower than the thermostat is indicating. Also see our tips on the use of your oven: www.weekendbakery.com/posts...your-oven/.
And the dough does rise in the fridge, that is normal and you should not try and wrap it too tightly to try and hold it down.
And it is really important that the croissants get enough proofing time at the right temperature before they go into the oven.
Also make sure your yeast is working properly.
Just carefully follow our steps and stick to the recipe and do not try to change things unless there is no other way.
Good luck with it and happy baking!
Marieke & Ed
Hi,
I just recently found your website. Thank you for sharing your baking experiences. I have two questions concerning your croissant formula:
1) the hydration is 56% leading to a rather stiff dough. Was this by default, or did you decide to forego the typical ~65% hydration range for some reason after experimenting?
2) the percentage of Instant Yeast seems extraordinarily high. How did you decide on this, and it would seem to me that the rise and/or proofing from the amount of yeast would be extreme.
thank you,
alan
Hi Alan,
As you can see the formula is a recalculation (to metric) from the recipe by the wonderful mister Hamelman. Except for a few adjustments and slight changes in the method we followed his excellent lead which works very well for us and the ingredients we use. The amount of yeast is not so high, considering the method used plus the fact that this is an enriched dough. When looking at hydration you should also take into account the amount of moisture in the added butter.
Hope you give this recipe a try too. We get very positive feedback from many home bakers 🙂
Happy croissant baking!
Ed & Marieke
I will. I’ve tried the formula from Steve B’s Bread Cetera (68% hydration from water and milk) a few times and have had problems with butter leakage regardless of how gentle I treat the dough. I also live in Florida where it is not so easy to keep a kitchen lower than ~78F (~25C). The feel of the dough is great but it is too hard to do the final roll out in prep for the shaping – and the bench warms the dough up too fast.
I can get the appropriate rise and proofing from non-enriched doughs (and I’ve worked with baguettes, ciabattas and levains a few hundred times – I was a baker for a while), but working with enriched dough where butter is incorporated is a new game for me. I will indeed try your formula next.
Just as with you, I accept that failure will be a constant when working on new formulas. It is the learning from each event that help get me to the next better trial, and error 😉 The only thing that is important is the final outcome after a number of attempts. Nobody gets it right the first time…
Thank you for your rapid reply,
alan
PS I too love the beauty of the honeycomb interior.
Thanks Alan,
You are so right. And if necessary, just allow for extra or extra longer fridge time to relax the dough and to get it colder before you continue to roll. Some bakers even put things like flour and tools in the fridge when the weather is hot.
Good luck with it!
Ed & Marieke
I made the experience, that the roomtemperature is one of tbe most important points while making the laminating. Everything changes the colder it is…but it should be minimum 21/20 degree celcihs. Had a try at 25 degree…it was a disaster. Also what I found out after several batches is that the utter should have the same consistency as the dough. Otherwise you get breakage. For example is the dough soft so should be the butter…dont wait till it gets to hard. Also the dough should not be kneeded too much…more like mixed. Because otherwise you will get too much glutenstructure a d the dough gets stiff. After mixing the ingridientses, lea e it in the fridge…you ll see the next day iy will be perfect and easy to work with, allthough it did not loom like that the day you put it in the fridge the first time. Then you do a lot of stretch and fold while laminating and if the dough was overkneeded while making it at day one it will be really stiff and hard to work with.
Thank you so much for your website help me to make croissant on my own. I would like to learn more if you can help me. I have done
my NVQ level 2 Catering & Hospitality at City College&South Birmingham . I would like to hear from you as soon as possible.
Your welcome, glad you liked it. But do we understand you are looking for an internship or something? Because we do not offer that…
Hello I tried your recipe this week and I had a very hard time rolling the dough plus my butter was coming out, I tried putting back in the refrigerator for 30 min still it was hard to roll. My dough seems tough what could have i done wrong? how should the dough feel and look like after mixing?
Thank you.
Ronnie
Dear Ed and Marieke,
I am so happy finding your blog. It’s unbelievable… I finished the first step and … got the first questions 🙂
Could you please enlighten me about ” leave in the fridge overnight”? I don’t know exactly how much time and the temperature inside the fridge. I left the dough in my fridge at 8’C but it rose fast after 4 hours. Meanwhile as I see in your video, when you remove the dough from the fridge, it looks unchanged in the dimension.
Thank you in advance. Hope you have a nice weekend !
Hello Amy,
Glad to be of help. Overnight usually means about 12 hours. Fridge temperature usually is 7 degrees at the most, ours is between 5 and 6 degrees Celsius. But do not worry, the dough should rise. It is hard to judge because you cannot see it very well but our dough definitely is higher after fridge time (not so much wider in dimension), I think between 1.5 and 2 times as high as when it went in.
Hope this helps you.
Happy croissant making and baking!
Marieke & Ed
There may be a flaw in your recipe. You call for cold water and milk, but the makers of instant yeast recommend all liquids be at 80F (27C) or warmer. My experience with no-knead bread suggests that water below 60F kills some of the yeast, and below 50F kills most of the yeast. This may be the reason some people’s croissants don’t rise well.
Hello Mike,
Thank you for your comment Mike,
In our opinion this is not really correct. The yeast is not killed at these temperatures, but it simply goes into hibernation. People store sourdough cultures in freezers and and professional bakeries use fridges to let bread proof overnight. The activity slows down and even stops at some point, but when the yeast warm up it gets active again. Otherwise we would have encountered the same problems. The problem most people have is they work not fast enough (yet) and the butter gets too soft in between layers. It is being absorbed within the dough and this will result in more of a brioche shaped croissant than a flaky croissant. So, in our opinion warmth usually is more of a challenge to get the perfect croissant than cold.
But nest time we bake we will measure the exact temperature of our ingredients and the temperature of the dough after kneading and update our recipe with this information.
Happy baking,
Ed & Marieke
wow wow wow… day of baking today. croissants warm from the oven, tasting so good cant stop eating… thank you so much for the wonderful recipe, i wanted to try this so long .. finally today.. good explanation , nice pics,, results r very good… dint expect such lovely croissants with so many layers.. thank u once again …
Very happy to hear it work out so brilliantly for you too Suganya!
Wishing you many more flaky croissants with impressive layers,
Ed & Marieke
Hello,
Thank you for the beautiful site and video on croissant making. A baker once told me that it’s a good idea to mix in a couple ounces of flour to the butter before laminating in order to make the butter “stronger”. Do you know anything about this technique/theory? Thanks!
Regards from California
Hello Ray,
Yes, we have read about this technique too but never tried it ourselves. It also seems to make the butter more pliable because it acts like a binding agent in the butter. Let us know if and when you give this technique a try?
Happy baking and greetings from Holland,
Ed & Marieke
Hey guys
Brilliant Croissants,keep up the excellent work.
My 1st question,if you were to double the recipe ,will the butter an dough measurments be the sameas per the standard recipe?.an if not,will I have to make bigger croissant,?
Do you guys make croissant on very hot humid days?,if so,can you set your airconditioner temp to around 22 degrees?,if faced with such a problem.
Really am inspired by these beautiful ‘bad boys’ you have produced.
Regard
Shakil
Hello Shakil,
First of all thanks! As for your question: The easiest option would be to work with two parallel batches and keep all the measurements as provided in the recipe. For a different method, let us calculate a bit and get back to you on that one. We try not to bake croissants on hot days, we know a baker who does and he tries all kinds of stuff to keep it cool, like storing flour and tools in the fridge. Usually we do not have air conditioners around here, they are not standard. But if you have one, of course it could work fine, it would indeed help to make the air colder and dryer. But for proofing you you then would need a spot that is a little warmer (25-26 C) and not too dry of course.
Greetings from Holland,
Ed & Marieke
Hi, I was wondering, does the dimension of the square (of dough, and of the butter) change when you reduce the size of the recipe? For example, if you had a recipe for 30, and you had the dough dimension of of 26cm x 26cm and the butter 15cm x 15cm, if you were to cut that yield in half, how should you account for the dough square dimensions and the butter square dimensions please?
Thank you,
Hi there,
For this you would need the square root: a slab of 26 x 26 = 676 cm2. With half the dough you can only make a slab of 338 cm2. To know the lengths of the sides of the square you need to take the square root of 338 which gives you a slab of dough of about 18 x 18 cm (18.38 to be exact). You can do the same ‘exercise’ with the butter.
The challenge now is that you have a smaller slab so you will get smaller triangles and smaller croissants, because all the measurements are related. To get the full size croissants you have to stick to this recipe.
Another suggestion would be to make the whole batch and cut it in half and keep the other half in the freezer for a later bake.
Good luck with it and happy croissant baking!
Ed & Marieke
Dear Ed and Marieke,
Your croissants made me crazy, I really like it so much. Could I have ask you for a few questions?
– I proofed my croissants in room temp with 25c and the result was my croissants not rise properly, the shape was flat. Could you give me some advice for this cause?
– For the temperature of baking croissants, the perfect temperature should be 200c for 15mins or 170c for 40mins. Which temperature is the best for baking croissant
Thank you so much for the best croissant recipe.
Thank you again.
Pung
Hello Pung,
To answer your first question: it is difficult to judge without seeing the dough but you could take a look at both the flour you use (it should be a lighter type flour with around 11% protein content, some flours can be too heavy for croissant baking) and also the yeast you use ( verify it is fresh and not past the sell by date so it works properly). The room temp is excellent.
As for your second question in the beginning you should really stick to the temperatures and times given in the recipe above (We bake the croissants in our big convection oven for 6 minutes at 195ºC, then lowering the temperature to 165ºC, and bake them for another 9 minutes.) and take that as a starting point to change things a little bit with further attempts. So around 200C for 15 minutes and maybe lower the oven when browning goes too quickly.
Good luck with it and happy baking,
Ed & Marieke