
It’s all about the layers…
Klik hier voor Nederlandse versie
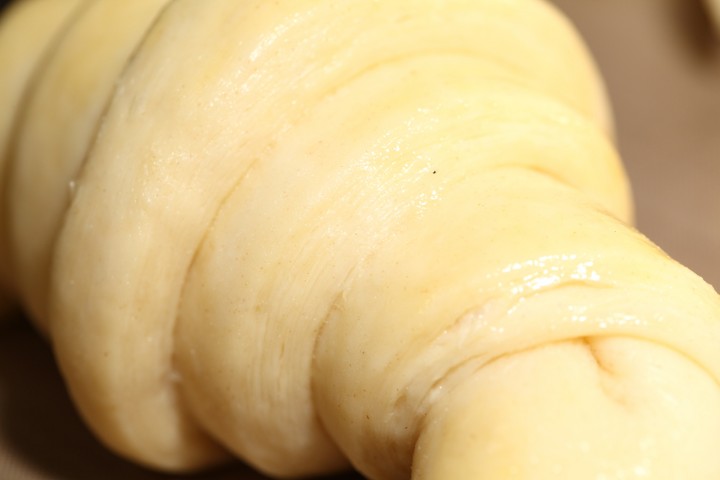
With this recipe we want to give you the exact directions on how we go about making classic French croissants. The recipe is an adaptation from the recipe for Classic Croissants by Jeffrey Hamelman. We started out largely following the instructions for his recipe, changed everything to our beloved metric system and found out some worthwhile croissant knowledge of our own along the way. Hopefully enough to justify sharing it all with you and inspiring you to give croissant baking a shot yourself.
Before you start we can recommend watching our croissant making video to get a general feel for the recipe. You can also check out our croissant making log where we keep track of our own croissant baking adventures. For answers to your croissant questions you can check out the Frequently Asked Croissant Questions section.
This recipe will yield about 15 good croissants plus some leftover bits which you can use to make a few, slightly odd shaped ones, or other inventive croissant-like creations.
If at first you don’t succeed, maybe you can take comfort from the fact that our first efforts were not very ‘croissant worthy’. But as you can see we persevered and got better…But we have to admit it is and always will be a tricky process. You have to work precise and be focused to get good results. So away with screaming children, hyperactive animals and all other things distracting! Put on some appropriate croissant making music and lets get to it…
Please read the following tips;


According to Raymond Calvel croissants laminated with margarine are formed into the crescent shape, while croissants laminated with butter are left in the straight form. We say, use whichever shape you like best, but do use butter!
The croissant recipe

Ingredients for the croissant dough
500 g French Type 55 flour or unbleached all-purpose flour / plain flour (extra for dusting)
140 g water
140 g whole milk (you can take it straight from the fridge)
55 g sugar
40 g soft unsalted butter
11 g instant yeast
12 g salt
Other ingredients
makes 15
280 g cold unsalted butter for laminating
1 egg + 1 tsp water for the egg wash
Day 1
Making the croissant dough
We usually do this part in the evening. Combine the dough ingredients and knead for 3 minutes, at low to medium speed, until the dough comes together and you’ve reached the stage of low to moderate gluten development. You do not want too much gluten development because you will struggle with the dough fighting back during laminating. Shape the dough like a disc, not a ball, before you refrigerate it, so it will be easier to roll it into a square shape the following day. Place the disc on a plate, cover with clingfilm and leave in the fridge overnight.


Day 2
Laminating the dough
Cut the cold butter (directly from the fridge) lengthwise into 1,25 cm thick slabs. Arrange the pieces of butter on waxed paper to form a square of about 15 cm x 15 cm. Cover the butter with another layer of waxed paper and with a rolling pin pound butter until it’s about 19 cm x 19 cm. Trim / straighten the edges of the butter and put the trimmings on top of the square. Now pound lightly until you have a final square of 17 cm x 17 cm. Wrap in paper and refrigerate the butter slab until needed.


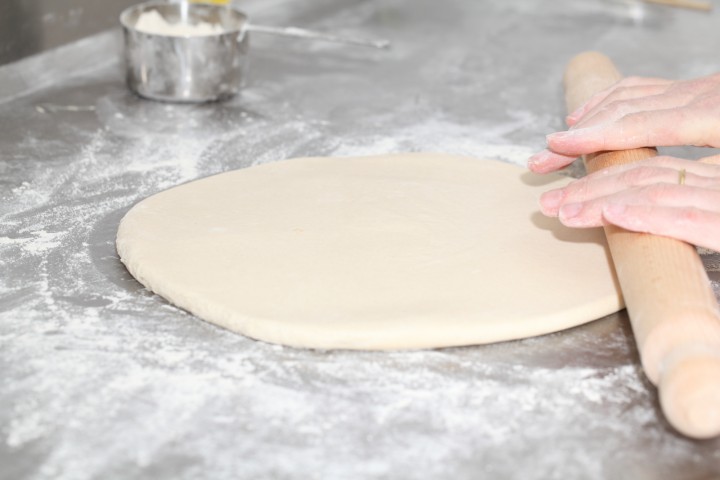
Take the dough out of the fridge. With a rolling pin roll out the dough disc into a 26 cm x 26 cm square. Try to get the square as perfect as possible and with an even thickness. Get the slab of butter from the fridge. Place the dough square so one of the sides of the square is facing you and place the butter slab on it with a 45 degree angle to the dough so a point of the butter square is facing you. Fold a flap of dough over the butter, so the point of the dough reaches the center of the butter. Do the same with the three other flaps. The edges of the dough flaps should slightly overlap to fully enclose the butter. With the palm of your hand lightly press the edges to seal the seams.
Now the dough with the sealed in butter needs to be rolled out. With a lightly floured rolling pin start rolling out, on a lightly flour dusted surface, the dough to a rectangle of 20 x 60 cm. Start rolling from the center of the dough towards the edges, and not from one side of the dough all the way to the other side. This technique helps you to keep the dough at an even thickness. You can also rotate your dough 180 degrees to keep it more even, because you tend to use more pressure when rolling away from you than towards yourself. You can use these techniques during all the rolling steps of this recipe. Aim at lengthening the dough instead of making it wider and try to keep all edges as straight as possible.
Fold the dough letter style, cover with clingfilm and refrigerate for 30 minutes (fold one third of the dough on top of itself and then fold the other side over it). Repeat the rolling and folding two more times (ending up with 27 layers of butter in total), each time rolling until the dough is about 20 cm x 60 cm. After each fold you should turn the dough 90 degrees before rolling again. The open ‘end’ of the dough should be towards you every time when rolling out the dough (you can see this in our croissant making video at around 3:40 minutes). After the second turn, again give it a 30 minute rest in the fridge. After the third turn you leave the dough in the fridge overnight until day 3, the actual croissant making day!
- Roll out to 20 cm x 60 cm
- Fold
- Refrigerate 30 minutes
- Rotate 90 degrees
- Roll out to 20 cm x 60 cm
- Fold
- Refrigerate 30 minutes
- Rotate 90 degrees
- Roll out to 20 cm x 60 cm
- Fold
- Refrigerate until day 3
- Rotate 90 degrees
- Roll out to 20 cm x 110 cm
Also see complete time table at bottom of page


Day 3
Dividing the dough
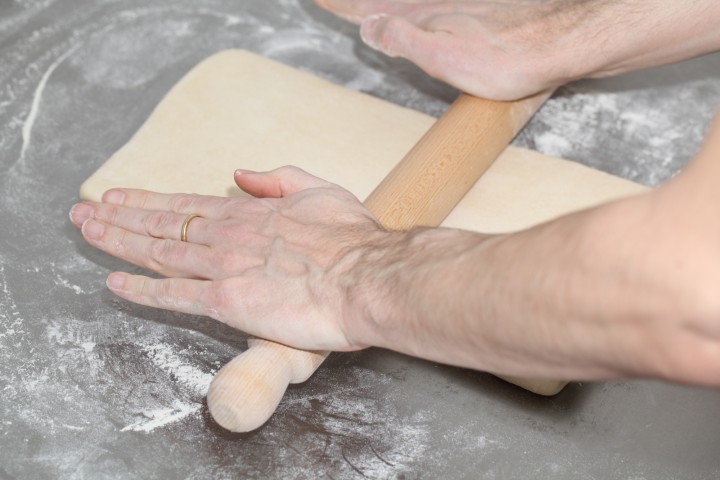
Take the dough from the fridge. Lightly flour your work surface. Now very gently roll the dough into a long and narrow strip of 20 cm x 110 cm. If the dough starts to resist too much or shrink back during this process you can fold it in thirds and give it a rest in the fridge for 10 to 20 minutes before continuing. Do not fight the dough, when the dough refuses to get any longer, rest it in the fridge! It is such a shame to ruin two days of work.
When your dough has reached its intended shape, carefully lift it a few centimeters to allow it to naturally shrink back from both sides. This way it will not shrink when you cut it. Your strip of dough should be long enough to allow you to trim the ends to make them straight and still be left with a length of about 100 cm.


Shaping the croissants
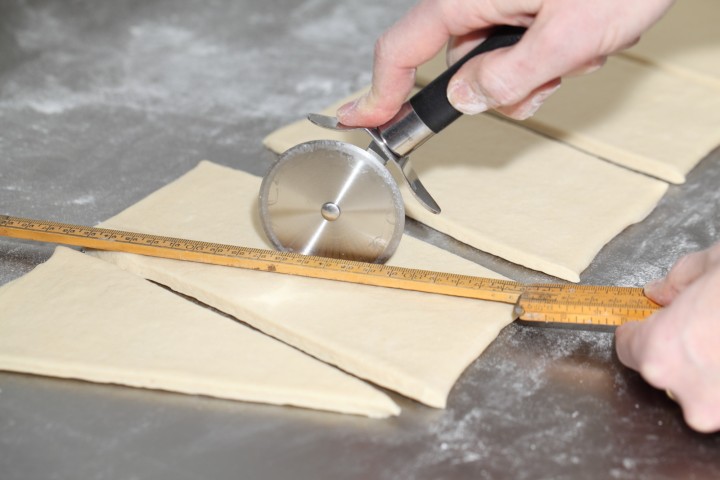
For the next stage you will need a tape measure and a pizza wheel. Lay a tape measure along the top of the dough. With the wheel you mark the top of the dough at 12,5 cm intervals along the length (7 marks total). Now lay the tape measure along the bottom of the dough and make a mark at 6,25 cm. Then continue to make marks at 12,5 cm intervals from this point (8 marks total). So the bottom and the top marks do not align with each other and form the basis for your triangles.
Now make diagonal cuts starting from the top corner cutting down to the first bottom mark. Make diagonal cuts along the entire length of the dough. Then change the angle and make cuts from the other top corner to the bottom mark to create triangles. Again repeat this along the length of the dough. This way you will end up with 15 triangles and a few end pieces of dough.
Using your pizza wheel, make 1.5 cm long notches in the center of the short side of each dough triangle.
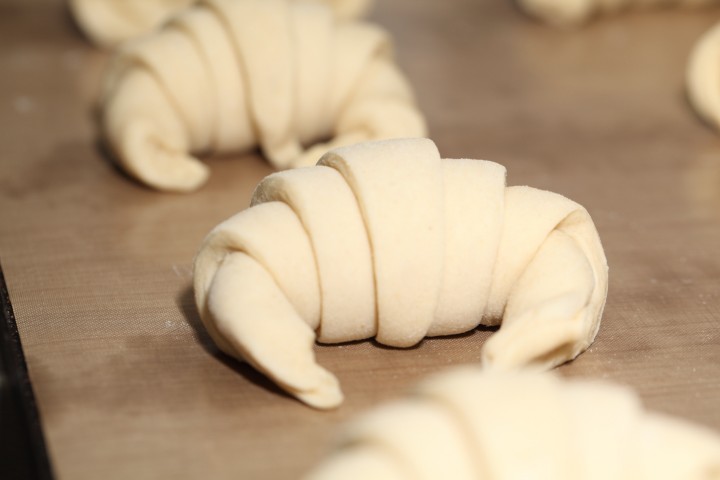
Now very gently elongate each triangle to about 25 cm. This is often done by hand, but we have found that elongating with a rolling pin, very carefully, almost without putting pressure on the dough triangle, works better for us. You can try both methods and see what you think gives the best result.
After you cut a notch in the middle of the short end of the triangle, try and roll the two wings by moving your hands outwards from the center, creating the desired shape with a thinner, longer point. Also try and roll the dough very tightly at the beginning and put enough pressure on the dough to make the layers stick together (but not so much as to damage the layers of course).
Proofing and baking
Arrange the shaped croissants on baking sheets, making sure to keep enough space between them so they will not touch when proofing and baking. Combine the egg with a teaspoon of water and whisk until smooth. Give the croissants their first thin coating of egg wash. You do not need to cover the croissants with anything, the egg wash will prevent the dough from drying out.
Proof the croissants draft-free at an ideal temperature of 24ºC to 26.5ºC / 76ºF to 79ºF (above that temperature there is a big chance butter will leak out!). We use our small Rofco B20 stone oven as a croissant proofing cabinet by preheating it for a minute to 25ºC / 77ºF. It retains this temperature for a long time because of the oven stones and isolation. The proofing should take about 2 hours. You should be able to tell if they are ready by carefully shaking the baking sheet and see if the croissants slightly wiggle. You should also be able to see the layers of dough when looking at your croissants from the side.


Preheat the oven at 200ºC / 390ºF convection or 220ºC / 430ºF conventional oven.

Right before baking, give the croissants their second thin coat of egg wash. We bake the croissants in our big convection oven for 6 minutes at 195ºC / 385ºF, then lowering the temperature to 165ºC / 330ºF, and bake them for another 9 minutes. Hamelman suggest baking the croissants for 18 to 20 minutes at 200ºC / 390ºF , turning your oven down a notch if you think the browning goes too quickly. But you really have to learn from experience and by baking several batches what the ideal time and temperature is for your own oven. Take out of the oven, leave for a few minutes on the baking sheet, then transfer to a cooling rack.
Latest way of baking; We heat up our double fan big convection oven at 200ºC, when heated up put the croissants in the oven and directly lower it to 175ºC. We bake them for 10 minutes at 175ºC, they will have a nice brown color by now, then lower the temperature to 150ºC, and bake them for another 6 minutes.
Best eaten while warm and fresh of course. Croissant we don’t eat or share within a day we freeze. We put them in the preheated oven (180ºC / 355ºF) for 8 minutes straight from the freezer. Nothing wrong with that, croissants eaten nice and warm, almost as good as the fresh ones…almost!
Croissant Time Table
Times are an indication and also depend on your experience with the recipe
Try to work swift but precise and take extra fridge time if needed!
Day 1 – Make initial dough
- 21.00 h – Knead for 3 minutes and store in fridge for 12 hours
Day 2 – Laminate the dough
- 09.00 h – Make butter slab and refrigerate till needed
- 09.05 h – Roll dough disc into square
- 09.10 h – Seal butter in dough
- 09.15 h – Roll out to 20 cm x 60 cm and fold
- Refrigerate 30 minutes
- 09.50 h – Rotate 90 degrees
- Roll out to 20 cm x 60 cm and fold
- Refrigerate 30 minutes
- 10.25 h – Rotate 90 degrees
- Roll out to 20 cm x 60 cm and fold
- 11.00 h – Refrigerate until day 3
Day 3 – Dividing, Shaping, proofing and baking
- 09.00 h – Roll out to 20 cm x 110 cm – part 1
- 09.05 h – Often needed! Take 20 min. fridge time if length not in one go
- 09.25 h – Roll out to 20 cm x 110 cm – part 2
- 09.30 h – Divide and shape the croissants
- 09.40 h – First coat of egg wash
- 09.45 h – Proof to perfection (indication 2 hours)
- 11.45 h – Second coat of egg wash
- 11.50 h – Bake for 15-18 minutes
- 12.10 h – Ready!
Hi
Made the croissant dough but it was look dry , I add little more milk & butter but still look like Dry
I use bread flour
1-Pleas can you tell me why the dough dry ?
2And I can keep it first time 8h in the fridge or it should be more ?
3- this for 12 layers or 27 layers croissant?
Best regards
Fawaz alarbash
Are you weighing your ingredients with an accurate scale? Pastry baking demands a higher, more exacting standard. Also, one possible variable is how dry your flour has become, depending on how it is stored and in what humidity, and what type it is. I’ve found that only a tiny bit more liquid is sometimes needed, other times when I’ve weighed carefully the dough comes together perfectly. The number of layers can be figured differently depending on whether you count repeated flour layers in between..you can put in some double turns, or four folds, or do three “simple” single folds, regardless, there are a lot of layers! The number of layers or increasing them doesn’t make a croissant lighter, or “better.” How well the dough is formed and treated, allowed to rise and baked determines the quality and lightness. In fact, too many layers you lose the definition of them and how much they separate during baking. Three single turns is a perfect place to start.
Also, “bread” flour means different things in different places..croissants need a flour softer than bread flour, like all purpose, true bread flour has more protein and stronger gluten which you don’t want in a croissant.
Amazing, thank you for the quick feedback! Really excited to try them on Saturday Morning and we will definitely try your tips on freezing so we can have a treat next week too!
We have completed step 1 and have the dough in the fridge. There is only two of us, so we were wondering if we were to freeze the croissants, do we freeze them just after the proving or after they have been cooked? Also we don’t have the best equipped kitchen so what would be the best way to prove the croissants, could we warm up our convection oven to a low temp and place them in it or is it better to leave them just in a warm place in our kitchen.
Cheers!
Freeze after cooking and complete, complete cooling. That way when you thaw completely in the original bag, they pop out just as nice as when they went in. No, don’t warm them to proof..you run the risk of melting them! A long, cool rise is just fine. If you have a warm kitchen, that’s fine too, it’ll just take less time. My recommendation for the first time is..let..them..rise! Until when you jiggle the pan, they have a pronounced wobble. When you go to brush them with egg before the oven, the brush must be delicate, or you leave tracks in the dough, like a big, puffy, gel! I’m not really exaggerating, I’ve let mine go three hours plus when it’s cool..they make the best ones..!
PS..freezing them, I was shocked. They are perfectly wonderful after freezing. Top notch quality. Crispy, even. The only tricks are to completely, absolutely cool them raised so they dry off, and then when thawing, leave them in their original bag so they reabsorb their own moisture.
Excellent advice, works for us too!
Do you think cultured butter is OK to use
Yes..check the fat content to be sure it is 82% or higher. Higher butterfat allows the butter to be more pliable at colder temperatures, to roll more easily, and is richer in flavor. If you can’t find high butterfat butter, you can still make the croissants, it’s just a bit more difficult and the results also a bit different. I prefer organic, personally, just use the highest quality you can find as the best ingredients make the best results, since you are working hard for days, why not use the best? Good luck!
Yes, but the main thing is indeed pliability and fat content. We find French cultured butter can be a bit ‘crumbly’ / dry.
I’ve seen a lot of questions lately about ppl being fearful of working with the dough, that the butter will “melt.” Please, don’t be afraid of the dough! Unless your kitchen is hot, you can work this dough without being so afraid! The flip side of this coin are the questions about seeing the butter break up, or break through the skin of the dough, or difficulty rolling it out. Well..that’s the balance only experience will provide you. I’m guessing most ppl refrigerate too much, actually, being so afraid of the dough that it makes the dough harder to work with. If the dough feels cool, the butter isn’t melting. Just shoot for cool, not freezing cold..maybe that will help..
I am really working hard at this recipe but the insides of the croissants are dense and taste doughy.
It’s really frustrating because they look great but taste awful.
Any ideas?
My first thoughts are..type of flour needs to be all purpose, not bread, and proofing time. Long. Proof them until they are huge, puffy, wobbly things that the brush for egg disturbs it. I’ve let them proof three+ hours in a cool room. I don’t think overworking the dough, with all the butter and yeast in it could be the issue..I feel confident in the protein content, (lower than bread flour) and rising time first, then look for other problems..
Yes, dare to proof and also look at the temperature of your oven, to establish it is correct and it is preheated well and you do not loose too much heat opening it. See our oven tips too:
www.weekendbakery.com/posts...your-oven/
We agree, one challenge at a time and make notes of the things you change and things that work well.
Yes..temperatures. I was thinking about the inherent difficulty in teaching things that involve a “feel, or feeling.” Like aikido, music, or a recipe, there are many assumptions that must be made we take for granted. In math, I can say “I’m going to add two, and two. Ok, you do that, what do you get?” Well, obviously four, because two ppl have concrete ideas or assumptions about the quantities. In this recipe, there are near infinite variables. One person reads “pound the butter until pliable,” and who knows what they do? What kind of butter? How cold? What shape? Even “preheat oven to X,” well, how accurate is the oven? Is it convection? What shelf are they baking on? That’s why novice bakers have so many questions..and also why this recipe is successful..it explains many of the variables and includes invaluable video. Still, ppl have questions, it’s nice to be able to share, and help..
And appreciated!
I am a first-time croissant baker, and it seems I’ve made the typical mistake of working the dough it too long between refrigerating it. I am struggling to get the final roll out up to 110cm–after about 8, 1min. attempts separated by at least 10 min. in the fridge, I am only up to 72cm. I’m starting to think I should start over. Do you have any suggestions for something else that I make with the dough that is not croissants?
Thank you!
Don’t start over! I’m sure the result will be tasty! If you can’t get the dough all the way long, rest it in the fridge for a while. After a few batches, I experimented with rolling out half as long, but twice as wide, making two rows. This also fits my large pastry board perfectly. I don’t see any difference in the baked croissants between rolling all out in one long row, or both up and sideways for two rows. Maybe a professional croissant chef could show me how the gluten strands benefit in some secret way by being rolled in only one direction, but, my eyes and tastebuds can’t detect any difference. Don’t fret about anything..if the butter isn’t melting, you’re fine. Keep the dough cool, you’ll be fine.
Rereading your post, I think you’re actually working against yourself by refrigerating so much. You can make all that butter very stiff, and it will be very difficult to roll. Just shoot for the dough feeling cool. If it’s cool, the butter isn’t melting. The butter has to have pliability to roll, that requires it to be not freezing cold. Experience will show you the limits. In all the batches I’ve ever made, I’ve never seen the butter, outside of the oven, get to anything close to melting.
Hey! My boyfriend and I tried these over the weekend. Began on Friday and had them on Sunday afternoon, all warm with jam. Quite the process. We found a couple of things: 1) we didn’t lay out the butter in the same way you did, just cut them in larger chunks on day 2 which meant that the distribution of butter was less even; 2) it was really hot on Saturday so there was some tearing of the dough that revealed some of the butter while we were working on it, those tears never “healed”; 3) we ended up making 14 croissants, not 15, so I think some of them were thicker; 4) proof may not have been as good – were they supposed to grow very much? ours didn’t really so they were small compared to yours; 5) baking time was off – the 6 mins at one temp and then lower didn’t work for us. I went longer for most of them. Also: put two batches in the oven at once and the one that was on the lower rack ended up burning – the butter seeped out and burnt the bottom, frying it while the tops remained undercooked. I can’t say they weren’t tasty (buttery bread is good no matter what) but it wasn’t the same because of the burnt bottom. I put them on the top rack after to cook them a bit more and they were a bit more even and despite the burnt bottom, the lamination was nicer. Thoughts on why this happened and why we made other mistakes? How do you fix tears? Thanks so much for all this. It was really hard lol but I kind of want to do it again!
We live in a world of instant gratification! Nothing will replace your experience and making batch after batch, being as observant as you are and questioning..why? Why does my oven need to be at X temp? Why this, why that? Well, you’ll get better. I did. For me, it was a matter of realizing I was reading the instructions, just not necessarily doing them. The butter “slab” must be uniformly soft and malleable, ALL the way through. French bakers achieve this by literally beating that crap out of cold, harder butter until they “feel” it’s perfect. I myself on my first batches was slicing the sticks of butter, assembling rectangles, smushing them together by beating perfunctorily and calling it good. Well, the butter wasn’t all uniformly soft and, well, “moving.” The reason butter separates, or tears is it’s too cold, or too hard, or has too high a water content at the temperature you’re working at. You have to figure out the cooking by your own oven, it’s temps, etc. I cook one tray at a time, that’s just how I get the best results. Also, experience teaches you to master a recipe, then make changes when you realize something isn’t working. For me, I work the turns faster, I don’t chill thirty full minutes. As long as the butter isn’t melting and the dough is cool, cold, and workable, I go ahead. For me, chilling too long between makes the butter too hard. These are things only experience can inform. This is why bakers specialize in certain things like pastry, and study for years. You’ll get better, if you want to..enjoy the process! (Underproofing happens a lot more than over..let them proof until they are practically a wobbly gel..!)
thanks for all the practical advice!! I think we def underproofed…big issue and then the butter issue. I appreciate it.
We cannot stress enough the importance of following the recipe to the letter! And thank you mister K. for your excellent advice and words of encouragement.
Ok first attempt. Definitely hard work. Ended up with great crust, good layers and flavour but not consistent honeycomb. I made a few mistakes: salted butter ( bad baker) and I don’t have a mixer so had to knead by hand , which I think smushes the butter possibly causing more separation. Also my final proof I made the mistake of putting my rolled croissants back in the fridge overnight so as to bake in the morning. I think they needed a shorter, warmer final proof. I also did fight with my dough at some points, so used the fridge a lot to chill it out.
Nothing can replace mindful practice and repetition. As you do more batches, you’ll find successful techniques. Yes, I think what may have tripped you up was refrigerating the shaped croissants. They would then need quite a bit of extra time to rise as the butter being cold would make them very stiff. I’ve let trays of rising croissants go well over three hours when the room was cool. I’ve always felt long, cool rises are preferable to short, hot ones. “Smushing the butter,” well, the butter initially inside the dough gets dissolved throughout, so, no worries there, and the lamination layers stay separate due to the nature of fat, unless the dough is heated to butter’s melting point. No mixer really isn’t a problem..please don’t think of this as a “bread” recipe requiring kneading. Pastry demands a careful treatment..think of it rather as simply “putting the dough together just, just until smooth.” This only takes about three minutes. The subsequent rollings and foldings exercises the dough plenty, the long rests overnight do two important things..relax the dough, and creates more flavor. More batches=more practice=more experience=higher and higher level of consistency. Congrats on your efforts!
Hello,
can someone advise on the triangle dimensions to get the style shape where the rolls are very close almost as though there are no “steps” in the finished croissant ?
thanks,
L
If you cut even rectangles and roll, there will be no “steps.” You can roll and cut the dough into any shape you can imagine. It’s difficult for someone else to advise you how to cut a specific shape you are imagining in your own head. Experiment, and enjoy!
it has been quite frustrating experimenting with shapes, because I live in the tropics and have to work very fast. Also if I try for very stepless triangle the rolled croissant does not sit flat anymore, it is very humped in the middle.
Sorry Lenny, we cannot help you with this, based on experience. We have not tried these shapes. Use the fridge more if you find you cannot work fast enough.
Hi there! 🙂
First, many thanks for the recipe and your sharing. It’s very helpful for the starter like me.
This is my 2nd time to start the croissant. (1st i failed because butter leaked when i laminated the dough, i guess that my butter may not cold enough.)
So i start the 2nd and i just wonder. When we knead the dough, i knead 3 mins by machine as per your instruction.
Do i have to continue knead until i can check window? As i continued do hand knead for 5 mins more, it still not reach window check state and it become more softer but not smooth skin.
Thank you very much
Nuii
No. Initially you just put the dough together. Gluten begins forming in bread dough the second you wet it, ppl don’t realize this. But, we manipulate this dough quite a bit, so, just put it together smoothly, it only takes three minutes, then proceed. Subsequent rolling forms plenty more gluten, and helps expose the yeast to new food sources, so no worries. You don’t want to “knead” at all..just put the dough together.
Exactly, like we say in the recipe, you only want low to moderate gluten-development, so just stick to the 3 minute kneading and continue with the instructions. No window pane needed!
Love your recipe! How can I convert the dry yeast to fresh yeast. I’m not sure if the ratio since the dry yeast requires 3/4 cup dry yeast to 1 cup water is equivalent to one package of fresh. Since your recipe already has water and milk.
Dry yeast is more concentrated, use a bit less, fresh yeast you use a bit more than in recipes with dry.
I made this recipe 5 days ago and I’m already back to make it again! Will this same recipe work for pain au chocolat if I cut the dough into rectangles instead and roll chocolate in?
Yes, but be aware as a commenter posted below that a different shape allows the dough to rise differently. You can also roll chocolate into croissants..it’s..all..good!
Maybe also try these recipes with the same dough, they are so good!
www.weekendbakery.com/posts...x-raisins/
and this classic:
www.weekendbakery.com/posts...y-caramel/
Enjoy your pastry baking!
Thank you for the recipe!After resting in the fridge in a book shape, there are lots of wrinkles on the folding line, especially on both edges. I wonder if this is normal. Few creases are quite deep, will that damage the gluten structure? Your reply will be appreciated.
Don’t fret over the small stuff. If you haven’t sealed the dough well, perhaps you’ve got some dehydration happening. Or some other reason. Wait until you’ve finished the process, I’m sure you’ll be fine. If it’s a real problem, it will become apparent later, but, it’s difficult to say what is the issue here without seeing it.
I baked them tonight and they come out quite nice. On the last shaping, I can see through the butter dots and there were some leakages at the corner. Was that because the butter slab wasn’t soft enough when I wrapped it into the dough?
I hope I can improve next week followed by your advice. Thank you again for your reminding on dehydration problem, the weather in Sydney is quite dry. I’m so happy I can bake my favorite brunch by myself at home.
Great job! Yes, my initial ones were the same. I wasn’t beating the butter enough as a whole unit, making the whole block soft. Also, I was chilling a bit too much, the butter would get too hard, but..they still turn out very well. The structure improves with better technique, but they taste about the same, so..enjoy!
Thank you so much for your kind reply and great encouragement. I found you discussed the similar issue on butter breakage below on 3May. I didn’t wait the butter become soft enough cuz I worry about melt.
The room temperature is around 20degrees recently, does that mean I shouldn’t worry about the butter melts into the dough, I can keep rolling the dough as long as it is stretchy ?
It’s around 25 degrees most time around the year, I wonder how to tell if the butter melts in between the layers since the dough is sealed tightly. Is it any indication that it should be chilled in the fridge even the dough is still flexible to roll out? It really takes me time to make it into rectangle.
There are always lots of these questions in the beginning, nothing replaces experience and just seeing how it works out. It’s all about feel. If the dough is cool, and malleable, you can do the turns. If you feel it’s melting, put in the fridge for five or ten minutes, then check. For me, a full thirty minutes makes the dough too hard..I tend to just rest a few minutes between turns. Others might think it’s wrong, but, maybe my fridge is really cold. You have to practice mindfully, observe carefully, and change things if it’s not working for you. Keep some notes if that’s helpful, but only a few batches and you can be sure you’ll improve.
I forgot to mention, rolling directly towards the corners makes more even and sharp edges, 45 degrees to the plane of the long axis to the dough.
I baked my croissants and they came out really fantastic, not only the taste but also the appearance. I followed your advice with mindfulness to small details. Thank you sooo much. You made me surprise that I could accomplish something beyond my own expectations.
I’m happy for you! I had the same experience with this wonderful recipe! I confess I went a bit nuts..I have several bags still frozen from the many batches I made..!
Congrats Jackie, these words you write are so very true! Mindfulness to small details is what croissants make perfect!
Hello
I make croissant successfully for the first time just by following all the steps. I had never imagined that I could make croissants at home because i live in a humid tropical city and it was said that there is no way to make croissant in hot weather.
Thank you so much for the great recipe and very detailed directions.
Congrats! You can also cool your surface if you don’t have the blue ice packs by placing a large, sided cookie sheet with ice on it, chilling your rolling pin, and pausing your rolling and putting the dough back in the fridge whenever you want. You can also splurge on the purchase of a marble or stone board to roll on, and chill that. Just some more ideas for you..I grew up too in a very hot and humid place..
Wonderful Merida, this will inspire other bakers too!
Hi
Can I cut each croissants smaller in width, perhaps half the size but the same length?
I’d really recommend that you try the recipe as written just once for a baseline to work from. You can certainly cut the dough into any shape or size, it’ll be great, just be aware your cook time may be altered by the different surface area presented. But, if you change the recipe first, without knowing how your hands, your ingredients, your oven produce the tried and true original recipe, then have questions about what happened, it’ll be slightly harder to determine exactly how it differs from how you did the recipe originally.
Wise advice, thank you!
Great recipe, very detailed and easy to follow. The results were unexpected. So delicious. Thanks you!
Hi Roses,
Great the recipe was a success for you too. Enjoy, and maybe try some other pastry with this dough too:
www.weekendbakery.com/posts...x-raisins/
Hello thanks so much for this great recipe. I’ve been experimenting with flour (in the UK) and so far a mix of 50/50 half plain flour(protein 10.4%) half strong flour (protein 12.3%) seems to give the right amount of rise. Plain flour only didn’t come up enough. Haven’t tried all bread flour yet but might do that next week.
Also I went for a halfway house between the 1 day and 3 day recipe, where I do ‘day 3’ in the evening of day 2, then retard in the fridge overnight so I can bake them first thing in the morning. This seemed to work well.
Hi Tappazee,
Great to read your feedback. More people use your method with success, combining day 2 and 3. Thanks also for sharing your your flour combo, which will be close to the 11% French flour we use too. All bread flour, is our experience, will make the croissants ‘heavy’ and flatter, but it also very much depends on the exact properties of the flour you use.
Enjoy your pastry baking!
Hey, you’re right, I did all bread flour this weekend and it was indeed a bit on the heavy side. Still delicious tho! Next step is to source some type 55 and see how that compares to my 50/50 blend. I will report back.
Great to hear the tales of this little community of croissant bakers:)
I found organic French T55 on Amazon. Compared to King Arthur Organic All Purpose the final croissants had a bit more, well, “shatter,” just a tiny bit more crisp of the outside crust, but other than that, the taste, rise, consistency etc was similar, and I decided any differences could be written off to variations in the individual bakes. So, for me, I decided it’s not worth the extra cost, the KA flour works fine. Glad I tried though, the French flour was great too.
Made the dough last night but it doesn’t seem to have risen much in the fridge. I believe my fridge might be a little on the colder side. Is it okay to let the dough rise outside of the fridge for a short time before starting the lamentation process or does the dough need to be fresh out of the fridge cold?
Lamentation usually begins when they’re finished, and you realize they didn’t turn out the way you wanted. Seriously though..it’s not meant to rise a whole lot in the fridge. It’s not going to. The butter already in the dough has a stiffening effect along with the cold. Just proceed with lamination..good luck!
Yes exactly!
Thank you! They ended up turning out perfectly!
Congrats! Yes, I went absolutely nuts after trying this recipe the first time. I started making them with honey and walnuts inside, raspberries, double, then triple batches..I have a freezer full. Now, unfortunately, I’m on a bit of a self imposed “croissant diet,” learning to use my new kamado style barbecue grill..!
We understand this very well!
And, because meat eating can also get out of hand (we did enjoy the low and slow recipes), we also use our green egg BBQ and our small Roccbox pizza oven to make lovely vegetable dishes, ratatouille style with lovely mixes or tomatoes and onions and pine nuts (also delicious with (sword)fish), cabbages, filled courgettes from the garden, corn on the cob, Brussels sprouts, cauliflower, sweet potatoes, garlic, mushrooms and so on. We make our own pita bread and fill it with only veggies and a bit of homemade sauce and it is delicious!
Wonderful!
The dough won’t rise much in the fridge, although some fermentation does occur (that’s why the 3-day croissants are the tastiest ones). The dough needs to be cold for the lamination (or “tourage”), otherwise the layers could be ruined. It is important to work quickly and let the dough rest sufficiently in the fridge after each step of the process ( at least 30 min as described here, better more).
Thank you Svetlana, for your excellent explanation.
Thank you Svetlana!! They ended up turning out perfectly
Hello
Trying to make these tonight
I have only all purpose flour is that fine ?
Also in the description you said it need to be rest in the fridge for 30 minutes. But on the video it says to be rest in the freezer ?
Next time start a new question at the top, this was a reply, hard to see! Anyway, you can rest either in fridge or freezer, but less time in freezer. I haven’t watched the video in a long time, I’m not sure what you’re referring to, but the rests between turns don’t necessarily have to be thirty minutes..just keep the butter from getting “melty,” or the dough from being too stiff to roll..
If this is the flour you have, it will be fine to use for the croissants. It is more important even to follow all the steps very carefully!
Great recipe, very detailed and easy to follow, thank you!
Thank you Emily for using the recipe. Hope you will enjoy many excellent croissants!
Hey,
I was on a mission to learn baking different kinds of bread and croissant was one among it. I came across the weekend baery website by chance and i couldnt be happier. The detailed directions in the recipe made it easy for a first timer. inspite of the non availability of bread flour, organic butter, and living in a humid tropical region, i managed to pull out some amazing croissants. The honeycomb pattern was not obtained like in the picture, but the layers wer visible and i was happy. thank you.
i wish i could share the picture.
thank you
Hello Mefa,
You should be very proud of what you have accomplished, it is amazing to be able to bake them under such conditions.
If you wish to share them you can do so here:
www.weekendbakery.com/send-...your-loaf/
Enjoy your pastry baking!
Thank you for this great recipe and detailed tutorial which is easily the best on the web (believe me I searched!). My croissants were a great success from the first try.
Best wishes from Russia,
Svetlana
Thank you so much Svetlana, that is a big compliment :), and thank you for choosing our recipe, which we have no doubt was also a success because of your baking skills.
Greetings from our tiny country by the sea to yours. Hope you will be able to make many more delicious pastries!
Marieke & Ed
WKB
I used to play horn professionally..we had a guest conductor from Russia, Pavel Kogan, he was really a fun, energetic conductor, and a super nice man. I really enjoyed working with him, and he even requested I play a concerto for him when he guested.
Hi!
I mage these for the first time this weekend. They turned out beautifully. Thank you for the detailed instructions and images.
Great Janeen, it’s the best feeling when perfect fresh croissants come out of the oven and you can show them and share them!
Hello
Can I freeze after proces od day 2.
Make different batches and then bake them in different days?
Sure, why not. Just remember that after thawing you may need extra rising or proofing time for the yeast to wake up.
Hi there,
I’m about to start the final roll out of this recipe. I’ve been working with Dominique Ansel’s recipe, but much prefer yours so far! So thank you!
I have been struggling with keeping the butter at the right temperature on the second roll so it doesn’t break. Time and again I go to roll out after the first fold and the butter breaks into little pieces. I know it’s important to keep the dough cold so the butter layers instead of incorporating, but I’m so frustrated with the breaking! I have made sure I rest 30 min in the fridge, that I have 83% butter fat butter so it’s malleable enough, and that I roll gently. What can I do differently?
Thank you!!
I gave up the entire thirty minute resting..I do two or three batches, so I put them in the fridge briefly while I do the turns. Honestly, if the butter isn’t melting, just go ahead and do the turn. I find like you that resting that long firms up the butter to the breaking point. Now, the ones that do that still turn out fine, but, when the butter rolls evenly it produces a more refined result. It’s all about feel. The first overnight rest is important in relaxing the dough..next day, do the turns by feel so the butter stays even, and the dough is relaxed enough to roll. Usually that overnight fermentation allows you to do the turns virtually immediately one after the other, at least in terms of dough relaxation, so, unless it’s melty, or too stiff to roll out (unlikely because of the overnight rest) just go ahead with it. Just one other home baker’s advice to another..!
I would like to try them, but reading the recipe I don’t find the quantity of yeast and what kind of fresh or dry
thanks
There’s a title above, it’s says “Ingredients for the croissant dough,” in a blue box, the ingredients are all listed, including “11 Grams Instant Yeast.”
Thank you for the recipe! I got to make 16 croissants.
The croissants turned out perfectly and the instructional videos were perfect.
Stretching the dough a little just to increasing the layers after cutting it into a triangle would be a helpful additional tip to your great recipe.
That’s a good point..I actually have gone to stretching them slightly by hand before shaping as well, instead of rolling. I’ve seen vids of French bakers doing the same thing, and noticed a slight improvement on the final structure. It’s all about refining your methods, always improving..good luck!
Thank you both for the excellent feedback.
Hi I’ve just completed your recipe and hope they turn out well! Do you freeze unbaked? and if so with or without the egg wash?
It’s easier to freeze after baking and cooling, let thaw in their original bag to reabsorb their moisture, it’s odd, they are then just as crisp if you had baked them fresh..!
We also give some more tips at the bottom of this recipe about freezing and retarding Alex.
www.weekendbakery.com/posts...nt-recipe/
Very keen to try this out. However do NOT have a mixer to do the kneading. Hence wanted to check whether its possible to knead by hand?
Given the complexity and the time it takes I do not want to risk this if its important to use a machine vs hand kneading.
Your website is amazing thank you very much!!
This dough needs only minimal, minimal kneading. Three minutes in the mixer just to put it together, that’s it. Gluten forms in dough the second you add water, and develops over time and additionally through manipulation by rolling. Think of simply putting it together, not kneading it. You’ll succeed just as easily by hand, don’t worry.
Yes, we would recommend to just go ahead and take the advice of Mr. Katanahamon. Give yourself time and chance to get to know the process and the dough. We all need practice to get a good croissant. And thank you for your kind words.
Above all, enjoy the pastry baking!
Ed & Marieke
WKB
Hi!
I’m currently at day 2, and would like to know why the dough needs to rest for one more day?
Why not keep it in the fridge for 1 hour after the last fold and then make the croissants?
Looking forward to tomorrow and my horribly shaped crescents!
A longer rest before the final roll out allows the dough to relax fully. Yes, you could just go ahead, but, the dough benefits from this cold rest, and, it splits up your work. If you want, you can even do a one day version of this recipe here on the site. Breads always seem to benefit from extra time. Enjoy!
Wow! Fantastic results!! Thank you for this recipe. I don’t ever bake so I did not have high expectations considering I’ve heard it can be difficult to make great croissants but by following this recipe word for word I was able to make perfect croissants. Thanks again.
Thanks for sharing your joyful comment Peter. Great our steps could guide you to a good result.
Enjoy the baking and eating!
Ed & Marieke
WKB
Yes..me too..I was very excited when this recipe turned out so amazing on the first try. I figured out why mine hadn’t been turning out like I wanted, I was putting the butter together in slabs, pressing them together, beating it a little and thought that was good, but in beating the butter as a whole unit, getting it softer allowed it to spread evenly and not break through the dough..it’s nice to master an allegedly “difficult” technique that makes such a beautiful, tasty and iconic item..!
Thank you thank you thank you!!!! I have been wanting to try to make croissants, but have heard how difficult they can be so I kept putting it off. My friend found your recipe and we decided to make them together while in different states. We messaged each other during each step which was fun. Your instructions are very precise and the video was incredibly helpful to give me a better idea of what to do. Our croissants turned out perfectly! My husband and I love to travel particularly in France and USA store bought croissants simply do not compare to those in Europe. One bite and my husband said it tasted like France! We are currently in quarantine and this made my week! Thank you!
Thank you Ashley, your comment makes us smile 🙂
No greater compliment than the taste of France.
So glad you can enjoy your baking too these strange days.
What a wonderful skill to have and spread joy with.
Greetings from semi-locked down Holland,
Ed & Marieke
Hello, I have a question about the croissant dough.. all the recipes I can find have flour, yeast, water, sugar and salt in the dough, and the other ingredients vary.. some recipes add milk (like yours), others add some melted butter in the dough, and others also an egg yolk. Would you be able to explain what could be the difference made by each of these ingredients (milk, melted butter, egg) in the dough? Thank you and thanks for the recipe, very well explained 🙂
Thank you Carlo,
Well that is something we could write a book about, but if you want to learn more about the science behind baking, we can recommend the book ‘How baking works by Paula Figoni. About the egg, it somewhat tenderizes the pastry and we are personally not looking for that in a croissant, so we do not use it. We also see no need for yolks (emulsifier, color, fat, moisture) in this type of dough.
Hope you will give our method a chance, maybe compare it with a totally different one.
Let us know how it goes!
I found that adding egg to the dough actually detracted from the mouthfeel..it’s hard to describe, but the ones with egg were fine, they just didn’t meet the expectation of what a croissant is supposed to taste like. I guess more cakey than bready… Try the brioche recipes, or brioche feuilletee for lots of egg and even more butter, you’ll see. These variables all have an effect, you could spend a lifetime experimenting. I also experimented with French organic 55 flour vs King Arthur all purpose, and there was very little difference, not enough to warrant extra price or shipping.
Exactly, our reference taste and the one we like the most as the ‘classic French’ one definitely has no egg in the dough.
Thank you very much!
I want to post a picture of what Ive done, and it was exactly like you have posted. If you follow up all the details, you will taste delicious croissants. 🤗🥰
Hello Adela,
Although it is unfortunately not possible to post pictures with these comments, we do have a ‘showcase’ possibility here:
www.weekendbakery.com/your-loafs/
Thank you for your enthusiasm and keep on baking pastry!
I did some calculations to halve your recipe, yielding 8 croissants, and otherwise follow the recipe exactly, it was a little complicated but I can share for those who want to do the same without doing all the math. My croissants turned out absolutely perfectly. To make a 8 croissants, halve all ingredients as written (except the yeast, use the full amount of that) then use the following measurements:
Butter square: 12cm x 12cm
Dough square: 18cm x 18cm
Rolling out for lamination steps: 14cm x 42cm
Rolling out for shaping: 20cm x 57.5cm (trim to 56.25cm), follow cutting measurements as written, will yield 8 triangles for croissants + trimmings.
Wow glad to find your reply. I really wanted to try this recipe as suggested.
We have a slightly different but similar calculation you can find here with our Frequently asked croissant question topic:
www.weekendbakery.com/posts...questions/
Hi weekendbakery,
Thanks a lot for ur information, anyway i try a lot of times to make Crossaint and it still fail, everything still in perfect untill i proof it, exactly the temperature and only in 1:30 hours but i look at this texture feel like overproof and when i bake it look so good untill i took it out and all of this will collapse i feei so sad but dont know the reason
Please can you help me, I would appreciated much
Hello Jil,
Collapsing can actually also be a sign of underproofing (see if they expand much when baking and then collapse). If you proof for 1.30 hours at the indicated temp in the recipe, they may very well need longer. It can also be a sign your laminating and shaping was not done correctly. Also the oven temperature can be less than what is indicated (check the true temperature of your oven or if not possible try to start at a higher temp) . Never open the oven during baking too. The challenge is that it can be a combination of factors and you need to find out what goes wrong by exactly measuring the temperature of your dough and oven to know if you truly proof and bake the right way.
Good luck with it.
sorry for my late respond, thanks so much…
Anyway would u like to let me know the brand of butter and the yeast to make croissants please, thanks a lot