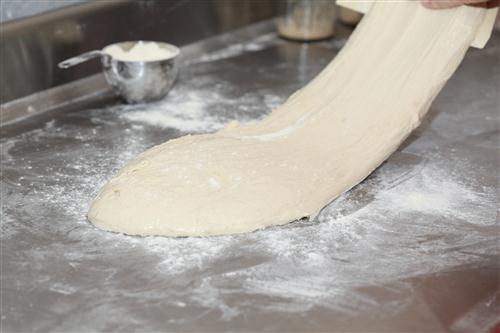
Wet dough, it’s all in the mind… and a little bit is sticking to your fingers…
Working with high hydration doughs can be difficult. When working with very soft and wet dough, for instance baguettes, ciabatta or breads like our Baguette Boules it will take a while for you to come to terms with the stickiness of it. You will ask yourself: “Should it be this sticky?” and maybe end up with more dough on your hands than your work surface! Do not panic, it’s all part of the wonderful journey that eventually leads to the land of creamy crumb and crusty loaves!

Our sticky dough tips:
- Make swift decisive, yet gentle confident moves and do not fumble about too much with the dough.
- Use a dough scraper to assist you when lifting, dividing and transferring the dough.
- How sticky is sticky? How sticky is right for this particular recipe? Find out first, from the recipe, or from people who have made it, so you won’t spoil it by adding tons of flour until you think you can handle the dough. It can range from tacky, to sticky to very sticky. From post-it sticky to ‘it’s OK to have pieces of dough sticking to your fingers. So find out what level of stickiness goes with your recipe so you can judge for yourself if your dough has the right consistency.
- Do not start out with the stickiest of dough recipes. Get comfortable with a slightly sticky dough first and take it from there.
- You can spray your scoring knife/lame with cooking spray just before scoring your sticky loaf or baguette. I tried this myself with spray oil on my own lame and I recommend you give it a try, it cuts just that little bit easier through the dough.
- Using the stretching and folding technique will strengthen your dough and with each stretch and fold and the passing of time it will become easier to handle.

- Don’t freak out if your hands get a bit doughy, especially during the first few stretch and fold stages of very wet dough like 80% hydration baguette there will be sticky dough bits clinging to your hands. Just keep breathing and scrape them of with your plastic scraper.
- Wash your doughy hands with cold water, because this will best dissolve the dough from your hands, warm/hot water will sort of cook the dough and make it more sticky.
- Some people oil their work surface and lightly oil their hands during kneading or folding. Some people lightly wet their hands. I prefer to use my hands dry, with maybe a bit of flour. Test different methods and see what works for you.
- We keep saying this but remember that different types of flour have different levels of moisture absorption. Make sure you have the right type of flour for the recipe or adjust your moisture levels accordingly.
- You will find you need less and less flour as you get more experienced in handling wet dough.
- A guideline to check if your high hydration loaf is done, is to measure the core temperature with a digital probe thermometer. For wet dough, like ciabatta, the core bread baking temperature should be around 96C/ 205F (The ideal average bread core temperature should read 93.3C / 200F). The reason being getting rid of the excess moisture still present in the dough. The excess moisture in the core would otherwise soften the crust while cooling, and with a too low core temperature, the crumb will not get the chance to fully stabilize.
- Practice, practice, practice!
- Consolation: even if you are still a bit rubbish at shaping wet dough, you’ll probably still end up with a very edible loaf!
Take a look at my 80% hydration baguette making movie and see how I attempt to handle this very sticky dough.
If you have a good tip on handling wet dough that’s not on the list but that’s really working for you, please let us know, leave a comment so we can all benefit from it!

Hi, i’m making bread that has butter & egg. Do i add their weight/volume to my water to compute for the total % of hydration?
Hello Aj,
You can add 75% of the weight of the egg (this is the part of the egg that is ‘water’) and for butter it is about 20%, depending on the type of butter.
Hi there. Quick question with different hydration’s do you need more or less folds. How do you know when your dough has had enough folds. I’m working with a 85% hydration and when I put my dough to rest they’re lovey fermented and bouncy then the next day they are sloppy and deflated before even taking them out of the basket. Thanks
Hello Seamus,
In general, you know when to stop S&F’s when the dough starts to resist.
85% hydration is very high and you need to make sure you use the right type of flour that can hold such an amount of water, otherwise the dough might become very slack.
I like your consolation. Whatever recipe i use, i end up with sticky dough all the time. The 1st time i add flour till it manageable but end up with hard bun after 1 day (it is still soft while it is hot), the 2nd and 3rd time i gave up and use transparent plastic glove to handle it (it is sticky but can be shaped thanks to the glove). It rise nicely and stay soft till day 2 and 3. Love the bread.
Hello Liaw,
Glad you can get some encouragement from these tips. You have seen that adding lots of flour is not the solution because the result will be different. Great you have found a way to handle the dough with the glove.
Enjoy your baking!
Hello! I’m trying to make a 75% hydration sourdough, using 50:50 spelt and buckwheat flour. I got to the stretch and fold stage (this is my first attempt) and ran into problems. After the first stretch and fold I could feel the dough getting strong, but following rounds seemed to make the dough wetter and wetter. I have been using cold water for my hands. Eventually I gave up and but the bowl into the fridge. Any ideas of why the Increased wetness? Could it be that it’s a hot day? Thanks.
Yes, Alex, your spelt and buckwheat are the cause, the first has ‘delicate’ gluten and the other is not a grain and has no gluten, so the combination has limited liquid retaining capacities and only a very weak gluten network can be build. The hydration is much too high. Which recipe are you using as a base?
It is a real challenge making bread this way. It is best to start with a combination of wheat and spelt for instance to get a good result.
Maybe you can still make some sort of flatbread / pita with your dough.
I keep a large bowl of cold water to wash my hands. I dump it in the garden. No need to clog up the sink with flour/dough.
Thank you Roger for this excellent tip we can all start using immediately!
Yes, THANK YOU. My sink has been stopping up a bit and I use a good sieve over the drain and could NOT figure out why this would happen. It never occurred to me it could be the dough…!!!
Yes, great advice!
Another question how can I shorten time of thepoolish?
Dear mr. Salur,
It is no problem to shorten the time, but it depends on the recipe and what you want to achieve how to go about it. If you shorten the poolish development time, you also need to adjust the amount of yeast you add. You can read all about it and how to calculate the right amount here:
www.weekendbakery.com/posts...lish-biga/
Enjoy your baking!
Excellent Information.
Thanks Guys.
I appreciate you providing some basic tips on handling high hydration dough. You specifically mentioned, “washing your doughy hands with cold water, ” as this should easily dissolve or wash away the dough from your hands. This is probably why some people find it hard to wash the dough off their hands because they must have been using warm water. I would make sure to keep this in mind when I have the time to bake my own bread. Thanks.
How do you drag/create tension after shaping without the round sticking to your hands? Unable to release it without pulling dough?
Hi Robin,
Maybe this short video can help you: www.weekendbakery.com/posts...g-a-boule/
The right amount of flour, the right amount of hand on /off the dough, right way to cup / hold hands and the use of a scraper all aid in getting there.
I had just considered taking a hiatus from making bread when I came upon this post. Very similar day to the reader who posted below about her “pile of mud” – that’s exactly how my loaf just went into the oven! I gave it another frantic shaping and then resigned to take a break. This post was so very encouraging! I’m going to try shaping with wet hands…and I can hardly wait for the next bake! Thank you. I mean it!
Hi Rachel,
So glad our tips inspire you to give it another go. really hope it will give great result and you will keep on baking your own bread.
Lots of luck and happy baking!
Hi there,
well, the perfect article to read after my day today.. my first attempt at a high hydration bread. It was all going well until I attempted to drop the bread out of the cloth/floured basket into my hot cast iron pots. Usually this goes well for me, but with this dough it was almost disaster. Between the dough sticking to my hands, the basket, the cloth ..then plopped into the pot like a pile of mud. Anyway, into the oven, they did bake ,tho a very wide shallow loaf, lots of lovely holes in the bread and a very crusty crust. Spent quite a bit of time just cleaning dough off everything it got near to. Much to learn , will have to be brave to try again. Was good to read this as well, so thanks for that! Deb
Hi Debbie,
Thank you for sharing your experience. Just be generous with the flour in the beginning to avoid the sticking. You can brush off the excess flour later, after baking. As you get used to it, you will notice you can use less. You say it was still just your first try, so go on to the next bake and we are sure it will get better and better.
Happy baking!
I made 100% whole wheat bread with Farro flour and added vital gluten. It called for 21/2 cups of liquid. I used 2 cups of water and a half cup of honey. It rose beautifully, but the crust flattened when it baked. It has a great flavor and texture, but is there anything I can do for it to keep it’s pretty shape?
Hi Marcia,
We do not know this recipe, but you altering it by adding less liquid and using farro flour might be part of the problem we think. Also check out our tips on ovens, because this could also play a very important roll here (oven hot enough, use of steam etc):www.weekendbakery.com/posts...your-oven/
Hi,
I’m very perplex at the moment.
My bread recipe I have been using for the past 3 years has suddenly gone askew…..
It’s a 2 loaf recipe using 700g Canadian Strong Flour (Shipton Mill) + 600ml water + 9g of EasyBake yeast mixed and left in fridge overnight, the next day (late morning) I add 166ml of water/milk + 50g Butter, 2 tble sugar and 3 tsp salt knead for 30 mins (I use an adaption of RB’s slap and fold) proof in oiled bowl until doubled, fold and shape and put in tins.
BUT lately when kneading I can’t get a nice smooth elastic dough it seems to stay ‘very soft wet and sticky’ until I think I can’t get it any better so dump it in the bowl to proof. It does double @ room temp but seems to take much longer than it used to and stays softish. I tip out and rectangle it, fold top to halfway -bottom up to meet then top to bottom, fold left to right middle and right to middle and then like a book fold. Leave it for 15mins before shaping for the tins.
I used to score the top but if I do that now it deflates so am leaving it and just flouring the top before baking @ 240c for 15 mins reduce heat to 220c for a further 15-20 mins. Core temp 93-4c
The bread tastes lovely but I don’t understand why I’m having the knead problem?
Any thoughts of why it’s happening or what to do to rectify this.
Hi Daphne,
Very hard to say without seeing what is happening exactly but our first guess would be the flour itself. Something changed or is not totally right or the same with this current batch of flour. There can be subtle changes in flour season to season, but this should not make a big difference other than having to add a bit more water, or adjusting the kneading a little bit. So our advice look at the flour and maybe the (date of) the yeast to make sure everything is up to scratch.
Good luck with it!
Hi,
Im making high hydration breads but the crumb is off. Its still small holes on the bottom and up to half way. The top of the bread has the open crumb texture. I have a baking stone in the oven and the loaf lifts well. The sides of the loaf lift off the stone. Any advice on how to improve.? I use the stretch and fold method, maybe I need to prove the dough longer, i prove abou 45 minutes for yeast breads
Thanks Brian
Hi Brian,
We do not know what flour you use, but if it is high in gluten, you might want to try using it in combination with flour with a little less protein (the more development, the tighter the crumb). As for the proofing the temperature of the dough also dictates what would be the right amount of time. Also see our tips : www.weekendbakery.com/posts...mperature/
And see how best to judge if your bread is proofed to perfection: www.weekendbakery.com/posts...e-in-size/
Hope this helps.
Thank you. I will watch the video. I’m just having a terrible time with wet dough, but, you are right, the bread tastes pretty darn good, although looks awful and the crumb is off, and the crust softened while cooling. Practice, practice, practice!!
Yes, the 3 p’s! And it is normal for the crust to soften a bit during cooling as moisture travels to the surface of the loaf. After a while it will firm up again, as long as the loaf is properly baked / cooked. If it stays too soft you should look closer at your oven temp and baking times and adjust.
Good luck with it!
I have been making sourdough bread for almost three years, good/bad. I have always had very hard crust ( inedible) can you help? I must be honest, I have followed Chad Robinson from the beginning, but the crust is a lovely colour, but always rock hard. Thanks
I prefer a wet bowl next to dough that I keep dipping my hands in before each scoop. You have to lower duration of dough slightly since you’re adding in water.
Thank you for this very useful tip Jmk, we are sure other bakers will find it helpful too.
Happy baking!
You lot should teach. Excellent recipes. Supportive and informative. Love you all. x
Thank you Amanda,
Happy baking!
I read through your ‘handling high hydration dough’ page. I have been trying to make a boule shaped loaf with a 65-70% hydration dough but all I ever end up with is a ciabatta shaped flat loaf. Tastes lovely but is no good if I want big slices.
I assumed it is something to do with the amount of kneading however I feel that this is not so. Artisan Bread inFive minutes say you don’t need to knead but your baguette video shows repeated kneading.
Please help, I am at a loss.
Hi there,
Can we ask you what type of flour you are using with what protein content?
The technique you see used in our baguette video is called stretching and folding and like kneading, it is also used to build up dough strength and develop gluten.
Ed
Great post!
I just wanted to mention that the altitude plays a significant role when baking bread. Since the water has different boiling points at different altitudes, we can expect that at sea level and at 2000 m in the mountains we will get different baking times and different temperatures in the core of the bread.
Thank you for this addition Feodor!
Hi Marieke & Ed,
This a question is about hydration, although not specifically related to sourdough or preferment. I’ve only been baking bread for the last two months and at the moment I have only been baking spelt bread (a mix of 300g white and 200g wholemeal spelt). I seem to get inconsistent results in how much the bread rises in the oven when being baked. My question is how much does the amount of hydration of the bread make in relation to how much the bread rises when being baked or could there be other factors involved.
Thanks in advance
Sylv
Btw I’m half way through making your Rye starter, I’ve nick named it Quatermass after a British Syfi serise 😉
Hi Sylvia,
It depends on many factors I am afraid, that is what makes it difficult to answer your question.
As a rule a higher hydration level tends to have a nicer oven spring. However like I said, it is not the only factor. The amount of gluten, of kneading, balance between wholemeal and white flour, temperature, equipment, amount of surface tension created when shaping, use of steam…any combination of these factors really can play a part.
Maybe these tips om consistency in baking can help you get a better grip on what is happening exactly: www.weekendbakery.com/posts...in-baking/
I can tell you, one of the most important tips on the list is definitely to write stuff down, so you know exactly what you did.
Love that you gave your starter a name 🙂 hope it will live a long and prosperous life!
Happy baking,
Marieke
Thanks for that Marieke. I did have a feeling i might get that answer and I’ll have a look at the consistancy tips too but thanks once again. I have started writing stuff down and your right it will help. I also got Paul Hollywoods Book ‘How to Bake’ as an advanced birthday pressie 🙂 and have had Little read of that this evening and that has shed some light on stuff too. Quatermass is at day 3 and doing quite well I think, although I feel like an anxious parent and keep checking it every hour to make sure its ok, my partner thinks I’ve lost the plot 🙂 .
Regards
Sylv.
nice
Thanks John 🙂
My ambition these past 2 years has been to arrive at the heavenly land of holes and crusty bread. When I take it out of the oven it’s beautifully crusty and as it cools the crust softens, now it all makes sence. I am about to attempt my first real high hydration bread (first attempt dough began to pick up everything on my kitchen counter and I nearly ran out of the kitchen screaming) but could you tell me how often to turn the dough and if the kneading part can be successfully done in a mixer.
Thank you
Jane
Hello Jane,
To better to answer your questions, could you please tell us which recipe you have in mind making, because it depends on the recipe. Is it the baguette dough? If a recipe does not use kneading and you do decide to knead it is possible of course, but you must expect a different result because of it.
Marieke
Hi Marieke,
sorry it’s taken so long to reply, I can’t stop baking bread as I have been getting very good results. Re. your question about the dough I’m using, mostly I use a baguette recipe but I have been experimenting with other bread recipes that have lower highdration (easier to handle dough) and have had a good successes rate. However, this bread will never have the same texture as a baguette recipe but still very good and easy to handle. If there was one tip I would pass on it would be the turning of the dough. Sometimes I let the dough ferment all day and do a few French turns about every hour and then other times I ferment for a much shorter time (1 1/2 hours) but I turn ever 20 minutes or so, have had good results with both methods. The thing I would like some help with is, how can I get the crumb on my
baguettes to be less ciabatta like?
Jane
Hello Jane,
I am afraid it is very hard to answer your question correctly without knowing what either your baguettes or your ciabattas look like. It is good that you are trying different methods and see what different results they yield.
hey which series of rofco oven do you guys have
Hi Nils,
First we bought a Rofco B20 and we where so enthusiastic about it that we started to bake more and more. That is why, after a lot of deliberating, we also bought a Rofco B40, which we now use as our main oven.
You can read about our first Rofco here: www.weekendbakery.com/posts...read-oven/
cheers again guys the cling film technique sounds effective
ah cool thanks again guys, thats really helpful and im sorry but one more thing i seem to sometimes get this toughish skin when i proof my baguettes or even boules, does this make a difference and if so how to stop it, i really appreciate the help 🙂
Perhaps I am misunderstanding but do you cover your loaves at all while proofing? Because if you leave them uncovered, especially in a warmer place where hot air is blowing, the surface will dry out quickly. You can try our preferred method of covering your bread during proofing as follows:
Take big pieces of clingfilm and dust them with flour (best to coat them on both sides) so the whole surface is covered. Use these to cover your loaves during proofing. Before you cover the bread also sprinkle some flour on the loaves themselves.
Also, before shaping, during the other stages, whenever your dough is resting, you need to cover the dough or the bowl it is resting in.
Some people use oil on clingfilm or use cloth that has been floured, but this can be heavy on your dough.
It is also a good idea to have a can of spray oil to spray the bowl your dough is resting in during (bulk) fermentation, so it will come out of the bowl very easily.
Good luck with it!
Ed & Marieke
hey thanks so much, i have made sourdough starters before and i was just wondering whether you knew something, richard bertinet mentions his sourdough starter being kept sweet and mild as a pose to very tangy and each time my sourdough starter was quite sharp almost unpleasant, do you know how to change it or how to start it again because i have ended up just making yeasted breads
Hi Nils,
There are two types of acid, lactic and acetic. Acetic acid (vinegar type taste) prefers a stiff starter while lactic (yoghurty fresh taste) prefers a liquid one. (keep stiff starter at 50-60% hydration, liquid 100-125% hydration).
So keeping your starter AND your preferment (use rather a poolish than a biga as preferment) more liquid should promote less acetic acid.
The acidity also depends on the type of bacteria, also depending on your geographic location. For example the one in San Fransisco is famous for its acidity.
You probably have a lot of acetic type bacteria in your starter at the moment.
We suggest you refresh your starter every two to three days and get it to a more liquid stage to flush out the acetic acid making bacteria and promote the growth of lactic acid bacteria.
Good luck with the starter culture!
Marieke
PS:
I am guessing you have already seen our info on making and keeping a rye sourdough culture:
www.weekendbakery.com/posts...asy-steps/
We like the rye culture best and it is easier to maintain than a wheat version.
More info on preferments like poolish and biga: www.weekendbakery.com/posts...lish-biga/
Hello Marieke
One of the questions that has been in my head is poolish vs. biga, and you gives a good explanation. I might even be able to give a 2 cent worth opinion based on my brewing experience. Bacterias forming acetic acid are generally considered being aerobic, i.e. needs oxygen for metabolism, while lactic acid forming bacterias are generally considered being anaerobic, i.e. in favor of an oxygen free environment. Further, bacterias forming acetic acid favors presence of ethanol. (Look at forming vinegar, – presence of ethanol and oxygen).
Saccharomyces (yeast) is a very powerful organism, which works as good aerobic as anaerobic, although it prefers an aerobic environment to start. In the initial phase it will use up all the oxygen very quickly and favor development of lactic acid and ethanol / co2 at the sacrifice of bacterias forming acetic acid. I would think it is much harder to get to an anaerobic environment in a ‘dry’ spiga, then in a more liquid poolish.
The above should support your experience?
Hi Endre,
Thanks for your addition. Ed told me the following after reading your comment: Yeast multiplies under aerobic conditions. Yeast produces CO2 and alcohol and ester chains in an anaerobic environment. It is generally thought that the amount of oxygen within the dough and the duration of the bulk fermentation is not enough to really start the yeast multiplying. But the yeast that is present will become active.
Could you explain why a dryer biga would be harder to become an anaerobic environment than the poolish. Ed could also imagine it being the other way around. Because it seems like it would be much easier to absorb extra oxygen within a bubbly liquid environment like a poolish.
Ed says that from books and own experience he learned that bacteria favoring a dry environment produce acidic acid and bacteria favoring a wet environment produce lactic acid, so keeping a starter wetter will produce a starter with more lactic acid producing bacteria.
We have to add that we do not very often make a biga, preferring a poolish that is easier to stir. That also means we do not have the baking experience to really compare the two.
We also prefer the yoghurty sourness and not the sharp vinegar taste in our bread and by using the poolish we seem to be getting this result. So yes we agree that lactic acid is what we want.
pffff, a challenging subject!
Greetings
Hi again Marieke, – certainly a challenging yet interesting subject.
‘Ed says that from books and own experience he learned that bacteria favoring a dry environment produce acidic acid and bacteria favoring a wet environment produce lactic acid’
Yes, that should support my ‘2 cents’ theory 🙂 Why a drier biga would be harder to become anaerobic then a more liquid poolish? My idea was ‘channeling’, i.e. free air, and even possibility to renew (exchange) that free air through those channels. You can’t have that in liquid without stirring. The ‘bubbles’ in a liquid poolish would be made up entirely of CO2, and not encouraging fresh oxygen down.
Marieke, still my 2 cents … should we dare to conclude a wet poolish favors lactic acid, and that a biga gives higher risk for acetic acid?
Does any baker consider presence of acetic acid favorable in any bread? I would think lactic acid is always preferred?
So, don’t shake / stir (adding oxygen) to much your pre-fermentation, if you want to avoid acetic acid.
Yes Endre, we think that is a careful conclusion. We want to make some more biga based breads in the near future. Maybe take our favorite pain rustique recipe and change that and see what the difference in taste would be. Again, an interesting experiment. In Holland there are a few artisan bakers who make very sour (vinegar!) bread and we do not like that at all. Our aim is and will be to have a complex taste with just that right balance between sweet and sour. But that is the privilege of the home baker: (provided you understand what you are doing) you can make the bread exactly to your own taste.
Happy Nordic Baking!
Marieke & Ed
hey, i am currently 15 and have actually always been into baking, i have crust and dough by richard bertinet and spent a lot of time on the fresh loaf and i really do like the idea of having to physically work the dough so little to result in such a smooth shiny dough. just saying your videos are great and informative and so inspirational, i mean the feeling of hopelessness when you handle a high hydration ciabatta dough and it sticks to your hands and eventually sticks to the kitchen, parents, the cat etc and you just want to give up and watch television this really helps, just sayin’ thanks 🙂
Hi there Nils,
Thanks for dropping by and for your gracious comment. Glad we can be of help.
We wish we both were where you are now at 15! You are really getting a head start so the sticky dough will be ‘in the bag’ before you are 16 ;0.
Our favorite bread book is Bread by Hamelman, lots of techniques that will teach you the know how to get consistent in baking and understand what you are doing and why.
Hope you stay a happy baker for many years to come.
If you have any baking questions or things you like to share, just let us know!
Marieke & Ed
Hi Erin,
I was very interested in your stretch and fold technic. But when I try it, the dough does not develope with each step as in your video “80% hydration” on youtube. The Gluten developement actually not exicstant and the dough stays the same as in the beginning. You could see, that in your video, the dough becomes more smooth ,stops sticking that much and developes somewhat of a surface tension. I don’t see my error I am doing. What can be the reason for no no gluten developement?
Our suggestion would be to first look at the flour you are using. Is it strong and high in protein?
We use organic flours, a wheat flour for this recipe, and they usually have a high gluten content by nature.
Hope it works out, give it another try!
Marieke
My baguette making is definitely getting better with practice, however, I cannot score the loaves………..the blade just seems to stick and pull????? All that happens is that the loaves deflate and still don’t have a nice cut in them?
Can you help?
Hi Niki,
A little deflation is normal and when the bread goes into the hot oven, esp. on a hot stone, it should rise up again.
Have you seen our tips on scoring with confidence? They will hopefully help you too. But it is also a matter of Practise, practise, practise and getting comfortable with the dough. And one of the tips people really find useful is the controlling the dough with one hand (not pinching but lightly guiding) and scoring with the other hand.
Hope you give it another try and let us know how it goes!
Good luck and remember that a not so beautiful looking bread can still taste pretty awesome :))
Hi Erin,
Thanks so much for your comment. These wet doughs take a while to get comfortable with but it’s so cool to have progress. And when you succeed..that’s the best feeling a baker can have! Until then practice, practice, practice, but even if your loaf or baguette is not yet stunning to look at, most of the time it is already very edible!
Good luck and I hoop it will turn out great,
Marieke
I am making my second attempt at Baguettes today, hopefully without the failure I had last time, and found your baguette video very helpful! After folding the Baguette dough (Hamelman’s Baguette with Poolish recipe), I definitely questioned whether it should be that wet. I can now ease my mind knowing that yes, it should be that sticky. Watching you shape the dough was also educational and feel more assured my bread will turn out fine tonight. Thanks for all the helpful information!
Thanks, this is reassuring. I made a sourdough a la Bertinet over the weekend and could not get the dough to the point where it was ‘coming away from the work surface’ and so had to make 2 additions of flour – I must have worked it for 45 mins. Does the type of work surface make a difference? I notice you have a smooth stainless steel and Bertinet a smooth granite whereas mine has a more pitted, rougher finish – could this cause the dough to stick more? Can the dough be over-worked?
The result, anyway, was 2 very tight, heavy loaves – tasty though (and chewy!).
Hi Nige,
I do not think the work surface matters a lot to the quality of your dough, however a big flat empty workspace works a lot more pleasant. You surely can overwork a dough; the gluten (the stuff which keeps the dough together) can be overworked and will be less strong. You can work a dough till the point it will turn into a gloop again, this is the stage where you break all the build up gluten by keeping on kneading the dough but this is very hard to reach by hand. Perhaps you should give the dough a bit of time. First knead it until you have a rough looking ball, let it stand for about 20 minutes and knead it again. You will be surprised by the change in dough quality within 20 minutes. In the end it comes down to making a recipe your own, with your hands, your tools and your ingredients. Like we said, practice, practice, practice. So just try again ‘tomorrow’!
Let us know how you get on,
Ed and Marieke