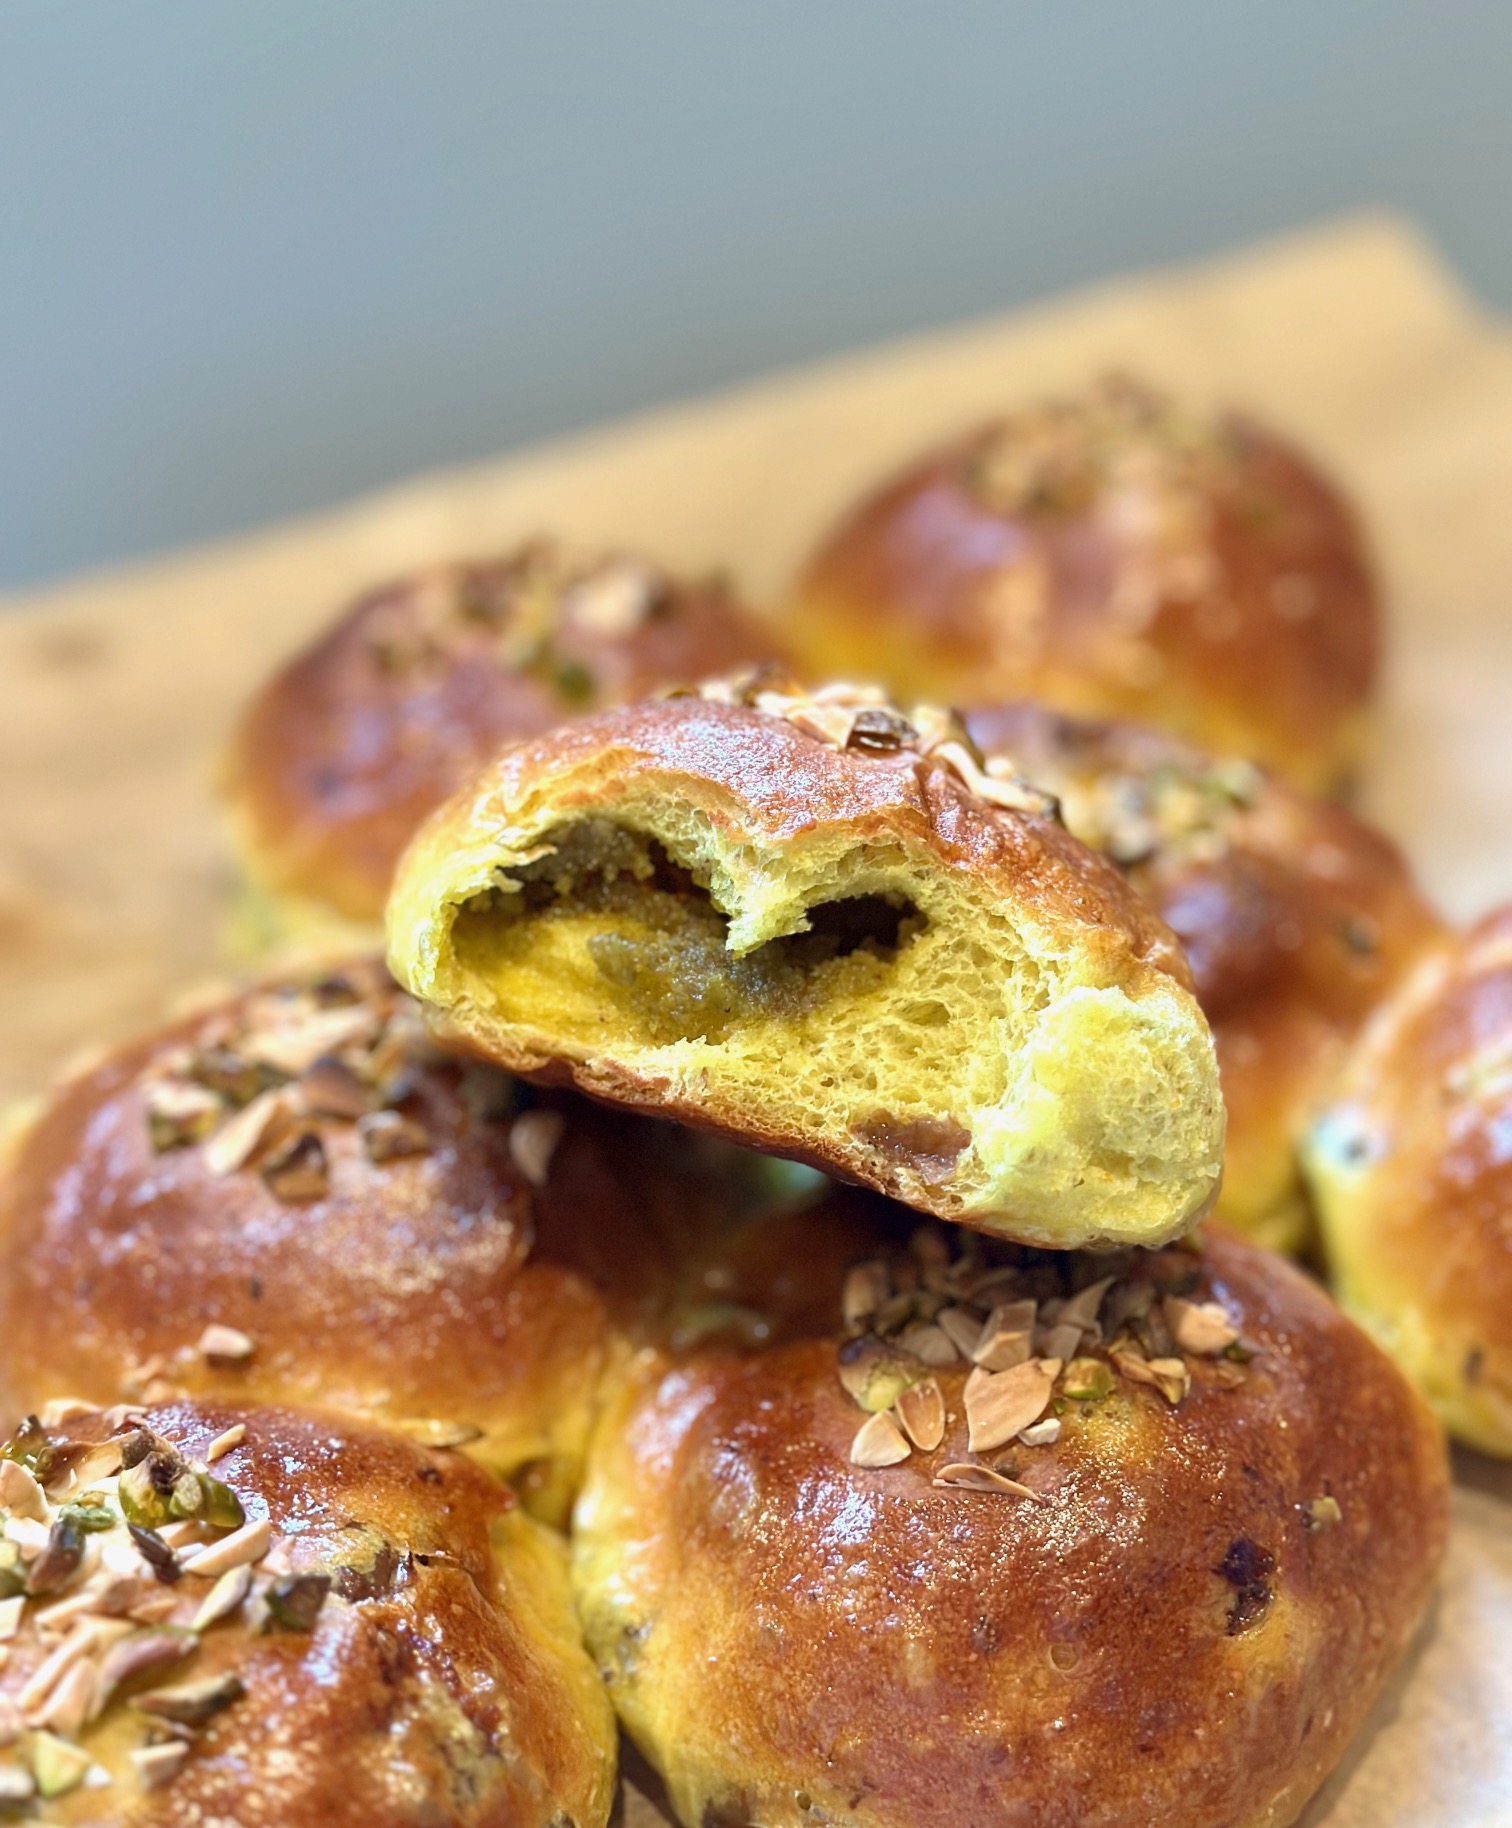
I love baking buns and coming up with new versions. The Easter bun with the yellow and green and fragrant citrus I dreamed up recently.
So much baking fun to be had, making these buns. They combine the healthy with the indulgent. There’s oatmeal and turmeric and vegetable oil instead of butter. There’s also the pistachio filling and the citrus rubbed sugar. But the main thing is they are just very, very delicious! A feast for the senses. They will hopefully be a great addition to a festive breakfast or brunch.


For this recipe we use a pistache paste we make ourselves. We combine the pistachios with some almonds, which gives great depth of taste, but you can decide how you want to go about it, or even leave it out entirely. There are a lot of options with these buns, you can make your own version very easily.
Enjoy!
Ingredients for the preferment
200 g wheat flour / bread flour (12 to 13% protein / protein content)
50 g oatmeal
250 g water
1 g instant yeast = approximately one third (1/3) teaspoon
Ingredients for Easter Buns
makes 16
The preferment from step 1
300 g wheat flour / bread flour (12 to 13% protein / protein content)
5 g instant yeast
8 g salt
1/2 teaspoon of turmeric (optional, gives nice color)
1 egg yolk
80 g water
20 g olive oil or other vegetable oil (we use macadamia oil)
30 g citrus rubbed sugar (see ‘before you start’))
250 g raisins washed and soaked (optional in Earl Grey tea)
180 g pistache paste (see ‘before you start’)
egg yolk to add to the pistache paste (10 to 20 g)
some chopped pistachios and almonds to use as topping on the buns (optional)
30 g melted butter for brushing after baking (optional)
Baking tools: Standing mixer (or knead by hand), Danish dough whisk, scraper, spatula, bowl, digital thermometer, timer, baking tray (approx. 30 x 40 cm) lined with baking paper.
Weigh all ingredients carefully for the best result!
Before you start!
For this recipe it is really handy if you have three things ready and prepared in advance, the raisins soaked in Earl Grey tea, the citrus rubbed sugar and pistachio paste.


The pistachio paste
You can find our recipe for the pistachio paste here. For this recipe you need 180 grams of it and add some egg yolk and work this through the paste until smooth. Make sure the paste is not too sticky and you can still roll bits of paste into small balls. Divide the paste into 16 equal parts and roll these into balls. Cover and set aside. We make the paste a bit more moist, but it is easier to make balls when the paste is less sticky.
If you do not want to make the paste you can skip this part and make the buns without the filling. They will still be very delicious.
The citrus rubbed sugar
For the citrus rubbed sugar mix 30 grams of sugar with the zest of 1 unwaxed orange and 1 unwaxed lemon. You can also make more than you need for this recipe and store this mixture in your fridge. It will keep for a long time and you can use it in a lot of other bakes.
Soaking the raisins
You also have to wash and soak your raisins. First wash them and then leave them in warm water or strong Earl Grey tea (we use the green variety) for about 15 minutes. Rinse with cold water, drain and leave to dry on a plate or in the sieve (cover them against dust). If you do not want to wait or you forgot, just drain them well and roll them lightly in flour before using.
Step 1: Make the preferment
- With a dough whisk or spoon, Whisk the flour, water and yeast in a bowl for 30 seconds until smooth. Cover the bowl and let this mixture develop for 4 hours at room temperature.
Step 2: Making the Easter Buns


Mixing ingredients
Put flour, preferment, salt, citrus sugar, egg yolk, yeast, optional turmeric and most of the water in the bowl of your standing mixer. Let everything come together by mixing slowly and gradually add the rest of the water.
- Flour
- Preferment
- Salt
- Citrus sugar
- Egg yolk
- Yeast
- Turmeric (optional)
- Water
Kneading the dough
Then add the oil and knead the dough until well developed. With a KitchenAid type mixer, the kneading takes 8 to 10 minutes, or about 15 to 20 minutes by hand, depending on your method. Make sure the dough is not too sticky or too dry. Ideally, the dough will come loose from the sides of your bowl but will still stick slightly to the bottom. Another indication that you can pay attention to is that the dough will start to shine nicely at the end of the kneading time (see photo). Remember, there can be a lot of difference in the required amount of liquid, depending on the flour you use!
- Oil
First resting
Now Leave the dough to rest for 5 minutes.
Adding raisins
Next add the raisins. If you are lucky enough to own a spiral mixer, you can use your mixer and it will only take one minute to distribute the raisins through the dough. Otherwise ‘pinch’ them through the dough very carefully by hand, so they are evenly distributed.
- Raisins
Second resting
Cover the dough and let it rest for 30 minutes.
Stretch and fold
After the first 30 minutes rest, take the dough out of the bowl and do one stretch and fold (a full letter fold, left over right, right over left, bottom over top, top over bottom).
Third resting
Transfer to the bowl, cover and again leave to rest for 30 minutes.
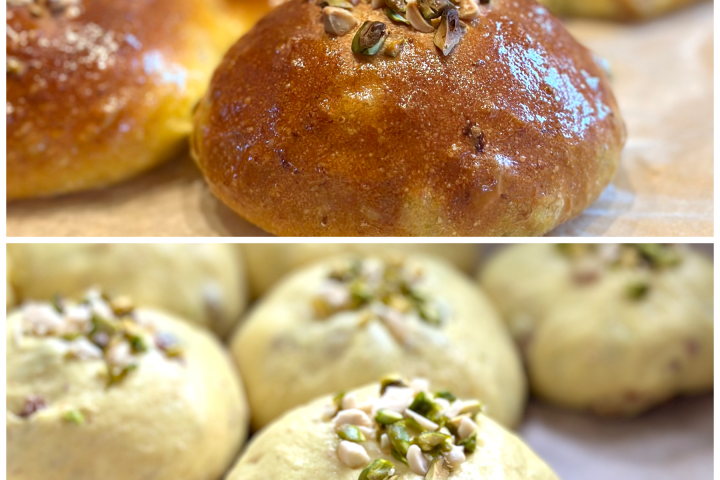
Shaping balls
Divide the dough into 16 equal parts and shape into balls. Cover and leave to rest for 10 minutes.
Filling with pistachio paste
Now slightly flatten the balls of dough and put the balls of pistache paste on top of each disk of dough. Seal the dough around the paste and round the dough again into a smooth ball.
- Pistachio paste
Tip
I always weigh each piece of dough before shaping to make sure they are all the same size and bake evenly.
Placing buns
Place the buns on a baking tray lined with a baking sheet or baking paper.
Optional topping
Option: You can place some chopped pistachios (and almonds) on top of each bun. You can use a bit of egg white (or water) to brush on the buns to make them stick better. You can still do this somewhere during the final proofing period, but better not too close to the end stage.
- Chopped pistachios
- Almonds
- Egg white (or water)
Final proofing
Now the rolls are ready for their final proofing. Loosely cover them. I use plastic wrap dusted with flour. Depending on your room temperature and the temperature of the dough this final proof will take about 2 hours or even more. Just be patient and check regularly. When you think the buns have risen enough, use your finger to carefully make a very small dent in the dough. If the dent remains, the bread is ready to bake, if the indentation disappears, the dough needs a little bit more time (check every 15 minutes).
Tip
In a bake at home situation we use our minimally preheated and switched off oven for proofing. We measure the temperature of the inside of the oven and the dough with an infrared thermometer and aim for a temperature of 25 to 27 ºC (77 to 80 ºF). Make sure it doesn’t get too warm, because above 35 ºC / 95 ºF the yeast is effectively dormant or dead.
Preheating oven
During the end of the proofing process preheat your oven to 200 ºC /390 ºF conventional setting.
Baking
When ready place the buns in the oven and bake for around 18 minutes, also depending on your oven. They should have a nice golden brown shine. Temper the oven to 160 ºC /320 ºF when the crust has the desired color (with some ovens this is needed, otherwise the tops of the buns will burn, so keep your eyes on the buns).
Cooling and storing
Take the buns out of the oven. Brush the tops with some melted butter while the buns are still warm, this way they also stay soft and get extra taste. Leave to cool. If you place them in a bag while still slightly warm, they will stay nice and soft too. The buns also keep well in the freezer and you can give them a quick blast in the microwave until they are slightly warm again.
- Melted butter
Thank you for this wonderful recipe!
The instructions are very clear and well detailed. For best results when stuffing the buns, I recommend keeping the sealed side facing upward. While I initially flipped the balls to achieve a nicely rounded top, I noticed this caused the pistachio filling to leak during baking. Keeping the sealed side up helps maintain the integrity of the stuffing throughout the baking process.
Hello Philippe,
Thank you for trying out our recipe, for your kind words and your very useful tip. I have never tried to bake the buns upside down, but it sounds like something I must try too. Keeping the paste very stiff so you can really form a ball also helps to keep it more in place, because then it would take a while before the paste ‘starts running’. For another variation on the theme also see our Christmas stollen bollen: www.weekendbakery.com/posts...en-bollen/)
Wishing you many great bakes and joyful moments around the oven.
Marieke