

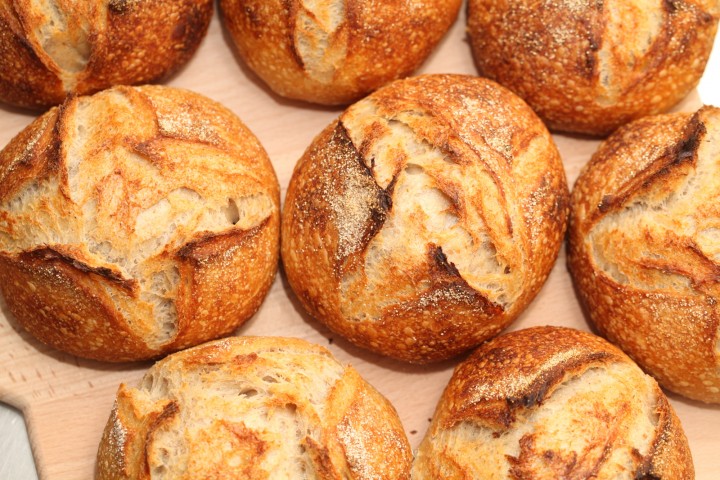
This recipe yields 6 mini boules. We usually triple it and end up with 18 boules…
Klik hier voor de Nederlandse versie
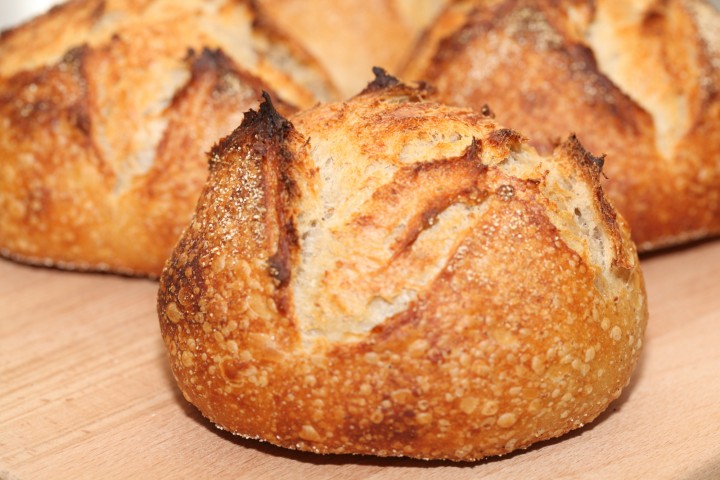
I find these mini boules are the perfect little breads for two or to accompany a nice family meal or dinner with friends. You can share one with some soup or dip it in a gooey Camembert out of the oven. They also make an original little present. Another advantage mentioned by one of our bread friends: there’s more crust to enjoy!
See what fun you can have sharing these boules and read how versatile they are (cheese fondue anyone?)!


Ingredients for the starter
100 g bread flour
80 g wholewheat flour
106 g water
36 g sourdough culture
Making the starter
These mini boules (little round breads) are made with a stiff sourdough starter dough and no added yeast. You make the starter the evening before you make the boules provided you want to bake the next morning (it takes 12 hours to ferment). Make the starter by dissolving 36 grams of your active sourdough culture in 106 grams of water and add 100 grams of bread flour and 80 grams wholewheat flour. Stir until it comes together and finish by kneading the dough by hand until you have a ball (about one minute tops). Put the dough ball in a bowl and cover with clingfilm and let it ferment for 12 hours at room temperature.
Ingredients for the mini boules
makes 6 boules of around 250 g each
Sourdough starter from day 1 – 322 g in total
720 g bread flour
470 g water
15 g salt
Making the mini boules
Preheat your oven to 235 ºC / 455 ºF (at what stage you preheat your oven depends on how long it takes your oven to heat through, some take 30 minutes, some with stone floors take a lot longer, up to two hours. The preparation time from this point until the bread actually goes into the oven is about 4.5 hours! So you might want to preheat your oven at the later stages of this recipe but make sure it’s well heated).
Dissolve the sourdough starter a little bit in some of the water you are going to use. This makes it easier for the ingredients to combine. Put the sourdough starter and flour in your mixing bowl and add 2/3 of the water. Now start mixing and gradually add the rest of the water and let the dough come together (see if you need all of the water or even a bit more, depending on the flour you use). Mix for only 1 minute until you have a shaggy mass (as Hamelman calls it). Leave it in your mixing bowl, cover and leave for 30 minutes. This process is called ‘autolyse’.
After the autolyse phase distribute the salt evenly on top of the dough and knead the mass for another 5 minutes and watch it turning into something much more resembling bread dough.
Transfer to a greased bowl and leave to rest for 50 minutes.
Ideally the temperature of your dough after mixing should be around 24-25 ºC / 75 ºF. You should adjust the temperature of the water you add, so the total dough reaches this temperature. For us this means in summer adding cold water to this recipe and in winter (when our little bakery gets much colder then the rest of our house) adding water up to 50 ºC /122 ºF. You can measure the temperature of water and dough with a food thermometer. These measurements are important because they correspond with the proving times in the recipe.
Now take the dough out of the mixing bowl and onto a floured work surface and do one stretch and fold (see our video to observe this technique if you are not familiar with it). Transfer to the bowl, cover and leave to rest for 50 minutes. After the 50 minutes again transfer it to the floured work surface and do another stretch and fold. Transfer to the bowl, cover and again leave for 50 minutes. This is your second stretch and fold.
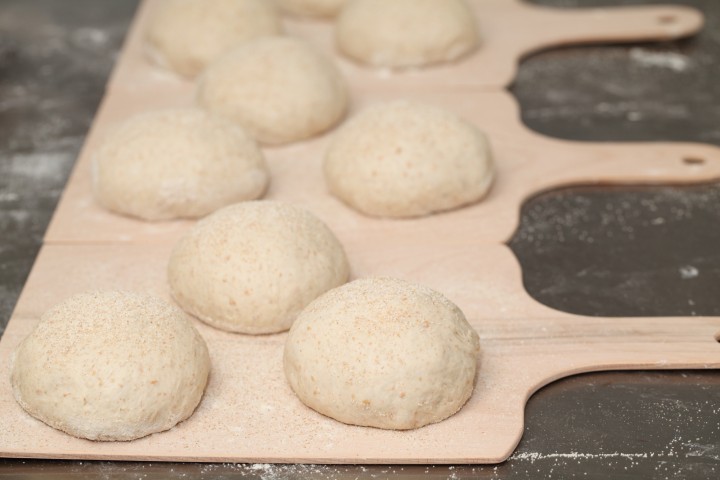
Now it’s time to shape. Shaping is something for which everybody develops his or her own technique over time. If necessary you can learn more on shaping from a good bread book, like the ones by Hamelman or Reinhart. You can also check out our short video on shaping boules.
Divide the dough into 6 equal parts and make boule shapes. They do not need proofing baskets. Lay them on a floured (semolina or rice flour works well) tray or peel that you are going to use for transferring them into the oven, or place them directly on a baking sheet /tray covered with parchment paper. Now cover and leave to proof for 50 minutes. When you think the boules have risen enough, use your finger to carefully make a very small dent in the dough. If the dent remains, the bread is ready to bake, if the indentation disappears, the dough needs a little bit more time.
Now your boules are ready for the oven (Preheated to 235 ºC / 455 ºF). Slash the top of the boules with a lame or bread scoring knife. To get a nice crust, try to create some steam in your oven by putting a small metal baking tray on your oven floor when you preheat the oven and pouring in half a cup of hot water immediately after putting the bread in the oven. Release some steam by setting your oven door ajar (perhaps with the help of a wooden spoon) 5 minutes before the bread is ready. If you are going to create steam with a baking tray, you maybe also want to turn your oven temperature a bit higher, because you are going to lose some heat in the process.
After 25 minutes of baking your little sourdough boules should be ready. Transfer onto a rack and leave to cool. These boules also keep well in the freezer and are quickly thawed in the microwave if needed.

Sourdough mini boules time table
day 1 22.00 h Make starter let ferment for 12 hours at room temperature
day 2 10.00 h Make the final dough
- 10.00 h Dissolve starter in some of the water
- Add flour and water and knead 1 minute
- autolyse for 30 minutes
- 10.30 h Add salt and knead for 5 minutes
- Leave to rest for 50 minutes
- 11.25 h 1 st Stretch and Fold
- Leave to rest for 50 minutes
- 12.15 h 2nd Stretch and fold
- Leave to rest for 50 minutes
- 13.05 h Shape
- approx 50 minutes final proofing at room temperature
- 13.55 h Into the oven, (235 ºC / 455 ºF) for 25 minutes
- 14.20 h Out of the oven and leave to cool


Cheryl DePrest says
Hello!
Can I use freshly milled flour for the whole wheat flour?
Weekend Bakers says
Do you also mean whole wheat flour that you mill yourself and want to use right away? This is no problem of course. You can expect the loaf to have less volume and less open crumb when using fresh flour. But on the other hand it can add extra flavor and texture that makes up for it.
Caliope says
How do you bake the small boules without a Dutch oven? I thought they need to be covered for a specific time to create some steam and then remove the cover and left to bake for the crust to fully bake and get brown… I’m fairly new to the sourdough world. Thank you!!
Weekend Bakers says
Hello Caliope,
That is not necessary, you can use your normal oven for these boules. The ones you see in the pictures are baked in our Rofco stone oven (so on stone) with added steam.
In your own (household)oven you can try and create conditions similar to such an oven with help of our oven tips:
www.weekendbakery.com/posts…your-oven/
Hope you can give it a try. Enjoy your baking 🙂
Caliope says
Thank you !!
Tamara says
Weekend Baker, tried this today and the recipe was straightforward and not cumbersome – yay! The flavor was fantastic!
HOWEVER: my finished product was rather dense . . . even crumb but quite tight. Also thought the unbaked rolls had a hard outer shell (?) that cracked when I tried the poke test to check on how much they’d risen.
For information, I’m at 8500 ft. elevation in the Rocky Mountains where our humidity is extremely low.
Any solutions or thoughts? Thanks in advance!
Weekend Bakers says
Hello Tamara,
Being at (almost) below sea level ourselves, we can only image the challenges of baking at such an extreem altitude.
We can recommend taking a look at these tips about adjustments when baking in the mountains:
www.kingarthurbaking.com/learn…ude-baking
So, it could be that all kinds of things need adjustment, from baking time, to liquid and flour.
For your situation it would be ideal to have a proofing cabinet with added moisture. If you google a bit, you can also find people who have made their own proofing cabinets.
If you have a steam oven, you could use that to help with the proofing in a more moist environment.
Wishing you all the best and improvement of your results with some of the tips.
Greetings from the Low Countries,
Marieke
Jordana says
Hi! I want to make this recipe this week. If I already have 322 g of starter made from KA AP flour, can I skip right to making the boules with the starter that I already have, instead of making the one you have written in the recipe? I just don’t have whole wheat flour and I would like to not have to purchase it for the 80 g needed. Thank you in advance!
Jordana says
Oh and if so, how much time after I feed my own starter should I start the recipe? 12 hours at room temperature as well?
Weekend Bakers says
Yes, that is no problem, use your own active starter and take the amount of 322 grams as stated in the recipe. If your starter is active and you have the total amount of 322 grams ready to use, you can just start following the instructions at day 2.
FYI:
We work with a two step system. When using a preferment (like a poolish or a biga) we use about 15-20 grams of sourdough for a sourdough loaf. With this small amount of sourdough you create a fully active sourdough preferment overnight which you then use to build the final dough. This way you can keep a small starter and still have the full sourdough flavor. Big advantage for home and hobby bakers is you are wasting far less precious flour when refreshing your culture than you would maintaining a big one!
Example: You bake 2 loaves each week. With our method you only have to maintain about 50 grams of sourdough. If you decide to skip baking this week, using our method, refreshing means throwing away only about 30 grams of sourdough. With the other-big-starter-method refreshing means throwing away 200 to 400 grams of culture depending on the recipe! Plus with this method you always need to refresh your starter before baking because the gluten weaken and you would otherwise have all this flour in your dough. With our method, you add the small amount of culture to a fresh batch of flour and so you will not have this problem of weakened gluten in your culture.
Jordana says
Thank you for the information! Yes, what I love about this recipe is that it requires such a small amount of starter. I have more discard than starter at this point so from now on, I plan on maintaining a small amount after baking this batch. I just want to double check, if my 322 g of starter was made from 100% AP flour, that won’t impact the hydration of this recipe? Do I need to make any adjustments in how much flour and water I add? I’m very excited to try this recipe tomorrow!
Weekend Bakers says
Hello Jordana,
The amount of wholewheat in the recipe is relatively small. If you were to change anything it would be to use slightly less water in the final dough. It is hard for us to judge what the absorption level of your AP flour will be, but it will probably also be lower than that of the bread flour we use. So taking this into account we would suggest to add between 425 and 450 grams of water to the final dough, instead of the 470.
Enjoy your sourdough baking 🙂
Jordana says
Thank you so much! I will!
Jordana says
Hi, I just wanted to come back on here and say that the loaves came out amazingly! It was my first time making sourdough and I was really happy with the results. My only problem is that I have a blood sugar issue and they spiked my blood sugar, unfortunately. Would you have any suggestions on replacing the bread flour with spelt or adding more whole wheat? Or would that be a completely different recipe? I really like your baking method and would love to incorporate it with other flours that would be easier on my blood sugar, if possible! Thank you very much for all of your help so far.
Weekend Bakers says
Thank you Jordana,
So happy to hear it turned out so well. As for the problem with blood sugar you are describing, we are no experts on the subject. Adding more whole wheat is of course possible, but will give a different result and you might need to add some extra liquid. Normally a good method to do this is to do this in small steps and see how you like the result, but this would mean you probably still would not be able to eat much of it. Maybe you can google for some more info on the subject, because we are sure there are more bakers out there with similar challenges.
Good luck with everything and happy baking!
Diane McLaughlin says
Can’t wait to make these mini boules.
Weekend Bakers says
Hello Diane,
Always very interested to know if and how the recipe works for you.
Enjoy your sourdough baking 🙂
Naomi says
Hey! After making the starter from step 1, can I store it in the fridge to use in over 12 hours? And if so how long can I leave it in the fridge and how long should I leave it out before continuing on? Thank you!!
Keoni says
Hi There! I do my baking using various types of Dutch ovens with successful results. This would be my initial foray into “open” oven baking with a home oven.
Do you have baking adjustments for “open” home ovens using baking/pizza stone for this mini-boule recipe? Unfortunately, a Rofco type oven just isn’t in the cards.
PS – I love your 80% hydration baguette recipe! I use it to make demi-baguette using a very large Dutch oven in my home oven.
Weekend Bakers says
Hello Keoni,
Yes, the Dutch oven method is great, with direct heat and capturing of steam under the lid. The best way to go about baking these boules would be to use the stones and preheat them very well and long enough to get the heat in, and then use a large amount of steam at the beginning of the baking process. You can use the suggestions we give in the recipe for that.
Also check out our oven tips for some more info on how to get the most out of your ‘household’ oven. www.weekendbakery.com/posts…your-oven/
Just give it a try and take it from there, maybe adjusting the oven temp just a bit higher at first for example.
Hope it will be great and you will enjoy the baking and tasting of the boules!
Lisa says
Hi there! Thank you for your recipe. I’m curious what would make my loaves spread towards each other? They were looking great until about 10 minutes prior to removing from oven. Thank you kindly for your time.
Weekend Bakers says
Hello Lisa,
Always hard to judge without seeing, but did your boules feel ‘sturdy’ after shaping and when you put them in the oven with enough surface tension after shaping? It could be a combination of the flour you use and the hydration level. If your flour cannot absorb the amount of water in the recipe, it could explain (partly) what happend.
You could either lower the amount of moisture a bit or use a different flour.
Use a good quality strong bread flour. If your flour has not enough protein it cannot hold the right amount of water.
For this recipe we use organic wheat flour with around 12.5 to 13% protein.
Hope you will give it a few more tries, it really is worth making it your own!
Lisa says
I absolutely will! Thank you so much for your response!
Jessica says
Kan je dit vergelijken met (zachte, luchtige) pistolets?
Zo nee, raden jullie een ander recept aan voor zuurdesem pistolets?
Alvast bedankt!
Weekend Bakers says
Hallo Jessica,
Wij zouden deze boules niet omschrijven als zacht en luchtig. Het kruim is wel open en heel mals, maar een desemkorst is toch vrij stevig en dik. Wij hebben en kennen ook geen goed recept dat het resultaat geeft waar je waarschijnlijk naar op zoek bent.Maar deze boules zijn echt een favoriet van ons, dus wie weet kun je ze toch eens proberen.
Succes ermee en veel bakplezier!
Rosemarie Guidice says
This looks like a very reasonable recipe one that I am so excited to try. What looks great about it is that you don’t have to cold proof it for 12 hours which means you can actually bake the bread in the same day after you make the levain the night before. When I make my sourdough, bread, I usually use both bread flour and whole wheat flour – 60-40%. I see that your recipe uses only the 720 g of bread flour, what are your thoughts on using whole wheat flour in this recipe as I indicated above?
Weekend Bakers says
Hello Rosemarie,
Thank you for your thoughts regarding the mini boules recipe. It is of course very possible to use a percentage of whole wheat flour for this recipe. This obviously would mean the result will be a bit different, for crumb and crust and taste. Based on our experience we found that up till around 30% whole wheat the recipe can stay about the same, more than that and we would add just a bit of extra water. Normally we would always advice to try the recipe as is and then make changes, gradually increasing the amount of whole wheat. You just have to make the recipe your own by baking it a few times, make some notes and see what works.
Hope you will give it a try soon and maybe let us know how you like your result (with the whole wheat).
Enjoy your sourdough baking!
Claire says
I am looking at the first section ” make the starter by dissolving 36 grams of your active sourdough culture in 106 grams of water. add 100 grams of bread flour and 80 grams wholewheat flour.”
I am new to bread, so i do not really know much. is there some kind of recipe or something for an “active sourdough culture”? I am trying to do a project on baking chemistry, so I need to figure out what each step to that is. Or could I just have a ratio of flour to water and what kind of flour?
Claire says
Oh wait I found a recipe nevermind.
Weekend Bakers says
We assume you have found our recipe here Claire:
www.weekendbakery.com/posts…asy-steps/
Good luck with your project!
RaJeana Gage says
What do you bake the little boules in/on?
Weekend Bakers says
Hello RaJeana,
We bake them ‘freestanding’ (so they do not need any molds when baking) on hot stones in our Rofco oven (you can see this oven here to get an idea of what we use: www.weekendbakery.com/posts…ven-users/
Alternatively you can place a boules on a baking tray lined with baking paper.
Hope it will be a success.
Happy Holiday baking!
Kelly says
Could you use all purpose flour instead of bread flour?
Weekend Bakers says
Hello Kelly,
We would advice to use strong bread flour for this recipe with a higher percentage of protein (at least 12 but preferably 13%) so the dough can develop a good strong gluten-network when proofing. All purpose flour usually has a lower protein content (check the bag) and is not ideal for this sourdough bread recipe. If you do want or need to use this flour, keep an eye on the dough when proofing, so it does not over-proof and collapse.
If you would like to learn more on the subject we can recommend this piece about gluten: www.weekendbakery.com/posts…ut-gluten/
Karen Klein says
I just found this recipe & would love to make for Christmas. Can I use just bread flour?
With thanks, Karen
Weekend Bakers says
Hello Karen,
Yes, you can, that is no problem. We would recommend to use a little less water in the final dough to compensate for not using the wholewheat flour in the starter. We would advice to use around 450 grams of water in the final dough, instead of the 470 grams that are indicated. It is to compensate for the ‘less absorbing’ bread flour instead of the wholewheat. Doing the correction in the final dough does give you some more control because you can see how the dough comes together and if it needs less liquid and how much less. Our estimate would be to use 450 or maybe 460 g.
Hope it will be great!
Karen says
Thank you for the response. Can’t wait to try them
Debbi says
I now make these fortnightly. Awesome recipe. My husband only eats wholemeal bread so these I give away. Always appreciated and one of my friends only eats these now. Thank you so much.
Weekend Bakers says
Thank you so much for sharing Debbi.
Simon says
Just baked these to accompany a lasagna dinner. They turned out wonderfully! I used whole spelt instead of whole wheat in the initial starter. Also, I got a bit impatient during the final proof and put them in the oven on the early side (our house is cool). There was a lot of oven spring, to the point that the crust ripped in a bunch of places I hadn’t slashed… But I don’t mind a little bit of nature-induced chaos! Happy Holidays 🙂
Gabriel H. says
Hi,
Is it possible to parbake the bread so I can finish baking it at another time? Do you recommend a temperature and time for 250g balls?
Juanita says
I’d be interested in this too.
Weekend Bakers says
We have not done this ourselves, but a general rule is to bake the bread to 2/3 of the baking time stated in the recipe BUT at a lower temperature. The important thing is, that the bread is cooked on the inside (between 80 and 90 C or about 180 F). After cooling, we would then store it in the freezer.
Depending on the colour of the crust and your own taste, we would then estimate they would need at least another 10 minutes in the oven when given them their final bake at 200 C / 390 F.
erica lin says
Hallo, I have been making this mini boules for over a year regularly (with my fresh sourdough culture), may I know if I am looking for a whole grain sourdough receipt, what will your recommend ? (water percentage? whole wheat, rye, spelt flour percentage?) Thank you very much !!
happyhighwayman says
How would you adjust the recipe if baking inside a combo cooker? I typically bake full size bread 500f/20 min 450 f/25 min (lid off)
Thank you so much!
Victoria Doyel says
What Combicooker do you own please? Our Instant Pot died today and my oven is broken.😞 It won’t heat up past 420F even with the temperature maxed at 550F. I researched Combicookers today and I don’t know what one to get?
Weekend Bakers says
Hello Victoria,
Very sorry to hear this. We do not think that what we own is a Combi cooker the way you use or mean. For the boules we use our Rofco stone oven and for ‘everyday’ use we have an ‘household’ oven that has functions for conventional heat, steam and hot air / convection. It is an oven that is from Germany (brandname Neff). I do not think this is what you mean by Combicooker?
Good luck with your oven challenges
Pam says
I was on the brink of giving up making sourdough bread. After several attempts following different “no fail” recipes and producing some rock hard offensive weapons in the shape of bread I found your recipe, method and final success.
My sincere thanks Weekend Bakery.
May your shift in priorities bring happiness to you, all your family and people who need you.
Micha says
Thank you! I had to make rolls to go together with soup. I took double the amount and made 36 rolls of 70-80g each. They came out excellent and look good, well risen.
Raj Kumar says
I have experienced First wish online cake delivers at midnight for my friend’s birthday. I really want to say the best experience I have ever seen. I ordered in a very less span but they haven’t overcharged for that. They took the actual price.
I highly recommended it.
Visit to order: www.firstwishonline.com/
or call: 9493533633
Ayla Isuf says
Can I leave them to proof overnight in the fridge, as I would with a normal sourdough bread? Thanks for the recipe, I am trying it out now!
Ellen says
Question, when making the starter can I leave this in the fridg overnight and remove in the AM until it is doubled (assuming this is the goal)? I have a timing issue and most importantly live in Hawaii which has been experiencing more than normal temperatures.
Cinda says
I’ve done that and yes you can! The fridge just slows down the rise so depending on your house temp the rise time on the counter AFTER taking out of the fridge will differ.
Horacio says
Hello there! Nice bread, I wonder how you manage the logistics involved during baking. Did you already have the Rofco oven back when you made these? I have a regular home oven, and managing many small pieces of dough is tough.
Tom E says
I can’t wait to try this recipe! I’ve baked a few full-size sourdough loaves, but we are hosting a soup night with friends and these little guys seem like the perfect accompaniment. I do have two questions before I dive in.
1) I’ve been working with a 100% hydration culture. Do I need to stiffen that up before the starter step, or does the ratio work out okay? It looks like the starter ingredients less the starter end up at about 63% hydration, and the culture is only a small portion of that.
2) What is the approximate final dimension of the baked loaves? I am thinking of using them as individual serving dishes and want to make sure they aren’t too mini!
Thanks for the the help, your site is great and the recipes I’ve seen are very easy to follow for a novice like myself.
Weekend Bakers says
Hello Tom,
Sorry for the late reply. You probably / maybe already baked them.
You can also compensate for the water by putting a bit less in the final dough of course, but always look at the dough itself and how it behaves (but this comes with experience with the recipe). The absorption of the flour you use could be different too, so you always need some adjustment anyway.
The boules are around 250 gram each / 1/2 a pound. For us that is quite big for one person especially when accompanying other food. When measuring the bottom diameter it will be around 5 inches maybe.
Hope it was or will be great!
Greetings,
Ed & Marieke
WKB