

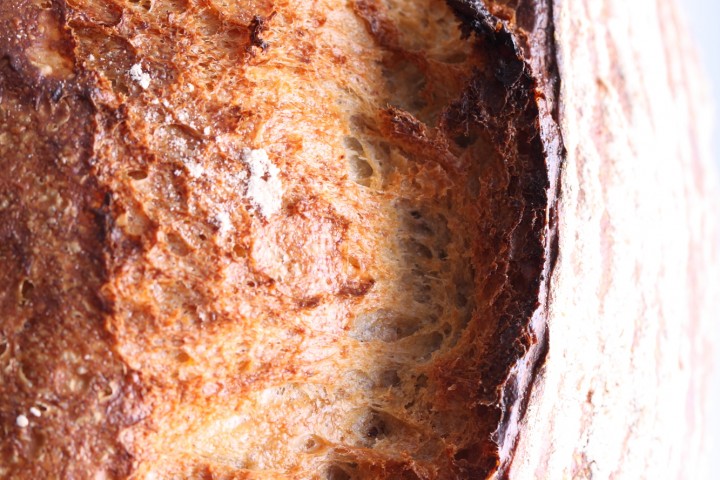
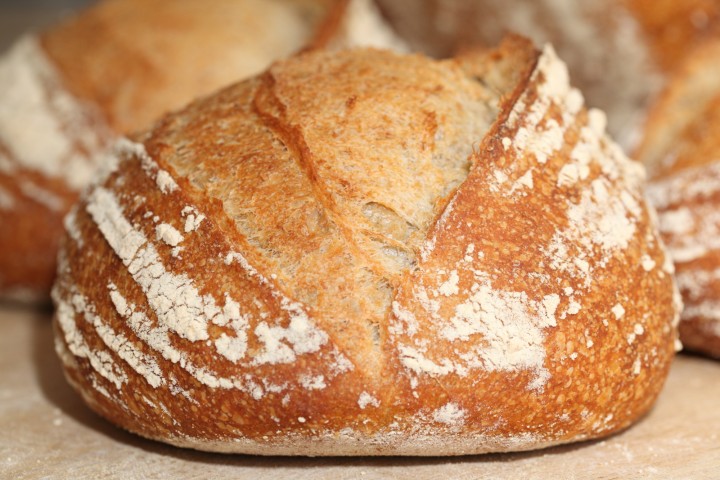
This Pain Rustique has become our daily bread
Klik hier voor de Nederlandse versie
After baking hundreds of pains rustiques you could say this recipe of our version of this rustic bread has been tweaked to the max. Of course the tweaking has been done to accommodate our equipment and ingredients and above all our taste. And I believe that the end result also has a lot to do with the hands of the maker (watch Ed’s hands at work making Pain Rustique). Give six people the same recipe and they all come up with very different loaves. So like with all other recipes, you have to make this one your own. But I believe this recipe can be a good starting point.
The recipe is very loosely based on Hamelman’s Pain Rustique but can actually be seen as a hybrid, sometimes also called ‘levain-levure’. It has sourdough in the preferment and yeast in the final dough. This way you get the best of both worlds: the extra flavor of the sourdough and the ‘speed advantage’ of a yeast based bread. Another point of difference is the shaping. Pain rustique usually has no preshaping or final shaping. Our version does have shaping and the final fermentation is done in bannetons.


For this recipe we are going to make a starter named a poolish. A poolish is a type of wet sponge usually made with an equal weight of water and flour and an extremely small amount of yeast or sourdough culture and NO salt. Making a poolish helps bring more taste and strength to your bread while using less yeast.
Note: We use European flour which absorbs a few % less water than American type flour. People using this type of flour should add 3-8 ml water to the final dough. If you dare, you can actually make the dough a few percentages wetter to get bigger ‘holes’ in your crumb. We lowered the amount of water in this recipe to make the dough easier to handle. Currently we are baking this recipe with about 67.5% hydration; so we use 80g water per loaf in the final dough.
Making the poolish
In a bowl stir together 180 grams of bread flour, 45 grams of whole wheat flour with 225 grams of water at room temperature with 10 grams of sourdough culture. Mix it well until you have a homogeneous slurry that looks like very thick batter. Cover the bowl with clingfilm and let the prefermenting begin. After 12 hours at room temperature it is ready for use. So if you want to begin your bread making in the morning, you make your poolish at 9 in the evening.
Our sourdough starter is not very sour by nature, it gives a very mellow sour note to the bread and we like it that way. We have found that the sourness depends on the ripeness of the poolish. This means that using an under-ripe poolish gives you the flavor advantages but not the added sourness. We tend to use the poolish before they peak out and collapse. When this points is reached all depends on ambient temperature and sourdough culture activity. An over-ripe poolish has a weaker gluten structure which will result in a weaker dough and less oven spring.
We use a sourdough culture which is made with 100% whole grain rye flour. A sourdough culture based on rye flour is easier to maintain, it does not go into a slurry when you forget about it, it is easier to stir because it has almost no gluten and it smells very very nice, a bit like fruit. It is also very forgiving in the amount you feed it. Normally we only feed it once a week, after the weekend baking, we just give it a few table spoons of water and rye flour, stir and ready!
If you want to make more than one loaf, just double or triple or quadruple the ingredients. We usually make 6 in one batch. That’s the maximum our bread mixer can handle.
| Ingredients for the poolish | ||||
|---|---|---|---|---|
| 180 | g | wheat (bread) flour | ||
| 45 | g | whole wheat flour | ||
| 225 | g | water (room temperature) | ||
| 10 | g | sourdough culture | ||
| Ingredients for the pain rustique | ||||
|---|---|---|---|---|
| makes 1 loaf | ||||
| the poolish from step 1 | ||||
| 225 | g | wheat (bread) flour | ||
| 70 | g | water | ||
| 7.5 | g | (sea) salt | ||
| 2.3 | g | instant yeast | ||
Making the loaf
Preheat your oven to 235 ºC / 455 ºF conventional setting (at what stage you preheat your oven depends on how long it takes for your oven to heat through, some take 30 minutes, some, like ours, with stone floors take a lot longer, up to two hours. The preparation time from this point until the bread actually goes into the oven is a little under 2.5 hours.
Ideally the temperature of your dough after mixing should be around 24-25 ºC / 75ºF. You should adjust the temperature of the water you add to reach this temperature of the total dough. For us this means in summer adding cold water to this recipe and in winter (when our little bakery can get much colder then the rest of our house) adding water up to 50ºC /122 F. You can measure the temperature of water and dough with a food thermometer. These measurements are important because they correspond with the proving times in the recipe.
Put the poolish starter and flour (no salt and yeast yet!) in the mixing bowl of your standing mixer and add 2/3 of the water. Now start mixing and gradually add the rest of the water and let the dough come together. Knead for only 1 minute until you have a shaggy mass (as Hamelman calls it). Leave it in your mixing bowl, cover and rest for 30 minutes. This process is called ‘autolyse’.

After the autolyse phase you now add the yeast and the salt and knead the mass for another 5 minutes (we use a spiral mixer for this job) and watch it turn into something a little bit more bread doughy. Cover and leave to rest for 40 minutes.
Take the dough out of the bowl and onto a floured work surface and do one stretch and fold (a full letter fold, left over right, right over left, bottom over top, top over bottom; see our bread movies to observe this technique if you are not familiar with it). Transfer to the bowl, cover and again leave to rest for 25 minutes.
Repeat the stretch and fold (full letter fold) part one more time (so 2 times in total) and again leave to rest for 25 minutes.
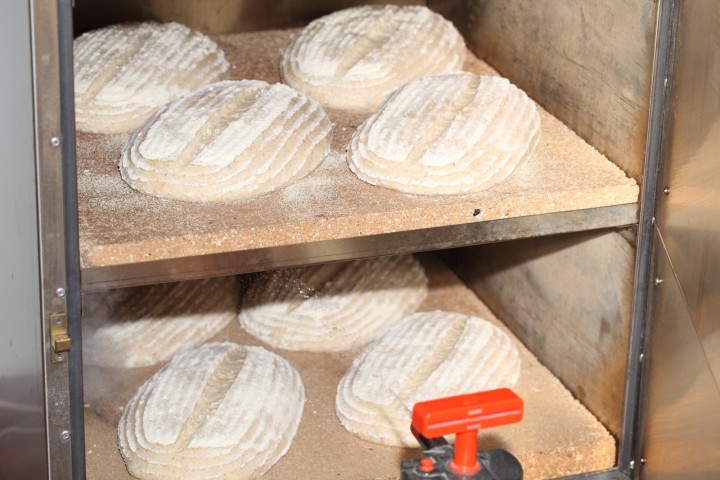
Now it’s time to shape. Shaping is a tricky subject. It’s something for which everybody develops his or her own technique over time. You can make a batard or loaf shape or a boule (ball). If necessary you can learn more on shaping from a good bread book, like the ones by Hamelman or Reinhart. We usually make batard shaped (oval) pains rustiques and use proving baskets/bannetons made of wicker.
Transfer the shaped dough in a proofing basket or baking pan, cover and leave to proof for 30 minutes. When you think it has risen enough, use your finger to carefully make a very small dent in the dough. If the dent remains, the bread is ready to bake, if the indentation disappears, the dough needs a little bit more time.
Now your loaf is ready for the oven. Slash the top of the loaf with a lame or bread scoring knife. To get a nice crust, try to create some steam in your oven by putting a small metal baking tray on your oven floor when you preheat the oven and pouring in half a cup of hot water immediately after putting the bread in the oven. Release some steam by setting your oven door ajar (perhaps with the help of a wooden spoon or oven mitt) 5 minutes before the bread is ready. If you are going to create steam with a baking tray, you maybe also want to turn your oven temperature a bit higher, because you are going to lose some heat in the process. During the baking process, as soon as the crust has the desired browning or you think the browning is going too fast, you can lower your oven temperature for the remainder of the baking time. Also check during baking, if your bread crust has the desired color or your loaf is very close to a heating element you can always temper your oven temperature during the baking process.
After 45 minutes of baking your loaf should be ready. Transfer onto a rack and leave to cool. This loaf also keeps very well in the freezer. But please make sure to eat at least some of it while fresh!
Pain rustique time table
day 1 21.00 h Make starter let ferment for 12 hours at room temperature
day 2 09.00 h Make final dough
- 09:00 h – Add flour and water to starter, mix for 1 minute
- 30 minutes autolyse
- 09:30 h – Add salt and yeast
- Knead for 5 minutes
- Rest for 40 minutes
- 10:15 h – First stretch and fold
- Rest for 25 minutes
- 10:40 h – Second stretch and fold
- Rest for 25 minutes
- 11:05 h – Shape
- 11:10 h Final proofing 30 minutes
- 11:40 h – Bake for 45 minutes at 235ºC / 455ºF
- 12:25 h – Your loaf is ready!
Note: If you like this type of hybrid method bread also check out the recipe for our Fluitje with Spelt


Elvira says
Hi Ed and Marieke,
Do you bake this bread the whole time under steam?
MVG
Elvira
Weekend Bakers says
Hi again Elvira,
Not exactly, steam is used at the beginning of the baking process to keep the skin of the dough soft so the bread can expand. Later you let the steam escape because you want the crust to firm and get crispy. So, also depending on the oven you use, you want to release the steam before the end of the baking process. With the stone oven we use we let the steam escape somewhere halfway the baking process. With household ovens it is different because usually they are not so airtight and a lot of the steam escapes anyway without opening the door during the process. But to make sure you get all the moisture out you put the door ajar in the last 5 minutes. Opening the door sooner with these ovens would give you too much heat loss.
Happy Baking!
Marieke
van says
Hi there! I found your web a couple of days ago and I couldn’t stop reading since then…Great job! I want to make your pain rustique and I have a question: I don’t have (use) dry yeast, how can I replace it for fresh yeast? I know the ratio is aprox. 1 to 3, but my doubt is about “how” and “when” to put the fresh yeast. ¿After the autolyse? and should it be diluted in water first?
I’ll use my rye sourdough culture for the poolish.
Thanks and sorry for my English….Saludos! Vanina.
Weekend Bakers says
Hi Van,
Thanks for that, much appreciated! You are right about the ratio from instant to fresh. We have two suggestions that will both work but you could maybe also try them both to see which one works best. The first is to add the fresh yeast after the autolyse (first dissolve it in some of the water taken from the amount of the recipe, because you do not want to add any extra water of course) Question is what amount of water will be enough to dissolve the yeast because you do need enough to let the initial dough come together. If you think this is a bit of a hassle, you can also try method two: add the yeast (not yet the salt) before the autolyse stage (dissolving it first of course again with water from the recipe) and shorten this stage by 15 minutes. This way the yeasts will not become overly active yet. If needed you can add some extra minutes between the Stretch and Fold stages to sort of compensate for this (go to 30 minutes instead of 25).
Hope it works out well.
Happy Baking!
Ed & Marieke
van says
Thank you so much for your quick response! The weekend is already here and I want to bake! I think I’ll go with the second suggestion, may be, dissolve the yeast in the 1/3 of the water you use when you start mixing, it means, before de autolyse stage (and as you suggest i’ll shorten this stage by 15 min). We’ll see….Next weekend i’ll try to get some dry yeast and give it a try with the original recipe and see the differences. I’ll let you know how it came out, it could be helpful for someone else, here in Argentina is very common to use fresh yeast for baking.
Thanks again. Beso. Van.
Weekend Bakers says
Yes Van, please do.
Lots of loaves 🙂
Ed & Marieke
Roger Vince says
Hi Ed & Marieke, thank you for your reply. I only baked for 35 minutes because the outside looked done and it sounded hollow when tapped – I don’t think that’s a very reliable test. I guess I just chickened out in case it got burnt, as you say, the more I bake the more experienced I will get. Thanks for the link to the picture gallery, I uploaded a pic of my loaf so you can see the lopsided holes, regards, Roger
Roger Vince says
Hi Weekend Bakers – What a great blog this is. I’m quite new to baking bread and I recently found this site when searching for a bread to make with a poolish. Yesterday I had a go at making your Pain Rustique with a few slight changes as I don’t have a sourdough starter, yet. I used your excellent tips on poolish and biga. I made the poolish as per recipe but used about .35g of instant yeast (one eighth teaspoon) for a 12 hour ferment and it worked very well . Apart from the addition of an extra 50g of wholemeal flour, and using the French ‘slap and fold’ method for ten minutes (I only hand mix), I followed the recipe and produced, for me anyway, a nice, light loaf with some holes. I do have a couple of questions – I think maybe it could have done with some extra time in the oven. I don’t know what temperatures your Rofco oven reaches but I only have a standard domestic gas oven. I baked on an upturned baking tray, preheated, with 10 mins at about 230deg (Gas mark 7) and another 25mins at 205 (mark 6). Also, all the larger holes appear to be on one side of loaf. I think this is probably my poor shaping technique but I would value your opinion. I’d attach a photo but I don’t know how.
Best Regards, Roger
Weekend Bakers says
Hi Roger,
Thanks for your comment. May we ask why you only baked the loaf for 35 minutes instead of around 45?
In our Rofco we bake at 235 and we turn the thermostat down as soon as the bread has the desired colour and then the bread cooks further on the heat of the stone.
About the large holes on one side, yes that could be a result of the shaping. You have to bake again of course (and you very probably want to of course :)) and see if this will happen again. Baking is also a question of doing it a lot and making small changes and making notes and getting to know your dough, you hands, your equipment and your surroundings and how to bring that all together.
The only way we have at the moment for sharing pictures is this section: www.weekendbakery.com/your-loafs/
Happy Baking,
Ed & Marieke
Peter says
Fantastic! And what a result! The only variation was that I used some of my daughter’s leaven starter to make the poolish and added 1/3 teaspoon of yeast. Our house has no one place where it’s warm all the time, so I left the poolish out overnight. The dough from the recipe came together and the finished loaf is a thing of beauty. This will be the basis of my “standard” from now on.
Weekend Bakers says
Hi Peter,
So a little tweaking for you and you got the perfect result. Sounds wonderful!
Happy Baking,
Marieke
Vincent says
Hi Marieke,
Unfortunately I had to abandon my previous go at this Pain Rustique. Even after some additional Stretch&Folds the dough remained way to wet to work with….. Even though I’m using 12.5% flour (Meneba Orchide) it seems the dough can’t handle all the water. I will give it another try soon.
Regards, vincent
Weekend Bakers says
Hi Vincent,
After some more flour experimenting lately (shortly more on this on our website about flour from 5 different mills) we see the differences between bread flours from different places, in look and feel of the flour and dough and especially the baking result (it can be very big). We would suggest also trying another flour (from a local mill maybe) and compare the result with your current flour. It could be this flour is a bit ‘whiter’ than the tarwebloem we use from De zandhaas (less fiber to soak up moisture) and that maybe is why it feels a bit too wet for you. If you use the Meneba flour we would suggest using a few % less water with this recipe.
Keep us posted and happy baking!
Ed & Marieke
Vincent says
Hi Bakers!
Yup, exactly my plan of attack… I even consider shopping at the Zandhaas soon to have a decent reference for all other recipes… To be continued!
regards, vincent
Weekend Bakers says
Very curious to know, if you will experience the difference like we do…
Vincent says
Hi!
First, thanks for all the wonderful recipes! I will be busy this winter 🙂
2 small questions: knowing that you use a Rofco oven as do I; what temperatures & times are you using in your oven to create the perfect Pain Rustique? I could imagine starting at 240 and after 12 minutes, turn it to 50 or so…. Second, You mix it for 5 minutes but can you help me understand the speed of mixing? I looked several times at your video but cannot determine it from looking at it… It seems rather fast though. I’m still uncertain to mix at a lower speed for a longer time or with a higher speed for a shorter time. Hw do you feel about it (sorry, 3th question… I was always bad at math)
Thanks!
Kind regards, vincent
PS The bannetons are great!
Weekend Bakers says
Hallo Vincent,
Thanks very much, also for liking the bannetons!
We start at 235 and turn it down as soon as the breads have the right coloration and turn it to 50. But we are using the B40 at the moment, what model is your Rofco? About the mixing: our mixer does 110 rpm, you could maybe call that a slow speed. Two speed mixers have, for example a 100rpm and a 200 rpm speed. The high speed mixers are an industry invention to speed up the bread making process. By mixing at 200 rpm you can cut mixing time in half and still bake a bread. There are also other ‘advantages’ in the speed of gluten development at 200 rpm but all result in a higher yield without a higher quality. So as a home baker you do not need a high speed mixer as the slower mixing more mimics the movement of the hands.
So in short, if you have the time, take it a bit slower 🙂
Hope this helps.
Vincent says
Hi,
Thanks for your reply!
I’m using the smalles of all… B5 and measure the temp ‘by hand’ before baking. I’m using a Bear Varimixer starting at 70rpm to 400 rpm so I must be able to use the 110 rpm. I will try it this weekend and ‘report my results’, thanks!
regards, vincent
Weekend Bakers says
Hi Vincent,
We hear only good things about the Bear. A great combination with the Rofco I would think!
Could be that the B5, because it is smaller and the heating elements are closer to the bread you have to temper the oven maybe already after 10 minutes or so. It’s a question of keeping a close eye on the color and turn it down when you think it is just right.
Would love to hear more about the 110 rpm results with the Bear!
Enjoy,
Marieke
mike says
Hello, i’m using your recipes for a couple of months now. I love the fresh bread. the only thing is the crust. out of the oven is nice and crispy, after 1 our it becomes soft.
any ideas?
grz Mike
Weekend Bakers says
Hello Mike,
Yes, the answer is moisture. There can be moisture coming from the surroundings softening the crust and even more important, moisture from inside the loaf traveling to the upper crust. This last issue can be overcome somewhat by looking at the baking time of the bread. Maybe it needs to stay in the oven just a few minutes longer.
Next to that it is normal for a crust to soften somewhat after the first hour, after it has lost most of its moisture, checking it again after 2 to 3 hours, you could find it has become more crispy again. It also depends on the type of bread you bake and the ratio crust to crumb. A baguette for instance, has less crumb and usually less moisture inside compared to a bigger loaf.
So, make sure your loaf is well baked and can lose its moisture well enough after baking.
Hope this helps.
Happy baking!
Ed & Marieke
Claartje says
Another recipe added to the favourites in this household! After your BB, now the pain rustique has passed the test big time. I think both the wholemeal and the sourdough elements have gone unnoticed … Really happy with the result (I had the hydration up to 70%): tastes & looks fantastic! My poolish wasn’t very active (due to low room temperature – Highlands, Scotland?), but the end result was great! “Een blijvertje” as we say! Thanks again and looking forward to new projects ….
Weekend Bakers says
Hello Claartje,
Isn’t it great to be able to bake something so good that people (and children!) love so much?
I am so very glad our recipes work out for you too.
New project is the ciabatta focaccia recipe that is now our absolute favorite. It is made with very wet dough that gives great result. And you can add all the things you love best to it, vegetables and herbs and cheese etc. Hope to have the recipe with lots of pics up and running this week.
Happy Baking,
Marieke
PS: If you want to give your poolish an extra boost because it doesn’t seem that active after a night of fermenting, you can (if you have it available of course) use an oven that you ever so slightly preheat to about 30 degrees and then turn of and put the poolish in for an hour or two to give it a bit of help.
Christlane says
Hello,
I would like to try your recipes here… I have some questions regarding flours. I live here in France and I am confuse about the flours here. For this recipe for instance… which flour did you use that is equivalent to french flour type? and for the baguette? can I mix t55 and t65 flour? I have here Francine Pain Maison flour… is it equivalent to bread flour? please help I really wanted to know these flours equivalent to King Arthur’s flour.
also which type of flour can I use for the 80% hydration baguette you made? t65 or t55?
Merci beaucoup!
Weekend Bakers says
Hello Christlane,
Whenever we talk of bread flour or wheat flour in our recipes we use a flour that comes closest to the French type 65 (similar in protein content).
Type 55 comes closer to what King Arthur would call all purpose flour.
We use the Type65 kind of flour for this recipe and for our baguette baking too, but using a combination of type 55 and 65 would work as well. Of course you have to keep in mind that next to every type of flour being different, there can and will be also different results with different brands of flour and even with different batches of the same brand and type of flour.
You just have to try some out and see what works best for you.
Good luck with it and happy baking,
Ed and Marieke
PS: more info on flour comparison can be found on this wiki page: en.wikipedia.org/wiki/Flour
Peter says
Thanks a lot for this recipe and the clear instructions. I have tried making a sourdough last year using your instructions but wasn’t successful and gave up. But ever since I couldn’t let go of it entirely, so I have it another try a week and a half ago and this time it worked and I now have my very own sourdough culture.
This weekend I had a try at your Pain Rustique recipe. The last stage was slightly different and I shaped it into a boule and baked in a Le Creuset pan, because it results in a better oven spring than it would straight in my oven. It turned out to be one of my favorite breads ever. The ever so slight sourness is pleasing but most of all the full flavor and structure of the overall bread are incredible.
It is going to be interesting how my sourdough will further develop as it currently is quite young. I will definitely bake with it more often and I may give one of your other recipes a try soon.
Thanks for the great website and keep up the good work.
Peter
Weekend Bakers says
Thank you so much Peter. The things you write about are very recognizable and we know the feeling of light despair when facing a new baking challenge and things are not working as planned. And how awesome the feeling can be if and when you ‘crack the code’ and you produce an amazing loaf. The trick is to know exactly what you did and keep notes of how you came to that result so you can reproduce, making a recipe your own, baking lovely loaves for many years to come!
Wishing you the best baking results and many happy baking days,
Marieke
Ada says
Thanks for the recipe. I made this today and it’s wonderfull to eat.
Not sour just full of flavour. Picture is on my blog
Weekend Bakers says
Ada,
I just saw the picture of you Pain Rustique, it looks amazing!
I can tell you that this bread is loved by many more children, including my own nieces.
I even have a friend who’s daughters ask for a piece of bread instead of a ‘toetje’, they eat it without any ‘jam’, ‘pindakaas’ or ‘hagelslag’, just plain. Our neighbors’ little girl of 18 months loves to chew on it. All this surprised me in the beginning, because I would have thought children would like the crust removed. I am so happy they all love it too, because it is the best bread they can eat. Maybe a good thing they do not know it is healthy because than they would probably look at it like they do at spinach…
Thank you so much for sharing and keep up the wonderful baking!
Marieke
Simon says
I made this today, using the recipe exactly as written – using my own sourdough culture.
It made a great loaf – nice crust, although a bit softer than my usual efforts, and you could just about make out the sourdough taste.
Really nice crumb, mix of hole sizes, so looks fantastic.
It rose really well in the oven, but not much of a ‘grigne’ – pix here: www.flickr.com/photo…158995901/
I usually make an overnight sponge with yeast, and have good results, but will continue to try this method. If I don’t want the sourdough taste, how much yeast would you reckon for the poolish?
Simon
Weekend Bakers says
Hi Simon,
Thanks for your addition and the pix of the tasty loaf. I actually found this information about ‘la grigne’:
La Grigne [pronounced (roughly!): la green-yeh], noun: In baking terms, this refers to the little lip of crust that pulls away from the body of the baking loaf right along the score-marks slashed in the surface. In french, this literally means “the grin.”
As for your question about the poolish:
If, like in the recipe, you are going to leave it for up to 12 hours you should use 0.2% of instant yeast. So that’s 0.2% of 225 g of the total flour for the poolish = 0.45 g of instant yeast. A very tiny amount!
You can find more on this subject here: www.weekendbakery.com/posts…lish-biga/
Hope it will work out great!
Happy baking,
Marieke & Ed
menno says
I’ve made this recipe last weekend. Not having a sourdough culture for the poolish, I’ve used ‘Hertog Jan Grand Prestige’ instead of water. This is a rather strong and dark beer (and very tasty!) and gave the bread a really nice, somewhat sweeter and complex taste. The color was somewhat darker too, probably because of the caramel content in the beer. Sorry for not having pics, by the time I was done with the baking for that day, the bread was gone too 🙂
Weekend Bakers says
Hi Menno,
Yes, we’d love to have seen pics of that! Good sign the bread was gone in a flash of course. I cannot remember how long ago we used beer in bread. We did use cider quite a lot last year, but it makes for a rather expensive bread as you can imagine.
Ed recently attended a beer brewing course and tomorrow he is going to collect the beer he has made a while ago. Maybe we can use that in our baking too.
Thanks for the sharing and happy baking!
Marieke
Marc says
Hi.
Very nice bread. Normally i make heavy german style sourdough rye- breads (schwarzbrot) but I needed a good french style bread as an alternative. I tried your pain rustique for the first time today and its definitely a keeper!!
I love it!! One question: if you make more than one loaf, do you also double the poolish?
I guess the answer is yes, but just to make sure.
Thanks for a great site.
Weekend Bakers says
Thank you Marc, your schwarzbrot sounds wonderful too!
And yes, you are right, making more than one loaf means multiplying everything, including the poolish.
Happy Baking,
Marieke
Bill in UK says
I am now quite angry with you guys at weekend bakery. After 3 years of making bread I now have my expensive Haussler oven installed and constantly try new breads and new variations in the search for the perfect every day loaf; something I can bake every week, with guarenteed results that all the family will enjoy. The family join in the search, tasting each loaf and commenting on what they like/don’t like about it. Then I try your Pain Rustique; no tweaks, no adding a bit of spelt or adjusting the rise time to personalise it. I just follow the damn recipe. They love it. Hey Dad this is great, will you do this next weekend?; and worst of all: can we make this the every day loaf? So you have reduced me from someone who thought of themselves as an innovative experimental baker to a recipe follower. I now dread trying your wholemeal loaf in case that works out perfectly also. 😉
Weekend Bakers says
Hi there Bill,
We do not know to feel happy or sorry for you 😉 but the important thing is your family likes what you bake!
Looking at our own recipe again we noticed we made a little adjustment in the last months with the mixing of the dough. Instead of mixing 2 minutes we now mix for 5 after the autolyse this gives a slightly better gluten structure and also allows for a longer final proofing (up to 40 -45 minutes) and results in a more airy crumb. But this is a work in progress, maybe you would like to try for yourself and see how it turns out.
We also vary with whole wheat whole grain rye and whole grain spelt in the poolish, all giving a slightly different taste result, but all very good.
Happy baking,
Marieke & Ed
Bill in UK says
Thanks – I will try that variation as I would like a slightly more open crumb. If I may be excused one more question why do you not use an autolyse step with the wholemeal bread but you do with this one. I generally don’t use a machine mixer and mixing in the salt/yeast by hand after the autolyse step is a pain so I am interested to know what would drive you to use it or not use it.
Thanks
Bill
Weekend Bakers says
We hear you, mixing in the salt/yeast by hand after the autolyse sounds like hard work.
As for your question, except for the recipe working really well this way and us trying different methods , we have to get back to you on this one as to why and when exactly it is better to autolyse than to mix and vice versa especially when using wholemeal…
Peter says
Hi there,
I made the bread twice now and it is really lovely! I’m baking a few months now and i’m really in to it. Especially making the sourdough culture, it is fantastic to see it come alive. This is the fourth recipe I tried en Saturday I’ll try the fifth, the sugar loaf, as a present for my father.
I have one question: where did you buy the bannetons? I tried the internet and found one webshop in Belgium, but the cooking shops had nothing…
Great website, keep on going!
Peter
Weekend Bakers says
Hello Peter,
Can I ask if you live in Holland? If you need just a few bannetons maybe we could arrange something.
Good luck with the sugar loaf. I think it is fantastic. I always use sugar lumps made from cane sugar, it gives great taste. It is also very satisfying to beat them with a hammer 😉
Marieke
Peter says
Hi Marieke,
Yes, I live in Holland (Amersfoort). I wanted to buy two oval bannetons because two loafs will fit in my oven at the same time. If we can arrange something, great!
And I’m looking forward to the crushing and thanks for the tip, I’ll try cane sugar
Peter
Bill in UK says
I notice you guys are putting half the flour for the overall mix in the poolish. I follow a very similar method to yours but generally put about 1/3 of the flour in the poolish (probably because I want to avoid the bread being too sour as that is not popular with the rest of the family). Chad Robertson in his Tartine Bread book (buy it if you haven’t done yet, it is expensive but well worth it) has only about 10% of the flour in the poolish. Do you have any thoughts on the pros/cons of different proportions and how it affects the final bread. My Haussler oven is now going great and having all that stone round the bread definately makes a difference.
Weekend Bakers says
I did not notice a big change in sourness by using 1/2 or 1/3 of poolish only a change in the resulting crumb. I like full flavor and bouncy crumb and I get this by using 1/2 poolish. Perhaps the lack of sourness is because my sourdough starter is not very sour by nature, it gives a very mellow sour note to the bread whatever I do. I have found that the sourness more depends on the ripeness of the poolish, using under ripe gives the flavor advantages but not the sourness. I tend to use the poolish long before they peak out and collapse. Tartine uses a 10% ratio because he wants a very very long maturing time and he also uses a very undeveloped poolish within his final dough. All this results in a long bulk fermentation and proofing, a sweet and almost lack of sourness within the bread. I do not know why he bothers with such a lengthy process but for me this technique takes too much day time.
Ed
Bill in UK says
Ed
Thanks for the great reply. I will do some experiments with more/less poolish. The family all like it when I get the ‘bouncy’ crumb you describe so maybe a higher ratio will work for me if I use the starter very young. I just came back from a business trip to San Francisco and visited Tartine. I tried an open ham/cheese/asparagus toasted sandwich. It was spectacular and the bread was fantastic but bread with so many huge holes in is impractical for every day use (at least in our house, where my son would fill all the holes with half a jar of chocolate spread at breakfast) so while I will continue to try to emulate his loaf for special occasions I suspect my regular loaf will be much more like your version of the country bread, particularly in the use of both starter and yeast. I vary the flour mix and find 10% spelt, 10% rye gives good results. I have also tried a couple of recipes that seek to emulate the famous Poilane loaf.
Weekend Bakers says
I bet you are inspired after your trip to Tartine! Your story about holes and chocolate spread (not to mention jam) is very recognizable…
Simon says
Hi, I am used working with a poolish in my Panasonic baking machine. I use only 0,5gr. instant yeast, mix it with the water and the bread flower and let it rest for 8 hours before starting the actual whole wheat baking proces. This adds more flavour and a better structure to the bread. I was wondering if you ever tried this recipe adding the sourdough culture and a tiny bit of instant yeast at the start of the proces (so at the same time).
Thanks for the instructions how to make a sourdough culture!
Rachel Mondor says
Many thanks for your reply guys!
I’m going to get myself a digital thermometer. As you say, the overall temp of the dough is probably too low.
I just wondered that it might be perhaps the strain of leaven that I’ve developed. Someone told me that natural/commercial leavens ‘sometimes really don’t like each other’.
But it smells/looks well enough. Certainly your tip of using rye flour rather than wheat for the starter is good, the starter is much more stable, low-maintenance and smells sweet!
You guys rock! When are you going to write a book?
Thanks, Rach x
Weekend Bakers says
Hi Rachel,
What a way to start the baking day with such a comment! The thermometer surely will help you to understand your dough even better. But it smells and sounds like you know your bread already pretty well!
Happy baking,
Marieke
PS: We tried different starter cultures but the rye is still our firm favorite, recognize everything you say.
Rachel Mondor says
Wow, I love this! A great everyday bread, with a balance of good flavour and convenience.
A question, after the addition of the yeast and salt, is it normal for the dough to become quite unactive for a period of time?
Both times I’ve tried it, it seems to ‘die’ after the Y&S go in, the dough becomes leaden and far less active than one would imagine given the amount of instant yeast used. It’s quite warm in my kitchen (and in England!) at the moment, so I don’t think the temperature is the issue. The subsequent folds and prove are far longer than specified in your recipe.
End result’s fab though!
Thanks, Rachel
Weekend Bakers says
Thanks Rachel,
Our initial thought would be, although the weather might be quite good, to still check the temperature of the dough itself. It has to be 24 degrees Celsius in order to be able to stick to the times given in the recipe. Most important factor would be the temperature of the water you add of course, but also the other ingredients and the bowl you use could play a little roll in getting the final dough up to the right temperature. (and of course the temp of the room). We use a digital thermometer to check the temperature. If you do not have one, it is a bit of a guess, but as you describe it you are very good in keeping your eyes on the dough to see how long it needs to develop and the result is great. But the weather must indeed be very hot in order to use cold water from the tab, in most cases luke warm to even warm water is needed.
Hope this helps for your next bake,
Ed & Marieke
Rachel Mondor says
Hi Guys, I love your site!
I’ve been working through a few of your recipes, I’m quite new to using natural leaven.
Just a question on the Pain Rustique-
You state 2,3g instant yeast.
Is that 2 (point) 3 g’s?
or
2 (or) 3 g’s?
And by instant yeast, do you mean fresh yeast or dried?
Sorry if my questions seem a bit dim! :~/
I just don’t want to cock it up. Many Thanks. Rach.
Weekend Bakers says
Hi Rachel,
It is indeed 2. point 3 grams of yeast ( trying to be very accurat here :)) and it is the dried variety.
I know you would need a precision scale but if you do not have one, just stay close to the 2 grams, because the yeast in this recipe is just used to accelerate the proofing process while having the bonus of the sourdough taste. It is sort of a hybrid loaf.
Hope it will work out.
Weekend Bakers says
Hi Gary,
You are on a roll I see. One bread after another! That is some enthusiastic scoring you did too. Glad our recipes are working well for you.
Gary Cook says
By the way, I’ve also been trying to contact ROFCO, to no avail. They just don’t seem interested in responding to UK queries. Anyone know more? I’m desperate for a price list, or just a rough idea of how much their ovens cost. They need a UK distributor.
Gary
Weekend Bakers says
I know there are other people who are in contact with Rofco from the UK and that the language is a bit of a challenge for the owner of Rofco. It is a very small company and I think the attention from UK and also US is rather new to them. Hope they get in contact with you soon. For now I can give you an indication of prices for the oven we have and one model bigger. You have to think along the lines of 1200 euros for the B20 and 1650 euros for the B30. Of course these prices were for delivery in Holland and Belgium a little while ago and I do not know about shipping etc. But this indication maybe can help you decide if the Rofco is a serious option for you. As for the oven itself and the way it is working we are nothing but positive. A simple and super effective design.
Hope it works out for you. Keep us posted…
Gary Cook says
Hi,
I made this today, after starting the poolish last night, and I’m really pleased with the result. twitpic.com/42wl7r The dough got very strong and elastic during the knead and subsequent folds, which resulted in a super-spring in the oven. It tastes fantastic, I will definitely make it again. Thanks for the recipe.
Regards
Gary
Mike D. says
Hello! I chanced upon your wonderful website last night while sitting out a blizzard! I am a no knead / sourdough fanatic. I have a starter I keep out on my counter as I use it every night and bake a loaf of whole wheat/bread flour 50/50 every evening of the week, plus sourdough pancakes every Sunday morning. I got the latest Reinhart book over Christmas and have been reading through it but had not tried any of the recipes yet. I had never done a poolish either and this recipe of yours caught my eye. I baked a single loaf of it today and I was very impressed with the effect of the poolish on the loaf. Wonderful texture and huge oven spring like I have never had before. We are now snowed in and waiting for the roads to be cleared, so we baked four diferent recipes today. This rustic loaf was devoured with great joy . Thanks for a new tool in my bakers tool kit!
Marieke says
Hi Rob,
Great to hear you are a home baker too! The no knead method is great fun and we are developing a new recipe for a breakfast bread as we speak, but going the stretch and fold and also the sourdough way is where our hearths start to beat faster.
You are right, we make our own. The rye sourdough culture is our favorite (the smell is amazing) and of course there is a posting: www.weekendbakery.com/posts…asy-steps/
Let us know how you get along!
Succes en veel plezier met het bakken,
Marieke
Rob Damen says
Good morning,
First of all, love your work, I do some bread baking myself at home, (unfortunately not in a ROFCO) I mostly use the “no-knead’ recipe from Jim Lahey which turns out quite OK. I have never used a sourdough culture before when baking my loafs, I always use instant yeast or fresh yeast when baking my loafs. But I must say I’m pretty curious of your Pain Rustique and I am planning on making your recipe in the near future. For starters I have one question, do you use prefab sourdough culture (I think you don’t) or do you make this culture yourself? Either way, could you please be so kind to inform me of where you get the culture or how you make it? Thank you very much for your reply!
Kindest regards,
Rob Damen
Marieke says
Hi Bill,
It’s a journey but it’s one worth making and the travel to get to the perfect recipe can also be very pleasant (with a hint of the old frustration sometimes). Both the Rofco oven and Haussler are working great for us. We did hesitate with buying the Haussler and visited someone with a mixer at half the price (Italian brand called Megnosud Italia
) that also did a great job with the kneading. The fact that you couldn’t remove the bowl with that model was the main reason we opted for the Haussler, plus there was a big difference in material and finish. The Haussler is a bit of beauty. In short, with the mixer there are other options, with the oven not so many alternatives for the Rofco as far as we can see.
Have fun with the baking!
Bill in UK says
Marieke
Thanks for the reply. I should have been more clear: it is the Haussler oven I have been looking at – my batches are small enough to work by hand which I prefer anyway. I currently cook in an AGA oven which has a good lot of latent heat but the new kitchen will nto have an AGA. The Haussler oven looks more like something you would want to put in a new kitchen from a design perspective but is very expensive. I have been trying to contact Rofco to get a price.
Marieke says
Hi Bill,
Yes, the Haussler ovens are quite expensive. I know the Rofco will be cheaper or should I say less expensive. Hope it works out. Let us know what you are going to get…always curious,
Marieke
Bill in UK says
Nice loaf.
Interesting – after 18months of home baking I have arrived at this same method: sourdough Poolish and yeast in the final bread. I find it gives good flavour, speeds up the bread process to better fit in with the time available and is popular with my children who don’t like too much ‘sour’ in the flavour. I make a wholemeal loaf with a similar method that is very popular.
I was interested to read about the Rofco oven. I am planning a new kitchen and struggling with the price of the Haussler!
Akiko says
Hello, Edwin
I made your a Pain rustique again. Is it better? It tastes better and the crumb doesn’t fall apart anymore 🙂 Thank you for all your help!
www.thefreshloaf.com/node/…ent-134623
Akiko
Akiko says
Hi, Edwin
I made your a pain rustique today. It came out successfully! Thank you so much. I am very happy with this bread and I love it.
I posted the picture here.
www.thefreshloaf.com/node/…ent-134273
I used Active dry yeast so that I have to add the yeast into the liquid first. If it was bread machine yeast, I would add it into the flour first. This bread is easy to make and great!! Thank you so much!!
Akiko Dunn says
Thank you for taking a lot of time to write me back. I will post when I make your sourdough bread. I like the kind of bread using natural yeast and dry yeast because they have a great combination of softness and tenderness and right moisture.
Wish me luck 🙂
Akiko Dunn says
Hello, I am very interested in your recipe and…
I want to give a try this recipe. But I don’t know why you don’t add yeast into the poolish and flour for autolize instead of SALT. I though that the salt should be the last ingredient to add on. Could you tell me why?
Best wishes,
Akiko
Edwin says
This recipe is a hydrid version between a sourdough bread and a bread with normal yeast. That is why I use a sourdough culture in the poolish for taste and yeast for speed!
I have re-read all the chapters about autolyse in the Hamelman and the Calvel books and you are right about the salt. The salt should be added after the autolyse stage. I remember that I read something about adding it before because it helped strengthen the gluten but I can not seem to find it anymore, perhaps I was mistaken. I did make this bread a lot with adding salt after the autolyse and trying to get the salt evenly through the dough is a bit of a pain. However with time passing I started to add the salt before the autolyse. I will change back to after the autolyse period and update this recipe. Thanks for reminding me!
You need to add the poolish before the autolyse because most of the water is in the poolish and you need this water during the autolyse else the dough is much too dry. When you use an other recipe with biga or a pate fermente you can add it in chunks after the autolyse period.