

Diastatic malt powder is the “secret ingredient” savvy bread bakers use to promote a strong rise, great texture, and lovely brown crust
The why and how
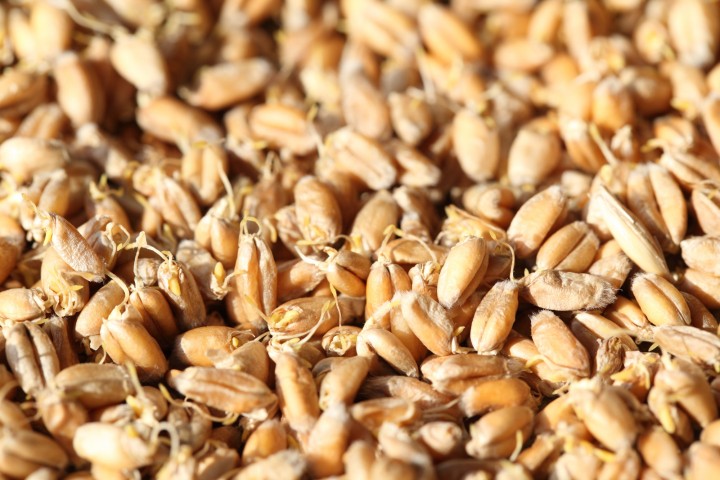
Simply said; diastatic malt is a grain which has been sprouted, dried and grounded into a powder. By sprouting the grain (often wheat or barley), letting the grain grow into a small sprout, you activate the enzymes inside the grain. These active enzymes (diastase) release sugars from the flour / starch which help to grow your yeast. It also promotes a nice golden crust and a good rise and oven spring.
You only need very small quantities of diastatic malt, about 5g or 1 tsp (or 1% of flour weight) per loaf of bread to get good results. Because there is also something like too much diastatic malt which can result in a reddish instead of a golden crust, weak dough and a rubbery crumb. Add just the right amount and it will do magic for your loafs! Some brands of flour already have diastatic malt added to it, so look on the package to check. As a rule, most whole wheat flour and organic flour does not have diastatic malt added and your bread will improve when you add your own.
3 Simple Steps
- Sprout grains
- Dry the wet sprouted grains on low temperature
- Grind the dried grains into a fine powder
Step 1 – Sprout grains
You can sprout grains yourself. Follow the steps on this page on how to sprout grains. We use organic wheat grains for our diastatic malt which we bought at our local windmill but you can also use barley. You need plain, whole (not broken or crushed) grains, preferably organic. When the grains have sprouted as described in the sprouting article you proceed to step 2 of this article.
Step 2 – Dry sprouts
Before you can mill the grains they have to be dried. You have to do this at a low temperature or your precious enzymes will not survive. The enzymes will damage and die and lose all activity at about 55 ºC or 130 ºF, so to be on the safe side do not let them get above 40 ºC or 104 ºF. We dry our sprouts, spread out, on a baking sheet lined with grease proof baking paper in a window sill. Turn them with a spoon every 6 hours or so the bottom grains are on top and everything gets evenly dried. If you have a fancy oven which can be set to 40 ºC or 104 ºF you can also put the baking sheet in your preheated oven for 3 to 4 hours. The grains are ready when they are dried completely and have turned rock solid again. Drying at room temperature can take up to two days or even more. Just be patient.
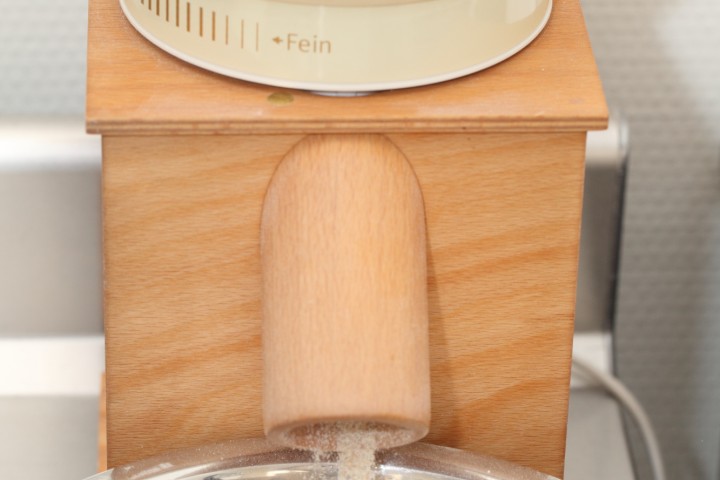
Step 3 – Grinding the sprouts
When the grains have dried it is time to grind them into a fine powder. We use a little home-use grinder with small stones especially made for flour. You can also pound them into a fine powder with a big pestle and mortar. The powder will keep ‘forever’ however, because it is flour we advise you to use it within a year (mark the date on your jar or bag). You just add the right amount of diastatic malt to your flour, just before you knead your dough, nothing more to it!
For example, you can add 5 grams of diastatic malt to the final dough to improve the dough of our Pain Rustique or Pain Natural!
Also check out our recipe for white fluffy buns with added diastatic malt.
Happy baking!


Carmine says
How to store the ground powder? I bought some that turned into a solid lump. Is it better to store dried sprouted grain and just grind some as needed?
Roger M. Zander says
Thank you for the clear, concise, and thorough details in this post on diastolic malt. Your writings show me specifics of how much and when to use d.m.
Some assumptions I have:
1. As my Winco all purpose flour doesn’t say malted barley flour in the list, it probably does not contain malted barley flour
My package INGREDIENTS: Enriched Unbleached Wheat Flour (Niacin, Reduced Iron, Thiamine Mononitrate, Riboflavin, Folic Acid), Enzyme.
2. When flour ingredients says malted barley flour it probably will be at or close to 1% of flour mass.
Gold Medal Bread flour Ingredients: Ingredients: Wheat Flour, Malted Barley Flour, Niacin (A B Vitamin), Iron, Thiamin Mononitrate (Vitamin B1), Riboflavin (Vitamin B2), Folic Acid (A B Vitamin).
3. Adding diastolic malt flour at 1% mass of only whole grain flours in the dough recipe will enhance dough structure and crust color.
Also, a final thank you to having a website tutorial where I am not bombarded by ads. We Yanks can’t help ourselves so we sometimes need others to guide us.
Weekend Bakers says
Hello Zander,
Our flour does not contain any enrichment, the enriched flour you mention under point 1 does contain some vitamins plus enzymes, which is or could be the same or have the same workings as our own made diastatic malt.
Thank you for sharing your thoughts and also a big thank you for noticing our ad-less content. We on our part are bombarded by companies and people who want to use our site and content for all kinds of advertising. We know exactly what you mean, with some web sites you cannot see the actual content through the ads. Nothing gives us greater pleasure than to be recognized as real people who love to bake and share genuine content and nothing more (or less)!
Enjoy your baking and greetings from the Low Countries,
Ed & Marieke
Catarina says
I used diastatic malt in a 100% rye recipe (with a scald and sponge) that called for non-diastatic. The bulk fermentation went much longer because I didn’t see significant rise (over 8 hours when the recipe only stated 4-6hours). On the two subsequent proofings I think it did not rise at all… Was it to much enzimatic work for a flour that didn’t need it (being rye and scalded)? By the way I think the result wasn’t bad, the crumb seemed the expected despite being a brick.
Weekend Bakers says
Hello Catarina,
Yes, we would not advice to use the extra malt again for this recipe. Maybe your gluten were also slightly damaged during the longer fermentation and there’s not much gluten to work with to begin with. You should try and make the recipe as described if possible and also keep in mind that handling 100% rye is very different to wheat, it will act and look different, especially with whole rye. So without seeing your bake it could very well be that it was already close to what this rye bread would look like.
Ellen van Schaik says
Wat een interessant artikel!
Heel graag wil ik het diastatisch moutpoeder kopen.
Weten jullie waar ik dat zou kunnen kopen?
Alvast bedankt voor de reactie.
Weekend Bakers says
Hallo Ellen,
Het is heel makkelijk om zelf te maken en heel moeilijk om te kopen (tenminste voor zover wij dit weten, want we maken het altijd zelf en tot voor relatief kort was het iig nog zo). Het donkere moutpoeder dat je bij veel molenmwinkels kunt kopen is zeker niet wat je moet hebben. Dit is sterk verhit en de belangrijke enzymatische werking gaat daarbij verloren en het wordt alleen toegevoegd voor de kleur en zoete smaak.
In Duitsland wordt diastatische mout onder de naam backmalz verkocht door de firma Seitenbacher. Wellicht dat men het bij De Zuidmolen in Groesbeek inmiddels ook heeft want zij hebben een heel uitgebreid scala aan producten.
Succes ermee!
Mai Huong Trần Thi says
Can I use malt syrup? Is it use like diastatic malt?
Weekend Bakers says
Hello Mai,
Malt syrup does not have the same enzymatic working as diastatic malt. It is more like sugar.
pat wilson says
This really works!!! Gives my rolls that European earthy flavor..not exactly sweet, but nutty. There really is a difference using the malt. It was an easy process because I have a grinder. First time I used too much of the malt. Less is more.
Weekend Bakers says
Hi Pat,
Thanks for the enthusiastic feedback. We recognize your experience and you are right, there is definitely such a thing as too much with diastatic malt. 1% of the total flour is on average the right amount.
Enjoy your baking!
pradeep ajinkya says
hi can i grind the sprout when wet and then dried at 40 c. can i get a malt. thank you
Weekend Bakers says
Hello Pradeep,
We do not totally understand your question but we would not recommend grinding it when wet.
Mairee says
Maireei want to make malt bread similar to old fashioned Veda. A beautiful popular bread 40 years ago. It was discovered by accident from a farmers wife using sprouted grain. Can you advise
Weekend Bakers says
Hello Mairee,
Sorry, we have not heard of this bread or ever tasted it. We do know that malted bread that has a dark color usually is made with roasted or burned malt or caramelized sugar.
Hope you will find what you are looking for.
Maree says
Thank you. Just starting to explore this and this will be very helpful. Cheers!
Weekend Bakers says
Thank you Maree,
Let us know how it goes…hope you will see the effect in your baking. We love it in our white buns.
Terry says
Are there gluten-free grains that can be used to create this malt?
Thanks.
Weekend Bakers says
Hello Terry,
We know lots of grains can be sprouted, also gluten-free, like buckwheat for example, but there could be a different process that you must follow. We do not have enough gluten-free experience to help you with this but we are almost sure when you google it someone will have tried it already.
Julia says
Hello. I can buy in the UK sprouted spelt flour, would this work in the same way? Love your recipes and tips, I have come on in leaps and bounds with my sourdough bread making since discovering your site. Thank you.
Weekend Bakers says
Hello Julia,
Not exactly. We are quoting one of our bread friends who commented earlier here:
Sprouting grain to the point where it’s 1/3 the length of the grain, is perfect for grinding into bread. It doesn’t need to be dried, but obviously to sell this product, it would need to be dried and processed into flour. To sprout for diastatic malt, however, the sprout is grown to the full length of the grain. The difference, and this is key, is in the amount of enzyme action. If you tried to grind wheat that was sprouted this much, it would become a gooey mess, not bread with good gluten action.
On the bag of sprouted spelt is probably indicated how and especially how much you can use in a given recipe, which will be more than you would use when adding diastatic malt as described above in the article.
sharon huddle says
is diastatic malt powder the same as buying sprouted dehydrated barley grains which you then mill into flour?
Weekend Bakers says
Hello Sharon,
The malt we make ourselves is made with wheat, but that would not really make a big difference. As long as this barley has the enzymatic workings intact (iiw is diastatic and has not been heated above 40C) it will have the same effect as described above.
Phil Usher says
There’s another way if you want to save some time and effort. Go to any store that sells homebrewing supplies and buy some “base malt.” It can be 2-row or 6-row pale, Munich, Pilsner, Vienna, pale ale, Maris Otter…doesn’t matter, as long as it is a base malt. It’s about $2 a pound. The malting process is already done, it’s dried, and it will have the diastase enzymes you need. Do not get roasted malts, caramel (“crystal”) malts, etc., as those have been heated in a kiln such that the diastase will be destroyed.
Then grind as you normally would. Cheers!
Weekend Bakers says
Hello Phil,
Thank you very much for sharing this information with us. We have checked for the Dutch bakers and in our language it would be called (tarwe of gerst) ‘basis mout’ and can also be bought for a few euros. So great this crossover between beer and bread. So people who are not into ‘do it yourself’ sprouting or are pressed for time could also use this. Excellent tip!
Greetings from the low countries,
Ed & Marieke
lucy li says
hello,my dear friends, i learn a lot from your website,I also make my own diastatic malt by learning your recipe up,thanks a lot!now I have a trouble which hunts me those days,
the trouble is :
why I add diastatic malt ,the dough become sour and stick,just like glue?
In my mind if i put diastatic malt into dough ,dough become sweet as puting sugar.
Weekend Bakers says
Hello Lucy,
May we ask how much you add to a recipe? It is really important to stick to the right percentage which is 1% of flour weight so 5 grams of dm per 500 grams flour.
Good luck with it!
Hans says
Dank voor deze informatie. Ik vond het leuk om te maken en diastatic malt vind ik superspul. Net iets beter bakresultaat op elk gebied en eennheel natuurlijk product. Het malen van de gekiemde korrel was een beetje een probleem. Gelukkig mocht ik van de molenaars in Kampen hun maalstenen gebruiken die ze voor het onderwijs aan de scholen gebruiken. Met een beetje spierkracht heb ik nu een hele pot!
Weekend Bakers says
Hallo Hans,
Dank voor je enthousiaste bericht en we zijn het helemaal met je eens . En alweer een mooie reden om naar de molen te gaan natuurlijk. Maar jij kunt nu even vooruit met je pot.
Heel veel bakplezier met goede rijs en mooie korst!
Ed & Marieke
Gill says
Is it ok to freeze diastatic malt to preserve it? If so how long for?
By the way love your website. I have learned so much. Thankyou
Weekend Bakers says
Hi Gill,
If you want to keep it for longer we would advice to keep the whole grains and not grind it. This way the fat content stays in the grain and does not get a chance to get rancid (which does potentially happen to ground whole grain products after several months). As for the freezing we cannot tell you from experience what would happen if you freeze it. We never do, as we also never freeze any grains or flour for example. But it is very much imaginable that freezing will slow down the spoiling process as is the case with many foods. If we would do it, we would store the grains before grinding.
Hope this is still a bit useful to you.
Greetings,
Ed & Marieke
Jeanne says
FYI- kitchen grinders of various sizes, uses and prices can be found at Lehmans, and a lot of other great stuff, too!
Richard says
Hi Ed and Marieke, what a fantastic sympathetic website you have. And above all good content! I am very pleased with it. Thanks for that.
As I understand it diastatic malt helps with almost everything; better proofing, better oven spring, better crumb, better color of the crust. So why don’t you include some in most of your recipes? (recipes I very much love!). After all, you guys strike me as perfectionists that like to tweak things as much as possible.
I am very curious what your answer will be. I started baking just weeks ago. I only made recipes from your website. So I am a big fan! Thanks again..
Weekend Bakers says
Hi Richard,
Thanks for your very nice comment. You can indeed put diastatic malt in all your recipes.
But a lot of people do not have it or want to / or can make it and it is also possible to bake a very nice loaf without it, especially with very good quality flour , plus there’s also enzymatic activity in rye starters for example, so there is no direct need to use it. So the choice is yours and it is fun to experiment with a recipe and see what the difference in result will be with or without it.
Happy baking and malting,
Ed & Marieke
George Fernandez says
Wow,
This step- by-step about making and use ok Malted Barley was really insightful.
I actually learned something here.
Thanks
Weekend Bakers says
Thanks George, very glad it was useful / helpful.
Peyton Perkins says
I am curious if a food dryer with adjustable temperature setting would be an acceptable drying system?
Weekend Bakers says
Hi Peyton,
We would not advice this if and when the dehydrator causes the sprouts to get too warm and the enzymes will very probably be killed and that would absolutely be a shame. If you know your dehydrator will not get above the indicated temperature of 40 Celsius, then you could give it a go of course.
Naomi says
I’ve been making my own diastatic malt for years, for use in bread-making. Is there another use for it? I guess I’m asking this because you keep mentioning to take care in dehydrating the grains to keep the temp down so as not to destroy the enzymes. What is the point of this when after all, they are going to be baked in a bread to temps around 190F?
Weekend Bakers says
Hi Naomi,
The enzymes help during bulk fermentation to convert starch into sugars, and this helps to develop the dough. So this process occurs way before baking. Think about yeast, you put in your bread but above 40C it dies.
We also do not use diastatic malt for anything else than bread making. Could be it is used for (beer) brewing for instance. We do not have hand on experience with anything else.
Kim says
Would sprouted wheat flour be the same thing as this or is the process different?
Kim says
I just read down further where you said that if the flour is made under 50C it would be the same! Forget my question! 🙂
Weekend Bakers says
Yes, you saw it, good 🙂
Michele says
Actually, in The Laurel’s Kitchen Bread Book, one learns sprouting grain, such as wheat, to the point where it’s 1/3 the length of the grain, is perfect for grinding into bread. It doesn’t need to be dried, but obviously to sell this product, it would need to be dried and processed into flour. To sprout for diastatic malt, however, the sprout is grown to the full length of the grain. The difference is in the amount of enzyme action. If you tried to grind wheat that was sprouted this much, it would become a gooey mess, not bread with good gluten action.
Weekend Bakers says
Thank you Michele for this clarification, very helpful.
Robin says
I use spelt only in my bread baking. I buy the whole grains and grind them just before use.
For 1% diastatic malt substitution I think you are indicating that I can use sprouted grains without drying them. If so I assume they get sticky using a food processor and so I should just scrap out the chopped up sprouted grains, and put them into the flour mix prior to kneading. I could put them into the poolish the night before. Would that be better?
Assuming the optimum sprouting temperature how long does it take for the grains to sprout to the length of the grain?
Peter Wassermühle says
Von einem Sprossenbrot-Rezept habe ich auch schon mal was gelesen. Es ist wirklich sehr gesund. Jedoch finde ich persönlich die Zubereitung sehr aufwendig, da man die Sprossen ein paar Tage vorkeimen muss. Gegessen habe ich so ein Brot leider noch nicht, aber ich würde es gerne trotzdem mal probieren.
Liebe Grüße Peter
Weekend Bakers says
Hallo Peter,
Ja, Sie haben Recht, das dauert einige Tagen, aber wenn Sie die Minuten Arbeit zählen dann ist das doch nicht so schlimm 🙂
Ein Wochenende im Herbst ist vielleicht einmal perfekt für diese Übung
Happy sprouting and baking!
Marieke & Ed
Megan says
My farmers market sells sprouted wheat flour, which I use for sandwich loaves all the time. I also used to sprout, dehydrate, and grind wheat berries and would make whole loaves with it (when I had a lot more time on my hands). I never had the problems you mentioned like reddish crust and a rubbery crumb. The dough was a bit weaker, but still made a great sandwich loaf. What is the difference between this and diastatic malt powder?
Weekend Bakers says
Hi Megan,
If the powder you mention is really diastatic malt powder and not just malt powder then they are (practically) the same. The problem in a lot of countries is that you cannot buy diastatic malt anywhere. Malt powder, which is more readily available, is a kind of sweetner that has no enzymatic properties to enhance your bread.
Shalva Levine says
What to do if only 50% of the wheat germinates ?
Weekend Bakers says
Hi Shalva,
We think it would be best to buy fresh new wheat, because our wheat germinates just about 100% and we think maybe yours not germinating might have to do with freshness.
Good luck with it!
Jay says
Hi Marieke and Ed,
Wonderful topic, here!
As I am new to the “making your own diastatic malt”, I have 2 questions, regarding the process:
– can I use a coffee grinder( with a blade) instead of a stone wheel grinder?
And if not, where can I find a house-stone wheel-grinder?
– do I keep the sprouts for the malt grinding, meaning I only use the dried grains once
they have sprouted??
Many Thanks in advance for your kind reply!
P.S.: Can’t wait to start!!! 🙂
Greetings from the U.A.E.,
Jay
Jay says
Btw, forgot yo mention: by coffee grinder I meant “electric coffee grinder”.
Thank you§§§
Cheers,
Jay
Weekend Bakers says
Hi Jay,
You could use a coffee grinder but you have to make sure not to grind continually to avoid overheating of the sprouts plus make sure there is no coffee (taste) in the grinder.
We got our grinder second hand from a friend and are not really experts on where to buy them. In Germany they are very popular. We have one called Komo (See www.top-getreidemuehlen.de/komo0.shtml)
Sorry, we do not understand your second question… could you rephrase it maybe?
Jay says
Hi guys,
Thank you very, very much for the kind reply and for the link!!!
Yeah, after re-reading, I too, noticed that it was confusing and not clear…
Sorry for that! 🙁
What I meant was:
Once the grain(in my case, barley) has sprouted, and as I am trying to make diastatic malt(only), do I need to keep the sprouts(the growing thing that comes out of the grain) in order to make the malt, or do I only use the actual grain(dried, of course)?
Basically, once sprouted, do I dry and grind the complete grain+sprout, or only the grain(discarding the sprout)?
Thank you very much for your great support and advice, guys!!!!
P.S.: I am moving to Germany in a couple of months, so I might be able to purchase one of these grinders 🙂
Kind regards,
Jay
Weekend Bakers says
Hi Jay,
Clear! The answer is yes, you have to grind the complete grain plus sprout.
Thank you for your kind words and we think Germany will be the perfect place to buy a grinder, you will be spoiled for choice!
Good luck with the move and happy baking in Germany,
Marieke & Ed
LYenHoong says
Would it be possible to use a food dehydrator to dry out the sprouts?
Weekend Bakers says
We would not advice this if and when the dehydrator causes the sprouts to get too warm and the enzymes will very probably be killed and that would absolutely be a shame. If you know your dehydrator will not get above the indicated temperature of 40 Celsius, then you could give it a go of course.
Good luck with it!
Wendy van de Water says
I noticed that you can buy flour made from sprouted whole wheat, is that the same as you are making here?
rudehealth.com/produ…eat-flour/
Weekend Bakers says
Hi Wendy,
It looks like it could be the same, unless it was heated above 50C because that would stop the enzymatic working.
So if this wheat has been sprouted, dried and ground without being heated then it would indeed be diastatic malt. We do not see any information on how to use it but normally you would use a (lower) percentage of this flour to add to other flour and ingredients to make a bread.
Wojtek says
Hi,
Do you think I can blend some of the sprouted grains before drying them and use it in the dough – I just cant wait to try it..
We can make this malt out of different grains (barley, rye?) – is there any difference in strength of the enzymes depending on the type of grains? Thanks in advance for the tips!
Weekend Bakers says
Hi Wojtek,
Yes you can, just make sure to drain well before adding it to the dough to avoid adding too much extra liquid. Sprouts are usually added about an hour into the bulk rise.
You can sprout any whole grain, be it barley, rye, spelt and also quinoa, using the same method. It will take most grains between 2 and 4 days to sprout. We do not know the exact answer to your question about the strength of the enzymes for all these grains when turned into malt. We just know that rye contains more enzymes than wheat but till now we only have experience using the wheat version. We add 1% of the flour weight to any given recipe.
Steve Anderson says
Working at a homebrew shop I believe I can answer. 6-row barley has the highest, 2-row next, red wheat then white wheat. The barleys can be de-husked then ground, wheat has no husk. If you have a corona type mill and a homebrew shop, you’re in business.
Weekend Bakers says
Thank you Steve, for sharing this with us. Excellent!
Ellen van Schaik says
Dag Ed&Marieke,
Op de foto zie ik dat jullie gebruik maken van een graanmolentje bij het maken van diastatic malt. (hoelang kun je dit bewaren)
Mag ik vragen welk merk en type dit is. Misschien wil ik er in de toekomst een aanschaffen, maar heb nog geen ervaringen gehoord hoe het bevalt om zelf meel/bloem te malen. Mag ik ook nog naar jullie ervaringen vragen en hoe het precies in zijn werk gaat?
Alvast bedankt voor jullie reactie.
Met vriendelijke groeten,
Ellen van Schaik
Weekend Bakers says
Hallo Ellen,
Jazeker! het is een Komo type Fidibus die we tweedehands hebben gekocht van een heel aardige hobby bakker. Het is een beetje het instapmodel, vergelijkbaar met wat nu de Fidibus 21 is. Het molentje werkt echt heel simpel. De juiste stand instellen, korrels erin en malen maar. Wij gebruiken het molentje met name voor roggekorrels en ook voor tarwe die we ook uit de buurt krijgen. Onze ervaringen zijn goed, maar we gebruiken hem niet heel intensief. Een voordeel is dat de hele korrel beter houdbaar is dan gemalen volkorenmeel (dit kan door de vetten sneller ranzig worden). He is wel een beetje luidruchtig als je maalt, dat geeft bij ons niet, maar wel iets om even te weten. Dit type maalt ongeveer 100 g korrels per minuut. Er zijn natuurlijk ook grotere te koop. Het ligt dus aan je eigen ideeën en behoeftes welk molentje bij je zou passen.
Wij vinden het vooral een leuke aanvulling, ook voor de ervaring, maar kopen nog steeds grotere hoeveelheden meel bij de molen omdat dat met dit machientje niet te doen is. Wil je bloem dan is dat nog een wat grotere uitdaging natuurlijk, want dan moet je na het malen gaan zeven. Dat doen we ook wel eens en werkt prima, maar je moet alleen niet verwachten dat je zelf op deze manier heel fijne witte bloem kunt produceren.
Hopelijk heb je iets aan deze informatie.
Marieke & Ed
Ellen van Schaik says
Dag Ed&Marieke,
Dank je wel voor de uitgebreide info.
Ik bak een paar broden per week, dus een dergelijk instapmodel zal voor ons voldoen.
Het lijkt me dat je van versgemalen meel/bloem een smakelijker brood/broodjes kunt bakken, omdat je alleen maalt wat je op dat moment nodig hebt. Vergelijkbaar met het malen van koffiebonen denk ik? Als je gemalen koffie een tijdje bewaart, dan wordt de smaak ook minder intens. Hoe beleven jullie de smaak van het eigen gebakken brood van zelfgemalen meel/bloem en kun je het direct verwerken in brooddeeg?
Alvast bedankt voor het meedenken.
Groeten van Ellen
Weekend Bakers says
Hallo Ellen,
De vergelijking met koffie van versgemalen bonen gaat niet helemaal op want het verhaal is dat de bakeigenschappen van meel /bloem juist verbeteren als het na het malen enige tijd mag ‘afstaan’ of ‘besterven’. Dit heeft te maken met oxidatie van de in het meel aanwezige eiwitten. Het heeft dus geen zin om telkens vers te malen en snel te bakken omdat dit een beter resultaat zou geven of gezonder zou zijn bijvoorbeeld. Je kunt rustig een aantal weken vooruit malen. De winst zit vooral in de houdbaarheid van de korrels, de kwaliteit van het graan en de keuze hoe je het meel zeeft of niet en verwerkt. En die kwaliteit van het graan (vooral biologisch) is weer heel belangrijk voor de smaak en de bakeigenschappen.
Heru Laksana says
Hi, I’m from Indonesia.
Your article about making diastatic malt is very interresting and important to make people understand very clear. In presence I only used powdered and liquid malt in baking, now I know and understand how malt is made.
Thank you for sharing.
Weekend Bakers says
Thank you Heru and happy baking from Holland!
Ed & Marieke
Tono says
Hi Heru, boleh tahu di mana bisa beli powdered & liquid malt, karena saya resep yang pakai diastatic malt powder
Saya domisili di Jakarta & Tangerang, email saya pokokepoke @ gmail . com
Terima kasih
For Weekend Bakers, thank you so much for a very usefull information
Tono
Weekend Bakers says
Terima kasih / Dankjewel Tono!
Astrid says
Hallo Ed en Marieke,
Zoals jullie weten maak ik sinds kort de diastatic malt zelf, overigens erg leuk om te doen.
Op dit moment staat er 600 gram gekiemde spelt te drogen, zodat ik een voorraad heb waar ik de zomer mee door kom.
Het lijkt me niet zo’n goed idee om het kiemen en drogen in de zomer te doen.
Wat is de diastatic malt een geweldige toevoeging aan het brood. De kruim is zachter, het rijst fantastisch en het geeft een prachtige goudbruine korst.
Heb het nog niet bij desembroden gebruikt, maar die zijn ook snel weer aan de beurt. Ik ben benieuwd naar het resultaat.
Jullie tip om het te malen met een koffiemolen heb ik uitgeprobeerd en het werkt fantastisch. Voor mensen die geen graanmolen hebben is het dus geen probleem om zelf je diastatic malt te maken.
Voor niet al te veel geld heb je een nieuwe koffiemolen. De koffie molen die ik gebruik worden geen andere dingen mee gemalen.
Kortom ik ben erg blij het nu zelf te kunnen maken en wil het iedereen aanraden want het is zeker de moeite waard.
Weekend Bakers says
Hallo Astrid, fijn te horen dat het allemaal is gelukt. Het viel ons ook op dat het structuur van brood beter werd en inderdaad de mooie volle kleur van de korst. Bedankt voor je berichtje! Happy baking!
Geraldine in Spain says
Thanks for the recipe. I live in Spain, many of these kinds of
things are VERY difficult to find here. The bread in Spain
at best is shocking in most cases, the flour here is not
strong enough, and there is not really a BIG group
of people who realy understand a good loaf.
Happy Baking. Remain Calm, Bake a Brownie
Geraldine
Lioe says
Hallo Marieke en Ed,
Very interesting articles about diastatic malt and sprouting.
Diastatic malt, is that the same as ‘moutpoeder’? I know the light and the dark moutpoeder. Indeed, the bread gets a great texture, I love it. In your article about sprouting , step 3 you write that when the shoots are the same size as the grains, the sprouts are ready to be used in the bread dough. What do you mean with this? Do you mix the shoots altogether (a little moist and without grinding) in the dough? When you mix it in the dough and continue kneading, will the sprouts not break?
Another question: Tarwekiemen? Is that the result of the sprouting, drying and than grinding it?
I am looking forward to your answer. Thank you!
Weekend Bakers says
Hello Lioe,
The reason we make our own diastatic malt is because the moutpoeder you buy in Holland in a store is not the ‘diastatic’ kind. Non-Diastatic Malt is a substitute for sugar and does not contain the enzymes to enhance the breakdown of starch into sugar. This malt is used as a source of sugar, so in a sense is it a substitute for the starch-into-sugar-converting ability of the diastatic malt. It helps the rise of the dough, but only in so far as it is a sugar.
With the same size we mean that if the grain is for example 1 cm the shoots should also be 1 cm, so the same length.
Do not worry about adding the sprouts, you just add them and mix, no grinding.
Tarwekiemen are the Dutch word for wheat germ. Wheat germ is the reproductive part of the wheat kernel so the germ is the embryo of the wheat plant from which the sprouting occurs.’Kiemen’ as a verb, is letting this germ sprout.
Happy baking and sprouting!
Paul Loopuyt says
hi Ed & Marieke
As you know, I’ve been sprouting for years and I even made beer from home made malt, but I didn’t realize the diastetic malt ingredient in bread recipes whas really this simple to make. So: thanks a lot for this .
It could be the key ingredient in my quest for the recreation of pre-industrial dutch pan-loaf.
However, I found this information about diastetic malt in Rose Levy Beranbaum’s “The Bread Bible”:
“…but keep in mind that it takes 45 minutes to an hour for diastatic malt to become functional in a mixed dough, and then the enzymes in the diastatic malt require at least 8 hours to work effectively.”
and:
“If too much diastatic barley malt is added to a dough, there will be too much breakdown of the starch and the result will be a sticky dough and gummy bread with an overly brown crust, from the residual sugar”
A little bit gummy, when not overdone, is one of the properties of dutch pan-loaf!
I am now trying with a “sponge” that is 1/3 of the whole lot with 1% diastetic malt. I leave it overnight lightly cooled.
I’ll keep you informed.
Love, Paul
Weekend Bakers says
Hi Paul,
We did now about the optimum quantities and that it takes some time for the malt to become functional. But we did not know about the 8 hours. Your method, or maybe retarding the complete loaf in the fridge could be a very good option.
Would love to hear how it turns out!
Happy pan loaf baking,
Ed & Marieke