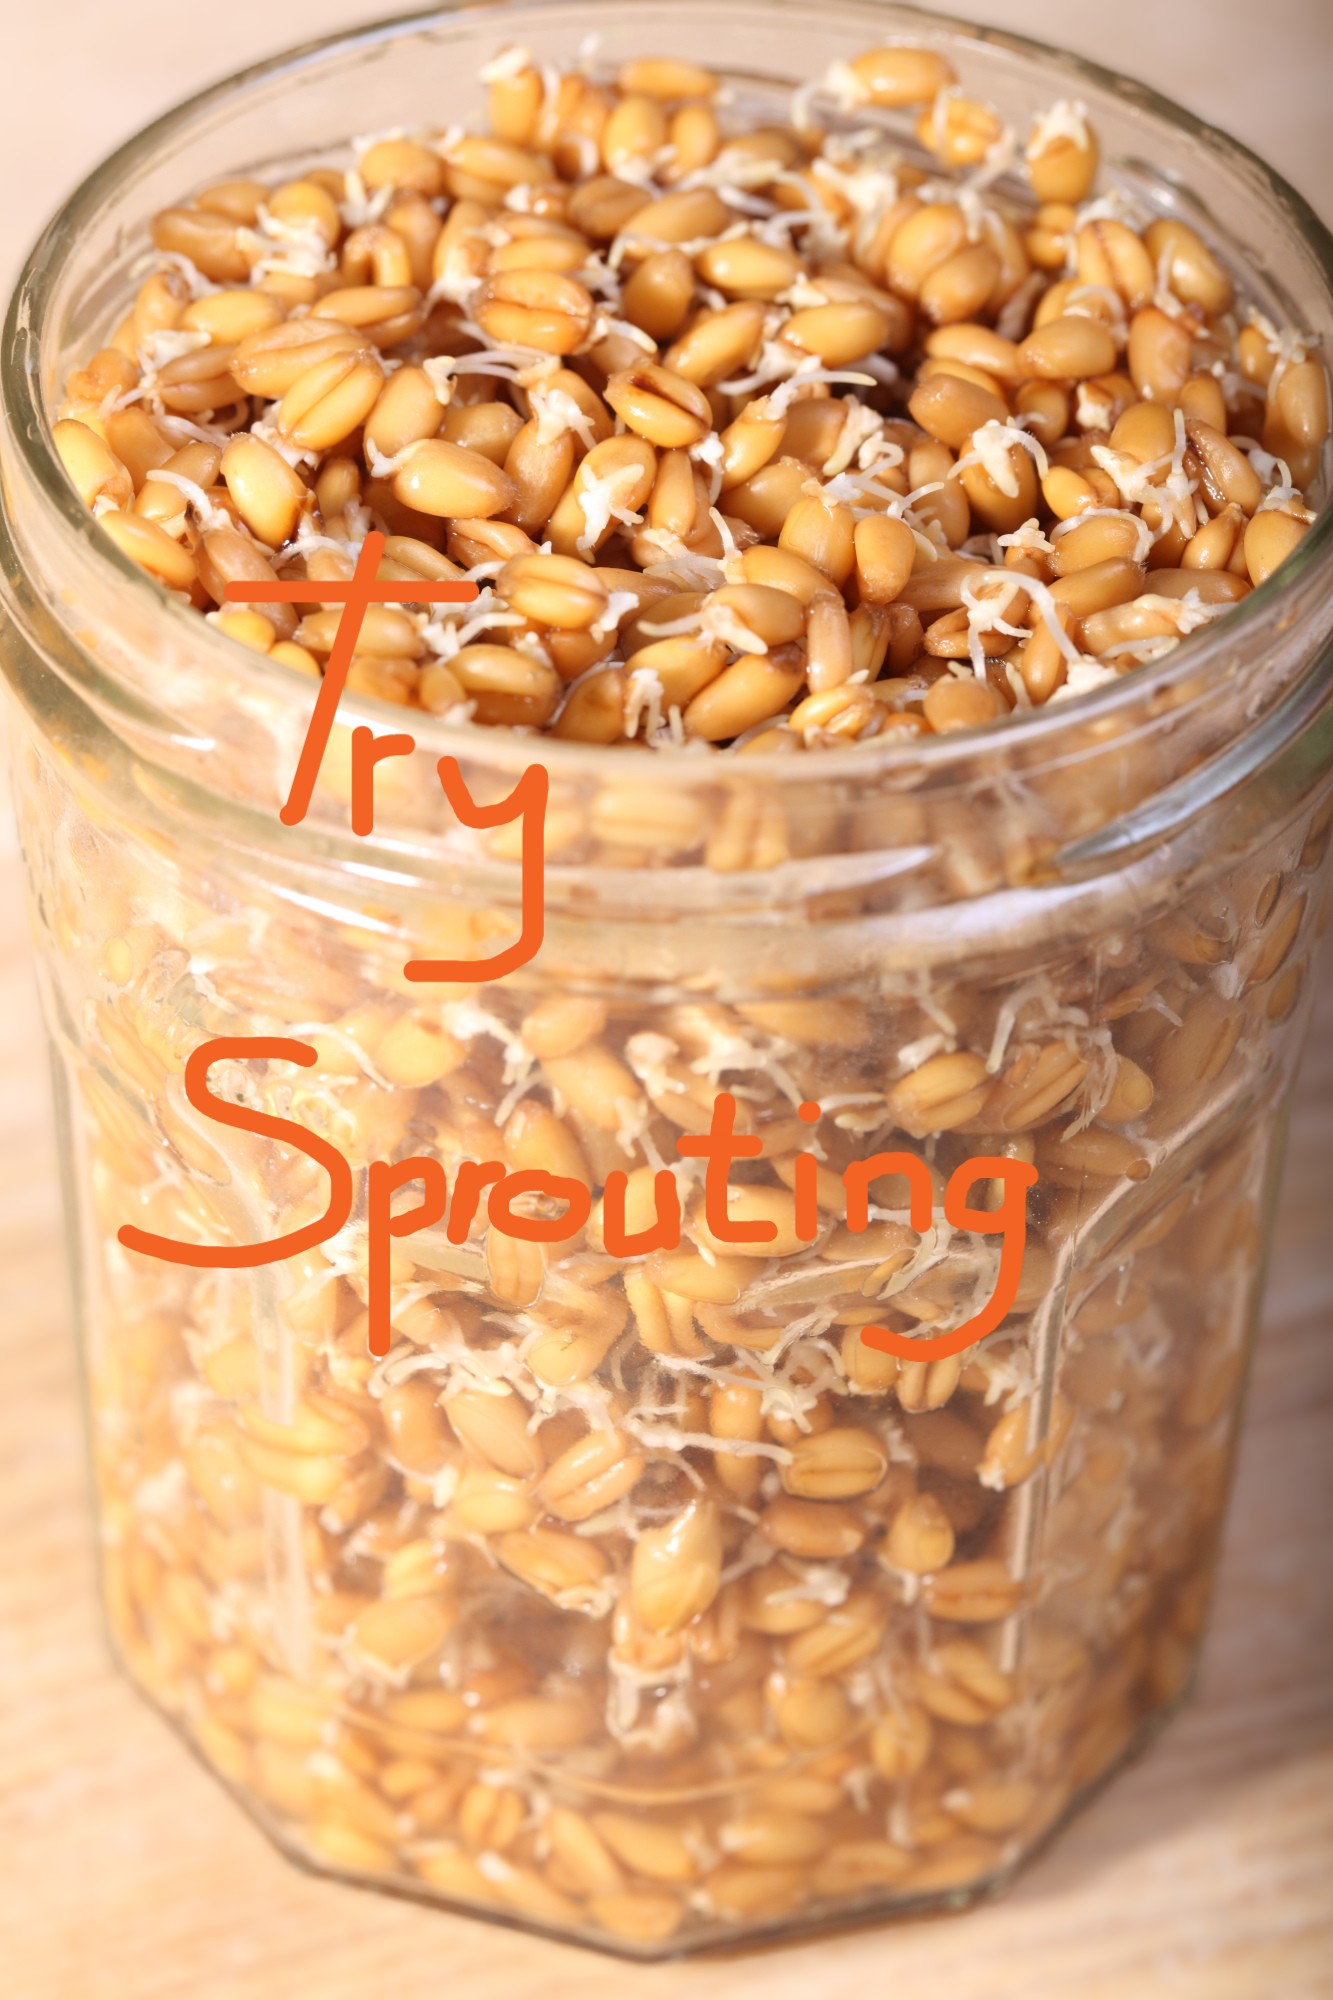
Sprouts are a small super food vegetable power house, they are packed with minerals and vitamins!
Nederlandse versie volgt snel…
At the moment we are experimenting with sprouting. Sprouting is a way to make whole unmilled grains edible and usable in a loaf of bread. You partly germinate the grains, the enzymes in the grain change the starch in the grain into sugars on which the small plant can grow. It is very easy to sprout grains and sprouts give more texture to your bread and a light sweetness. Sprouts are a small super food vegetable power house, they are packed with minerals and vitamins that are also easier to digest.
You can sprout many different types of grains like wheat, rye, spelt, einkorn, barley, amaranth, quinoa etc. Sprouts are added to your dough by hand after the kneading process. The sprouts are fragile and will break when added too soon. We add the sprouts during the first stretch and fold of the bulk rise. On average an extra 125 g of sprouts are added to a loaf of 750 g dough (so the loaf will be a bit bigger and heavier).


How to sprout grains
First of all we must start with a little warning;
Mould is a serious danger here, it can be lurking in your grain, in your equipment or even in the air. Mould on wheat, barley etc. can be very poisonous. If at any time you see or smell anything strange that could be mold, like discoloration, black or white or other colors, stringy spores, or musty odors in your germination pot, throw it all away immediately, wash the pot with hot water, or sterilize it in the oven and start again!
Step 1
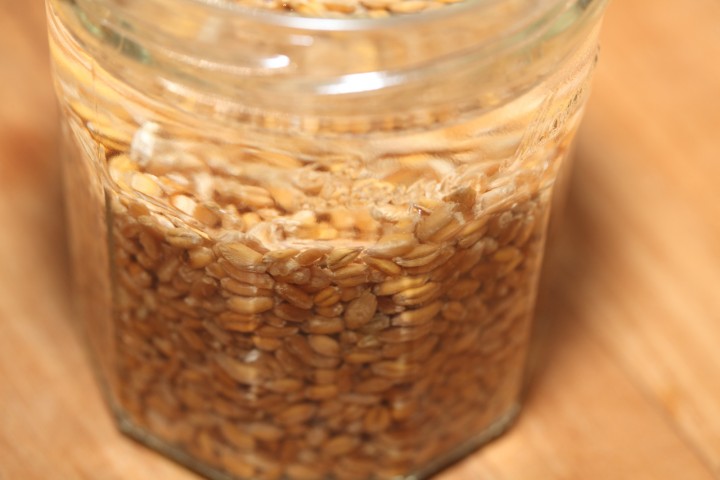
The process of sprouting is very easy. First soak the grains for 6 to 10 hours in a clean glass jar. We soak the grains at 23:00 in the evening and drain them at 08:00 in the morning. Preferably use organic good quality grains, they give the best sprouting chance. Use a large enough jar so the sprouts can swirl freely. The grains will absorb a lot of water and will expand and double in size, so be sure your jar is big enough.
We quarter fill the jar with grains and fill it almost to the top with water. The soaking activates the germination process within the grains. Grain needs water and air to germinate. So after soaking, drain off the water and aerate the grains by stirring the grains. Do NOT touch them with your fingers to prevent contamination. Put them back in the glass jar and cover with a cheesecloth at room temperature and out of direct sunlight. You only need to do this soaking the grains step once, at the next stage you will go on to wash, drain and aerate them.
Step 2
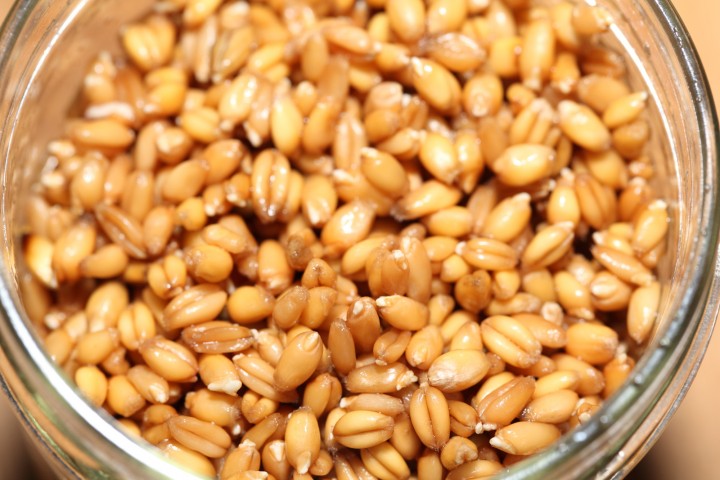
As the grains need water and air to sprout you now need to wash, drain and aerate the grains twice a day. Once in the morning and once in the evening. After washing, draining and aerating put the grains back in the glass jar and cover with a cheesecloth. Be careful not to damage the small white shoots coming out of the grains. We wash the grains swirling them with fresh water in the jar and then drain the grains / sprouts by putting the jar upside down using a cheesecloth or a screening mesh (with a thick elastic band keeping it in place) on top of the jar as a sieve. The total sprouting process takes between 2 to 4 days, warmer is faster, cooler is slower. You learn by experience and keeping a close eye on your grains.
Step 3
When your shoots are the same size as the grains (a few millimeters) the sprouts are ready to be used in your bread dough. As a rule, we start soaking the grains at 23:00 on day 1 and we use the sprouts in our dough in the morning on day 3.
Also read our post about making your own Diastatic Malt. Diastatic malt powder is the “secret ingredient” savvy bread bakers use to promote a strong rise, great texture, and lovely brown crust
With thanks to Paul for his additional valuable information and tips regarding safe sprouting!
Want to know if Diastatic Malt replaces the need to add sugar in the bread.
The more water and sugar the faster the yeast can grow. Except Salt and sugar pull water from yeast so it grows slower. Diastatic Malt Powder will convert starch to sugars slowly so the yeast gets the sugar it needs to grow faster with out pulling as much water out. Since the yeast dies on the surface but the enzyme still converts starch to sugar your crust will brown more because of un consumed sugar on the surface.
Short answer is Yes Diastatic Malt Powder will give your dough product a slightly sweeter flavor while speeding yeast production.
Thank you Michael, for sharing this helpful piece of information to understand the workings of diastatic malt.
Non-diastatic malt powder has no active enzymes and is added only for taste and color.
For more information about making your own diastatic malt see our post:
www.weekendbakery.com/posts...atic-malt/
This is interesting! Thanks for sharing
Hi, after 2 days some of my wheat berries sprouted faster than others, should I separate them and use only those sprouted while continue to wash, drain and aerate those that have not sprouted or discard them altogether?
What would happen if the sprouts are longer than the size of the grains?
Thank you!
Hi
Thank you for clear and unselfish info without the usual “hoo hah” that (some) sites and writers on that sites do!…(probably to show how clever they are with unpronounsible scientific gibberish mixed in-of course to let us know how knowledgeable and wise they are…etc etc etc…an immediate 👎put off as far as I am concerned!)…you are just the opposite and a fresh breath of air!👌👌👌
Christiaan
Thank you Christiaan for noticing 🙂 it is a very conscious and ‘staying true to ourselves’ approach that we would like to continue with as long as people appreciate it.
Enjoy your baking!
Here in the Philippines it is near impossible to find or get basic baking items so readily available in other countries. Grains like barley and quinoa are imported and can get expensive, but cheaper than paying ridiculous shipping costs associated with ordering malt powder through Amazon, eBay, etc. So having failures trying to sprout imported grains can get costly. And so far I’ve had repeated failures trying to sprout barley and quinoa from Bob’s Red Mill. Does anyone know if they use some process that “kills” the grain or otherwise prevents it from sprouting? I thought about trying lentils but they too are from Bob’s Red Mill.
Mung beans are readily available here and I was wondering if they can be used for sprouting? Better yet, mung bean sprouts are sold here; can they be dried and ground up to make malt powder or have they lost something because the sprouts are too long? If I have to sprout my own, is the process the same?
I’m really looking at trying to get malt powder for making bagels but I’d like to try sprouts in bread after reading this article. Thanks.
Hello David,
Interesting to read your story. We canot really help you based on experience but know mung beans can be sprouted. We even found mung bean bread:
treadingmyownpath.com/2019/...ean-bread/
With some googling for a combination of sprouting mung beans and baking bread you will get some more results. We do not know about the exact process and properties of the mung sprouts regarding the malting / making of diastatic malt.
Wishing you all the best and hopefully lovely bagels!
Greetings from Holland,
Ed & Marieke
Are you adding the spouted grains whole to your dough or are your grinding them into a diastatic malt powder before adding?
Hi Douglas,
These are added to the dough whole.
You can find our method for making your own diastatic malt here: www.weekendbakery.com/posts...atic-malt/
Hey!!!
If you use whole sprouted grains in your dough, don’t you get chunks of grain into dough?
Does it give that same effect like diastatic malt powder?
If yes, please tell me how much you use in how much flour?
Hi Manisha,
It is not the same, the enzyme still exists within the grain but it is not released into the dough, the same as the powder.
The sprouted grains in your dough are sort of visible but they will be completely soft and part of the crumb and very edible. Sprouted grains are usually added after the autolyse phase, so somewhere during the bulk fermentation. Diastatic malt is usually added with the preferment when making the final dough. You add diastatic malt powder sparingly, so only around 1% of the total amount of flour. Sprouted grains can be added in much higher quantities and you should see them more as a flavoring ingredient. You can find a lot of information on sprouting and adding all kind sof sprouts to your bread in the ‘Tartine book no 3’ by Chad Robertson.
We used to do this in 30 gallon trash cans for growing organic wheat grass for extracting into juice.Very simple. Just keep your working enviroment clean. We did use the slower process keeping everything in the 60f to 65f enviroment though.
Thanks Pat, for sharing this, that sounds awesome.
Buy a small aquarium air pump. Run a line from the pump to an aeration stone in the bottom of your barrel. Put a level of water to cover the stone and cover container with lid that supports a bag full of soaked over night grain. I used a plastic screen door material. Turn on your pump. The oxygen keeps the water fresh the bubbling keeps the humidity just right. Wait a few days and they will be ready. If your doing mung beans use a high pressure spray or a electric drill with a paint paddle to separate the hull from the bean sprout.
Thank you too Bob, for sharing your method.
Enjoy your sprouting and the last days of the year. All the best for 2019!
I will try it.
can u make video tutorial ?
Hi Nor,
That is a good idea, but at the moment we simply do not have time to do it. We will put it on the to do list for later.
sprouting grains was very easy. I now have a jar of diastatic malt powder, thank you for a well explained procedure.
Great it worked well for you too Sandy!
T nieuwste boek van peter reinhart al gezien?
Staat vol met recepten met “sprouted grains and beans ” etc
Ik ben zeer benieuwd!
Bij bol.com 33 euro
Maar bij de bookdeposetory 17!!!!!
Ga er ook maar eens mee aan de slag
Te beginnen met t bovenstaande recept:-)
Oh ja:
Ik ben een andere petra dan de bovenstaande:-)
Bedankt voor de tip, we gaan er eens induiken 🙂
Goedemorgen Ed en Marieke,
Het schijnt dat Chiazaad weinig smaakt heeft, dus ik weet niet of het nog eens probeer.
Er staan nu wel linzen te kiemen, lekker voor in de soep.
PS welkom op het broodbakforum!
Groetjes Petra
Hallo Petra,
Ik snap wat je bedoelt, het chiazaad komt waarschijnlijk niet zo door wat smaak betreft na het bakken, het is natuurlijk ook prijzig om er veel mee te experimenteren, en als het dan qua smaak niet veel zou toevoegen is dat wel jammer, ook al is het nog zo gezond.
Wij zijn beiden dol op linzen en gebruiken ze vaak in curry en ook soep, we hebben ze echter nog nooit gekiemd. Je brengt ons weer op een idee!
Dankjewel voor het warme welkom. Ed is de man die je het meeste op het forum zult aantreffen en ik ben wat vaker op onze eigen site te vinden.
Hallo,
Ik heb de tarwekorrels al eens eerder gekiemd. Heerlijk!
Nu staan er weer tarwekorrels te kiemen voor morgen.
Ik heb ook een bakje met chiazaad te kiemen gezet. Maar ik betwijfel of dat goed gaat.
Het vocht wordt helemaal opgenomen en het geheel is heel gellig.
Hebben jullie enig idee?
Alvast bedankt voor de reactie,
Groeten, Petra
Hallo Petra,
Wij hebben zelf nog geen chiazaadjes gekiemd maar ik weet dat de methode anders is dan bij tarwe omdat deze zaadjes inderdaad een gelatineus laagje vormen bij aanraking met water:
“Because these seeds form a mucilaginous coat when soaked in water they can’t be sprouted using the usual mason jar method. These seeds are best grown on terracotta, clay or ceramic dishes or trays.”
Ik vond deze site met instructies: www.instructables.com/id/Sp...all-Seeds/
Hopelijk kun je ze nog even overdoen op een ongeglazuurd schaaltje…
Succes ermee en we horen graag je bevindingen!
Een mooi (bak)weekend,
Ed en Marieke
Hallo Ed en Mariek,
Dank je wel. Ik ben ook benieuwd.
Ik heb het nu op een grote terracotta gedaan, maar het lijkt wel een plak kikkerdril 😉
Het was 65 gram chiazaad, maar door het opgenomen water is het in volume is het nu meer dan de 250 gram tarwekorrels.
Groetjes Petra
Anders kun je er nog een drankje van maken, dat doen de Mexicanen ook, heel gezond ook, maar je moet wel van dat ‘drillerige’ houden!: www.cocomamafoods.com/chia-...d-recipes/
Helaas, het is niet gelukt. Het deeg bleef een onhandelbare glibberige massa.
De broden met gekiemde tarwekorrels zijn prima gelukt.
Groeten,
Petra
Misschien een volgende keer toch van voor af aan beginnen met die andere methode…
Hi,
Here’s some extra tips from an experienced sprout-man.
Mould is a serious danger here. it can be lurking in your grain, in your equipment or even in the air (you have no control over the neighbour’s waste-bin). Mould on wheat, barley etc. can be very poisonous. If, at any time, you see something odd that could be mould in your sprouting pot, throw the whole lot away, wash up and start again! Sprouting is fun and healthy, but there is a substantial number of casualties worldwide from home-sprouting. Really. Anti-health people (funny, that must be the financial world) use it as an argument
Here we go:
If you use the jar in the picture, take a bigger one or use two jars for this amount of grain. Cheesecloth will do, but much better is screening mesh, tarlatan, or anyting more open. Fasten that on the jar with a rubber band, TieWrap, steel thread or anything. That way the grains can (and should) swirl around when you rinse them under running water until the rinsing water is clear again. After that you can leave the jars upside-down and tilted untill the next rinsing to let excess water out. ( For heaven’s sake don’t poke around with your fingers to “aerate” them: as with a sourdough culture you should touch them as little as possible) Also the jars should be no more than half-filled with soaked grains and the top layer of grain will be between jar-bottom and cheesecloth to get maximum air all the time.
Alternatively you could use a stainles steel or plastic, BPA-free, sieve and leave it on a bowl, lightly covered and follow the same workflow.
It is, and should not be, rocket science, but believe me: the setup you’re using now is not safe especially in summer. My baking skills have improved so much since I found your tips and tools and will even get better but I (we, the weekend baker community…) need you to stay healthy to keep up the weekendbakery.com work AND we don’t want a mysterious worldwide epidemic disease among weekend bakers. We want them to walk the earth and multiply.
Love,
Paul
Hi Paul,
Thank you so much for your help and feedback. We have updated our posting with your very helpful information.
Hope you approve.
Happy baking and sprouting!
Ed & Marieke
I couldn’t have done a more accurate crash course in grain-sprouting!
Love,
Paul