

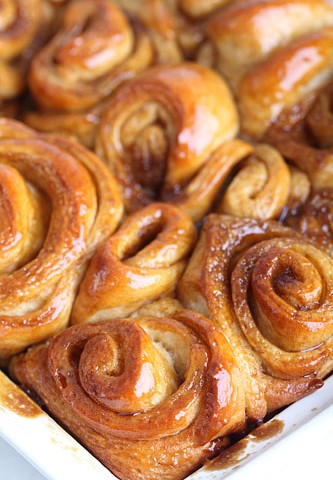
Sticky, gooey, warm and fresh…what’s not to like!
Klik hier voor de Nederlandse versie
They are sticky and delicious and they are best when warm and fresh. In Holland we have something called ‘Zeeuwse Bolussen’ made in the province of Zeeland. They are very similar to these cinnamon buns.
You can also keep them in the freezer after they’ve cooled. You can stick them in the microwave for a minute to defrost and get them back to their natural warm and gooey state.
Ingredients for the Cinnamon Buns
makes about 20 buns
520 g fine wheat flour / all purpose
25 g fresh yeast / 8 g instant yeast
150 g lukewarm water
150 g milk
60 g butter
60 g sugar
1 tsp. salt / 6 g
1 egg, beaten
Ingredients for the Topping
225 g soft dark brown sugar (muscovado or ‘bruine basterdsuiker’ in Dutch)
125 g butter
1 tsp cinnamon / 2 g (maybe more, just taste)
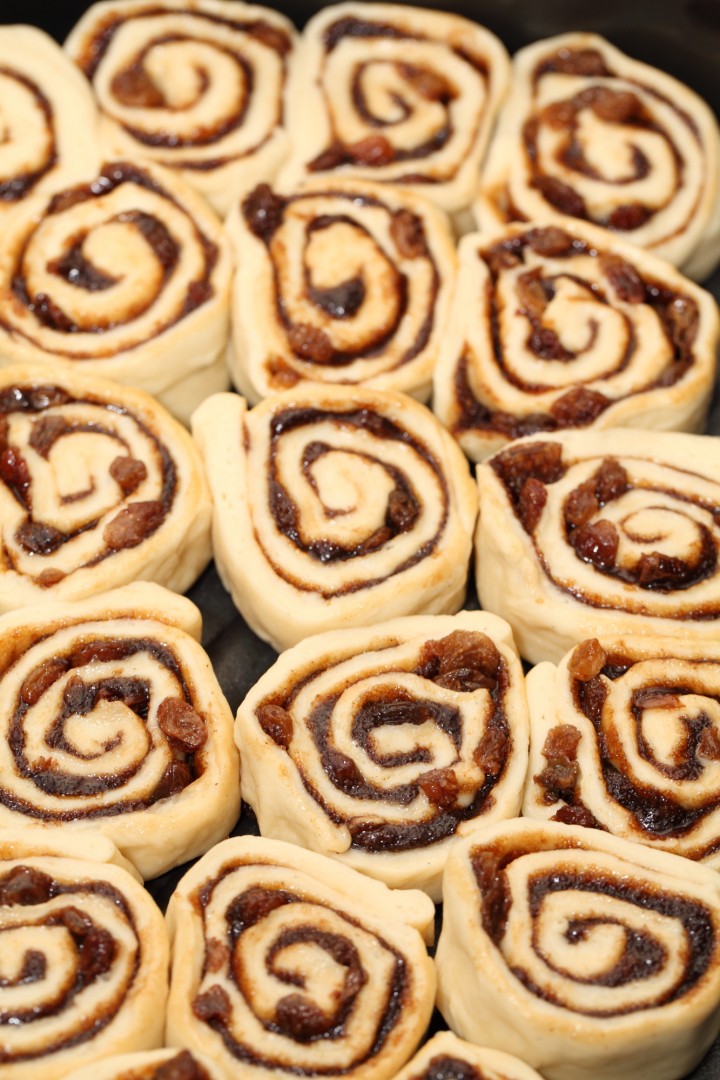
100 g raisins, pre-soaked (optional)


Making the Cinnamon Buns
Dissolve the fresh yeast in the lukewarm water and let stand for 5 minutes (instant yeast can be added directly to the flour). Make sure the rest of your ingredients are at room temperature. Combine the butter, sugar, milk and salt. Blend in the beaten egg. Now add the dissolved yeast. Add flour until your batter is smooth and soft, but not sticky. Knead well for 15 minutes by hand or for 8 minutes with a KitchenAid type mixer. Cover the dough and let rest in a warm place for 60 minutes.
Roll out into a rectangle of 50 x 30 cm. Slightly Warm the topping ingredients in a pan until the butter is dissolved and you have a spreadable mass. Spread the rectangle evenly with the topping. You can do this with a pallet knife or, if preferred, with a brush. At this point you can also add the raisins.
You can also reserve some topping to brush over the buns after you cut them and place them in the baking pan. This way they will be extra sticky.
Now roll op the rectangle. Cut the roll into 2,5 cm / one inch thick slices. Place them in a pan (approx 20 x 30 cm). Let proof for 45 to 60 minutes until well risen.
Best baked at 190 ºC/ 375 ºF convection oven (slightly higher if using conventional setting) for 20 to 25 minutes (depending on your oven). Enjoy!


frances says
they turn out to be perfect. thanks for the recipe. I have tried them a few times making use of other recipes, and this one is certainly it!
I have a question about timing and overnight resting. What would you suggest, overnight resting as first or as second proofing? And also, would long resting mean, I can / should use less fresh yeast?
thanks very much anyway, hope to hear from you. Frances
Weekend Bakers says
Hello Frances,
Thank you for your very kind comment. We would suggest trying the first proof first, because you have used less ingredients if things do not work out as planned. And yes, you need to compensate for the longer proofing. But the amount depends on the time you leave the dough to proof and the temperature. An indication we can give you is to cut the amount of yeast you use in halve when placing the dough in the fridge (around 7 degrees Celsius) for 12 hours.
We have a table percentage that you can use for various times and temperatures, so you can calculate the amount of yeast yourself if you want to use other variables: www.weekendbakery.com/posts…gh-recipe/
This table is for ‘straight’ pizza dough, so with richer dough you would normally use a bit more yeast, but it is a good starting point and you can always compensate with slightly longer proofing times if needed.
Just take a few test rounds to get it right for your requirements, because every situation is slightly different and might need a bit of tweaking to get it spot on.
Best of luck with it and enjoy the bun baking!
frances says
thanks! I am in the process of making them again. The first proofing, I did that for 1 – 2 hrs. and the dough was very light and fragile, Amazing! I would like a glozzy top, the cinamon butter which is used inside, I put that on top as well, but it does not give a glozzy top. Can I use a water and powder sugar mix to put on immediately after they come out of the oven? Or do you have another suggestion? It would just look great if they ‘shine’, and i do not want a cream cheese or other complicated topping, it is not that they need extra sweeting or extra taste ingredients.. Do you have a suggestion? thanks!
Weekend Bakers says
Yes, the topping on top is a great idea, but if you want to try a water / sugar solution that is fine too. Or alternatively, brush with some melted butter right after baking. Or you can try an egg wash before baking. Lots of options, hope your version will be great!
Kim Ward says
Hi!
Thanks for the recipe. I made some adjustments to the recipe to make the cinnamon buns vegan. They were amazing.
I am looking forward to making more of your delicious recipes, with a vegan twist.
Weekend Bakers says
Hello Kim,
Very glad to hear your vegan version turned out so well! Did you use oat or nut milk or water?
Liza says
Thanks for sharing! I found this recipe while searching for “sticky cinnamon buns.” The buns are very soft, the topping is delicious! I only use this recipe now. 😍
Weekend Bakers says
Thank you Lisa, if you do want to try a different but equally delicious type of bun we can also recommend this recipe:
www.weekendbakery.com/posts…ns-deluxe/
Wishing you a lovely time baking and enjoying your results!
Minerva says
I made this for the first time and everyone loved it, i personally think the taste is way better than store bought cinnamon rolls. Thank you for sharing this recipe. I have one question though, why is it all my fillings drip to the bottom of the pan? Lol!
Weekend Bakers says
Thank you Minerva,
Wonderful, so rewarding don’t you think!
A bit of dripping is normal, but maybe the type of sugar we use is a bit different and more sticky.
Have you tried this suggestion?
You can also reserve some topping to brush over the buns after you cut them and place them in the baking pan. This way they will be extra sticky.
You could also try the newer slightly different version we have and see how that goes.
www.weekendbakery.com/posts…ns-deluxe/
Or what about these as an alternative:
www.weekendbakery.com/posts…lla-glaze/
Enjoy the buns and the baking!
Supy says
I have all ingredients prepared. Will make it soon. Quick questions, how long do I soak raisins for? Do I soak in room temperature or warm water?
Thank you. Love your website so much ❤️
Weekend Bakers says
Hello Supy,
We would soak them in warm water and halve an hour would be enough but longer is no problem.
Hope it will be great and thank you for your love 🙂
Greetings from Holland,
Ed & Marieke
WKB
Emilie says
This dough is amazing, what a pleasure to work with it ! I did the second proofing in the refrigerator overnight, and it baked up perfectly this morning. It really made our morning special, we needed that. Thank you for sharing. 🙂
Weekend Bakers says
Thank you so much Emilie, great to be a part of your baking joy this way.
If you are looking for a bit of variation on the theme we also have this version:
www.weekendbakery.com/posts…ns-deluxe/
Wishing you all the joy and comfort baking can bring you and your family.
All the best,
Ed & Marieke
Weekend Bakers
Jasmine says
Emilie and Ed & Marieke,
If I proof them overnight in the fridge do I need to let them sit at room temp. for a certain amount of time before baking them?
Thanks for your clarity,
Jasmine
Weekend Bakers says
Hello Jasmine,
It is hard to say, because it can be a bit different for everybody, also depending on the temperature of the dough when it goes in the fridge and the temp of the fridge itself. So this is something you have to try and if the buns need a bit more time when you take them out of the fridge, you can proof them to perfection at room temp. Just make sure they do not over-proof so check them early in the morning. If the process is going too slow this way, next time you can kick start the process by proofing an hour at room temp before the fridge or you can increase the yeast a little bit. With a few (maybe even one) tries you will have it perfect for your own conditions.
Enjoy your baking!
Ed& Marieke
WKB
Kai says
I make these, or a slightly altered version of these in our restaurant. I change some of the brown sugar for maple syrup for the filling. I do a bulk proof overnight in the cooler which I feel improves their flavour, then roll out and form and proof in the pan, but I make a little extra filling, add buttermilk and cream to it, warm it up and pour it over the rolls. I bake at 425 and then when nearly done I flip them out onto a sheet pan covered in parchment and stick them back in the oven til they are crispy but not burnt. I then glaze them lightly in a vanilla glaze, this way they don’t dry out on the shelf and are extra tasty.
Weekend Bakers says
Thank you Kai for your inspirational comment. We love the addition of buttermilk and cream and your suggestion for flipping and baking.
Maybe you would also be inspired in turn by these cherry and cream buns:
www.weekendbakery.com/posts…lla-glaze/
Marcel says
Beste weekendbakery, deze gebakken en super lekker. Mijn deeg was wel erg slap. Heb er wat vragen over:
De melk/water verhouding tussen de Engelse en Nederlandse versie wijkt af. Wat adviseren jullie?
En moet de boter gesmolten door het recept of gewoon zo op kamer temperatuur? Ik heb het nu zo op kamer temperatuur geprobeerd maar dat mengt natuurlijk vrijwel niet.
Dank jullie,
Marcel
Weekend Bakers says
Hallo Marcel,
Door het gebruik van melk wordt het deeg wel wat zachter, er zit een stofje in melk dat gluten slapper maakt. Alle verhoudingen van melk en water zijn valide om te gebruiken, zolang het eindresultaat maar klopt. Dat betekent dat je in combinatie met de bloem die je gebruikt (en daar zit weer allerlei verschil tussen) goed moet uittesten wat de optimale hoeveelheid vocht is voor dit recept. Het kan dus zijn dat je een net wat lekkerder werkbaar deeg krijgt met iets minder vocht (ook afhankelijk van de grootte van je ei want dat is ook vocht) dan wij aangeven.
Ons advies is de melk / water verhouding van de Engelse versie aan te houden en wellicht terug te gaan naar 280 g in totaal.
Wat betreft de boter kan deze het beste zacht zijn maar niet gesmolten. Je kunt hem even in de magnetron doen bijvoorbeeld om hem net mooi zacht te maken zodat hij ‘crèmig’ geroerd kan worden, een makkelijk smeerbare consistentie.
Dit recept is ook een variatie op het thema:
www.weekendbakery.com/posts…ns-deluxe/
Succes ermee en geniet van het bakken!
Helen Morgan says
I am so in love with these buns. I have never baked with fresh yeast till I made these. This is the 3rd batch I’ve made and they walk out the door!!
Thank you and regards from Australia!
Weekend Bakers says
Wonderful to read your comment Helen!
Always love to use fresh yeast, the smell of the dough even seems to be different and there’s always that little bit extra ‘enthusiasm in the dough as it develops.
Hope they keep ‘walking’!
Greetings from / Groeten uit Holland
Ed & Marieke
Peter says
We’ve been so inspired by your website, and have just baked our first bread (your Pain Naturel) from homemade sourdough starter. It was incredible!!! Such a great recipe!
We want to use our starter in this cinnamon bun recipe, but are unsure how to convert an amount of instant or fresh yeast into a corresponding amount of starter. Specifically: the recipe calls for 25g fresh or 8g instant yeast, so if we’re getting our yeast from sourdough starter, how much of that should we add in place of the 25g fresh or 8g instant yeast? Thanks so much!!
Weekend Bakers says
Hello Peter,
Thank you for your very kind comment. We are a bit behind with our replies, but we try and answer all questions. Yours is a bit of a challenge because we do not / have never made a sourdough version of this recipe. There is no easy conversion for this, because sourdough needs a different approach and mainly a different time schedule.
So it would be best to find a sourdough cinnamon bun recipe with the right instructions. Otherwise you will have to experiment a bit, with adding a preferment you made the day before or amount of active starter and different /longer proofing times. You also have to like the possible sour taste combined with the sweet buns and expect a different (less fluffy) texture of the crumb and a thicker crust.
Glad you also like the Pain Naturel, it is one of our absolute favorites and daily bread.
Hope it works out well with the buns too!
Brigid says
I baked these and they turned out fantastic! Thanks for the recipe. However, when I weighed out 225g of sugar for the filling I was shocked by the amount, so I put in about half as much sugar and butter, and 3 times as much cinnamon. They turned out perfectly sweet and sticky enough, as the raisins also add sweetness. The next time I think I’ll put in even more cinnamon, though.
Weekend Bakers says
Hi again Bridgid,
We can understand your thoughts on the sugar, especially nowadays when we are supposed to use a little less. We love to spread some on the dough and also over the buns once in the pan for extra stickiness.
Great to know you enjoyed the buns with halve the sugar!
hemi says
ja,ofwel in de winkel in belgie verkopen ze dat hier en daar
Weekend Bakers says
Kwestie van vragen denk ik ja, want lard oftewel reuzel is natuurlijk een product dat door de jongere generaties niet standaard meer gebruikt wordt.
Hemi says
Erg goed recept,waren juist zoals op de foto.doet me denken aan de lardy cake(misschien een ideetje om eens te proberen) die ik vroeger soms maakte.
Persoonlijk vind ik dit één van de beste zuurdesem websites👌👍
Weekend Bakers says
Hallo Hemi,
Dank voor je heel aardige comment :). Wij hebben nog nooit lardy cake gemaakt, maar het wel eens voorbij zien komen bij bakprogramma’s op de BBC. Wij hebben ook nog nooit lard gebruikt, maar roomboter zal toch ook goed als vervanging kunnen dienen nemen we aan.
Geniet van het bakken!
Marieke
Hemi says
Voor lardy cake gebruik ik reuzel/boter met een 50/50 verhouding.reuzel voor de smeuigheid en boter voor de smaak.blijft natuurlijk hoe dan ook een calorie💣
Weekend Bakers says
En reuzel haal je dan waarschijnlijk bij de slager Hemi?
Tere Van Diest says
I’ll be making these early early Saturday morning. My little grandchildren are coming to spend the day with me while their parents tackle some household landscape projects. I’ll send some of these buns home with my son and DIL. I know they’ll appreciate having these to, dare I say devour, when they take a break from their labor.
Thanks for the recipe. Easy and I’m sure delicious.
Happy weekend to all.
Tere
Weekend Bakers says
Hello again Tere,
Hope they turned out as planned and sustained the hard workers during their outdoor activities.
Don’t know if you have seen this already but we do have a few other variations on the sticky bun theme (slightly newer alos than this recipe) that you might want to try:
www.weekendbakery.com/posts…ns-deluxe/
And this one is also a real treat:
www.weekendbakery.com/posts…lla-glaze/
Happy bun baking & sharing!
greetings from Holland,
Marieke
Zanzoona says
No doubt that this recipe is more better and more normalized than the Sunday Cinnamon Buns Deluxe recipe.
When you add eggs to any recipe you add something LIVE, so this recipe depends on less liquids for the concern of adding eggs and that’s something successful..
Weekend Bakers says
Yes, Zanzoona, egg also acts as a leavening agent and especially the yolk can make the crumb more tender. You can also add egg to the other recipes of course (just make it your own according to the structure of dough you like best).
Zanzoona says
Absolutely right dear friends, eggs is a tremendous fabulous grace from God, it’s like a magic..
Thank you so much for your kindness 💝 and reply, all my beautiful wishes to have a great celebrations and HAPPY NEW YEEEEEEEAR 🎇 🎄 🎊 🎄 🎉 😘😘😘😍😍😍🎄🎄🎄🎄🎄🎄🎄🎁🎁🎁🎁🎁
Weekend Bakers says
Thank you Zanzoona,
Wishing you health and happiness in the New Year and lots of baking pleasure of course!
Zanzoona says
😘😘😘😊😊😊😊
vero says
This recipe is perfection! I even messed up the order and used white sugar and half butter and half margarine and in 20Min. I was eating the most delicious cinnamon bun ever, thanks a lot!!! grüsse aus Potsdam:)
Weekend Bakers says
Hi Vero,
Thanks for the enthusiastic feedback. Love to read the recipe worked so well, even with the ‘mess up’.
Greetings / Groetjes,
Ed & Marieke
Weekend Bakers
Terri Arens says
Dear Merieke and Ed,
I love everything about your shop, website and posts! Thank you so much for this wonderful playground!
I just made these! In fact, they are still in the oven! My dough is rather soft, not sticky, but soft compared to the pictures of your dough. I used American cake flour because the recipe called for fine flour. I just read one of your comments and am wondering if I should use bread flour instead next time. Would love to hear what your thoughts!
Thanks,
Terri
Weekend Bakers says
Hi Terry,
To better answer your question can you tell us if this cake flour is just 100% flour or are there other ingredients in this product, like raising agents for example?
We would suggest using all purpose flour for this recipe or possibly a mixture of all purpose and bread flour.
Greetings,
Marieke
Terri Arens says
Hi Marieke,
I used Swans Down cake flour. Ingredients state: Enriched cake flour
(Bleached wheat flour, niacin, reduced iron, dyamin mononitrate, riboflavin and folic acid.)
Thank you!
Terri
Weekend Bakers says
Hello Terri,
Sorry for the late reply. The additives in the cake flour are a form of vitamins. But this cake flour is made from soft winter wheat and due to the lack of gluten it is not ideal to use for this recipe, because you do not want a cake-like structure but more of a soft white bread structure, so we would think your result would be the best using an unbleached all purpose flour with a protein content of around 11%.
Hope you will give it a try!
tere van diest says
Not my post but…great explanation and information on the flour. I’ll remember that when baking other similar goodies.
Thanks Marieke!
Maria says
Thank you for the recipe, the whole family in New Zealand enjoy the bun!
Weekend Bakers says
Thank you for your very kind comment, excellent!
Enjoy with the family and greetings from Holland,
Ed & Marieke
Leanne says
Greetings from Lausanne! We made these today and they turned out amazing!!!! It’s the first successful bun I have ever made, thank you so much sharing this recipe and for your wonderful website. I am currently preparing myself to make the San Francisco Sourdough…wish me luck!
Weekend Bakers says
Hi Leanne, thank you very much for sharing your enthusiasm, that sounds wonderful!
Let us know how the SF goes…
Happy baking from Holland,
Ed & Marieke
earlybaker says
Dear Ed/Marieke
I’d like to partly prepare these the day before and bake them early the next morning. Do you think it would be fine to let the final proof (post-shaping and cutting) take place in the fridge, or is it best to use the method suggested on your page for Sunday morning cinnamon buns, i.e. use less yeast and let the initial fermentation take place at room temperature?
Thank you
Weekend Bakers says
Hi, we use the method as used in the Sunday morning buns as we never seem to have enough space in our fridge to store dough 🙂 When you store them in the fridge you have to use the full amount of yeast and perhaps give them a head start by final proofing for 30 minutes to an hour before putting the tray in the fridge. Success!
Brigid says
I made these, and put them into the fridge overnight straight after rolling and cutting them. They rose beautifully overnight and were deliciously light and moist when I baked them the next morning.
Weekend Bakers says
Thanks again for sharing Brigid, very helpful!
Grace says
Hi weekend bakers,
The cinnamon buns look super yummy. Just a quick question, does this dough freeze well?
Thanks
Weekend Bakers says
Hi Grace,
Thank you! We never freeze the dough of this recipe, we always freeze the buns after baking and give them a quick tour on high wattage in the microwave, which works excellent and makes them warm and fluffy again.
Happy baking 🙂
Carola says
Is dit hetzelfde recept als eerst op jullie website stond, maar dan in het Nederlands? Wel jammer dat dat recept ineens weg is..
Weekend Bakers says
Hoi Carola,
Jawel, de versie is gelukkig niet verloren gegaan. Je vindt hem hier: www.weekendbakery.com/posts…amon-buns/ We zijn bezig wat dingen samen te voegen en te updaten, ook met foto’s. De Nederlandse recepten die we tot nu toe hebben omgezet vind je hier bij elkaar: www.weekendbakery.com/posts…tegory/nl/
Er volgen er nog meer de komende tijd maar het is natuurlijk wat werk om dingen tweetalig te doen.
Veel bakplezier!
Marieke
richina timmers says
Hoi Marieke,
Allereerst… HAPPY NEWYEAR! heel veel creativiteit toegewenst voor 2013. Ik heb gisteren deze kaneelbroodjes gemaakt en ze zijn weer geweldig. Ik heb ze maar snel in de vriezer gedaan, anders komt er van mijn goede voornemens nu al niets meer terecht. Ik had een stukje van de rol deeg over en die heb ik, in 2,5cm plakken, in een ingevette muffinvorm gedaan en zo afgebakken, in plaats van tegen elkaar in een groot blik. En ook die waren heerlijk.
Weekend Bakers says
Happy New Year with lots of wonderful baking moments Richina!
Dank je wel voor de tip van de muffinvorm, dat ga ik binnenkort ook eens proberen.
Geniet ervan, samen met je familie,
Marieke
Jan says
This recipe has become my standard “bread” for anything sweet, I make it as cinnamon rolls, veggie/pizza danish rolls, mix in some grated mozzarella and caramalized onions and bake them in a muffin tin for wonderfull light savory buns, and I roll it out cut it into croissant triangles and roll them up, everything works never fails and everybody loves it. What more does an amateur baker want, such a versatile dough. I’ve said it before and I’ll say it again, many many thanks 😀
Jan – Chiang Rai – Thailand
Weekend Bakers says
You inspire us with the many creative twists on this recipe Jan! We have to try them too of course. Thanks for sharing and keep up the fantastic baking!
All the best to you and your family,
Ed & Marieke
Jim says
The instructions say to warm the topping ingredients in a pan until dissolved and then spread it on the dough. Then in your answer to Gingi’s question about the glaze on top, you said you brushed leftover topping over the buns before you put them in the oven. That sounds like the topping is a liquid. It also sounds easy.
I warmed the topping until it was as near a liquid as it would get, with the butter melted but the sugar not so much dissolved as suspended in the butter so that it was about like the gloppy, gritty lava they show oozing out of the volcanoes in Hawaii. I was afraid to dissolve the sugar completely because you don’t call it a syrup. Even so, it was hot enough that it burned my finger, so I put the pan in a sink full of cold water to cool off a bit before spreading it on the dough.
When I tried to spread it on the dough it did the same thing the lava does just a few seconds out of the ground: it became much less liquid and refused to cooperate with my efforts to spread it around on the dough. The best I could do was to dot the dough with little dollops of the topping until that became so tedious that I just dumped the last bit out and figured the dough and the topping could fight it out in the oven.
What did I do wrong? As I was trying to get the topping to spread around, it occurred to me that it would have been a whole lot easier if the topping had been crumbly instead of liquid: I could just have sprinkled it over the dough and ended up with a lot more uniform covering than what I got with the very uncooperative sugar lava.
I know none of this will keep the buns from being delicious, and I don’t much care what stuff looks like anyway; but I like to follow instructions the first time I try something, and I must have done something wrong here. I have never made anything like this before, so I have no prior experience with how it should be done.
Weekend Bakers says
Hello Jim,
Sorry to hear about your struggles with the topping. I think I am also to blame here, because of the word dissolved and what it could mean. I start the sentence with ‘slightly warm the ingredients’ but it ends with ‘dissolved’, from which you could deduce that the sugar has to be completely dissolved, but that is not the case. It was more to indicate you should melt the butter rather than the sugar, but that was not totally clear. So, you just make sure the butter, together with the dark brown sugar (it is the soft very dark sugar sometimes also called muscovado I believe, that we use) and the cinnamon are forming a homogenous spreadable paste. This way there is no need for oozing, burning or cooling it in cold water.
Hope this helps and I want to thank you for pointing this out. I will try to adjust the recipe instructions to make it more clear.
Marieke
Jim says
Thanks, Marieke. I’m glad I had trouble with the topping, because it gives me an opportunity to learn something.
Calling it a spreadable paste helps a lot. I’ll experiment and see what gives me that. What I had would have been spreadable if I had been trying to spread it on something hard like a toasted baguette, but the dough was so very soft that the topping just pulled the dough along as I tried to spread it. Now that I know what the dough is like and that I need something that I can spread on it easily, it shouldn’t be hard to get it right.
I had never heard of muscovado, so I read about it. Evidently it’s unrefined sugar that has been boiled down but not had the molasses removed, as opposed to regular brown sugar (what’s called brown sugar here, anyway), which is refined white sugar with molasses added back into it. It’s called either dark brown or light brown sugar depending on how much molasses is added, but even our dark brown sugar is nowhere near as dark as muscovado. It’s interesting having to work out the differences in ingredients that share the same name but are different in different parts of the world.
I don’t think muscovado is readily available here, but the Wikipedia article says it can be substituted for ordinary brown sugar if you reduce the liquid in the recipe. That means I could substitute ordinary brown sugar for muscovado by increasing the liquid, which sounds right. If my glop had had a lot more melted butter in it, I think it would have been a lot easier to spread. I’ll just keep adding butter until it spreads easily.
My buns don’t look much like yours (well… they really don’t look anything like yours), but they taste fantastic – so good that I don’t mind experimenting several more times to get the topping right. Fortunately, I don’t care how fat I get as long as I’m having fun doing it. I’ve lived long enough already; I’m going to enjoy however much time I have left instead of letting doctors and nutritionists ruin it.
Jim says
I think what I need is about a 1:1 ratio of sugar to butter. I did a little experiment, starting with 20 g of butter melted in a teacup and adding brown sugar to it until it had enough sugar in it to taste but was still easy to spread. When I got to equal weights, it looked more like sugar with some butter in it than the other way around, but I could still spread it easily as long as I kept stirring it; if I let it sit for even just a few seconds, the sugar settles to the bottom and gets lava-like, beneath a layer of melted butter. Maybe muscovado mixes better with butter than this brown sugar does, but it’s all I have. But I think I could keep it stirred, spreading a little bit at a time, and cover the dough just fine. Even I won’t make another batch tonight, but once I do I’ll come back here and say how it worked out.
I was looking at the beautiful picture of your beautiful cinnamon buns again, and I can’t actually see a layer of brown coiled up inside the dough. Mine could be described as either coils of dough with thick brown stuff inside or coils of thick brown stuff with dough wrapped around it. I guess that means that the layer of topping in yours really is very thin on the dough before you roll it up, and when it bakes most of it must sink down to the lower part of the roll where I can’t see it. Pictures help a lot.
Jim says
Oh. I just checked my experiment again, and now that the butter has cooled somewhat the sugar stays suspended in it and doesn’t sink down into a thick mass at the bottom. As it is right now, I think I could spread it easily on the dough even without constant stirring. I think I could even do it with a pastry brush, which is what I assume you meant when you said you brushed it on top of the buns before baking. That would be great. Thanks. This is encouraging.
Weekend Bakers says
Thank you Jim, for sharing all your experimenting and experiences with us, and also helping us to clarify our recipe in the process. And if the brushing is not working, maybe smearing it on with a pallet knife would be an alternative option.
And very glad they are still tasty anyway!
Greetings,
Marieke
cookandbaker says
Hi weekend bakers, this looks amazing and I look forward to making this at some point soon. No offence, but is that just one tenth (1/10th) of a gram of dry yeast that add to make the poolish, and not one gram? Seems incredible. I do hope you mean a gram as I’m really worrying about taking a sachet of dry yeast (7g), separating this into 70 parts, of which I will use one.
Happy baking!
andrew
cookandbaker says
Oops, I meant to post the above to your ‘ciabatta-foccacia’ recipe page.
Regarding the cinnamon bun page, it’s great that you enjoyed that episode too, and that you thought my version of cinnamon rolls looked great. Thanks! The aroma of freshly pounded cardamom, butter, sugar, and cinnamon baking away was indescribably appetising!
Also thanks for the links you posted. I too cannot wait to do the snurr/knot recipe. I’ve located it on someone else’s blog, which I reblogged on mine – here’s the link to the initial blog which refers to this recipe as Morten’s own: transplantedbaker.typepad.com/the_t…nurrs.html
I’ll post pictures on mine when I make it – likely to be over the next week or so.
Happy baking!
andrew
Weekend Bakers says
About the 0.1 gram in the poolish of the focaccia: Yes it is correct and that is why we also made the pictures to show you how small the amount really is (in case you do not have a precision scale).
It is just a tiny heap in a 1/4 tsp.
The recipe for the cinnamon knots uses much more sugar and butter than we did up till now in our recipe.
I am curious to see how this one will turn out and how it compares.
Happy knot and snur baking!
Marieke
cookandbaker says
Hi both,
this looks amazing – identical to a Norwegian sweet yeast dough pastry called ‘skillingsboller’, it’s meant to be Bergen’s pride – it was showcased on an episode of the ‘Hairy Bakers’ (a cookery show on BBC) and it looked amazing. I managed to track down a recipe and tried it for the first time, and it turned out really well. I’ve posted it and photos on my blog under ‘fluffy cinnamon pastries’.
Happy baking!
a.
Weekend Bakers says
Hi there,
That looks great! Yes, we where also very inspired by that episode and already made several attempts to make both kinds of boller, also the ones you tie into a knot (kanelsnurrer or kanelknute). We liked the result but I must say the dough Morten has looks so amazing, I would really like to have that recipe. Did you also see this recipe? iheartcakes.wordpress.com/2011/…elsnurrer/
The ones with the raisins where amazing too, I think I liked them even better, but the snurrer are so much fun to make.
The breads of Åpent Bakeri are also very inspirational. I made a version folding in fresh herbs like thyme and some very nice sun blushed tomatoes using our ciabatta focaccia dough: www.weekendbakery.com/posts…-focaccia/ sprinkling the top only with fleur de sel and some oil. Very satisfying bake!
M.
Marie-Claire says
Even ‘snuffelen’.. en weer zo’n lekker recept.. #stillwonderinghowyoubothcanbesoslim ;-)..
Weekend Bakers says
Hi Marie-Claire
Thanks! Still baking yourself? Of course we do not make and eat these buns ourselves every week.
Groetjes,
Marieke en Ed
Sam says
Hi there, recipe looks great, thinking about trying it out, I have few questions though … when making the dough do I cream the butter and sugar first, then add the milk, egg and yeast water? also, do I need a dough hook if kneading with a machine? and lastly just wanted to check what flour you use – is it ordinary plain flour or strong bread flour? sorry for all the questions, just want to make sure I get it right! Thanks x
Weekend Bakers says
Hi Sam,
You don’t need to cream first, it will all come together just fine with the kneading. For this kneading you do need a dough hook yes! I use bread flour for this recipe and although different countries have different flour types I am sure for this recipe your bread flour will be fine too. It is always advisable to save a bit of milk or water until you see how your dough turns out so you can always add a bit more if needed.
Hope this helps!
Marieke
Gingi says
Hi there. Nice website.
I have a question regarding the picture included in this recipe. It seems to me that there is a glaze that drips from this buns – a very nice and shiny glaze. However, I could not find anything that mentions layering any glaze -making ingredients on the buns. Please let me know… and thanks again !
Marieke says
Hi Gingi,
What we did is very simply use some left over/held back topping and brush it over the buns before they went into the oven. It was Ed’s idea so the buns would turn out sticky inside and out. I think it works well and looks great also.
Happy Baking,
Marieke
Marieke says
Hi Paolo,
Good idea to try it with sourdough. Haven’t done that myself but am very curious as to the result.
Of course this means that the proving will take longer. First thought is to take a bit more culture to help the dough along. And the sourdough culture should not be to ‘sour’ imho to make for a good marriage with the cinnamon and sugar.
We will post our results as soon as we have tried it. Also curious to know about your results!
Greetings from Holland
Marieke
paolo says
They look great….feel like to try making them but would like to use sourdough instead of yeast..did anyone try? if yes, was the result successful? Cheers from quito. Paolo