This gloopy dough will delight and surprise you and just wait till you taste it…
Imagine making a dough that looks like pancake batter, but acts like silky bread dough. Imagine a bread moist and tender and velvety in your mouth. We think making our focaccia with this ciabatta dough was one of the better baking ideas we had over the last few months. Let us know what you think!
The recipe for the ciabatta dough is inspired by Jason Molina’s Quick Coccodrillo Ciabatta Bread as found on The Fresh Loaf website.
These are our adaptations to the original dough recipe:
- We adapted the recipe to include a 12 hour poolish, for even more taste!
- We tuned the hydration level down to 85%, this allows you to skip using the peddle attachment of your mixer needed in Jason’s recipe and go straight for the dough hook.
Why? Less water gives quicker dough development, plus it is easier to handle when spreading in a baking pan, it behaves more like a dough and has more of a bread structure. - We use KitchenAid speed 6, Jason says to ‘beat the living hell out of it’ but speed 6 works great for this adapted version of the dough and your mixer will live longer too!
By the way, it is not such a novel idea to make a focaccia with ciabatta dough. Focaccia typically contains flour, water, yeast, salt, and oil. Ciabatta is made with a similar dough but without oil, often as wet as focaccia or with even wetter doughs.
Making the Poolish
Ingredients for the Poolish
250 g bread flour
250 g water
0,1 g instant yeast (see pictures)
This preferment is called a poolish and has equal parts of water and flour. In a bowl stir together 250 grams bread flour with 250 grams cold water and 0,1 gram instant dry yeast. We use a precision scale to measure the 0.1 gram but to give you a good indication of how tiny this amount is we made some pictures (see gallery above). Mix it until you have a consistency that looks like a very thick batter. Cover the bowl and leave for 12 hours at room temperature. So if you want to begin your bread making in the morning, you can make your poolish the evening before.
Making the Ciabatta Dough
This dough should pass the windowpane test with flying colors!
Ingredients for the Ciabatta Dough
Poolish (500 g)
280 g bread flour
200 water
8 g salt
7 g instant yeast
Attach the dough hook to your KitchenAid type mixer and combine the ingredients until you have a shaggy mass (30 seconds to 1 minute). Let it rest for 10 minutes.
Now comes the fun part. Start mixing at speed 6. First your dough will look like pancake batter with some gluten but after about 3 to 5 minutes of mixing (so way shorter than the original recipe’s 10 to 30 minutes) the complete dough ball should stick to the dough hook and be separated from the sides, hardly touching the bowl anymore, even separating from the bottom from time to time.
When this happens you can make a wonderful ‘windowpane’ with your dough, as demonstrated in the picture.
Place the dough in a bowl sprayed with oil, cover and let it rest for 90 minutes in a warm place, provided the temperature of your dough is around 24ºC / 75ºF. During this period this dough really increases in size, more so than with your regular bread dough. After this period it should look very wobbly with lots of air, but it should not collapse of course.
Preheat your oven at 230ºC / 445ºF. Prepare your baking tray (about 30 x 40 cm / 12 x 16 inches) by lining it with a baking sheet or baking parchment and lightly spray or coat it with some oil. Spread out the gloopy dough on the baking tray (wetting or oiling your fingers will help) making sure to evenly distribute it into the corners.

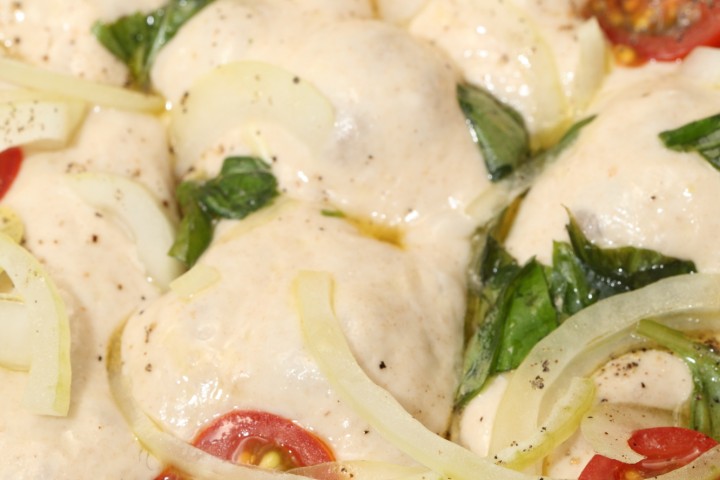
Dress the dough with the following ingredients (or ingredients of choice):
Ingredients for the Topping
24 ripe mini tomatoes, halved
1 large thinly sliced white onion
about 3 tbsps olive oil
a handful of fresh basil leafs
sea salt flakes and black pepper to taste
You can shred the basil leafs and mix them in with the oil before rubbing it on the surface of the dough.
With your fingertips, make indentations all over the surface, making sure the lovely oil also drips into the dents.
Let it proof for another 30 minutes.
Note:We like to add ingredients like the tomatoes before the final proofing, so they become ‘encapsulated’ during the proofing and stay nice and juice during baking too.
Bake in the preheated oven for 20 minutes, until golden brown.
Brush with some more olive oil if you feel like it leave to cool ever so slightly then take your pizza cutter and attack!


Your recipe looks good. I use to do the final proofing in a plastic shopping bag. This works very well and keeps the dow silky and moist. My favorite topping is green olives and chopped fresh rosemary.
Hello Frank,
Up till now we just left it uncovered for the final proofing, because it would not dry out so quickly with all the oil and wet dough going on, but with your shopping bag method you would really make sure nothing can escape.
Thanks for the great tip and sharing your favorite topping, delicious! We love fresh rosemary, sadly our plants died this winter because of the extreme cold, so we have to start over with some new ones.
Happy baking,
Marieke
I WANT TO MAKE THIS BREAD — CIBATTA – FOCACCIA AND SINCE I HAVE A BOSCH MIXER I AM HOPING IT WILL WORK AS WELL AS A KITCHEN AID — WILL IT — IT HAS DONE A GREAT JOB ON MANY OTHER BREADS —
THANKS,
TONYK IN TEXAS
Hello TonyK,
I am guessing the Bosch will d the job just as well. Let us know how it turn out!
Happy baking,
Marieke
Window pane, indeed! Wow!
And it does not stick to your hands as much as you would expect, it releases itself very easy from your fingers, because of the gluten.
I MADE THIS BREAD TODAY AND IT WAS EASY AND TURNED OUT GREAT — IT DID TAKE ABOUT 35 MINUTES TO COOK BUT IT WAS DELICIOUS — THANKS FOR THE GREAT RECIPE AND I WILL BE MAKING THIS AGAIN SOON —
TONYK
Thanks for sharing your great result Tony!
Happy baking,
Marieke & Ed
Must try this, it looks great. As I think I said elsewhere on the site I have been using the Jason Molina gloop method for ciabatta for a while. My current variation is to throw in 100gm or so of my rye/wheat starter, and cut the yeast down a bit. I sometimes add a handfull of spelt into the flour. This combination gives a more ‘rustic’ type of ciabatta with just a bit more chew than the original. Last time I made focaccia I pulled the dough out a little thinner than normal then opened a jar of grilled red/yellow pepers and laid some out on half the dough, together with some torn Mozzarella , then folded the other half on top and pressed down with my fingers. After rising for 30 minutes or so I dimpled the top and added garlic, rosemary and salt before cooking. All I can say is that there wasn’t much left after lunch.
Hi Bill,
Thanks for your tasty contribution. I like the way you are thinking! Inventing great new things on the way. Seems like you came up with the focaccia calzone!
Keep it up with the baking inspiration!
Marieke
I AM MAKING THIS AGAIN TOMORROW AND WILL USE GREEN ONIONS INSTEAD OF WHITE ONION AND WILL ADD A BIT OF SHREDDED MOZZARELLA AS WELL — IS THER ANY WAY I CAN ADD A PHOTO TO MY RESPONSE — I TRIED BEFORE BUT WAS UNSUCCESSFUL — LOVE YOU WEBSITE AND HOPE YOU KEEP ADDING MORE RECIPES — THANKS –
TONYK
Hello TonyK,
You are right it is not possible now but we are looking into that. At the moment all I can suggest is sending us the photo via our contact form or adding a link to the photo posted elsewhere (flickr for example) . We would love to see the result anyway.
And thank you for being so nice about our website and recipes
Marieke & Ed
Hi TONYK,
It took a while but we now have the means to showcase your baking results with our recipes on our website! See: http://www.weekendbakery.com/your-loafs/
You can also add private and public information if you wish. Love to see your version of the focaccia with the green onions.
Happy Baking!
Ed and Marieke
I made this recipe yesterday, and although I let it get a little bit dark on top it tasted great. I will try this one again, putting the baking tray a little lower in my oven. And my wife asked for cheese, so I might put some mozzarella on.
Hi Edwin,
Thanks for sharing, and you are right the slightly dark result is easily fixed next time. You always have to adjust and tweak recipes a bit to your equipment, environment and also taste. Adding mozzarella will be wonderful too!
Happy baking,
Marieke
This is the worst bread recipe. Ever.
I’ve made it several times now, and each time the bread disappears within 15 minutes. Into thin air seemingly. I just can’t understand it.
Amazing stuff guys, I love it!
Do you think it’d work if I used my leaven in the preferment rather than bakers yeast? And if so, how much leaven (She’s white, 100% hydration, called Hilda, BTW)
Hi Rob,
.
I know the feeling, also had that happening with my apple pie! Maybe install a camera to catch the culprit
And yes you can use your lovely Hilda, we would guess you would need about 20 to 30 grams in your poolish and probably allow for some extra proofing time after the 3 to 5 minutes mixing, or you can make a hybrid, using the sourdough for taste in the poolish and using the yeast in the final dough (times would stay the same as in our recipe with this version).
Let us know how it turns out, always very interested to know!
Happy Baking,
Ed & Marieke
Grrr, since I don’t have a mixer, nor a precision scale (I don’t even trust mine on the single grams), this one could be one step too far … For now I’ll stick to my favorite, the BB. Just a simple question, could I use the 1/4 tsp measure, which says 1,25 ml, and trust that that would give me about 1,25 gr. (instant) yeast? That would be of some help ….. Thanks again and keep up the good work!
Do not despair Claartje! Yes the recipe calls for a mixer, but you could also try and use a hand mixer with the dough hooks attached. Something to borrow more easily from a neighbor or so.
The 1/4 tsp yeast does not give you 1,25 g instant yeast but 0,775 g yeast. A whole teaspoon is 3,1 g. (also see our baking conversion page: http://www.weekendbakery.com/cooking-conversions/). So for the BB loaf that would mean you could use 1 tsp instant yeast in the poolish (3 g) and 1/2 tsp (1.5 g) in the final dough and it would be almost perfect, without scales!
Hope this helps,
Marieke
That is very helpful, all of it! I do have a hand mixer w. dough hooks, so will definitely give it a go!
Sorry, I should have looked around the site a bit better. Really useful your conversions page! Everything is written down in my notebook now! Thanks again, I’ll let you know how things turn out. (Poolish for BB is in the fridge, looking forward to baking day tomorrow!)
Same over here. Hope it all works out.
Happy Sunday Baking!
Made my first “FC” today” without a stand mixer: my good old hand mixer did the job fine! Suggested topping plus mozzarella, fantastic, that’s another favorite added to my baking list! Thanks for the help and this lovely recipe! Looking forward to your next project …..
Such good new Claartje! I am so glad it worked out. Going to update the recipe right away to let people know the good old trusty hand mixer is also an option.
I recently made several FC and folded ingredients in the dough (sprinkle on dough and then do a letter fold (use olive oil and scraper to handle the dough) place on baking tray and pull /push into shape for final proofing. Made with herbs like thyme, dried tomatoes and also with porcini mushrooms and walnuts. Also ate it with mozzarella, because…well who needs a reason to eat mozzarella or Parmesan…
Coming soon: new projects like our simpler version of a baguette and a very nice quiche…
Happy baking,
Marieke
just checking – do you mean 1g of dried yeast or literally 0.1g for your poolish?
g
Yes, we do mean 0.1 gram! That is why we made the pictures, to show how tiny the amount is. The picture on the right is 1/4 teaspoon, you can almost count the little grains. In 12 hours at room temp it will have still done its work.
oh dear i took a flyer last night and used 1g! i’ll reduce the yeast in the production dough. hopefully it will still work ok. I’ll find out later on this morning. It looks lively this morning. Unexpected day at home so the weekend baking has started a little early. Busy day. I’ve got the ciabatta, SF sourdough and baguette boule on the go. And for the first time in weeks its actually stopped raining, so the garden is beckoning too. Have a good weekend. g
seems ok…tastes good. Note the missing bit at the end.
http://yfrog.com/nz7t2ycj
I see there was no problem with the dough in the end. That looks seriously good Gill!
Have a great (rest of baking) weekend. Hope the other projects will be successful too.
Marieke
Hi Gill,
We now have the means to showcase your baking results with our recipes on our website! See: http://www.weekendbakery.com/your-loafs/
You can also add private and public information if you wish. Love to see your version of our favorite bakes on our website.
Happy Baking!
I would love to try the Ciabatta-Focaccia, But I have burnt out 2 KitchenAid machines, using the dough hook at higher speeds. Luckily, the machines have been under warranty, so they were replaced free of charge. Kitchen Aid has advised me not to run the dough hook any faster than #2, so #6 worries me. Can I use the paddle attachment?
Thanks,
Michael
Hello Michael,
Yes you could try and use the paddle attachment. But for what it is worth, this recipe is about the only thing (next to egg whites / meringue sometimes) we use our KitchenAid for anymore. But the dough is much like batter and that is why it (seems to us at least) works very well with the KitchenAid, there is not that much resistance as you would have with heavier doughs (you would then notice the machine working very hard and getting very warm) . So you could also give it a careful try maybe. Hope it works cause the recipe is really worth a try!
Happy Baking!
Marieke
This looks fantastic as well as all your other recipes. I’d also like to thank you for keeping and giving such precise and meticulous instructions/description/pictures in all your recipes. It is very helpful. I love you site and used quite a few of your recipes.
I will try this FC bread tomorrow (planning to add some cheese to topping for a “pizza” effect – what do you think?). I have a few questions and I was hoping maybe you can advise:
1. It looks like the timeline on this bread is about 14-15 hours from start till bake time. I need to extend it (due to my work schedule) by about 5 hours. Would you recommend using even less yest in the poolish? How about 15-20 grams of my 100% hydration sourdough culture instead (I saw you recommend 20-30 grams in one of the post above as a substitute for 0.1 grams of dry yeast)? Or should I try to keep the poolish a bit cooler to allow longer fermentation?
2. I do not have a KitchenAid. How important is that short period of mixing at very high speed? Can I compensate for it with energetic hand kneading or extra bulk proof time (with stretch and folds)?
Thanks in advance for your help.
Lev
Hello Lev,
We would recommend to keep the poolish in a cool place. About the mixing, it is essential for the structure of the bread, it is simply too wet to knead by hand, stretching and folding would not do the trick we think. You can try using a hand mixer with the dough hooks attached, we have not tried it ourselves but know somebody who does, and it seems to give good results too.
Good luck with it!
Ed & Marieke
Thank you for your prompt reply. My impatience prevailed and I already “jumped the gun” with using 20g of sourdough culture in place of 0.1 of dry yeast. But my place is not too warm (about 69-70F). Per your advise I will try to use hand mixer to do the kneading and I will report back with results
Do you see any benefit in slightly reducing final amount of dry yeast in the final dough (maybe about 4.5-5g) but extending the proof time? That way I can still keep my poolish at about 12-14 hours but extend my total time with extra proof time for the final dough?
Also shoould I be concerned about adding cheese to topping because it potentially increases weight on top and may obstruct the dough rise in the oven?
Thanks for your help, sorry for the million questions – hopefully it is not too much of a nuisance to you
Lev
He Lev,
I think that would be an option that could work, but again we do not know the outcome because we have not tried it ourselves and cannot speak from experience on this… You are changing different things here so the exact outcome (also combined with the already different equipment, ingredients, hands, climate) is a bit unsure. If you have the time we would encourage you to also try the recipe as described (and compare the two maybe).
You are right about the cheese, it could be an option to add it later, after the bread has stabilized.
Good luck with it!
Ed & Marieke
Thanks again for all the advise and support. I baked it yesterday and it was wonderful. The sourdough based polish turned out really well (I think 20g is just the right amount for 12-14 hours preferment). My hand mixer could not do the job so I just used bread machine kneading cycle for about 20 min of energetic kneading. It developed the dough really well and after 90 min of proofing, it increased in size and looked exactly as you described in your recipe. I used your original topping (I love how, as you described, topping ingredients, specifically halved cherry tomatoes, incorporate into the dough during that final 30 min proofing period). I also sprinkled a bit of cheese on top (not too heavy at all though). It was a total success. Absolutely tasty, very tender and full of air bubbles crumb, soft crust but not too oily.
I will try to make it exactly as your original recipe to compare as soon as I can my work schedule allows.
I know that your original recipe calls for only 8g of salt (which is what I used) but I can not help to notice that amount being lower comparing to traditionally used 1.7%-2% of flour weight which would make it about 10g-11g of salt. I am sure you call for less salt on purpose and I am just wondering why? Is it because of short proof period and relatively high dry yeast amount to let the dough expand quickly and get really full of gas?
Thanks,
Lev
Hi Lev,
That sounds absolutely marvelous. Thanks for reporting this great result back to us. It is good to know your methods are working so well, great info to have and to try it out ourselves sometime too.
About the salt: we kept it down a bit in the dough because of the salt flakes that we add on top, that’s the main reason. But in all our recipes the salt is on the low side of the spectrum, it is just our personal taste (not too salty esp with other added herbs and spices in the mix). But you can always add some more of course.
Happy baking and thanks again!
Marieke & Ed