


Conclusion: Making your own croissants, totally worth the effort!
Some years ago we bravely started our quest for the perfect croissant. But after two attempts we cowardly sneaked away again.
The first attempt was just a disaster. I believe we used a recipe by Michel Roux, so we probably cannot blame the recipe. But how foolish can you be to go and try to make your first croissant dough ever on a very hot and humid summers day?! Maybe if you are an expert and know what you are doing, but at that time we sure didn’t. So, big disappointment with butter dripping out from all sides.
Luckily for us, no pictures were taken (better not to touch the camera with butter fingers) so we just put this aside as a ‘now we know what NOT to do’ learning moment and moved on.
The second attempt happened months later, cooler in the bakery, check! But better conditions alone do not make a good croissant. In fact, you can bake something that vaguely looks like a croissant but in truth is just a buttery roll. So again, we where a bit discouraged to say the least…It took as over a year to get our courage up and give it another try. The cold weather also helped a lot.
And then things quickly got better…

So our most important advise would be to practice your first croissant making when the weather is nice and cool, or make sure your surroundings are around 20ºC = 68ºF, or even better, a bit lower. This way the butter will not get too soft or even melt and get absorbed by the dough, a thing that also happened with our second batch (look mummy no layers!). We also knew we needed a better recipe as a starting point.
But then we remembered our quest for the best baguette and how much time and effort went into that. So then it was on and we would not rest until we had truly mastered the wonderful art of croissant making!
Hope you will get stuck in there with us and please do not give up after one attempt…practice does make perfect!
OUR CROISSANT MAKING LOG
CHECK OUT OUR MAKING & BAKING CLASSIC FRENCH CROISSANTS VIDEO
CHECK OUT OUR MAKING & BAKING CLASSIC FRENCH CROISSANT RECIPE
Recipes used / Inspiration
Classic Croissants by Jeffrey Hamelman
Mr. Hamelman is a favorite for croissants and an inspiration for many other bread recipes!
TXfarmer on The Fresh Loaf
The book ‘Pastry, savory and sweet by Michel Roux (croissant recipe does not work, only 50% hydration resulting in very stiff, unmanageable dough, ‘hope’ it is a typo? more likely it was us!).
We use French type 55 flour for our croissant making.
November 2018
We were experimenting with our Roccbox making pizza. As pizza needs a dough which is easy stretchable and croissants also need a stretchable dough we thought perhaps this flour will also work great with croissants. So we made some croissants with Caputo Pizzeria Long fermentation 25kg and added about 300mg of vitamine C as a dough enhancer. It worked great, very nice layering and easy to work with. The croissants on the photo are a bit under proofed, so next time we will give them an extra 30 minutes to proof.


September / October 2014
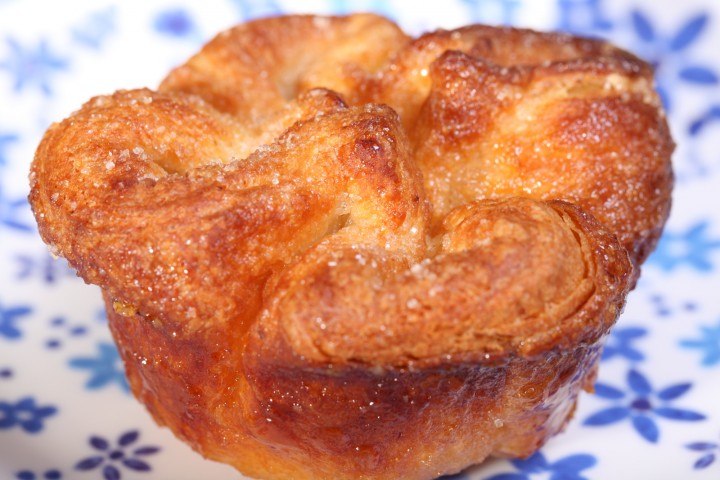
Very much inspired by the pastry episode of the Great British Bake Off we could not help but have a go at the Kouign-amann. This interestingly named concoction is a regional specialty of the Bretagne region in France. It is a round ‘crusty cake’, made with bread dough containing layers of butter and sugar folded in resulting in puffed up layers with lovely caramel inside and out. The name derives from the Breton words for cake (“kouign”) and butter (“amann”).
We thought our croissant dough would be very well suited to make the version as shown in the BBC program, using a muffin tin to create the shape you see in the picture. The results of the first baking sessions are so delightfully good that it is quickly becoming a favorite with us and a wide circle of people around us.
February 2014
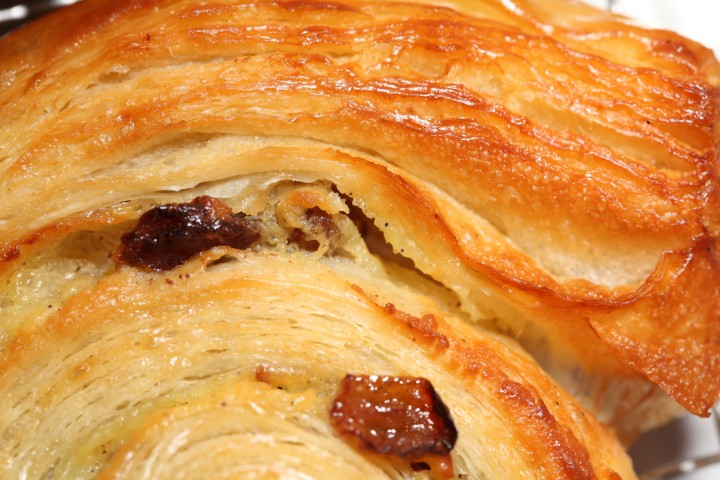
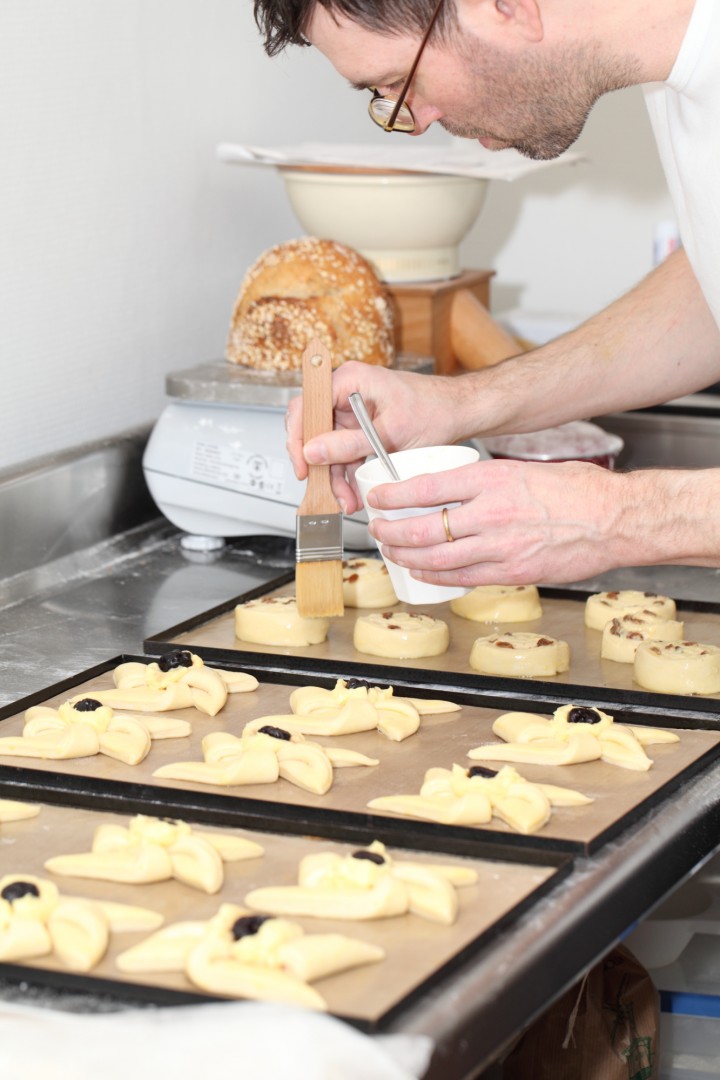
Next to croissant baking in the past months we also perfected our pinwheels and pain au raisins. You can find the instructions here. These pastries are all made with the same laminated dough as used for croissants and pain au chocolat. The fun is in the shaping and in ending up with a totally different pastry but equally delicious and worthwhile to make and bake. Another thing we love is making crème pâtissière / pastry cream, the stuff that plays an important role in the end results of both pinwheels and pain aux raisins. You can find our favorite pastry cream recipe here. It can be used for lots of other things too of course, like the famous vanilla slice or Dutch tompouce for example. Next to the pinwheels with cherries and apricot on top, we also made one with an apple, cinnamon and raisin compote, also very delicious. In the next months we hope to do some more experimenting with ‘pâtisserie viennoise’.
September 2013
We are experimenting with different flours at the moment. We tried the organic German type 550 but it proved too heavy and we ended up with a slightly flattened croissant with less then impressive honeycomb structure. The next step is to try some organic Manitoba flour which is very high in gluten and is traditionally used for Italian enriched breads. It originally come from the Canadian region of Manitoba. We already noticed it is a joy to roll out compared to the French Type 55 we normally use. But we need more experimenting to draw conclusions.
At the same time we are playing with the tightness with which to roll up the dough triangles. To get a good honeycomb structure that starts at the core of the croissant you have to roll the dough pretty tight at the beginning. We are establishing what the best techniques are to get this right.
Keep you posted!
December 2012
Moving on to other Viennoiserie / Danish Pastry


Inspired by our baking friend Luc Martin from Tilburg Sourdough and our new book ‘Advanced bread baking and pastry’ by Michel Suas, we are now enthusiastically experimenting with the laminated dough, trying out different kinds of Danish pastry. The shapes you see in the last three pictures are called pin wheels. They are filled with crème patissière made according to the recipe from the book of Mr. Suas. We will keep you posted on our Danish pastry results.
We also decided it is time to post the compleet version of the croissant recipe. We found a firm base in Jeffrey Hamelman’s recipe but over the months we made many small changes and we think it justified and more clear for other bakers to explain in a new recipe exactly how we make and bake our croissants at the moment. So we will post our version of the recipe in the near future.
March 2012
BATCH 6

Just baked another batch of croissants and also some ‘petit pain au chocolat’. Practiced with and altered a few things, like shaping, with good result.
Made some pics to go with it. Comparing this batch with the previous, we again made some progress, especially with the honeycomb structure and thinner inner layers (lighter mouth feel).

According to Raymond Calvel croissants laminated with margarine *ugh* are formed into the crescent shape, while croissants laminated with butter are left in the straight form.
Next to the three fold method or letter fold there is also the ‘book’ method. Calvel also mentions that an experienced individual, using a dough sheeter, which we home bakers do not have but which makes life (by which we mean rolling the dough) so much easier, can accomplish two book folds with no rest period between, thus saving precious time.
Tips and lessons learned from batch 6
- Do not over-knead / develop the dough too much, too much gluten will not help during the lamination process. The lamination process itself is a kind of stretch and fold anyway and will strengthen the dough.
- Gently shape the dough into a flat ball by pressing it down before storing it in the fridge, this makes rolling during the first fase more easy. Making a tight ball will strengthen the gluten and you need an elastic dough.


We also made some ‘petit pain au chocolat’ and this time tried to make them a bit more authentic by using rectangles of the dough instead of leftover odd pieces and also shaping them better. We used our favorite Valrhona Caraïbe chocolate, it’s simply delicious, much better than the rather strange sticks you often see being used that sometimes taste a bit musty and sometimes even burned.


Februari 2012
BATCH 5

Our best batch of croissants to date! Very pleased with the result.
We got the honeycomb structure we wanted and this also resulted in the croissants going towards the structure and bite we are aiming for.
What are we aiming for you ask?
Well, there is this place in Normandy in France where we tasted the best croissants ever and it is our ultimate goal to match those. We like these croissants because they are buttery and flaky but still they have this center that has a light melt in the mouth sort of ‘custardy’ feeling. In our opinion a croissant would not be right if all you got were flakes in your mouth and on your plate.


Tips and lessons learned from batch 5
- Work precise and try to get all measurements right. Make sure your dough is shaped with straight lines and squarish corners.
- Do not pull the dough to stretch the individual triangles. Because of the squeezing and pulling with your warm hands you will damage the layers. Use a rolling pin to gently elongate the triangle.
- With this batch we have been really careful with the rolling out part of the dough triangles. We have not elongated/stretched the dough by hand like it says in the Hamelman recipe, just very gently worked with a rolling pin. Next time we want to try and elongate them just a little bit further, trying to create thinner dough layers, and see how it turns out.
Januari 2012
BATCH 4

After the encouraging results of batch 3, there was no way we were going to wait long before trying the next. So batch 4 was made the following weekend.
We did not improve much on the previous batch, but we were still happy we were able to duplicate our previous success. Batch 3 was not just a lucky shot! But probably because of too much pinching and stretching of the croissant dough triangles, we damaged the layers a bit, resulting in a, still tasty but, slightly heavier croissant.
We also fine tuned the oven temperatures and baking time, a few degrees lower, a minute or two less. We use a semi-professional convection oven for the croissant baking so we have to take that into account.


Tips and lessons learned from batch 4
- Too much fumbling, and squeezing the dough triangles does not make a light and beautifully layered croissant. Most important thing to improve on with the next batch.
- On the third day, when you have to lengthen the dough to a formidable 112 cm / 44 inches, the dough at some point may resist and /or shrink back when rolling it out. Hamelman suggests folding it into thirds and giving it extra relax time in the fridge for about 10 minutes. We did this with this batch and it worked great.
- We used the excess dough we trimmed from the edges to make a bit odd shaped but still very delicious ‘pain au chocolat’ using our favorite Valrhona Caraïbe dark chocolate. The trimmed dough parts are still worth using, it would be a shame to throw them away.
- We tried freezing the croissants and putting them for 8 to 10 minutes in the preheated oven (180ºC / 355ºF) straight from the freezer. Nothing wrong with that, croissants eaten nice and warm, almost as good as fresh ones…almost
Januari 2012
BATCH 3

The first time we used the Hamelman recipe. Pleased with our ‘looks like a real croissant’ result. The taste is fantastic but the croissant is not as light and crisp as we’d want them to be. A little bit heavy when biting into it.
The center is hollow, but we want that honeycomb structure also in the middle of the croissant. Still work to be done!


Tips and lessons learned from batch 3
- After you have made the initial croissant dough, shape it like a disc, not a boule, before you refrigerate it, so it will be easier to roll it into a square shape the following day.
- After each rolling and folding I already gave the dough a quarter turn and gently rolled it out just a little bit (think a few cm) so the dough could relax in the shape I was to continue with. This seems to work well.
- If you have a pizza slicer, use it, it works a charm to cut the croissant dough.
- Next time pay extra attention to the begin part of the rolling of the triangle when shaping the croissants.
- We use our Rofco stone oven as a croissant proofing cabinet by preheating it for a few minutes to 25ºC / 77ºF. It retains this temperature for a long time because of the oven stones and isolation. We can do this because of the luxury of having more than one oven. But you can also try this with a smaller household oven and use a baking stone. You can check the oven temperature with a digital thermometer. If possible you can also put a baking tray on top of your oven to speed up the proofing process if necessary.
Croissant baking somewhere in 2010
BATCH 1 & 2
No pictures of our first attempt at croissant making, but as you can see looking at the pictures below, our second attempt left much to be desired. The recipe we used was a quick 1 day recipe we found on the Fresh Loaf site. We decided to use it mainly to practice the laminating part and with this one day version we could go straight to work.


Sorry excuse for croissants…need therapy first to get over it and dare to try again
So, what went wrong with this second batch?
- The room temperature was around 22ºC / 71.6ºF so still a bit too high.
- When you are inexperienced the process of laminating and rolling just takes too long.
- Because it was a one day dough it lacked in stretchability, so the dough was fighting back like crazy. You probably need a dough that has rested in the fridge for 24 hours to get the right gluten development to get a more stretchable dough.
Check out our version of the perfect croissant recipe here


Ckb says
Hello!
There’s a temperature spike and I’m afraid it’s too hot in the house (22 degrees). I’m making your three day recipe, would it be a terrible idea to make it a four day recipe? The butter is laminated so this is the cut day. I’m not novice, but I’m also not a machine so Im worried.
My other thought is to use a timer to make sure the dough isn’t out of the fridge for more than a minute (abuse my fridge essentially), and chill my rolling pin (poor pin!) and knife.
Issy says
Hi, I’m just wondering how you get the nice more open and bigger honeycomb in batch 6. Is there a specific thing that causes that or is it all down to proofing?
Thank you!
Lidwina says
Hi, what cause the croissant layer in batch 1&2 picture on the rightest one? Mine is always like that, sadly, although they taste good.
Please reply it, also how long should I do the laminating process of rolling dough?
Thank you.
Lekha Amod says
I used your recipe and video diligently (a big change for me!) and my first attempt was amazing. Looking at these blog responses, I see that my mistake was to roll too hard and not work quickly enough. Can’t wait to do the second batch. So grateful for this amount of detail.
Weekend Bakers says
Hello Lekha,
It is so wonderful to get a comment like yours! You are already enthusiastic about your first attempt and at the same time you see room for improvement and made your own assessment of what you can do different to get to a perfect result! You are a true baker with an attitude that will bring you many successful bakes.
Thank you and enjoy the process!
Greetings,
Marieke & Ed
Debbie says
Hi,
Thanks for a great detailed recipe!
I made these croissants and they came out great, only they were really flat…
They came out really good and flakey with no butter leakage. When I proofed them they came out nice puffy but for some reason still flat…maybe I rolled out the dough too thin? I used the measurements provided but I have no other explanation….
Thanks in advance!
Mary says
Hi
Thank you so much for your recipe and blog.
I’ve made many batches and your recipe and technique definitely works for me.
My question is- why my croissants are flatter when they’re baked. They are properly proofed and are jiggly and full when I bake them at 200degC. They are nice and high until around 10 mins. Then they lose the nice height.
Could it be that I open the oven to turn the baking sheet 180 degrees for even browning?
There is minimum butter leakage and the croissants are light but not as light as they can be. I am aiming for the beautiful honeycomb crumb structure.
Proofing time 2.5 hours at 24-26 degC
Dough rested overnight prior to lamination. Kitchen temperature 18 DegC and marble kitchen bench. Butter used 83.1% fat
This photo below shows the proofed croissants prior to baking:
share.icloud.com/photo…rnsby,_NSW
share.icloud.com/photo…rnsby,_NSW
This photo shows how they flattened after baking.
I hope you can give me your opinion and help.
Thanks!
Weekend Bakers says
Hello Mary,
Thank you for your comment. Yes your croissants look wonderful prior to baking and still quite OK after, but they are a little flat. So we do have some suggestions:
First is to indeed not open the oven door during the baking process although we know you do this for even browning but opening the door too soon with the structure not yet stable could lead to a bit of deflation possibly. Or you could try a different (brand of) flour, which could make a difference and could lead to a less heavy result if your current flour has a higher percentage of fibre that weighs the dough down. And our last tip is to add some vitamin C to your flour for extra strength. Due to the properties of vitamin C, it can be used as a dough (gluten) strengthener during fermentation, helping to improve the structure of the dough. You can buy vitamin C 1000mg tablets and in general use one third of one tablet in a dough with 500 grams of flour. You grind the piece of tablet to a powder and add it to the flour.
Lots of success with the pastry baking, hope you will get your honeycomb!
Dasme says
Help! I am in the process of making croissants making two batches of dough using my Kitchenaid mixer. With the first dough, I let it mix until the dough came together and it was slightly sticky. I then took it out and kneaded by hand for a couple of turns until it was a little more smooth. I formed it into a disc and then put it in the refrigerator. The second dough I let continue to mix in the mixer until the dough had completely formed and had cleaned the bowl. This dough was noticeably heavier and not sticky. I used the dough hook and had the mixer at speed 2 for both. Both mixed longer than 3 minutes. At 3 minutes neither batch was a formed dough. What should the dough look like and feel like when it is ready? How do I know that the dough is overworked? And lastly what can I do with the overworked dough if I don’t go through the laminating process with it?
Weekend Bakers says
Hello Dasme,
Did you make our recipe? It is best to judge by our pictures with the recipe and our video what our dough looks like:
www.weekendbakery.com/posts…roissants/
We would advice for a kitchenAid to knead at speed 4. It is not clear from your comment how long your second batch was mixed.
Matt says
Great article!
Having just attempted my first ever batch it was a disaster!
Searching on the internet this morning it appears that there are many cases of people having similar experiences using the Roux recipe from “Pastry”. All saying that the dough was much too dry…
2nd batch to be attempted following your recipe, which has 30ml more fluid…
Weekend Bakers says
Hi Matt,
Do not give up! Lots of people have excellent results with the recipe. You can also see their bakes here: www.weekendbakery.com/your-loafs/
Of course you always need to make a recipe your own for your flour, hands, equipment and climate, but it helps so much to have a good starting point.
Check out our video and the question page too if you want some more background and support:
www.weekendbakery.com/posts…questions/
As you can see in our log, our first attempts were quite the disaster too, so welcome to the club of persevering bakers 🙂
Let us know how it goes,
Ed & Marieke
Alice says
Hi there!! I’ve been trying to perfect my croissants for some time now and your log and recipe has been a god send. This is my latest attempt (photo on insta). Please help! My honeycomb just isn’t quite there! Help~any suggestions? Tastes Devine regardless though!
Weekend Bakers says
Hi Alice,
Thank you so much. Can you give us the link to your picture so we can take a look?
Alice says
Thank you so much for responding!! Here’s the link to pic
www.instagram.com/p/BtK…sfa4w8a807
Weekend Bakers says
Hi Alice,
Well that is a very good result already! We think that maybe during the process, because you are not yet able to work ‘fast’ there is just some butter incorporated into the dough. So as you gain experience you gain a bit more speed and this will help during the laminating process. In the meantime you can use the fridge a few times extra to cool the dough. When laminating each stage at a certain point should only take 1 or two minutes, but at the same time, you should still keep in mind to be gentle with the dough (do not press hard on it, put your weight into it and do not fight it). So more fridge and rest if needed.
Hope this helps and again, great result already!!
Alice says
Thank you so much for taking the time to help me troubleshoot. I will definitely try your suggestions. I think I squash the layers when rolling. Will try a lighter hand next time. In the meantime, here’s the latest. I hope I’m getting closer? www.instagram.com/p/BtQ…kn52pwbzut
Weekend Bakers says
You sure are, that is already the dream of many bakers!
Lots of people squash and put their weight into the rolling. Realizing this is not beneficial and getting used to the gentle touch is all you needed. Excellent!
Alice says
Thanks again. I cannot express how thankful I am of you blog and your willingness to respond to questions. My husband literally ate half a baking tray of them after a long run. Afterwards he looks at me and said “good god these are good, what have I done!?” Thank you so much.
livingstone says
Am baker in hotel, my problem is after baking de croissant they fall ending up not bringing that cobweb thing inside, could it be too much butter coz in my 2kg I put 1800g butter. thx
Weekend Bakers says
We are not sure, also not the reason why you use this much butter. There are several reasons this can happen. Take a look at our answers that might help you further here:
www.weekendbakery.com/posts…questions/
Mary-Anne Klus says
Hi Ed and Marieke,
My first attempt at making croissants this weekend was somewhat successful thanks to your very clear step by step instructions! Some butter leaked out during baking, and the croissants rose beautifully in the oven but fell once I took them out. This resulted in some flattening of the honeycomb effect. Also the layers weren’t as distinct in the middle as at the “legs”. I think I may have been too heavy handed while rolling the dough, and maybe used too much flour while rolling. I also need to be more precise with the oven temp-need to use my digital thermometer. I will definitely do this again!
Weekend Bakers says
Hi Mary-Anne,
Thank you for your comment. Sounds like a very good first try! Next time try to proof just a bit longer and your own assessment is also very good about the rolling without pressing too hard. Brush off excess flour regularly.
And yes, if you have one, use the digital thermometer, especially with this pastry, excellent.
Happy croissant baking and enjoy the process!
Naily says
Hi. I made croissants using your recipe and followed your tips.
The layering and shaping process went pretty well as I did the whole work in aircond room with temperature between 20 – 18 degree C. But I experienced problem during the baking in which the butter leaked out of the dough and formed a pool of sizzling butter at the bottom. The final products were still good though with visible layers inside. May you suggest any possible reason that lead to the leaking.
Thanks!
Weekend Bakers says
Hello Naily,
Your croissants were probably under-proofed. Just let them proof a bit longer so they get nice and wobbly and increase visually in size (also see our video). When under-proofed the butter tends to leak out from in between the layers and you end up with a butter puddle.
While working in a cool room is perfect, proofing needs to be done at a higher temperature of preferably around 25 C.
For these and other questions also see our FACQ page: www.weekendbakery.com/posts…questions/
Hope you will give it another try!
Greetings,
Marieke
Nabeela says
Hi I am trying this recipe for the first time and have followed the steps.I have let my dough Rest in the fridge and I will move onto day 3 tomorrow withe the final stage of shaping the croissants altho my dough is not smooth and has bits of butter everywhere.
Did I go wrong somewhere and will the croissants still come out ok
Thanx
Weekend Bakers says
Hi Nabeela,
Hope it still was OK. Have you red our tips in the yellow boxes at the beginning of the recipe? Especially about the butter: it needs to be pliable but not too soft. We use an organic butter with a low water content. A higher water content tends to make butter hard, which promotes tearing and breaking and ruins the layers. The butter we use has written on the package ‘at least 82%’ butterfat’.
Raj says
Thank you so much for making available your croissant baking log and recipe! Its amazing this log was posted 4 years ago and you’re still replying to so many people and offering helpful suggestions and tips!
I’m very inspired by your croissants and hope some day I can make such a perfect crumb!
Thank you for the wonderful gift you have given to the croissant bakers of the world!
Weekend Bakers says
Thank YOU Raj, for such high praise. We love to help and are very pleased that lots of other bakers (even first timers) get such good results, based on our tips and instructions.
Wishing you happy baking and lovely flaky croissants.
Greetings from Holland,
Ed & Marieke
Henry Rose says
I have tried your croissant method before and they came out nice and flakey. This time they were tasty but not at all flakey. No crumbs all over the way it should be. Any ideas where I might have gone wrong? Overworked dough? Too much extra flower during the rolling? I had a lot of trouble getting the final dough to 110 cm. I quit at 100 cm after giving it two rests in the refrigerator.
Weekend Bakers says
Hi Henry,
Maybe you used different flour? Overworked dough could very well be the cause too and adding too much flour will not help either, doing both will have a big impact. Very hard to say without seeing you at work. Try to think what you did different and just go on to the next version. With croissants it is a learning curve and it is very normal to put in lots of practice rounds to get it right and even then some batches will be better than others. Luckily the result will almost always be very edible!
Good luck with it.
Susan Bohuslav says
Hi! I am so happy that you all did these tests and have so many notes. I’ve been doing a lot of reading recently and hopefully it turns out well. I know its a lot to think that the first round of testing for me will work out well, but its not my first time making croissants. It’s been a few years. O_O *saying a prayer with face almost pressed against oven window*
THANKS! Y’all are such a great find.
Weekend Bakers says
Hi Susan,
Thanks for your wonderful comment. Recognize the face against the oven window!
let us know how your batch turns out.
Happy croissant baking!
Steven Samuel says
Hi there,
I’m not familiar about types of butter, there are european butter, regular butter and many more. I’m trying to make croissant, and i’m using Anchor unsalted butter. I’am having trouble with the butter, the butter aren’t pliable. Straight out of fridge, the butter is too hard to work with, too long sit in room temperature, it’s started to melt. When laminating, the butter mess out. Am i choose the wrong butter? Help me explain about choosing the butter for making good croissant.
Thankyou so much.
Steven
Weekend Bakers says
Hi Steven,
You should look for butter with a fat content of 82%, that is the most important thing. Also read the comments on butter from other bakers below.
Good luck with it!
Gavin says
Hi there
The phot of batch 3 where there is a hole in the centre after baked. What causes this?I am having this issue and cant work out how to fix this and get an even crumb all the way through?
Thankyou
Gavin
Weekend Bakers says
Hi Gavin,
You need to pay extra attention when rolling up the triangles of dough. The beginning needs to be tightly rolled, because if there’s no dough in the middle when rolling, there will be nothing there after baking.
neriman aydin says
I want to try..It Will Be perfect i hope
Weekend Bakers says
Just give it a few tries to get a feel for the recipe and you will get better and better with every attempt we are sure!
Happy croissant baking!
James says
Hi! First of all, I would like to thank you the explanation of the process and all the photos. I have tried different recipes to make croissants, including yours. However, although I follow every step, it is not possible to distinguish the layers in the last folding. I do not put too much pressure when I am using my rolling pin, and I have tried different types of butter. Of course, the result is a non flaky croissant, more like a bread.
Please help!! I would like to make the perfect croissants and I already tried it at least ten times with the same result!
James says
I have checked the flour that I am using most of the times, and although here is called plain flour, it has 9,5 g of protein. Could be that the problem?
Weekend Bakers says
Hello James,
Judged from a distance we would recommend you look at temperature and speed of working. As soon as you reach a certain temperature the butter is absorbed by the dough and you get a bread / brioche like consistency as a result. So use the fridge to keep the dough cool during the whole process and try to keep a certain pace (do not get distracted and leave your dough etc). Next to that finding the right flour can be a bit of a journey. We tested several types and brands and the one that gives perfect result for us is the French type 55 with a protein content of around 11%. We would recommend using a flour with a protein content around that mark because 9.5 is quite low.
Hope this helps you get your layers. Best of luck with it!
Ed & Marieke
Roland says
If anyone is still here, I love the taste and texture of croissants but hate the messiness of puff pastry. I am actually looking for somewhere I can buy non-flaky croissants.
I’m not much of a baker and like the mystery of them anyhow.
Anyone know where I can get some …or if they are called something else?
Weekend Bakers says
Maybe look for a recipe for crescent rolls, same shape but more of a enriched bread dough type thing, and it solves your flake issues…
nerinan aydin says
Super
Weekend Bakers says
Thanks!
Matthew Pitts says
I have used your recipe and instructions for the first time last night and these have been my best croissants so far, but I did notice that they were a little doughy after cooking. Could you suggest the reason? Thanks
Weekend Bakers says
Bake them a few minutes longer?
Sefie Ebrahimi says
I made it last night with little to none experiment it came out of the oven very nice , you are good teachers