

Learning and improving to get to that perfect croissant, meanwhile intensely enjoying the eating!
MAKING & BAKING CROISSANTS: THE MOVIE
This video shows us making classic French style croissants. You can find the croissant recipe with detailed description and lots of pictures here.
It also contains a time lapsed oven shot of the baking of the croissants.
You can also keep track of our croissant baking efforts through our Croissant Making Log


Rashmi alwis says
Hello there!
I made this today
But I did correctly lamination process and 1 & 2 foldings.when i’am doing 3 rd folding butter break and leak from the sides! Why is that?😊
Weekend Bakers says
We use organic butter with a high fat content and low water content (about 82% fat). A higher water content tends to make butter hard, which promotes tearing and breaking and ruins the layers. Your butter needs to be pliable and at the same time not too soft at the moment of usage.
shivam shukla says
hey! I think I just saw the best way to bake croissants. So actually your recipe is for about 12 croissants but I don’t want to bake as many at a time, maybe around 5 to 6. I can divide the amount of ingredients needed by 2 but then I am confused about the dimensions for rolling the dough. Can you please help me with this?
Weekend Bakers says
You can find your answer here :
www.weekendbakery.com/posts…questions/
See under General questions!
Franklin says
Hi, i am so exiting more to make a croisant after watcing this video.
I ever made a croisant but always confuse about the croisant result that i made. I never get the honey comb perfecly. I always thinking if that the recipe is the problem or not. But after i watch this video i will try more and do the best… Thanks for share this video. I hope you can help me if i have some problem.
Weekend Bakers says
We hope with the recipe, video, tips and questions and answer page you will be able to get a good result. Just be patient and get to know the recipe and method and with a few rounds you will see you will get good results and improve and hopefully get your honeycomb structure.
Emso says
Hi again
I can not think you enough for your response. I just want to let you know that my first try out the butter croissants come out successfully gourgeous.
The recipe is very easy to follow. But I do have something to ask:
You have two versions :
1) “one day version
2) “3 days version
I choose the 1day version and I want to know after the dough come together, you take out to form the disc on the plate , cover it and leave to proof at room temperature for 60 minutes or for 30 minutes in freezer?
Then lamination process the dough has to rest for how long?
Before to take it out for rolling.
I did read the instructions you posted but I found a little troublesome
Other than that your recipe for butter croissants is one of the best I come cross so far in web
Thank you for sharing
Regards!
Weekend Bakers says
Hello Emso,
Our one day recipe says:
cover the DOUGH with clingfilm and leave to proof at room temperature for 60 minutes.
But you start the laminating, the BUTTER slab making part that is 30 minutes into the above 60 minute proofing period.
And after the 60 minutes you start to roll out the dough and take the butter out of the fridge and seal the butter in the dough.
Then you follow the steps with the resting periods as described, so first a 60 minute period in the fridge after the first roll out and 30 minutes for the second and third.
Hope it will be OK this way and enjoy your pastry baking!
Emso says
Hi
Interesting video the way to process to finish is fantastic
and I can not wait to try by myself
Before I start it I would like to know the length and the width of one croissant and the final dough dimensions before the cutting
Tx
Regards
Weekend Bakers says
Thank you Emso,
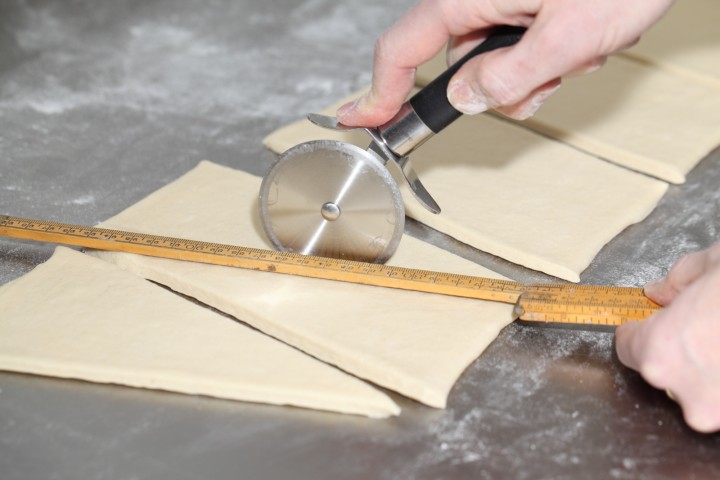
You will find all the details including all dimensions in the recipe. The final slab before cutting is 20 x 110 cm and each croissant piece after cutting is 12.5 x 20 cm. Each triangle is then carefully elongated to about 25 cm length.
Hope the recipe will be a success!
yiling says
This is the 2nd croisssant recipe that I’ve tried, after reading through countless recipes and I’ve settled. The detailed step-by-step guide is extremely useful and makes it less intimidating for novice bakers. I have since made it a few more times and realise it is quite an enjoyable process. I find that halving the portion makes it easier to handle as my tabletop is small. But the problem is the croisssants are gone too soon. 😄
Thank you for sharing!
Weekend Bakers says
Thank you so much Yiling,
This is also very encouraging for novice pastry bakers. Glad you found that with more turns, the process became more comfortable and enjoyable. Exactly like it should be.
Wishing you many more happy baking days and excellent croissants!
Greetings,
Ed & Marieke
WKB
Linda says
Hi!
I’m on day 1 of this foodie sojourn and I’m pretty sure I’ve already messed up on the dough. I made two batches to be sure, but can you tell me what the dough should look and feel like? And also, if one does not have a proper mixer, how long should we knead the dough if doing it by hand?
I used my food processor with the dough blade but I took the dough out after only a minute and a half of mixing. The dough was super “sticky”. My second batch went longer but the dough got stuck and ended up shutting the machine down after a little more than 2 minutes. The dough was super sticky again and very warm.
At any rate, I refrigerated both batches and will see how they roll out tomorrow morning.
Weekend Bakers says
Hello Linda,
The look and feel of the dough we tried to describe in the recipe and show in the video. The dough is not sticky but also not dry, so super sticky is not good. Using the food processor is not a great idea for this dough maybe and could it be you made a slight weighing mistake or did you measure the liquids, which also could account for the sticky dough?
Otherwise you should hold some back and see how the dough comes together and only add some extra if needed.
You can need by hand, and depending on your technique you should have the right moderate gluten developed dough in about 6 to 7 minutes.
Hope you are /were still able to make a decent croissant with the dough, but do not despair, for most of us it takes quite a few turns to get a really good croissant.
Good luck with it!
Andrea says
Hi! I’m on the second day of the process…let’s see how it ends! But so far so good!!
What if next Time I want to bake bicolor croissants?
I’m thinking of it…but not really sure how to pair and cut both colors.
I assume that the rising process would be half of the butter on each.
Thank you so much!
Baking Your recipe from Costa Rica
Weekend Bakers says
Hello Andrea,
The bicolor croissants that you see are not really two parts but the color comes from a thin layer that is placed on top of the cut croissant dough. This is colored with food coloring or cocoa and maybe flavored too. We are no experts when it comes to these ‘rainbow’ variations, but there are some video’s on youtube that you can look at for instructions.
The most important thing is to be able to bake a good ‘plain’ croissant first. Hope it will be good.
Greetings from Holland,
Ed & Marieke
Shanmugaraja says
Great
Francesca Renna says
Can I use beer yeast instead of instant yeast? if the answer is positive, how many grams of brewer’s yeast should i use?
thanks for your answer
Weekend Bakers says
Hello Francesca,
You could use them in equal quantities, but we would not advice it as we understand brewers yeast can give bread a bitter taste. So we would stick with instant or fresh (baker’s) yeast.
Marcus Camba says
I loved this video!!!! Do you are Engineer?
Thanks !!!
Weekend Bakers says
Hi Marcus,
Like me, lots of enthusiastic (home) bakers (and also beer brewers) seem to work in IT or used to work in this kind of profession!
Ed
Anna says
Hi there – thanks so much for this tutorial it was really helpful. It’s my first time making croissants and I made a bit of a mess ! The following went wrong:
1) the dough rose on night 1 and 2 and so did not remain flat at all
2) it started off well but then the layers were completely ruined by the end of it and the butter and dough just mixed together 🙁
3) I don’t have a food mixer and kneaded the dough by hand so it wasn’t as smooth as it should be
4) I’ve searched the internet for several other recipies and some use bread flour and others use plain flour. What is the difference ? I used bread flour for this as it was the only flour I had.
Any tips as to why the above happened and how I can improve would be greatly appreciated ! Thanks so much!
Weekend Bakers says
Hi Anna,
You just need to go through the process a few times.
Nr. 1 This is no big deal, a bit of rise is OK.
For the other questions we refer to our FACQ page, these are things that go not so great for a lot of novice bakers:
www.weekendbakery.com/posts…questions/
We would suggest to use a combination of bread and plain flour 50/50 for your next turn.
Just give yourself time to practice, this is one of the most challenging bakes. Be gentle with the dough, work very precise and use the fridge a lot to cool whenever needed is the main advice we can give.
Also read the comments with the recipe, you will learn a lot from them!
Good luck with the next bake!
Tim says
I notice in the video it says to “fold letter style and store in the ‘freezer’ for 20 minutes” after laminating (3:28) but in the recipe it says to use the refrigerator. Please confirm which is preferred?
Weekend Bakers says
Hello Tim,
Depending on the climate you live in, you can use the fridge in a moderate climate and freezer if it is warm / tropical climate. We prefer to use the fridge if possible because the dough stays more workable this way. (the freezer can be a bit too ‘aggressive’). You can leave it in the fridge a bit longer if necessary too (if it is warmer we take 30 minutes for instance), it is something you learn with practice and more batches of pastry.
Hope yours will be perfect!
Raluca from Transylvania says
Update: it was a total fail – I know you said not to fight the dough but I had to do it. There was no way to make it as beautiful and slim as you have it in the pics/video. I am just eating a freshly baked smth (I cannot call it croissant). But besides that I am trying it for the first time, and considering I can improve my technique to the point where I make it exactly like you, I find it interesting (not in the good sense) that it is so so salty. I followed the exact quantities of this recipe and used non salted butter, but I added the indicated gr in salt (12 gr ) -> it tastes like “saratele”/salty crackers. From my eating croissant experience – they should be far, far away from the saltiness of crackers. Why does this recipe require so much salt? I doubt that the layering/laminating can make such a difference in taste. If it’s salty it’s salty with layers included. Just sharing thoughts with you….. Thank you for taking the time to write this recipe and providing the step by step pictures/video.
Weekend Bakers says
Hello Raluca,
Did butter leak out maybe? The 12 grams salt is used to not only enhance the 500 grams of flour but also the over 300 grams of butter. So % wise it is correct and gives the end result a light salty taste. But it is very easy and no problem to use less salt in your next version. The salty cracker level is not at all how we would describe the saltiness.
If you want to give it another go, please try and let the dough relax in the fridge and then continue to roll instead of fighting it. Make sure you use the right flour with around 11% protein if possible and do not develop the dough too much to avoid it getting too elastic.
No worries, the first attempt is really also a ‘getting to know the recipe version’.
Katanahamon says
Reminder to set out all, all ingredients..I usually use regular yeast I proof, instant doesn’t require it. Last night I decided to start three batches, the second batch my zero pitcher decided to break at the spigot leaking pure water everywhere, and somehow in the distraction during the third batch I forgot to put the yeast in! The benefit of regular yeast is that you know it’s working for sure, and you can’t forget to put it in..oh well..a reminder lesson!
Weekend Bakers says
Thank you for sharing. At some point we all forget to put in yeast or salt in a certain bake, we are only human and we cannot help making mistakes sometimes. The trick is to get a system in place to make it as ‘foolproof’ as possible. Prepping like you suggest, checking and double checking will help big time to avoid forgetting ingredients. The other important factor in our humble experienced opinion is making sure there are no distractions while baking so you can focus on your bake and enjoy the process!
Rajh says
? SUPER thanks
sandeep says
Thanks
margie phillips says
Can you freeze these at some point? Maybe after they’ve been cut and rolled?
Loved your video! Can’t wait to try.
Weekend Bakers says
Hi Margie,
Yes, you can find all the info for this with our one day version croissant recipe:
www.weekendbakery.com/posts…nt-recipe/
Let us know how it goes!
Theron Unrath says
I love your videos so far I have used them all
Weekend Bakers says
Thank you Theron, for letting us know you find them useful. Wish we had more time to do lots more!
Dani says
HI! I found your blog yesterday and it is just precious! Everything super detailed. I took a croissant class two weeks ago, in the class the croissants came out perfect, but I have tried doing them twice with awful results. My class’ recipe is almost the same as yours. What I have noticed is that when Im making the second or third turn , the dough seems to thin and the butter goes outside through small holes. When I proof, this magnifies and when I bake, the butter just leaks out. The croissant ends up with holes 🙁 I do the mixing and kneading of the dough by hand, for how long would you recomend me to do it? I don’t know if I am knsding to short or long?… thank you!
Weekend Bakers says
Hello Dani,
Thank you for your comment. If your amounts and measurements are correct, your dough should have the right thickness. You need to be really precise and measure regularly. Butter leaking out during baking is usually a sign of underproofing. Also make sure your butter does not get too warm, so use the fridge more regularly if necessary. You can read more tips to help you here:www.weekendbakery.com/posts…questions/
Maybe try and follow just our recipe with the exact instructions and see how that goes.
Do not give up, you will get there 🙂
Happy pastry baking!
venus gargavite says
thank you so much guys you make me more inspired, godbless
Weekend Bakers says
Hope you get to try the recipe Venus! Let us know how it goes…
Zanzoona says
This is my second Comment about croissant, and every time I see your video I completely realize how much your site is the first site in the baking sites.. Definitely you are No1 👏👏👏👏👏👏👏. HAPPY EASTER TIME DEAR ALL 😘 😘 😘 😘 🌷🌸💐🌺🌻🌹🌼🐝🐝🐝
Weekend Bakers says
Thank you so much Zanzoona, for all your oh so kind compliments.
Happy Easter (baking too) to you and all your family!
Marieke & Ed
Zanzoona says
😘😘😘😘😘😍😍😍😍😍
Krystyna W. says
How was the dough prepared? How far in advance? Thanks for the details
Weekend Bakers says
Hello Krystyna,
You can find the recipe with all the details, pictures, instructions and time table here:
www.weekendbakery.com/posts…nt-recipe/
Eybee says
Can you transfer to cups and tsp/tbsp of ingredients please? I will try this soon
Weekend Bakers says
Hello Eybee,
We very much recommend weighing your ingredients. Professional bakers use scales (also in the US) and in Europe home bakers do too. A scale will give you the exact same weight every time. Which is absolutely needed if you consistently want to make good bread and especially good pastry and good croissants, one of the most challenging bakes. You can get a scale for the same price as a few sacks of good flour.
If this is not an option for you then follow these directions:
For the dough
1 lb. 2 oz. (4 cups) unbleached all-purpose flour; more for rolling
5 oz. (1/2cup plus 2 Tbs.) cold water
5 oz. (1/2 cup plus 2 Tbs.) cold whole milk
2 oz. (1/4 cup plus 2 Tbs.) granulated sugar
1-1/2 oz. (3 Tbs.) soft unsalted butter
1 Tbs. plus scant 1/2 tsp. instant yeast
2-1/4 tsp. salt
For the butter layer
10 oz. (1-1/4 cups) cold unsalted butter
For the egg wash
1 egg
Good luck with it!
sonia says
Hi
Any specific butter brand can you suggest please?! Thanks
Weekend Bakers says
Hello Sonia,
Where do you live? There are so many brands that people have mentioned already.
Denys says
Hi I made them and they came out wonderful no complaints from me but someone who tasted them said they could use a little more salt.
Weekend Bakers says
Hi Denys,
The amount of salt a person prefers is very personal and very much linked to what he or she is used to. Because too much salt is not very good for you we have found that it is very easy, especially with the use of good quality ingredients, to (gradually) lower the amount and get get used to this quickly, especially with bread. Salt can also mask other tasted if you use to much. So it is all about finding the balance.
We actually wrote an article about it which you can find here: www.weekendbakery.com/posts…h-and-why/
If you or the people you share your bakes with like just a bit more salt, it is no problem to use a little bit more in this recipe, but make sure you do not increase it too much, just 1 or 2 grams will probably already do the trick.
Dimah says
Hi,
Thank you so much for the recipe and the great instructions. I’m going to try it soon.
Can I halve the recipe?
What can I use instead of egg wash? whipping cream / milk / water only?
Thanks
Weekend Bakers says
Hello Dimah,
Yes you can. If you halve the recipe, the dough square should be 18.4 x 18.4 cm and the butter slab 12 x 12 cm. The same for the laminated dough, you must shorten only one side (otherwise you get a quarter of the original), so you end up with a 20 x 30 rectangle. The size of the final dough, right before cutting, should be 20 x 55 cm.
You can use milk or cream instead or not use a glaze at all, but do make sure the dough does not dry out during proofing.
Dimah says
Thank you so much for your reply, appreciate it.
I’ve a question:
Αfter shaping the croissants – can I keep them in the fridge to the next day (cover the baking sheet with towel, plastic wrap?) and the next day proof them at room temperature for about (2 hours or more?) then bake them?
Weekend Bakers says
Hello again Dimah,
Yes you can! You can read exactly how we do it at the bottom of this posting which also includes the one day version of our croissant recipe.
See: www.weekendbakery.com/posts…nt-recipe/
Happy pastry baking!
Dimah says
Hi,
I want to thank you for the amazing recipe. The croissants turned out flaky and so tasty. Not 100% perfect but I’m happy with the result – of course I will keep practicing.
My croissants: www.instagram.com/p/BfP9ZMinTrW/
Weekend Bakers says
Hi Dimah,
Congratulations on your result. You should feel proud of this first batch. Great color and we can judge from your picture your proofing and baking were already close to perfect.
For variations with this dough we can also recommend making these tasty pastries: www.weekendbakery.com/posts…x-raisins/
Happy baking & sharing!
Johanna Taylor says
That was great! I’m off to give it a try 😊
Weekend Bakers says
Hi Johanna,
Always love to hear about your results!
maybelle emmaru grace says
its just before christmas and i’m going to recommend your recipe to the restaurant my french boss will love your recipe,it just works brilliantly.
maybelle emmaru grace…
Weekend Bakers says
Thank you so much for both your kind comments Maybelle.
Wishing you and your boss a very happy Holiday season and an excellent New year!
Marieke & Ed
Weekend Bakery
maybelle emmaru grace says
hallo i enjoyed the video in all simplicity the illustrations are brilliant..
best regards
maybelle grace…
D. Zazzi says
Your tutorials are a great visual to understanding how to work with the different doughs and shaping etc.
Thank you, my bread baking has improved greatly.
Weekend Bakers says
Thank you Zazzi for your kind comment.
Enjoy your baking!
jimmy says
Hello Am Jimmy from Uganda a up coming pastry chef I really like your things it’s amazing .Thanks
Weekend Bakers says
Hello Jimmy,
Thank you and enjoy your baking.
Greetings from Holland,
Ed & Marieke
Henk says
I’ve been making croissants for like 8 times or more and I always fail during the tourage. During the tourage butter is coming through/out of the dough and rolling the dough becomes harder then. I put the dough with butter at the end of every fold in the fridge for 30 mins. What do I wrong?
Weekend Bakers says
Hello Henk,
The only things we can suggest without seeing what you are doing is that first of all the dough is not properly sealed (butter not sealed in) and maybe you are pressing to hard on the dough, putting your weight on it while rolling out. The fridge part is good of course. Try to work precise and gently elongate the dough without too much pressure.
The butter we use is ‘100% biologische roomboter’ (organic dairy butter) that is just the right consistency (Do not know what you use, but there can be a difference maybe, so it might be a good idea to try this butter too).
Good luck with it.
Henk says
Thank you for the reply!
KB says
Henk, I’ve had that problem in the past. The best advice is that as soon as you start having trouble getting the dough to roll out any further, stop struggling. Put the dough back in the fridge to rest for 15-20 minutes more. You’ll find the dough will roll out much easily. Put it back in the fridge every time it starts to get too hard to roll. The more you force it, the more you’ll damage the dough and break your layers. It just needs the gluten to rest periodically. Good luck!
Weekend Bakers says
Thank you for adding your excellent advice KB.
stone says
I’m just getting back into baking after many years away from it. Haven’t had time.I followed a recipe to the tee a couple of days ago. It was one that you can hit a button and they send you the ingredients. Even with my limited knowledge I felt that I was being set up for failure at every step. Just watched your video and am about to give it another go with your directions. I was right about the being set up bit (do they think they’ll sell more stuff this way). I feel very confident now. Thanks guys Stone
Weekend Bakers says
Hi Stone,
No button hitting here! Hope you will have great results with our recipe. Take your time to read the recipe and enjoy the process. Let us know how it goes.
You can also check our page with Croissant Questions for more helpful info: www.weekendbakery.com/posts…questions/
Happy pastry baking!
Suzanna says
Beautifully executed! I was looking for ideas in rolling the butter for croissants. Going to try this.
Thank you!
Weekend Bakers says
Let us know about your results Suzanna!
Sam says
I made this for the first time, I thought it worked well, except the final result was quite different inside, were yours are airy, mine are flaky layers on the outside, inside was a single doughy layer. I put the dry instant yeast directly in the dough, should I have started the yeast with hot water first? Thank you, and I’m excited to get this perfected!
Weekend Bakers says
Hi Sam,
It is no problem to put the instant yeast directly in the dough, we do this too. But something went wrong with the building up of the layers. This can have several causes but comes down to things like being new to the process and taking longer to do the steps, pressing too hard on the dough, not working with enough precision, and also the shaping, the proofing and also the baking can all be involved. It is perfectly normal to get such a result the first time. Most people need to make them 3 to 4 times to get the general feeling for the process. There is no substitute for practice and experience. There is no way to hide little mistakes in your technique when making croissants, so work very precise and follow the instructions to the letter. One small mistake is no problem but several small mistakes add up!
Hope you will give it another try and we are sure you will already see improvement.
Harrison Galante says
I actually had the same experience as Sam and have made them well in the past (so I don’t think it’s just about experience). I have 2 questions:
1) Why do you choose to use the square butter block approach as opposed to setting a small rectangle of butter inside a larger rectangle of dough, then doing a tri-fold. In this case, you start out with 3 layers, and with the square approach you start out with 2.
2) Additionally, since you start out with 2 layers and only fold 3 times you end up with 54 layers. I suspect this is why the layers aren’t as defined for people like me and Sam, because there aren’t as many of them. If you do a tri-fold with the butter block and then do 4 folds instead of 3, you end up with 243 layers. Pretty drastic difference.
I’d love to hear your thoughts! I bake a lot, but still committed to learning as much as possible.
Thanks,
Harrison
Weekend Bakers says
Hi Harrison,
May we ask if you already made a croissant with this many layers (243) or is it a theoretical question?
The possible damage to layers increases with the number of layers, so for most people 27 like we do (not 54) should give a good result, as you can hopefully judge from our pictures. For us it is not about the number but the quality of the layers. Of course other methods are valid too, if it gets closer to the result you are aiming for.
Aaron says
I’ve just attempted my first go. I took the butter from the fridge and placed into the dough to roll out, however the butter didn’t budge and I ended up with all dough at one end, my butter barely moved. Should I have taken the butter out of the fridge to allow it to soften first? Any tips? I’m pretty sure I have just ruined my first batch LOL.
Weekend Bakers says
Hi Aaron,
Yes, you are right. The butter needs to be pliable but not too soft, like we point out in the tips above the recipe. We use an organic butter with a low water content. A higher water content tends to make butter hard, which promotes tearing and breaking and ruins the layers. The butter we use has ‘at least 82%’ butterfat’. So find the right butter and make sure it has the right ‘pliability’ before rolling out.
Good luck with it!