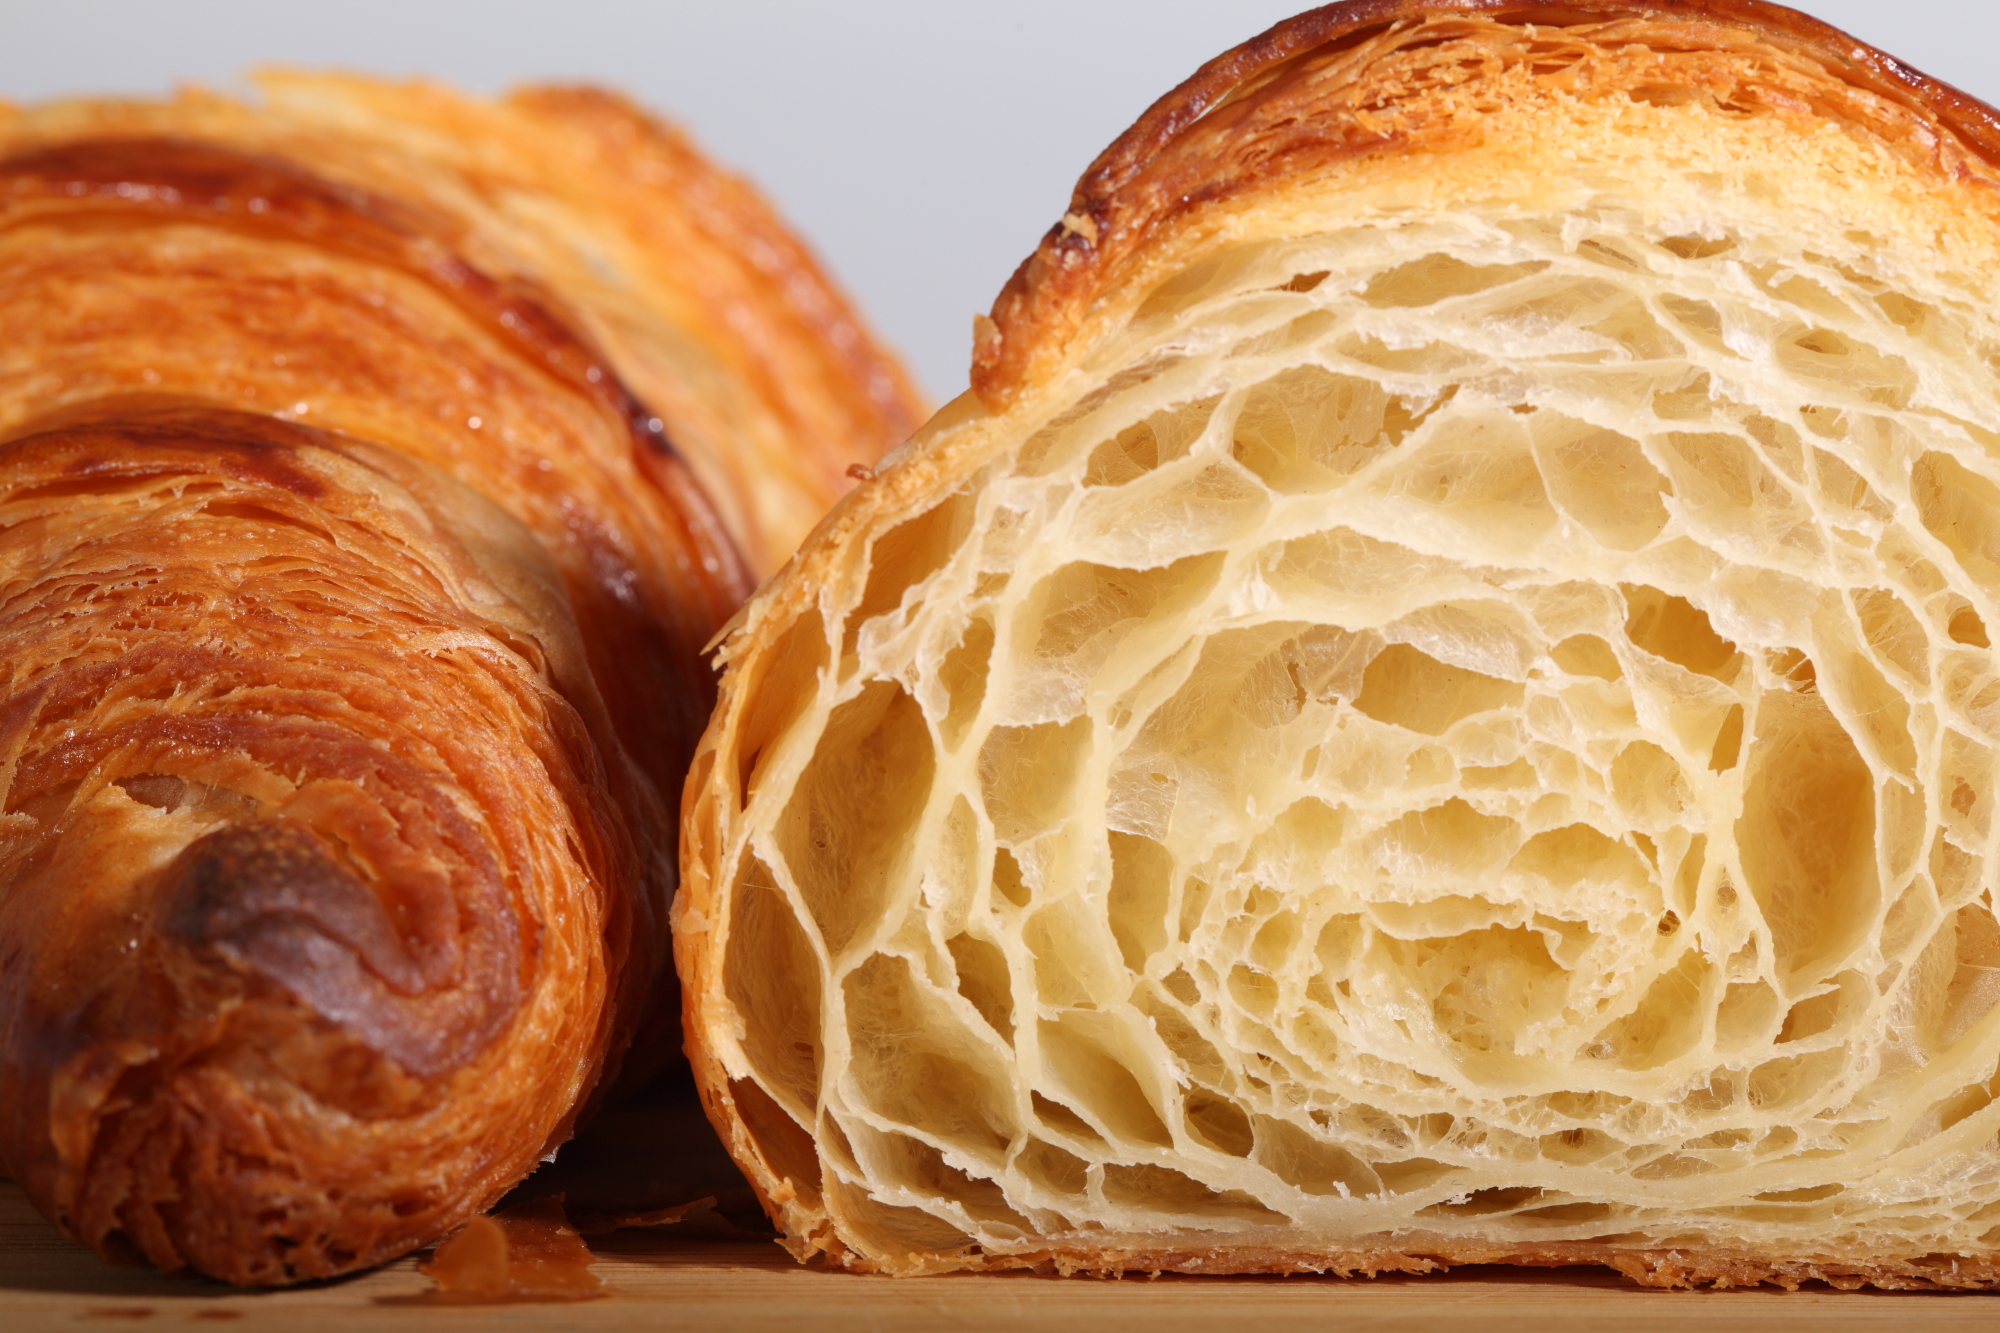
It’s all about the layers…
Klik hier voor Nederlandse versie
With this recipe we want to give you the exact directions on how we go about making classic French croissants. The recipe is an adaptation from the recipe for Classic Croissants by Jeffrey Hamelman. We started out largely following the instructions for his recipe, changed everything to our beloved metric system and found out some worthwhile croissant knowledge of our own along the way. Hopefully enough to justify sharing it all with you and inspiring you to give croissant baking a shot yourself.
Before you start we can recommend watching our croissant making video to get a general feel for the recipe. You can also check out our croissant making log where we keep track of our own croissant baking adventures. For answers to your croissant questions you can check out the Frequently Asked Croissant Questions section.
This recipe will yield about 15 good croissants plus some leftover bits which you can use to make a few, slightly odd shaped ones, or other inventive croissant-like creations.
If at first you don’t succeed, maybe you can take comfort from the fact that our first efforts were not very ‘croissant worthy’. But as you can see we persevered and got better…But we have to admit it is and always will be a tricky process. You have to work precise and be focused to get good results. So away with screaming children, hyperactive animals and all other things distracting! Put on some appropriate croissant making music and lets get to it…
Please read the following tips;


According to Raymond Calvel croissants laminated with margarine are formed into the crescent shape, while croissants laminated with butter are left in the straight form. We say, use whichever shape you like best, but do use butter!
The croissant recipe

Ingredients for the croissant dough
500 g French Type 55 flour or unbleached all-purpose flour / plain flour (extra for dusting)
140 g water
140 g whole milk (you can take it straight from the fridge)
55 g sugar
40 g soft unsalted butter
11 g instant yeast
12 g salt
Other ingredients
makes 15
280 g cold unsalted butter for laminating
1 egg + 1 tsp water for the egg wash
Day 1
Making the croissant dough
We usually do this part in the evening. Combine the dough ingredients and knead for 3 minutes, at low to medium speed, until the dough comes together and you’ve reached the stage of low to moderate gluten development. You do not want too much gluten development because you will struggle with the dough fighting back during laminating. Shape the dough like a disc, not a ball, before you refrigerate it, so it will be easier to roll it into a square shape the following day. Place the disc on a plate, cover with clingfilm and leave in the fridge overnight.


Day 2
Laminating the dough
Cut the cold butter (directly from the fridge) lengthwise into 1,25 cm thick slabs. Arrange the pieces of butter on waxed paper to form a square of about 15 cm x 15 cm. Cover the butter with another layer of waxed paper and with a rolling pin pound butter until it’s about 19 cm x 19 cm. Trim / straighten the edges of the butter and put the trimmings on top of the square. Now pound lightly until you have a final square of 17 cm x 17 cm. Wrap in paper and refrigerate the butter slab until needed.


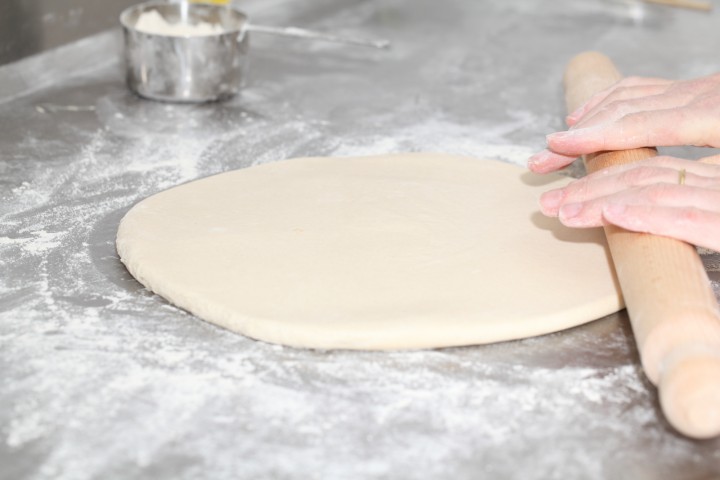
Take the dough out of the fridge. With a rolling pin roll out the dough disc into a 26 cm x 26 cm square. Try to get the square as perfect as possible and with an even thickness. Get the slab of butter from the fridge. Place the dough square so one of the sides of the square is facing you and place the butter slab on it with a 45 degree angle to the dough so a point of the butter square is facing you. Fold a flap of dough over the butter, so the point of the dough reaches the center of the butter. Do the same with the three other flaps. The edges of the dough flaps should slightly overlap to fully enclose the butter. With the palm of your hand lightly press the edges to seal the seams.
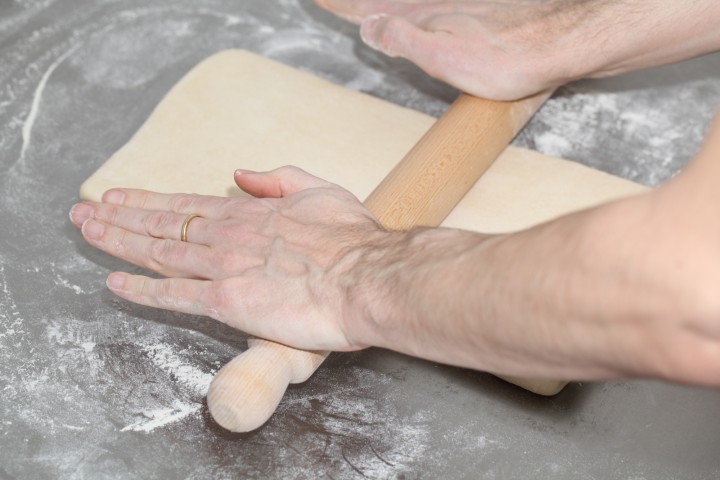
Now the dough with the sealed in butter needs to be rolled out. With a lightly floured rolling pin start rolling out, on a lightly flour dusted surface, the dough to a rectangle of 20 x 60 cm. Start rolling from the center of the dough towards the edges, and not from one side of the dough all the way to the other side. This technique helps you to keep the dough at an even thickness. You can also rotate your dough 180 degrees to keep it more even, because you tend to use more pressure when rolling away from you than towards yourself. You can use these techniques during all the rolling steps of this recipe. Aim at lengthening the dough instead of making it wider and try to keep all edges as straight as possible.
Fold the dough letter style, cover with clingfilm and refrigerate for 30 minutes (fold one third of the dough on top of itself and then fold the other side over it). Repeat the rolling and folding two more times (ending up with 27 layers of butter in total), each time rolling until the dough is about 20 cm x 60 cm. After each fold you should turn the dough 90 degrees before rolling again. The open ‘end’ of the dough should be towards you every time when rolling out the dough (you can see this in our croissant making video at around 3:40 minutes). After the second turn, again give it a 30 minute rest in the fridge. After the third turn you leave the dough in the fridge overnight until day 3, the actual croissant making day!
- Roll out to 20 cm x 60 cm
- Fold
- Refrigerate 30 minutes
- Rotate 90 degrees
- Roll out to 20 cm x 60 cm
- Fold
- Refrigerate 30 minutes
- Rotate 90 degrees
- Roll out to 20 cm x 60 cm
- Fold
- Refrigerate until day 3
- Rotate 90 degrees
- Roll out to 20 cm x 110 cm
Also see complete time table at bottom of page


Day 3
Dividing the dough
Take the dough from the fridge. Lightly flour your work surface. Now very gently roll the dough into a long and narrow strip of 20 cm x 110 cm. If the dough starts to resist too much or shrink back during this process you can fold it in thirds and give it a rest in the fridge for 10 to 20 minutes before continuing. Do not fight the dough, when the dough refuses to get any longer, rest it in the fridge! It is such a shame to ruin two days of work.
When your dough has reached its intended shape, carefully lift it a few centimeters to allow it to naturally shrink back from both sides. This way it will not shrink when you cut it. Your strip of dough should be long enough to allow you to trim the ends to make them straight and still be left with a length of about 100 cm.


Shaping the croissants
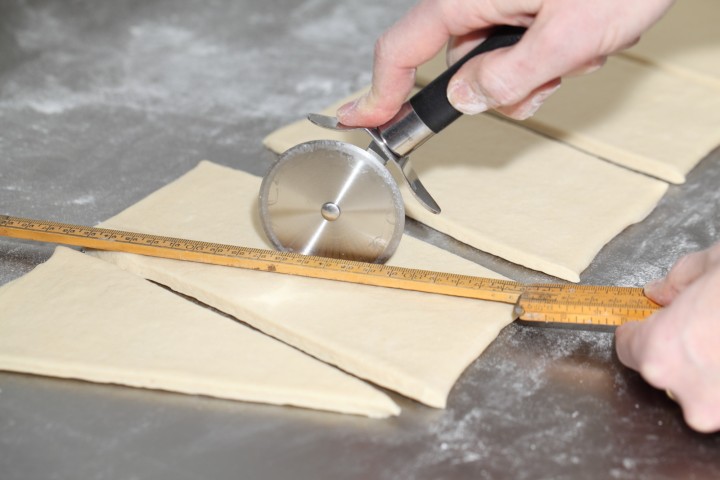
For the next stage you will need a tape measure and a pizza wheel. Lay a tape measure along the top of the dough. With the wheel you mark the top of the dough at 12,5 cm intervals along the length (7 marks total). Now lay the tape measure along the bottom of the dough and make a mark at 6,25 cm. Then continue to make marks at 12,5 cm intervals from this point (8 marks total). So the bottom and the top marks do not align with each other and form the basis for your triangles.
Now make diagonal cuts starting from the top corner cutting down to the first bottom mark. Make diagonal cuts along the entire length of the dough. Then change the angle and make cuts from the other top corner to the bottom mark to create triangles. Again repeat this along the length of the dough. This way you will end up with 15 triangles and a few end pieces of dough.
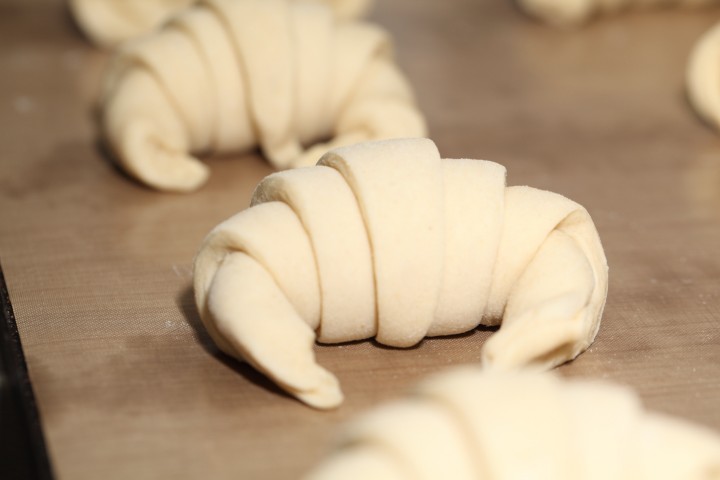
Using your pizza wheel, make 1.5 cm long notches in the center of the short side of each dough triangle.
Now very gently elongate each triangle to about 25 cm. This is often done by hand, but we have found that elongating with a rolling pin, very carefully, almost without putting pressure on the dough triangle, works better for us. You can try both methods and see what you think gives the best result.
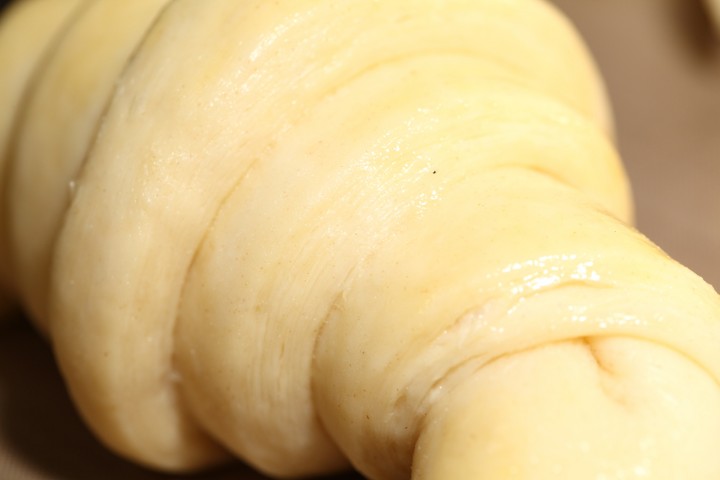
After you cut a notch in the middle of the short end of the triangle, try and roll the two wings by moving your hands outwards from the center, creating the desired shape with a thinner, longer point. Also try and roll the dough very tightly at the beginning and put enough pressure on the dough to make the layers stick together (but not so much as to damage the layers of course).
Proofing and baking
Arrange the shaped croissants on baking sheets, making sure to keep enough space between them so they will not touch when proofing and baking. Combine the egg with a teaspoon of water and whisk until smooth. Give the croissants their first thin coating of egg wash. You do not need to cover the croissants with anything, the egg wash will prevent the dough from drying out.
Proof the croissants draft-free at an ideal temperature of 24ºC to 26.5ºC / 76ºF to 79ºF (above that temperature there is a big chance butter will leak out!). We use our small Rofco B20 stone oven as a croissant proofing cabinet by preheating it for a minute to 25ºC / 77ºF. It retains this temperature for a long time because of the oven stones and isolation. The proofing should take about 2 hours. You should be able to tell if they are ready by carefully shaking the baking sheet and see if the croissants slightly wiggle. You should also be able to see the layers of dough when looking at your croissants from the side.


Preheat the oven at 200ºC / 390ºF convection or 220ºC / 430ºF conventional oven.

Right before baking, give the croissants their second thin coat of egg wash. We bake the croissants in our big convection oven for 6 minutes at 195ºC / 385ºF, then lowering the temperature to 165ºC / 330ºF, and bake them for another 9 minutes. Hamelman suggest baking the croissants for 18 to 20 minutes at 200ºC / 390ºF , turning your oven down a notch if you think the browning goes too quickly. But you really have to learn from experience and by baking several batches what the ideal time and temperature is for your own oven. Take out of the oven, leave for a few minutes on the baking sheet, then transfer to a cooling rack.
Latest way of baking; We heat up our double fan big convection oven at 200ºC, when heated up put the croissants in the oven and directly lower it to 175ºC. We bake them for 10 minutes at 175ºC, they will have a nice brown color by now, then lower the temperature to 150ºC, and bake them for another 6 minutes.
Best eaten while warm and fresh of course. Croissant we don’t eat or share within a day we freeze. We put them in the preheated oven (180ºC / 355ºF) for 8 minutes straight from the freezer. Nothing wrong with that, croissants eaten nice and warm, almost as good as the fresh ones…almost!
Croissant Time Table
Times are an indication and also depend on your experience with the recipe
Try to work swift but precise and take extra fridge time if needed!
Day 1 – Make initial dough
- 21.00 h – Knead for 3 minutes and store in fridge for 12 hours
Day 2 – Laminate the dough
- 09.00 h – Make butter slab and refrigerate till needed
- 09.05 h – Roll dough disc into square
- 09.10 h – Seal butter in dough
- 09.15 h – Roll out to 20 cm x 60 cm and fold
- Refrigerate 30 minutes
- 09.50 h – Rotate 90 degrees
- Roll out to 20 cm x 60 cm and fold
- Refrigerate 30 minutes
- 10.25 h – Rotate 90 degrees
- Roll out to 20 cm x 60 cm and fold
- 11.00 h – Refrigerate until day 3
Day 3 – Dividing, Shaping, proofing and baking
- 09.00 h – Roll out to 20 cm x 110 cm – part 1
- 09.05 h – Often needed! Take 20 min. fridge time if length not in one go
- 09.25 h – Roll out to 20 cm x 110 cm – part 2
- 09.30 h – Divide and shape the croissants
- 09.40 h – First coat of egg wash
- 09.45 h – Proof to perfection (indication 2 hours)
- 11.45 h – Second coat of egg wash
- 11.50 h – Bake for 15-18 minutes
- 12.10 h – Ready!
Hi Ed and Marieke, many thanks for the great recipes – we love your 24hr pizza and the different sourdough boules so thought it time for a next challenge. First attempt was fairly ok, second one though the outer layer broke for part of the dough.
In hindsight I should probably have taken more freezer time and perhaps use more flour on the table top. Will try for batch 3.
Two questions though:
1/ where do you buy t55? Is this regular tarwebloem from de Zandhaas? I looked for specific t55 and the only once I can find in NL are those with additives. Now used a mixture of t45 (75%) and tarwebloem (both molen de hoop).
2/ how do you ensure equal “thickness” along the entire dough length? Toward the edges my dough ends up much thinner. Still nice but makes for much smaller croissants.
Thanks!
Ronald
Hello Ronald,
Great you are diving into the pastry baking and croissant making. Yes, you are right that some T55 flour can contain some additives sometimes. If it is only ascorbic acid (Vitamin C) that is not a big problem. We have used flour that we bought in Belgium and France, but that is not a great option now. The alternative we use is the Italian flour from Caputo: shop.italieplein.nl/produ...aputo-1kg/
It works well for us, so maybe give it a try.
About the thickness, this can be helped by using a different rolling technique. Turn your dough frequently and roll to one side, away from you and not to you, just focus on the elongating. Resist the temptation to press harder when you get to the edges (this is something a lot of people do unconsciously).
Enjoy the process and the croissants!
Hi
At last i got it right after 3 times trying this recipe.
Thank you for your guidance
Happy we were able to help Zailan!
Hi,
If I want to use fresh yeast instead of instant yeast, how many grams should I use?
Hello Catarina,
In general you triple the amount, so that would mean 33 grams of fresh yeast, however it is our experience (at least with the fresh yeast we use here, which tends to a little bit more ‘enthusiastic’ than the instant yeast) that 25 grams of fresh yeast is the right amount for the croissant recipe.
Enjoy your pastry baking! Hope it will be great.
I have the most success making the croissants with your recipe! they turned out beautifully and so flaky and light. Thank you for the recipe. I would love to increase the dough amount next time. Would it still work I add 1/4~1/2 each of the ingredients to the dough?
Hello Joyce,
Thank you that sounds wonderful. We would make a double batch and divide this in two and stick to the instructions /measurements given. Adding 1/4 for instance would mean making some recalculations for all the steps. Making an extra 1/2 you could do this by then dividing the batch into 1/3 and 2/3 and then follow our instructions on how to work with halve the amount of dough from the original recipe:
If you halve the recipe, the dough square should be 18.4 x 18.4 cm and the butter slab 12 x 12 cm.
Put the butter slab on top of the dough square and wrap the butter.
Roll the dough into a 20 cm x 30 cm rectangle.
Fold letter style to a 20 cm x 10 cm rectangle.
Turn dough 90 degrees.
Roll from the short 10cm side to a 20cm x 30cm rectangle (the short 10cm side will get 30cm).
Turn dough 90 degrees.
Roll from the short 10cm side to a 20cm x 30cm rectangle (the short 10cm side will get 30cm).
Turn dough 90 degrees.
Roll from the short 10cm side to a 20cm a 55cm rectangle (the short 10cm side will get 55cm).
The size of the final dough, right before cutting, should be 20 x 55 cm.
Although it is possible to use halve the dough we advise to make the full recipe as described in the recipe as the geometry of the shapes are much easier to work with.
You can always use halve and freeze the other halve.
To us this just seems like a lot of work for not so much yield, so we would always make a double batch ourselves, like suggested above.
Enjoy!
That makes more sense! Thanks for your reply and l look forward to making more of these wonderful croissants!
Hi I live in a tropical country where it’s above 30 degrees Celsius everyday. Any tips on how I can proof my croissant without the butter leaking out?
Perfect recipe trebled the recipe 45 perfect croissant and 8 pain au chocolate with the left overs , I didnt add any warmth in the warming cabinet to prove though as enough warm air temp at this time off year using the adjusted cook times further down the recipe worked a treat.
Thanks for sharing Trevor!
Hi Amelia,
If you scroll down the comments (see especially around the end of May) you will find a lot of helpful info from other bakers about this very subject.
We also got some tips for you in this section under general questions:
www.weekendbakery.com/posts...questions/
When i use convection oven, does it mean with fan forced or normal baking?
With fan Zailan!
Hi
I made one batch during the weekend. It turned out great. Didn’t get the nice honeycomb structure but there is resemblance. What went wrong? Use unbleached all purpose white flour. I proof for about 2 hrs. It puffed in the oven.
Hello Zailan,
We think you still might have slightly damaged the layers during lamination and rolling. So it is very important not to press on the dough and work precise. If the dough resists, do not try further but let it relax in the fridge more often if needed. And make sure they proof under the right conditions. So it is really handy to be able to measure the temperature of your dough at several stages. If the dough gets too warm when proofing for instance, butter can also be incorporated back into the dough, affecting the layers.
Another suggestion is to check your true oven temperature, to make sure your oven is working properly and your baking temperature is accurate.
You can see how this works here: www.weekendbakery.com/posts...your-oven/
We know it is a lot and many things have to come together to get it right, but it is our experience that most often, with practice and more experience, and attention to accuracy comes a faster pace when handling the dough and much improvement can be seen.
Good luck with it!
Ed & Marieke
Hi
I could get wonderful soft fluffy croissants with series of well defined layers. This is my second attempt. I took extra care in kneeding and did proofing well. Thank you all for the great recipe and support.
I greatly appreciate the immediate response to all my queries.
Regards
Prometheus George
Glad we can help you and give you the support to get a good result.
Enjoy your baking this weekend!
Ed & Marieke
If I would like to half the recipe, please could you give me the measurements I should follow.
Hello Ava,
If you halve the recipe, the dough square should be 18.4 x 18.4 cm and the butter slab 12 x 12 cm.
Put the butter slab on top of the dough square and wrap the butter.
Roll the dough into a 20 cm x 30 cm rectangle.
Fold letter style to a 20 cm x 10 cm rectangle.
Turn dough 90 degrees.
Roll from the short 10cm side to a 20cm x 30cm rectangle (the short 10cm side will get 30cm).
Turn dough 90 degrees.
Roll from the short 10cm side to a 20cm x 30cm rectangle (the short 10cm side will get 30cm).
Turn dough 90 degrees.
Roll from the short 10cm side to a 20cm a 55cm rectangle (the short 10cm side will get 55cm).
The size of the final dough, right before cutting, should be 20 x 55 cm.
Although it is possible to use halve the dough we advise to make the full recipe as described in the recipe as the geometry of the shapes are much easier to work with.
You can always use halve and freeze the other halve.
You can find this answer and more answers to fAQ’s here too:
www.weekendbakery.com/posts...questions/
Dear Marieke & Ed. I have never made croissant before, but have just spent the last three days following your recipe. I wasn’t very confident, as I am not a very good cook or baker. Followed it to the letter (apart from my edges that weren’t always straight), and have just produced the most delicious and lovely looking croissant ever! I am very pleased with myself, especially for a first attempt. It is a shame I cannot send the smell and taste of them via the internet! Taken some pics, but don’t think can post them on here? Thank you for the recipe. I actually halved the first bit after Day 1, so have half left to make some more for the weekend! Yum
Hello Paul,
Excellent, so glad it turned out this way. If you want you can post pictures in our ‘yourloaves’ section:
www.weekendbakery.com/send-...your-loaf/
Always happy to see the results.
Wishing you happy pastry baking days and enjoy the eating and sharing this weekend too!
Ed & Marieke
WKB
Hi again Marieke & Ed. Pics added now!
Thank you Paul, they are now visible: www.weekendbakery.com/your-loafs/
Love this recipe! Made beautiful croissants, but I also made some into the most delicious almond croissants, I live in a small town and these are not available anywhere!
Easy recipe, takes a little time but easy. Thank you so much!
We love it too Amanda, thank you so much for trying the recipe and your feedback.
Enjoy your pastry baking!
Ed & Marieke
This recipe was great! I made them for my family and nearly half were devoured in 1 day!! This was my first time making any sort of pastry and it totally worked. I think that they might have been a bit smaller than the photos, but that’s okay! I also made this in the summer in Canada and it worked out. I just chose a cooler day and wasn’t afraid of chilling time. The hardest part was rolling it out to 20×110, but I used extra chilling time and just kept patient. I really didn’t think that these would work out but they are phenomenal!
Hello Clarisse,
So happy with your comment. This is exactly the right ‘baking attitude’ for getting a good result! Choose your moment, no pressure, take your time, concentrate on the bake at hand, use the fridge if needed…e voila: Lovely croissants. You should be proud of this result.
Enjoy and greetings from Holland to beautiful Canada,
Marieke & Ed
WKB
By d way I have another question ; why my dough was reproofing every time I was refrigerating it?
It depends a bit on the temperature of the dough going in and that of the fridge but a tiny amount is not a problem. But the thing is to get enough practice so you can do a fold in about one minute, maximum two, then back in the fridge. This way the dough will stay cool and you will see less reproof.
Many thx really
Thank you so much for these amazing instructions and helpful video. I bake a lot of bread, but my first attempt at croissants! Most tricky bit was the final rolling out and shaping, needed to return to fridge a couple of times, difficult to get consistent thickness, but the end result was brilliant, amazing flavour and texture which took me back to the memory of holidays in France when I was young. Wow!
Used T55 French flour from Shipton Mill.
Oven is a bit temperamental, but started at 200 deg, then turned straight down to 180 for 20mins.
I swear I will never buy shop croissants again.
Hi Peter,
It could not have gone any better as a first attempt we think. Excellent!
Hope the next rounds will be equal if not better, because you will see you can speed up the process and need the fridge a bit less, because you are familiar with the steps and the dough.
If you want to change it up a bit, these pastries are excellent and made with the same dough:
www.weekendbakery.com/posts...x-raisins/
Enjoy your pastry baking and thank you for sharing your experience with the recipe!
Ed & Marieke
WKB
Hi there
Well, upon d given instructions I’ve worked with my dough and d first day was great but the next day d second time I rolled it for d second and d dough started to tear up while rolling and d butter started to come out🙈🙈I’ve fold it again refrigerate it again, what should I do d 3rd day ,should I freeze it tonight and try to roll it again tonight? Need help
Hi Caroline,
We think your dough was possibly too dry (the flour you use might absorb more liquid) or you were a bit ruff handling it, putting too much pressure on it / pressing on it with your weight. The layers are damaged and this means the croissants will not be as good as you hoped.
We think some of the answers we give in our FACQ section and the comments with it could inspire you for a next bake:
www.weekendbakery.com/posts...questions/
Many tanks I assumed later that I did put pressure over my dough
Knowing that I used also 0 type of flour🙈 but I didn’t had any butter Leaking while baking
Will give it another try definitely and thanks for ur prompt replies and feedback
Thanks for the recipe, I have tried to make this recipe and have had a lot of trouble in the laminating step. At the second fold I find that the butter breaks into chunks poking through the dough and when i bake it I find that the butter leaks out and I end up with heavily buttered bread. Can you provide some advice on how to gauge whether the butter/dough is too hot or cold or some techniques to understand this?
Hello WY,
If you scroll down to previous comments and answers you will see this is probably the most asked and answered question. So, you are not alone.
In short, you need to choose the right type of pliable butter with right fat content like we describe in the recipe. So the butter should be just pliable which happens at a around 21 to 22 Celsius. Butter leaking out is due to under-proofing, so try to proof for longer and at the right temperature like we suggest. You can read more about it in our FACQ section under butter and proofing and the comments with both the recipe and FACQ page:
www.weekendbakery.com/posts...questions/
Good luck with it!
Hi,
I have been attempting croissants for 3 months and on a few occasions, have achieved success. But, I have a number of issues I hope you can help me with. I use T55 flour (Grand Moulin de Paris) and butter @84% fat.
1) what are the reasons that my croissants sometimes flatten after baking (proofing is around 2 hours @ 25°C – 27°C
2) I seem to get a better result if I substituted water for the milk and reduce the total quatity to approx 48% of the flour weight (for example : 240g water to 500g flour, instead of 280g). Why?
3) if I used the milk and water combination in the dough recipe (140g water and 140g milk, I get a somewhat sticky dough and is quite soft when rolling out (even when it has been rested in the fridge during lamination). The end result is a flatter shape !
Can you help?
Hello Audie,
If you have success and then less so, there must be something you are doing differently or conditions must be different. It could be a humidity issue maybe, but we cannot be sure.
Your second ‘issue’ can be partly explained by the fact that milk has mild solids in it and for that reason water gives more hydration and you need slightly less of it.
We can suggest trying a milk with a lower fat content maybe.
Also, even though you use the same type of flour, it can act different from ours. When also taking your conditions and other ingredients into account it could be you need slightly less liquid than we use. Always look at the dough and see what it needs. This can also change with the weather and each bag of flour, so hold some liquid back and see how the dough comes together and if it needs more.
Good luck with it!
Thank you for your advice and will work on getting the dough structure right.
Hi
I would like to know what is wrong with
salted butter. It is probably a stupid question
but the butter here in Ireland is so nice ! and
salted…
Hello Janna,
Not at all, it is just a choice you make to control the amount of salt in your baking. Using unsalted butter is the easiest to use for most people, because you do not have to calculate the amount of salt in the butter and then the addition of extra salt to get to a certain amount. Using salted butter and the amount of salt in this recipe would be too much salt in our opinion. So yes, you can use salted butter, but you have to decide how much extra salt you want to add to the dough to avoid a too salty end result.
Hope you will be able to give French croissants with Irish butter a go!
Greetings from Holland,
Ed & Marieke
Honestly the most flawless croissants I’ve ever made! And I’ve made quite a few. This recipe is perfection, thank you so much for sharing!
Thank you so much Wendy, we very much appreciate your feedback, coming from a baker with clearly a lot of pastry baking experience.
Enjoy your baking!
Hi,
I only have a hand mixer at home and the lowest speed of it is still quite fast for me. can I use it to mix the dough or should I just use my hand? I’m afraid the dough will not reach the perfect consistency. If I can use a manual hand kneading, can you suggest me how much time do I need to knead? thank you very much
Hello Anya,
We would suggest to knead this dough by hand. It only has to be developed to moderate gluten development and we expect you to reach this in 5 to 7 minutes, depending on your technique. The dough is not that sticky and quite easy to handle we think.
Good luck with it!
I have bread flour protein content around 13.2 can this be use or i have to mix with plain flour to have a balance . As my country doesnt sell the french flour.and if the country i am staying is a hot country can i proof with my room temperature with the dough cover ? Thanks you
Hello Ellaster,
Yes, we would advice to make a combination with plain flour for a better handling of the dough. When proofing the main point is to not go over around 26C temperature otherwise butter will leak out.
With this recipe you will find tips at the bottom on how to use the fridge for retarded proofing:
www.weekendbakery.com/posts...nt-recipe/
Good luck with it!
Hi
I made this recipe exactly as written and my dough was really good but I don’t have a Appropriate oven so I use my little oven toaster, when I cut my Croissant it was raw at the center of it 😭😭😭 but it was proof very well on zest and I was put all that on trash
Please help me whit your point and advise to figure out my mistakes and make it better at next time.
Very sorry Arash, but we are afraid your oven is not very well suited to make pastry. A very small oven looses heat very quickly, especially when you put a lot of cold dough in it. Maybe next time you could use the bigger household oven of a friend or neighbor to get a better result.
Hello, i just made your recipe and it was delicious. The dough rolled out beautifully. I had a couple of minor problems and i wonder if you can answer.
Due to time constraints, I had to laminate on morning of day 2, and create the triangles and bake about 6 hours later, same day. Additionally, when I did the proving for 2hrs, I proved them in oven with the light on but no heat. They did enlarge nicely during the proving. But on the top tray near the light, some of the butter melted out. Then when putting the trays in oven to cook, the trays were awkward to fit in and there was some clunking/bumping of the trays. The croissants came out delicious and brown, and crispy, but slightly flatter than I would have hoped. Do you know which of these issues would have caused them to be flatter than expected? thank you
Great to read your comment Jill. A lot went right and the things that went wrong you already hint at yourself. The oven light caused a hot spot that hopefully can be avoided next time. Bumping never helps of course when you bring well proofed things to the oven, but if you did not notice any sagging immediately afterwards, that might not have been the (main) culprit for the flatter result. It could also be the flour (quality) you use, for instance if you use flour with some fiber in it that is not as light as the French type 55 we use. The main thing is the inside structure that can still be good, even though you have a slightly flatter shape. If you do not have a honeycomb-like structure yet, next time (next to maybe changing flour) make sure you can do the whole process as described and we are sure it will improve your result.
Enjoy the pastry baking!
Thank you! I will take the advice on board!
Do you have a recommended flour protein content to use? Is higher or lower preferred? Thanks!
Hello JJ,
The flour we use is Type 55 French flour with around 11% protein. We would not recommend higher / stronger bread flour as it makes the dough harder to work with and the end result more ‘heavy’.
Higher, the best flour for croissants has to contain a minimum of 14 g proteins for 100g of flour.
That is interesting. Can you please tell us the source of this information? Do you mean you use Manitoba type flour for your croissants?
Hi
I used the recipe and I should say it was great for a novice like me.The croissants did shape out well before baking. How ever when they came out of oven did not fluff as expected and though layers were there it mostly oily. Can you suggest what should I do to avoid this again and to get dry fluffy ones
Hello George,
This could be a result of under-proofing, so make sure you proof at the right temperature and take the time to proof to perfection and get that nice wobble in your dough. It could also be you were not as meticulous as needed during the lamination process, so stick to the measurements, make sure they are as exact as possible, the edges are straight and follow our laminating instructions carefully.
For more suggestions and experiences read the comments below with lots of recognition from other bakers (you are not alone of course in not having perfect croissants as a novice pastry baker!
Also check out our questions and answer page:
www.weekendbakery.com/posts...questions/
Enjoy the process!
Hi
Thank you for the detailed reply. Is it ok I do the proofing at room temperature which around 30c at the shade out of AC in United Arab Emirates.
Or
Can i use the oven itself which is heated and switched with doors open. In fact I did this for two hours prior to backing.Would appreciate a detailed response from your end.
Regards and Best Wishes
Prometheus George
Hello George,
Please read the instructions in our recipe carefully. It says it is important to do the proofing at no warmer than 26.5 C otherwise butter will almost inevitable leak out!
So you need to be able to measure the temperature of the dough, the surroundings and the inside of your oven if you are going to use this.
If it is too warm please check our tips for using the fridge for proofing (see bottom of this article):
www.weekendbakery.com/posts...nt-recipe/
Good luck with it and always keep an eye on your dough!
If I make half recipe
What the exactly the size of the dough laminate ? For example 20×30 ? Or another size ?
And what the best temperature I have to use ( 20 minutes on 200c )
Or ( 195c 6 minutes then young down to 165 c )
Best regards
In this section under ‘general recipe’ you will find the instructions for making halve the dough:
www.weekendbakery.com/posts...questions/
We always advice to make the whole recipe and freeze the other halve of the baked croissants (works perfect). The process just works better and easier and you reap more rewards from your labors.
Thanks you so much
Finally got around to making croissants following all your steps. They were demolished very quickly. Absolutely delicious. We have cooler weather here in Victoria Australia so that helped with laminating process. Thanks again for the recipe and tips.
Hello Carolina,
Wonderful to read your comment about the successfull pastry baking 🙂
Enjoy more baking and the cooler weather, that must be nice!
Another recipe to enjoy is this one, with the same dough:
www.weekendbakery.com/posts...x-raisins/
Greetings from Holland (in need of rain ‘funnily’ enough)…
Marieke & Ed
WKB
Has anyone tried to make chocolate babka using this croissant dough?
We must confess we have never made a babka of any kind (yet). Maybe this is a good article for you for inspiration.
www.seriouseats.com/2015/...k-nyc.html
Seems no problem to use this dough, though 🙂
Not Babka, but I did add some cinnamon, cardamon and such (~5 gr) to the butter slab (mixer, shape, cool overnight) and followed the rest of the recipe. Since this takes the croissants to a sweeter direction, once out of the oven, I gave them a simple syrup wash. Loved the results.
Thank you for this suggestion, that is delicious, we can almost smell it! very much worth a try as a variation on the theme. It would also be very good to make these Breton pastries this way we think:
www.weekendbakery.com/posts...y-caramel/
Followed this recipe and they turned out great! I preheated oven (regular oven) to 230 degrees, popped croissants in and immediately turned down to 190 and baked for 10 mins then lowered temp to 170 and baked for another 7 mins.
The link to the FAQs is extremely useful and a great place to find answers.
Thanks so much for the level of detail in this recipe!
Suggest an alternate timing. Start in the morning of day one. 12 hrs later, you can start laminating, refrigerate overnight and divide/bake the next day.
Thank you, we like this method / schedule. For some more variations on this theme plus our own tips on retarding and freezing :
www.weekendbakery.com/posts...nt-recipe/
Hello. Thank you for the wonderful recipe and for the abundant and straightforward explanations. I have two questions. 1: quantity of yeast for 5 kg flour because I’ve been told that the higher the flour quantity the lower the amount of yeast. 2: how should I correlate to the thickness of the butter slab and dimensions to the thickness of the dough and its dimensions to form the envelope in higher amounts of flour lets say 2kg. Thanks in advance
Can you tell us what your source is for the less yeast with more flour suggestion? We wonder, have you ever baked croissants (with this recipe too) and would you want to start with such a large amount of flour and butter? Isn’t it better to try a smaller batch first?
Thank you so much for the recipe. I made croissants before but this was the first time I made this recipe and it turned out perfect. It was really close to ones I had in Paris.
Thank you Rabia, that is a wonderful compliment, but you should also be very proud of your own accomplishment. It is one of the most challenging bakes!
Enjoy the pastry baking and eating
croissant was great.
great recipe.
Thanks.
Thank you Amir for using the recipe!
Perfeita, mas un tanto trabalhosa.
We understand, but the result is worth the effort. You can also try our one day recipe, the result will be also good and it is / feels quicker:
www.weekendbakery.com/posts...nt-recipe/
Disfrutar!
Hi, hope you are well through the epidemic…
We have not tried your recipe but another and our croissants get flooded with the melting butter even though we are using the right amount of butter.
We will try yours tomorrow, and would like to know what we should watch out for as the temperatures are really high in India.
Thanks
I live in trinidad which is just as hot as India. I roll on a plastic table which doesn’t transfer as much heat to the dough and in air conditioned room. I also make sure to not have the dough out more than a few minutes, or it goes back in fridge.
Hello, so happy to hear comments from someone who understands hot weather. So they say let the shaped croissants proof at room temperature. But its over 40 degrees C (100 degrees F) here in New Delhi. How long should we let them proof? I’m worried the butter will all melt within minutes.
Thank you
Hi Vandana,
I am from Jaipur and have started making croissants just recently so I can totally understand your pain 😋.
Id suggest firstly not to use the easily available Amul butter, no matter the temperature it will end up melting. I’ve sourced President butter and it stays malleable much better and it doesn’t melt easily.
Secondly try and keep Air Conditioning on in the room next to your kitchen or make these early in the morning or late in the evening when temperatures are lower.
I proof them for between 1-1.5 hours by keeping them in the oven which is kept switched off.
Thank you Vatsal, we admire you for baking pastry under these conditions and we thank you very much for sharing these tips too.
Greetings from Holland,
Ed & Marieke
WKB