
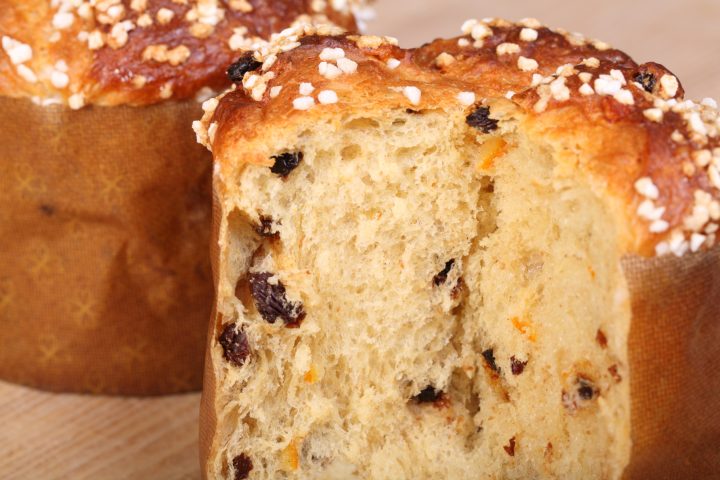
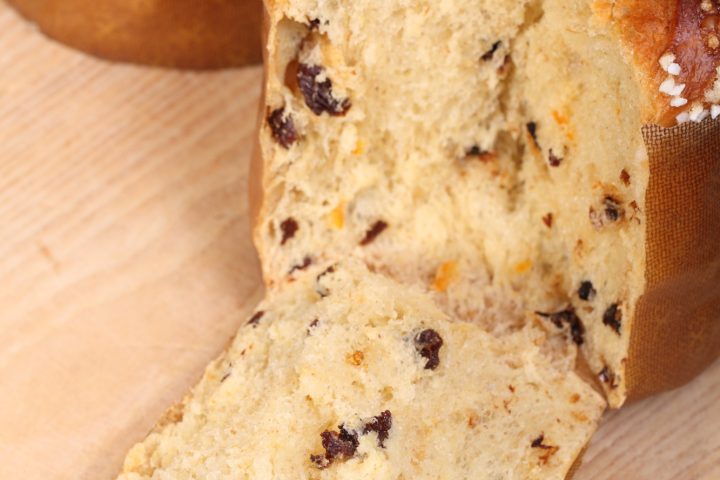
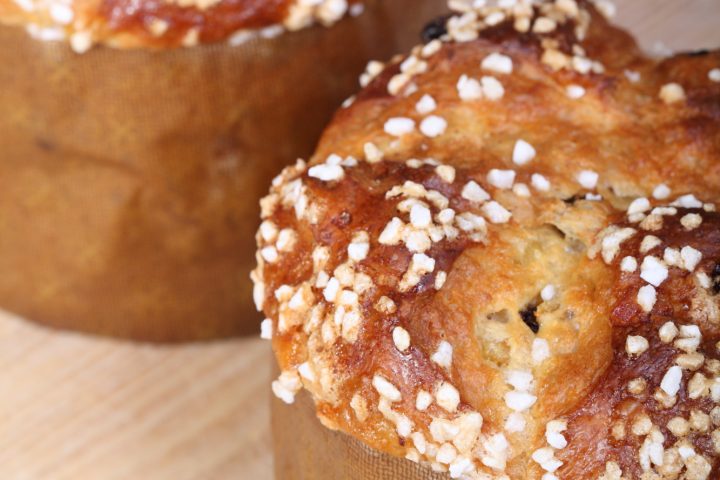
This Italian festive bread is the fluffiest we ever baked!
Klik hier voor de Nederlandse versie
This is a journey to find the ultimate panettone recipe, like the road we traveled to get to the best croissants.
We always take our time and go through several attempts to learn and adapt and modify until we are satisfied with our (version of) a recipe.
So we started the panettone adventure one Christmas and had our favorite version somewhere before Easter the following year.
Baking a good traditional panettone was always on our list. We baked panettone-like breads in the past, but never the original version with sourdough and long mixing and fermentation times.
We think this recipe is good enough to share with you and will give great baking fun! And of course we will keep adding more detail, tips and tricks as we gain more experience with future bakes and answer any questions you might have in the comment section below.


Update 1
We baked the panettone several times and each time with great result and very much to our satisfaction. Because we liked it so much we did not change much. We did add the pearl sugar after the first try, which we like a lot because of that extra crunch to accompany the fluffiness. We made a version with candied peel, but have to say we still do not mind leaving it out and adding some cranberries for example, because the peel needs to be of great quality and not too overpowering to make it work.
We are also not a fan of the addition of essences or (artificial) panettone aromas, as they tend to overpower and coat the inside of your mouth a bit too intensely.
Update 2
We made a video of the panettone making process, so you can see the quality of the dough, the stretching process, the filling of the molds et cetera, before you start your own baking. The panettone were baked in our normal household oven. Hope it helps you get a great result!
We also made a version, using the Italian Caputo blue flour with 12.5% protein and it did the job very well, giving the dough lots of strength and a lovely fluffy and airy crumb in the end.
Pandoro
We also made the cousin of the panettone, the pandoro. It contains much more sugar and butter than the panettone, has no filling in the shape of raisins or peel and is also lots of fun to make. The smell of the fermenting dough of both breads is amazing. If we have to choose at this moment we like the panettone best of the two, it is just a little bit more exiting and it also tastes better when not completely fresh from the oven or after some time in the freezer.
Finding a good recipe to start with
The first thing we do when tackling a new recipe is finding a good basic and above all trustworthy source to start with. We browsed our baking bookcase and decided to use the ‘panettone with natural starter’ recipe from the, excellent but sometimes hard to read for a home baker, book ‘Advanced bread and pastry’ by Michel Suas. Because this book is aimed at professional bakers it takes some advanced thinking and calculating to get to a recipe that is doable and fun for a more experienced home baker. Also his instructions are sparse and scattered. Hopefully you will not say this about our recipe but you have to allow us some time to still improve on the version you’ll find below.
Other sources we consulted for our recipe are:
- The Wild Yeast blog
- ‘The fundamental techniques of classic bread baking’ by the French Culinary Institute
- ‘The Italian baker’ by Carol Field
- Our own sensible baking heads
We want to share with you our own attempts to get to a recipe that we are totally content with and that will work for all slightly experienced home bakers. Maybe these attempts will give you the inspiration to give it a try too or to give us some advice based on your own experience.
The basic recipe
We started by recalculating the amounts of Suas formula. The first attempt we stayed really close to the recipe steps, which are spread over three days. The first day of the process works well if you make large amounts of dough, but for home bakers we found it is no problem to skip this step and still get a great result. That is why our basic recipe version is a two day process, where the steps of day one and two are merged.
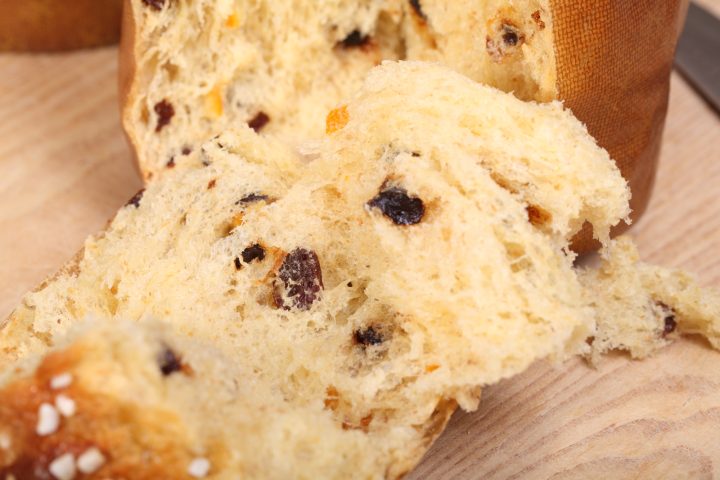
This recipe yields two panettones of around 460 grams each. The dough is extremely wet which can make you doubt if your amounts are right, but have faith!
Day 1
This step of making the initial dough is ideally done in the evening. This way you can continue with the recipe on day 2 in the morning, because you must take into account the long proofing times of the final dough (up to 6 hours for the final proofing alone).
Ingredients for panettone dough nr 1
220 g strong white bread flour (13-14% protein)
120 g water
1.5 g instant yeast or 4.5 g fresh yeast
20 g sourdough starter (100% hydration)
one egg yolk (20 g)
45 g sugar
4 g diastatic malt (optional, gives great color)
45 g butter, softened
Making dough nr 1
All ingredients
In the bowl of your standing mixer add all the ingredients from the list above.
- Flour
- Water
- Yeast
- Sourdough
- Egg yolk
- Sugar
- Butter
Combine
Mix on a low speed for no more than one minute, until all ingredients are combined. You could call this a ‘shaggy mass’.
Rest
Cover the bowl and leave to rest overnight (for 12 hours) at room temperature.
Day 2
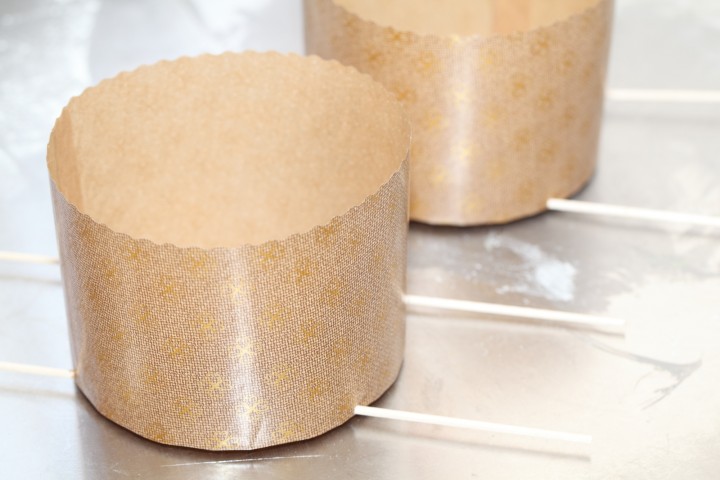
Panettone is usually made in classic panettone molds you can also find in our baking shop. You can also use a well greased baking tin. The dimensions should be around 13,5 cm / 5.3 inch diameter and a height of 9.5 cm / 3.7 inch.
Panetonne needs to cool upside down after baking, because the delicate and fluffy bread would collapse if you leave it standing up after baking. You can, rather ingeniously, prepare the molds for this by sticking bamboo skewers into them like you see in the picture. Directly after baking you hang the panettones upside down between for example two chairs. Alternatively you can also lay the panettones on their sides on a pillow after baking, so we have read but not (yet) tried.
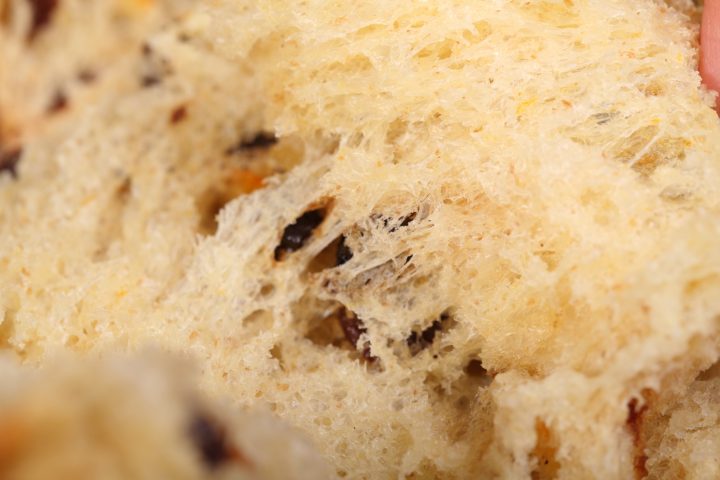
The dried fruit does not have to be soaked before adding, because it will spend many hours in a very wet dough.


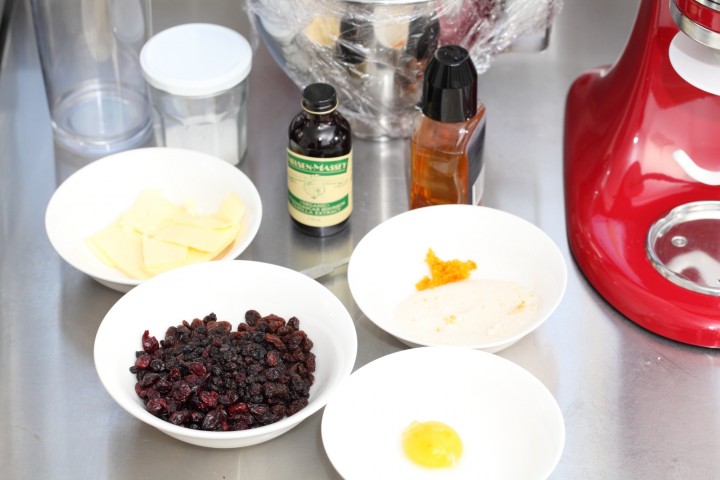
Ingredients for the final panettone dough
The dough you made on day one
60 g strong white bread flour* (13-14% protein)
30 g water (part 1)
one egg yolk (20g)
2.8 g salt
1 tsp vanilla extract
1 tsp orange zest
50 g sugar
70 g butter, softened
30 g water (part 2)
10 g honey
70 g raisins
70 g candied orange peel**
25 g candied lemon peel**
some egg white for brushing the tops
pearl sugar for decorating (optional)
*We used French type 45 in both the first and final dough and added 3 grams gluten powder to the final dough for more strength. But note that this French flour we used already had 12% protein.
**Due to lack of homemade candied orange and lemon peel we used 95 grams of dried cranberries for these test batches.
Making the final dough
Kneading start
Start by combining dough nr. 1 with the flour, water part 1, egg yolk, salt, vanilla and orange zest.
Knead for 4 minutes (stand mixer on speed 2) to develop the dough. The dough should be well developed before adding sugar or butter, as both sugar and butter prohibited development of the gluten.
- Flour
- Water part 1
- Egg yolk
- Salt
- Vanilla
- Orange zest
Kneading add sugar
Then add half the sugar and knead for 2 minutes. Then add the second half of the sugar and again knead for 2 minutes.
- Sugar
Kneading add butter
Now gradually add the butter in stages during the next 4 minutes of kneading.
- Butter
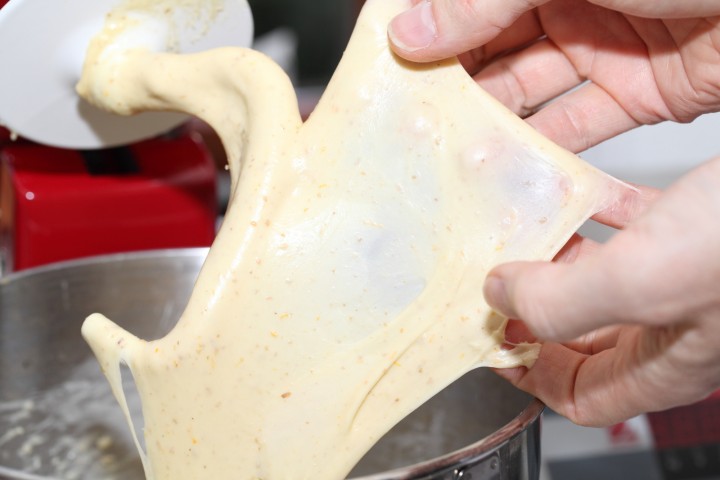
Kneading add water
Next add the water part 2 and the honey and slowly knead (lowest possible speed so the water will not slosh out of the bowl) for 2 minutes until the water is completely absorbed by the dough. You should should now have a smooth yet very sticky dough. You should be able to pull a window pane from the dough like you see in the picture.
- Water part 2
Kneading add filling
When you have reached window pane stage you can add the raisins and candied peel and incorporate them into the dough. Knead/mix for 1 minute at a low speed and all the fruit should be distributed through the dough.
- Raisins
- Candied peel
Rest
Cover the bowl and leave to rest for 45 minutes.
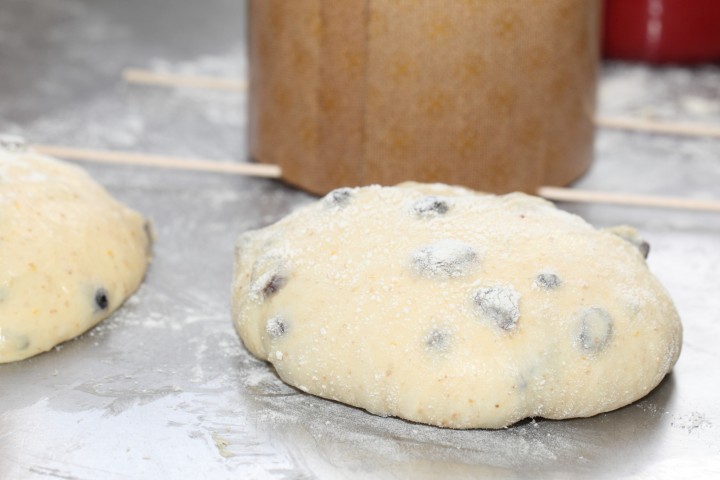
Stretch & Fold
After the rest, perform two complete sets (so one set directly after the other without rest in between) of stretch and folds and see the dough develop from very slack into a plumper shape that somewhat resembles a ball. Use a dough scraper and use some flour on your bench and dough to make this task easier and less sticky.
Rest
Cover the dough and let rest for 25 minutes.
Preshape
Now divide the dough into two equal parts and pre-shape them into a flat ball resembling shape.
Rest
Again cover the dough and let rest for 25 minutes.
Shape
Shape the two pre-shaped pieces of dough into still sort of flat balls as well as you can, use some flour and a dough scraper to tuck the dough under. Make sure the shapes will fit into the panettone molds. Quickly with one swoop of your dough scraper lift each dough ball and put them inside the panetonne molds. Cover the molds with floured cling film.
Proof
You are now at the final proofing stage which will take, depending on your room and dough temperature, between 4 and 6 hours.


Baking the panettone
When the top of the dough is starting to reach the rim of the paper mold, preheat your oven to 175 °C / 345 °F, conventional setting. Make sure you have something prepared to hang the panettones upside down as soon as you take them out of the oven. We used two chairs for this.
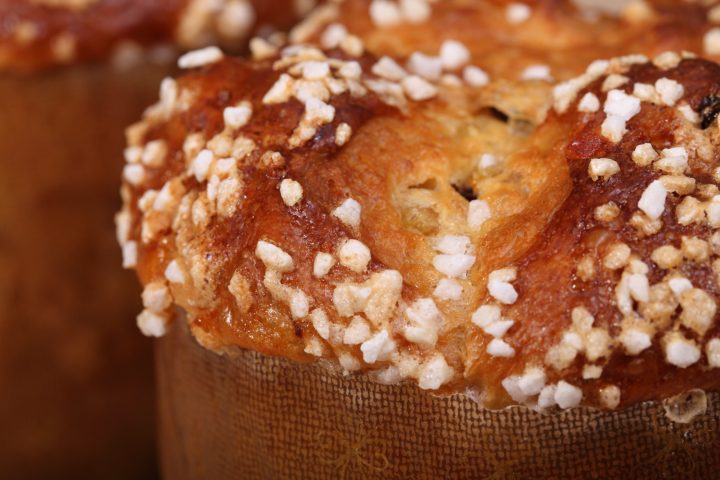
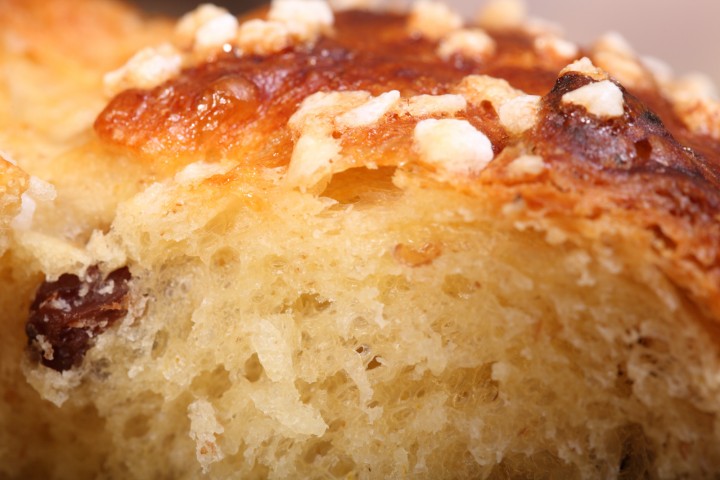
The panettones are ready for baking when the top of the dough is slightly above the rim of the paper molds. Just before you take the breads to the oven you can cross cut with scissors and/or glaze your panettones and sprinkle them with pearl sugar (use egg white to make the sugar stick). Take the molds to the oven. You can try and add some steam during the first stages of baking.
Bake for 40 minutes, keep an eye on the color of your panetonne. We had to turn the oven down to 160 °C / 320 °F after 15 minutes to stop the browning process. Take them out of the oven and immediately hang them upside down so they will not collapse and be careful as the panetonnes are very fragile at this stage. Leave them hanging for at least two hours, so the crumb can stabilize.
Enjoy the fluffiness while they are still a bit warm!
Hi
I would like to try baking panettone using my sourdough starter and came across your website. I live in Singapore, a tropical country, where the weather is humid and room temp is around 26-29degC. I didn’t want to over rest dough nbr 1. What should I look out for in terms of the size or texture for dough nbr 1 when I rest it overnight? I borrowed the book “Italian Baker” by Carol Field and her recipe (using commercial yeast only, no sourdough starter) says to dough nbr 1 rise until doubled. Looking forward and thank you in advance for your advice.
Hello Lim Lian,
After day one the dough looks springy and plump with us. It looks like a developed dough, more like a stiffer biga than a wetter poolish.
We have discussed it and we came up with two suggestions for you:
1. Use less yeast- our estimate is to use halve of the amount of yeast from the recipe and use the ‘coolest’ spot in the house to leave the dough overnight, so you come closer to 26 degrees Celsius (because even higher would mean even less yeast). Our development period is 12 hours, you can also take a look after 8 to 10 hours and if your dough already looks plump and springy and developed go ahead to fase 2.
2. Use your fridge at least for part of the development process. Maybe 8 hours fridge and a few hours at your ‘room temperature’.
‘Double in size is really hard to access and usually not correct unless you use a perfect cilinder for the dough to proof in. (also see our article about why this is: www.weekendbakery.com/posts...e-in-size/)
It will maybe take some trial runs for your exact situation, but by doing more runs you will also get a feel for the dough and can finetune the proofing times and best way to move forward under your challenging conditions.
And make notes! This will help you immensely.
Beste of luck and we hope it will turn out well!
Ed & Marieke
Thank you Ed and Marieke for your prompt response. Much appreciated. I will monitor the development of dough 1 closely as suggested. I also noted that you use a 100% hydration sourdough starter, different from other Panettone recipes which use stiff starter. Possible to share your rationale please? Thank you.
Hello again,
With the amounts we are talking about, it does not really matter if the sourdough added to the mix contains a little more or less water.
But the fact is we do keep a slightly stiffer starter at the moment, almost like a thick paste. The reason for this is that it will develop slower with less water, so it matures during the week and is ready for baking the next weekend. The feeding and refreshing, to be honest, we do ‘by feeling’. Because after so many rounds you just know what it needs to look like and how it feels when stirring and so on.
But again, do not worry about it being a little more or less hydrated in the ‘grand scheme’ of the total recipe.
Enjoy the process!
Thank you very much again for your prompt response. Really appreciate your effort. Will try out your recipe soon.
Hi there,
This is great and I have just about perfected my proving times after initially having a collapse in the oven! I’m interested to know why the butter and sugar is not all added on day 2 as the addition on day 1 will inhibit the gluten development of the initial dough?
Love your site. I have been using your recipes for many years. Keep up the good work! Thanks
Gill!
Hello Gill,
So nice to ‘hear’ from you. The recipe works for us as described and our yeast performs well / as expected for this recipe. Certain ingredients like fat (salt also) help keep the yeast growth in check, during longer fermentation. But if you are not sure or having problems with the development of the dough, then it is OK to add the potential yeast inhibitors like the butter and egg yolk on day 2.
We hope we will have more time to bake and post the coming period, because we have such fun with it, but sometimes life takes over and priorities shift.
Enjoy your baking this festive season and all the best to you and your loved ones from Holland,
Marieke & Ed
I have made this once a couple of years ago with success but this time my dough didn’t rise. It is still very tasty and moist. One was a bit gummy but the other was fine. Not super dense given the lack of rise but not light and fluffy either. Wondering if you might have an idea on the lack of rise? The only thing that didn’t go according to plan was the first step. I had difficulty incorporating the butter fully in the one minute and didn’t want to over mix so did what I could by hand.
Hello Lisa,
Sorry for the late reply. It is a bit of a mystery what happened, seeing as you describe one as fine and the other gummy. As stage 1 is supposed to be a shaggy mess, the butter not fully incorporated will not be a problem.
Could there be something going on with the yeast you used? Was it past the sell by date, or did you use an already opened packet? Using older yeast can account for the lack of rise.
It is my 4th year in a row baking panettones using your recipe, my family loooooves them! Thank you for the wonderfully well written recipe and instructions!
Very happy with how well the recipe works for you too Liuda!
Tried making panettone for the first time using this recipe last year & it was a hit! I’m getting requests to make it again this year. 😋
I used 2 cup (472mL) glass bakeware/storage containers to make individual sized panettone because I didn’t have paper moulds. It worked but they were more round than tall – still tasty!
Also, adding dried yeast is not necessary – just wait a little longer to rise if only using sourdough starter.
This site is excellent. it has very nice look and perfect look. that information better and very important .Very good writing style. I really like this proofer