

SF Sourdough: Time, Patience and Planning Skills!
His recipe intrigued me when I first read it; the use of the refrigerator, the promised taste and sourness, and the sheer amount of steps and time. These kind of recipes always trigger my interest. Plan ahead for this recipe because it is going to take 4 days from start to finish. Perfect to incorporate in a very long weekend of baking. This recipe is based on the San Francisco Sourdough recipe from Peter Reinhart’s latest book ‘Artisan breads every day’. But of course, as you may know by now, I have made my own version (which comes with exact measurements and a time table!).
The trick of this recipe is to fit it in with other activities like sleep and work. The times given in the time table at the bottom of the recipe keep this in mind. Of course you can be a bit flexible with the time table, especially with the 34 and 15 hour periods the dough spends in the fridge. But alterations can have an effect on taste and texture. For example if you extent the time in the fridge the bread will become more sour, but the gluten strength will weaken, so you probably get a flatter, denser bread. If you want to make more than one loaf, just double or triple or quadruple the ingredients. We usually make 6 breads in one batch. That’s the maximum our spiral mixer can handle.


For the starter in this recipe I use a sourdough culture which is made with 100% whole grain rye flour. A sourdough culture based on rye flour is easier to maintain, it does not transform into a slurry when you forget about it, it is easier to stir because it has almost no gluten and it smells very very nice, a bit like fruit. I maintain the starter as a ‘almost’ stiff starter. This way it stirs easy but does not add as much water to the dough as a poolish starter. It is also very forgiving in the amount you feed it. As I am a bit lazy in feeding, normally I only feed it once a week, after my weekend baking. I just give it a few table spoons of water and rye flour, stir, and ready!
| Ingredients for the Starter | ||||
|---|---|---|---|---|
| 126 | g | bread flour | ||
| 83 | g | water (room temperature) | ||
| 24 | g | sourdough culture | ||
| Ingredients for the SF Style Sourdough | ||||
|---|---|---|---|---|
| makes 1 loaf | ||||
| the starter from step 1 | ||||
| 264 | g | bread flour | ||
| 50 | g | spelt flour (pref. whole grain) | ||
| 204 | g | water (room temperature) | ||
| 9 | g | (sea) salt | ||
Making the Starter
In a bowl stir together 126 grams of bread flour with 83 grams of water at room temperature with 24 grams of the (rye) sourdough culture. Mix it well for about 1 minute until all the ingredients have been combined and you have a dough like ball. It is not a problem if your dough still looks a bit rough. Cover the bowl with clingfilm and let it preferment. After a minimum of 9 hours at room temperature it is ready for…the fridge. It will stay there for the next 34 hours! This means that on the morning of day 2 you put it in the fridge and in the late afternoon of day 3 you take it out again (see time table at bottom of recipe).


Making the Loaf
So, it is now probably somewhere in the afternoon on day 3 of the recipe (17.00 h if you stick to my time table). Take the starter out of the fridge and immediately start making the dough. Combine the starter with the 204 g water and stir for 1 minute to loosen the stiff starter. Add the flour and salt and knead (we use a spiral mixer) for 3 minutes. Cover the mixer bowl and leave to rest for 15 minutes.
Take the dough out of the mixer bowl and onto a floured work surface and do one stretch and fold (a full letter fold, left over right, right over left, bottom over top, top over bottom; see our bread movie to observe this technique if you are not familiar with it). Leave covered to rest for 15 minutes on your bench. Do a second stretch and fold. Return to the (greased) bowl, cover and leave to rest for 40 minutes at room temperature. Now put the dough in your fridge and leave it there for the next 15 hours (yes you can go to sleep, the yeast cells in your dough probably will do a bit of hibernating of their own in the fridge, the bacteria stay more active in this colder climate and tend to produce acetic acid, which, if all goes well, will give your bread the sour taste of the sourdough.
It is now day 4 of the SF sourdough making process: Baking Day! In my time table it’s now 10.00 in the morning.
Take the dough out of the fridge and let it acclimatise for 2 hours at room temperature.
Now it’s time to shape. You can make a batard/oval loaf or a round one for around 750 grams of dough. I like to use the batard shape for this bread, it’s also good for a more even bake. I also use floured proving baskets/bannetons. Transfer the shaped dough in a proofing basket or baking pan, dust a bit with flour, cover and leave to proof for 2,5 – 3 hours (at room temperature which is about 21 ºC). When you think it has risen enough, use your finger to carefully make a very small dent in the dough. If the dent remains, the bread is ready to bake, if the indentation disappears, the dough needs a little bit more time.

Preheat your oven to 235 ºC / 455 ºF (at what stage you preheat your oven depends on how long it takes for your oven to heat through, some take 30 minutes, some, like ours, with stone floors take a lot longer, up to two hours. The preparation time from this point until the bread actually goes into the oven is 3 hours.
Now your loaf is ready for the oven. Slash the top of the loaf with a lame or bread scoring knife. To get a nice crust, try to create some steam in your oven by putting a small metal baking tray on your oven floor when you preheat the oven and pouring a half cup of hot water immediately after putting the bread in the oven. Release some steam by setting your oven door ajar (perhaps with the help of a wooden spoon or oven mitt) 5 minutes before the bread is ready. If you are going to create steam with a baking tray, you maybe also want to turn your oven temperature a bit higher, because you are going to lose some heat in the process.
After 45 minutes of baking your loaf should be ready. Transfer onto a rack and leave to cool. This loaf also keeps very well in the freezer. But please make sure to eat at least some of it while fresh!
Note: We use European flour which absorbs a few % less water than American type flour. People using this type of flour should add 3-8 ml water to the final dough. If you dare you actually make the dough a few percentages wetter to get bigger ‘holes’ in your crumb. I lowered the amount of water in this recipe to make the dough easier to handle.

SF Sourdough Time Table
day 1 23.00 h Make starter let ferment for 9 hours at room temperature
day 2 0.800 h Put the starter in the fridge for approx 34 hours!
day 3 17.00 h – 18.40 h Making the dough
- Starter + water 1 minute stirring
- Add flour + salt 3 minute kneading
- 15 minutes rest
- Stretch and fold
- 15 minutes rest
- Stretch and fold
- 40 minutes rest at room temperature
day 3 18.40 h Put dough in fridge for 15 hours
day 4 10.00 h Take dough from fridge and leave at room temperature for 2 hours
day 4 12.00 h Shape the loaf and leave to proof for about 2,5 – 3 hours
day 4 14.30 – 15.00 h Bake for 45 minutes at 235 ºC / 455 ºF


kaisman says
just did this bread and it was awesome- the crust’ the crumb, the flavor – EVERYTHING.
i just made this bread 75% hydration by adding 40g water to the final dough.
thank you
Weekend Bakers says
Hello Kaisman,
Great! For us, this recipe never disappoints, glad you like it too!
Adrien says
Thank you for this great recipe !
I have a question about the optimal fridge temperature. I measured 10 °C on the top and 3°C on the floor of my fridge and I was wondering what is the best temperature to let the dough proof during the night ?
Weekend Bakers says
Hi, our fridge is around 6C, but anything under 12C is ok, because the yeast will become dormant at this temperature.
antonella ferrante says
scusate se scrivo in italiano, vorrei chiedere perchè così tanto starter 233g per 314g farina?grazie ciao
Teresa Teague says
Thank you so much for sharing your recipes.
Your explanation and instructions for sour dough starter were very helpful. I made the starter according to your instructions and my bread turned out perfect. Rye flour makes all the difference. (I used Hodgson Mill stone ground whole rye flour). The flavor profile has gotten even better with the 3rd loaf and my starter smells wonderfully pungent.
It’s amazing that no commercial yeast is needed and the bread rises perfectly.
I had tried the seed culture starter recipe in the Bread Baker’s Apprentice which was less than mediocre and I think it’s because it begins with rye flour but is fed only bread flour thereafter.
So thank you, thank you….finally a loaf of sour dough bread that actually tastes like sour dough.
David Castro says
Hi! I recently made this bread and it turned out a bit sweet? I’m not sure if it’s because I converted the grams to ounces or my sourdough culture is acting weird. I suppose I should mention that I used Dark whole wheat rye flour (if it matters?). But either way the crust was nice and this was a good experience for my first bread!
Dylan Schink says
This has been my weekly loaf for a couple months now and I’m incredibly happy with it, though I’ve found I get best results baking at 200˚ on a granite stone for 40 minutes. What advantages does doing the falling temperature thing have over just baking at 200?
Another question: I of course slash my loaf before I put it in, but I never get that nice ear, I just get a more stretched out glossy patch of crust than on the rest of the loaf. How do I slash for that beautiful torn look?
Weekend Bakers says
Hi Dylan, most bakers do not use a falling temperature. It is a simulation of ‘old’ wood fire oven. You fire-up the oven with wood, remove all the burned out residue and put in the bread. This way the oven starts at about 240 and falls to 180. Our Rofco does the same by switching off the heating elements, the heat retention of the stones will bake the bread. Most bakers with deck ovens do not use this procedure because switching on and off the oven takes too much time, energy and steps. So find out what works best with your oven, perhaps you can heat your oven to 230, put in your bread and after 10 minutes turn down the oven to 180. The high starting temperature will kick the bread in its b*tt and will perhaps improve your ear on the bread. Also steam is crucial during the first 10 minutes for getting a glossy crust with a nice ear. Happy baking!
Martin says
A lot of SF sourdough recipes use about 200-250g of recent-fed sourdough culture (depending upon hydration) as the starter instead of building a levain as you have. Is there a reason why you use so little culture (24g)? Is it all about taste or is it, in effect, the same end result just done a little different?
Weekend Bakers says
Most recipes make you keep about 300g of culture day in day out, week in week out, when you do not bake regularly you need to throw away a lot of starter (and flour) during refreshing your culture. By keeping a small amount of culture and making / building a poolish or starter out it you are more flexible and do not to keep as much culture. All resulting in more flexibility and less waste.
Shoshy says
Hello, thank you for the lovely site, very helpfull tips!
Is it possible to keep the ready dough (before shaping) in the fridge for 24 hours instead of 15?
Weekend Bakers says
Hi Shoshy, changing the time from 15 to 24 hours should be no problem, however over time the quality of the gluten and the strength of the dough will degrade. So there is an end to amount of time a dough can stay in the fridge. We never tried it, but it should not give real problems. Happy baking!
Teresa Teague says
I did 24 hours with excellent results. Having a little flexibility with the time helps to work around one’s schedule.
Weekend Bakers says
Lovely to hear it all works out! Home baked fresh bread is the best!
erin says
this is beautiful bread. Even a novice can follow these excellent directions and create wonderful bread. Thank you for rescuing my deteriorating sour dough experiences…now my sour dough breads are awesome 🙂
new_baker says
Lovely website! When you use your proofing baskets, do you line them with a cotton cloth, or does the dough go directly in there without any lining ?
Weekend Bakers says
Hello, we do not line the proofing baskets. We simply dust them lightly with some flour before putting in the dough. Happy baking!
Ishi butcher says
I like your website…useful information. I am trying the SF style sourdough bread,
but if I want to produce two loaves, do i double the starter and the Ingredients or
do i use the same 233 g starter and double the rest of ingredients ??
Weekend Bakers says
Hello Ishi, for two loaves you need to double everything, so you need 466 g of starter. Happy baking!
jill says
I had a go at this bread at the weekend and I had a few issues.
Firstly the oven temperature seemed way too hot – my bread was baked with 18 mins to spare. I adjusted it down slightly, to 220C, as I have a fan assisted oven but not sure whether I should have reduced it more. I am off to buy an oven thermometer at lunch so I can check the actual temperature.
Secondly the bread was not sour enough for my tastes – I am assuming this was due to the maturity of my starter (just over a week old at time of baking).
I am going to have another go this weekend as the process was easy to follow – thanks for the timings it made it so much easier 🙂 Although it baked too fast the texture inside was spot on and it tasted good too!
Weekend Bakers says
When using fan assisted ovens, you need to lower the temperature at least by 20C. It is also a good thing to turn the oven down to for example 150C when the bread has the right color. This will stop the browning process but the temperature if still high enough to get a full bake. Happy baking!
David O. says
After probably 10 attempts, I was very satisfied to finally produce two loaves this weekend that actually resemble the image in your recipe. There are lots of holes and the taste and texture is wonderful! The key thing I have learn’t is that it’s crucial to refresh the starter the day before using it, and also to use plenty of coarse flour – I used wholegrain flour- while shaping the dough for the banneton to prevent any sticking.
I have a 40C dough proving function on my oven, and have found that if you get the above right, you can bring up to room temperature AND prove in the banneton in less than 2 hours. While the dough will not quite double, I’ve found the ‘ovenspring’ effect when the loaves are put in the hot oven compensates for this, more than doubling the size compared to the dough that left the fridge.
Weekend Bakers says
Hi David, there is balance between a full proofing, a bit underproofing and oven spring. Slighty underproofed gives indeed a nice oven spring. Controlling the temperature of your dough gives access to consistency in proofing times. We have thermometers lying around everywhere to measure everything! 😉 Happy baking!
Liz Wilson says
Is it OK to leave my starter in the fridge for an extra 24 hours….something has come up that will prevent me from being at home for Day 4…..Thanks
LIZ
Weekend Bakers says
Yes Liz, we think it can be OK, but there is a chance the gluten will get weaker as time progresses.
Good luck with it!
Liz Wilson says
It was a little flat…but totally delicious…lovely chewy tasty texture. Another one due in the oven tomorrow (and staying to the timetable…. ) Will report back.
Thank you lovely weekend bakery
Liz
Weekend Bakers says
Great to hear Liz, thank you for your kind words and keep us posted!
Happy weekend baking!
Ed & Marieke
Laura Pedraza says
Hello, i found your blog very useful, and the process its quite simple comparing others i have read, for the moment i dont have any spelt flour, can i replace it with more bread flour?, thank you!
Weekend Bakers says
Yes, you can Laura, no problem. You can use bread flour or whole wheat flour if you happen to have that.
Happy Tartine baking!
cookandbaker says
Stunning loaves! And the crumb looks so aerated and elastic! Is there a link to the ‘sourdough culture’ itself?
Best wishes,
Andrew
cookandbaker says
Sorry, found it, right at the top! Ignore the earlier message! 🙂 a.
Petra says
Hi there,
I followed the recepe to the letter , so far.
I am on a differend time table, so it is my Day * Evening * of day 3.
I did the water with the starter stiring for 1 Minute, added the flower and the salt, kneaded it in my Mashine for 3 Minutes BUT, that dough is soooo stiff * I added a little bit more water and kneaded by hand for 1 minute * but it is still very still.
It is now at the first 15 minute rest and I have no Idea how to do the letter fold stretch with such a stiff dough?
I really followed your instructions.
🙁
I always assumed that it is called SanFrancisco Sourdough when it is made with the specific Starter that you only get in SanFrancisco or purchase and not the Method of making it.
Am I wrong?
Weekend Bakers says
Hi Petra,
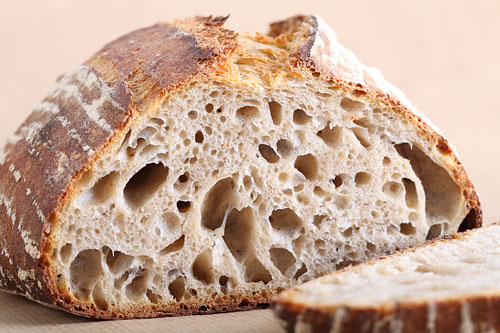
This bread is of a reasonable high hydration and as you can see in the picture the dough is not / should not be stiff. What flour did you use?
The discussion about sourdough culture is a difficult one. You can get the culture from SF, but as soon as you feed it with local flour, will it still be the same? People have all kinds of opinions about this and somebody has to do some scientific research to clear this up. Our own findings with different cultures we used point in the direction of local taking over when feeding with local flour. But the SF is as much about the method as it is about the culture. Because we used our own culture we called it ‘SF style’.
Petra says
I used strong Breadflour and spelt flour, it is so stiff that I had to pull real hard to get the fold and stretch done.
I used the same amount of Starter, Flour , Water and Salt as in the recepe.
I must have done something wrong if it is not working for me.
So I shall see what happens when it is time for it to come out of the fridge for the last steps.
Thank you so much for the explanation reg. the SanFrancisco Sourdough Bread e.g Starter.:)
It makes sense that once it is Europe or anywhere else in the World it will feed on differend yeast in the Air.
Weekend Bakers says
It all sounds really OK, except for the dough not cooperating of course… Just in case: Please note that spelt flour does absorb more water than wheat flour so if you maybe used a different combination of both (more spelt), this could already account for a different result. But it is really hard to judge for us, without seeing of course. The pictures give the best indication of how the dough should look.
Francesca says
Is it possible to scale up the recipe by doubling all the amounts?
Weekend Bakers says
Hi Francesca,
Yes of course, you can double, triple, quadruple as much as you like. As long as you divide the dough by 2, 3 or 4 et cetera to make individual loaves again, you can also stick to the baking times given in the recipe. If you would double up to make one big loaf, you would have to adjust the baking times.
Good luck with it,
Marieke
jim says
what make is your oven with orange spray bottle ?
Weekend Bakers says
Hello Jim,
It is a Rofco stone oven and it is made in Belgium. See www.rofco.be.
We have a model B20 and a model B40.
Greetings,
Marieke
Carina says
Hi what is the possibility to bake this bread with 100% rye flour? Will it work and will the end product be hard or soft?
Weekend Bakers says
Hello Carina,
You cannot just substitute wheat with rye flour, the result will be completely different. The most important difference is the amount of gluten / protein. Rye has a very low protein content, so a 100% rye loaf has a much denser crumb and handling the dough will feel more like working with clay. You can check out some of our recipes for rye bread in our best bread recipe section: www.weekendbakery.com/posts…d-recipes/
Happy baking!
Marieke & Ed
Rachael says
I love your blog!!!
Have you ever used any starters from a company called Sourdough’s International?
I keep hearing about them but I want some reviews from some fellow bakers.. If anyone knows, let me know! Thanks : )
Weekend Bakers says
Thank you so much Rachel. We have never ordered sourdough from this company. It is all very interesting these different cultures and how it all works. We have done some initial experimenting and we need to do more to draw some more definite conclusions but very carefully we must say that when you get a culture from the other side of the globe but you feed it with your own local flour, chances are you will end up with a local culture again. We tested this with another baker by exchanging cultures and this is what happened. But like I said, more testing needs to be done and probably a scientist needs to be involved to explain and analyze what exactly is happening during this process.
Any other bakers with experience with the company or the subject? Would be very interesting to hear!
Happy Baking!
Marieke & Ed
Sandra says
Hello,
I baked this over the weekend and the bread tastes too sour. What causes this and how to prevent this from happening in the future?
Thank you.
Weekend Bakers says
Dear Sandra,
This recipe, with its long fermentation in a cold environment is created to develop sour taste. But the results for sourness between people who bake this bread still vary a lot also depending on the workings of their culture. For some people it is the highest goal to get more sourness in their bread. This recipe with its 4 day process gives the acidic acid a good chance to develop. Acetic acid, or vinegar, is the acid that gives sourdough much of its tang.
The best thing you can do is try a recipe with shorter fermentation times and proofing in a warmer environment like our pain naturel or the Tartine style bread.
Another tip is to maintain your starter at a higher hydration level. Lactic acid-producing organisms seem to thrive in a wet environment whereas acetic acid is produced more abundantly in a drier environment.
Good luck with it and happy baking!
Marieke & Ed
Abel says
One question, refered to the baking process.
The temperature you suggest to bake it’s 235C during 45 minutes. Is that ok?
About the steam. Do you recommend steam during all the baking process or just in the first minutes? I’ve seen some recipes in which you create steam during 10 minutes and then you remove the tray with hot water. Thank you very much.
Abel, BCN.
Weekend Bakers says
Hello Abel,
Yes the temperature and time are OK, but you should always check the temperature of your own oven to know that it really has this temperature too (some ovens have big deviations). Also see our tips about getting to know your oven: www.weekendbakery.com/posts…your-oven/
Steam does its job in the first minutes of baking, keeping the skin of the dough soft so the bread can expand (oven spring) after this you can let the steam escape if you want a nice crusty loaf (opening the oven and getting the tray out would maybe be not such a good idea because you will also loose a lot of heat (with a normal household oven that is). So it is better to use the right amount of water that will vaporize during baking and to let the excess steam escape by a small opening. If you are aiming for soft bread (rolls for example) then you don’t have to let the steam escape.
Happy Baking,
Ed & Marieke
Raluca says
Thank you! will do that!
I did see it and will try soon!
have a nice evening!
Raluca says
Hi,
and apologies if this question was asked before.
I have just started making this with your rye sourdough culture and the lovely Dutch flour and can’t wait to see the results.
just a quick question: can I extend the first fermentation period from 9 hrs to maybe 12 or will this ruin everything?
thank you!
Raluca
Weekend Bakers says
Hi Raluca,
That should be no problem, just make sure to put it in a slightly cooler place if possible, not the warmest space in the house.
Hope it will turn out great!
Marieke
PS: Have you seen, I posted the no knead version of the brioche? You can find it here: www.weekendbakery.com/posts…d-version/
Winter says
Hi Ed and Marieke,
What a wonderful and fairly easy recipe. I tried it this last weekend and I couldn’t believe how perfectly chewy the inside was, how crispy the crust was, and how it was the perfect sour flavor! Thank you! Here’s a pic: instagr.am/p/Qdcs1wxlGO/
I only had one issue–my bread didn’t have very many bubbles like you have in your picture. I stuck to the timeline given and when I pulled it out, it looked like it rose beautifully and that there would be plenty of bubbles, but alas, there were very few when I cut it open. So I’m wondering if you have any recommendations on getting more bubbles. Any recommendations for baking at altitude? I live in Utah–about 3500 feet above sea level.
Thank you,
Winter
Weekend Bakers says
Hello Winter,
The bread looks wonderful! Thanks for sharing the picture with us.
About the bubbles: they are a result of using wet dough (high hydration) and careful and not too much handling of the dough. If, and I am assuming you do because you live in the States, you use American flour you should also compensate by using a bit more water in the recipe. Maybe you have seen this in the recipe above:
” Note: We use European flour which absorbs a few % less water than American type flour. People using this type of flour should add 3-8 ml water to the final dough. If you dare you actually make the dough a few percentages wetter to get bigger ‘holes’ in your crumb.”
This also means that, although the dough is wet it is important not to (deliberately or not) compensate by using greater amounts of flour while handling and shaping the dough. You can also try to keep the handling of the dough to a minimum, do not pull and press et cetera, but shape and transfer the dough with decisive but light movements.
Hope this helps you getting your bread even more perfect!
Happy Baking,
Marieke
Winter says
Hi Marieke,
Thank you for the quick reply. Yes, I live in the states. I will try a little bit more water this next time and try to be a bit more gentle when handling the dough. I am excited to try again and I’ll let you know how it goes.
Thank you again!
Winter
Weekend Bakers says
Yes please do 🙂
Weekend Bakers says
Hallo Caroline,
Leuk van je te horen. Jazeker, geen enkel probleem om die 50 gram te vervangen met whole wheat of rye, dat maakt geen verschil, behalve een beetje in smaak.
Ik zou nog willen zeggen wees in het begin een beetje genereus met het inbloemen van je mandje en sprenkel ook wat op je brood voordat je het omkeert en in je mandje legt. Je zult zien dat het steeds makkelijker gaat en dan neem je wat gas terug wat bloem betreft. Het rijzen in de oven is belangrijk maar tegelijk ook een lastig onderwerp omdat het met veel aspecten te maken kan hebben. Ten eerste moet je brood voordat het de oven in gaat tot het optimale punt gerezen zijn (de rijstijden bij onze recepten gaan uit van een deegtemperatuur van 24 Celsius, als je deeg kouder is, dan duurt het uiteraard lager). Dan moet je oven goed op temperatuur zijn en niet te veel in temperatuur zakken zodra je de deur open doet. Voor oven-rijs is het met name belangrijk dat de buitenkant van je brood de eerste minuten zacht blijft in de oven. Daarom gebruik je stoom want anders lukt dat heel moeilijk. Stoom zorgt ervoor dat je brood nog zacht blijft en kan expanderen in die eerste minuten. Zodra de korst vormt is dat niet meer mogelijk. Misschien heb je nog wat aan deze tips: www.weekendbakery.com/posts…your-oven/
Vooral als je een recept voor de eerste keer probeert kan er nog van alles zijn dat je aan jouw omgeving, ingrediënten en apparatuur moet aanpassen. Wij maken veel recepten wel minimaal 10 keer voordat we het echt in de vingers hebben. Ik kan aanraden dat je zaken opschrijft in een notitieboekje, zodat je kleine aanpassingen kunt meenemen en weet wat wel en niet werkt.
Heel veel succes en plezier nog met bakken en geniet van het brood!
Marieke
Caroline says
Hoi Marieke en Ed,
Vraagje. In plaats van 50gr spelt bloem kan ik ook whole wheat of rye bloem gebruiken bij het maken van de sourdough?
Ik heb voor het eerst julie nieuwe mandjes gebruikt, maar het deeg bleef er jammer genoeg een beetje in hangen. Toch nog gebakken maar het rees niet meer dus een beetje dense. Hoort het nog wel een beetje te reizen in de oven?
Alvast bedankt.
Caroline
Ben says
Hi,
I really want to try this at some point. In the “Making the Loaf” section it says 3 minutes of mixing, but in the timetable at the bottom it says 3 minutes of kneading. Could you clarify this please?
Cheers,
Ben
Weekend Bakers says
Hello Ben,
Thank you for asking. For this recipe we do our kneading in a spiral mixer with a dough hook. So if you are using a similar mixer you have to knead for 3 minutes, if you are kneading by hand I would double that to 6 minutes. So what we mend to say I guess is ‘kneading in a mixer’.
Good luck with the recipe and happy baking,
Marieke
cookandbaker says
Hi both,
I’d be very grateful if you could help out once more: I was wondering whether it’s possible to freeze a loaf to bake off at a later stage. If so, is this done at before the second proving, after the second proving, or at some other stage?
Best wishes to you. Happy baking!
andrew
Weekend Bakers says
Hello Andrew,
We do not have experience with this ourselves. We know that it is possible and people usually freeze after shaping.
You can find more info here: www.thefreshloaf.com/node/…bake-later
Good luck with it and let us know how it turns out for you, would love to learn about it too.
Happy freezing & baking
Marieke
cookandbaker says
Hey, Marieke, thanks for getting back to me. It’s a great site the one to which you referred me.
Thanks,
a.
Tijen Uslay says
Hello Weekend Bakers,
Excellent recipe, worked for both me and my mother, although we are beginners. How can we alter this recipe, to make the taste a bit more sour? Any ideas?? Thank you.
Weekend Bakers says
Hello Tijen,
Great to hear! About the sourness, the challenge is in your sourdough culture, it probably does not contain enough lactic (think yoghurt) and acetic (think vinegar) bacilli . You could try to make your sourdough culture a bit less wet and stiffer and keep it in a cool place, but not the fridge, to promote development of especially the acetic acid bacilli, because they thrive in a cooler and less wet climate. Also, a younger culture tends to be less sour because of the lack of both bacteria, the older it gets, the more complex the taste of your culture can become.
Good luck and happy baking!
Ed & Marieke
cookandbaker says
Hey both, thank you so much for getting back to me. I had gone ahead an knocked the air out but it still rose in the end so it was all totally fine, which was a relief. You could check out my recent ‘fermented juice sourdough’ post in which I refer to your links.
I baked it off in a pyrex oven dish for about 50′ at 200C fan, and it was totally fine. Hope I get the same results the next time. Still surprised that I managed to get a decent loaf on Friday and today, Sunday. So hopefully so long as I keep the starter alive, I get the same results.
Thanks once more for making your expertise available on this great resource that is your blog, and for your specific advice and clarifications.
Happy baking to you both!
Andrew
Weekend Bakers says
Thanks Andrew, glad we could be of help!
Your loaf is looking good and the things you ate with it sounds like our cup of tea too 🙂
Maybe next time you can try a little less ‘air knocking’ and see what kind of result that will give you.
Lots of loaf!
Marieke
cookandbaker says
Hello both,
thanks for your reply above. Also getting in touch for some clarification re a stage to the above recipe.
I’ve attempted making my sourdough to some success (cf., my recent blog post) making a starter out of apple juice that had fermented/become sour and gassy, and plain flour. I then stirred that daily for 3-4 days occasionally feeding it till I mixed 1 & 1/2 cups of it with 2 cups of flour, and lo and behold, I made a sourdough after proving twice – firstly, for 90 minutes, and then for 60 minutes. It baked at 200C (fan) for c.60 minutes and was fine, nice and elastic with a good crust and very little inner crumb. I have more starter left which I’ve refrigerated. I have also mixed some with flour last night, kneaded it, left it to prove for 90 minutes and then for its second proving left in the fridge overnight. It’s now more than doubled and I am bringing to room temperature to bake off in about 3 hours or so. This is where I want your help: you state above that:
“day 3 18.40 h Put dough in fridge for 15 hours
day 4 10.00 h Take dough from fridge and leave at room temperature for 2 hours
day 4 12.00 h Shape the loaf and leave to proof for about 2,5 – 3 hours
day 4 14.30 – 15.00 h Bake for 45 minutes at 235 ºC / 455 ºF”
I was wondering where you say ‘shape the loaf and leave to proof’ whether I am meant to knock the air out of the dough and let it prove again so that it doubles during those 2.5-3 hours….
Any additional clarifications would be greatly appreciated.
All the best,
Andrew
Weekend Bakers says
Hi Andrew,
This loaf needs gentle shaping (into a boule or oval shape, whichever you prefer), not so much knocking the air out of the dough. See an on how we handle a similar dough here:
www.weekendbakery.com/posts…g-a-boule/
Another post you might find interesting is the one on proofing and ‘double in size’ : www.weekendbakery.com/posts…e-in-size/
Good luck with it,
Ed and Marieke