

You will not be going anywhere for a while! Tell your family you will be stretching and folding for the next 3.5 hours…
The last few months we have been making quite a lot of these loaves. We made them with tiny variations and alterations, experimenting with flour, water, times and temperature and above all quantities. We even developed a hybrid version for the baker in a bit of a hurry. We are now pleased enough with the results to share them with you.
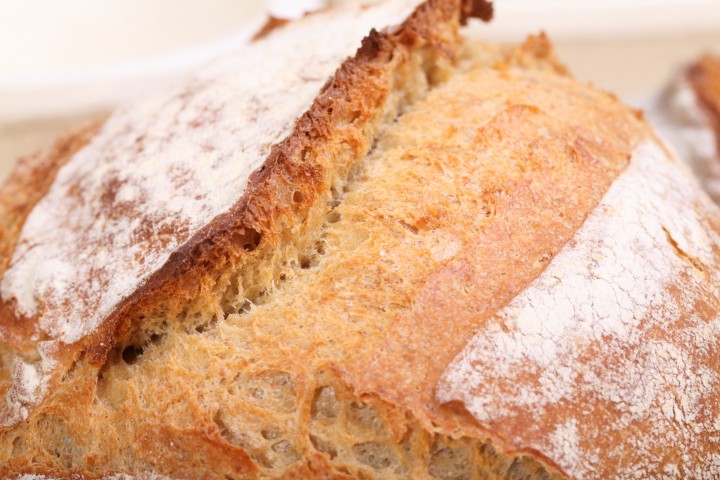
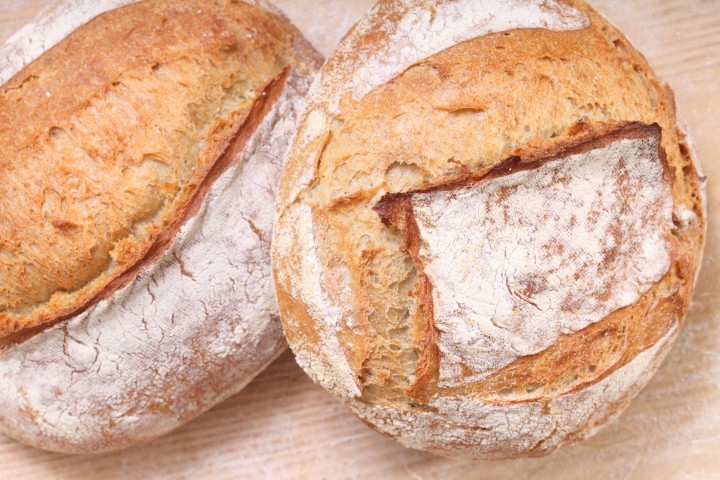
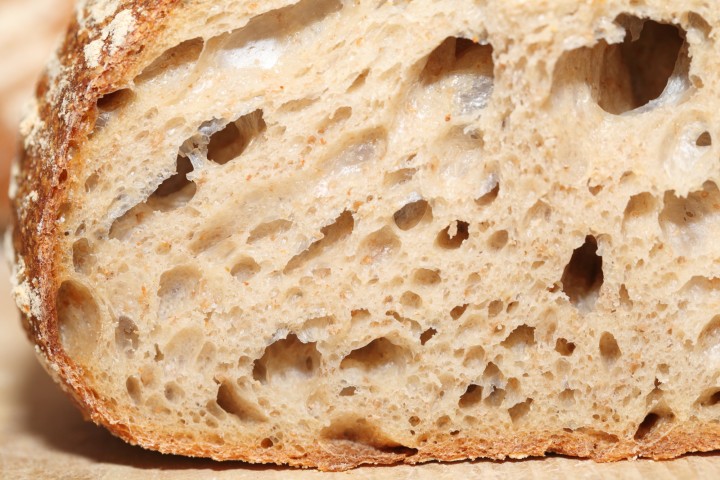
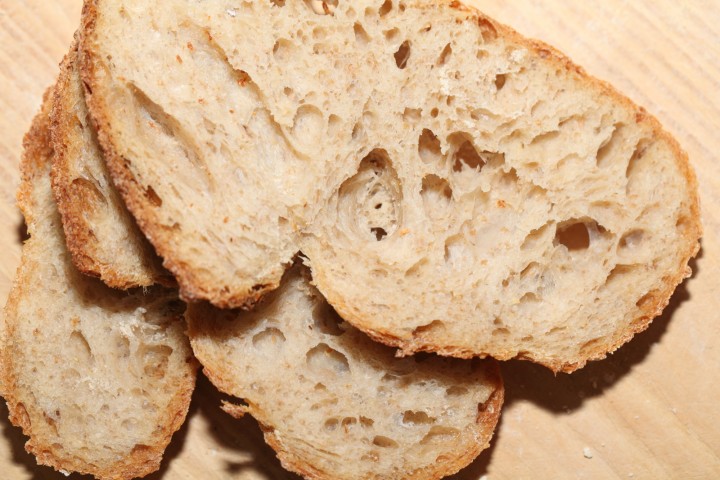
To most bakers the name Tartine does not need further introduction. A lot of home bakers will know the book, the bakery in San Francisco or even the bread. When you look at the pictures in the book, you just want to make that bread too! It’s attractive and impressive. Just one tiny remark about the recipes. We found that some of the essential information was pretty well hidden in a lot of text and it needs careful reading to avoid mistakes and there seems to be some errors in the bakers percentages. We tried to be clear and unambiguous with our version of this recipe and for that we made a few changes. The result to us is an outstanding bread with a very pleasant crumb structure and ‘bite’ and complex taste.


We make these loaves in both cane and wood-fibre proofing baskets and shape as boules or batard. Whatever your personal preference, the wonderful taste stays the same!
What’s different from the original?
The most important change we made is one that all home bakers should be pleased with. We scaled the amount of sourdough culture back to manageable proportions, avoiding unnecessary waste of flour. Instead of maintaining a 400 grams culture all the time, we changed it by building a poolish the night before with a small amount of sourdough culture.
We recalculated the ingredients to a smaller loaf of about 770 grams. In the recipe below you will also find the percentage of whole wheat flour a bit higher than the original.
Also we recalculated and adjusted the hydration level to be 70% as our European flour absorbs less water than American and the original Tartine recipe does some strange bakers percentage calculations.


No need to knead, but….
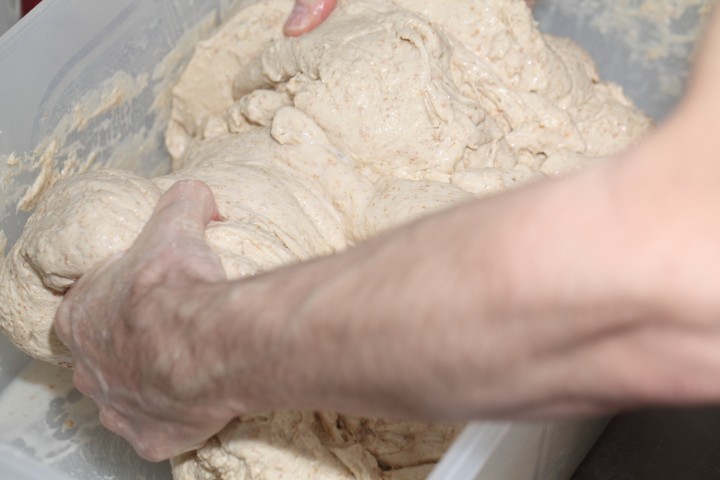
There is some serious stretching and folding to be done. It is also the beauty of this recipe that all the dough is developed without the aid of a mixer. So even if you want to make 12 loaves, no worries about mixer capacity with this recipe. Everything is done by hand. You feel the dough changing under your hands. We use a big rectangle food grade plastic container to make batches of 12 breads.
Use our Dough Calculator
Below the ingredients lists you will see a ‘dough calculator’ button. Click on the button to open. Now it is very easy to change the total amount of loaves and amounts of flour to make smaller or larger breads. You can also change the bakers percentages to adjust the ratio between the ingredients like water or salt. And last but not at all least you can calculate the exact temperature of the dough!
Before you start
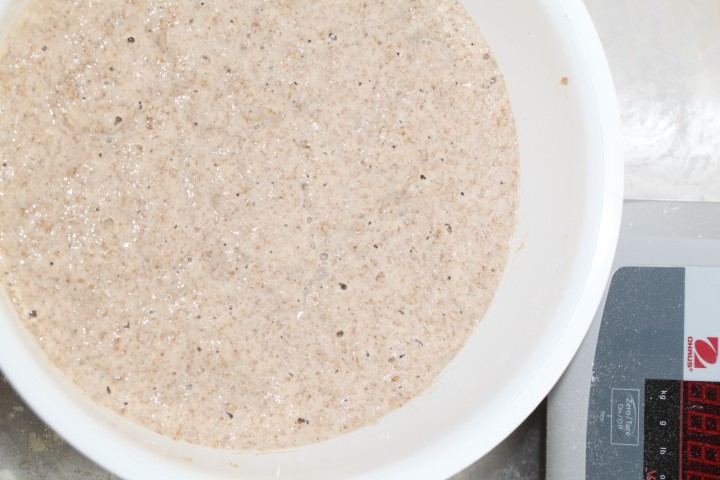
For this recipe we are going to make a starter named a poolish. A poolish is a type of wet sponge usually made with an equal weight of water and flour and a small amount of sourdough starter culture or yeast and NO salt. Making a poolish helps bring more taste and strength to your bread.
We use a sourdough culture which is made with 100% whole grain rye flour. A sourdough culture based on rye flour is easier to maintain, does not go into a slurry when you forget about it, is easier to stir because it has almost no gluten and smells very nice, a bit like fruit. It is also very forgiving in the amount you feed it, everything seems to be alright. Normally we only feed it once a week, after our weekend baking we give it a few table spoons of water and rye flour, stir, ready!
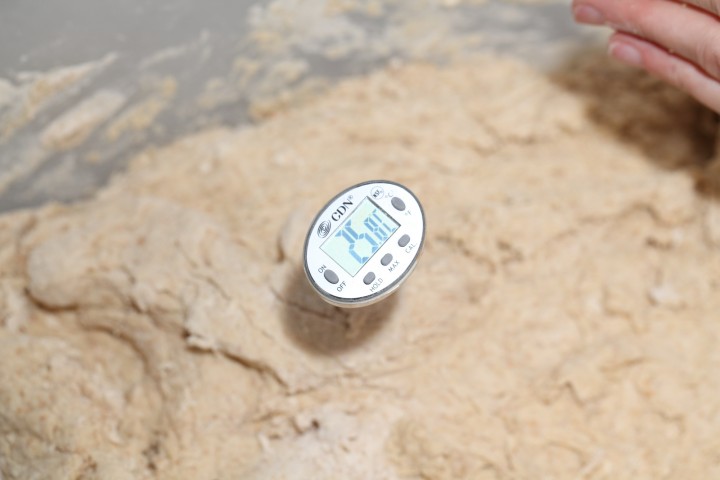
Ideally the temperature of your dough after mixing should be around 24-25 ºC / 75 ºF. You should adjust the temperature of the water you add, so the total dough reaches this temperature. For us this means in summer adding cold water to this recipe and in winter (when our little bakery gets much colder then the rest of our house) adding warmer water. You can measure the temperature of water and dough with a food thermometer. These measurements are important because they correspond with the proving times in the recipe.


| Ingredients for the Poolish | ||||
|---|---|---|---|---|
| 25 | g | wheat (bread) flour | ||
| 25 | g | whole wheat flour | ||
| 10 | g | sourdough culture | ||
| 45 | g | water (room temperature) | ||
| Ingredients for the Tartine Style Bread | ||||
|---|---|---|---|---|
| makes 1 loaf | ||||
| the poolish from step 1 | ||||
| 350 | g | wheat (bread) flour | ||
| 40 | g | whole wheat flour | ||
| 240 | g | water part 1 | ||
| 20 | g | water part 2 | ||
| 6.5 | g | (sea) salt | ||
| 2 | g | instant yeast (optional hybrid version, see text at bottom recipe!) | ||
Making the Poolish
When we make this recipe we make 12 loaves at a time and that is why we do not make the poolish in the big box we use for the final dough (it would spread too thin). But if you make less loaves it totally makes sense to make the poolish and your dough in the same bowl. A good method for making this bread and keeping your worktop clean!
Now in your bowl stir together the bread flour, whole wheat flour and the water at room temperature with the sourdough culture. Mix it well until you have a homogeneous slurry that looks like very thick batter. Cover the bowl with clingfilm and let the prefermenting begin. After 12 hours at room temperature it should be bubbly, light and ready for use. So if you want to begin your bread making in the morning, you should make your poolish at 9 in the evening.
Making the Tartine Style Bread
Take your bowl with the poolish and add water part one (around 32ºC) plus all of the flour but NO SALT. Combine with your hands or a dough whisk until all the water is incorporated.
Leave the dough in your mixing bowl, cover and let rest for 20 minutes (this technique is also referred to as autolyse).
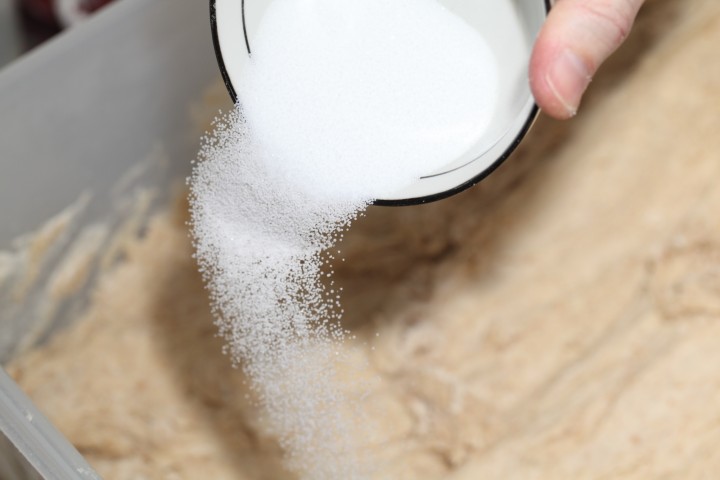
Now add the salt on top of the dough and then add water part two, making sure the salt gets wet. Squeeze the dough with your hands to combine water and dough until smooth and all water has been absorbed. This should take only 1 or 2 minutes.
Again leave the dough in your bowl, cover and let rest for 30 minutes.


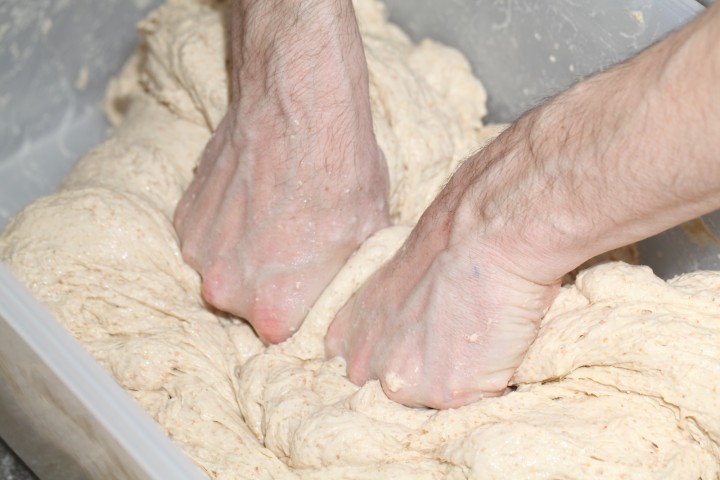
Stretching and Folding Stage
Wet your hands a bit before you start to stretch and fold, this will make it easier to handle the dough. Now do your first stretch and fold while leaving your dough in the bowl. Do a full letter fold, left over right, right over left, bottom over top, top over bottom. Watch our bread movie or our stretch and fold method video to observe this technique if you are not familiar with it.
Cover and again leave to rest for 30 minutes. Repeat the stretch and fold (full letter fold) five more time (so six times in total) each time leaving the dough to rest for 30 minutes. The whole process takes 3,5 hours.


Shaping and Proofing Time
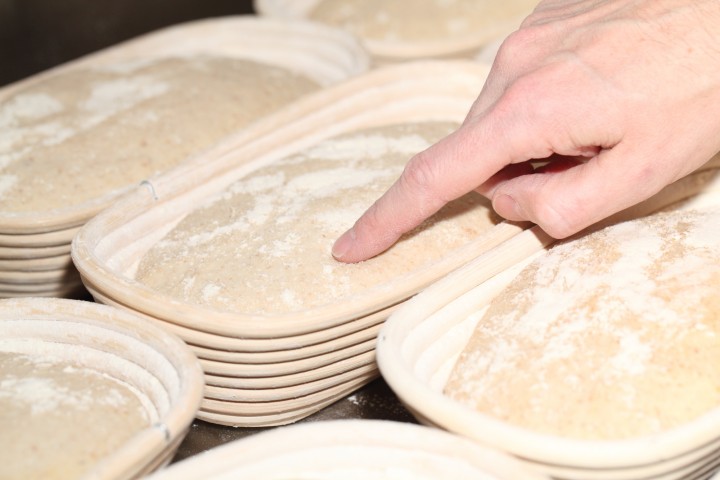
After the last 30 minutes rest it is time to shape your dough. You can make oblong (batard) or round (boule) loaves of bread, whichever you prefer. For instructions on how to shape a boule, take a look at our boule shaping video.
Because this is a true sourdough bread, the final proof will take quite a long time. Please take that time and make sure your dough is really ready for the oven.
Transfer the shaped dough to a proofing basket / banneton, cover and leave to proof for 2 hours and 30 minutes. When you think it has risen enough, use your finger to carefully make a very small dent in the dough. If the dent remains, the bread is ready, if the indentation totally disappears, the dough needs a little bit more time.
Baking
Preheat your oven to 230 ºC / 445 ºF (at what stage you preheat your oven depends on how long it takes for your oven to heat through, some take 30 minutes, some, like ours, with stone floors take a lot longer, up to two hours.
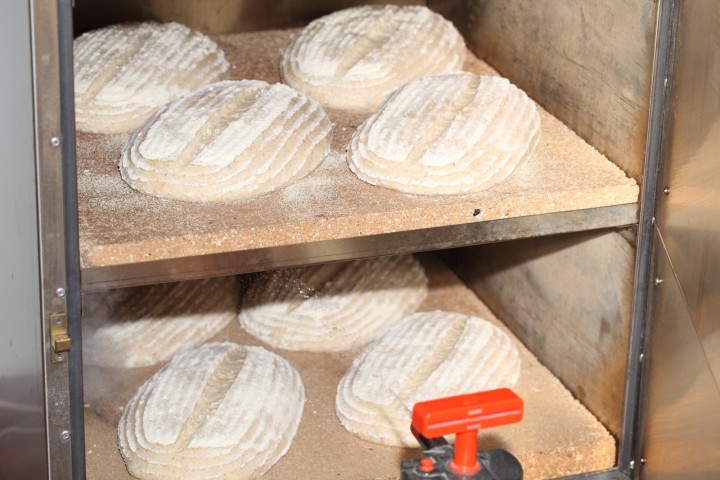
Now your loaf is ready for the oven. Slash the top of the loaf with a lame or bread scoring knife.
To get a nice crust, try to create some steam in your oven by putting a small metal baking tray on your oven floor when you preheat the oven, and pour in half a cup of hot water immediately after putting the bread in the oven. Release some steam by setting your oven door ajar (perhaps with the help of a wooden spoon or oven mitt) 5 minutes before the bread is ready. If you are going to create steam with a baking tray, you may also want to turn your oven temperature a bit higher, because you are going to lose some heat in the process.
After 45 minutes of baking your loaf should be ready. Transfer onto a rack and leave to cool. This loaf also keeps very well in the freezer.
Tartine Style Bread Time Table
Day 1 – 21.00 h Make poolish let ferment for 12 hours at room temperature
Day 2 – 0.900 h Make final dough
- 09:00 – Add flour and water part 1 to starter, combine
- 20 minutes rest (autolyse)
- 09:20 – Add water part 2 and salt, combine
- Rest for 30 minutes
- 09:50 – Stretch and fold 1
- Rest for 30 minutes
- 10:20 – Stretch and fold 2
- Rest for 30 minutes
- 10:50 – Stretch and fold 3
- Rest for 30 minutes
- 11:20 – Stretch and fold 4
- Rest for 30 minutes
- 11:50 – Stretch and fold 5
- Rest for 30 minutes
- 12:20 – Stretch and fold 6
- Rest for 30 minutes
- 12:50 – Shape
- 12:55 – Final proofing 150 minutes
- 15.35 – Bake for 45 minutes at 230ºC / 445ºF
- 16:20 – Your bread is ready!
Making the Quicker Hybrid Version
If you want to make a quicker version of this recipe you can opt for the hybrid version. With hybrid we mean a bread that uses both sourdough culture plus a small amount of yeast to speed up the proofing of the final dough.
For this version you must use 2 grams of instant yeast per loaf in the final dough. You add the yeast together with the salt on top of the dough after the autolyse fase.
You can limit the stretching and folding to 2 hours but do two sets of complete stretch and folds every 30 minutes, 3 x 2 sets in total. The final proofing will be around 1 hour.


Bert Visser says
My rye flour starter smells like paint or acetone…..is this normal or should I start a new batch?
Weekend Bakers says
Hello Bert,
We would advice you to start again. It would be a good idea to get some more oxigen into the culture, by more frequent stirring. The ‘nail polish’ bacteria do not like oxygen but the yeast and the good bacteria like it just fine! You can read about the how and why of this and more tips on sourdough here: www.weekendbakery.com/posts…ough-tips/
Good luck with it!
Hannelore says
In the book Tartine Bread they also give a recipe for pizza, I don’t understand when they use the dough, is it before the stretching and folding or after?
Weekend Bakers says
We have never tried this pizza recipe and never did a pizza dough involving stretching and folding, we would to have to look into it.
We can recommend given our recipe a try:
www.weekendbakery.com/posts…a-poolish/
Pan8 says
When should I use my starter to make the levain? I read on a comment you wrote “you should always let it ripen for 24 hours” what does that mean?
Say I feed it at 8am, should I make my levain the next day at 8am? Should my starter be bubbly and doubled in size or should I wait until it collapses? Sorry English is not my first language 🙁
Jenna says
Hi there! I work in a bakery and have a question. I would like to try this bread, because and I would probably make the poolish at 1am. I wouldn’t be able to get back there the next day until 9pm. Is it okay to let it sit for that long?
Weekend Bakers says
Hi Jenna,
If you are going to need a little more time we suggest compensating by using less culture, cold water or the fridge for a period of time if necessary. You can try a run first and see how it holds up and if needed you can try and slow the process down a bit. But it could be that it will be alright by just using a cool spot for the fermentation for example.
Good luck with it.
Ariane de Roos says
It would be so nice of you guys if you”d add the possibility of a print verse. Now I have to copy and paste everything and sometimes that goes wrong.
I love your website!!! I bake your bread all the time.
thank you!
kindest regards,
Ariane de Roos from Holland
Weekend Bakers says
Hello Ariane,
If you print directly from your browser*, we have made it so that only the recipe and explanation will be printed, all other information and pictures are left out. So, you do not have to copy and paste this way. Hope it will work for you. We are looking to also add a print button to all recipes soon (work in progress) to make it more obvious and convenient.
Greetings,
Marieke
*There is a menu in your browser, usually in the upper right corner that you can click on, it opens and shows a print function. You can click on it and print the page.
Caz says
I have recently discovered the joys of bread making and have been searching for different recipes. Your website is fantastic. I want to try all, the recipes! I am however a little (Ok… very) confused on the different types of flour. Amongst the recipes I have shortlisted to try there are:
1) wheat (bread) flour – Is this also known as strong white flour?
2) bread flour – As above?
3) whole wheat (bread) flour – I am pressuring this is strong wheat flour?
4) whole wheat flour – Is this ‘simply’ an all purpose whole wheat flour?
Thank you in advance.
Weekend Bakers says
Hello Caz,
We want to direct you to our post about flour types: www.weekendbakery.com/posts…our-types/
So it really depend in what country you are and where the flour comes from.
For bread, as a base the flour you would look out for is a wheat flour with a protein content of 12 to 13%. Whole wheat flour is the whole wheat grain ground with all the fiber still in it.
Trish says
Great recipe and timetable. I have been known to take my dough on outings to fit in the stretch and folds 🙂 Thank you for sharing this with us.
Weekend Bakers says
Great stuff, whatever it takes!
Happy baking and greetings from Holland,
Marieke
Tom says
Eerst en vooral bedankt voor deze mooie website! Het is een plezier om hier rond te hangen.
Maar… ik heb een probleem. Ik volg dit recept exact maar mijn ‘deeg’ blijft na het vouwen en rijzen een dikke kleverige brij. De structuur lijkt niet te veranderen.
Mijn starter is zeer actief (verdubbelt na 12u) en ik gebruik natuurlijke lokale bloem en tarwemeel.
Bedankt!
Tom
Weekend Bakers says
Hallo Tom,
Dat is een uitdaging! Het lijkt alsof er niet genoeg gluten in je meel / bloem zouden kunnen zitten.
Weet je het percentage? Voor dit brood is het ideaal om een eiwitgehalte van tussen de 12 en 13 % te hebben.
Ed
Samira says
Hello, thank you for all the information in your blog.
I have some questions. 🙂
1. I live in a warm place. The room temperture is between 28 C and 33 C. Should I live the poolish inside de fridge during the 12 hours?
2. And how about the dough, should I leave inside the fridge too during the bulk fermentation time?
3. And, when you are feeding the levain, how much percent do you use of levain? Considering you are making a 100 hydration.
Thank you very much,
Samira
Weekend Bakers says
Hi Samira,
1.Yes that is a good idea, use the fridge or use it partially with one or two hours outside the fridge if needed to get the poolish good and active.
2.No, you are just going to need less time, experience will teach you how much. You can also add very cold water to the dough for example to lower the initial dough temperature. Also see our piece on dough temperature: www.weekendbakery.com/posts…mperature/
3.We do not exactly understand this question, but we if you keep a third of levain, say 35 grams then you add about 35 g water and 35 g rye flour to make around 100 grams of new levain.
Trish says
Can I bake straight from the fridge if slow proved overnight for 14 hours….love love your site!
Trish
Weekend Bakers says
Hi Trish,
Yes you can! The exact optimum retard time is always a bit of ‘trial and error’ depending on the enthusiasm of your culture and the temperature of your fridge for instance, but it will work.
An thank you and happy baking!
Ed & Marieke
Rossella says
Dear Weekend bakers,
I’m an italian baker and very happy to know and follow your piece of advice.
First of all I would like to say thanks for your suggestions that you have shared with us.
At this point with levain rye starter, 100% hydration i have tested all of your recipes. My loaves is airy and custy and for that i have to say thanks to Rofco oven.
Anyway, in my last experience, I made tartine bread , both wheat-flour type 1 and white wheat flour for bread, and despite a good amount of steam, it’s never developed “grigne”.
Could you give me some piece of advice about how develop a good grigne on my loaves of bread?
(The problem of grigne, it’s an issue also with other loaves made with istant yeast)
Thanks a lot
Rossella
David says
Cara Rossella,
I’m an experienced home baker with a fair amount of experience baking hearth breads, both with instant yeast and with lievitazione naturale. First, I wonder what you mean by “grigne.” My understanding is that the French use this term to refer to the opening or blooming of the loaf where it has been scored. Almost any bread that has been scored before baking will have some degree of “grigne.” In fact, it’s almost unavoidable.
But, when the edges of this opening are raised into pronounced ridges, sometimes quite rough in appearance, they are called “ears.” If you are simply trying to get your bread to open where you have slashed or scored it, it’s a matter of placing properly proofed dough into the oven at the correct temperature. The sudden expansion of the dough due to heat and the greatly increased yeast activity will cause the dough to bloom or open into “grignes.” By the way, this process is greatly enhanced through the use of steam, but that doesn’t seem to be your problem.
If you are trying to achieve “ears” on your bread, it’s basically the same thing, but more extreme. It depends to a large extent on how long the dough has proofed. An over-proofed loaf will have reached close to its maximum volume before going into the oven, and thus will not expand as much or as violently. Dunque, no “ears.” On the other hand, an under-proofed loaf will expand so much and so abruptly, that the dough will tear where the scoring was done, (and sometimes elsewhere on the loaf).
My advice to you is to experiment with different proof times, taking careful note of the times and temperatures. Try a shorter proof time than you have been using. It’s always better to under-proof than to over-proof. Another factor is shaping. A tightly shaped loaf will tend to expand more dramatically and thus produce more of a “grigne” and more pronounced “ears.”
Buona fortuna!
Weekend Bakers says
Hello Rossella,
Thank you first of all and great to hear you already tried so many of our recipes. The thing that we would suggest is to take a look at the quality and brand of the flour and if possible work with organic flour that is preferably stoneground. As you can see here from our experiment, the quality of the flour can make a lot of difference in getting that ear on your loaf: www.weekendbakery.com/posts…nt-part-1/
Next to that the proofing needs to be just right of course if you want to get that oven spring and the scoring itself needs to be deep enough and at the right angle (see our tips here: www.weekendbakery.com/posts…onfidence/)
Hope this helps.
Ed & Marieke
Rossella says
Hi at everybody,
first of all i would to say thanks for your answers. I’ve followed your piece of advice, trailing off time of rising and turning up the oven temperature that it’s turned down when i’ve baked loaves. In that way, today i was able to reach the “ears” on the top of loaf. (here you can see the proof www.instagram.com/p/BBu…rposeflour).
Only you can have an idea how much i feel happy and satisfied.
Weekend Bakers says
Hi Rossella,
What great result and such an amazing color too! Bringing a smile to your bread and your face. Excellent work and wishing you many more of these loaves.
Marieke
Susan Hodges says
Hi Ed and Marieke,
For some reason, my second attempt at my sour dough bread was not quite so successful, as my bread was NOT sour at all.
Will doubling the amount of my rye SD starter (your recipe) , increasing it to 20g, make my bread a little more sour.
Could it be that I have not fed/refreshed my starter sufficiently and hence my bread is not sour?
I have tried the Float- test to see if the SD is active. It sinks to the bottom of the glass of water every time, even after 2 days of feeding. Starter is bubbly, smells ok, and yet it fails the float test.
Could it be that the float-test does NOT apply to100% rye starter because a 100% rye starter is heavier than a white starter?
Also my rye starter is quite thick, not watery.
Can you please please help me with this, as the whole point of making a sourdough bread is for it to turn out at least a tinge sour.
Thank you,
Susan
Susan Hodges says
Forgot to add that my bread did rise, plenty of holes, and my rye starter is about 2-3 months old.
Weekend Bakers says
Hi Susan,
Sourness can vary and sometimes be elusive. We do not think the float test is very reliable and would advice to look at the airiness of the culture itself to judge its quality. We never do the float test ourselves.
A thick culture in terms of aiming for more sourness is good. For further tips that can help you see this post: www.weekendbakery.com/posts…ough-tips/. Every culture has its own properties, so if you are not happy in the end, try and start a second culture next to your current one, maybe with flour from another batch, brand or mill. It could well be that this culture gives you quite different results.
Good luck with it.
Lonny Heiner says
Do you use your starter cold from the fridge for the poolish?
Weekend Bakers says
Hello Lonny,
Yes we do, it is not a problem, especially when you look at the amount used. Just make sure your culture is alive and kicking and has not been sitting in the fridge for weeks without feeding / refreshing otherwise we would advise to do this a day in advance and then make the poolish the next day with the refreshed culture.
Susan Hodges says
Hi Ed and Marieke,
Must tell you this fantastic news. I made this bread and the holes are huge, some the size of a house!
Also plentiful of them. Wow. Simply beautiful. Have never been able to achieve this with any other recipe.
Still Cannot believe I can achieve this after months of trying. This recipe is definitely for keeps.
Thank you very very much for sharing this with us.
Susan
Weekend Bakers says
Wonderful Susan! Yes this recipe is sooo worth the effort. It looks the part but it sure tastes the part too be think!
Susan Hodges says
Hi Ed and Marieke,
Brilliant recipe. I baked this today following your instructions to the letter and the bread
turned out just great. I did not encounter any problems except when it came to slashing the bread.
Using your lame, I dipped it in water and tried to slash it, but it was difficult to move the blade as the dough
Was wet and the blade seems to get stuck in it. The lame just would not cut. The bread did rise beautfully,
but there was no ‘eruption’ because it was not properly slashed? No ears.
I have tried 4 of your recipes and they have all turned out perfect except for this issue.
Can you please advise how I can resolve this problem.
Thanks,
Susan
Weekend Bakers says
Hi Susan,
Scoring properly takes a bit of practice and scoring very wet dough is a double challenge. It is not something we see going perfectly smooth the first time anybody tries it. That is why we made a list with tips on the subject: www.weekendbakery.com/posts…onfidence/
Try to score with one hand and guide the dough a bit with your other hand, this might help too.
Vincent Hentzepeter says
Hello weekend bakers,
Last Saturday we baked your Tartine recipe the hybrid way, I wanted to eat the bread at 14:00 and the yeast indeed did speed up the process. The bread was delicious, nice crumb and great taste. Holes where slightly smaller than the ones on your picture. Today I used my own rye based starter and performed the six steps of letter folds + 2,15 hour of proofing. The result was even better. More taste, as you predicted above, and exactly the texture of your picture. We all love this bread, I stopped eating in time this afternoon, because I know by now: enough is enough. We used a mixture of wheat bread flour from Zuidmolen (Netherlands) and whole wheat flour of our local mill in Hellendoorn (Netherlands). The protein content of this flour is 13,4 grams, so even with this hydration rate the dough is easy to handle. I want to compliment you for the great recipes, they really meet expectations! That’s very inspiring. I have been baking since boyhood, but I am still making progress this way every time I touch new dough. Next bread on our list: your hybrid bread and the semolina with sesame seeds!
Weekend Bakers says
Hi Vincent,
Thank you so much for the excellent comment. Very happy to hear the recipe is such a success. Great you want to try more of our recipes. This time of year we can also highly recommend our kerstbrood and ‘stollenbollen:
www.weekendbakery.com/posts…s-stollen/
www.weekendbakery.com/posts…en-bollen/
Or this festive hybrid loaf : www.weekendbakery.com/posts…nd-prunes/
Wishing you a wonderful Christmas time with your loved ones and many happy baking moments!
Ed & Marieke
Dan says
First, thank you for this extremely helpful article.
Last week I made bread with the standard size given above and the rye starter. I found the mixture too wet, so added in a little flour each time I folded it until it got to the point where it was easier to handle. I cooked it on a circle of baking paper in a 20cm Le Creuset cast iron casserole with the lid off for the final 10 minutes, about 40 minutes in all. It worked very well – looked beautiful, great crust and good crumb except for one little “seam” of harder, doughy bread about two cm across, a few mm thick and 5cm long. Other than that, I was very happy with the result.
This week I tried double the amount. I used slightly less water. This time the dough felt much better, not as wet and soon became nicely elastic and springy. After finishing the six folding sessions it seemed to rise well near a warm radiator (a bit less than three hours).
I baked it in a 24cm Le Creuset casserole for about 40 minutes. Again, it looked great. However, when I cut it the crumb felt a bit soggy and dense; it didn’t have the more airy and open texture of last week. Also the “sour” taste seemed a little stronger than usual. It was still edible but not as pleasant.
Do you have any suggestions as to what I did wrong? In retrospect, the possibly obvious issue is baking time. Because the crust looked as if it were done I only gave it about 40 minutes, the same as the smaller loaf from the previous week, despite having nearly twice the dough.
Also, is there a “best” time to use the starter? For example, I refreshed mine in the morning and used it for the poolish that same evening. At the time I took the starter for the poolish the starter had grown and was shot through with bubbles – it looked fine.
If you have time to share your thoughts I would be most grateful.
Weekend Bakers says
Hi Dan,
Yes, the amount of dough you made needs lots more baking time! It needs about 70 minutes on a slightly lower setting to cook through. No wonder your crumb was soggy, your bread was not nearly ready. Measuring the inside of the bread gives a much better indication than the look of the crust. This Tartine bread is a challenging loaf, so changing things before you are comfortable with the recipe can also be challenging, even for an advanced baker.
Next to that you did not use the starter at the optimum time. You should always let it ripen for 24 hours before using it. This can also have influenced your baking result of course, partly explaining the denseness.
We would advice to go back to your first attempt, making the recipe several times to get comfortable with it and really try to not add flour in the process, it is a real shame to add too much flour and change the recipe in this way. Try to use less flour, just as much as you can handle and practice to get comfortable with the stickiness of the dough. See our tips for handling wet dough here: www.weekendbakery.com/posts…ion-dough/
Hope this helps you on your way.
Happy baking!
Ed & Marieke
Dan says
Thank you Ed & Marieke for those tips, especially the sticky dough link!
Today I have gone back to the original size and will not worry about the wetness of the dough so much. I should clarify that when I say I added flour, I mean no more than what was used to flour the folding surface and also the flour used to prevent it sticking so much to the bowl in which I let it rest.
Still, this time I will try it without this. It turned out very well the first time despite my lack of skill, so I have high hopes.
Dan
yossi hazan says
looks great. can i retard the dough in the refrigerator for 14 hours, right after the last s&f and before the shaping? or it’s better to shape and bake in the same day like in the recipe? tbh i hust afraid of overproofing- so this is the reason to this question. wait to your answer
thanks in advance
Weekend Bakers says
Hi Yossi,
The recipe is balanced so yes, it will give the best result in principle to shape and bake the same day and stick to the time table.
However, it is possible to retard the dough, we would advice to shape the dough and then retard it in the fridge (make sure to cover it well, a plastic bag with air blown in it works well). The amount of time you need to get the perfect proofed dough after retarding is a question of trial and error (depends on dough temp, fridge temp, sourdough activity). Lots of bakers try for weeks to get the optimum result. Just try your 14 hours and see what comes out, it is the only way to find out where you stand under your conditions.
Good luck with it.
Michiel Eldering says
Good results with this recipe with less starter and less water. Worked good with my 11% bread flour. However I stick to Chad Robertson’s advise to use a Dutch oven.
Weekend Bakers says
Good to hear Michiel, thanks for sharing. We had great results with a similar method in the past too.
kathleen says
Hi there,
Love your website! I live in the UK and have been experimenting with the tartine recipe, and am now trying your recipe. Are the gluten levels in UK flours the same as the european flours you bake with? When you specify wheat bread flour do you mean “strong white bread flour” or “strong wholemeal bread flour”? I am using the Doves Farm Organic.
thanks!!
Kathleen
Weekend Bakers says
Hello Kathleen,
Thank you so much for your lovely feedback! We looked into it and we would recommend the strong white bread flour as it comes very close to what we use for this recipe too, also the percentage of protein of around 12.5%. Next to that the recipe calls for a little bit of whole wheat too, so you can use the strong wholemeal bread flour for that and the result should be excellent!
Happy baking,
Ed & Marieke
kaisman says
can i add ollives to the dough? say i make one loaf- so how many clemete olives to add and when to add it ?
gonna make the poolish tomorrow- can’t wait
thanks in advance
Weekend Bakers says
Hello Kaisman,
Yes you can. How much is, in this case, more a question of personal taste but we think you need at least 100 to 150 grams to make an impact on your loaf. We would add them at the stage where it says ‘add water part 2’.
Good luck with it!
Laura says
Hoi Ed en Marieke,
Bedankt voor het verhelderende recept.
Ik heb het stap voor stap gevolgd en tot op heden verliep alles volgens plan, maar helaas toen ik het brood uit het rijsmandje wilde halen was dit bijna onmogelijk. Het deeg zat vastgeplakt aan het mandje en ik kreeg het er moeilijk uit. Ik heb genoeg bloem gebruikt aan beide kanten en vraag me af of jullie een opmerking/oplossing voor mijn probleem hebben. (als het nodig is heb ik filmpjes om het te verduidelijken)
Alvast bedankt,
Weekend Bakers says
Hallo Laura,
Heb je het rijsmandje (is het van riet?) geprepareerd voor het eerste gebruik? Wij hebben een filmpje waarin je kunt zien hoe we dit doen: www.weekendbakery.com/posts…jsmandjes/
Het is belangrijk bij riet dat zich een basislaagje vormt, dat je daarna iedere keer met meel bestuift. Je kunt in het begin het beste een beetje overdrijven met het inmelen, want het is heel vervelend als je brood niet uit het mandje wil. Ook moet je de zwaartekracht in je voordeel laten werken, het mandje op kop houden en een beetje heen en weer wiegen met beleid zodat het deeg rustig naar beneden kan vallen op de plaat.
Succes!
Ed en Marieke
Ying says
I tried baking using the original Tartine bread without any success as the starter is a bit weak and acidic. But the hybrid version in your website is a guaranteed success. It retains the flavour and saves me time. I only started baking for a few months and your website has provided me useful tips to make baking a pleasure.
Thanks so much for coming up with such a wonderful alternative recipe.
Weekend Bakers says
Hello Ying,
So great the recipe worked out for you in this way. We are big fans of the hybrid method and with this recipe for us it yields a wonderful tasty version of this bread and it saves a bit of time too.
Happy baking!
Helga Stintzcum says
I don’t much care for whole wheat bread, but I love rye bread. Can I exchange the whole wheat flour for rye flour?
Weekend Bakers says
No problem, we interchange rye, whole wheat, whole spelt a lot. No problem!
Laurie says
I love this website. Have tried a bunch of recipes. Just discovered your dough calculator!!!!!!!!!!!!!!!!!!!!!!!!
Weekend Bakers says
Thanks!!!!!!!!!!!!!!
Tim says
Hello Ed and Marieke,
I’ve made this bread several times now, it’s our favorite!
I only have a cheap combi-microwave oven and the results were mediocre, great tasting but poor looking (especially the oven spring opening from the side no matter what I tried). So I read in the Tartine book that Chad used a ‘dutch oven’. I bought one from Ikea (Senior braadpan), tried it and now the breads come out perfect!
I have a question about the leftover sourdough. I want to make pannenkoeken (Dutch pancakes) with it but all the recipes that I found include a much larger portion of sourdough (like 250g or even more).
What is your recipe for pannenkoeken with the smaller amount of sourdough from your rye culture?
Thanks for a wonderful site!
Tim
Weekend Bakers says
Hi Tim, we never made sourdough pancakes, as with our method we never have any sourdough starter left to ‘throw away’. However you can make 250g of culture from the rye sourdough very easily; add 15g of rye starter to 125g water and 125g bread flour. Wait for 12 hours and voila pancake sourdough ‘leftover’ starter. Happy baking!
Tim says
Thanks!
Erik Mulder says
Hi,
First of all i really like your website with clear recipes and dough calculator.
I changed this recipe a little to 80% hydration and upped the salt to 2% for compensation.
Now everything worked out good but when I turned my dough from the benneton on to the stone it completely flatted out.
Do I have to make more stretch and folds to compensate for the hydration ?
Thank you in advance!
Weekend Bakers says
Hi Erik, it looks like you used too much water for your flour. Use a stronger flour (with more gluten, like Canadian Manitoba) or reduce the amount of water. There is no shame in this. The flour we can get in Europe tends to absorb a lot less water than the flour of our American friends.
Emily says
I just made this for the first time, following the instructions exactly without the yeast or faster timetable. But it baked to 208 degrees F in 25 minutes! I’m just relieved that I tested it halfway through when it was smelling done. Any idea why this happened? I made a single loaf in a round banneton.
Weekend Bakers says
Emily, we need at least 40 minutes to get a full bake. It is strange for a 750g (full loaf) to be ready in 25 minutes. Did the crumb turn out ok, or still a bit wet and ‘clangy’ ?
Kalle says
This is insanely useful. Thank you for addressing the main concerns I have with the original recipe. I especially appreciate the note on scaling back hydration percentages for European flours. The difference is often overlooked when recipes get converted.
Weekend Bakers says
Hi Kalle, most American recipe tend the use the high fluten ‘strong’ bread flour. This type of flour can absorb a lot more water then a the European flours. However the gluten are not the whole story, you can bake beautiful breads with European flour and you decrease the amount of water a little bit.
Donna Masanotti says
this is a great site!
muna says
I am making this bread formula tomorrow and just started the polish. my questions: 1- my rye starter is not revived yet . Can I use any other starter I have ? 2: Question: we prefer to have more whole-wheat in our bread, I tried the calculator to increase the WW flour and reduce bread flour, but seems doesn’t work, as water weight did not increase among other values, how can I achieved this bread with minimum 30% whole wheat please? what hydration should I go to? thanks
Weekend Bakers says
Hi, you can use any starter you like. We like a rye starter, but a wheat starter will of course work as well. You can increase the amount of whole wheat, using the dough calculator you can change the wheat flour to 60% and the whole wheat flour to 30%. To compensate for the larger amount of whole wheat flour, you probably need to increase the ‘water part 1’ to about 62% for a total hydration of around 75%. Happy baking!
Muna says
Made it, omitted the commercial yeast but my bread came out so beautiful! Thanks allot for sharing, and will be a repeat bread in my house 🙂
Alan Neilson says
May I say what a fantastic site this is, and thanks for the “Tartine” recipe which worked brilliantly. Chad Robertson may be an iconic baker but as an author, I think not so good….!!
Weekend Bakers says
Hi Alan, we also found that his ideas are good, but the recipe are little bit illogical. Happy baking!
Diane says
Hey Ed & Marieke
Have you ever left your bread to prove overnight in the fridge after the final shaping they way the Tartine bread book suggests? I know this would mean stretch the process out to three days – would this be a problem for the dough using up all of its food source and collapsing??
Many thanks
Diane
Weekend Bakers says
Hello Diana, we have indeed tried to make retarded loafs. We sometimes do the final proof of our Pain Rustique bread in the fridge. Most of the time we do not have enough free fridge space to store 6 loafs. Just give it a try, we use bags of organic plastic to store the loafs in.
Trevor G says
Hi there, just wondering how big of a container you use to mix up a recipe that makes 12 loaves.
Weekend Bakers says
Hello Trevor, we use a food safe container of 28 liter with a plastic lit. The dough for 12 loafs do fit nicely within this container with still space left to do the stretch and folds. Happy baking!