Less stretching & folding, less wet, less steps, but you do need a mixer for this one…
This method is easier, the recipe has less steps, the dough is less wet than our 80% hydration baguette recipe, and yet this one also yields wonderful baguettes. If you were to compare the two recipes you could say this easy version has a little less depth of flavor and the holes in the crumb are less impressive, but it is also less laborious and less sticky (saves you 2 hours on baking day). The flavors are actually very much comparable and eaten in combination with other foods like cheese it will be hard to notice much difference in taste.
We think this recipe offers a great place to start for the novice baguette baker. Still, it is not at all the easiest of bread recipes to master, but it is one every home baker wants to have as part of his baking repertoire. And we are confident this recipe will also give you very satisfying results.


So lets start baking! But before we do, you may want to check out our baguette video Watch it here…
And our tips for bread scoring with confidence and handling wet dough may also come in handy.
Last but not least do not forget to stop by our baguette log and follow our baguette baking progress and learn from our experiences and mistakes!

This is what the active poolish looks like
| Ingredients for the poolish | ||||
|---|---|---|---|---|
| 380 | g | wheat (bread) flour | ||
| 380 | g | cold water (straight from the tap) | ||
| 0.7 | g | instant yeast* (we use twice the amount in winter when temps are low!) | ||
| Ingredients for the baguettes | ||||
|---|---|---|---|---|
| 1 batch makes 4 baguettes | ||||
| the poolish from step 1 | ||||
| 380 | g | wheat (bread) flour | ||
| 190 | g | water at room temperature | ||
| 12 | g | (sea) salt | ||
| 2 | g | instant yeast | ||
* In winter our bakery is between 16ºC / 61ºF and 18ºC / 65ºF, so we use more yeast to get the poolish going. In summer the average temperature is between 21ºC / 70ºF and 25ºC / 77 ºF so we can use less yeast to get the same result. So take the temperature of your surroundings into account to determine your amount of yeast.
Making the poolish
In a bowl stir together 380 grams of bread flour with 380 grams of cold water with the yeast (see above). Mix until you have a consistency that looks like dough-like batter. Cover the bowl and leave for 12 hours at room temperature. So if you want to begin your baguette baking in the morning, you can make your poolish the evening before.

Making the baguettes
In the bowl of your standing mixer, combine the poolish with the other ingredients and knead for 6 minutes. Cover and leave to rest for 40 minutes. Now turn out the mass onto your work surface and stretch and fold, doing two to three sets of letter folds (one set = right over left, left over right, bottom over top, top over bottom) depending on how well your dough cooperates. Stop if the dough is not willing to stretch anymore. Put the dough in a greased bowl, cover and again leave to rest for 40 minutes.


Turn out the dough and stretch and fold a second time, doing one to two sets of letter folds.
Directly after the stretch and fold, divide the dough in 4 equal parts. Now you are going to pre-shape the dough parts one by one by carefully stretching the corners, making a rectangle of each of the 4 pieces, and rolling them up. Try to make your rectangle and roll as even as possible without fussing too much with the dough. Use enough flour to handle the dough, but try to keep it to a minimum. Cover and leave to rest for 10 minutes so the gluten can relax.


Preheat your oven to 240ºC / 465ºF (at what stage you preheat your oven depends on how long it takes for your oven to heat through, some take 30 minutes, some, like ours, with stone floors take a lot longer, up to two hours.)
Take a roll of the pre-shaped dough and sprinkle it with a little flour and softly press it into a rectangle with a short and a long side. The more even the rectangle the nicer the baguette will look in the end. With a dough scraper make sure the dough is not stuck to your work surface with the help of a little bit of flour.


With a dough scraper, flip 1/3 of the long side onto itself and press down the seam, with the heel of your hand, to get some tension on the outside of the dough, now repeat it two more times until you have a roll shape. Make a rolling motion with your hands from the center to the sides with a soft touch to make the baguette longer and to try and make nice pointy ends on both sides of the baguette.
Practice makes perfect, do not be hard on yourself, it is not an easy job, even with this slightly less sticky dough, compared to the 80% hydration we use for our other baguette recipe.

Place the baguettes in a couche / proofing cloth made of linen or in a baguette pan, or something of your own invention, but make sure the baguettes have enough side support to hold their shape. Cover them and leave to proof for 35 minutes.
Baguettes resting in their couches (beds) made of thick proofing linen
To check if the baguettes are ready, dip your finger in some flour and gently poke your dough.
- If the hole disappears completely: under-proofed
- If the hole dent pops half way back out: proofing is just right
- If the hole stays entirely dented in: over-proofed


Score the top of the baguettes with a lame/bread scoring tool. Cut as straight along the long axis of the loaf as possible. Mentally divide the baguette into lengthwise thirds, and keep the cuts within the middle third. Overlap the cuts by about one third of their length, while holding the knife at a 30 degree angle. Also check out this very useful video on proper baguette scoring.

Do not use this steam generating method with your normal household oven! Check our oven tips first
Bake in the preheated oven for 27 minutes. Leave to cool on a wire rack.
To get a nice crust, try to create some steam in your oven by putting a small metal baking tray on your oven floor when you preheat the oven and pouring in half a cup of hot water immediately after putting the bread in the oven. Release some steam by setting your oven door ajar 5 minutes before the bread is ready. If you are going to create steam with a baking tray, you maybe also want to turn your oven temperature a bit higher, because you are going to lose some heat in the process.

Baguette time table
Day 1
Make poolish
Day 2
00:00 Mix ingredients 6 minutes
40 minute rest
00:46 – 2-3 letter folds
40 minute rest
01:26 – 1-2 letter fold + divide + pre-shape
10 minute rest
01:41 – shape + proof
35 minutes final proofing
02:20 – into the oven
Baking time 27 minutes
02:47 – take out and leave to cool
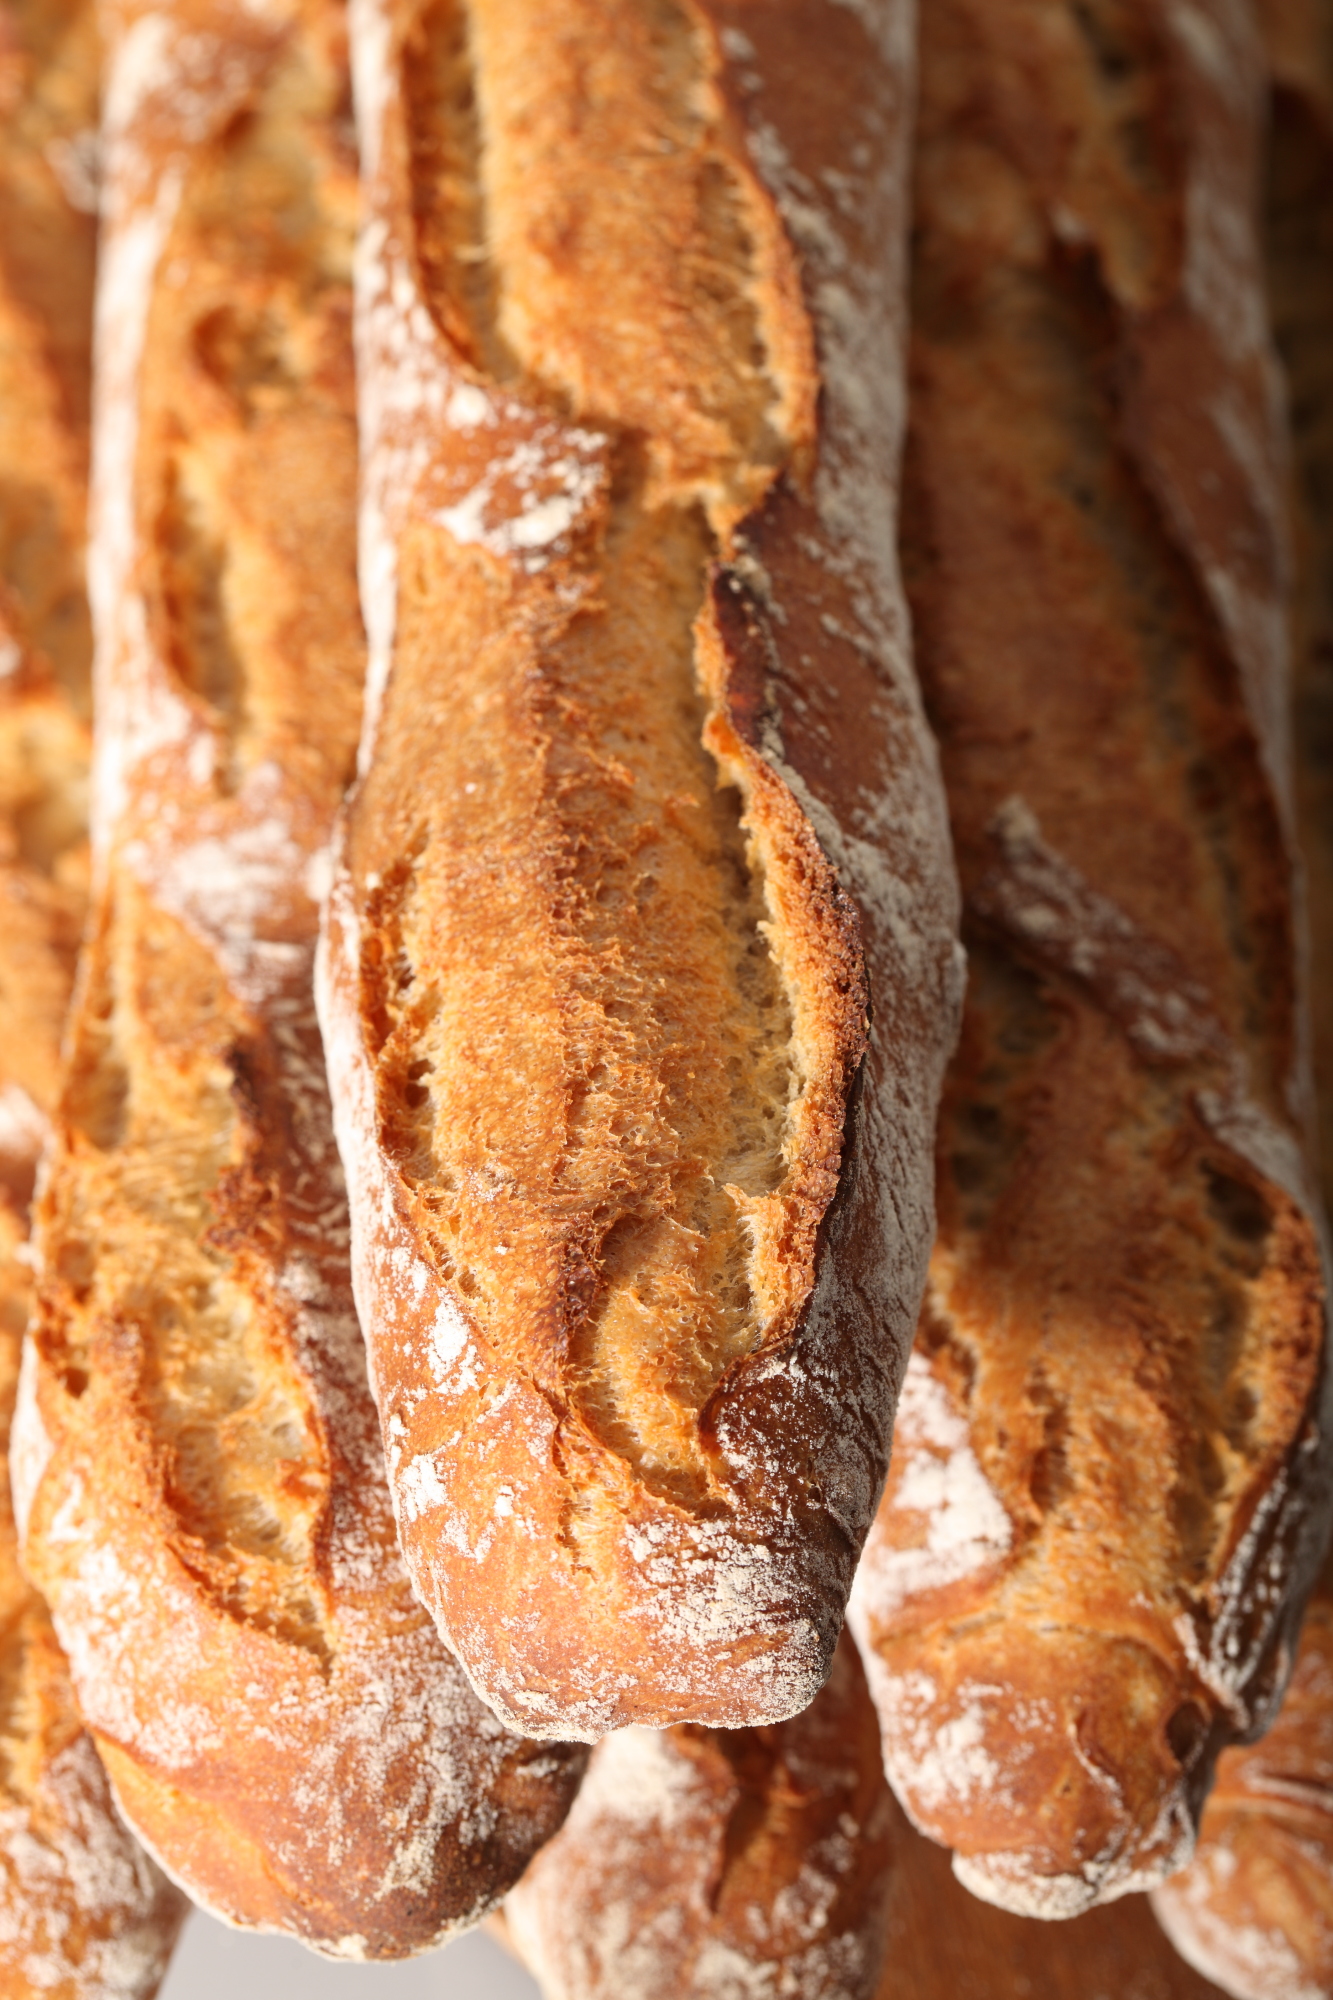
The crumb: the holes are slightly less impressive compared to the 80% hydration recipe, but still very nice texture and taste!
If you are looking for couches / proofing linen for baguettes, we have really good ones made from 100% French bakers linen in our Weekend Bakery web shop!
Hi! I have been making my baguettes without a Poolish for a few years now and I want to try your great recipe. Since I don’t have a standing mixer, can I mix my dough by hand without any problem?
I thank you in advance.
Hello Diane,
Yes, that is no problem. Depending on your method, we would estimate a kneading time of 12 to 15 minutes.
Alternatively, you can add an ‘autolyse’ phase by roughly mixing the poolish with the other ingredients – but WITHOUT the salt and yeast of the final dough – for 1 minute until you have a shaggy mass. Leave this covered for 20 to 30 minutes and then continue with the kneading process and of course now adding the 12 g salt and 2 g yeast for the final dough.
This way the water gets absorbed into the flour and you can handle the dough better when starting the kneading by hand. Maybe even shorten the kneading time too.
Hope it will be great.
Enjoy your baking!
Hi,
This recipe looks like it might be a great one to start making baguettes. Can I use active dry yeast instead of instant? I’m planning to bloom the yeast per package directions before making poolish and before making the dough the next day.
Thanks for providing this and the other great recipes here!
Hello Tim,
Yes you can of course. You need to do a conversion from instant to active dry yeast.
You need a little bit more when using active dry yeast.
Converting from instant dry yeast to active dry yeast you must multiply by 1.2
So for the poolish you need 0.84 active dry yeast and for the final dough you need 2.4 grams.
And yes, this is, we think a very good starting place for making baguettes.
Hope it will turn out great and you will have fun with the process.
Happy Holiday baking!
Ed & Marieke
Thanks so much. Enjoy your holidays!
Just a not the baguette shaping video has moved to.
www.kingarthurbaking.com/video...a-baguette
Hi,
This will be my first attempt at baguettes. I have the baguette pans (metal with air holes) and am wondering if I should line with parchment before baking, and if the baking temperature/time would be different than on a baking stone. Thank you for the recipe and I’m crossing my fingers on my first try!
Ed & Marieke,
I have loved this recipe and have started making it weekly so we fresh bread at home instead of buying it.
I am making a batch for extended family and I am hopeful you can help me. I know this makes 4 baguettes but I am looking to make 6 baguettes instead. How would I go about adding to the recipe so I can get it correct? I know I could just make to batches but it will go bad before we can eat it and 6 will fulfill everyone who needs one. I don’t want to get the ingredients count wrong especially the yeast.
I hope you can help!
Jasmine
Hello Jasmine,
Very happy to read the recipe is so well loved. Glad to help you. It is very simple with the dough calculator that comes with the list of ingredients. Open it and where you see ‘total flour’ you fill in 1140 instead of the current 760 (the calculation behind this is you divide the one batch by 4 and then multiply x 6). Each loaf needs 190 grams of flour so 6 x 190 =1140. When you have filled in this 1140 g for the flour the rest of the ingredients are shown also for your 6 baguettes.
Hope this will work for you. Let us know if you need our help!
Best of luck and enjoy,
Marieke
Perfect! Thank you for the dough calculator! I will definitely use it.
Jasmine
Hi, thanks for this wonderful recipe.
I live in a very humid climate (averaging 70-80%) with the average temperature in the day at 30deg C.
How can i adapt this recipe to where i live?
Thanks for your reply!
Hello Cas,
Thank you. These are very different conditions to ours. The main changes you need to make when humidity and temperatures are this high is to lower the hydration of the recipe. So you should probably start with 10% less hydration, maybe even go to 20% less. We cannot tell you from our experience what would work best. The other thing is that because of the humidity your baking time could be a bit longer because of the slower evaporation, so take this into account too. Of course the proofing will go quicker too in these conditions. You can lower the yeast amount, shorten the proofing times or do a combination of both. Our suggestion would be to start with 1/3 to 1/2 of the yeast amount, depending on the temperature not only of the surroundings but of everything you use and the dough itself. If everything in total is 30C then use 1/3 of the yeast, maybe even less.
Hope you will work it out with a few tries!
Hi again!
I have since tried baking baguettes twice, following your advice on humid environments. I reduced the hydration to 65% and used ice cold water, and these seemed to work well! the baguettes were delicious straight out of the oven!
however i realised that after 3-4 hours on the bench, the crust became soft and more chewy, while the interior stayed the same. i suspect it is due to the humidity in the environment on the countertop…?
Hello Cas,
This is perfectly normal and cannot be helped. It is not for nothing bakers in France bake baguettes several times a day. Even in their climate the baguettes have a tendency to do this after a few hours. So in your case, with the extra humidity, this will happen.
You can use the freezer, give the baguettes a quick turn in the oven again or use a toaster to get some crunch back. But eating fresh is the best option.
Hello Ed & Marieke,
I just discovered your website, better late than never, and I am really impressed with the level of detail and instruction you give to all your recipes.
I loved my first try making this baguette recipe before the 80% hydration one as I feel like I need to work up to it. I do have a question for you. Your recipe for the poolish says .7 grams of yeast and I was wondering if that was correct or if you meant 7 grams. So, to give you context, I read 7 grams and made the poolish and it worked perfectly fine, I think, but I wanted to check before I try this recipe again in a couple weeks.
Thank you again for the work you put into these recipes and posts before you deliver them to us.
Jasmine
Hello Jasmine,
Thank you for your kind comment. It really is 0.7 grams and not 7. So that would be 1/4 of a teaspoon or double that amount when it is really cold. If you used 7 grams we almost cannot understand it was not over-ripe the next morning and even collapsed and soupy. Maybe it was really cold or did you put it in the fridge? Or is the yeast you use a bit older or not from a sealed package. That could also explain less activity.
You can assume, with our recipes that the amounts you read are correct and also look at the comments of other people who have already made them that they have good results.
We hope you will try it with the right amount next time (so maybe you need to use the 1.4 grams or 1/2 teaspoon with your conditions).
Above all we hope you will enjoy your baguette baking and if it works it works!
Greetings from Holland,
Ed & Marieke
Thank you so much. I will follow the receipt to a T as I have discovered that your recipes are incredible and incredibly thorough.
I am going to be trying the baguette recipe again with the .7 gram in the poolish and I am hoping to try your classic croissant recipe this weekend coming up.
Again, your website and how you explain everything is very well done.
Thanks,
Jasmine
Much appreciated Jasmine!
Hi,
I wanted to do the baguette using the sourdough starter. How much starter should I use together with the 380 of flour and 380 of water?
I meant using my sourdough culture.
Hello Christina,
This is not an easy question to answer, the recipe we describe here is perfectly balanced for yeast. If you want to add sourdough to the preferment we would suggest using 40 grams of active sourdough culture for this and still use the small amount of instant yeast in the final dough, so make a hybrid version and you can stick to the method and times given in the recipe. If you do not want to add any yeast you need to adjust the proofing times, but we cannot tell you what would work best to get a good result. Also take into account that a 100% sourdough version will be very different in taste and texture and thickness of the crust.
I’m enjoying this recipe! Using my sourdough starter instead of the poolish, with pretty good success. The recipe is not quite 4 baguettes using my baguette pan, so on second batch, have made two larger baguettes and a some rolls, as a breakfast treat! Second time around, I had a lot more confidence with the dough, and they improved a lot. The video on shaping is so helpful, as is experience in how the dough feels. Thanks so much for this carefully written and excellent recipe.
Hello Tina,
Excellent, thank you for your feedback and enthusiasm. Yes, your refreshed culture with enough quantity can of course function as a poolish.
Great you are making big steps forward already on your second attempt. Baking and confidence are two words that go together well and lead to better results in our experience too 🙂
Enjoy your baguette baking and maybe try the baguette boules too?
www.weekendbakery.com/posts...he-recipe/
My first attempt and quite a succes! Not without some frustration at the sticky dough but a wonderful crusty and tasty result. Proving your recipes are really dummy proof….
Thank you very much for your excellent website!
Hello Sara,
Thank you for your lovely comment. And you are certainly no baking dummy when tackling this kind of recipe with this level of stickiness!
And you will get used to it more and more with practice.
Enjoy your baking , eating and sharing in 2020!
I baked my baguettes today with a 75% success rate. I can’t get all 4 baguettes in my oven at the same time so after 20 minutes I moved the first 2 to the oven rack (outside my baking steel) then slipped the other 2 in onto the steel. The first 2 burned badly on the bottom so I took them outside to rid my kitchen of the smell. I finished cooking the last 2 with success (50%). I later cut into the first 2 and the crumb was pretty good (25%). So, I know what not to do next time.
Got a question: my dough was 72° F after mixed, before shaped. They were ready to cook after 40 minutes of proofing. I cannot get all 4 in the oven at the same time so at what point do I put 2 in the fridge while I take care of the other 2?
Btw, I used KAF Organic bread flour and I used all of your measurements/weights. Dough was wet at first but settled each time I did my folds. I did the max number of folds you recommended. You guys are THE BEST!
Hello Jeanette,
Sounds like a lot of things are already going well, but what was the cause of the bottom burning (very often it is too dark on top that is the problem). Great you liked the crumb already. There are many roads you can take to split the recipe in two or the baking in two. The most economic is using the fridge with the second batch a short while (say 30 minutes) before the first batch goes into the oven. It depends if you already see signs of over-proofing or if the second batch can take some more or a cool spot or the duration of the final proofing for the second batch is enough (and the fridge not needed that way) at all).
Great you kept going with the dough and saw it developing, just as it should be.
Hope you get to the bottom of the burning You can use a baking sheet with baking paper maybe and see how that goes. And of course keep an eye on them, and if needed temper the oven.
Hope it will all work out and you find our advice useful.
Enjoy your baking this December!
Ed& Marieke
I’m trying out this recipe and after doing stretch and fold two times (with a 40 minute interval) my dough is actually too wet to handle. I’ve done some dlour on my hands and the deegschraper, but still I was unable to make nice rectangles. On Youtube I found your baguette baking video in which you stretch and fold for a much longer time than in this recipe. Should I also stretch and fold for 2 minutes and then try pre-shaping my baguette? Thanks in advance!
Hello Stan,
That’s a very good suggestion and that would be our advice. So much is dependent on the flour you use and the amount and type of gluten in it. This determines how much liquid to use and the elasticity and extensibility of the dough. So, it could well be that just a few % less hydration and /or some more S&F would make the dough more ‘cooperative’. This is why we suggest the added ‘depending on how well your dough cooperates and Stop if the dough is not willing to stretch anymore’ to the instructions.
Also, try a different flour (with around 12% protein or a bit higher) if you still do not like your results.
Hope this helps and enjoy your baguette baking!
Operation succeeded with in the end 66 % moisture. Large ‘alveolles’ as a french trad francaise baguette.
Super tasting baguette.
Used your 30° angle suggestion for scoring technique: i still need a lot of practicing after this batch but saw immediate difference from scoring straight 90° instead. Tx!!!
Glad to read your latest comment Philip and glad you persevered! Based on your earlier comment we were wondering if your mixing was the culprit, maybe somehow under-developing the dough, not getting enough gluten strength. But practice makes perfect. So glad you like our instructions and they help you perfect your baking and loaves.
Enjoy your baking and baguette making!
Ed & Marieke
Hi,
First time i use this recipe. I do not understand why my dough always looks much stickier and lacks strength at the end of mixing. Even when reducing the water to total 66 %. I use 13/680 wheat flour. Package states a moisture perc at around 15 perc. I had this with your recipe but also with other recipes. When above 70 % water dough loses strenght. I had better experience when using 24 h 4 degr C ‘pointage retarde’ but even then when eg looking at french bakery instruction video on youtube they all show a much stronger dough at end of kneading. While all this is is a bit frustrating i manage to bake good tasty baguettes
Wanted to add still. Your website instructions are really excellent! Thank you for this.
Thanks so much for this recipe and the excellent instructions with videos and images. For me this produced a remarkable baguette, better than some I have had in New Orleans, and certainly good enough to wow my friends who come to dine.
The stretch and fold technique works so well that I have gained new confidence in working with high hydration dough and am going to move next to the 80%. Thanks Again!
Benny
Great work Benny, so glad it worked out well and you are enthusiastic about the recipe and techniques. Always great to learn something new, especially when it yields good results. With this experience the 80% recipe will be a good step to take. Enjoy the baguette baking!
Marieke & Ed
This sounds really good…but do you have cup/teaspoon conversions for this recipe ? Anxious to try this…comments are so positive!
Hello Bonnie,
We very much recommend weighing your ingredients. Professional bakers use scales (also in the US) and in Europe almost all home bakers do too. A scale will give you the exact same weight every time. Which is absolutely needed if you consistently want to make good bread, especially good baguettes and pastry. You can get a scale for the same price as a few sacks of good flour and less than a lot of baking tools.
But we understand not having scales at hand. We do have very handy baking conversion tools and a quick and easy to scan table for conversion of all staple baking ingredients.
www.weekendbakery.com/cooki...nversions/
Let us know if you need our help!
Happy baking
I made this the other day, and used the slap and fold technique instead of a machine, and added 15 minutes of autolyse. Despite completely failing the shaping of the baguettes, they came out tasting great with an amazing holey crust. Thank you for this recipe! I will be attempting it again tomorrow.
Thanks for your comment Emma. The shaping takes some practice but you will get more comfortable with the stickiness of it when you do it more often!
And so great with baking bread, even though it is not yet 100% the way you want it, it can still taste absolutely great.
Happy baguette baking!
Best French bread recipe. Texture, and taste were fantastic. Great explanation, and the videos explaining technique were really good. This will be my go to French bread recipe. Thanks.
Thank you so much for your kind comment April. So glad it worked out well and you are enjoying your own home baked French baguettes.
Happy baguette baking!
Marieke & Ed
look easy
Did not get the nice holes that you got. What did I do wrong?
Did not get the nice large number of holes . What did I do wrong ?
Hello Antoine,
It can be one of these things or a combination:
Fumbling too much with the dough, pressing on the dough too hard or adding too much flour during the process to compensate for the stickiness of the dough.
Some people oil their work surface and lightly oil their hands during kneading or folding. Some people lightly wet their hands. I prefer to use my hands dry, with maybe a bit of flour. Test different methods and see what works for you.
Also remember that different types of flour have different levels of moisture absorption. Make sure you have the right type of flour for the recipe or adjust your moisture levels accordingly.
Thanks.
Really good explanation
Great website
Thank you
Thank you Sammy for letting us know and happy baking weekend!