
It’s all about the layers…
Klik hier voor Nederlandse versie
With this recipe we want to give you the exact directions on how we go about making classic French croissants. The recipe is an adaptation from the recipe for Classic Croissants by Jeffrey Hamelman. We started out largely following the instructions for his recipe, changed everything to our beloved metric system and found out some worthwhile croissant knowledge of our own along the way. Hopefully enough to justify sharing it all with you and inspiring you to give croissant baking a shot yourself.
Before you start we can recommend watching our croissant making video to get a general feel for the recipe. You can also check out our croissant making log where we keep track of our own croissant baking adventures. For answers to your croissant questions you can check out the Frequently Asked Croissant Questions section.
This recipe will yield about 15 good croissants plus some leftover bits which you can use to make a few, slightly odd shaped ones, or other inventive croissant-like creations.
If at first you don’t succeed, maybe you can take comfort from the fact that our first efforts were not very ‘croissant worthy’. But as you can see we persevered and got better…But we have to admit it is and always will be a tricky process. You have to work precise and be focused to get good results. So away with screaming children, hyperactive animals and all other things distracting! Put on some appropriate croissant making music and lets get to it…
Please read the following tips;
According to Raymond Calvel croissants laminated with margarine are formed into the crescent shape, while croissants laminated with butter are left in the straight form. We say, use whichever shape you like best, but do use butter!
The croissant recipe

Ingredients for the croissant dough
500 g French Type 55 flour or unbleached all-purpose flour / plain flour (extra for dusting)
140 g water
140 g whole milk (you can take it straight from the fridge)
55 g sugar
40 g soft unsalted butter
11 g instant yeast
12 g salt
Other ingredients
makes 15
280 g cold unsalted butter for laminating
1 egg + 1 tsp water for the egg wash
Day 1
Making the croissant dough
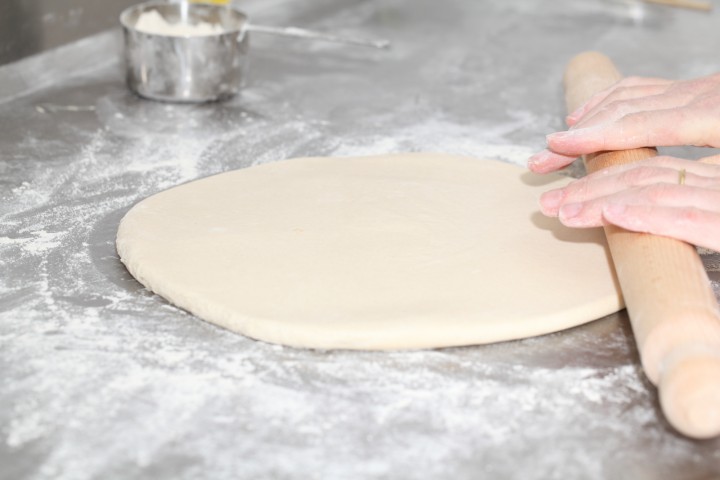
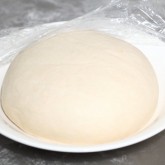
We usually do this part in the evening. Combine the dough ingredients and knead for 3 minutes, at low to medium speed, until the dough comes together and you’ve reached the stage of low to moderate gluten development. You do not want too much gluten development because you will struggle with the dough fighting back during laminating. Shape the dough like a disc, not a ball, before you refrigerate it, so it will be easier to roll it into a square shape the following day. Place the disc on a plate, cover with clingfilm and leave in the fridge overnight.
Day 2
Laminating the dough
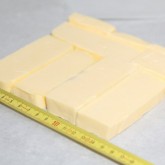
Cut the cold butter (directly from the fridge) lengthwise into 1,25 cm thick slabs. Arrange the pieces of butter on waxed paper to form a square of about 15 cm x 15 cm. Cover the butter with another layer of waxed paper and with a rolling pin pound butter until it’s about 19 cm x 19 cm. Trim / straighten the edges of the butter and put the trimmings on top of the square. Now pound lightly until you have a final square of 17 cm x 17 cm. Wrap in paper and refrigerate the butter slab until needed.
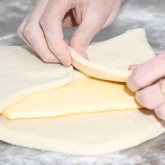
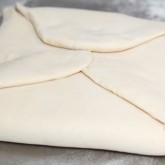
Take the dough out of the fridge. With a rolling pin roll out the dough disc into a 26 cm x 26 cm square. Try to get the square as perfect as possible and with an even thickness. Get the slab of butter from the fridge. Place the dough square so one of the sides of the square is facing you and place the butter slab on it with a 45 degree angle to the dough so a point of the butter square is facing you. Fold a flap of dough over the butter, so the point of the dough reaches the center of the butter. Do the same with the three other flaps. The edges of the dough flaps should slightly overlap to fully enclose the butter. With the palm of your hand lightly press the edges to seal the seams.
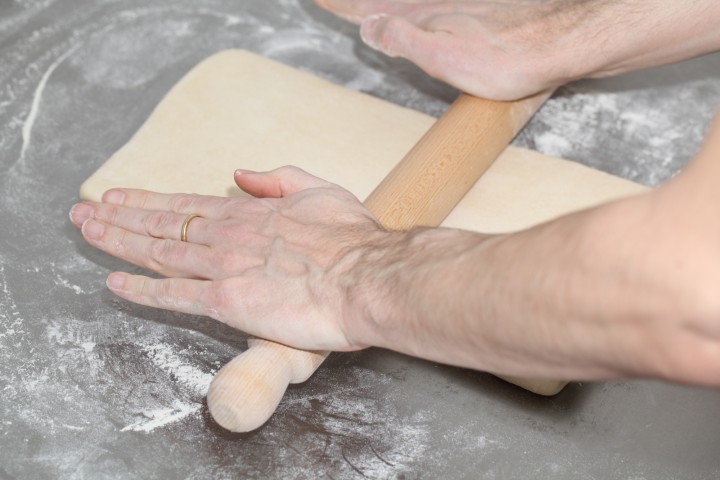
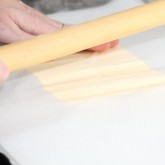
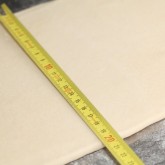
Now the dough with the sealed in butter needs to be rolled out. With a lightly floured rolling pin start rolling out, on a lightly flour dusted surface, the dough to a rectangle of 20 x 60 cm. Start rolling from the center of the dough towards the edges, and not from one side of the dough all the way to the other side. This technique helps you to keep the dough at an even thickness. You can also rotate your dough 180 degrees to keep it more even, because you tend to use more pressure when rolling away from you than towards yourself. You can use these techniques during all the rolling steps of this recipe. Aim at lengthening the dough instead of making it wider and try to keep all edges as straight as possible.
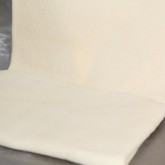
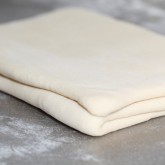
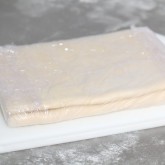
Fold the dough letter style, cover with clingfilm and refrigerate for 30 minutes (fold one third of the dough on top of itself and then fold the other side over it). Repeat the rolling and folding two more times (ending up with 27 layers of butter in total), each time rolling until the dough is about 20 cm x 60 cm. After each fold you should turn the dough 90 degrees before rolling again. The open ‘end’ of the dough should be towards you every time when rolling out the dough (you can see this in our croissant making video at around 3:40 minutes). After the second turn, again give it a 30 minute rest in the fridge. After the third turn you leave the dough in the fridge overnight until day 3, the actual croissant making day!
- Roll out to 20 cm x 60 cm
- Fold
- Refrigerate 30 minutes
- Rotate 90 degrees
- Roll out to 20 cm x 60 cm
- Fold
- Refrigerate 30 minutes
- Rotate 90 degrees
- Roll out to 20 cm x 60 cm
- Fold
- Refrigerate until day 3
- Rotate 90 degrees
- Roll out to 20 cm x 110 cm
Also see complete time table at bottom of page
Day 3
Dividing the dough
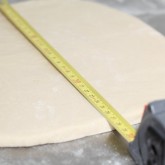
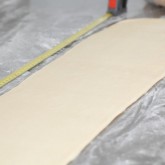
Take the dough from the fridge. Lightly flour your work surface. Now very gently roll the dough into a long and narrow strip of 20 cm x 110 cm. If the dough starts to resist too much or shrink back during this process you can fold it in thirds and give it a rest in the fridge for 10 to 20 minutes before continuing. Do not fight the dough, when the dough refuses to get any longer, rest it in the fridge! It is such a shame to ruin two days of work.
When your dough has reached its intended shape, carefully lift it a few centimeters to allow it to naturally shrink back from both sides. This way it will not shrink when you cut it. Your strip of dough should be long enough to allow you to trim the ends to make them straight and still be left with a length of about 100 cm.
Shaping the croissants
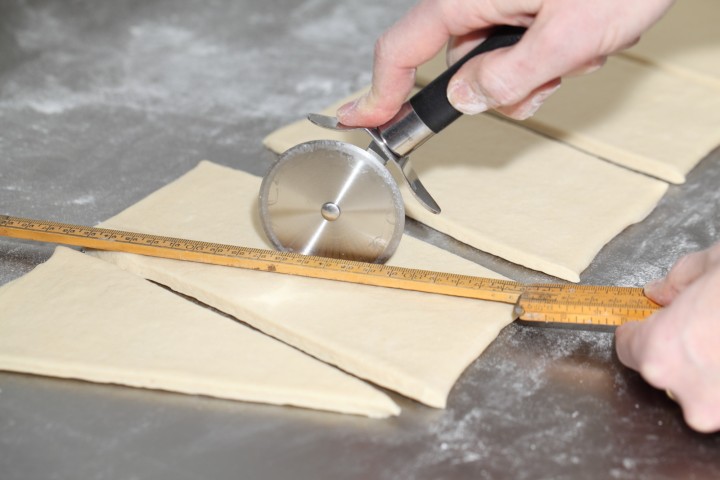
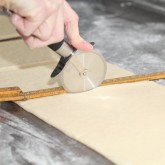
For the next stage you will need a tape measure and a pizza wheel. Lay a tape measure along the top of the dough. With the wheel you mark the top of the dough at 12,5 cm intervals along the length (7 marks total). Now lay the tape measure along the bottom of the dough and make a mark at 6,25 cm. Then continue to make marks at 12,5 cm intervals from this point (8 marks total). So the bottom and the top marks do not align with each other and form the basis for your triangles.
Now make diagonal cuts starting from the top corner cutting down to the first bottom mark. Make diagonal cuts along the entire length of the dough. Then change the angle and make cuts from the other top corner to the bottom mark to create triangles. Again repeat this along the length of the dough. This way you will end up with 15 triangles and a few end pieces of dough.
Using your pizza wheel, make 1.5 cm long notches in the center of the short side of each dough triangle.
Now very gently elongate each triangle to about 25 cm. This is often done by hand, but we have found that elongating with a rolling pin, very carefully, almost without putting pressure on the dough triangle, works better for us. You can try both methods and see what you think gives the best result.
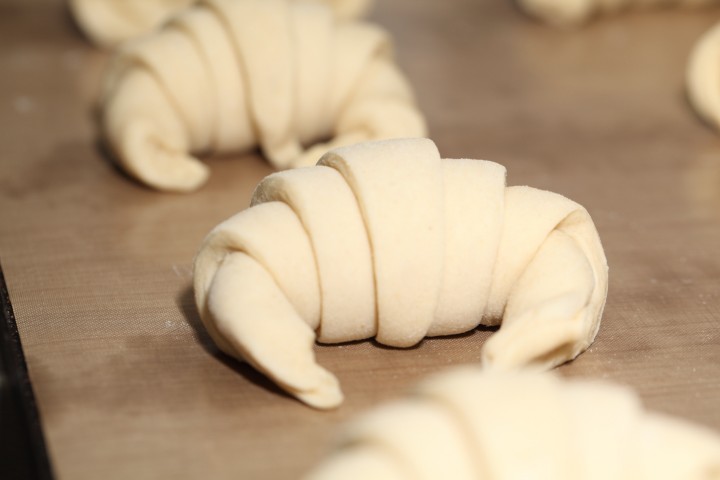
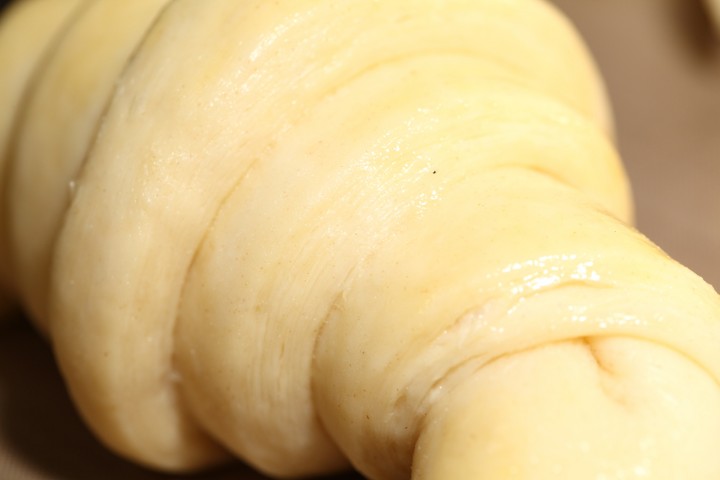
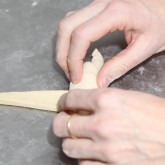
After you cut a notch in the middle of the short end of the triangle, try and roll the two wings by moving your hands outwards from the center, creating the desired shape with a thinner, longer point. Also try and roll the dough very tightly at the beginning and put enough pressure on the dough to make the layers stick together (but not so much as to damage the layers of course).
Proofing and baking
Arrange the shaped croissants on baking sheets, making sure to keep enough space between them so they will not touch when proofing and baking. Combine the egg with a teaspoon of water and whisk until smooth. Give the croissants their first thin coating of egg wash. You do not need to cover the croissants with anything, the egg wash will prevent the dough from drying out.
Proof the croissants draft-free at an ideal temperature of 24ºC to 26.5ºC / 76ºF to 79ºF (above that temperature there is a big chance butter will leak out!). We use our small Rofco B20 stone oven as a croissant proofing cabinet by preheating it for a minute to 25ºC / 77ºF. It retains this temperature for a long time because of the oven stones and isolation. The proofing should take about 2 hours. You should be able to tell if they are ready by carefully shaking the baking sheet and see if the croissants slightly wiggle. You should also be able to see the layers of dough when looking at your croissants from the side.
Preheat the oven at 200ºC / 390ºF convection or 220ºC / 430ºF conventional oven.

Right before baking, give the croissants their second thin coat of egg wash. We bake the croissants in our big convection oven for 6 minutes at 195ºC / 385ºF, then lowering the temperature to 165ºC / 330ºF, and bake them for another 9 minutes. Hamelman suggest baking the croissants for 18 to 20 minutes at 200ºC / 390ºF , turning your oven down a notch if you think the browning goes too quickly. But you really have to learn from experience and by baking several batches what the ideal time and temperature is for your own oven. Take out of the oven, leave for a few minutes on the baking sheet, then transfer to a cooling rack.
Latest way of baking; We heat up our double fan big convection oven at 200ºC, when heated up put the croissants in the oven and directly lower it to 175ºC. We bake them for 10 minutes at 175ºC, they will have a nice brown color by now, then lower the temperature to 150ºC, and bake them for another 6 minutes.
Best eaten while warm and fresh of course. Croissant we don’t eat or share within a day we freeze. We put them in the preheated oven (180ºC / 355ºF) for 8 minutes straight from the freezer. Nothing wrong with that, croissants eaten nice and warm, almost as good as the fresh ones…almost!
Croissant Time Table
Times are an indication and also depend on your experience with the recipe
Try to work swift but precise and take extra fridge time if needed!
Day 1 – Make initial dough
- 21.00 h – Knead for 3 minutes and store in fridge for 12 hours
Day 2 – Laminate the dough
- 09.00 h – Make butter slab and refrigerate till needed
- 09.05 h – Roll dough disc into square
- 09.10 h – Seal butter in dough
- 09.15 h – Roll out to 20 cm x 60 cm and fold
- Refrigerate 30 minutes
- 09.50 h – Rotate 90 degrees
- Roll out to 20 cm x 60 cm and fold
- Refrigerate 30 minutes
- 10.25 h – Rotate 90 degrees
- Roll out to 20 cm x 60 cm and fold
- 11.00 h – Refrigerate until day 3
Day 3 – Dividing, Shaping, proofing and baking
- 09.00 h – Roll out to 20 cm x 110 cm – part 1
- 09.05 h – Often needed! Take 20 min. fridge time if length not in one go
- 09.25 h – Roll out to 20 cm x 110 cm – part 2
- 09.30 h – Divide and shape the croissants
- 09.40 h – First coat of egg wash
- 09.45 h – Proof to perfection (indication 2 hours)
- 11.45 h – Second coat of egg wash
- 11.50 h – Bake for 15-18 minutes
- 12.10 h – Ready!











Lisa Heckman says
First time ever attempt! Thank you for such detail — I felt like you were both holding my hand through the process 🙂 I am including a photo in hopes you may have some pointers for me (I have read your entire, fantastic website) as I am vegan. I substituted both butter and milk for vegan products and followed everything else to the letter.
Ah, it seems I cannot upload a picture. I am pretty pleased with the level of lamination. I am hoping it improves with practice, but wondered if you had any other words of advice given that they are vegan.
Warm regards, and again, thank you and Happy New Year to you both!
Weekend Bakers says
Hello Lisa,
Great to read your enthusiastic comment, thank you so much. We expect your experience with vegan baking is much greater than ours. We are happy to take a look at the pictures of your croissants (you can upload them here: www.weekendbakery.com/send-…your-loaf/) but we do not know if we can give many pointers regarding your vegan version. But very happy to hear this first version was already so very much in the right direction. You should be very proud and with experience things will even get better , we are sure!
Wishing you health happiness and lots of baking in the New Year!
Danny lufundisha says
I will give it a try
Sandy Laurenti says
Hi there! Hope you can help me.
I recently purchased a box of frozen croissants (content:80)!
The directions say to preheat to 360 degrees and bake for 20-22 minutes. They bake up nice and full beautifully, but just minutes after they are out of the oven, they all deflate. I have shared the croissants with my daughter in law and the same thing happened to hers. Can you tell ne what we are doubg wrong?
Thank you in advance for your advice. Sandy from NC
Weekend Bakers says
Hello Sandy,
We cannot truthfully answer your question without knowing more about this product. What the ingredients are and the exact instructions. Did you defrost before baking or not? Where they close to or past their due date? Do they have a nice honeycomb structure or are they sort of hollow inside? Maybe you are doing nothing wrong but it could very well be that these croissants will always do this, because of the way they are produced.
Try and start at a higher temp of around 400 degrees and turn down to oven for the second halve of the baking and see how that goes.
dapa says
I bloomed my yeast in warm water first and then mix the whole thing like normal, and then when I rest it in the fridge, the dough rises like a ball. Can I still use it to make croissant? and if I halve the recipe, how long should I roll out the dough? thank you
Weekend Bakers says
Hello Dapa,
Using warm water in the dough like you did, made the dough rise more enthusiastic in the beginning. As you can read in the recipe, we do not do this. So next time you could make sure it is a little cooler (like we say in the recipe, we take the milk from the fridge and water from the tap).
It is not a problem if the dough rises slightly in the fridge, ours does too. In your case we would suggest very gently rolling out the air in the dough to the sides, so it can escape and continue with the instructions in the recipe.
If you halve the recipe, the dough square should be 18.4 x 18.4 cm and the butter slab 12 x 12 cm. The same for the laminated dough, you must shorten only one side (otherwise you get a quarter of the original), so you end up with a 20 x 30 rectangle. The size of the final dough, right before cutting, should be 20 x 55 cm.
Good luck with it and Happy Christmas!
Dapa says
Thank you! I give it a try again a couple days ago and it turns out so much better than my first 4 attempts haha. But when I bake my croissant, the folds separates and making the inside texture not quite soft and doesnt create that honeycomb. Is there something I can do?
Weekend Bakers says
Hi Dapa,
Good to read your feedback. The honeycomb structure is challenging, this means you have to practice some more on carefully building up the layers, working precise and elongating the dough without putting much pressure on it.
Hope says
I am following your directions to the tee and hoping I get it right. I am in Day 1 and wonder if I already have a problem. My dough looks like it has cracks in it, unlike yours that already looks smooth from the get go. Do you have any idea why that happens?? Am I doomed?
Weekend Bakers says
Hello Hope,
Do not know if you persevered. Our dough is not super smooth, because of the short kneading it has moderate gluten still, but it is easy to press into a disc, without any ‘cracks’. Without actually seeing your dough, we think yours might need some more liquid because of the specific flour you use (American?).
Good luck with it and just give it another go and one more after that to get it right. It will be better as you adjust for your conditions and it will be sooo worth it in the end.
Happy baking and happy Christmas!
Tzila Barneis says
Thank you very much for a fabulous recipe and the so detailed instructions! I just made my first batch and these croissants are the best I ever made.
Weekend Bakers says
Hi Tzila,
Very happy to read your comment. Tip for future baking after you gained some experience, is our one day version of the recipe with information on retarding and freezing:
www.weekendbakery.com/posts…nt-recipe/
Happy pastry baking!
Tzila Barneis says
I just prepared the dough and it is right now resting in the fridge. Can I freeze the ready-to-bake the croissants? Or is it better to freeze them after baking?
Weekend Bakers says
Hello Tzila,
You can find all the information about freezing and retarding the croissant dough with this version of the recipe:
www.weekendbakery.com/posts…nt-recipe/
Dido says
Are you sure that dough with so much yeast (10grams) will not ferment? There are 22h rest in fridge which usually is 3-4C but yeast can not stop his activity… Also dough should not ferment during lamination process but after 22h rest I am 99% sure that dough should expan in fridge even at 3C… If the yeast quantity is smaller say 3-5 grams instansts its possible to rest so much time. 8-10h is good rest for this quantity of yeast. But I will give a try to your recipe and schedule.
Weekend Bakers says
Hello Dido,
Thank you for sharing your expertise with us. We understand what you are saying and, based on what other bakers share with us, we see a lot of variations in yeast activity with this recipe. The amounts given work well for us, but we can imagine less would in some cases even be preferable.
Hope you will give it a try and share your findings with us.
Dido says
So one more question: You mix dough only for 3-4 min, right? Just to combine ingridients, no any gluten development? Because some french good pastry chefs say that dough shoul be well developed and they mixed it for 2-3 on 1st speed and 8-10 on 2st speed, then retard overnight to make gluten pliable. Some like Peter Yuen (google it) after mix bulk ferment dough until double in size then degass and cold bulk retard for 12-18 hour which develops more flavor in dough. But that is maybe because they laminate with sheeters not by hand? You are 100% sure that after I finsish fold at 10am on the day 2, the dough rest in fridge for 22h without any rise? I ask because the dough SHOULD NOT ferment during lamination process..
Weekend Bakers says
Hello Dido,
We are sorry but we do not have any experience with the recipes you mention. The 3 to 4 minutes is for moderate gluten development. All the rolling and folding also helps gluten development.
Like we said, this recipe works for us as described and for many other bakers too, as you can read in the comments and hopefully can judge from our pictures. The nice thing about bread and pastry is there are many roads that can lead to success and as you know, most recipes need adaptations to fit your conditions, appliances and hands.
So based on your skepticism of our recipe and your expectations and experience, we would suggest, if you want to try it, you make the adaptations you think are best beforehand.
Dido says
I will try it for sure and will see the results! Thank you for answering to my questions…! Yes there are 1000 methdos and recipes for croissants and there is a lot to lear, so the best way is t keep baking and practice…
Janice says
Geweldig recept en gelijk goed de eerste keer. Ik heb verse gist gebruikt en tijdebs de rijstijden kwam het deeg erg omhoog, ik was bang dat het teveel gist had, maar ze zijn perfect gebakken! Dank voor de goede uitleg en video. Leuke website waar ik al veel van heb geprobeerd. Gr
Weekend Bakers says
Zo leuk je enthousiaste reactie te lezen Janice. Fijn dat het zo goed gelukt is. Bij ons komt het deeg ook omhoog, maar met voorzichtig uitrollen, rol je de lucht er ook weer uit. Je hebt gemerkt dat je toch een heel goed resultaat krijgt. Je kunt met verse gist ook wel experimenteren met wat minder, maar met dit verrijkte deeg is het bij de meeste bakkers in eerste instantie beter wat meer te gebruiken om een goede rijs te krijgen.
Geniet van het bakken en van de gezellige decembertijd!
Andrea says
Thank you for this great recipe!
I was wondering if it’s possible to leave the dough an extra day in the refrigerator after “day 2”? Or if this will ruin the dough.
Jenik says
I do not know if it will solve your problem you have to proof the croissants at sub butter melting temperature, it means room temperature until they are nicely formed. At least in my case it lead to failure and the layers disappeared. I am going to try this method of folding and measuring now and getting galette de rois style cake with almond cream. Will see how it turns out.
Jenik says
Sorry accidentally replied to someones comment here. To answer your question YES. I normally do the whole process overnight and keep the dough in the fridge. The yeast get inactive as they eat up most of the nutrients and the rising may take longer, but I like the taste of more fermented croissants even more.
Weekend Bakers says
Hello Andrea,
Just keep an eye on the dough and check that it doesn’t dry out. We would advice to make the recipe as described the first time. It also depends on your fridge temperature if the dough will develop / ferment very much and what your taste preference is like Jenik tells you in the comment above.
Good luck with it!
Nigel says
I’ve sent some pictures for the gallery but for anyone considering croissants this is the recipe to use. It’s excellent. I had never made croissants before but follow the recipe closely, watch the video a couple of times and use good flour. I found everything progressed exactly as described.
Weekend Bakers says
Much appreciated Nigel and thank you again for your contribution to YOURLOAVES:
www.weekendbakery.com/your-loafs/
Greetings,
Ed & Marieke
Zailan says
Hi
Can i do a 4 fold and 3 fold instead of a 3x3x3.
Thanks
Weekend Bakers says
Hello Zailan,
Do you mean a so called ‘French lock in’ with a book fold?
We have not done this but of course it is possible. You get more pronounced layers it is said. Would like to hear about your experience!
Aneesa says
Hello, im a very amatuer baker. Just a regular mum-at-home type of baker. I tried this recipe (my second attempt at croissants btw) the croissants came out really nice, not bad at all buuut i have two queries, during lamination i see butter at the top of the dough. Is this normal. In ur pictures i dont see streaks of butter at the surface of the dough. Why would that happen as i was rolling 🙁 also during proofing the butter leaked into the baking tray. But i js tried to scoop that butter out n left them to proof n continued to bake them. Is the amount of butter too much maybe or is it because my butter wasnt sealed into the dough properly. Maybe. I reallt have no clue. Bt it was worth the try and experience n my kids enjoyed them none the less. Thank u so much for sharing your recipe !
Brandon Garner says
Was there butter seeping out of the dough? Or was it very visible threw the dough layer? I’ve had butter push threw the seems that I made during my initial dough seal and somehow it always finds its way out even on the third turn. Try to keep butter cold so it doesn’t ooze out, but rolls with the dough usually ten minutes after you take it out of the fridge. It’s going to happen I’ve made hundreds of croissants and it still happens every once in a while. Usually my place is to warm, can’t help it sometimes. If you’re just seeing butter through the layer of dough I don’t think that’s really a problem. Unless you see cracks and that only means you rolled it while the butter was to hard and it shattered between the layer.
Butter melts between 30 and 35 Celsius or 90 and 95 Fahrenheit. I would go to the store and get one of those probe thermometers and wherever your proofing keep the probe inside to keep track of the temp. I’ve only had butter leak when I miscalculated the temp in my proofer, which is usually a box and a boiling glass of water. what I find was really helpful to proof in at home are those triple extra large Ziploc bags that you store clothes in. You can get it at Target. It fits a half sheet tray and a small glass of boiling water. Hope this helps I’m still learning as well but this has happened to me and changing those things helped.
Weekend Bakers says
Thank you Brandon, for your helpful comment to Aneesa. Yes, keeping cold and sealing in are crucial! A probe or infrared thermometer is something we use and recommend wholeheartedly too!
Just give it another try Aneesa, with these tips. Practice will help you improve and in the meantime your children are already enjoy your results!
Aneesa says
Hey only came and checked my replies today… thanks so much u guys are so helpful… gona gv it another try soon keeping your tips in mind.. the holidays hv been hands-full havent had a chance to mk them again bt definately gona keep making until i perfect it!! Thanks again and tc .😘💜💙
Weekend Bakers says
Great, keep us posted Aneesa!
Gail says
How about regular measurements along with the metric??
Weekend Bakers says
Hello Gail,
We do not understand what you mean with regular? The world standard for measurement is metric as defined by the world SI standards.
Could you explain?
Shannon says
I think she means American measurements
Weekend Bakers says
You can use the ones given in this recipe:
www.finecooking.com/recip…croissants
Note: Note for all bakers who use cups and measuring spoons:
We are true advocates of weighing your ingredients. Professional bakers use scales (also in the US) and in Europe home bakers do too. A scale will give you the exact same weight every time. Which is absolutely needed if you consistently want to make good bread and especially good pastry. You can get a scale for the same price as a few sacks of good flour and less than a lot of baking tools you already own, so if possible, go and get one!
Weekend Bakers says
Thank you Shannon.
Sophie says
Hello!
Thank you for a lovely croissant recipe. I’ve made these a few times, and they turn out great, but the most recent time I made them the dough had noticeably puffed after lamination and resting in the fridge overnight. When I rolled it out to 110 in the morning I had to roll some air out of the dough! Is this a normal phenomenon? Perhaps was my fridge not cold enough?
Thank you!!
Weekend Bakers says
Hello Sophie,
No problem at all, as long as you gently roll from the center to the edges and carefully press out the air that way. Don’t know what would be different compared to the other times you made the dough, maybe the yeast, the dough temperature or indeed the fridge, but like we said, you can just continue and it will be fine. Happens to us too!
Autumn Martin says
Thanks for such a comprehensive recipe, unfortunately I’m not sure what stage I messed up. Haha
I have a flaky outer layer but the inside, while full of many buttery layers didn’t get very fluffy. Not sure if it was the proofing stage or the rolling up the final croissants. Any help would be great.
Thank you
Weekend Bakers says
Hello Autumn,
We are not sure what the answer would be in your case and what to make of the buttery layers you still seem to have inside (would have to see what that looks like). The oven temp and baking time could also be a cause, next to the proofing (might need some more time, so make sure the dough temp is right while proofing).
Maybe some information we provide with the croissant Q&A could be of additional help. See: www.weekendbakery.com/posts…questions/
Seems you are already on your way to a good croissant, so practice will make perfect!
Zailan says
hi
My first time making croissant using yr recipe. It poofed up during baking but the inside shows only some flakiness. Did i underproofed?
Thanks
Weekend Bakers says
Hello Zailan,
This could very well be the case. Make sure the dough is the right temperature while proofing if possible or give it more time till you have that good wobble in the dough. We have more tips and possible answers to questions for you here:
www.weekendbakery.com/posts…questions/
Cho says
Hi there,
I don’t have a special drawer for proofing, can I use my home oven as one? So for example, would I need to preheat the oven for 1 min on 25C, then switch it off and leave the egg-washed croissant to proof like that for 2 hours?
Thanks!
Weekend Bakers says
Hello Cho,
Yes, you can use your oven this way. It is wise, if possible, to measure the temperature in your oven (with an oven thermometer or an infrared thermometer) to make sure it is not too warm and stays below the 26 to 27 Celsius mark.
Hope it works well!
Pamela says
Hello,
My second time making croissants.
The butter is leaking while baking. I follow the recipe exactly and I left 2 hours proofing time after shopping into crescents the first time and 3 hours (just in case) the second time.
Could it be the butter? I can not get dry butter, have tried European style butters (kerry gold unsalted, Italian style burro)
Any advice?
Thanks
Weekend Bakers says
Hello Pamela,
We are not familiar with the butter you mention, but the most important thing is that the dairy butter is solid and can be cut and has a fat content of around 82%.
As for the proofing time, it is important to know the temperature of your dough while proofing. If your dough is too cold, three hours might still not be enough and butter will leak out during baking. So make sure you can proof at the right temperature and to the right wobbly point before baking, even if it means proofing for 4 hours if needed, because your dough and surroundings are a bit colder.
Good luck with it!
Chris says
I’m going to try this recipe soon, so I can’t say how well it works yet, but I have no doubt that your method would give me the best chance to succeed.
Well done on the very well thought through explanation.
I always convert measurements into g and ml as you have done and I hate finding recipes with cups and sticks!
Weekend Bakers says
Hello Chris,
Preaching to the choir there about the g’s and ml’s! Hope you’ll let us know about your results.
Enjoy!
Sarah says
Can i leave it more after i complete day 2
And thank you very much for sharing this recipe i’m excited to give it a try 🙂
Weekend Bakers says
Hello Sarah,
It depends what you mean by more. A few extra hours yes..otherwise and especially if it is your first attempt, please stick to the recipe! You can also put your dough in the freezer, but make sure it is back at the right temperature before you handle it again.
If you are looking for more ways to fit baking around your schedule, take a look at this version with tips for retarding and freezing:
www.weekendbakery.com/posts…nt-recipe/
Kristi says
Thank you for all of this wonderful information!! I have been successful at making regular croissants and tried making pain au chocolat this week. Initially they were great but as they cooled, they became soft. I have never had that happen with regular croissants. Any thoughts?
Weekend Bakers says
Hello Kristi,
Our initial thought would be to look at the time in the oven, seems they may need a bit more. Also, don’t know how much you used but the amount of chocolate you use should be around 5 to 7 grams per roll / pain.
Eleni Melirrytou says
Thank you so much all the way from Athens Greece
Perfect recipe and technique
God bless you
Weekend Bakers says
Thanks Eleni, for your enthusiasm and enjoy your pastry baking.
Greetings from Holland,
Marieke & Ed
Nonik says
Hi.. If I can only make half recipe, what would be th size of the dough and butter ? Thank you…
Weekend Bakers says
If you halve the recipe, the dough square should be 18.4 x 18.4 cm and the butter slab 12 x 12 cm. The same for the laminated dough, you must shorten only one side (otherwise you get a quarter of the original), so you end up with a 20 x 30 rectangle. The size of the final dough, right before cutting, should be 20 x 55 cm.
Enjoy your pastry baking!
Check our FACQ page for answers to this and other croissant questions:
www.weekendbakery.com/posts…questions/
S. Gelinas says
Wish the recipe was not in metric ):
Weekend Bakers says
Hello S,
You can use the measurements given in this recipe:
www.finecooking.com/recip…croissants
Or you can use our conversion tool: www.weekendbakery.com/cooki…nversions/
Hope you give the recipe a try!
Note for all bakers who use cups and measuring spoons:
We are true advocates of weighing your ingredients. Professional bakers use scales (also in the US) and in Europe home bakers do too. A scale will give you the exact same weight every time. Which is absolutely needed if you consistently want to make good bread and especially good pastry. You can get a scale for the same price as a few sacks of good flour and less than a lot of baking tools you already own, so if possible, go and get one!
Zuleika says
I have a modern digital scale that weighs in grams or in ounces, but not all scales sold in the US have this option, especially older ones or analog scales. So people wishing for non-metric measurements may have scales, but ones that measure in pounds and ounces. That said, I have an app installed in my menu bar for converting measurements and there are many available on the web. This makes it easy for anyone to convert from given weights to another system.
Weekend Bakers says
Thank you Zuleika, for sharing this information. Very helpful.
We do have a very handy multi converter on our site too, which converts from grams to pounds and ounces, plus all the other conversions that a baker might need, for yeast, temperature, et cetera. www.weekendbakery.com/cooki…nversions/
520 says
Hello~
For example, if I want to add 50g cocoa powder to the dough to let it have a chocolate color, do I need to reduce the flour to 450g or should it remain the same 500g? Thanks.
Weekend Bakers says
Hello,
We think you should stick to the 500 g flour. Cocoa is not a substitute for flour, it does not contain gluten, so it will not help with dough development. But except for chocolate croissants, we have never made croissants with cocoa added to the actual dough, so we are no experts and you may also want to consult somebody that has actually made croissants this way.
Fay says
What should the humidity level be like while proofing? Many recipes ask people to put a bowl of hot water in the oven to create a humid environment. Is that necessary?
Weekend Bakers says
Hello Fay,
We cannot tell you the humidity level as a number other than the level we in general have where we proof and bake and that is around 45%. Humidity in a proofing environment is a good idea. We do also proof our croissants in a closed controlled space (our small rofco oven) but never add any bowl of water. If you want to do this because you have very dry conditions where you live, be sure you are able to measure the temperature of the dough, so it does not get warmer than the 26/27 Celsius (otherwise butter will leak out of the dough, ruining the layers).
Momo says
Hi,
The video says “freeze for 20 minutes” in 3:31 when the article says “refrigerate for 30 minutes”. Which one is correct? Thanks.
Weekend Bakers says
Hello Momo,
You can stick to the instructions in the article which are always the most updated. The freeze 20 minutes is not wrong, but we since found that as a rule the 30 minutes fridge works best for us and a lot of people.
Erica L Leahy says
Hi,
Love this recipe and have used a few times. I have a batch in the oven now and noticed that butter seems to be pooling on bottom of pan. What would cause this? I was careful with not proofing at too warm a temp but maybe not careful enough?
Weekend Bakers says
Hi Erica,
It can very probably be one of these causes: First under-proofing (maybe it was a bit colder or some other reason why the croissants where not proofed as before) or you maybe were less meticulous with the laminating of the dough. If it was too warm during proofing, you would notice a more bread-like structure in the croissant because the melted butter is absorbed by the dough.
Hope this helps
chef friday anyebe says
most it be neccessary to be refridgerat for 3days before baking?
Weekend Bakers says
Hello Chef,
No you can also choose a shorter version than this three day one. This 3-day schedule is done for the right planning of the whole process so you can make your croissants on the third day in the morning, but of course you can take less time if this fits your timing better. Take a look at our one day version with tips for retarding and freezing. www.weekendbakery.com/posts…nt-recipe/
Ann Hondrogen says
My apologies for asking this, especially since the detailed descriptions and fantastic photo illustrations deserve only appreciation, and not a request. You are already in the stratosphere compared to me, an inexperienced baker. I hate to ask but do you know of an easy way to convert from grams to ounces? An app or something? I am in the US–not happily so these days! Resist!
Thanks for your great site.
Ann
Weekend Bakers says
Hello Ann,
Thank you for the praise. We do have two suggestions for you.
First our own baking conversion page: www.weekendbakery.com/cooki…nversions/
Also: You can use the measurements given in this recipe from which we started (many years ago) with our own version of the recipe;
www.finecooking.com/recip…croissants
Plus Q+A page is also a very good base to read before you start.
www.weekendbakery.com/posts…questions/
If you have scales or are able to buy them (which we always recommend wholeheartedly) you should be able to weigh everything in grams which would make your baking life easier we expect.
Let us know how it goes and enjoy the process!
Ed & Marieke
Graham Hyde says
Great recipe, thanks. I tried it at the weekend, the first time I’ve ever rated to make croissants, and I was very pleased with the results. Lessons learnt though which will make the next batch even better. Hoping to adapt the recipe to make pain au chocolat next weekend. We’ll see. Thanks again. 🙂
Weekend Bakers says
Great Graham,
We also have some very tasty variations you can give a try, made with the same croissant dough….such fun!
www.weekendbakery.com/posts…x-raisins/
+
www.weekendbakery.com/posts…y-caramel/
Doris says
Dear sir. I am going to try and make this croisant for the first time. Your instructions are so clear that I am sure I wil succeed. I will letvyou know how it went.love doris (from israel)
Weekend Bakers says
Hello Doris,
Yes, we love to read about your results. Hope it will be great and enjoy the process!
Sarah Hockley says
Is there anywhere in this recipe to cut down on time? Maybe between the first night and second day?
Also can you freeze the uncooked croissants and then bake them fresh when needed?
Weekend Bakers says
Yes, you can. Take a look at this recipe and the tips for freezing and retarding:
www.weekendbakery.com/posts…nt-recipe/
Enjoy your pastry baking!
Fay says
Hi!
I loved your croissant recipe and have already made it once.
However,I have a sister who can eat the butter I use, but is allergic to milk. Can I substitute soy milk or rice milk instead?
Also, can I use this recipe to make chocolate croissants? And if so, when do I insert the chocolate?
Thank you so much for this AWESOME recipe! 🙂
Weekend Bakers says
Hello Fay,
Thank you so much for your lovely comment. We are no experts when it comes to milk substitutes, but we know you can use soy milk at the same ratio as dairy milk so other than a slight difference in taste, we think it will be no problem.
As for the chocolate you can add it just before the shaping / rolling up stage. You will need no more than 5 to 7 grams per croissant (so less than you think, but it will be enough if you want it to be like the ones you buy). Professional bakers use stick chocolate for this, but you can use your own good quality (dark) chocolate and it will be even better!
Enjoy your pastry baking and sharing with your sister 🙂
Fay says
Thanks so much for your advice! 🙂