

Usually we are of the school of crusty, but soft, warm and fluffy ‘Polarbröd’ is no punishment either!
A few years ago I had braces, and for over a year crusty baguettes weren’t compatible with me. I was more comfortable with soft foods and things I could drink with a straw. That year we visited Norway and I found this wonderful soft bread in a Coop supermarket, which at the time was like Valhalla. It was called polarbröd and it turned out to be from Sweden (it’s actually a brand name, also called mjukt tunnbröd or soft tin bread). Back home I did some research to see if anybody sold this Swedish polar bread in Holland. At that time Ikea didn’t sell any, now they do, they call it something like arctic tunnbröd (please feel free to correct me people of the Nordic Countries). I also searched the web for recipes. I didn’t find much at the time, but managed to convert the information into a recipe of my own. The only thing that bothered me about the original polarbröd was that it contained some stuff I do not want to eat too often and also stuff you don’t need at all. So I wanted to make a healthy everyday version. This is the recipe I came up with.
I love flatbreads and I also love the idea of baking bread in a grill pan or skillet for a change. No two hour oven preheating and only one hour rest before you get to the baking. Great to have in your bread repertoire. Hope you like it too!


Ingredients for the Polar Bread
makes 8 disks of Polar Bread
325 g wheat flour / bread flour
125 g light rye flour
200 to 220 g lukewarm water
60 g creme fraîche or full fat yogurt
20 g honey
7 g salt
7 g instant yeast
a combination of fennel seeds and aniseed, 2 tsps in total (or to taste)


Making the Polar Bread
In the bowl of your mixer, combine the flour with the salt and fennel and aniseed. Add most of the water but keep a little aside, add the honey and the yeast. Now mix until the dough starts to come together, add the creme fraîche or yogurt. Carefully add some more water, see how much you need to make a dough that is slightly tacky (dough sticking at bottom of bowl but not too much). Knead for 7 minutes. Of course you can do the whole process by hand in which case you probably have to knead a little longer. Put the dough in a bowl greased with some oil, cover and leave to rest for about 1 hour in a warm place. Alternatively you can make the dough as described, using 5 grams of yeast instead of the 7 mentioned, and immediately put it in the fridge, leave it there overnight and use it the following day. Just take the dough out of the fridge and start with the next stage of the recipe.

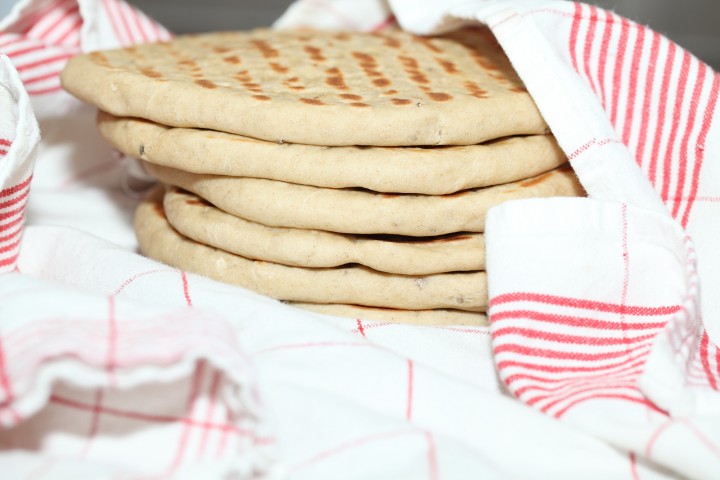
Divide the dough into 8 equal pieces, shape into balls and cover. Put a skillet or grill pan over medium heat. Preheat it so it is hot before the first polar bread goes in. Shape the first ball into a flat disk. I do this shaping by hand, with my fingers mostly, so I can feel how thick it is (anything between 3 and 5 mm will do, see what you like best). With a fork, make a pattern of little holes in the bread (see pictures). Now carefully place the bread in the preheated but dry pan (so no oil or butter or anything), bake for 2 minutes then turn the bread and bake for another 2 minutes. On our induction cooking plate we preheat at setting 7 and bake at setting 5 (out of 9) and this gets the perfect medium heat for this bread. Keep a close eye on it and check the heat, so they will not burn, adjust the heat if necessary. Use a stopwatch if you are easily distracted ;). Take the bread out of the pan and wrap it in a clean tea towel, where it will stay soft and warm for quite some time. Repeat the same process with the rest of the dough balls.
Your pan can get a little hotter during the process of baking so keep an eye on the bread so you won’t burn it. The bread will puff up slightly while baking, feeling soft but not doughy when ready. Eat some while still warm, it’s the best. We like it with cheese, or jam or both, maybe tuna salad, or…
Polar bread can be stored in the freezer after it’s cooled. It keeps amazingly well. Just put a piece in the micro wave and blast it for a minute at about 600 watt and you’ll have your lovely warm and soft bread ready to be dressed with whatever you like.
Variation: You can replace half of the aniseed or fennel seed by cumin seeds for a more distinctive savory taste that goes great with curry’s and other Indian or (Middle) Eastern food. But if you want to go down that road, you could also try our recipe for Indian Naan!
And I am sure there are lots of other variations with types of flour, herbs, spices and other ingredients you could think of.
Enjoy your very own version of Polarbröd!


Raimon Stappat says
At First! Thank you for this recipe. It is very Close, so Close to the Original swedish bread. I Like it very much and eat it many Times…(the swedish one, everytime im being there). Now Back in Germany, i have a very good recipe (from you)to bring a Bit Sweden in my House…good luck for you an keep baking…💯✨
gloria says
hello. I was just wondering if I could convert this recipe into sourdough, and how. I hardly ever use commercial yeast; I prefer sourdough. thanks
Richard says
Just like the bread I have had in Sweden, it was ideal when I mixed some cumin seeds and had it with a curry. Thanks Richard
Martha says
I swapped in 400g unfed sourdough starter (50% flour/50% water by weight) for the 200g water and 200g of the flour. I didn’t have rye flour, so just used whole wheat. Minor additions of a bit more flour when kneading – grilled up very nicely and fantastic frozen and then popped into the toaster + some smashed avocado on top. Thank you for sharing! This is a keeper for sure!
Weekend Bakers says
Thank you for sharing Martha! So glad you liked it and made your own version work so well. Love the toaster and avocado option.
Happy (weekend ) baking 🙂
LucyinAust says
Absolutely delicious and so easy! Was a wonderful reminder of our holiday in Sweden: eating yummy bread with butter and lingonberry jam. I did have to adjust the water/flour a little (but all flours are slightly different and I’m in Australia). Thank you!
Weekend Bakers says
Hi Lucy,
Same with us! Sounds great, and you did well to adjust to get it perfect for you of course.
Happy baking in Australia.
Ed & Marieke
Declan says
I tried these yesterday. The dough was very stiff and difficult to work. Is it dark or light rye flour that is to be used in the recipe? (I used dark which is probably why I needed more than the 200g of water.)
Many thanks for this recipe and for all the other recipes, articles and videos on your excellent website.
Weekend Bakers says
Hi Declan,
Thank you for trying the recipe and sorry for not stating the type of rye flour. As you can maybe judge from the pictures it is a light version, so you are right about having to add more water using the dark (whole rye) version.
Thank you for your feedback and compliment and happy baking!
Marieke & Ed
Nick Savage says
Great Recipe! Just spent a Month in Sweden with my kids, and they are now addicted to PolarBröd… So after recovering from jetlag, I did a quick search, and found your site. I had to convert it all to US volume values and figured I’d share!
2.5 C Bread Flour
1 C Rye Flour
.85 C Lukewarm Water
1 T Honey
1/4 C Yogurt/Creme fraîche
1.5 t Salt
1.5 t Instant Yeast
1 T Anise/Fennel Seeds
Also, I didn’t have rye flour at the store nearest me, so I used some Spelt flour I had lying around, and it turned out great. Can’t wait till I get the real deal.
Stephy says
I don’t have an oven at the moment, and have been on the hunt for non-oven recipes, and this recipe did not disappoint!
It’s not conventional, but I substituted blended silken tofu and vinegar for the yogurt.
The dough was so easy to handle, and my polar bread turned out wonderfully soft with a slight chew.
Thank you for sharing this recipe!
Weekend Bakers says
Thank you for sharing your method Stephy!
Happy non-oven baking!
Elena says
I just made polar breads with whole wheat and rye flower and they turned out perfect. They go well with some tuna salad and pesto. Yum! Thanks a lot for the recipe!
Weekend Bakers says
Thanks Elena,
It is very good to hear about other versions that work well too. And almost anything with pesto gets a Yum! from me too.
Last week we made pesto with the walnuts from my brothers garden, really delicious :O
Happy Baking,
Marieke
Elena says
Hi! I have 2 questions- can you use whole wheat flour and can you bake the breads in the oven? Thanks!
Weekend Bakers says
Hello Elena,
Yes, you can use whole wheat but you will probably have to adjust the water a little bit (add some extra). As far as baking in the oven goes I would say that of course it is possible but at the same time I would not recommend it because baking this bread in a pan and not an oven is what makes it different and special. If you want to use your oven I would suggest baking them on a very high heat (about 250 Celsius), baking them directly on your oven rack for about 5 minutes.
Happy Baking,
Marieke
Emil says
Haha, intriguing recipe. Being Swedish, and my dad being from the north of Sweden, I’ve grown up with the different flatbreads of this country, and the Polarbröd was one of my favourites as a child (even though, or maybe because, my dad always shunned it for being too sweet and spongy). It was great for toasting out of the freezer.
I haven’t had it in a long time though, and the idea of making it myself had not occurred to me, but this I must try. Too bad I don’t own a grill pan, I will miss out on the nice patterns.
Nina says
I used wholemeal rye, this may have made them a bit heavy, they were certainly a lot darker than yours!
I will try again using all white flour and a bit less water, will keep you posted!
Many thanks
Nina says
I made these last night and love them – I do have a query though:
they were more like chewy pitta breads in texture, any reason?
I tried making them thicker, to see if they would be spongy and they were just very dense.
I have dough leftover, so I will try again tonight, maybe they needed to rise more?
Thanks
Weekend Bakers says
Hello Nina,
My suggestion would be to make sure the dough is not too dry (like it says in the recipe the dough should stick to the bottom of the bowl, so maybe your flour needs some more water than indicated in the recipe), make sure your water is lukewarm so your dough is not too cold and let it rise in a warm place, maybe a little longer. Also make sure your yeast is working properly. Do not forget to prick the holes in the dough with a fork, otherwise air pockets can form and this may also lead to a more pita bread type bread.
Hope it helps,
Marieke
Nina says
Thanks – do you use flour to shape?
I found the dough to be very sticky, too sticky to make into balls or shape, so I had to add flour to be able to handle it. It was better tonight (same dough, 24 hrs later), but they still don’t look anything like yours!
:-/
Weekend Bakers says
I use very little flour when shaping as you can see in the pictures. If you find it very sticky of course you can try the recipe with a little less water (maybe your flour absorbs less water than mine) the consistency should be slightly sticky, so you have to adjust accordingly. Also make sure the dough is kneaded long enough. I do not know what else could be different, I now of several people who made the recipe and as with all bread recipes, they never are exactly alike, but you will hopefully get the soft texture maybe next time because that is the essence of this bread. Wrapping it in a tea towel is also essential for the softness.
Nina says
Hi,
Thank you for an amazing site!
Do you wrap them in teatowel even before freezing?
Weekend Bakers says
Yes Nina,
Let them cool that way, before eventual freezing.
Hope they will be great!
Peter says
I finally made the polar bread but i had flower with the bran still in it so it looked a little different than the ones you made. But they still tasted great. I put chilli powder in it and you feel a little heat when you eat it but it didnt have a lot of flavour so next time im gonne try anis and fennil seeds. Thanks for the great recipe.
Weekend Bakers says
Hi Peter,
Thank’s for the comment. We found that the quality of the flour can also make a difference to the taste. We use organic wheat and rye flour from the mill and it makes a big difference. If you like the taste of cumin seeds you can also add them, I like it very much myself, it adds a lot of flavor and goes well with cheese and soups and curries etcetera.
Making the dough the night before and leaving it in the fridge also helps develop more depth of taste. Adding the chili powder sounds great too, I am definitely going to try that!
Happy baking,
Marieke
Marieke says
Hello Peter,
Thanks! Homemade chilipowder sounds really intriguing, but we can safely say we have never tried this ingredient with our bread making (only thing I can think of is a hint of cayenne in cheese cookies). But we see no reason at all why this should not work. So, if you are a chili man you must definitely also try it in (this) bread AND let us know how it turns out!
Happy baking!
Marieke & Ed
Peter says
I am gonna try this recipe very soon im getting hungry just looking at the pictures. But i have some homemade chilipowder with different grades of heat level. Can i use this for the breads? Keep up the great site!
Carl Legge says
Lovely recipe – have made this twice this week. First with cumin seed and chopped coriander leaf which went with a chicken & lentil curry. Second time I doubled up the quantities and made ‘plain’ ones so we could eat some and freeze some.
It’s a lovely bread: crisp on the outside and soft and moist on the inside.
Thanks so much for sharing, this will be a family favourite .
Marieke says
Thank you so much for the feedback Carl. Did you already notice how well they keep in the freezer?
In addition for fellow bakers: If you want to keep the bread soft inside and out, you have to wrap them completely in a tea towel so the heat and moisture will keep the bread completely soft. If you like crisp, do not use the tea towel of course.
Happy baking,
Marieke
Marieke says
Thanks Johanna, for your nice words and the tip. I know I have some nigella seeds somewhere,..
Joanna says
Lovely photos! I would maybe use black onion seed (nigella) for a middle eastern taste. I will try these next time I’m in a hurry for bread and don’t want to put the oven on. Thanks!