

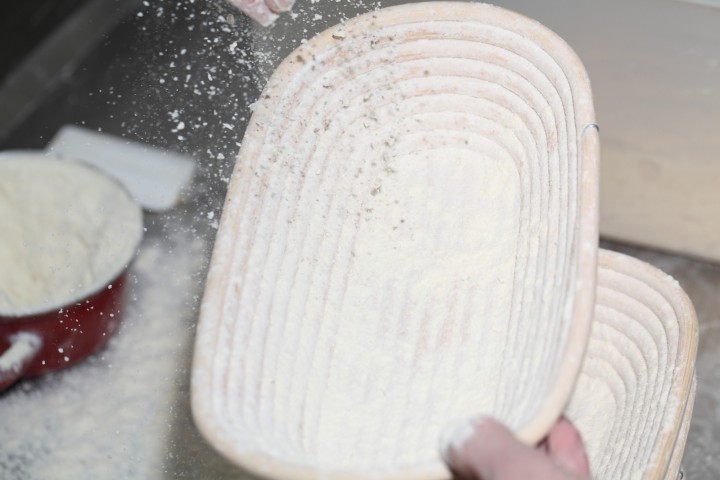
Get your banneton ready, it’s a good idea to prep your bread baskets!
Klik hier voor de Nederlandse versie
This tiny video clip shows you what to do with a brand new banneton / bread proofing basket (rijsmandjes in Dutch) before using it for the very first time.
It is important to prepare your banneton before use to avoid dough sticking incidents, but above all to get great looking loaves! This is especially true for bannetons made of cane. So, take a look at the video and prepare your proofing basket carefully.


After use, always make sure to store your baskets in a dry place and check they are completely dry before storing.
We also advise, especially when detecting any signs of mold, to place your bannetons in a preheated oven of around 120-140 ºC for around 45 minutes every 3 to 4 months (depending on conditions).
In our WKB webshop you will find bannetons, both in cane and wood-fibre, in many shapes and sizes.


Mary Vincent says
rice flour or regular wheat flour?
Weekend Bakers says
You can use regular wheat four, the same as you use in your bread.
Laura Lyon says
do you have to spray the Banneton prior to dusting it for the first time? I did not and didnt have any issues with sticking on my round basket. in my oblong baskets it just dusted with flour but I did have sticking issues. can I go back in my oblong baskets and wet?dust or just let the flour build up with the next try? thanks
Weekend Bakers says
Hi Laura,
We would give them a quick brush and prepare them as described to get a good base.
Good luck with it!
Carl Selfe says
Great help. Much appreciated.
Weekend Bakers says
Thanks Carl, glad you find it useful.
Alicia says
How do you effectively clean the basket for the first time to ensure its sanitary for use?
Weekend Bakers says
Hello Alicia,
Please make sure your baskets come from a good ‘food safe’ source. Inspect the baskets and make sure they look clean, without any signs of mold . Next the best thing you can do is also put the baskets in the oven for a short while at around 100 C to kill invisible ‘germs’.
Ivy says
I never knew I had to break in a new proofing basket. I’ve never used one before until now. I ordered a rattan proofing basket… Amazon delivered it yesterday. I’m super excited to use it as soon as possible. Good thing I came across this. Thank you!
Weekend Bakers says
Enjoy your prepping and baking Ivy!
Moggy says
Thank you, just the info I needed.
Weekend Bakers says
Thank you for letting us know Moggy and happy baking.
Leslie says
Thank you for the video. I’m glad I found it before I used my baskets for the first time. Would have ended up with a very sticky mess.
Weekend Bakers says
Thank you Leslie, enjoy your baking!
Nat says
Can I cook the bread in this basket?
Weekend Bakers says
Hello Nat,
No you never should cook bread in a proofing basket. It is only intended for the bread to hold its shape during the final proofing and NEVER goes into the oven.
Callix Miller says
Just starting with a large Bannaton and did follow your suggestions for preparing it for use, and it worked well, but my dough was not quite up to snuff. I’m getting a better looking dough this time, but would appreciate any/all suggestions for ‘proofing’ in the Bannaton, and for getting the risen dough out and into the oven. Thanks in advance for the advice.
Weekend Bakers says
Hi Callix,
We would suggest watching our short video on making a pain rustique: www.weekendbakery.com/posts…the-movie/
You see how we handle the banneton and place the loaves on a bread peel and then into the oven.
We also have some tips on how to judge if the proofing is perfect:
www.weekendbakery.com/posts…e-in-size/
When releasing the loaf from the banneton hold it close to the surface of the peel or baking sheet and give the banneton a slight wobble to gently release the dough, do not shake the basket but wait for the dough to drop.
More tips in this section: www.weekendbakery.com/posts…king-tips/
Happy baking!
Tiago says
Hi Ed and Marieke,
I recently acquired a cane banneton 750g (oval long) from your webshop. I’ve been having some difficulties in finding out how much flour and water I should use with this banneton. Last time that I used it, the dough slopped over the edge of the banneton and the dough got stuck on the outside of the banneton 🙁
This banneton has a dough capacity of 750g, so I would like some hints about the ratio of flour and water to use with my banneton. Any advice is greatly appreciated!
My kind regards,
Tiago
Weekend Bakers says
Hi Tiago,
In most of our recipes we start of with a total amount of 450g flour. Then we calculate the total amount of water depending on the type of flour used, wholewheat flour needs more water than a bread made of 100% of regular bread flour. But with a percentage of 62 to 65% you are in the right ball park. This give a total amount of 450g + 62% * 4.5 = 729g to 450g + 65% * 4.5 = 742g. This is the amount of dough we use our self in the baskets. When your dough is too wet or over-proofed it tends to loose structure / strength and flop over. The dough should have enough inner tension to rise above the edge of the basket without flopping over the edge. You can look at www.weekendbakery.com/posts…-rustique/ for a complete recipe.
Let us know how it goes!
Tiago says
Hi Ed and Marieke,
I am just coming back here to say that it went very well. Thank you so much! I even managed to stretch the total amount of flour to 500g with very satisfying results as well.
Speaking of which, do you happen to have some tips regarding transferring the oval dough to a hot Dutch oven? When I try to transfer the oval dough from the counter to my cast iron oval casserole, I managed to either drop the dough or deflate it. I’ve followed Ken Forkish’s videos for that, but he shapes the dough into a ball and ‘drop’ in a round Dutch oven.
Greetings and happy Easter 🙂
Tiago
Weekend Bakers says
Hi Tiago,
Great to hear! As for your question, we would suggest first transferring the dough to a bread peel (rubbed with some bread flour or semolina) and let it slide from the peel in the casserole. You can see the peels we use to slide our bread in the oven in pictures with our recipes. Here for instance:www.weekendbakery.com/posts…i-boulles/
Hope this helps!
Tim says
Hi Ed and Marieke,
I bought some wood-fibre bannetons and put some flour in it to avoid sticking.
Unfortunately I probably didn’t use enough flour, so some of my dough is stuck inside of the banneton. What is the best way to get that dough out of the banneton without damaging it?
Greetings,
TIm
Weekend Bakers says
Hi Tim,
We don’t know how much dough is stuck in the baskets, but it would be best to let it dry out and carefully scrape it off, maybe with the help of a flexible dough scraper. Tiny bits of dough that get stuck in our baskets we just remove with our fingers.
Good luck with it.
Rachel says
Hi.
I just got my banneton in the mail for amazon and there’s a tiny fork that came with it. I was just wondering what this fork is used for. Thank you!
Weekend Bakers says
We do not know Rachel, we never use or need a fork!
Wynne Tummon says
Hi I just received 2 banner on bowls for Christmas and when I took off the label a patch of glue remained. Do you have any ideas of how to take this off. It is really stuck on the bowl, or should I just leave it there? Thanks Wynne
Weekend Bakers says
Hello Wynne,
We presume you mean bannetons?! We do not have any labels glued to the baking baskets we sell ourselves in our bake shop and we have never seen baskets in the past that have. We would suggest contacting the seller of your baskets if possible and ask for advice. If dough will come in contact with this glue (so on the inside) we would indeed suggest trying to remove it.
Good luck with it!
Greetings from Holland,
Ed & Marieke
Kat says
What about clay or terra cotta proofing baskets?
Weekend Bakers says
Hi Kat,
That sounds very interesting and could very well work, although the question is, would they absorb a lot of warmth from your dough, so the temp of the dough will drop more than it would in a cane basket for example. We would also like to try them, so we will keep an eye out for them.
Jake says
I would think five minutes in an 80C oven would be enough to take off the chill. I use a Mason Cash Clay Cooker (chicken brick) instead of a baking cloche or much heavier Dutch oven. They used to list a round terracotta banneton (reviews on Amazon last year), and still shown in the group photo at:
www.masoncash.co.uk/produ…eware.html
Weekend Bakers says
Hi Jake,
Thank you, that is very interesting. It would seem this banneton could even be used to both proof and bake the bread, don’t know if this is the intention of the product?!
John Pemberthy says
Am I right in thinking that the second proving is done in the banneton? I have used it twice and it stuck both times.
Weekend Bakers says
Hi John,
After shaping, the final proofing is done in the banneton. We advice, in the beginning, to exaggerate the flour use a bit, so sticking will not be an issue. You will notice over time and with practice you will get to the point where you have learned how much flour to use. Excess flour can also be brushed of your loaf after baking.
Mark A Brown says
Thanks,
Very useful vid as I just received my Banneton today and needed proper guidance in its care. The comments were also quite enlightening and enjoyable to read.
Good job and nice site. I’ll be sure to puruse your store for equipment in the future as your prices are also quite reasonable. (that oval one in the top pic is the same size as mine)
Weekend Bakers says
Thank Mark, that sounds great! Just let us know if you need any baking related advice or guidance and we will gladly give it.
Happy baking!
Rosa says
Hello there
I would like to know the diferences between cane and Woden-fibre banneton. I have been reading about, but I have only found people preference to work with, not really difference. But I see they are different prices, so I a wonder if the more expensive are better.
Thank you
Weekend Bakers says
Hi Rosa,
The main difference is that the preparing you see in the video, is not necessary for the woodfibre bannetons. So they are easier to use, especially for the novice baker. The cane baskets need to be prepared before the first use (like you see in the video) to avoid sticking. One of the important reasons people choose cane is because they are more authentic (as used by artisan bakers for many years) and because they like the look of them (they are a bit ‘prettier’ than the woodfibre ones, we agree). Both can be used for many, many years. The price of course is also a factor so it also depends on your budget what choice you make.
Hope this helps.
Lays Nunes says
Hi, I just wanted to know, is there any possible difference between banneton’s quality? The reason I am asking is because I bought 2 cane bannetons, and I handle them exactly the same way… One of them, creates a kind of layer of dust/flour that prevents it from sticking, but the other one on the other hand always ruins my breads… I tried many different ways of handling it and recipes. Applying water and flour, then I tried some cornstarch as well but nothing solves this problem… It’s the 4th time I use it and I keep using it because I hope it gets better, and each time I try a different way of preventing it from sticking… Not successful though, while the other one works perfectly
Weekend Bakers says
Hello there,
Yes, there can be indeed (we are not sure of yours came from the same source). Without having seen your baskets we suspect that maybe the quality of the cane between the two baskets is different. Maybe one of them has a cane structure that is more ‘open and fibrous’. But we have to say that we use baskets of different quality cane ourselves but never encountered a problem like you describe were the banneton would not ‘take a coating’ or not work properly. The only suggestion we have is starting with an extra (exaggerated or double) layer and work from there. If possible and not leading to damage, you could try to sand down the cane a bit before coating.
Good luck with it,
Marieke & Ed
Petra Robinson says
Thank you for the Tip:)
Do you shop, by any chance to the UK?
I would love to buy Banetons from your Store.
Weekend Bakers says
Hi Petra,
Yes sure we do, we ship worldwide. If you have any questions or need our help please email us.
Marieke
Sue Tarling says
This UK newbie breadmaker thanks you for the video! I’m one of those who learn better by seeing things, rather than reading about them! Could you let me know if it matters what type of flour is used to flour the banneton? Would white flour or semolina be OK, as wholewheat and rye are off the menu for various reasons.
Weekend Bakers says
Hello Sue,
We always use our normal bread flour (white flour) for our bannetons and this works very good and is commonly used by many bakers. We also use this flour to dust our baking linen.
We use semolina or rice flour on our bread peels to slide the bread in the oven. The grains are very round and hard and this is why it works really well sliding the (usually rather wet) dough in the oven.
Good luck with it and happy baking!
Marieke
Sue says
Thank you Marieke – my sourdough is proving right now – I’ll let you know if I have a triumph or a tragedy!
Sue
Sue Tarling says
Wow! I’m so pleased to report a triumph (even if I do say so myself!) – no sticking to the banneton at all. Thanks again.
As I’m typing this (and moving on from sourdough temporarily), my first attempt at Stollen is on its final rise…… I can’t wait until Christmas? !
Sue
Weekend Bakers says
Hi Sue,
Great stuff! We also bake stollen for Easter,but we also have these mini ‘trial’ stollen that are lovely to make. Any excuse for stollen really 🙂
Hope it will be delicious too!
Happy Baking,
Marieke
Ray says
Thanks for this. I bought a new banneton at the weekend and had a bit of a sticking dough disaster as i just floured it as usual. Bread tasted fine, a cheese chilli and rocket leaf creation, but it looked like a deformed splat. luckily I am only a home baker and eat most of my own bread!
Weekend Bakers says
Hi Ray,
Glad to be of help! And even a deformed bread can taste delicious…+your other loaves look just stunning!