
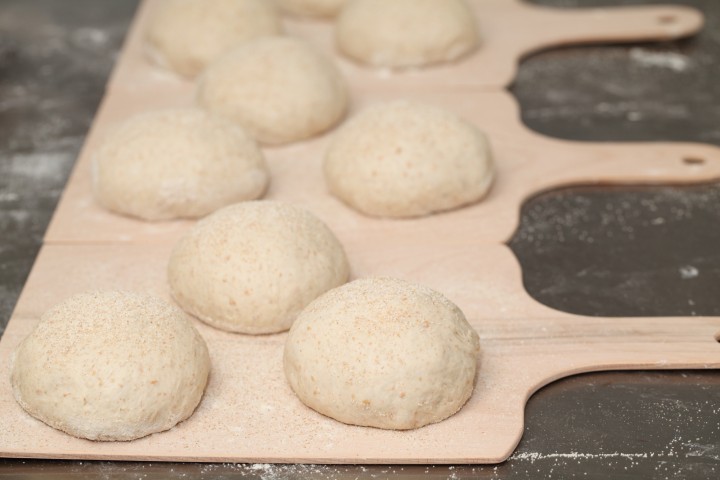
This recipe yields 6 mini boules. We usually triple it and end up with 18 boules…
Klik hier voor de Nederlandse versie
I find these mini boules are the perfect little breads for two or to accompany a nice family meal or dinner with friends. You can share one with some soup or dip it in a gooey Camembert out of the oven. They also make an original little present. Another advantage mentioned by one of our bread friends: there’s more crust to enjoy!
See what fun you can have sharing these boules and read how versatile they are (cheese fondue anyone?)!


Ingredients for the preferment
100 g bread flour
80 g wholewheat flour
106 g water
36 g sourdough culture
Making the preferment
These mini boules (little round breads) are made with a stiff sourdough starter dough and no added yeast. You make this preferment the evening before you make the boules provided you want to bake the next morning (it takes 12 hours to ferment). Make it by dissolving 36 grams of your active sourdough culture in 106 grams of water and add 100 grams of bread flour and 80 grams wholewheat flour. Stir until it comes together and finish by kneading the dough by hand until you have a ball (about one minute tops). Put the dough ball in a bowl and cover with clingfilm and let it ferment for 12 hours at room temperature.
Ingredients for the mini boules
makes 6 boules of around 250 g each
Sourdough starter from day 1 – 322 g in total
720 g bread flour
470 g water
15 g salt
Making the mini boules
Preheat your oven to 235 ºC / 455 ºF (at what stage you preheat your oven depends on how long it takes your oven to heat through, some take 30 minutes, some with stone floors take a lot longer, up to two hours. The preparation time from this point until the bread actually goes into the oven is about 4.5 hours! So you might want to preheat your oven at the later stages of this recipe but make sure it’s well heated).
Dissolve the sourdough starter a little bit in some of the water you are going to use. This makes it easier for the ingredients to combine. Put the sourdough starter and flour in your mixing bowl and add 2/3 of the water. Now start mixing and gradually add the rest of the water and let the dough come together (see if you need all of the water or even a bit more, depending on the flour you use). Mix for only 1 minute until you have a shaggy mass (as Hamelman calls it). Leave it in your mixing bowl, cover and leave for 30 minutes. This process is called ‘autolyse’.
After the autolyse phase distribute the salt evenly on top of the dough and knead the mass for another 5 minutes and watch it turning into something much more resembling bread dough.
Transfer to a greased bowl and leave to rest for 50 minutes.
Ideally the temperature of your dough after mixing should be around 24-25 ºC / 75 ºF. You should adjust the temperature of the water you add, so the total dough reaches this temperature. For us this means in summer adding cold water to this recipe and in winter (when our little bakery gets much colder then the rest of our house) adding water up to 50 ºC /122 ºF. You can measure the temperature of water and dough with a food thermometer. These measurements are important because they correspond with the proofing times in the recipe.
Now take the dough out of the mixing bowl and onto a floured work surface and do one stretch and fold (see our video to observe this technique if you are not familiar with it). Transfer to the bowl, cover and leave to rest for 50 minutes. After the 50 minutes again transfer it to the floured work surface and do another stretch and fold. Transfer to the bowl, cover and again leave for 50 minutes. This is your second stretch and fold.
Now it’s time to shape. Shaping is something for which everybody develops his or her own technique over time. If necessary you can learn more on shaping from a good bread book, like the ones by Hamelman or Reinhart. You can also check out our short video on shaping boules.
Divide the dough into 6 equal parts and make boule shapes. They do not need proofing baskets. Lay them on a floured (semolina or rice flour works well) tray or peel that you are going to use for transferring them into the oven, or place them directly on a baking sheet /tray covered with parchment paper. Now cover and leave to proof for 50 minutes. When you think the boules have risen enough, use your finger to carefully make a very small dent in the dough. If the dent remains, the bread is ready to bake, if the indentation disappears, the dough needs a little bit more time.
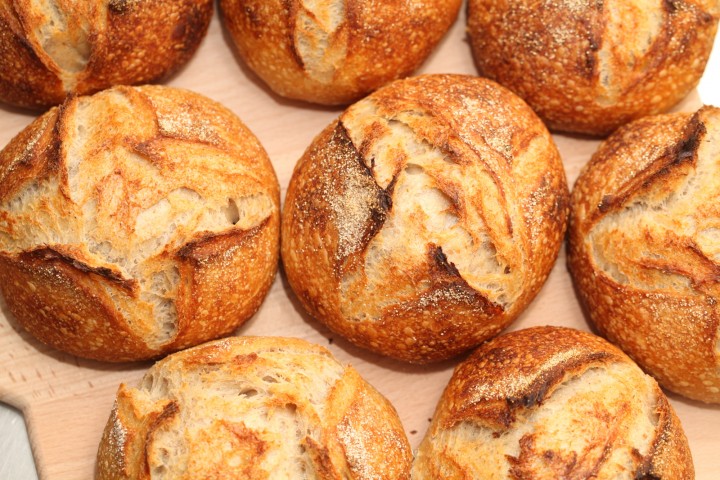
Now your boules are ready for the oven (Preheated to 235 ºC / 455 ºF). Slash the top of the boules with a lame or bread scoring knife. To get a nice crust, try to create some steam in your oven by putting a small metal baking tray on your oven floor when you preheat the oven and pouring in half a cup of hot water immediately after putting the bread in the oven. Release some steam by setting your oven door ajar (perhaps with the help of a wooden spoon) 5 minutes before the bread is ready. If you are going to create steam with a baking tray, you maybe also want to turn your oven temperature a bit higher, because you are going to lose some heat in the process.
After 25 minutes of baking your little sourdough boules should be ready. Transfer onto a rack and leave to cool. These boules also keep well in the freezer and are quickly thawed in the microwave if needed.

Sourdough mini boules time table
day 1 22.00 h Make starter let ferment for 12 hours at room temperature
day 2 10.00 h Make the final dough
- 10.00 h Dissolve starter in some of the water
- Add flour and water and knead 1 minute
- autolyse for 30 minutes
- 10.30 h Add salt and knead for 5 minutes
- Leave to rest for 50 minutes
- 11.25 h 1 st Stretch and Fold
- Leave to rest for 50 minutes
- 12.15 h 2nd Stretch and fold
- Leave to rest for 50 minutes
- 13.05 h Shape
- approx 50 minutes final proofing at room temperature
- 13.55 h Into the oven, (235 ºC / 455 ºF) for 25 minutes
- 14.20 h Out of the oven and leave to cool
And remember, It is OK to change things in a recipe, only if you understand what you are doing and have some baking experience and know the impact of your variation!
This size is exactly what I want to
Make next time. I want to share w neighbors.
Thank you.
Enjoy the baking and sharing Bonnie!
I just made these and they came out perfect. I baked them on a baking sheet with a pan of hot water on the lower shelf and they rose beautifully and baked evenly.
Hi Sarah,
Thanks for the excellent feedback. Great to read the recipe worked so well for you.
Sorry pictures cannot accompany a comment (WordPress does not support it unfortunately) so we are very happy to showcase your pictures via our ‘yourloaves’ section. See: www.weekendbakery.com/send-...your-loaf/
Wishing you many happy baking moments and an enjoyable weekend!
Goedemiddag
Kan ik in plaats van volkorenmeel ook roggemeel gebruiken ?
Complimenten voor de mooie recepten en de geweldige website
Groeten Jan
Hallo Jan,
Ja dat kan zeker. Roggemeel zal wel een iets ander resultaat geven, ook omdat het minder gluten bevat dan tarwe, maar op het totaal gezien zal het niet een enorm verschil maken. Het kan soms zijn dat er kleine aanpassingen gedaan moeten worden wat betreft de hydratatie of het kneden, maar dat is bijna altijd al het geval als je een recept ‘adopteert’ en bv net een andere soort / merk meel gebruikt of een andere mixer hebt et cetera.
Dank voor je aardige woorden en hopelijk worden het mooie en lekkere bolletjes!
Groeten,
Ed & Marieke
How can I I scale down the recipe to make only one mini boule?
Hello Sabine,
This will be a very small dough, but it is very well possible of course. Just divide everything by 6. The rest will stay the same, including the baking time (more or less, because less buns in the oven can mean a little less baking time for one small boule). Keep an eye on it. The other thing to keep in mind is the handling of a very small piece of dough is a bit more fiddly than a larger piece.
Thank you for this recipe on mini boules! I’m a newbie at making sourdough boules and have adopted the approach of freezing them so I can have “fresh-made” bread a little more on demand than making it fresh. With the full-sized boules, we can’t eat through each one quickly enough while they still feel freshly baked, so these mini boules solve that problem. When I make the full-size boules, I usually put them in the refrigerator overnight for the final proofing, and I’ve found it also helps with firming up the boule, making it easier to score and transfer to the cast iron.
My question is this: I didn’t refrigerate my boules for proofing, and so my boules were very flexible, making it quite challenging to score and transfer onto my baking surface. They rose beautifully and had nice texture, but I’m thinking I should be doing something different to get the dough to a more manageable state when scoring and transferring. Without resorting to refrigerating (because I like how relatively quick your recipe is), what should I be doing differently to get my dough more firm before scoring and transferring to the hot baking surface?
hello Deborah,
We understand what you mean. But we would definitely not suggest making the dough firmer by making it less hydrated for instance, that would be a shame for the texture. We score these boules too of course (and even wetter dough like the 80% hydration baguettes, and we do have some tips for you to help you score this type of dough, swift and with confidence.
www.weekendbakery.com/lame/
and
www.weekendbakery.com/posts...onfidence/
Make sure your scoring tool is very sharp.
You could also try and let the dough dry out very slightly at the last stage of the proofing, so a skin forms that would make scoring a bit easier.
Hope this helps. Happy Christmas and Happy Baking!
Are you baking them on a stone or a baking pan, or just on the oven racks? I’m so excited to try this!!
Hi Janet,
The ones you see in the pictures are baked on a stone.
Enjoy your boules baking and let us know how it goes!
Those look mighty fine. I think I’ll try them out this weekend. 😀
How well do they freeze?
Also, were they scored at an angle or just straight 90°?
Hi Sune,
They freeze very well, just let them cool and put them in a freezer bag and store. They will keep for many weeks of not months. Because of the higher hydration dough you can also put this bread in the microwave (short at high watt) and it will be great. You can also make it as good as freshly baked with a short ‘pick me up’ in the oven.
The scoring of the boules in a cross pattern is done straight.
Happy weekend baking!
Thanks for this great recipe. I am going to bake it. just 2 questions :
1) I already have my starter ready from previous baking so I don’t need to make a new one. how much starter is needed in total to dissolve in water?
2) during the bake, what temp do you recommend for the oven?
cheers – Fari
Hello Fari,
The starter from day one is 322 grams in total. So if you already have enough active starter you can use this and follow the instructions of day 2.
The baking instructions are in the recipe but you should preheat your oven to 235 ºC / 455 ºF and bake the boules for approx 25 minutes.
Hope it will be a success. Happy baking!
Thanks alot! Will report the result soon 😊
Hi
Thank you for your recipe
I made 24 loaves to give as Holliday presents
They came out beautifully, nice rise! Except I was disappointed in my scorings.
I tried to score it deeper with each batch I did but none had a nice split. Here is a link with a picture to help explain. Please help 🙂
photos.app.goo.gl/u7BaO3RhpRPbbNoq1
Hi Vera,
Great to see your result and they actually look pretty good with a good crust. We do have some tips to help you. First of all we would suggest trying different (brand / quality) flours. Why this is important is explained and showed in our experiment:
www.weekendbakery.com/posts...nt-part-1/
Also the angle of your scoring is important. We do have some tips for this too of course:
www.weekendbakery.com/posts...onfidence/
Hope this helps and we wish you a lovely Holiday season with baking and sharing!
Ed & Marieke
Weekend Bakers
Hi, I really enjoyed reading your post. I’ve been trying several sourdough recipes. Unfortunately they always ended up in soury bread, almost vinegary.
Since I’m living in Indonesia where the room temperature is around 28C-39C throughout the day, do you think I sould reduce the bulking and proofing time on this recipe?
Thank you.
Hi Yogi,
These are challenging conditions. We would recommend reducing the amount of sourdough culture added, reducing times, and if possible use the ‘coolest parts’ of the day/night and house. Also if possible use the fridge to retard the dough / slow down the process.
Also see our tips here on how to get less sour in your sourdough, although this is also a challenge under your circumstances because usually faster means less sour and you want to slow done the process: www.weekendbakery.com/posts...ough-tips/
Good luck and happy sourdough baking from Holland!
Good afternoon from the North Country! Unfortunately, due to my schedule, I had to modify the recipe a bit, but had fantastic results.
My starter that I use has been a bit of a mutation, starting from my wive’s 100% rye starter to a combination of bread flour and white whole wheat. I followed the initial recipe for your sponge, doubling for later use. The next day, I split the sponge in half, following the regular measurements, autolysing, working the dough, and about three stretch and folds before separating into four (I intend them for soup, so wanted them a little bigger), doing a few more stretch and folds, and a rough shaping before putting them in the fridge for an overnight fermentation. This morning I pulled them out, rested the dough for a few to relax the gluten, did one final stretch and fold/relax before tension pulls and final shaping and a very abbreviated rise on semolina four before scoring and putting on my pizza stone with a steam bath beneath.
The oven spring was fantastic, even for their smaller size, and I was very happy with the result; in fact, we already have two sliced open and are about to enjoy some beef stew in them. 😀
Thank you again for this recipe! I feel like I’ll continue to use it, playing with hydration levels in the future!
Hi Joe,
Thanks for sharing your experience with our recipe, the modifications seem to do it no harm at all. Wishing you many enjoyable hours experimenting, baking and eating.
Greetings from Holland,
Marieke & Ed
Thank you so much for your wonderful website. I just made most beautiful mini boules in my life. The lava stones make a great job by the way. Got the tip from your website too! I put a whole box of them at the bottom of the oven and pour a little bit of water over them to create steam. Works great.
Thank you Alena, that sounds excellent! And great to hear about your own experience with the lava stones.
Wishing you many more boules and happy baking moments,
Marieke & Ed
Can I use all rye flour and follow this recipe, or will it not work?
Hello Rebecca,
It will be totally different. Rye has very little gluten so it needs its own recipes and treatment. We can recommend this recipe if you want to give rye bread a try (it is 70% rye but you can make it 100% with fairly good result too:
www.weekendbakery.com/posts...h-raisins/
Another favorite rye recipe of ours and completely different again in method is this one:
www.weekendbakery.com/posts...rye-bread/
Good luck with it and happy (rye bread) baking!
Does anyone have this recipe converted to cups instead of grams. I do not have the knowledge to convert this recipe.
Thanks.
Hello Jo,
Check out our handy conversion table:
www.weekendbakery.com/cooki...nversions/
Our quest
Next to that we would really like to encourage every baker to use scales. Baking is an exact science and measuring with cups and spoons can lead you to diverge by as much as 10 to 20%. So, how can you not invest in a kitchen scale! You can get them for the same price as a 10 kg bag of flour (we know most people have kitchen appliances that are way pricier that are never used) and with great artisan bakers all over the world leading by example, you just need to jump on board if you want to get consistently great baking results!
Hi Guys. 🙂
i have problems. its my first time baking breads and i tried this “Sourdough mini boules”. this is my my second attempt to bake it. and something goes wrong. I’m using scale for the Ingredients and doing all step by step. and I have “sourdough culture” follow your recipe. my sourdough culture looks and smells great. but something goes, i thing in the last step, the baking.
I’m using regular oven, without stone, around 240 ºC for around 25 min. I use the steaming technique that you are suggesting here. However, the end result is not good. i hope you can tell me what’s go wrong before my third attempt.
I’m adding photos that my help you understand what is happened. hope you will get answer and you can ask me questions that may help to get solution. 🙂
pics:
my sourdough culture:
www.imagehost.co.il/images/18PIC0.jpg
the bread top (sorry, i know it looks bad)
www.imagehost.co.il/images/27PIC1.jpg
the bread bottom
www.imagehost.co.il/images/97PIC2.jpg
the bread inside
www.imagehost.co.il/images/86PIC3.jpg
the top looks like a rock. ^_^
the bottom got some shades of gold. (that i can’t see on top)
the inside bit sticky, inedible.
need your help.
I don’t wanna give up.
Hello David,
We suspect your oven! There seems to be something wrong with the heat elements and heat distribution. It seems there’s almost no heat coming from the top, while the bottom is dark. We also suspect your oven does not reach the indicated temperature. To find out what the real temp of your oven is see our tips on the subject here: www.weekendbakery.com/posts...your-oven/
Your sourdough culture looks OK and the crumb looks OK too (for an oven which seems to not be doing the best of jobs). Please keep in mind this is our suggestion without seeing everything in real life, but we think it would be a good starting point. Next to that you can maybe also take a look at the (quality of) flour you use. It can make a big difference in the end result as you can judge for yourself from our experiment: www.weekendbakery.com/posts...nt-part-1/
Good luck with it!
Thank you very much.
I read it www.weekendbakery.com/posts...-your-oven already. I’ll try again. maybe i put the bread tray higher and put the temperature around 250, so it will be hotter. should i give it ago? 😉
Yes definitely! Make notes to keep track of what you are doing and you will get to a great result!
Hi!
I made a starter using another recipe I found but now I found your website, must say your mini breads look amazing!
My question is how much of this starter (in grams if possible) do I mix with 720 g bread flour, 470 g water, 15 g salt please?
Thank you, Sasha, New Zealand
Hello, I’m from Spain and I’m starting in this ‘bread-world’ 🙂 I love your website, but I have some doubts: my house is 19ºC, so in fermentations I put my dough on top of a radiator, it is okay? And also for the 2nd fermentation you only allow 50 min, it isn’t a little short? I’m accostumated to 1st fermentation about 4-5 h and the 2nd about 3h. Thanks
Hello Luna,
It is OK to put your dough on top of your radiator, as long as it does not get too warm. It all comes down to kepping the dough at the right temperature, so it can rise properly. So for this you would need to measure the temperature of your water and dough. The times in our recipe are correct, provided your dough temperature is around 24 to 25 degrees Celsius when proofing. Also see our tips on dough temperature and see how much longer it takes when dough is colder: www.weekendbakery.com/posts...mperature/
Good luck with it!
Ik heb jullie mini bollen geprobeerd te maken alleen mislukte het. Ik heb een net iets andere aanpak gebruikt. Ik heb mijn standaard desem recept gebruikt en dat kleiner verwerkt om de zes bollen te vormen maar wel met het 100% rogge desem wat jullie voorstellen voor smaak. Alleen gaat er iets mis met het brood, het blijft bij mij een soort van luchtballon die uiteindelijk instort.
Ik maak het voordeeg (of starter zoals jullie noemen) en doe de autolyse en kneed daarna met een kitchenaid tot het deeg goed is en dan laat ik het rijzen in een kom. Na 4 uur (ongeveer) rijzen is mijn deeg goed gerezen, alleen heel luchtig. Als ik er op druk voel je de lucht, het wordt niet stevig hij stort zelfs iets in. Ik verdeel het deeg na de eerste rijs in de kleinere bollen, bol het iets op en geef het een bankrust. Daarna vormen ik het voor de laatste reis, maar dat gaat ook slecht. Ik voel dat het slap is, ik krijg niet die strakke huid die ik gewend ben bij mijn bloem desem. De 2de rijs zelf gaat goed (super zelfs), alleen wederom is het deeg heel luchtig.
Als ik hem op de bakplaat leg stort hij helemaal uit. De smaak is perfect maar de vorm is waardeloos, is meer een eierkoek dan brood. Ik heb dit alleen met het 100% rogge desem. Mijn normale 60% bloem desem doet het normaal. Dus aan het kneden kan het toch niet liggen? Het desem werkt op zich perfect hij rijst onwijs goed, maar het wordt geen stevig deeg het is gewoon vormloos doordat het zo slap is. Hoezo is die stevigheid er niet? Ligt dat aan de verschillende desems? Ik gebruik mijn rogge desem eigenlijk voornamelijk voor roggebrood in een bakvorm.
Zou mijn desem de schuldige zijn? Het gebeurt bij twee verschillende mixen. Bloem met volkoren en spelt met rogge. Bij de spelt en volkoren zou ik kunnen bedenken rogge geeft geen gluten, spelt is ook wat slapper dus het deeg is slap. Maar bij mijn “normale” bloem en volkoren zit genoeg gluten.
Is jullie ooit zoiets overkomen?
Groeten
Peter
PS Smaak is wel super, maar goed oog wil ook wat.
Hallo Peter, het is moeilijk op afstand in te schatten wat er nu precies mis gaat, maar het lijkt op overrijzen. Je hebt het over luchtig, ballon, inzakken etc. Jouw desem lijkt heel enthousiast en snel. Ook de gebruikte bloem niet instaat om het het deeg bij elkaar te houden, en heeft waarschijnlijk niet genoeg gluten. In roggemeel komt amylase voor, een enzym, welke de neiging heeft deeg te verzwakken bij hele lange rijstijden. Misschien de de combinatie van amylase en niet erg sterk bloem. Een eerste rijs van 4 uur zonder een stretch en fold is ook erg lang en geeft het deeg niet genoeg kracht. Misschien ons recept eens volgen 😉 ? Happy baking!
Hello,
I ‘ve decided to make my own sourdough starter and found your site. I am happy to report the starter is rising and bubbling, it looks great 🙂 So now I am looking for recipes to try it. I was wondering if I can replace the bread flour with wholewheat spelt flour and if so, are there any modifications to the process?
Thank you!
Hello Katka,
Yes, there are big consequences indeed in replacing bread flour with whole grain spelt flour. The baking result will be very different and the recipe will need some tweaking and adjusting, especially when it comes to the hydration of the dough. The absorption of water will be different when using spelt and especially with whole grains, it will be a bit more, but how much it will be we cannot tell you from experience for this particular recipe. Another factor is the gluten content of the spelt flour. Because there is less gluten in spelt the structure and strength of the dough will be less so it is harder to get a good rise and oven spring. The bread you may end up with may still be very delicious but over all it will be more compact and heavy. You could also start with a combination of white spelt and whole grain for a lighter result.
You just need to give it a few baking rounds to see what the results will be and keep track of the things you adjust.
Good luck with it and happy baking!
Cute little breads and a good idea. I might try those for my little bakery – people like small loaves they can have for lunch.
I appreciate that you, too, try to write your posts as detailed and understandable as possible.
Thank you so much Karin. And you are very right about the small loaves. They have the ‘cuteness’ factor but are still big enough to share. And thank you for your words of appreciation 🙂
Happy baking in your bakery!
Marieke
I’m not quite sure how to formulate my question, but I will try.
I have been baking with sourdough for about a year, but lately I seem to get one failure after the other. Can a sourdough starter go bad? I have only ever heard that it should get stronger the more I use it, which is roughly once a week. I am considering making a new starter, but I don’t know if it’s a bad idea. My starter get nice and bubbly when I feed it and make the poolish, but it’s not rising the dough like it used to. Today I made a loaf and it was the biggest failure yet. I guess expected to learn and get better instead of getting worse 🙂 I can’t figure out what I am doing wrong. Do you think I should start over with a new starter? There has been times when it’s been left in the fridge for maybe 2 weeks and looking a little sad, but I have thought I was able to save it. Any input would be great. And THANK YOU for a great website.
Hello Frida,
Yes it can! You can judge both by smell and appearance. The ‘nail polish’ smell indicates that something might not be right (it should should smell fresh and fruity or yogurty) and if you see signs of mold or strange colors it could be some unwanted organisms (bacteria, mold) found their way into your culture. Next to that your yeast and good bacteria can die of different causes and your culture will be come less and less active. Depending on how bad the situation is ( sometimes if the smell is not too bad it can be corrected with refreshing the culture) it is best to start a new batch. Make sure your flour is fresh (not over sell by date) preferably organic and wholemeal. Keeping it in the fridge is no problem but if it has been left in the fridge for over a week you need to refresh it first so it will be ready and active the following day.
Good luck with it!
Marieke & Ed
Graag gedaan!
Ik hoor graag wat jullie van ze vinden;-)
nog even ter info : van de verhouding 100gram-100gram-100gram (kaas, boter, bloem) maak ik ongeveer 29 a 30 koekjes dus geen 80!
Petra,
Dat klinkt bijna te lekker, ik heb het meteen geprint en kan niet wachten om je recept te proberen.
Dank voor de heldere instructies. Weet zeker dat ik ook moeite zal hebben alleen maar naar die koekjes te kijken :O
Heel veel dank dat je het met ons wilde delen, ook namens Ed (ook niet vies van kaaskoekjes!)
Marieke
Hoi Marieke,
Ik ken dit recept inderdaad en is erg lekker!
Maar ik kwam een recept tegen met niet de standaard (lees: juiste!) verhouding van bloem-boter-kaas (van alles dezelfde hoeveelheid) maar met deze verhouding:
-80 gram bloem
-60 gram boter
-100 gram kaas
plus een eigeel en wat paprikapoeder en peper (cayennepoeder of chilipoeder of vlokken)
Ze waren erg lekker en heeeel bros en ietsje gezonder door minder boter;-)
(ik eet er rustig iedere avond 10 totdat de 80 koekjes die ik gebakken heb op zijn……)
Ook t volgende recept geeft erg lekkere koekjes:
(t is ontstaan door een fout van mij en ik ben blij dat ik hem maakte want t is één van onze favorieten geworden)
-100 gram bloem
-100 gram geraspte oude goudse kaas
-50 gram boter met 50 gram verkruimelde gorgonzola er doorheen plus walnoten in stukjes.
dus eerst de boter met gorgonzala mengen (prakken met een vork wanneer t op kamertemp gekomen is) en dan de noten erdoor. bloem en kaas door elkaar en vermengen met de gorgonzala noten boter.
rol van maken van +- 4 cm in doorsnee en in huishoudfolie rollen dan nog een mooiere rol er van maken wat makkelijk gaat door de folie, uiteinden dicht draaien en een uurtje in de koelkast laten opstijven.
Heb je geen vormpjes dan kun je nu van die rol makkelijk met een scherp mes er plakjes van snijden van ongeveer een halve centimeter dik.Op bakpapier leggen en op een rooster in de oven schuiven (t is makkelijker als je t rooster er van te voren voor t opwarmen van de oven er uit haalt en samen met t bakpapier erop in de oven schuift wanneer deze de juiste temp aan geeft.)
20 min op 180 graden ietsje boven t midden van de oven
10 min af laten koelen
en dan
tja……..
smullen maar!!!
ps wat nog lekkerder is, is de koekjes insmeren met een bakkwastje met ei en sesamzaadjes erop doen plus een halve walnoot
per koekje er voorzichtig indrukken.
gr v petra
ps 2:
Ik heb wél allemaal verschillende soorten kaaskoekjes gebakken en deze waren erg lekker, bv met goudse oude kaas of met vers geraspte parmezaanse kaas en veel zaden en noten gebruikt (soms in t deeg en soms alleen op de koekjes)
soms met allerlei kruiden erdoor en met of juist zonder ei etc etc
Ook een heerlijke lemon cheesecake gebakken.
Nu mijn vraag: Wanneer komen jullie met het perfecte cheesecake recept
én de allerlekkerste kaaskoekjes???;-)
Ik neem aan dat je dit recept voor kaaskoekjes wel gezien hebt: www.weekendbakery.com/posts...y-cookies/
Wat betreft cheesecake zijn we niet zo ervaren. Het is alweer een tijd geleden dat ik cheesecake heb gebakken (weet wel dat het iets was van een New York style cheesecake van Nigella met een sourcream topping die erg lekker was).
Houd me ook aanbevolen voor een goed recept want ik krijg meteen zin om te gaan bakken.
Iets anders op de bakagenda van deze week: angel food cake…
Happy baking!
Marieke
Hallo Ed en Marieke,
Als ik van dit deeg 18 kleine broodjes wil maken (t deeg verdelen in 18 stukken van pakweg 80 gram…?) hoelang moet ik ze dan in de oven doen en op welke temperatuur?
Ik dacht zelf aan 20 min op 220 graden.
Groet van Petra Woods
ps Een tijdje niets van jullie site gebakken, wel andere recepten gebruikt met soms veel soms weinig succes.
Maar bij jullie recepten (die best wat tijd en planning vergen) weet ik dat t altijd klopt!
Dus toch weer bij jullie uit gekomen;-)
Hoi Petra,
Leuk weer wat van je te horen! Ja, 18 tot 20 minuten zou perfect moeten zijn.
Ben benieuwd hoe deze mini-mini broodjes uitvallen!
Marieke
I just gave my sourdough culture its first ‘test-drive’ with this recipe. I didn’t make mini boules, but divided the dough into two loafs. I don’t have proofing baskets yet and also didn’t have a proper scoring tool, so I got a bit oddly shaped loafs, but with a wonderful crust, nice crumb and absolutely delicious!! I am so proud 🙂 Already started my next baking project, my new hobby is addictive and you guys hooked me up 🙂 Thanks for this beautiful and inspiring website!
Groet, David
Hello David,
Thank you so much for letting us know you are having such a good time baking.
Keep up the good work and hope we can keep up the inspiration part.
Happy baking!
Ed & Marieke
Dear Ed & Marieke,
I am giving this recipe another shot and am just preparing the starter. I don’t own a kneading machine and have to work the dough with my hands. In the recipe it says to knead the dough for 5 minutes after the autolyse, for how long I would have to knead with my hands to achieve the same result?
Thanks for your help.
Groetjes, David
Hi again David,
We would recommend 8 minutes kneading by hand and at the first stretch & fold see if you can do a double one instead of a single letter fold, if the elasticity of the dough allows it.
Good luck with it.
Groetjes,
Ed en Marieke
Hallo,
Allereerst dank voor jullie reacties tot nu toe! Erg mooie en leerzame site.
Ik heb 2 vragen:
Ik zit een beetje met de planning. Kan ik de proofing tijd uitbreiden naar een aantal uur of kan ik een volledige nacht laten tussen de laatse twee stretch and folds? Dit om s ochtens te bakken?
Bewaren… Ik wil in het weekend bakken voor de rest van de week. wat is de beste manier om te bewaren, in plastic, papier of toch echt vriezer?
Groet Mike
Hoi Mike,
Onze suggestie is om je deeg een nacht in de koelkast te stoppen en de volgende dag door te gaan en daarbij dan nog een extra stretch and fold te doen om weer wat spanning in het deeg te brengen en om het weer op temperatuur te laten komen.
Wat betreft het bewaren: Wij verkiezen papier boven plastic als je het voor korte tijd (1 tot twee dagen) en bewaar het op een koele en droge plek maar nooit in de koelkast! Wij bakken zelf ook vooruit en eten wat vers brood op de bakdag zelf en bewaren de rest in de vriezer. Dat is voor ons toch de beste methode gebleken. We snijden het ook vaak voor en pakken dan een aantal sneetjes en ontdooien die dan in de magnetron. Wat betreft de magnetron, ook daar hebben we mee geëxperimenteerd en we kwamen tot de conclusie dat dit soort vochtige brood het beste ‘uit de strijd’ komt als je het heel kort op een heel hoog wattage ontdooit (denk 900 watt) ipv langer en lager. Het wint het nooit van vers, maar op deze manier komt het er heel dicht bij. Na een maand in de vriezer heeft het brood haar beste tijd wel gehad, maar als het goed is doe je er gemiddeld ook niet zo lang mee.
Hoop dat het ook voor jou werkt, succes ermee!
Ed en Marieke
Hallo, is mijn tarwebloemdesem 100% hydratatie geschikt voor dit recept? Bedankt!
Hallo Rachel,
Jazeker, die kun je prima voor dit recept gebruiken!
Veel succes en plezier met het bakken,
Marieke
Hallo Ed en Marieke,
Ik heb vandaag jullie mini boules gemaakt in mijn Rofco B10 en exact jullie recept gevolgd.
Het zijn de lekkerste broodjes geworden die ik tot nu toe gebakken heb , met een mooie korst en heel luchtig.
Het was de eerste keer dat ik met alleen maar desem werkte , het deeg was makkelijk te hanteren en te vormen en ik ga ze zeker snel weer maken.
Ik heb veel plezier van jullie website en hoop dat jullie er nog lang mee door gaan.
Met vriendelijke groet ,
Jan
Hallo Jan,
Mini boules in de mini Rofco, geweldig dat het zo goed lukt!
Dank je dat je onze website waardeert. Voorlopig gaan we er zeker mee door.
Volgende project is ons croissant ‘dagboek’ zodat mensen kunnen volgen hoe we proberen in de buurt te komen van onze favoriete Franse croissants en kunnen leren van onze ervaringen.
Heel veel plezier met bakken en met de Rofco!
Marieke en Ed
Dear Marieke,
Can I use rye flour to replace the whole wheat flour in this recipe?
Cynthia
Hi Cynthia,
Yes that is a very good idea, you can use rye or also spelt to give the recipe a subtle change in flavor. Because of the amounts used (the 80 gr compared to the total amount of flour in the recipe) it should not make a big difference in the end result in terms of the appearance, crust and crumb of the bread.
Happy baking,
Marieke
Erg benieuwd of ik deze ‘Marieke-broodjes’ ook gewoon met gist kan maken, dit soort hogeschool-bakken vind ik toch wat te complex eigenlijk.. ? En.. ik was wél een fan..
Dit is inderdaad niet echt een beginnersrecept, maar misschien heb je wel al vaker brood gebakken, dat weet ik eigenlijk niet. Maar je kunt niet zomaar zuurdesem vervangen door gist omdat de tijden bv niet meer kloppen. De meeste recepten zijn wel een beetje ambitieus, vandaar ook onze ‘slogan’. Je idee om met het baguette-deeg aan de slag te gaan is het proberen waard en het wordt vast lekker, maar zoals je ziet is het wel erg nat om mee te werken. Je kunt het percentage water voor de eerste keer ook terugbrengen naar 75 ipv 80, voor een iets handelbaarder deeg.
In ieder geval leuk dat je wat gaat proberen. De geur van versgebakken brood in je huis, in boule-, batard- of baguette-vorm is sowieso fantastisch!
Happy baking!
Hallo Ed & Marieke,
Ik heb een vraag: Als ik nu 2 grotere broden wil maken van dit deeg, in plaats van 6 kleine, hoelang en op hoeveel graden denken jullie dat het dan in de oven moet?
Ik zelf dacht 45 min, 220C? Hebben jullie Tips?
groet en alvast bedankt voor jullie reactie Mevanne
.. Heb ‘t uitgeprobeerd: op 225C – 25 min en toen nog 10 min op 200C. De broden zijn wat plat en breed geworden maar heel luchtig en zalig!
groet Mevanne
Ik zie dat je al gebakken hebt! Ons advies zou nog zijn om het brood (dat bij elkaar aan deeg ongeveer 750 gram weegt per brood) toch een baktijd van tussen de 40 en 45 minuten te geven, zodat het brood ook echt gaar (uitgebakken) is. 35 minuten is dus aan de korte kant, wij bakken in onze oven 45 a 46 minuten. Kenmerken van brood dat niet helemaal gaar is: een ietwat kleffe binnenkant en een korst die snel zacht wordt.
Neemt niet weg dat dit brood inderdaad al heerlijk zal smaken, maar misschien heb je nog iets aan dit advies voor de volgende keer.
Happy baking,
Marieke en Ed
Hallo Ed en Marieke,
Vorige week heb ik op basis jullie aanwijzingen een zuurdesem gemaakt. Na wat extra aanwijzingen in de comments (dank daarvoor) leek het gelukt. Dus besloot ik gisteren om mijn eerste brood te bakken met mijn starter. Helaas zonder succes.
Mogelijk dat mijn starter (nog) niet actief genoeg is, hoewel het zich ruim verdubbelde. Bij het mengen van de starter met bloem, volkorenmeel en starter leek het al mis te gaan. Het deeg voelde erg nat aan. Niet het soort deeg dat fijn is om mee te werken. Vervolgens 12 uur laten staan alvorens met de andere stappen verder te gaan. Het maken van het deeg leek in eerste instantie wel goed te gaan, maar het rees helemaal niet. Om een lang verhaal kort te maken: na het bakken had ik 2 zware bollen ‘brood’ die in niets leken op de foto’s.
De vraag is nu wat ik verkeerd heb gedaan. Mogelijk ben ik te vroeg begonnen met het gebruiken van desem en was hij gewoon niet actief genoeg. Omdat het een eerste probeersel was heb ik de helft van de aangegeven hoeveelheden gebruikt en daardoor dus ook maar 18 gram desem. Is dat soms onvoldoende?
Overigens bak ik al enkele jaren zelf brood met gist en ben daarin redelijk succesvol, hoewel niet altijd consistent. Bakken met desem is echter totaal nieuw voor me en ontbeer dus ervaring. Ik zou het op prijs stellen als jullie me van enkele tips kunnen voorzien. Alvast bedankt daarvoor.
Hallo Peter,
Het kan zijn dat je desem niet actief genoeg was, dat is op afstand niet zo goed te beoordelen. Als je de helft van het recept maakt, gebruik je ook half de desem, maar hoeveel actieve gistcellen erin zitten en of je iets meer moet gebruiken blijkt inderdaad in de praktijk. Misschien had hij inderdaad nog een paar extra dagen nodig om echt goed actief te worden.
Als eerste zou ik de volgende keer de desem eerst een beetje los roeren met een deel van het water, zodat je een mooie verdeling krijgt als je het deeg maakt. Weet niet of je dit gedaan hebt. Dat nat aanvoelen is ook weer een persoonlijke beleving misschien. Wij werken veel met natte degen van tussen de 63 en 80% vocht, misschien ben je drogere degen gewend en vind je dit deeg heel nat, maar is het toch goed zo.
Belangrijke tip om in de gaten te houden is de temperatuur van je gebruikte water en je deeg. Je water dat je gebruikt om het deeg te maken moet zodanig hoog zijn dat je uiteindelijke deeg 24 tot 25 graden is. Met deze zomerse temperaturen kun je handwarm water gebruiken. Misschien heb je koud kraanwater gebruikt, in combinatie met een wat minder actief of nog niet op volle sterkte zijnde desem.
En was je voordeeg na die 12 uur actief? Zag je bubbels? Heb je het op een plek laten staan die warm genoeg was?
En misschien al vaker gezegd, maar voedt je starter met liefst biologisch volkoren (rogge) meel, daar zitten van nature de meeste gistcellen op die zorgen voor een actieve starter.
Als je het deeg te nat vindt, kun je iets minder water gebruiken (denk in procenten) en het bij goed resultaat langzaam opvoeren, zodat je er aan went.
En helemaal niet zo gek dat je niet meteen een fantastisch resultaat hebt de eerste keren met desem. Je moet je desem, hoe het zich gedraagt en hoe het werkt in je deeg echt leren kennen. Hoop dat de volgende poging met deze tips een eind meer in de richting komt van je ideale brood!
‘Lots of loaf’,
Marieke