

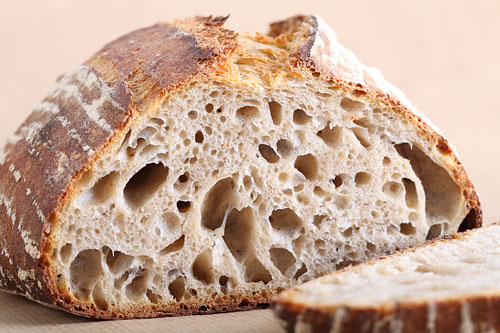
SF Sourdough: Time, Patience and Planning Skills!
His recipe intrigued me when I first read it; the use of the refrigerator, the promised taste and sourness, and the sheer amount of steps and time. These kind of recipes always trigger my interest. Plan ahead for this recipe because it is going to take 4 days from start to finish. Perfect to incorporate in a very long weekend of baking. This recipe is based on the San Francisco Sourdough recipe from Peter Reinhart’s latest book ‘Artisan breads every day’. But of course, as you may know by now, I have made my own version (which comes with exact measurements and a time table!).
The trick of this recipe is to fit it in with other activities like sleep and work. The times given in the time table at the bottom of the recipe keep this in mind. Of course you can be a bit flexible with the time table, especially with the 34 and 15 hour periods the dough spends in the fridge. But alterations can have an effect on taste and texture. For example if you extent the time in the fridge the bread will become more sour, but the gluten strength will weaken, so you probably get a flatter, denser bread. If you want to make more than one loaf, just double or triple or quadruple the ingredients. We usually make 6 breads in one batch. That’s the maximum our spiral mixer can handle.


For the starter in this recipe I use a sourdough culture which is made with 100% whole grain rye flour. A sourdough culture based on rye flour is easier to maintain, it does not transform into a slurry when you forget about it, it is easier to stir because it has almost no gluten and it smells very very nice, a bit like fruit. I maintain the starter as a ‘almost’ stiff starter. This way it stirs easy but does not add as much water to the dough as a poolish starter. It is also very forgiving in the amount you feed it. As I am a bit lazy in feeding, normally I only feed it once a week, after my weekend baking. I just give it a few table spoons of water and rye flour, stir, and ready!
| Ingredients for the Starter | ||||
|---|---|---|---|---|
| 126 | g | bread flour | ||
| 83 | g | water (room temperature) | ||
| 24 | g | sourdough culture | ||
| Ingredients for the SF Style Sourdough | ||||
|---|---|---|---|---|
| makes 1 loaf | ||||
| the starter from step 1 | ||||
| 264 | g | bread flour | ||
| 50 | g | spelt flour (pref. whole grain) | ||
| 204 | g | water (room temperature) | ||
| 9 | g | (sea) salt | ||
Making the Starter
In a bowl stir together 126 grams of bread flour with 83 grams of water at room temperature with 24 grams of the (rye) sourdough culture. Mix it well for about 1 minute until all the ingredients have been combined and you have a dough like ball. It is not a problem if your dough still looks a bit rough. Cover the bowl with clingfilm and let it preferment. After a minimum of 9 hours at room temperature it is ready for…the fridge. It will stay there for the next 34 hours! This means that on the morning of day 2 you put it in the fridge and in the late afternoon of day 3 you take it out again (see time table at bottom of recipe).


Making the Loaf
So, it is now probably somewhere in the afternoon on day 3 of the recipe (17.00 h if you stick to my time table). Take the starter out of the fridge and immediately start making the dough. Combine the starter with the 204 g water and stir for 1 minute to loosen the stiff starter. Add the flour and salt and knead (we use a spiral mixer) for 3 minutes. Cover the mixer bowl and leave to rest for 15 minutes.
Take the dough out of the mixer bowl and onto a floured work surface and do one stretch and fold (a full letter fold, left over right, right over left, bottom over top, top over bottom; see our bread movie to observe this technique if you are not familiar with it). Leave covered to rest for 15 minutes on your bench. Do a second stretch and fold. Return to the (greased) bowl, cover and leave to rest for 40 minutes at room temperature. Now put the dough in your fridge and leave it there for the next 15 hours (yes you can go to sleep, the yeast cells in your dough probably will do a bit of hibernating of their own in the fridge, the bacteria stay more active in this colder climate and tend to produce acetic acid, which, if all goes well, will give your bread the sour taste of the sourdough.
It is now day 4 of the SF sourdough making process: Baking Day! In my time table it’s now 10.00 in the morning.
Take the dough out of the fridge and let it acclimatise for 2 hours at room temperature.
Now it’s time to shape. You can make a batard/oval loaf or a round one for around 750 grams of dough. I like to use the batard shape for this bread, it’s also good for a more even bake. I also use floured proving baskets/bannetons. Transfer the shaped dough in a proofing basket or baking pan, dust a bit with flour, cover and leave to proof for 2,5 – 3 hours (at room temperature which is about 21 ºC). When you think it has risen enough, use your finger to carefully make a very small dent in the dough. If the dent remains, the bread is ready to bake, if the indentation disappears, the dough needs a little bit more time.

Preheat your oven to 235 ºC / 455 ºF (at what stage you preheat your oven depends on how long it takes for your oven to heat through, some take 30 minutes, some, like ours, with stone floors take a lot longer, up to two hours. The preparation time from this point until the bread actually goes into the oven is 3 hours.
Now your loaf is ready for the oven. Slash the top of the loaf with a lame or bread scoring knife. To get a nice crust, try to create some steam in your oven by putting a small metal baking tray on your oven floor when you preheat the oven and pouring a half cup of hot water immediately after putting the bread in the oven. Release some steam by setting your oven door ajar (perhaps with the help of a wooden spoon or oven mitt) 5 minutes before the bread is ready. If you are going to create steam with a baking tray, you maybe also want to turn your oven temperature a bit higher, because you are going to lose some heat in the process.
After 45 minutes of baking your loaf should be ready. Transfer onto a rack and leave to cool. This loaf also keeps very well in the freezer. But please make sure to eat at least some of it while fresh!
Note: We use European flour which absorbs a few % less water than American type flour. People using this type of flour should add 3-8 ml water to the final dough. If you dare you actually make the dough a few percentages wetter to get bigger ‘holes’ in your crumb. I lowered the amount of water in this recipe to make the dough easier to handle.

SF Sourdough Time Table
day 1 23.00 h Make starter let ferment for 9 hours at room temperature
day 2 0.800 h Put the starter in the fridge for approx 34 hours!
day 3 17.00 h – 18.40 h Making the dough
- Starter + water 1 minute stirring
- Add flour + salt 3 minute kneading
- 15 minutes rest
- Stretch and fold
- 15 minutes rest
- Stretch and fold
- 40 minutes rest at room temperature
day 3 18.40 h Put dough in fridge for 15 hours
day 4 10.00 h Take dough from fridge and leave at room temperature for 2 hours
day 4 12.00 h Shape the loaf and leave to proof for about 2,5 – 3 hours
day 4 14.30 – 15.00 h Bake for 45 minutes at 235 ºC / 455 ºF


Stacie Ponton says
I am eager to try your recipe! I can only bake one loaf at a time, but love the idea of making 4 or 6 loaves at once due to the effort of the process.
Question: Where and how do I stall the ‘waiting loaves’ while I cook one at a time?
Thank you.
Weekend Bakers says
Hi Stacie,
Sorry for the late reply, we are so busy at the moment!
It is not really possible to make so many loaves this way, because the other loaves will have to wait longer and longer, while the proofing continues. If you bake two you can proof the second one in a cool room to slow the process down. But for 6 you need other options. The challenge is that you would need different conditions for each loaf, because they all have longer and longer proofing times. The only way to stop this would be use of a freezer.
Maybe starting with two loaves would be a good idea to see how the dough behaves and what it needs under your conditions.
Good luck with it!
Abe says
This is why I love your recipe. It never fails me and I always get a delicious loaf. It’s a shame I can’t post a photo on here but I’ve written up a forum post on TFL with a photo included.
www.thefreshloaf.com/node/…ranberries
Thank you Ed and Marieke.
Weekend Bakers says
Hello Abe,
Wonderful to read your comment and see the loaf on TFL. We actually never made a version with nuts and fruits, but how inspirational for the fall period.
Thank you for sharing and for embracing the recipe in this way.
Enjoy your baking while the leaves fall and the oven gives warmth and great bread!
Ed & Marieke
Tony Jones says
Hello
Ive had great success with your pain naturel recipe (have a fine looking one for lunch today with cheese) so am looking at this for during the week.
I’m doing the maths as I want to increase the weight to 1.2kg, but I get the hydration as 68%.
What do you think?
(I created an Excel sheet to do the maths when increasing weight!)
Weekend Bakers says
Hello Tony,
We do not understand why the hydration would increase, but we will add the dough calculator to this recipe soon and see what happens.
When all ingredients are multiplied by 1.57 you get very close to 1.2 kg of dough.
Enjoy the bread and baking!
Abe says
Hello Tony,
Hope Ed and Marieke don’t mind me joining in. Thought I’d share a formula on how to scale any recipe if you don’t have a specific recipe calculator app.
The formula is…
The new weight you want / the old weight. Then you multiply each ingredient by the answer.
Example recipe….
500g flour
300g water
10g salt
100g starter
Total = 910g
You want 1100g (for example). So here’s what you do…
1100g / 910g = 1.2087
So now you multiply each ingredient by 1.2087
500g flour x 1.2087 = 604.35g
300g water x 1.2087 = 362.61g
10g salt x 1.2087 = 12.087
100g starter x 1.2087 = 120.87
Now just round up or down to the nearest whole number and you have your new weight and the same percentages of everything.
604g flour
363g water
12g salt
121g starter
Total = 1100g
Tony Jones says
Thanks Abe – that’s just what I did in Excel.
And I think the difference in my hydration % is I use a little more starter (which I count as 50/50 solid/liquid) than you – for my current one, I’m using 90g.
Last San Fran one I got my days wrong and had to do the final proof as an extra day in the banneton in the fridge.
Came out very well with a particularly tasty crust. 😊
Weekend Bakers says
He has just now added the calculator to the recipe!
Weekend Bakers says
Thank you Abe, for writing it out like this.
Hope Ed will also find the time to add the calculator for this recipe soon!
Geert Vermeersch says
Ik ben “FLABBERGASTED”!!!!! Wat een heerlijk brood!!!!! Boordevol smaak, verderlichte kruim, heerlijke crunchy korst. Waw, echt waw!
Mijn vraag, ik merk dat er geen calculator staat bij dit recept. Heeft dat een betekenis? Mag ik de ingrediënten verdubbelen voor twee broden en verdelen bij het vormen? of moet ik bij de aanvang alles in twee porties houden? Alvast heel erg bedankt!
Geert Vermeersch
Weekend Bakers says
Hallo Geert,
Wat geweldig! Ja de calculator is later gekomen dan het recept en staat er (nog) niet bij. Maar u kunt gewoon verdubbelen en dan verdelen en vormen!
Geniet ervan,
Ed & Marieke
Geert Vermeersch says
Ok, super! Dank je wel!
Abe says
Thank you so much for such a nice recipe. Yes, it takes a few days but actual hands on time is minimal. Everything went perfectly well and the resulting loaf has such a lovely unique flavour. This recipe will definitely become part of my baking repertoire.
Weekend Bakers says
Glad the recipe was such a success.
Enjoy your weekend baking and sharing!
Bere says
Hi
I made your recipe for the first time. I found the crust is very hard but the middle felt like it needed a bit longer. Do you have any tips on how to bake it so it doesn’t hurt your teeth please? 😀
Weekend Bakers says
Hello Bere,
We think this can be a combination of different factors. The most important one is adding enough steam in the beginning of the baking process and also the true temperature of your oven (maybe it is too low or you lose a lot of heat when putting in the cold dough / opening the oven).
Look at our oven tips to help you further with this:
www.weekendbakery.com/posts…your-oven/
Anna says
Ok, so this might be the best sourdough I’ve made yet. I’m fairly experienced and have been making nice open crumb loaves for a while, but wanted more tang! This fit the bill. I went ahead and increased the hydration up to 77%, which resulted in a super light, airy, melt-in-your-mouth crumb. The crust is perfectly crisp. I did make some modifications: on day 3 after mixing the dough, I followed my usual method of 3 coil folds over the course of 3.5hr (at 78F), until it had increased in size about 60%. Then I shaped and put in a very cold (38F) fridge for 19hrs. Baked directly from fridge.
Weekend Bakers says
Thank you Anna, for your excellent feedback and for sharing your experience and method. This will inspire us and other bakers too, to give it a go this way!
Morgan says
Hi Anna, I am also loving this recipe and have had good success, interested in your coil fold, what is this, and when you talk about increasing hydration is that just the ratio of water / flour in g?
Happy baking!
Isabelle says
I am pretty(very) new to baking but I’ve always been a big sourdough fan so decided to try making you starter, which is probably about a month old now, I refresh it weekly. I did pretty well with the Pain Naturel, it was very tasty and had a nice round shape and spring so decided to have a go at that one. My first attempt wasn’t great, I think it was too wet, when it was ready for the oven it kind of fell flat in the pan, didn’t keep its shape and didn’t rise much but flavor was nice we didn’t waste it. I was pretty sure I had the measurements right. It might be my bread flour, however it did fine with the pain naturel a few times. I had another go, this time I reduced water to 200g(400g for my 2 batches) and it came out great! wow!
Weekend Bakers says
You did very well Isabelle,
Assessment, adjustment and better result! There are different factors that can account for the flatness of the dough, from the new sack of flour to the weather to the shaping or maybe a small measuring diversion.
Above all, enjoy your baking and eating of great bread!
Anna says
Think I’ll run into any problems if I increase the hydration of this dough? I normally make a 78-80% hydration sourdough. Sister asked me to make a “more sour” loaf so intrigued by this recipe, but I love the airy, open holes the high hydration gives me. Thanks!
Weekend Bakers says
Hello Anna,
It depends on what flour you use, but if this flour can normally handle this level of hydration well, we think it will be OK. But we would suggest starting out on the lower side and see how the dough handles and comes together.
Hope it will be the right kind of sour for your sister!
Enjoy
Linda Klassen-Brown says
I have just finally managed to finish making my first successful sourdough starter. I would love to start using it now but……..I used a recipe that does not discard at any point and it is a 50gm rye flour to 100gm water starter. I know from other sites that this does not make a traditional 50grm flour/50gm water starter as it has much more water than a traditional starter does. So how would I use that in your recipe that calls for 100% hydration or the 50/50 starter? I must say I now have enough starter to make a lot of bread & or other sourdough recipes and it smells/looks great – probably helped that I started it during the recent heatwave with 7 days of temps in the 30+ range!
Weekend Bakers says
Hello Linda,
If you use more water in your starter, you just subtract that amount from the total amount of liquid you use, so the grand total is the same. So if you use 10 g extra water in your starter, you just add 10 g less of the 83 grams to the starter in this recipe. You can also always correct liquid in the final dough.
Hope your sourdough starter will have a long and happy baking life and just give the recipe a try. Hydration is almost always something you have to adjust anyway because of the flour you use and other factors.
Enjoy!
Patricia says
Started 2 months ago with my starter and after a few good results I would like to try this recipe and bake my bread in the Dutch oven. Are there people who have experience with the Dutch oven? Do I have to preheat my pan or can I start with a cold oven?
Weekend Bakers says
Hello Patricia,
Both methods are used, but we would very much recommend starting with a hot Dutch oven, so make sure it is preheated well with the oven. Also make sure to be careful with the hot pan, keep those gloves close and bake the first halve with the lid and the second halve without for browning purposes.
Hope it will be great!
queencafe says
I tried this recipe. The end results as far as taste was so good although my crumb did not have big holes as I wanted to be. It rose medium height for my opinion. How can I get it better. I did the poke test at 2.5 hrs and it passed the test. The crust is crunchy. I benched it for 2.5 hours room temp here Southern California temp 90 degrees F. I need to practice more. Thks
Weekend Bakers says
Hello,
If this was your first time making this recipe, then your result was very good. Most often it just needs some adjusting for your conditions.
The most important tip we can give you is to use the right type of flour and if needed experiment with different brands. We use an organic bread flour with around 12.5% protein, so make sure your flour is close to this type and %. Also make sure not to add much flour during the process, because this will make the dough less wet and prevents the large hole structure too.
Creating steam is another important step for a good result. The more the better we would almost say.
Check our best baking tips for more info on the subjects above:
www.weekendbakery.com/posts…king-tips/
Enjoy your sourdough baking!
Rob says
What a great recipe. Absolutely delicious result. Thanks a lot for the detailed description of this and all the other recipes.
I was just wondering if you could substitute the spelt flour for rye flour. Or would that upset the delicate balance too much? I read in the comments below that one of the people tried that but made a mistake with the measurement so I am still not sure if it would be possible without changing the measurements of the other ingredients.
thanks in advance for your reply and keep up the good work.
Rob
Weekend Bakers says
Hello Rob,
Thank you for your kind feedback. Yes, you can use whole rye flour to substitute the spelt. With these amount we do not change anything in the recipe. So no worries when changing from a small amount of spelt to rye or whole wheat, just make sure to carefully weigh everything 🙂
Hope it will be great. Enjoy your baking this weekend,
Ed & Marieke
John R says
Love this bread!! I live in California about an hour and a half away from San Francisco…tastes like it was made there!
Weekend Bakers says
Thank you so much John, we love your compliment!
Enjoy your baking and greetings from tiny Holland to California,
Ed & Marieke
Christine says
I made this bread and what a disaster. I followed the recipe to the letter, timing everything as it should be, so on day 4 at 10am the bread was taken out of the fridge. I weighed all my ingredients exactly as stated and I do weigh my water I don’t measure. I’ve been making yeast bread for the past 5 years once I retired. I’ve only been baking sourdough bread for the past 6 months, mainly started because I couldn’t get yeast due to the lockdown in the UK. I’ve done a variety of recipes, mostly successful but this as soon as I took it out of my banneton the whole thing spread like a pancake. Why? I’ve re-proved it without much success. I oil my hands to handle wet dough but even that didn’t work, my fingers stuck to the dough regardless. Up until the last part it was ok. Where have I gone wrong?
Weekend Bakers says
Hello Christine,
Sorry to read about your not so successful bake. Because this bread has been made over and over by many people and with good results, and you address the spreading of the dough, we can only assume there must have been a weighing error. It seems the dough is too wet. Even if we are very careful, sometimes these things happen (and to all of us). Based on your baking experience we would have no other explanation, because we assume the bread was not over-proofed and your flour was high enough in protein for longer fermentation and your sourdough culture was up to the task too.
We hope you will give it another try. Or maybe take a look at our favorite sourdough recipe that is a two day version :
www.weekendbakery.com/posts…n-naturel/
Good luck with it!
Sandra Stander says
Thanks for sharing such a detailed recipe. At last I feel safe to start the Sourdough baking journey. I will use your time table.
Happy Baking
Weekend Bakers says
Let us know how it goes with the recipe Sandra,
If you want a recipe that has a shorter lead time you can also start with this one:
www.weekendbakery.com/posts…n-naturel/
And a great way of ‘test driving’ the sourdough are the pita’s:
www.weekendbakery.com/posts…ough-pita/
Enjoy!
Diane says
I don’t have spelt flour, can that amount be added in equal weight with bread flour? How does the spelt change the bread ?
Weekend Bakers says
Hello Diane,
Yes you can. With this smaller amount of spelt the effect on the dough will not be that great (except for taste) and you can just stick to the recipe as described. Making small changes to the level of hydration may always be something you need to do, because every flour, also from the same type, may behave differently in terms of absorption. You will only learn what the perfect amount is for your flour and conditions after baking a recipe several times and ‘getting to know’ the dough.
Hope it will be great!
Shona says
Hello I baked this at 235 and it was basically burning after 20 minutes. Oven was far too hot.
Weekend Bakers says
Hello Shona,
If the top of your dough is too close to the heating elements, you can temper your oven after 10 to 20 minutes and bake the loaf at a lower temperature for the remainder of the baking time. You also need to know the ‘real temperature’ of your oven, because there are many ovens that deviate from the temperature that is indicated. See our tips on the subject here:
www.weekendbakery.com/posts…your-oven/
So it could be a combination of a lower starting temperature and tempering during baking could give you a better result without the burning.
LiLian says
Hello Marieke & Ed –
I’ve made this three times now and really like it, although it does need a bit of planning. I’ve pushed the hydration up to 69% and am fairly happy with the holes produced; maybe 1-2% more, but that’s it.
I also like your Fluitje recipe a lot: maybe I just like the taste of spelt! Could you explain why you add the spelt to the poolish in the Fluitje, but to the main dough in this one?
Thanks very much!
Weekend Bakers says
Hi Lilian,
Thank you for trying and liking the recipes. There is no ‘compelling’ reason why, you can just look at it as a choice in general. There are many roads that lead to a good loaf and they are all valid. With these smaller quantities, compared to the bread flour used, it does not make that much of a difference. If you would use much more spelt, or even all spelt then there are other factors, like time, kneading and hydration, that need to be considered.
Enjoy your baking!
Paul says
What is a ‘sourdough culture’?
Weekend Bakers says
Hello Paul,
The sourdough culture is used as an alternative to commercial yeast and you use it to add to a larger amount of water and flour to make a preferment that you will then use to make a final bread dough. All your questions about sourdough (starter) cultures will be answered here (including how to make your own culture in easy steps):
www.weekendbakery.com/posts…asy-steps/
Emily says
If I have a starter already going (rather than culture) can I just start with that on what would normally be your day 3 as per your timeline?
Margo says
I have the same question…..
Margo
Weekend Bakers says
Hello Emily and Margo,
It depends, does your starter have the same composition / hydration as the one in the recipe? Otherwise make sure you adjust the amounts so the totals of water and flour are the same as in the recipe. Also, has yours been in the fridge to cold ferment, because this is also a key element of the development of this dough. When in doubt, we would encourage you to just follow the recipe as described and take 24 grams from your active starter and make a new one with that as described.
Hope it will be great.
Jeanne says
Thank you for this great recipe and so glad it’s in metric! This is the first San Francisco-style sourdough bread I’ve made. The result was brilliant — crisp crust with a hint of caramel, bouncy crumb, mildly sour, and the amount of salt was just right for us. Instead of 34 hrs in the fridge, it had spent 48 hours there. Baked inside a Dutch oven at 235 C at the lowest shelf of my oven. After 30 minutes, checked and saw it was browner than expected but still not 200 C inside, so lowered the temperature to 190 C, and baked for 10 more minutes. I am mixing the second batch tonight and doubling the amount this time. Cheers! 🙂
Weekend Bakers says
Hi Jeanne,
Love your description of the loaf! So glad our recipe works well, also with the longer fridge time. Always good to know these things as a reference for others and ourselves of course.
Enjoy the baking and lots of crusty loaves,
Greetings from the Low Countries
Ed & Marieke
WKB
Amaryllis says
Ik heb een starter op basis van tarwe momenteel… kan ik die ook gewoon gebruiken voor dit recept?
Gebruik ik dan in stap 1 ook gewoon 24g starter (geactiveerde starter)?
Alvast bedankt 🙏🏻
Weekend Bakers says
Ja Amaryllis, that kan zeker, gewoon dezelfde hoeveelheden aanhouden.
Succes ermee!
Andrew Jensne says
Yum!
Ferenc Marincs says
Hello.
Your starter in this recipe is 72%. Isn’t it too high?
What is protein content of the flour you use?
Regards, Ferenc
Weekend Bakers says
Hello Ferenc,
How do you come up with 72%?
Our flour is stone ground organic wheat flour with around 12.5% protein.
Ferenc Marincs says
I thought that the ingredients % is calculated based on the amount of the flour. 233 gr starter per 310 gr flour is 75 %, 72 was wrong, sorry.
I tried the recipe, it went OK in all steps, but the loaf remained very low. I have no banetton, so used an Emile Henry loaf baker for the last 2.5-3 hours RT proofing and baked in the same baker in hot oven. Was that the problem. Scoring was also bad, I got no ear, but I only have a regular laboratory blade, which is thicker than a shaving blade. What is your suggestion?
Merry Christmas.
Ferenc
L. Kutikov says
Ed & Marieke,
What oven brand and model do you recommend?
Weekend Bakers says
Hello,
We use and have been using for quite a few years two Rofco stone ovens (rofco.be).
The B20 and the B40. You can read about it here, especially in the comment section:
www.weekendbakery.com/posts…read-oven/
Other brands you can look at are Haussler (backdorf.de) and Manz (manz-backtechnik.de/). They are all a bit between serious hobby and semi-professional.
Good luck with the decision process.
Steve Wilks says
I have tried sourdough recipes from many websites with mixed success, but this recipe has given the best result, both in texture and taste. Very clear instructions and I think the 4 days makes a big difference. Four days sounds a lot, but the effort is minimal . With my last bake, I doubled the ingredients and had enough for a generous cob loaf and two small baguettes.
Weekend Bakers says
Hi Steve,
Great feedback! Yes, 4 days but the amount of work can be expressed in minutes. And thank you for letting us know the cob and baguettes. This will inspire others too. We never made baguettes with this dough. Excellent!
Susan Vegsund says
One of favourite ways to eat sourdough bread is toasted so I want to bake it in a loaf pan. I have an Emile Henry covered loaf pan that is 34 cm long, 13 cm wide and 8.5 cm deep. Can you give me an idea of how much dough (weight) I would need for this pan and what the weight of one recipe would be? Thanks.
Weekend Bakers says
Hello Susan,
Sorry, we think the pan might be too shallow for the bread, you do need a bit of height (12 cm would be a better start), also the width of 13 cm is tight for a good loaf. If your loaf wants to expand enthusiastically it might touch something. If you want to try, we would suggest making a loaf with halve or 2/3 of the amount for this recipe, but that will be a small loaf in the end of course.
Sandy says
Thank you for just being clear on ingredients!
Many sites I visit, I find myself scouring through tuns of words to find weights and hydration levels etc.
Here you’ve the started ingredients & main dough ingredients and a clearly labelled hydration %.
So thank you for being just perfect for me! 🙂
Weekend Bakers says
Thank you Sandy, we try to present it exactly like we want to be presented with a recipe ourselves and we always look at ways to improve on it too.
Very happy the recipes are to your liking presented this way and hopefully the same will go for the results after baking!
Enjoy the baking,
Ed & Marieke
WKB
Rykie says
Hi,
I just want to ask about the starter. Why don’t you use a 100% starter?
Weekend Bakers says
Two reasons really, one is this drier type of preferment can be held longer at their peak but also with our recipes we use different styles and methods and we want to show that they can all work and yield good bread. So of course you can use a 100% starter like you suggest, but there is also nothing wrong with doing it this way. It is mainly just a choice because of the way the recipe is set up.
Cristen says
I’ve been making bread for years but I’m very new to making sourdough. This came out wonderfully! Very clear instructions and easy to follow timeline. I already started my second loaf before we had finished the first!
Weekend Bakers says
Wonderful! We recognize the enthusiasm we get when a bake has gone really well. You just want to bake more! That is why many years ago, we started to bake more loaves in one go and got our first bigger oven for 6 loaves. To be able to practice the shaping and scoring with more loaves, one after the other, was also something that felt so good to be able to do.
Thank you for sharing your enthusiasm and enjoy your baking and sharing!
Ed & Marieke
Weekend Bakers
L. Kutikov says
Ed & Marieke,
What oven brand and model do you recommend?
Suzanne Pillsbury says
What do you think about using a dutch oven for baking the bread?
Weekend Bakers says
Hi Suzanne,
Yes that works very well for this recipe too. Just make sure to be safe with the hot pan and to take of the lid for the second halve of the baking process so the crust can get a nice color.
Suzanne Pillsbury says
I made it in the dutch oven and it came out great! I’m from San Francisco and this is the real deal – even when made in the Poconos! Thanks for the recipe.
Weekend Bakers says
Thank for the feedback and great it worked out so well. Confess I had to look up the exact location of the Poconos. Had heard of it but did not know it can be found in the state of Pennsylvania. A long way from San Fransisco of course, but great the recipe reminds you of home.
Greetings from Holland,
Ed & Marieke
Dan says
Baked this twice using a cold dutch oven. 20 min closed, 30 min open and 10 min out of pot at 450 degrees F. Came out great both times.
Weekend Bakers says
Thanks for sharing your method Suzanne!
Hunter Minator says
Great recipe. Have made a few now. Perfect every time.
Weekend Bakers says
Thank you Hunter, for the excellent feedback. Enjoy your sourdough baking.
LiLian Randell says
Thanks for another brilliant recipe! I’m new to sourdough baking and tried this for my third attempt. It’s so well explained, and I love the minimal amount of work required. The loaf did have holes (will post photo shortly) but I’m longing to have another go in order to produce even bigger ones. I cooked it in a steam assisted oven for 15 minutes, then finished it for another 25 without steam.
I’m about to buy a banneton and lame as my scoring has been extremely bad!
Weekend Bakers says
Hi Lilian,
Depending on the flour you use, it could be you could up the hydration with a few % and see how that goes. (see note above)
If possible you can experiment with different bread flours too, because they all give a different result even though they seem the same. We definitely have a favorite mill to get our flour, their bread flour always seems to give just the result we want and the taste we want.
We can also recommend our tips for handling high hydration dough:
www.weekendbakery.com/posts…ion-dough/
and our tips for scoring:
www.weekendbakery.com/posts…onfidence/
Enjoy your baking adventure and the excellent bread it yields!
Greetings,
Marieke & Ed
WKB
Ptolemy says
I do not know what your kitchen temperature is like but right now where I live in Texas my kitchen temperature is 80 F / 26 C. Do you have a rule of thumb to scale the times the starter or dough is sitting outside at room temperature? I do not want to over proof. Are there other indicators to use than just time? Thanks.
Weekend Bakers says
Hello Ptolemy,
You can take a look at our tips on dough temperature to help you adjust:
www.weekendbakery.com/posts…mperature/
Looking at temps of 21 compared to 26 it can go twice as fast, so you need to take this into account. It is important the starter will not over proof so you need to adjust by (partly) using the fridge for this phase. Depending on the temp of your fridge, so it takes a few runs to establish if 9 hours in the fridge works fine, or maybe kick start with a few hours at room temp, then go to the fridge or combine it with a bit more sourdough culture (between 30 and 40 grams). The main thing to watch out for is the activity of the starter, it should be active and bubbly but never retracted in the bowl and soupy. Better to use it under-developed, it will be OK because the process is a long one.
Hope you will find your favorite way to make this bread.
Kerry says
I love this website ! I have been coming back time and time again to your recipes and patient explanations , So a big virtual hug from an irish woman In Switzerland !! Thank you .. now back to my sourdough ….
Weekend Bakers says
Thank you so much Kerry! You bring a smile to both our faces.
Wishing you lots of baking joy in beautiful Switzerland.
Greetings from the Low Countries,
Ed & Marieke
WKB