

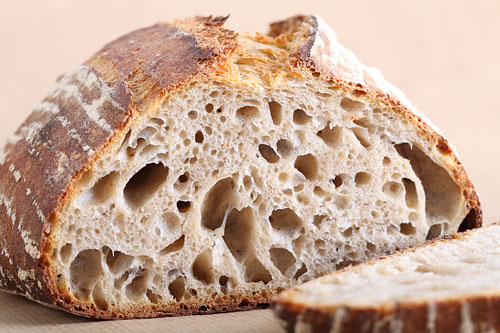
SF Sourdough: Time, Patience and Planning Skills!
His recipe intrigued me when I first read it; the use of the refrigerator, the promised taste and sourness, and the sheer amount of steps and time. These kind of recipes always trigger my interest. Plan ahead for this recipe because it is going to take 4 days from start to finish. Perfect to incorporate in a very long weekend of baking. This recipe is based on the San Francisco Sourdough recipe from Peter Reinhart’s latest book ‘Artisan breads every day’. But of course, as you may know by now, I have made my own version (which comes with exact measurements and a time table!).
The trick of this recipe is to fit it in with other activities like sleep and work. The times given in the time table at the bottom of the recipe keep this in mind. Of course you can be a bit flexible with the time table, especially with the 34 and 15 hour periods the dough spends in the fridge. But alterations can have an effect on taste and texture. For example if you extent the time in the fridge the bread will become more sour, but the gluten strength will weaken, so you probably get a flatter, denser bread. If you want to make more than one loaf, just double or triple or quadruple the ingredients. We usually make 6 breads in one batch. That’s the maximum our spiral mixer can handle.


For the starter in this recipe I use a sourdough culture which is made with 100% whole grain rye flour. A sourdough culture based on rye flour is easier to maintain, it does not transform into a slurry when you forget about it, it is easier to stir because it has almost no gluten and it smells very very nice, a bit like fruit. I maintain the starter as a ‘almost’ stiff starter. This way it stirs easy but does not add as much water to the dough as a poolish starter. It is also very forgiving in the amount you feed it. As I am a bit lazy in feeding, normally I only feed it once a week, after my weekend baking. I just give it a few table spoons of water and rye flour, stir, and ready!
| Ingredients for the Starter | ||||
|---|---|---|---|---|
| 126 | g | bread flour | ||
| 83 | g | water (room temperature) | ||
| 24 | g | sourdough culture | ||
| Ingredients for the SF Style Sourdough | ||||
|---|---|---|---|---|
| makes 1 loaf | ||||
| the starter from step 1 | ||||
| 264 | g | bread flour | ||
| 50 | g | spelt flour (pref. whole grain) | ||
| 204 | g | water (room temperature) | ||
| 9 | g | (sea) salt | ||
Making the Starter
In a bowl stir together 126 grams of bread flour with 83 grams of water at room temperature with 24 grams of the (rye) sourdough culture. Mix it well for about 1 minute until all the ingredients have been combined and you have a dough like ball. It is not a problem if your dough still looks a bit rough. Cover the bowl with clingfilm and let it preferment. After a minimum of 9 hours at room temperature it is ready for…the fridge. It will stay there for the next 34 hours! This means that on the morning of day 2 you put it in the fridge and in the late afternoon of day 3 you take it out again (see time table at bottom of recipe).


Making the Loaf
So, it is now probably somewhere in the afternoon on day 3 of the recipe (17.00 h if you stick to my time table). Take the starter out of the fridge and immediately start making the dough. Combine the starter with the 204 g water and stir for 1 minute to loosen the stiff starter. Add the flour and salt and knead (we use a spiral mixer) for 3 minutes. Cover the mixer bowl and leave to rest for 15 minutes.
Take the dough out of the mixer bowl and onto a floured work surface and do one stretch and fold (a full letter fold, left over right, right over left, bottom over top, top over bottom; see our bread movie to observe this technique if you are not familiar with it). Leave covered to rest for 15 minutes on your bench. Do a second stretch and fold. Return to the (greased) bowl, cover and leave to rest for 40 minutes at room temperature. Now put the dough in your fridge and leave it there for the next 15 hours (yes you can go to sleep, the yeast cells in your dough probably will do a bit of hibernating of their own in the fridge, the bacteria stay more active in this colder climate and tend to produce acetic acid, which, if all goes well, will give your bread the sour taste of the sourdough.
It is now day 4 of the SF sourdough making process: Baking Day! In my time table it’s now 10.00 in the morning.
Take the dough out of the fridge and let it acclimatise for 2 hours at room temperature.
Now it’s time to shape. You can make a batard/oval loaf or a round one for around 750 grams of dough. I like to use the batard shape for this bread, it’s also good for a more even bake. I also use floured proving baskets/bannetons. Transfer the shaped dough in a proofing basket or baking pan, dust a bit with flour, cover and leave to proof for 2,5 – 3 hours (at room temperature which is about 21 ºC). When you think it has risen enough, use your finger to carefully make a very small dent in the dough. If the dent remains, the bread is ready to bake, if the indentation disappears, the dough needs a little bit more time.

Preheat your oven to 235 ºC / 455 ºF (at what stage you preheat your oven depends on how long it takes for your oven to heat through, some take 30 minutes, some, like ours, with stone floors take a lot longer, up to two hours. The preparation time from this point until the bread actually goes into the oven is 3 hours.
Now your loaf is ready for the oven. Slash the top of the loaf with a lame or bread scoring knife. To get a nice crust, try to create some steam in your oven by putting a small metal baking tray on your oven floor when you preheat the oven and pouring a half cup of hot water immediately after putting the bread in the oven. Release some steam by setting your oven door ajar (perhaps with the help of a wooden spoon or oven mitt) 5 minutes before the bread is ready. If you are going to create steam with a baking tray, you maybe also want to turn your oven temperature a bit higher, because you are going to lose some heat in the process.
After 45 minutes of baking your loaf should be ready. Transfer onto a rack and leave to cool. This loaf also keeps very well in the freezer. But please make sure to eat at least some of it while fresh!
Note: We use European flour which absorbs a few % less water than American type flour. People using this type of flour should add 3-8 ml water to the final dough. If you dare you actually make the dough a few percentages wetter to get bigger ‘holes’ in your crumb. I lowered the amount of water in this recipe to make the dough easier to handle.

SF Sourdough Time Table
day 1 23.00 h Make starter let ferment for 9 hours at room temperature
day 2 0.800 h Put the starter in the fridge for approx 34 hours!
day 3 17.00 h – 18.40 h Making the dough
- Starter + water 1 minute stirring
- Add flour + salt 3 minute kneading
- 15 minutes rest
- Stretch and fold
- 15 minutes rest
- Stretch and fold
- 40 minutes rest at room temperature
day 3 18.40 h Put dough in fridge for 15 hours
day 4 10.00 h Take dough from fridge and leave at room temperature for 2 hours
day 4 12.00 h Shape the loaf and leave to proof for about 2,5 – 3 hours
day 4 14.30 – 15.00 h Bake for 45 minutes at 235 ºC / 455 ºF


Antoinette says
I was researching why my sourdough looks like a flying saucer and I have found so many people with the same. But even if it looks like a saucer the taste is out of this world. I use Richard Bertinet’s procedures in making sourdough and I love the results. If you are interested his book is Crust and it is worth purchasing.
Weekend Bakers says
Hello Antoinette,
Yes, we are familiar with the excellent Mr. Bertinet.
And we do have lots of tips on our site like these ones to help you improve your baking. Like our top 12 tips that are our base when baking:
www.weekendbakery.com/posts…king-tips/
Enjoy the sourdough baking!
Krisztina says
Dear Marieke and Ed,
This is the first time I am making your SF sourdough bread.
I am now at day 3, loosened up the starter with water, put the flour and salt in. According to your recipe, it should have rested 15 mins before transferring to the floured surface to do the stretch and fold. However, I was so excited that somehow I skipped this 15 min rest and I transferred the dough and did the stretch and fold.
To compensate the skipped rest, I did another stretch and fold + 15 min session, so all together 3 of them, instead of the 2 in the recipe.
Do you think this will still be OK or have I missed a very crucial step?
(I know I am being slightly paranoid, but since I am very new to home baking I tend to overworry the things 🙂
Another question: I have a regular household electric oven, with a fireclay stone I placed in it. I am preparing a double batch from the SF sourdough bread. Can I bake the 2 loaves at the same time or is it better to bake them one after the other not to make the oven temp go down?
Many thanks in advance!
Krisztina
Weekend Bakers says
Hi Krisztina,
Hope your SF project was a success. We would expect your slight variation did not have too much impact. Let us know how it turned out.
You are right about the amount of dough that goes in the oven having an effect on the temp (cold mass) so if you bake two loaves (very much possible if you have the space) you just need to preheat a little higher, but you will get the hang of it after a few runs.
Happy baking and eating!
Ed & Marieke
Krisztina says
Thank you, it turned out wonderfully, being my first SF sourdough loaves:) Love the flavour!
Weekend Bakers says
Great to hear. Time = Taste!
Christiane says
Amazing . I have been trying to make sourdough but not successfully. Thank you for so detailed the recipe. I will try again 🙏🏼
Weekend Bakers says
Thank you. Let us know how it goes. We can also suggest starting with this other recipe we think you will like and people had excellent results with:
www.weekendbakery.com/posts…n-naturel/
Enjoy the baking!
Bob tremeer says
Hi
I’ve been making your tartine style bread regularly with great success, and would like to thank you for a wonderful site and all your brilliant recipes.
I wanted to try out your SF recipe.
When looking at the recipe I noticed that there doesn’t seem to be an autolyse step at the beginning of mixing the bread. It would appear that the salt is mixed straight in when you make the bread.
Is that correct?
Thank you again for all the effort you’ve put into your site. It’s made such a difference to my bread making.
Weekend Bakers says
Hi Bob,
Thank you very much. The reason this recipe is slightly different is because of the longer process. There is no need really for the autolyse with so many hours of fermenting. So it is just another way / method to get to a (also very tasty) loaf.
Hope you enjoy it and let us know what you think!
Ed & Marieke
Leanne says
Hi!
Thanks for your wonderful website. I just made this and am really happy with the taste…but I only got one major air bubble and am wondering if you can please give me some tips on how next time I can get the air bubbles throughout the loaf for that true SanFran texture.
Leanne from Lausanne
Weekend Bakers says
Hello Leanne,
And thank you for your lovely comment. One air bubble is not what you are aiming for of course.
Our first tip is always to stick to the recipe and fight the urge to change things and especially add too much extra flour because you find the dough sticky.
Wetter dough (> 64%) gives a more open irregular structure in comparison to dryer dough, but handling these wetter doughs can be a bit daunting the first few times. Just practice and you will get used to them.
The longer you knead the dough, the finer the bread crumb becomes, so make sure to also stick to the kneading times giving.
Handle the dough with care, do not deflate it or press it down, because you will loose the structure you are after. But also make sure you create tension when shaping.
Take a look at our oven tips to check if there is anything you could improve and make sure to only take the loaf to the oven when it is fully proofed: www.weekendbakery.com/posts…your-oven/
Also experiment with different (Types and brands of) flour and use the best quality (stone ground , pref organic) flour you can get. It really makes a difference in the end result.
Above all: Enjoy the learning and baking!
Greetings from Holland,
Ed & Marieke
Seth says
Thanks so much for the recipe!
I am currently making a loaf with it right now, but was wondering about tanginess. I grew up in SF and love a really tangy sourdough, and was wondering what can be done to this recipe to increase the sourness of the loaf? Thanks in advance to any response!
Weekend Bakers says
Hi Seth,
Thanks for liking it. We do have some tips for you in this posting: www.weekendbakery.com/posts…ough-tips/
Check under ‘more sour please’!
Happy sourdough baking
ellie says
Hello! I’ve tried this recipe once before and it didn’t rise as much as i would have hoped but i’m putting that down to me making it in Scotland of all the coldest places.
But am not deterred and trying again. This time i’ve made a double batch, i was just wondering when would be the moment to split the dough in half? would it be just before shaping? or does the dough need to be divided before then?
Thank you!!
Ellie
Weekend Bakers says
Hi Ellie,
Yes, that is correct, just before the shaping is the correct moment.
Also see our tips on baking and dough temperature: www.weekendbakery.com/posts…mperature/
Happy baking in beautiful Scotland!
Amanda says
If I have a combo cooker can I make it in that rather than doing the steam?
Weekend Bakers says
Hi Amanda,
Sorry, we do not have any experience with a combo cooker.
Idan says
Made it far far away from San Francisco…
Came out delicious!
Not too tangy, works great with butter.
Will make more in the future.
Weekend Bakers says
Hi Idan,
Great to read your comment. We love this bread and butter usually is all it needs.
Greetings from Holland and happy baking in 2017!
Ed & Marieke
Magda says
Nov.25,2016
Hello Marieke,
I have baked sfs bread. My bread was not that high, the reason being, I did mixed it with hands, maybe….
Can I substitute spelt flour with rye flour?
Thank you for your time.
Magda.
Weekend Bakers says
Hello Magda,
Using your hands we would suggest to knead the dough a bit longer than the 3 minute using the mixer, so depending on your technique at least 7 or 8 minutes.
And yes, it is no problem using rye instead of spelt for this recipe.
Happy SF baking!
Susan Eacker says
This is very confusing. You never really explain how to make the sourdough culture (not the starter). All you say is you use rye flour. Also, for your American friends you might want to convert your measurements to cups.
Weekend Bakers says
Hello Susan,
In the recipe, where we explain what type of culture we use, there is also a link to the page where we explain how we make our own: www.weekendbakery.com/posts…asy-steps/
As European bakers, we want to encourage everybody to use scales. Tests have shown that when using cups, you deviate from 10 to even 20% from one bake to the next. As baking is an exact science and we strive for consistency, we really want to stick to our scales and grams.
Berta w Falcon says
I am a little bit confused , when you mentioned starter ,is that the culture or you have two type of starter.
Weekend Bakers says
Hello Berta,
The terms can be confusing, but you just need to follow the process. The idea is a two step method for which you initially need a very small amount of sourdough culture that you develop over a few days with the other ingredients to an active starter to add to the final dough.
Gina says
I love your site and wish you can help me with my sourdough attempts which have so far been flops.
I knead the dough on low speed on a kitchen aid mixer with dough hook for about 4 mins and still looks like a shaggy mess. I let it rest and do stretch and folds but notice the dough gets wetter and stickier the longer it sits. I end up doing up to 10 stretch and folds and dough does not seem to change its texture. I go ahead and ferment overnite in fridge and as i let it sit at room temp, it starts to get wet and sticky again making it so hard to shape that i almost want to knead it by hand. Never looks billowy nor does it seem to have that extensibility. Have tried thrice, excluding the 4th dough which i threw away. The last attempt was the worse as it did not even rise so i ended up with a flat, chewy dough, though it had the sourdough flavor i like.
I leave in manila where the weather is 26-30degrees celcius. Does that affect my dough? Why doesnt it seem to develop gluten? My starter is healthy to begin with, feeding it for 2 -3 days, 2-3x a day, before i attempt a sourdough. Pls help😥
Gina
Weekend Bakers says
Hello Gina,
Sorry to hear it is not yet working out. First question we want to ask is what flour you are using. Do you know the protein content?
Gina says
Thanks for your reply. I am using bread flour but am unable to determine the protein content. Store i buy breadflour at buys in bulk and just repackages for home bakers and package provides no information. Maybe i should reducing my water?
Weekend Bakers says
Hi Gina,
It is very hard to determine what exactly is going wrong without the right details and without seeing what is happening. All we can advice is to try and use if possible another flour (brand), use cool water to counteract he warm weather conditions, indeed try what results adjusting (lowering) the hydration level will have and make sure your starter is nice and strong. Also see our tips on sourdough for maybe some more useful tips and hints: www.weekendbakery.com/posts…ough-tips/
Best of luck with it!
Gina says
Thank you. Will give this another try with you suggestions.
Lana says
Hi!
Thank you for this wonderful website, and also for my recently arrived baking set from your webshop, it was awesome! I baked with the recipe you have sent, and so far it was the best looking result I have ever gotten before.
I have already baked this SF-style bread by your recipe version once, but wasn’t too happy with the crumb (quite different from your pictures, with more dence crumb). I am planning to start again in several days, this time enforcing our usual Russian flour (10,3 to 11 protein) with Manitoba (14 go of proteins) flour 50/50 of each type.
Do you think it’s a good idea?
Also, I have gotten a present from my friends in San Francisco – an authentic SF starter, which I am currently growing up. It’s about to get ready for using by the time I plan to start baking by you recipe. Can I just switch the amount of rye starter to this new SF starter? Or should I take less/more, it is about 100% hydration (I can’t estimate exactly, because the whole starter recipe is in the measurement units they use in USA, drives me crazy).
I want to try to bake 2 loaves, with different starters though.
Weekend Bakers says
Hello Lana,
Sorry for the late reply, we are very busy with an imminent move and it takes up a lot of our time, planning and traveling to and fro, lots of appointments et cetera. Next month we hope to be ready!
The answer to both your questions is yes, but maybe you already tried it and hopefully with good result. The only small thing is that rye absorbes more water than wheat, so you could keep about 10 ml water per loaf back and see if you want to add it to the dough or not, (so just a little less water, a minor change if necessary). Otherwise proceed as planned. Hope it works or already worked out!
Greetings,
Marieke & Ed
Jessica says
Just got back fro Holland (visiting my mom in Zeist) and found your blog. Its my new favorite (no, I dont speak Dutch 🙁 )
My questions:
I used all wholemeal flour for this (with the rye starter). Its a flour called “white whole wheat”, which is a soft, more glutinous whole meal flour. I realize after making the final dough that I should have used more water to account for the flour. Its not horribly stiff, but definitely harder than your picture. Is it too late to add water once I’m in the 15 hour stage?
Can I proof in a bread pan (loaf pan) that has a cloth in it covered in flour? I dont have a loaf shaped banneton (only a round one, and I dont want that shape for this loaf)
Weekend Bakers says
Hello Jessica,
Thank you so much. I think your loaf will already be finished by now but yes, you can ‘fold in’ a little bit of extra water, but because of the kneading required there is a chance your crumb structure will be a bit tense.
And yes you can proof in a loaf pan, just make sure you have the right cloth (pref. linen) and use enough flour so the dough will not stick.
Hope it turned out OK or you will give it another try with the above in mind.
Happy baking and greetings from Holland,
Marieke
Paul says
Thanks for your more art than science recipe.
Great loaf if you like tart chewy things.
I ain’t from San Fransisco but the recipe gives a Eureka moment.
Namely, to get a light, “white” baguette that is not too heavy , with a nice tang on the back palate. I’m not French but their work is supeerba. Italian is good .
To that end ,with a “ stiff ,whitish starter + 2 tablespoons of rye flour “, my complicated maths asserts 67% starter over flour, water 51% over flour. Salt ? How much sodium can you like? Me, approx 2%
But I’m not Einstein.
A really hot domestic oven after 30min. + 6 ice cubes in iron tray at it’s bottom does the business.
I’d like to be more sci/tech.
Can’t do it.
Paul says
Another tactic is to treat temperature as an ingredient.
Room Temp rarely good enough.
In winter cold add water 32˚C+
Summery heat, get your H20 from the fridge
Weekend Bakers says
Thank you Paul, for your suggestions. As you can see here this is one of the points we highlight in our piece on dough temperature:
www.weekendbakery.com/posts…mperature/
Enjoy the not so tech baking, lots of people will recognize this too!
Robert says
Im trying this for the first time. Im from San Francisco, but living in Brasil. Ive had a heck of a time just figuring out starter for months. The heat and humidity are harsh, but, with cool weather right now, I have a gret culture and I turned out some dough today with this method. Seems pretty authentic. Boudin, in SF is premier sourdough. Ive just put my dough in the fridge till tomorrow. I dont see much rise yet, Im guessing its very gradual. Also, thats a lot of starter, but Im sure thats not bad. I tasted the dough and its very unique. I bake lots of bread here and this is very different. Im hopeful.
Weekend Bakers says
Sounds very good Robert. Hope it turned out well. But no shame at all in giving it several tries to get to a good result, especially under challenging conditions!
Mark says
Hello,
I’m planning to attempt this recipe this weekend. Which size cane banneton do you recommend?
Thanks,
Mark
Weekend Bakers says
Hi Mark,
We use both round ( around Ø 20 cm / 7.9 inches) and oval bannetons (indication Internal dimensions 24x14x7 cm / 9.4×5.5×2.8 inches) for around 750 grams of dough.
Happy weekend baking!
Mark says
Thanks for the reply! I started this recipe on Thursday night and baked the loaf Sunday afternoon (yesterday). It was awesome! Totally unbelievable that I made bread this good at home, with very little previous bread making experience. I followed the recipe to the letter which was pretty easy.
The sourdough flavor was great. Creating the steam with a pan of water in the oven made the crust so good, it’s the best part. Also, the rye culture is so easy to keep and maintain. I see no reason to not keep it going forever.
One little issue, the dough stuck to the cane banneton when i tried to flip it out onto the peel. Any tips for next time about how to flour the basket better? I just kinda dusted it and shook out the excess.
This weekend we are hosting family for father’s day. I’m going to double the recipe and have fresh homemade bread for everyone. A nice Olive Oil with salt, pepper, and garlic for dipping, along with this bread, will make a great appetiser.
Thanks!
Mark
Weekend Bakers says
Hi Mark,
That makes us very happy! Excellent. And about the banneton, you need to prepare it like you see here in the video and then it will be fine: www.weekendbakery.com/posts…-banneton/
And better to use just a bit extra flour in the beginning, which you can always brush off after baking too.
Hope your FD weekend was a success!
Greetings from Holland
Ed & Marieke
Kakuska says
Hi,
Thanks so much for the detailed recipe. I have just baked one loaf and it came out looking great! I have never achieved a crust like this before.
Some questions, when I did the final shaping I noticed a lot of air bubbles. Should I flatten them or should I try my best to keep them while I shape (quite difficult)? I did flatten quite some this time. The final loaf tasted fine and not heavy at all. However not like your photos, mine has much holes. I wonder if this is because of my shaping?
The loaf tastes wonderful. But I don’t have that tinge of sourness. I am not using rye starter (I don’t have one). I use a white one. Does this matter?
Thank you again for wonderful blog. I think I may just follow the SD recipes here one by one 🙂
Weekend Bakers says
Hi Kakuska,
The shaping is very likely the most important cause of your result. We would advice to try and keep the bubbles in. If and when you make this recipe more often, you can play with it and see the different outcomes.
As for the sourdough cultures: Yes it can make a difference, using one made with rye or with wheat, but there are more factors that play a part, the thickness of the culture for example. You can read more about it in this post: www.weekendbakery.com/posts…ough-tips/
May we also suggest trying the Tartine style recipe: www.weekendbakery.com/posts…yle-bread/
We think you will like this one too and it may be that you will end up with different flavours due to the process.
Happy sourdough baking!
Antonio says
This recipe is perfect for those weekend bakers who, like me, get ‘baking abstinence’ in between weekends!
The planning is challenging, the steps are delicate, but the end result is rewarding, and looking back, each step was so fun to make!
Thank you WeekendBakery, this recipe will stay in my favorites and I’ll bake it many more times!
Weekend Bakers says
Hi Antonio,
Thank you so much for your wonderful comment. Your description is so spot on and many bakers, including ourselves, will recognize the challenging, delicate yet rewarding and fun of the whole process.
Wishing you many happy baking weekends!
Ed & Marieke
Trish says
Just made this and works perfectly for starting on my late shift and baking on my days off. Was really good! Thank you for sharing
Weekend Bakers says
Thank you again Trish for sharing your results with us and liking the recipe so much.
We can also recommend this one: www.weekendbakery.com/posts…yle-bread/
I think you can fit it in when you use your day off. It is one of our big favorites.
Happy sourdough baking!
Marieke
R Krol says
Hi,
I’ve been searching endlessly for a bread recipe similar to the bread made in the area of Italy where my family come from (Lazio). I was absolutely thrilled to have tried your recipe and found it was what I’d been searching for – the open crumb and elastic consistency. So thank you so much for sharing this!
Can I ask a question: I have problems shaping the bread as it seems too floppy to hold it’s shape and reverts to being fairly thin. Am I doing something wrong?
Thanks
Roman
Weekend Bakers says
Hi,
That is great to hear, excellent! We think what you are describing can be caused by the flour you use and possibly you could do with a bit less hydration (every flour used has a different absorption level). You need strong bread flour with a protein content of at least 12% so your dough builds strength as you work it. So look at your flour to make sure and maybe try making a version with 60 to 62% hydration and see how it turns out. But remember that it takes some practice and getting used to to work with this rather wet dough.
Good luck with it and happy sourdough baking!
Ed & Marieke
R Krol says
Thanks guys. Using 14% protein flour so will adjust the hydration.
I’m still happy with it whatever the shape, though. The taste is out of this world and my family devour it all in no time!
Thanks again for sharing your recipe and the work you’ve put into describing it.
Roman and family
Weekend Bakers says
Thanks Roman enjoy the baking and sharing with your family!
Mary Rubra says
Hello, I am very new to sourdough and making bread.
I have tried several recipes but they were too heavy and not as I had hoped.
I found your website on Pinterest and I have followed it very closely.
OMGGGG, my loaf yesterday “Popped ” and it was airy and light and absolutely Delicious. My kids were amazed and nearly ate the whole loaf.
Thank you for sharing your recipe and precise method.
I have a dough ready to bake today and I hope that it is going to be as tasty as my first.
If I have managed to understand and regularly re create this tasty bread, I shall no longer buy shop bread and I shall be teaching my kids aged 10 and 6 how to make this bread. So that they can continue this Wonderful Art into their lives.
Thank you again for inspiring me, I am truly grateful xx
Weekend Bakers says
Hello Mary,
Thank you so much for your wonderful comment. This is really what it is all about isn’t it! The baking, the sharing the passing on. So glad our recipe is in part ‘responsible’ for bringing this about.
Wishing you many happy baking days and lots of excellent loaves!
Greetings,
Ed & Marieke
Paulo Martins says
Hi guys,
I have baked your SF sourdough recipe and achieved great results. Thank you for the tips.
Now that I want to bake more that one batch I was wondering whether I could portion the loaves only when it comes to shape them.
Thanks,
Paulo
Weekend Bakers says
Hi Paulo,
If you want to make multiple loaves you indeed make a double, triple, quadruple batch of the dough and divide into as many loaves just before shaping.
Paulo Martins says
Which I did thank you.
I thought that by dividing the dough only before shaping it would mess with the work done by the stretch and fold but I don’t think it did. The bread was great once again.
Cheers
Paul says
HELLO AND THANK YOU FOR SHARING!! I HAVE BAKED MANY OF YOUR RECIPES WITH EXCELLENT RESULTS!!! I WAS WONDERING, THOUGH, MY WIFE IS DIETING AND WAS ASKING ABOUT NUTRITIONAL FACTS. FOR EXAMPLE, DO YOU HAVE AND IDEA ABOUT THE CALORIES AND CARBS PER SLICE? AGAIN, I APPRECIATE YOUR WORK AND SHARING THE WONDERFUL KNOWLEDGE THAT YOU HAVE!
Weekend Bakers says
Hi Paul,
Thank you very much. We are no experts on nutritional facts and we live our life by the simple rules of not too much, lots of variation, do it yourself and close to the source. We estimate that one loaf of bread (around 700-750 grams) would have 1400 calories (without the added sugar of your recipe) and one third of this would consist of carbohydrates.
Happy & healthy baking!
Ed & Marieke
Andrew Ou says
HI dear,
I notice that you wrote mix the starter and water for 1 minute stirring, does that make any difference when you put all the ingredient and stirred it for 3 minutes? Does that affect the end product (density of the bread)?
Weekend Bakers says
Hello Andrew,
Yes you need to stick to the recipe because the sourdough first needs to mature and before adding salt which inhibits the growth you are aiming for. Changing anything in the recipe will always have an effect on the end result. We would not choose to try your particular suggestion for the reason mentioned but there is no reason you cannot experiment with this recipe, after you have tried the original a few times, so you understand and can compare the differences with the original.
Happy baking!
Wayne Scott says
I made this recipe for the first time this week. As a new person to sourdough, it’s the best recipe I’ve used yet. Wonderful!
Weekend Bakers says
Hi Wayne,
So good to hear the recipe was such a success! For more sourdough inspiration we can also highly recommend our Tartine style recipe: www.weekendbakery.com/posts…yle-bread/
Happy sourdough baking!
Ed & Marieke
Vale says
Thank you for your inspiring recipes!
I have a question concerning the water temperature when making the loaf. As the starter comes straight out of the fridge, should I take into account the fact that it is going to be about 6 degrees Celsius when calculating the water temperature for the dough? Should I make the water hotter?
Weekend Bakers says
Hi Vale, try to aim for a dough temperature of around 25C to 27C. So you need water of about 30C to 35C counteract the fridge. Happy baking!
sue e says
Words can’t describe how delighted I was with this recipe: my loaf texture was tasty, spongy and perfectly chewy with a lovely crisp crust from my new banneton. Well worth the 4 days planning! Hubby is well pleased.
I have to say that the recipes on this website are so successful and practical to fit into a normal workaday. I have bought one of the books referred to in some of the articles here, but can see how the modifications by ‘weekend bakers’ are well worth their effort. Well done you two – you’re a favourite on my task bar.
Sue e
Weekend Bakers says
Thank you so much Sue. We are so pleased you value our efforts. Hope we can inspire you some more in the future.
Happy baking and lots of loaves!
Ed & Marieke
Ludovic leclerc says
Baked the loaf today, quite happy with the result. Next one planned for Monday. Family liked it.
Weekend Bakers says
Great to hear! You can play around with the recipe a little bit of course as you are pleased with the results you could try and make a next version with a slightly higher hydration percentage.
Ludovic leclerc says
Hi good morning to you. It is the day of the baking and i am looking forward to see the loaf coming out of the oven. You mentioned having lowered the water content in this receipe to make the dough easier to handle for us home bakers. Could you please let me know what would be otherwise the quantity of water you use and what percentage hydration it would then be. Many thanks. Have a good eeekend.
Ludo
Weekend Bakers says
Hello Ludo,
We are not exactly sure anymore, because we recalculated everything and changed more things from the original recipe but is was around 5% more or close to 300 g water in total, divided over starter and final dough probably.
Susan says
Hi,
I made this bread today, for the first time, and it turned out simply delicious. Just the right tinge of sourness.
I have never made SD bread before, so it must be sheer luck! Will try again just to make sure that I have got it right.
The dough was very very soft when I poured it into the Dutch oven. I never thought for a moment that it would rise.
I was all ready to bin it.
Is the dough meant to be so soft, almost like thick cream???
But it rose tall and proud?
Thank you for sharing your wonderful recipe.
I also made the walnut, fig and prune bread and it also get out like a dream. Perfect in every way.
Thanks,
Susan
Weekend Bakers says
You are really on a roll Susan. It all sounds excellent!
Keep up the good baking. And now you have also experienced the excellent workings of the Dutch oven.
Mirjam says
A great recipe. One small question. Do you fold before the shaping?
Weekend Bakers says
No we do not. When we shape it usually builds up enough strength and tension.
Magda says
Fantastic recipe, only bread I am going to bake now, per request of my family.
Used rye flour instead of spelt. Very good result.
THANK YOU!!!
Weekend Bakers says
Thank you so much Magda!
Bernie the banjopicker says
I love the sourness of this one! I’ve also got some great oven spring with this – it flattens worryingly when flipped onto the peel and slashed, leading me to think I’ve over proofed it. But it bounces right back. Lovely. One thing I’m not too fond of is the taste of spelt. If I were to substitute plain wholemeal, or just more white flour instead of the spelt, would you adjust the hydration? If so, by how much?
– Bernie
Weekend Bakers says
Hello Bernie,
When using wholemeal we would leave the hydration as is, when using white flour we would adjust it probably to a few % less and see how the dough comes together.
Good luck with it and happy baking!