Diastatic malt powder is the “secret ingredient” savvy bread bakers use to promote a strong rise, great texture, and lovely brown crust
Klik hier voor de Nederlandse versie
The why and how
Simply said; diastatic malt is a grain which has been sprouted, dried and grounded into a powder. By sprouting the grain (often wheat or barley), letting the grain grow into a small sprout, you activate the enzymes inside the grain. These active enzymes (diastase) release sugars from the flour / starch which help to grow your yeast. It also promotes a nice golden crust and a good rise and oven spring.
You only need very small quantities of diastatic malt, about 5g or 1 tsp (or 1% of flour weight) per loaf of bread to get good results. Because there is also something like too much diastatic malt which can result in a reddish instead of a golden crust, weak dough and a rubbery crumb. Add just the right amount and it will do magic for your loafs! Some brands of flour already have diastatic malt added to it, so look on the package to check. As a rule, most whole wheat flour and organic flour does not have diastatic malt added and your bread will improve when you add your own.
3 Simple Steps
- Sprout grains
- Dry the wet sprouted grains on low temperature
- Grind the dried grains into a fine powder
Step 1 – Sprout grains
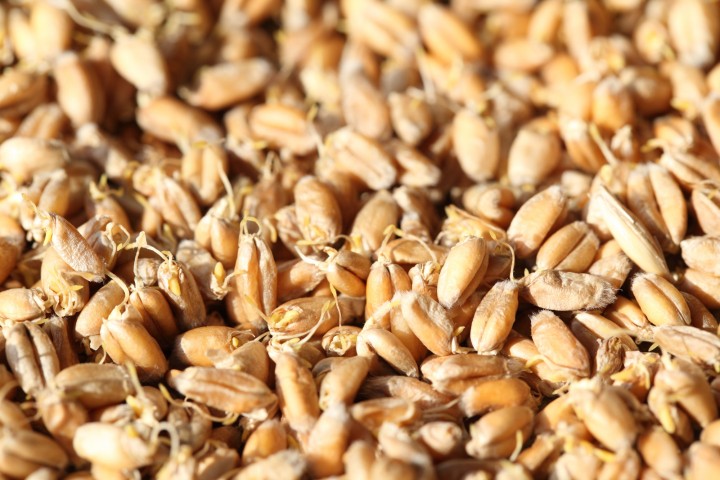
You can sprout grains yourself. Follow the steps on this page on how to sprout grains. We use organic wheat grains for our diastatic malt which we bought at our local windmill but you can also use barley. You need plain, whole (not broken or crushed) grains, preferably organic. When the grains have sprouted as described in the sprouting article you proceed to step 2 of this article.
Step 2 – Dry sprouts
Before you can mill the grains they have to be dried. You have to do this at a low temperature or your precious enzymes will not survive. The enzymes will damage and die and lose all activity at about 55 ºC or 130 ºF, so to be on the safe side do not let them get above 40 ºC or 104 ºF. We dry our sprouts, spread out, on a baking sheet lined with grease proof baking paper in a window sill. Turn them with a spoon every 6 hours or so the bottom grains are on top and everything gets evenly dried. If you have a fancy oven which can be set to 40 ºC or 104 ºF you can also put the baking sheet in your preheated oven for 3 to 4 hours. The grains are ready when they are dried completely and have turned rock solid again. Drying at room temperature can take up to two days or even more. Just be patient.
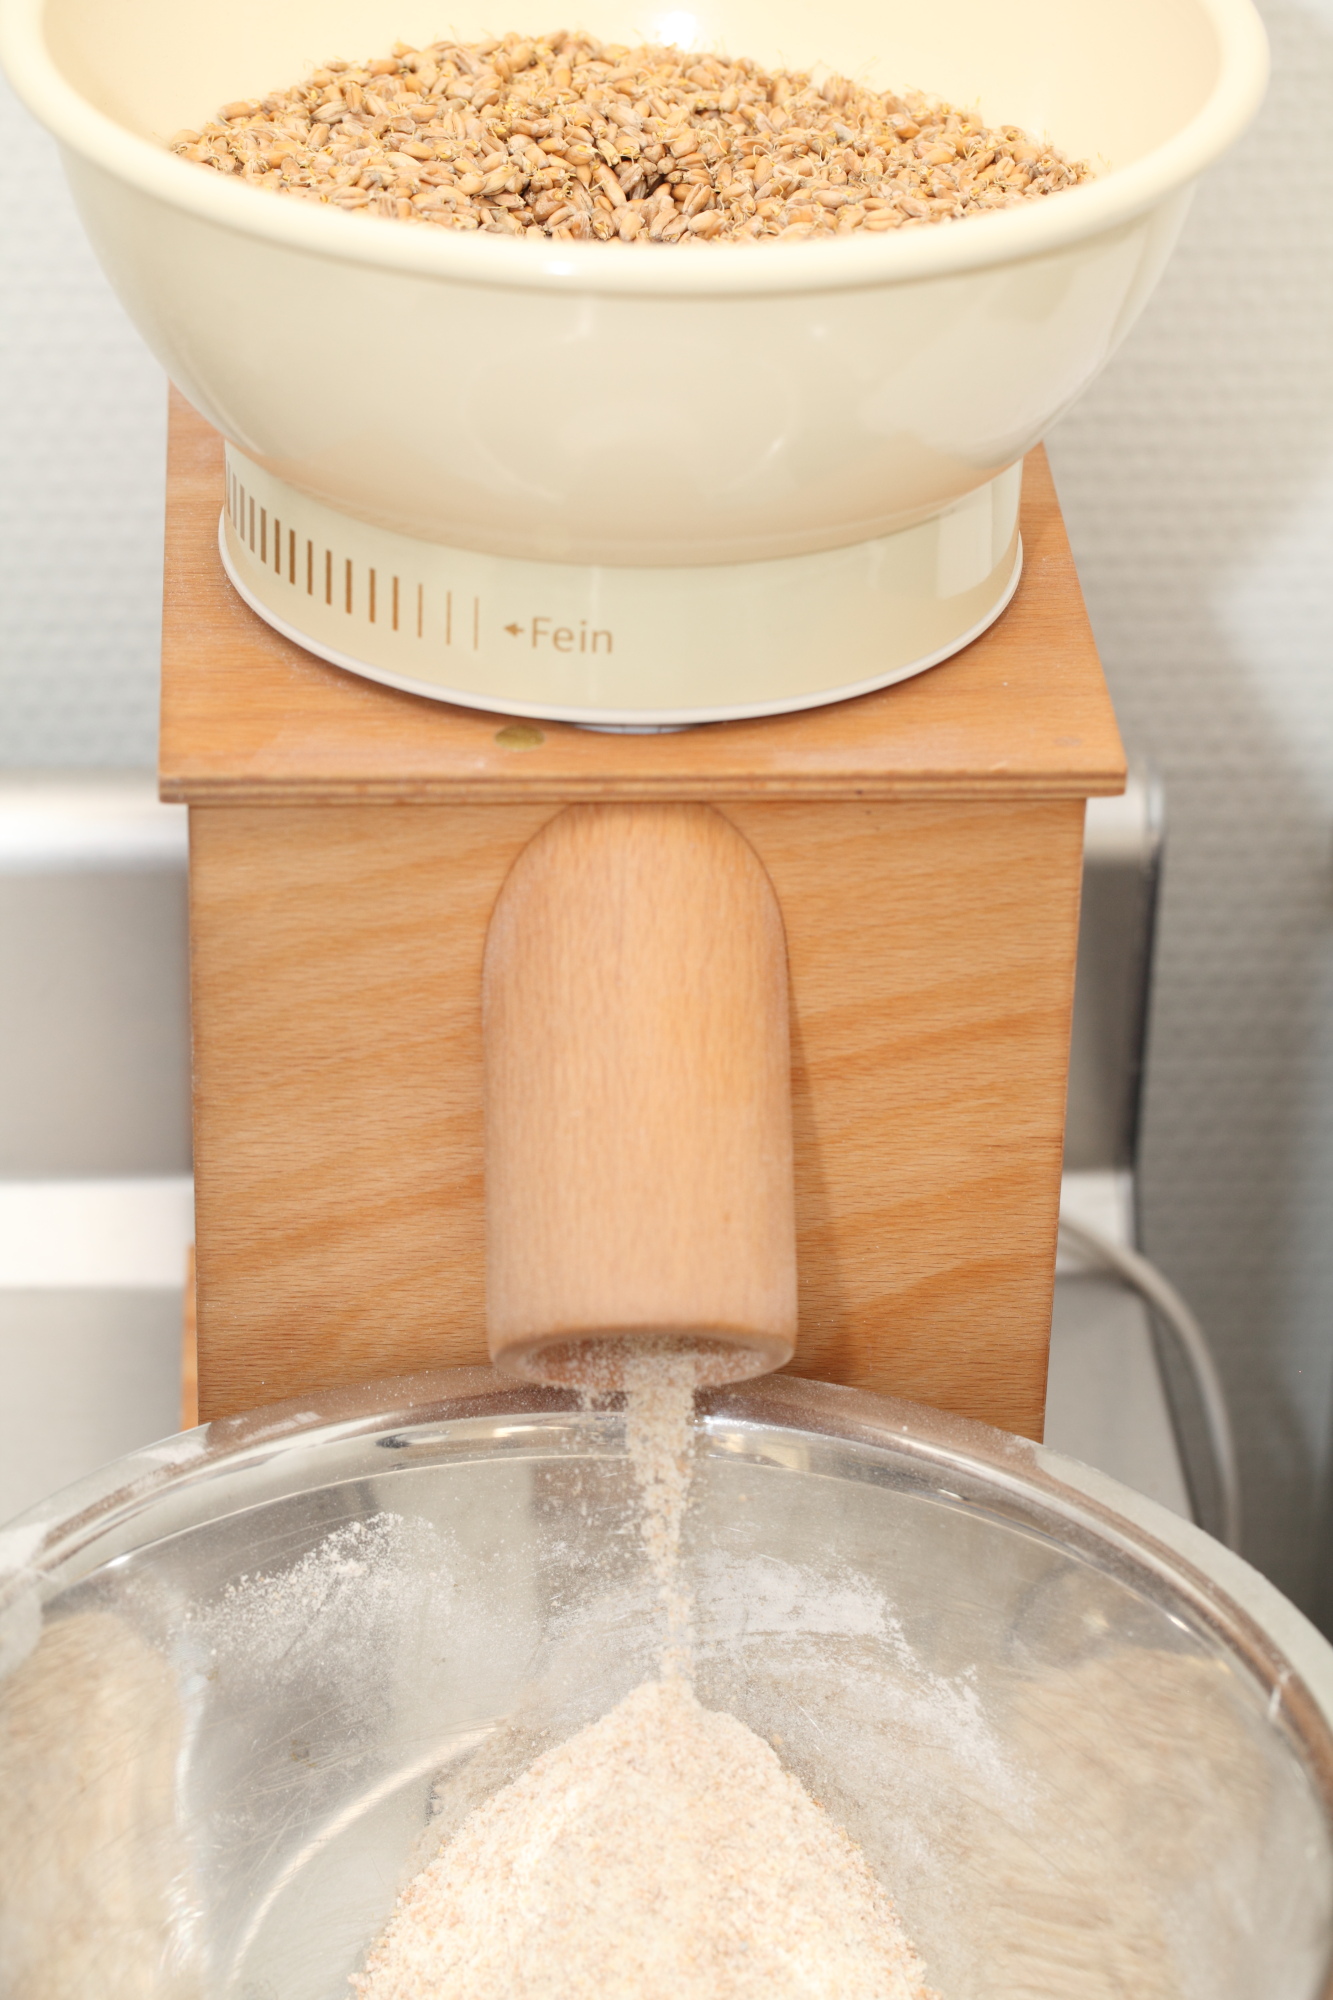
Step 3 – Grinding the sprouts
When the grains have dried it is time to grind them into a fine powder. We use a little home-use grinder with small stones especially made for flour. You can also pound them into a fine powder with a big pestle and mortar. The powder will keep ‘forever’ however, because it is flour we advise you to use it within a year (mark the date on your jar or bag). You just add the right amount of diastatic malt to your flour, just before you knead your dough, nothing more to it!
For example, you can add 5 grams of diastatic malt to the final dough to improve the dough of our Pain Rustique or Pain Natural!
Also check out our recipe for white fluffy buns with added diastatic malt.
Happy baking!
Hi, thank you for this guide. What setting would you recommend on the KoMo mill? I usually grind at the finest setting. Are you ever concerned about the heat of the stones denaturing the alpha-amylase?
Hello Alex,
Whatever you use as a setting for your whole wheat is also perfect to use for the malt. We have never been concerned with the heat of the stones to be honest. If you grind in small batches, allowing the grinding stones to cool in between, then this should not be a problem.
Enjoy your baking!
It is not clear from the text, is it the grains you grind or is it the sprouts?
A novis
It is both, so the grain including the minuscule sprouty bit. This small bit of sprout showing can also be seen as a sign that the malting process has taken place within the grain.
Do the sprouts need to be removed before grinding the dried grains?
If you bake your bread at 177 C, then it seems like you could dry it at a higher temp. I was looking for a recipe where the wet wheat berries are mixed to make the bread so its simpler. I did find ONE recipe like that on YouTube but the gal does not use any yeast.
If you dry the malt at a higher temp. you will disable the enzymes that convert the starches into sugars that the yeast is able to use, (this happens in the fermentation stage before baking).
What’s the difference in diastolic malt powder and sprouted grain flour?
If it is the diastase (enzyme) which is being developed why do you need to dry and then grind. Why not just bring to sprouting and then use directly. Can easily be done in required small amounts and would result in no denaturing of enzyme due to heat. Or is this to further modify grain and produce browning effect. Geoff
Can you please direct me to a recipe like that? amcken9@gmail.com. I have developed quite severe issues from not eating heritage grains and need an easy sprouted grain recipe (for the insoluble fiber).
TY
You can by brewers malt and grind it yourself. I get mine from my local homebrew supply shop
Don’t use roasted malt or this purpose, the diastase will be deactivated by the roasting process.
Can I dry the sprouted grains in a dehydrator?
yes at 105F. I do all the time.
Can grinding heat destroy diastrase?
GF breads tend to be heavy and don’t rise much. Will diastatic malt provide added lift when I use gluten-free bread flour mix?
Thx
Carol
Hello Carol,
We assume the malt needs to be gluten-free too? We only use wheat (or barley) and do not know how a gluten-free variety would behave in GF bread and if it would give you the lift you are looking for.
Beste WB. Ik heb diastatisch mout gemaakt volgens jullie wijze. Wel erg leuk zeg. Ik hoop dat ik niet te ver ben gegaan. Hier en daar kwamen al wat groene kiempjes op, en de worteltjes zijn wat te lang geworden. Waarschijnlijk huidige temperaturen en/of de goede kiemkracht van de gebruikte tarwe. Totaal heeft het bij mij 48 uur geduurd. Dus nu ben ik aan het drogen (eesten dus).
Nu dus in een recept gaan proberen. Dan denk ik aan jullie Pain Naturel recept.
Mijn vraag is: het toevoegen van diastatisch moutmeel moet toch wel invloed hebben op o.a. rijstijden?
Hallo Henk,
De mout doet haar beste werk in bloem die geen enzymwerking meer heeft, zoals sommige ‘supermarktbloem’. De invloed op het deeg en de korstkleur en ovenrijs is echt merkbaar, die op de rijstijd minder (ten minste dat is onze ervaring). Het is niet zo dat de rijstijden ineens tot de helft kunnen worden teruggebracht. Andere factoren spelen ook een rol, zoals de temperatuur van het deeg en de omgeving, die zijn, bij ons althans, nooit helemaal gelijk, dus is het ook wat lastiger om aan te geven wat de rol van de mout was bij het eventueel versnellen van de rijstijd.
Geniet van het bakken en sprouten!
Hi there!
My sprouts have gotten a little bit long (they vary from about 1/4in to about 1/2in) with most having those tiny white root hairs. But no green tips (if anything just a tiny tiny bit of green). Are these still okay? I was just a few hours later than you in starting to dry them.
Thanks for your help!
Hello Jenny,
We are not sure. Our plant-knowledge is not so big that we know exactly at which stage the enzymatic working stops or diminishes. There is no harm in drying and using them, but there is a change the enzymatic working will be less.
Hope your bread will be good anyway and you can always start a new batch.
Thanks for the tips
Glad you found it useful Bill.
have you ever heard of gluten-free diastatic powder? i am wondering what grain i might use, but more importantly if such approach ( the addition of a diastatic powder to the dough to improve the conversion of starch to sugar) is actually applicable to such gluten free dough ( containing: cassava flour, oat flour, rice flours, corn starch, tapioca starch, millet flour, buckwheat flour… i am not mentioning sorghum as its taste is quite objectionable to me).
Thank you!
Hello André,
We do not know much about it and have not experimented with it ourselves. We do know that the gluten-free powders have way less ‘power’ (enzymatic activity) than the ‘regular’ version. Would be interesting to know which gluten free grain would be the best option.
Hope somebody can shed more light on it.
Greetings,
Ed & Marieke
WKB
Here is a study on sprouted buckwheat as a gluten free ingredient to improve the nutritional content of gluten free cookies etc. www.sciencedirect.com/scien...101730749X
I have been making my own sprouted buckwheat flour and using it 100% and 50/50 as a flour substitute in sourdough recipes. It makes the dough heavier, and you need a narrow baking tin to support it, but still good bubbles, good texture and nicely flavoured. From what you have said I am using much too much for helping it rise – but I was using it for lower gluten not for rising. I will experiment with 5g sprouted buckwheat flour as a diastatic malt in my panettone recipe and see if it helps it rise. Thanks for the explanation and info.
Thank you Buddy for sharing this with us. Yes, it would be very interesting to see how the lower quantity would perform in the bread / panettone. We are not sure how the enzymatic workings of buckwheat compare to that of wheat.
You can sprout and malt hulled buckwheat groats. Make sure that they are sproutable – some major brands’ groats (e.g. Bob’s Red Mill) will not work. Only soak the groats for about 20 minutes, then rinse every 12 hours for a couple of days.
Thank you for adding your knowledge Jeff.
In Holland they are called ‘boekweitgrutten’ and they are available in mill shops and (bigger) organic food stores. I am not sure about the hulled part, the hulls seem to be removed most of the time and are used for things like pillow stuffing.
Enjoy your sprouting
I sprout my grains and dry then mill into flour. What’s the difference between my sprouted flour and malt flour?
Hello Sunny,
It depends on the sprouting that you do, more precise how long the sprout becomes before you use it / dry it. To sprout for diastatic malt the sprout is grown to the full length of the grain. The difference is in the amount of enzyme action you get by letting the sprout grow to a certain length.
Awesome thank you
Thank you all,
Perhaps reading an earlier reply regarding storing the grain rather than the powder, answers my question . 😄
Glad you found your answer already Carmine, we hope you will enjoy your baking results with the malt!