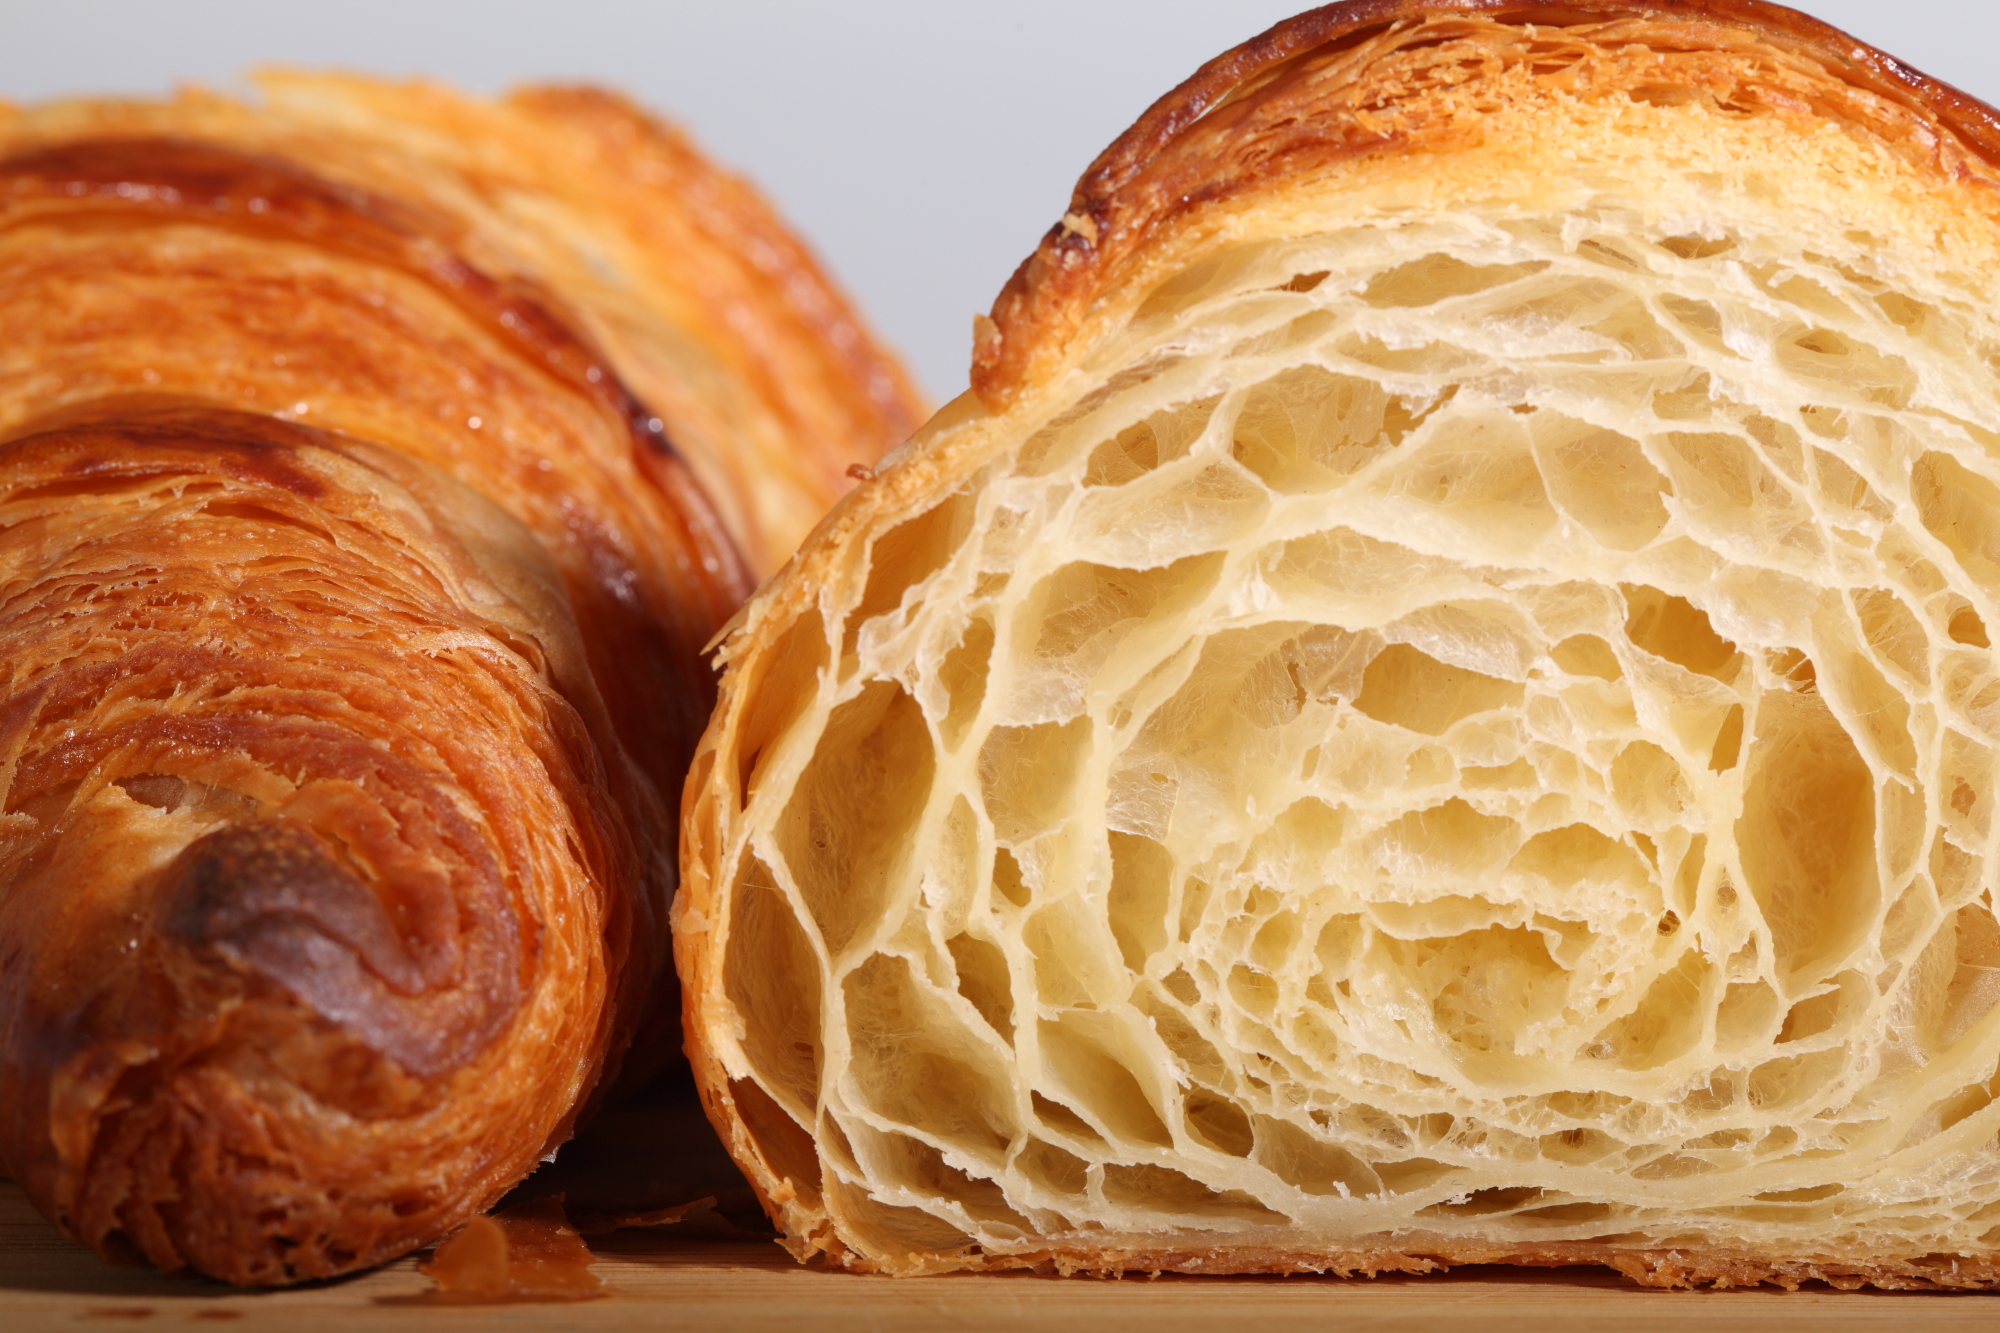
It’s all about the layers…
Klik hier voor Nederlandse versie
With this recipe we want to give you the exact directions on how we go about making classic French croissants. The recipe is an adaptation from the recipe for Classic Croissants by Jeffrey Hamelman. We started out largely following the instructions for his recipe, changed everything to our beloved metric system and found out some worthwhile croissant knowledge of our own along the way. Hopefully enough to justify sharing it all with you and inspiring you to give croissant baking a shot yourself.
Before you start we can recommend watching our croissant making video to get a general feel for the recipe. You can also check out our croissant making log where we keep track of our own croissant baking adventures. For answers to your croissant questions you can check out the Frequently Asked Croissant Questions section.
This recipe will yield about 15 good croissants plus some leftover bits which you can use to make a few, slightly odd shaped ones, or other inventive croissant-like creations.
If at first you don’t succeed, maybe you can take comfort from the fact that our first efforts were not very ‘croissant worthy’. But as you can see we persevered and got better…But we have to admit it is and always will be a tricky process. You have to work precise and be focused to get good results. So away with screaming children, hyperactive animals and all other things distracting! Put on some appropriate croissant making music and lets get to it…
Please read the following tips;


According to Raymond Calvel croissants laminated with margarine are formed into the crescent shape, while croissants laminated with butter are left in the straight form. We say, use whichever shape you like best, but do use butter!
The croissant recipe

Ingredients for the croissant dough
500 g French Type 55 flour or unbleached all-purpose flour / plain flour (extra for dusting)
140 g water
140 g whole milk (you can take it straight from the fridge)
55 g sugar
40 g soft unsalted butter
11 g instant yeast
12 g salt
Other ingredients
makes 15
280 g cold unsalted butter for laminating
1 egg + 1 tsp water for the egg wash
Day 1
Making the croissant dough
We usually do this part in the evening. Combine the dough ingredients and knead for 3 minutes, at low to medium speed, until the dough comes together and you’ve reached the stage of low to moderate gluten development. You do not want too much gluten development because you will struggle with the dough fighting back during laminating. Shape the dough like a disc, not a ball, before you refrigerate it, so it will be easier to roll it into a square shape the following day. Place the disc on a plate, cover with clingfilm and leave in the fridge overnight.


Day 2
Laminating the dough
Cut the cold butter (directly from the fridge) lengthwise into 1,25 cm thick slabs. Arrange the pieces of butter on waxed paper to form a square of about 15 cm x 15 cm. Cover the butter with another layer of waxed paper and with a rolling pin pound butter until it’s about 19 cm x 19 cm. Trim / straighten the edges of the butter and put the trimmings on top of the square. Now pound lightly until you have a final square of 17 cm x 17 cm. Wrap in paper and refrigerate the butter slab until needed.


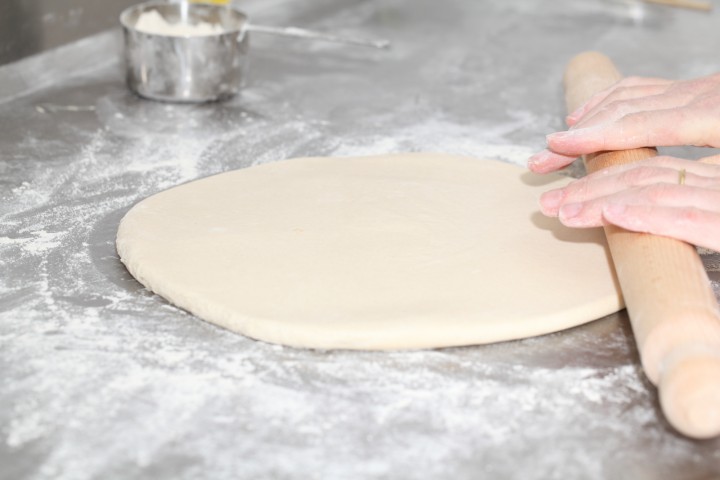
Take the dough out of the fridge. With a rolling pin roll out the dough disc into a 26 cm x 26 cm square. Try to get the square as perfect as possible and with an even thickness. Get the slab of butter from the fridge. Place the dough square so one of the sides of the square is facing you and place the butter slab on it with a 45 degree angle to the dough so a point of the butter square is facing you. Fold a flap of dough over the butter, so the point of the dough reaches the center of the butter. Do the same with the three other flaps. The edges of the dough flaps should slightly overlap to fully enclose the butter. With the palm of your hand lightly press the edges to seal the seams.
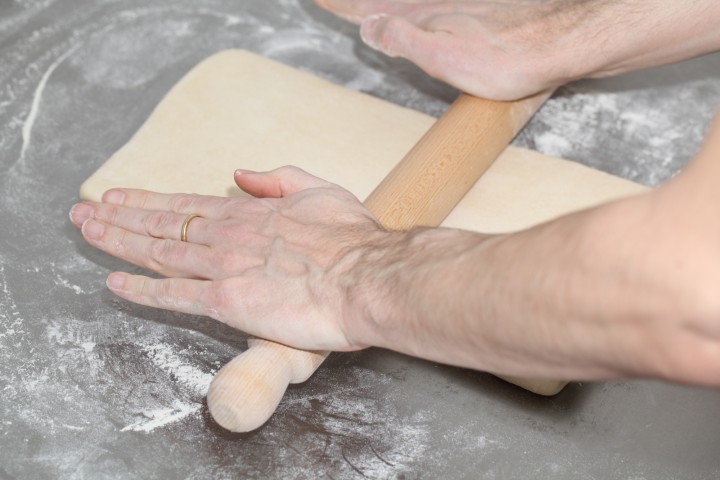
Now the dough with the sealed in butter needs to be rolled out. With a lightly floured rolling pin start rolling out, on a lightly flour dusted surface, the dough to a rectangle of 20 x 60 cm. Start rolling from the center of the dough towards the edges, and not from one side of the dough all the way to the other side. This technique helps you to keep the dough at an even thickness. You can also rotate your dough 180 degrees to keep it more even, because you tend to use more pressure when rolling away from you than towards yourself. You can use these techniques during all the rolling steps of this recipe. Aim at lengthening the dough instead of making it wider and try to keep all edges as straight as possible.
Fold the dough letter style, cover with clingfilm and refrigerate for 30 minutes (fold one third of the dough on top of itself and then fold the other side over it). Repeat the rolling and folding two more times (ending up with 27 layers of butter in total), each time rolling until the dough is about 20 cm x 60 cm. After each fold you should turn the dough 90 degrees before rolling again. The open ‘end’ of the dough should be towards you every time when rolling out the dough (you can see this in our croissant making video at around 3:40 minutes). After the second turn, again give it a 30 minute rest in the fridge. After the third turn you leave the dough in the fridge overnight until day 3, the actual croissant making day!
- Roll out to 20 cm x 60 cm
- Fold
- Refrigerate 30 minutes
- Rotate 90 degrees
- Roll out to 20 cm x 60 cm
- Fold
- Refrigerate 30 minutes
- Rotate 90 degrees
- Roll out to 20 cm x 60 cm
- Fold
- Refrigerate until day 3
- Rotate 90 degrees
- Roll out to 20 cm x 110 cm
Also see complete time table at bottom of page


Day 3
Dividing the dough
Take the dough from the fridge. Lightly flour your work surface. Now very gently roll the dough into a long and narrow strip of 20 cm x 110 cm. If the dough starts to resist too much or shrink back during this process you can fold it in thirds and give it a rest in the fridge for 10 to 20 minutes before continuing. Do not fight the dough, when the dough refuses to get any longer, rest it in the fridge! It is such a shame to ruin two days of work.
When your dough has reached its intended shape, carefully lift it a few centimeters to allow it to naturally shrink back from both sides. This way it will not shrink when you cut it. Your strip of dough should be long enough to allow you to trim the ends to make them straight and still be left with a length of about 100 cm.


Shaping the croissants
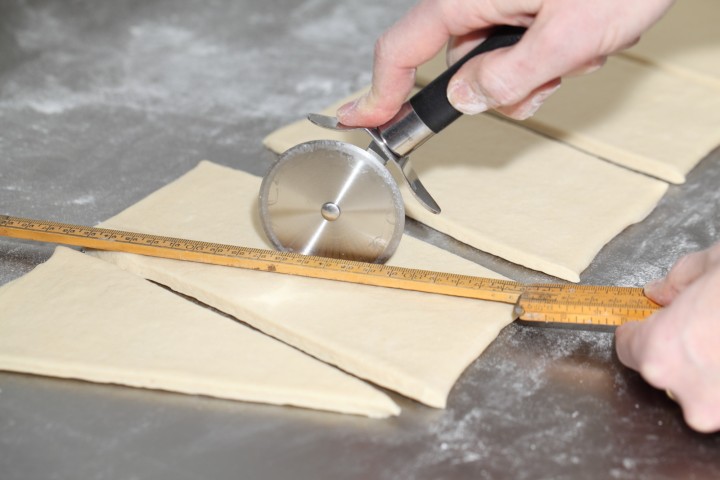
For the next stage you will need a tape measure and a pizza wheel. Lay a tape measure along the top of the dough. With the wheel you mark the top of the dough at 12,5 cm intervals along the length (7 marks total). Now lay the tape measure along the bottom of the dough and make a mark at 6,25 cm. Then continue to make marks at 12,5 cm intervals from this point (8 marks total). So the bottom and the top marks do not align with each other and form the basis for your triangles.
Now make diagonal cuts starting from the top corner cutting down to the first bottom mark. Make diagonal cuts along the entire length of the dough. Then change the angle and make cuts from the other top corner to the bottom mark to create triangles. Again repeat this along the length of the dough. This way you will end up with 15 triangles and a few end pieces of dough.
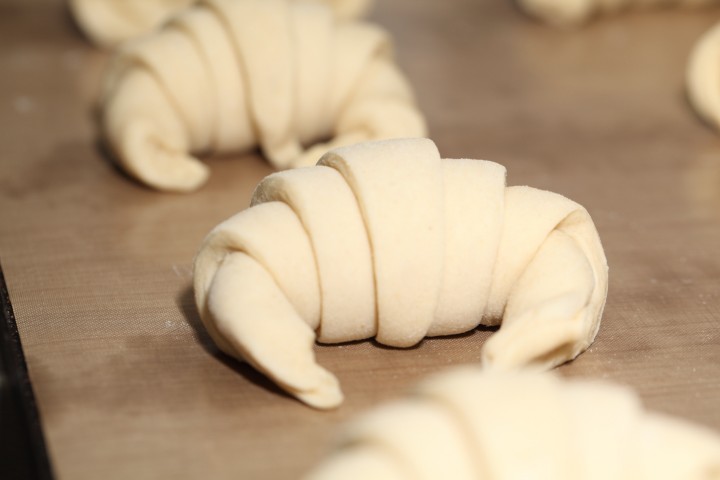
Using your pizza wheel, make 1.5 cm long notches in the center of the short side of each dough triangle.
Now very gently elongate each triangle to about 25 cm. This is often done by hand, but we have found that elongating with a rolling pin, very carefully, almost without putting pressure on the dough triangle, works better for us. You can try both methods and see what you think gives the best result.
After you cut a notch in the middle of the short end of the triangle, try and roll the two wings by moving your hands outwards from the center, creating the desired shape with a thinner, longer point. Also try and roll the dough very tightly at the beginning and put enough pressure on the dough to make the layers stick together (but not so much as to damage the layers of course).
Proofing and baking
Arrange the shaped croissants on baking sheets, making sure to keep enough space between them so they will not touch when proofing and baking. Combine the egg with a teaspoon of water and whisk until smooth. Give the croissants their first thin coating of egg wash. You do not need to cover the croissants with anything, the egg wash will prevent the dough from drying out.
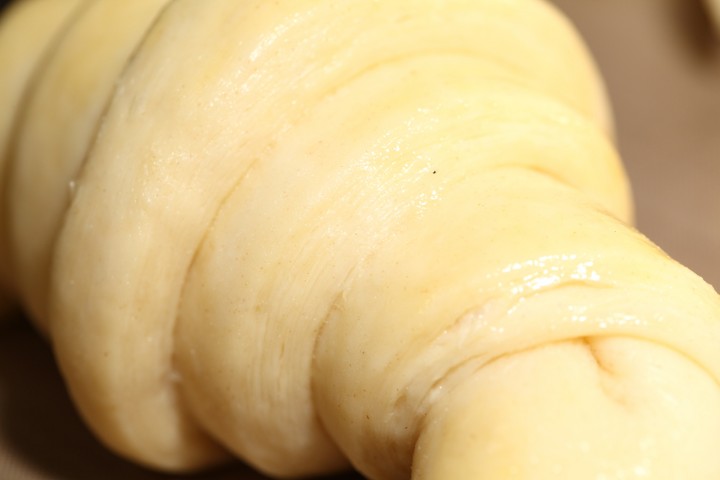
Proof the croissants draft-free at an ideal temperature of 24ºC to 26.5ºC / 76ºF to 79ºF (above that temperature there is a big chance butter will leak out!). We use our small Rofco B20 stone oven as a croissant proofing cabinet by preheating it for a minute to 25ºC / 77ºF. It retains this temperature for a long time because of the oven stones and isolation. The proofing should take about 2 hours. You should be able to tell if they are ready by carefully shaking the baking sheet and see if the croissants slightly wiggle. You should also be able to see the layers of dough when looking at your croissants from the side.


Preheat the oven at 200ºC / 390ºF convection or 220ºC / 430ºF conventional oven.

Right before baking, give the croissants their second thin coat of egg wash. We bake the croissants in our big convection oven for 6 minutes at 195ºC / 385ºF, then lowering the temperature to 165ºC / 330ºF, and bake them for another 9 minutes. Hamelman suggest baking the croissants for 18 to 20 minutes at 200ºC / 390ºF , turning your oven down a notch if you think the browning goes too quickly. But you really have to learn from experience and by baking several batches what the ideal time and temperature is for your own oven. Take out of the oven, leave for a few minutes on the baking sheet, then transfer to a cooling rack.
Latest way of baking; We heat up our double fan big convection oven at 200ºC, when heated up put the croissants in the oven and directly lower it to 175ºC. We bake them for 10 minutes at 175ºC, they will have a nice brown color by now, then lower the temperature to 150ºC, and bake them for another 6 minutes.
Best eaten while warm and fresh of course. Croissant we don’t eat or share within a day we freeze. We put them in the preheated oven (180ºC / 355ºF) for 8 minutes straight from the freezer. Nothing wrong with that, croissants eaten nice and warm, almost as good as the fresh ones…almost!
Croissant Time Table
Times are an indication and also depend on your experience with the recipe
Try to work swift but precise and take extra fridge time if needed!
Day 1 – Make initial dough
- 21.00 h – Knead for 3 minutes and store in fridge for 12 hours
Day 2 – Laminate the dough
- 09.00 h – Make butter slab and refrigerate till needed
- 09.05 h – Roll dough disc into square
- 09.10 h – Seal butter in dough
- 09.15 h – Roll out to 20 cm x 60 cm and fold
- Refrigerate 30 minutes
- 09.50 h – Rotate 90 degrees
- Roll out to 20 cm x 60 cm and fold
- Refrigerate 30 minutes
- 10.25 h – Rotate 90 degrees
- Roll out to 20 cm x 60 cm and fold
- 11.00 h – Refrigerate until day 3
Day 3 – Dividing, Shaping, proofing and baking
- 09.00 h – Roll out to 20 cm x 110 cm – part 1
- 09.05 h – Often needed! Take 20 min. fridge time if length not in one go
- 09.25 h – Roll out to 20 cm x 110 cm – part 2
- 09.30 h – Divide and shape the croissants
- 09.40 h – First coat of egg wash
- 09.45 h – Proof to perfection (indication 2 hours)
- 11.45 h – Second coat of egg wash
- 11.50 h – Bake for 15-18 minutes
- 12.10 h – Ready!
Hey,
I made the recipe in 2 days and it came out divine! Thanks!
I took the last step on only half of the dough because we would’nt have finished so many croissants. Can I freeze the left over dough?
If so, should I freeze after shaping them as croissants or before? How should I thaw and proof them after freezing?
Thanks
You can freeze them after they are baked, just thaw them in the bag, they are good as new. Or, after the final turn, freeze the dough. To thaw, leave in fridge or on the counter overnight, and when thawed, roll out, shape and proof. Some say to use frozen yeasted doughs within three months or so, I haven’t tested that. I think it’s easier to bake a batch, cool, and freeze in bags. I usually double or triple the recipe and bag the excess to the freezer.
You can also look at the tips for retarding and freezing you can find with our one day recipe version: www.weekendbakery.com/posts...nt-recipe/
Greetings,
WKB
Hi good morning! I’m making your croissant recipe, I’ve made many others and never had a desired result. I’m looking forward to seeing the final result of your recipe.
However I have a doubt I did not understand if the time of day 2 for rolling the dough is morning or night. I’m Brazilian and it’s very hot now so I decided to do the process at 9pm. Is this correct or will I have to change my croissant?
Thank you! Valdirene from Minas Gerais, Brasil.
It doesn’t matter..yes, use your own judgement for your situation. You can use cold packs, or cookie sheets with ice to cool your surfaces, get a marble or steel rolling pin and chill it, marble board and chill it, chill the dough on a cookie sheet in the fridge or freezer while rolling, there are lots of ways to keep the dough cool. And yes, certainly you have flexibility in the three day window to do the lamination. After the lamination, it’s nice to have at least eight hours, twelve or twenty four before the final roll for shaping. Time is a luxury in this recipe, it allows us to be flexible, do a little each day instead of a lot, and allows the dough to have maximum flavor, maximum relaxation. Enjoy!
Excellent advice thank you mister K. And enjoy the process Valdirine!
I finished it this morning. Unfortunately, when I rolled out the triangles, I think I pressed them a bit too much, so the croissants are a bit flat, not as fluffy-puffy as they should be. However, the taste is great, the consistency is really good, I can really see the layers nicely, this is an absolutely fantastic recipe. I only made a half portion as I am alone, and I used a bit less butter, and I don’t have a scale either, but in the end all the waiting and prep paid off. Thank you for sharing this recipe!
The reason they are as you say “a bit flat,” is using less butter, and/or not proofing or rising enough. Butter creates an impermeable layer, or layers that trap escaping steam from the dough which in turn creates the layers and puffiness and lightness. Not weighing ingredients is also a variable. You might try making a whole batch, they freeze excellently. However, as I say, our efforts as home Bakers usually turn out delicious, so our practice is always worthwhile. Make notes about your process, and refine them next time! Congrats!
Thanks so much for sharing this. Have made several batches to date and they’ve all turned out perfectly!
Great instructions and found it all very easy to follow.
Thank you Liz, great to be part of your pastry baking success this way.
Greetings from Holland and be safe,
Ed & Marieke
WKB
Why does this recipe almost double
The amount of yeast from the Hamelman recipe? That one calls for 1-1/2 tbs, which is about 6 g. Above it calls for 11 g, which seems like a large amount of yeast. All of the other ingredients are about the same proportion when converting to metric.
Hello Jeremiah,
It would indeed be a big mistake if we had the quantity wrong for all this time. But what you see in the recipe is one tablespoon and 1/2 a teaspoon which converts to 10.85 grams of instant yeast which we rounded to 11 grams. You need this quantity because of the rich croissant dough with lots of butter and sugar. Yeast does not particularly like this environment so more yeast is added to compensate. You can also use special yeast for enriched dough, but because this is not available to that many people, we made the recipe with the standard instant yeast.
Also, large scales are notorious for not being very accurate for tiny amounts. A small, accurate scale is best for yeast.
Hello,
On day 2 can I continue the steps and do the final roll out and shaping of the croissants?? Then store in the fridge in air tight containers? Then on day 3 start with the proofing??
Something like this:
Day 2 – Laminate the dough
09.00 h – Make butter slab and refrigerate till needed
09.05 h – Roll dough disc into square
09.10 h – Seal butter in dough
09.15 h – Roll out to 20 cm x 60 cm and fold
Refrigerate 30 minutes
09.50 h – Rotate 90 degrees
Roll out to 20 cm x 60 cm and fold
Refrigerate 30 minutes
10.25 h – Rotate 90 degrees
Roll out to 20 cm x 60 cm and fold
11.00 h – Refrigerate 30 mins???? 1 hour???? (Instead off over night)
11.30 Roll out to 20 cm x 110 cm – part 1
Often needed! Take 20 min. fridge time if length not in one go
Roll out to 20 cm x 110 cm – part 2
12.00h – Divide and shape the croissants
Store in air tight container over night!??
Day 3
08.00h – First coat of egg wash
08.05h – Proof to perfection (indication 2 hours)
10.05 h – Second coat of egg wash
10.10h – Bake for 15-18 minutes
Ready!
Let me know your thoughts! Thanks
It may be slightly more difficult to roll out for final shaping without the overnight rise that thoroughly relaxes the dough. You will likely encounter a much longer rise time since they will be coming from the refrigerator. There is a one day version of this recipe on this site. I don’t think your modification will save any time. Any time saved from the final roll out will be lost by waiting for the extra rise time since the croissants will be chilled all the way to the center. When you roll out the dough, you are equalizing the temperature, so when you shape them, the interior is not significantly colder than the exterior.
Hi! I’m using your recipe to make croissants for the first time and I’m on my day 2. I was wondering about the oven temperature: you wrote you heat up at 200C. Do you mean the oven mark 200 or actual temperature inside? I’m asking because if you use fan you should normally heat up at a lower mark on the oven because convection makes it hotter. Don’t want to burn mine))) Thanks in advance!
Hello Anna,
This is the indication we give in the recipe:
Preheat the oven at 200ºC / 390ºF convection or 220ºC / 430ºF conventional oven.
Because every oven is different, you need to know your own oven and keep a close eye on the baking process so you can also temper your oven if needed. Hope it will be great!
So I made them today. They were delicious but definitely the amount of butter was too much. I made half batch and I used proportions provided by you in an earlier comment and I followed the recipe to a tee but they didn’t turn as puffy as in your photos. When I cut them they had those nice swirls inside but the layers were sticking to each other due to huge amount of butter and they weren’t airy at all. I will most likely give this recipe another try but with less butter. Any other ideas why this have happened?
Butter doesn’t make them “stick,” butter creates an impermeable layer that traps escaping steam from the dough and itself, causing pastry to rise in layers. Less butter=less rise, less layers. The butter is also why this entire category of baking is called “butter pastries.”
Ok, understood. Then maybe you can please help me understand what exactly i did wrong? Maybe I should have done more proofing? Or made thinner triangles?
It’s difficult to say. There are many variables. You say you did a half batch, and “proportions,” if your amounts were correct, proper rise time is always a good tip. The croissants when fully risen are very wobbly and delicate..when brushing them with egg the brush can drag and disturb them they are so puffed. If the croissants are stiff, or don’t move, they haven’t risen fully. Don’t be discouraged by one batch..practice, practice, practice! Bakers do apprenticeships for this for a long time..
I will. We definitely loved the taste. I think I will proof them for longer time next time. I just didn’t think 2 hours would not be enough. Actually I pu t those in 2 batches and the second batch proofed longer and looked better after. One thing I wanted to ask is whether cooling them would have changed anything as we ate them right away.
I actually prefer them cool. Even after freezing, if after baking cooled to dryness then frozen, let thaw in the bag to reabsorb its natural moisture, they are just as fresh as if freshly made. I like them for several days after. I don’t reheat in any way, that’s just my preference..
Right..it’s like baking pizzas..the very last one is always the best. I’ve let croissants go well past three hours, my room was fairly cool, but I always think breads regardless of style benefit from the longest, coolest rise possible for best flavor.
Thanks for answering to all of my questions. Next time I’ll just leave them for longer. Will be hard to be that oatient though haha
We prefer them cool too, it is tempting to bite into a warm croissant and you should definitely do that, but the taste and texture are the best when cooled / cool.
Yes, do not use less butter, but try and improve your process and proofing!
Hello! I love the recipe and I’ve made two batches of amazing and flaky croissants with it! However, I’ve tried to make pain au chocolate by cutting a few pieces of the dough into rectangles and putting two sticks of chocolate inside, and it alway comes out slightly denser than the butter croissants. Do you have any idea why?
Could be the weight of the chocolate, but you also realize that the shape influences the result. The free ends of the croissant are free to rise without the encumbrance of the other layers and weight of dough..you notice the ends always rise more and are nearly as big as the center of the croissant which has more layers of dough. Therefor a uniform rolling will be denser. Try rolling the chocolate into croissants..
could i use active dry yeast instead?
Yes. I talked below about yeasts..with active dry, you need to dissolve it into the liquid part first. Instant is the same yeast, it’s just milled finer, may have other stuff in it, and doesn’t have to be dissolved first.
Plus in general you would use a tiny bit more of the active dry yeast, in this case 13 grams instead of 11 of the instant dry yeast (so about 1.2 x as much). But we do not know from experience how it works out in the end result (if it is really necessary to use more, but with this type of dough it could actually be a good idea).
I just finished my first attempt at these and while they taste nice, sadly the internal airiness was not achieved, was more like a roll. Any idea where I may have gone wrong? The layers look like they peeled back and the inside sort of bulged out.
Most of the time we look at the clock instead of the rising dough. I think you need more rise time. I’ve waited until they seem like a puffy gel about to wobble off the pan! Three hours plus! That’s my first guess..don’t be afraid to let those puppies rise!
Wish there was an edit feature..I also meant to say that in the final product, if you notice an extreme rise in a portion of the dough (oven spring) or a bulge as you say, that’s an indication of not enough final rise time..
Yes, we also want to add you really need to focus on dough temperature and extra proofing time because this sounds like under-proofing.
Hi! Thanks so much for this fantastic recipe! I was wondering, should you cut off the ends, if when rolling out and folding the ends come out a bit imperfect or not entirely square?
Best wishes,
Niamh
No. As you repeat the turns, things will even out. Below I talk about this. You can do a “double” turn on the first turn, which brings both ends into the body of the dough (fold both ends up to the top third or fourth of the dough, then fold over the entire doubled over dough like a book which immediately evens things out on the next turn, or, if when you seal the butter in you have a lot of excess dough at the ends with no butter in between, you can trim the parts with no butter close, place the strips evenly on top and they will roll right back into the dough. There is a lot of wiggle room and the dough is very compliant. Your goal is nice, even layers with butter all the way to the ends.
OMG! The first time I made this for breakfast. Everyone likes It. It was so good, I now have to double the recipe because they eat too much! This is perhaps our favorite thing to eat now!
Thanks!
Thank Michael, great to read your happy comment 🙂
We have a suggestion for a few variations with the same dough, which might be a nice idea to change it up:
www.weekendbakery.com/posts...y-caramel/ (these are too good…)
Also big fun:
www.weekendbakery.com/posts...x-raisins/
But next to these lovely calorie bombs we will also be posting a recipe very soon for healthy yet very delicious bus with spelt and oats to compensate for our love of pastry!
Enjoy your baking and eating
Ed & Marieke
WKB
hi, i will make these croissants for a Sunday brunch, just a question, is type 55 flour equivalent to the italian type 0 flour which is used for pizza dough for example? I also have type 0 “manitoba” flour which is a little stronger. In some Italian recipes for croissants they use half “manitoba” and half all pourpose flour. Any suggestions?
Many thanks
Hello Leo,
If you must choose between these flours we would advice you to use the type 0 flour because, although not the same, we would guess it would come closer to the one we use. Our experience with Manitoba for croissants are very limited, but we did not like the result too much. A combination like you suggest could yield a good result (we have not tried this), but we would start with only the type 0.
Hope you will enjoy your baking and the end result!
This was my first time trying your recipe and all I can say is WOW!!!! I had success on the first attempt and will definitely make again. It was well worth the 3 days wait. I got beautiful layers, and I could not stop staring at them….as I shaped them, as they rose for the 2hrs before going in the oven, while they were in the oven, when they came out the oven…you get the point. I even did a little happy dance. Thank you! 😊
Hello Joy,
Your name suites you 🙂
We love your comment and the enthusiasm for the recipe. We recognize the staring part. Don’t know how many hours I have sat on the floor (Marieke), staring into the oven looking at the bread rise and pastry puff.
Maybe you would also like to use this same dough to make this recipe for instance, because it is fun and absolutely delicious: www.weekendbakery.com/posts...x-raisins/
Enjoy your pastry baking and munching!
Ed & Marieke
WKB
My oven has died on me…too many bread, pastry (puff included since this croissant recipe gave me the confidence to so), pie & cake baking hours on the clock 😩
But I will try the pinwheels & pain au raisin soon enough…I’ll be back 😉😉
Bedankt!
I have Kerrygold Irish butter that is at least 82% butterfat but it’s salted. Can I reduce the added salt and use this? Any suggestions how to change the salt amount?
Well..I’d try maybe, halving the salt amount. You still need some salt in the dough, that’s where it ends up in the recipe, so, you can try it, but, unsalted butter works best as you really need the salt in the correct place in the recipe..in with the dry ingredients. Salt influences taste, obviously, but also elasticity of the dough and how the yeast functions, among other things, so..modifying the recipe, which as you can see by the comments is very much tried and true, you won’t get the same exact results. I have a saying..it’s easy to brew a great beer, or bake a great loaf of bread, but it’s not easy to bake the “same” great loaf, or “same” great batch of beer. As home Bakers, it doesn’t matter how consistent we are, we have a wide margin, and as long as it tastes good, we are happy. The pros however, are forced to reproduce a certain taste consistently. As my first horn teacher told me, “we are looking for a higher and higher level of consistency.” Good luck!
Could not agree more, excellent!
Hi Joe, I also realized that I have Kerrygold Irish butter, but it also salted. How did yours turn out with the salted butter? And, did you make any modifications?
Do you know the salt content % of the butter Stephany? We would always advice to use less than having things too salty. You can always compensate with a slab of salted butter on your croissant, but you can never take salt away once it is added to the pastry.
Hi. Thank you for your recipes! I am new using convection oven and have no idea if I let the fan on or off during baking croissants – afraid that it will dry out before rising in the oven. Thanks again!
You may use either setting, just be aware there is a temperature adjustment to be made. Sometimes the oven will adjust the reading on your display. Since the circulating air increases the exposure of the food to the heat, you would adjust the temperature down while using convection, meaning 385F convection would be equivalent to 400F “regular” bake with no fan, depending on the oven. Convection is nothing to fear, it doesn’t dry things out as moisture circulates within the closed oven, it does cook more evenly and redistributes the heat more effectively.
Thank you very much! 🙂
The results using convection with pastry / croissants can be very good, indeed do not fear it but use it if possible. Thank you mr. Katanahamon for your excellent advice and explanation.
Hello, I made this and followed instructions very carefully. However, I did not get the same result shown here. The croissants were flaky from outside but from the inside they had no define layers, instead it was fluffy.
In the end they were good but not croissant good.
Pleas if you know what went wrong let me know
There are too many variables. If indeed you “followed instructions carefully,” they would turn out as described. This is an activity like any other..as a former professional brass player, I could tell you exactly how to perform the French Horn solos in Mahler 5, but on your first try they wouldn’t turn out exactly like you want. Perfect practice, as they say, makes perfect. Good news is that even our imperfect baking results are tasty! Keep trying!
Yes, we very much agree to keep making more batches and get more familiar with the recipe and procedure. This way you will also develop some speed which will help with the quality of the dough and the layers. Also check out our tips and answers to questions that could help you on your pastry baking journey: www.weekendbakery.com/posts...questions/
Hello! I have a question about the croissant dough. Right after I shaped the croissant dough, I put them in the freezer where they have been for around two months. I would like to bake them now. How would I go about doing that? should I thaw the dough overnight? on the counter or in the fridge? should i wait until it is room temperature? Thanks!
I think in terms of thawing, general practice is to thaw in the refrigerator as you have better control. (Meats are always recommended to be thawed in fridge as you obviously never want them to be warmer than refrigerator temperatures.) Once thawed throughout, you have a baseline. Then remove from fridge and allow to warm to room temperature and proof fully. Trying to make it go faster by thawing outside of the fridge, well, I suppose you can try it. Not being meat you don’t have to worry about bacterial buildup. I have thawed inverted puff pastry batches in the fridge, that turned out fine. You may need more time for the yeast to “wake up” and do its thing. Plan for extra proofing time. Good luck!
Excellent advice mr. K. We would like to add that there is a limit to how long you should keep bread and pastry in the freezer, not so much for food safety, more for loss of quality. So we would probably advice to use the pastry within 3 to 4 weeks.
Thank you very much !! So good. Just perfect ! You are so generous to share this recipe. I will make this again and again.
Thank you !
Thank you so much Atsuko. If you are pressed for time or want to play with retarding and freezing the dough, you can also take a look at this version: www.weekendbakery.com/posts...nt-recipe/
Enjoy your pastry baking and greetings from Holland,
Ed & Marieke
I usually buy all butter croissants from Waitrose, but due to Coronavirus lockdown, decided to make my own. What a wonderful recipe! The instructions are comprehensive and easy to follow and the croissants were delicious. I shall definitely make again and try to perfect them. I don’t think they proved quite as they should and perhaps I killed off some of the yeast in the making. I had to leave them proving overnight in the end. I think I was a little too robust in the elongating of the dough too. In spite of all the above, the croissants were light and crispy on the outside with a beautiful fluffy inside. I could clearly see the layers. Almost perfect first attempt!
Congrats! I wouldn’t worry about thinking you are too “robust” in rolling..the professional dough laminating machines put the dough into very exacting pressures, besides, as you say, your results were great! Now, if you’re like me, the trick is not to eat them all very quickly…
Excellent Sarah,
‘Sounds’ like you already very close to perfection. You already know what you would do just a little bit different next time too. We always handle the dough with care. We know the sheeters are also ‘robust’ with the dough, but the beauty of the hand made version is you can be gentle and it could make a difference in the structure and layers. But these are details and indeed nothing to worry about. Just enjoy your making and baking and eating and be proud of your achievement!
Greetings from Holland,
Ed & Marieke
Hi there, thank you so much for the informative recipe! I have a question about my dough rising too much if that’s OK.. on day 3 when I took it out of the fridge to cut it up, it had risen so much in the fridge overnight it was like a balloon in the cling film. I still rolled it out which knocked it back, and it rose again OK before baking. However, I never see anyone having this issue in the videos I watch – everyone else’s dough seems to be as flat as it was when it went in the fridge. I think I lost some layer definition because of this as well.
Is this because my fridge is too warm, or am I using the yeast incorrectly?.. I use fast action yeast.
You help would be much appreciated!
Hi..I’ve been using instant yeast as well. Do you have a small scale for tiny amounts? Sometimes large scales don’t measure 0-20 grams very accurately. It’s worth getting a small, accurate scale. Another thing is how long your last rolling steps are taking and how warm the dough gets, then how fast it cools down in the fridge. You could try “knocking the temp down” by putting it in the freezer first for 30-45 minutes, then the fridge for the overnight rest. Or, put the dough in the fridge on a shelf by itself not stacked on something else so it receives the fullest amount of cold, circulating air. Perhaps it isn’t chilling well. My batches are pretty puffy before the final roll out.
Hi, thank you for your response! I found a rough conversion for grams to tsp for yeast, and my scales do sort of register grams individually.. but I did think that maybe I need to reduce yeast a bit. Also, I was thinking that maybe fast action yeast is not that suitable for long-rise bakes, and instant yeast is better, but I can’t get hold of that type anywhere at the moment.
I’ll definitely try the freezer next time as well, and I’ll crank down the temperature in the fridge. Fingers crossed!
The “yeast” species in bread baking yeast are identical, it’s how it is processed and any other additives that are different. Active dry yeast must (should) be dissolved in warm water (maybe some sugar to see it foam, but it’s not necessary and actually just “trains” the yeast to eat the wrong kind of sugar..) to activate, or “proof, prove,” while instant or fast rise does not and can be added directly to the dry ingredients, is milled to a finer consistency for faster dissolution and may also contain enzymes or other additives to speed leavening. Good news is that as long as you know to add active dry yeast to water to foam or proof first, either yeast type can be interchangeably used in any recipe. If you are running low on yeast and there isn’t yeast available at the store, simply save a piece of rising dough, add flour and water every day or even less if you refrigerate it and treat it like a sourdough.
Thank you so much for the explanation! I’ve now got hold of both types of yeast, so will do more trials this week taking everything into consideration. Fingers crossed no balloon dough this time 🙂
Well, it does and will puff up..there’s always a certain amount of CO2 you press out on the final roll out and shaping..the yeast is alive, and rolling it out during the “turns” exposes the yeast to new food by remixing the dough. The refrigeration moderates how fast the reaction goes and allows for maximum flavor and dough development.
Our dough also rises in the fridge , but not to the balloon stage. So a little bit is quite OK. You should always gently roll out the air. We think a combination of lower fridge temp and a little less yeast should solve the problem. We hope you will have excellent pastry soon!
Hi, thank you for your response! It is good to know that I should expect some rise still. I think I’ve got enough tweaks to trial now for a hopefully better result 🙂
Enjoy the process!
Made this recipe last week and it was a total success! Thank you so much!
I did find that the croissants did not keep crispy even when stored in an airtight container. I wonder how bakeries that have their croissants showcased in open air, manage to keep them crisp and flaky. Does it have to do with the oven temperature and length of time in the oven? Or maybe the type of flour used?
Any insight to this would be greatly appreciated!
I have found them to stay crispy at least twenty four hours in a bag, they soften after that but not unpleasantly so. Even freezing, upon opening I find them crispy. Absolute cooling (in open air, preferably on a rack with good aeration) must take place before storing them, or the steam or residual moisture will soften them. Thoroughly cool them, make sure they are dry before storing, perhaps you’ll have better luck.
Hello Ksaieh,
We like the tips from Mr. Katanahamon. We also know bakeries in France sell their pastry super fresh and people now when to go for the freshest possible bake (baguettes even three times a day). So if they know their customers and behavior, they know how much to bake and how quick it will sell, so what we have seen is that it will not be that long before they are sold out, usually within a few hours. In supermarkets for instance, they will probably use ‘enhanced’ ingredients to keep their pastry ‘fresh’.
Looking forward to making these very soon… But I would like to ask, what may be an obvious question; If I make a half quantity recipe, do I roll out to half the length, whilst keeping width and depth the same, each time?
Many thanks
Yes, halve dimensions, but..I’d encourage expanding, not contracting the recipe. I usually do a double or triple batch..they freeze spectacularly.
We agree with Mr. K.. Although it is possible to use halve the dough we advise to make the full batch as described in the recipe as the geometry of the shapes are much easier to work with.
You can always use halve and freeze the other halve.
If you want to halve the recipe, the dough square should be 18.4 x 18.4 cm and the butter slab 12 x 12 cm.
Put the butter slab on top of the dough square and wrap the butter.
Roll the dough into a 20 cm x 30 cm rectangle.
Fold letter style to a 20 cm x 10 cm rectangle.
Turn dough 90 degrees.
Roll from the short 10cm side to a 20cm x 30cm rectangle (the short 10cm side will get 30cm).
Turn dough 90 degrees.
Roll from the short 10cm side to a 20cm x 30cm rectangle (the short 10cm side will get 30cm).
Turn dough 90 degrees.
Roll from the short 10cm side to a 20cm a 55cm rectangle (the short 10cm side will get 55cm).
The size of the final dough, right before cutting, should be 20 x 55 cm.
Enjoy the process and the pastry!
Thank you. Turned out OK… But next batch will be better… But not as good as the third batch!
That is the absolute right baking spirit. You will get better and better!
I consider myself an competent home baker but have stayed away from laminated doughs. Tackled this one looking for a new at-home project and followed directions to the letter. Used grocery-store AP flour and butter, and 2% milk, because that’s what I had at home. Stuffed four croissants with ham and cheese, and rolled the trimmings up with cinnamon sugar. Proofed for over 3hrs as it’s chilly in my home– seemed to help to put the tray in the oven with the light on but needed to rotate as the croissants near the light rose quicker than the others. Baked one tray at a time in conventional oven at 425F for 6 minutes followed by 350F for 15 minutes.
They came out perfectly. I was expecting more challenges, but had no dough tears and no leakage. The layers are pronounced, and the flavour incredible. Thank you for this recipe. The detailed instructions make this a very doable project for anyone with a bit of patience and a long counter!
Thank you Sarah, wonderful to read your comment and the way you ‘tackled’ the recipe and got such wonderful results. Even though you had no experience with laminated dough, we are sure you were able to use your built up baker skills, understanding the what an how of the process, and especially the patience (very important) that led to the pastry perfection.
Wishing you lots more enjoyable baking moments and excellent pastry to share!
Ed & Marieke
Thank you so much for this recipe! I was always a little too apprehensive to take on croissants, but your clear instructions have given me the courage to try. I have made these twice now and have just one question: the first time I made them I stuck to the 18-20 minutes on 200 and I got a this layer of wonderfully laminated crispness envelloping a lump of raw dough. Allright, so the temp. was too high. I made them again today and baked them for 10 minutes on 190, then 30 (!) on 140 and some of them still are not quite done. I am at a loss at what I am doing wrong, but there must be something. The croissants had a lovely wobble after the final proof and I followed your instructions to a tee. Can you help me?
Thanks again for this, and all your other recipes! As a budding amature baker, you are my heroes!
Before baking anything else, I’d suggest you get an accurate oven thermometer, and test your oven thoroughly, at each shelf height. Examine this aspect closely first, then we can talk..! Something is very fishy about your oven..
Thanks for your reply! My oven is fairly new and so far I have baked many breads in it, it does seem to get 5-20° warmer than it says on the knob. Nothing that would explain the weirdness surrounding the croissants though…
Oops! That should be 5-10! Not 20, silly phone
If it’s warmer, then it really makes no sense that they wouldn’t be getting done. I still suggest getting the most accurate oven thermometer you can, and testing the temp at each shelf. Be sure to thoroughly preheat before testing. Think about getting a thick pizza stone and keeping it on the lowest rack, this acts as a heat sink and helps keep an oven at proper temps, and cooking things evenly.
I checked the temp and found my oven is indeed a bit off. I’m baking croissants again Sunday and will keep this in mind. Thanks again for your help!
Hello Charlotte,
This advice of mr. K. is really good and we hope you will be able to check it with the a ‘true temp’ oven thermometer (they will cost about 5 to 10 euro or dollar). We would also suggest not to temper your oven this much (140 is too low) at the second stage of baking and we also hope and expect you do not open your oven door during baking (just making sure…)
And thank you for your kind words. We hope you will give it another go, because you are very close, just this last oven bit to get right and then they will be perfect!
Greetings from Holland
Ed & Marieke
Thanks for your reply! I checked the oven temp and found it was about 5° off at certain levels. BUT, I also realised I often need much more water (or other liquid) with my flour than a recipe might ask for. I did find the dough a little tough but I thought this was just because I’ve been baking so much high hydration sour doughs that I’d forgotten how ‘normal’ dough is supposed to feel.
Anyway, I’ll start another batch tomorrow and will report back on the results.
Thanks again for the recipe and your additional tips, I’ll keep them in mind!
If you aren’t weighing accurately, you may find you have to adjust recipes. Even if flour is very dry, you shouldn’t have to add more than a small extra splash of liquid for this recipe. I’ve made this recipe many times with several different flours, when weighed accurately, the dough is silky and perfect. Accurate scales, measuring properly, accurate temperatures, really are necessary in baking.
We agree very much on the use of scales. We always want to stress the importance of being exact in baking. We can assure all the top chefs and bakers, also in the US, are using scales too. A reliable scale will cost no more than any other simple cooking or baking tool everybody already owns and it will make your bakes so much more consistent.
Thank you so much for sharing your recipe and ‚how to‘!
Baked croissants for the first time today and your step by step guidance made them turn out perfectly! Patience really is key!
Loads of love and gratitude all the way from Switzerland! <3
Thank you Chrissie, so glad we could be part of your pastry baking success in this way.
Did you see the one day version with tips on retarding and freezing?
Could maybe come in handy at some point:
www.weekendbakery.com/posts...nt-recipe/
Enjoy your baking and stay safe!
Ed & Marieke
Holland
Hello! I wanted to ask what kind of butter did you use and where did you purchase it?
In the US there are several kinds available depending on what you like. I like organic stuff, I’ve found Straus organic Euro style 85% butterfat content, available at Whole Foods, or check the Straus website for availability. All the pics from me on this site were made with the Straus butter, they all turned out great. (The recent pics of croissants stacked untidily on an oven are mine. I went on a triple batch baking extravaganza..) There are several other Euro style, higher butterfat content ones available as well.
Once the croissants have been shaped, can you put them in the fridge overnight to proove, so they can be baked in the morning, please?
I believe the site has a question/answer section for croissants, you might check there, and the comment section for the one day version too. I don’t see why not, though, that would probably work fine if you cover them to keep from drying out and have the fridge space. Just make sure you allow them to warm up and rise fully if they haven’t already from their overnight rest..
Thank you.
I am going to try to have freshly baked croissants for breakfast on Saturday morning!
Hope it worked out fine Leigh.
More tips on retarding and freezing at the bottom of this recipe:
www.weekendbakery.com/posts...nt-recipe/
It’s too late but I hope this will help. I have tried to proove croissants in the fridge and they came out nothing different from what had been before the prooving time. Croissants need to be proven in the warm area because yeast dough rises better in warm place and the most important thing is that when you refrigerate the dough, the high butter content chills down and becomes hard, which weights down the fragile air bubbles from the active of the yeast and makes it impossible for the dough to rise. I highly recommend prooving your croissants at room temperature for the promising results. I can make sure that the butter won’t melt because I live in a tropical land so if my butter doesn’t melt, there is no way your butter is gonna melt.
Hi! First time croissant maker here. I’m in Step 2, waiting to roll out a third time before resting dough overnight. I can’t bake both trays at the same time, they won’t fit in the oven together, so my question: Do you recommend I put second tray of proofed croissants in fridge while waiting for first tray to bake? Or even freeze overnight to make fresh batch the next morning? Or should I just keep them out on counter and exchange trays when the first one is done baking? Thanks! Also: I think my butter didn’t stay smooth while rolling; I can see it in sort of waves in the dough. Will that cause problems for the bake? Thanks fir the helpful guidance!
I always bake a single tray at a time..extra rise time never hurts. Unless you’re environment is too warm, you don’t need to worry about an extra twenty or thirty minute rise.. You’ll find many variations as to how the butter behaves..it can be different in three exact batches you’re doing at the same time. Luckily, these layered doughs are super forgiving. Enjoy!
Thanks for your helpful hints!
I’m disabled, so, I have plenty of time to look at the iPad. I figured that if I can get to a question quickly for someone, you probably wouldn’t mind. If you get sick of me, feel free to delete my responses..I’m just trying to be helpful! Bread baking is such a rewarding thing, I really wish more would try it. Then, these recipes like croissants wouldn’t seem so complicated to people. It’s really, really not difficult! Sure, there are steps, but, the three day recipe eliminates lots of manual labor all at the same time, plus, the overnight cold rests develop the dough and flavor in a superior way. I guess I’m just still excited by finding a recipe that produces such amazing results..!
Hello mister K,
We are very grateful for your help, it is a big task some days to answer all the questions we get online and via email. We welcome the help because it is our goal to always try and answer all comments.
We think other bakers will also welcome your perspective and sharing of experience, because we do not know everything and have not baked all possible combinations, versions and ways of recipes.
We hope you get enjoyment out of writing and sharing too, next to the baking.
Be safe and stay excited about the baking!
Ed & Marieke
Excellent recipe.
Really worth the three days.
Will definitely do again.
Thank you for sharing.
Thank you Robert,
Wishing you lots of excellent pastry and the joy of baking to delight and divert you these days!
Ed & Marieke
Thank you so much for sharing your technique. You’ve made the directions so organized and easy to follow. I do have a question… while laminating, my butter began to break up and I can see it through the dough. Did I press too hard while rolling out my dough? Please help.
Hello Christy,
This is a much asked question and we can tell you that we use organic butter with a high fat content and low water content (about 82% fat). A higher water content tends to make butter hard, which promotes tearing and breaking and ruins the layers. Your butter needs to be pliable and at the same time not too soft at the moment of usage.
Also check the comments below for suggestions for butter brands from other bakers.
For more answers to questions check our page:
www.weekendbakery.com/posts...questions/
Enjoy your pastry baking and sharing and stay safe!
Thank you so much for sharing your technique. You’ve made the directions so organized and easy to follow. I do have a question… while laminating my butter it began to break up and I can see it through the dough. Did I press too hard while rolling out my dough? Please help.
I just made a triple batch, photos on this site, one of the three with the same dough, same butter, same temps did exactly what you’re talking about, just slightly separating, but no quality difference in the finished croissants.
There are so many variables, like how thick or thin the butter slab, temperatures, how far you roll out, etc. This happens some of the time. It’s only a “problem” if the chunks are big and break through the dough. (Still, while rolling it’s a cosmetic flaw, my beginning attempts where that happened still produced great croissants..you’ve gotta love the forgiving nature of butter doughs..) This is most likely caused by too cold butter, too thick butter, and butter not “beaten into submission,” as I like to say. Next time beat all the butter, trim, stack, beat again into a larger or thinner block, try to make sure all, all of the butter is homogenous in temperature and mobility. I shoot for a warmer butter temp than when I first started, (not melting) and pull the dough cold right from the fridge for the seal in and first turn. I feel this allows the butter to move smoothly, but the dough cools it to keep it firm.
This is a matter of practice and mindful observation. Putting the butter sheet in the fridge for just a few minutes can firm it up. (Too firm though…not good.) Once I start the turn process, I refrigerate only a few minutes in between turns…I’ve noticed definite separation of the butter if I chill long times between turns. If the dough doesn’t resist rolling, you can perform the turns.
One more thing..as you practice, you might change things as you see other chefs’ recipes. One thing I have changed, when sealing in the dough, I make a large, thin butter slab, and a dough rectangle twice as large. I place the butter on the left as close to the edge as I can, use my fingers to press the edges of the butter down to the dough, then bring the right side over to the left trying not to get any big air bubbles. (Not a problem..poke with a knife and bleed out the air and reseal) Just like a book. This way I get more even dough on both sides. The method described here, it’s really necessary to leave more dough in the center and more thinly roll the four edges that get folded over, or you end up with a very thin layer of dough on one side, and a thick one on the other. Perhaps this is why sometimes ppl see butter “breaking through” on one side especially. Another trick is that when you seal in the butter, if there are uneven edges that extend well beyond with no butter in between, just trim them off and place them on top as evenly as you can. They’ll roll right back into the dough no problem and leave you with a nice even dough with butter in the middle all the way to the edges. On the first turn, sometimes the ends are very uneven. One way to fix is to incorporate a double turn on the first turn, bring both of those uneven ends into the top third or fourth of the dough, this is merely cosmetic in rolling..I just noticed once when experimenting with double vs single turns that it evened up the dough ends for subsequent turns. What really helps even up your corners is to roll towards a point, or towards the corners, usually fortyfive degrees from the direction of rolling. To make corners more square, roll directly toward them.
Helpful!! Thanks for this.
How long can the dough sit in the refrigerator before you begin rolling and laminating?
I made the dough Wednesday (now Saturday), so I’m on day 4 of the 3-day recipe!
The dough looks fine – not too developed
If you allow the yeast to consume too much, you run the risk of not having enough leavening power when you need it at the end to make the croissants rise. It’s better obviously if possible to follow the recipe. It’s a gamble at this point. I wouldn’t want to put in multiple days of effort and add that much quality butter to a dough that might not produce the best result. I’d put together another dough and start over..if you’re in a hurry, they have a one day version of this recipe. Just one baker’s opinion..
Is it possible to make this recipe with Active Dry Yeast rather than Instant Yeast?
Yes Jade, that is very much possible. You need to increase the amount from 11 to slightly over 13 grams and follow the directions on the package to activate your yeast.
Hope it will be good!
To add to my last comment I also rolled out/ laminated on a refrigerated coriander cutting board. Obviously this cutting board is not long enough for the 60 cm, I would just fold the dough up on itself with a sheet of parchment in -between the folds as I was rolling and moving my dough up/down the board allowing the folds to be at either the top or the bottom of the cutting board depending on my rolling direction. Then when I thought my dough was long enough I would lay it out across the board do my folds, turns, and marking and put it in a 2 gallon zip top bag to go back into the fridge.
Thank you GIna, for sharing your method. We are sure it will be helpful to other bakers with a worktop space challenge.
Hope you will bake many more excellent pastries to bring joy and comfort in these difficult times for many people.
Stay happy, healthy and safe!
Greetings from Holland,
Ed & Marieke