

It sounds almost too easy, but the delicious truth is….it really works!
Klik hier voor de Nederlandse versie
I tried several version of this recipe, each with just tiny changes because the first version I tried already turned out quite perfect. Except for one thing: The crumb needed just a little bit of help to get it from a slightly cake-like stage to something a bit more cohesive. So, just before I pop the dough in the fridge for a well deserved 48 hours rest, I give it one or two stretch & folds.
I also tried versions with slightly more (5ml) and slightly less water. The version you find on this page is the recipe that works best for me. I am very pleased with the result.
Also check out the short video we made of the making and baking of the brioche.

| Ingredients for the No Knead Brioche | ||||
|---|---|---|---|---|
| makes 1 Brioche loaf | ||||
| 250 | g | French Type 55 flour / all purpose flour / plain flour | ||
| 100 | g | fresh dairy butter, melted | ||
| 70 | g | water at room temperature | ||
| 110 | g | organic eggs (1 medium egg is about 55g) | ||
| 50 | g | runny honey / 2.5 tablespoons (flower /acacia) | ||
| 5.5 | g | (sea) salt | ||
| 3 | g | instant yeast | ||
Making the Brioche dough
In a bowl, combine eggs, honey, water, salt and melted butter and whisk, somewhat vigorously, for about 30 seconds. We do this with a Danish dough whisk. Add the instant yeast to the flour and sift it into the mixture. Again, with enthusiasm, whisk for 30 seconds until your dough looks smooth and homogeneous. Cover both bowls and let the dough rest for one hour at room temperature to kick start the proofing process.


Take the dough out of the bowl and onto a floured work surface and do one or two stretch and folds (full fold ones, left over right, right over left, bottom over top, top over bottom; see our bread movies to observe this technique if you are not familiar with it). If your dough is very ‘elastic’ and cooperative, do a few, if it starts to resist you can just stop.


Return the dough to the bowl, cover and take it to the fridge where it will stay for 24 hours. I have made several versions using both dough that had rested 24 hours, and dough that was allowed to rest for 48 hours and I can say the results are both fine, not that big of a difference. So you can be a bit flexible when it comes to that.
Some people leave it even longer. I have not tried that, but I cannot see it would get any better, maybe it would even dry out. I have read about people leaving it in the fridge up to 5 days. All I can say is that, with the fine results I got within the 24 to 48 hours range I saw no need to take it any further.

Shaping the Brioche
Take the dough out of the fridge. Now it is time to shape. You can choose any shape you want of course but this is how I do it most of the time. Divide the dough into 4 or 6 equal pieces and shape them into balls (shaping quickly while the dough is still very cold from the fridge goes best). Place the balls two by two in a baking tin, well buttered or lined with baking paper.
Cover and leave to proof for 2.5 to 3 hours, depending on the temperature of the dough and of the room. It is important to take the time needed, to proof the dough to perfection. You might also want to check out our tips on dough temperature to help you improve your baking results.
It is best to cover the brioche with something that does not stick to the dough or weighs it down. That is why I just turn my mixing bowl upside down and use that as a cover. It works really well.
Alternatively you can brush it with some beaten egg (with a splash of water added to make it easier to brush on) right after shaping. Give it a thin layer and repeat with another thin layer just before baking, same as with making our croissants recipe.

Baking the Brioche
Preheat your oven at 190ºC / 375ºF conventional setting.
Brush the brioche with some egg wash before you put it in the oven, or brush it with some melted butter directly after baking.
Bake at 190ºC / 375ºF for about 10 minutes, then turn down the thermostat to 160ºC / 320ºF and bake for another 15 minutes. If the top browns too quickly or gets too dark, cover it with some aluminum foil to protect it.
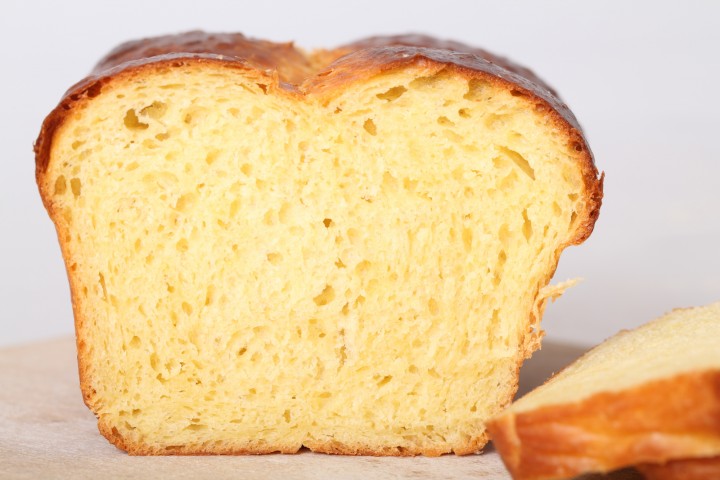
After taking it out of the oven, it is best to leave it for 5 to 10 minutes before turning it out of the tin on a cooling rack. Then leave to cool completely before slicing it. You could slice it while warm, but the crumb needs to set a little bit and slicing it too soon could press it together and make it sort of sticky. If you cannot wait please slice with a very sharp knife that easily cuts the slices without having to put too much pressure on it.
The brioche keeps very well for a few days (in container or bag) and even after that it can be given some oomph by toasting it lightly or heating it quickly in the microwave. Delicious! You can also reheat them in your oven, preheated at 170ºC / 340ºF until the outside is crisp, 5 to 7 minutes should do the trick.
With this same recipe you can also make ‘petites brioches’. Just divide the dough in 6 equal parts, shape and leave to proof in individual, well greased tins of choice. The proofing should take a little less time (something like half an hour less), depending on the temperature of the dough and surroundings of course.


Because of the smaller sizes, the baking also goes quicker. Bake at 190ºC / 375ºF for about 8 minutes, then turn down the thermostat to 160ºC / 320ºF and bake for another 7 minutes.

Let us know what you think of the recipe and how your (no knead) brioche turns out or how it compares to your more authentic brioche recipe.
The traditional brioche has a fluted bottom and a topknot and is made in a special mold. As this dough is wetter and a bit harder to shape I am just pleased to shape it quickly into balls, not fumbling with it too much. This way the shaping is done while the dough is still cold from the fridge and the warmth of your hands has not yet been given the chance to make it extra sticky.


Guille Godinez says
Sounds delicius!! I will make it soon!!
Yael says
I just trying this recipe and it was lovely and so easy!
I’m just wondering if you’ve ever tried it with olive oil instead of butter?
Thanks so much!
Нина says
Спасибо за рецепт. С трудом нашла ваш рецеп. В инете много рецептов, но даже по фото видно, что это не бриошь.Попробую испечь. Уверена, что будет очень вкусно, если получится. Спасибо, спасибо!
Bea says
I’m about to make the Brioche but have 2 questions I need answered. First I was told to buy French t45 for brioche, is that ok? That’s what I have. Second should I use the SAF GOLD instant yeast? Thanks so much!
Weekend Bakers says
Yes, Bea, it is perfectly alright to use both for this recipe.
Good luck with the baking!
Ayako says
Hello!
I’m new to the site, and I was wondering if the temperatures in the recipe are for convection ovens. I saw the classic croissant recipe, and it has the temperatures for both, but not in this recipe. I also saw that you guys have a convection oven, so should I assume all the temperatures in your recipes are for convection ovens? I have a conventional oven.
Thanks!
Weekend Bakers says
Hello Ayako,
Thank you for your comment. Sorry we did not clarify, but for this and other recipes we all use conventional setting, unless we clearly state that we use convection, like with the croissant recipe. So we also use or mean the conventional setting almost all of the time. But we will go through our recipes and see where we need to make this more clear.
Thank you for that and happy baking!
Charlotte says
I held back some of the water as I know my flour has low absorption, and shaped the dough into buns and they turned out amazing! I have bad thumbs and can’t knead much so this recipe was really helpful! If I wanted to put things in like chocolate chips, would I do that before the 24 hour rest in the fridge?
Weekend Bakers says
Hello Charlotte,
That is wonderful, so glad you had great success with this recipe.
Did you also see the mini version?
www.weekendbakery.com/posts…arl-sugar/
Yes, you can add chocolate in the first phase or you can sprinkle some on the dough when you do the stretching and folding and work it in that way.
Hope it will be great again!
Charlotte says
Yes I actually made those marbled ones and they’re were INCREDIBLE. Thank you for your help!
Weekend Bakers says
Marvelous! Glad we could help and this recipe was a success too.
Enjoy the brioches and the summer!
Charlotte says
Just back again to say that last weekend I rolled the dough out into a rectangle, put a layer of creme pat on (using your recipe), sprinkled chocolate chips on, cut them out like pain aux raisins and baked. They turned out amazing! I love this brioche dough so much!
Weekend Bakers says
Hello Charlotte,
Oh Yum! That is such a good variation on the theme. Going to try this myself as soon as the weather starts to cool down! Thank you for the inspiration 🙂
Maria Vieira says
Love the simplicity of your recipe! Have done many times and it comes out always beautiful.
Could you adapt the recipe to sourdough? Meaning no knead sourdough brioche instead of the regular yeast?
Thank you.
Lurdes
Weekend Bakers says
Thank you Maria,
We do not have the experience with this recipe of turning it into a sourdough version, so you would have to experiment with it.
Conversion is not straightforward and always depends on the steps of the recipe as each recipe is different and timing and times will be different. No matter what amount of sourdough you add, it will always take longer than the yeast recipe, so you have to adjust the timing and the steps. So you are basically making a new recipe.
So especially with 100% sourdough recipes we always advice to just find a good sourdough version that has already worked out amounts and timing for a good result.
Please let us know if and when you have made a successful sourdough version of this recipe, that would be very a good thing to share with other bakers too.
Enjoy your baking!
Marieke
Maria says
Hi! I would love to try this recipe out but I don’t have honey. Could I swap it with sugar? If so how much?
Weekend Bakers says
Hello Maria,
Yes, that is no problem. In general people would use a little bit more sugar than they would honey in baking, so they would use about 1/4 extra sugar, so 60 to 65 grams of sugar.
Hope it will be delicious!
Pierre-Alain says
For any UK bakers here unable to get hold of t55, a 50:50 mix of strong bread flour (12% protein) and standard plain flour has given me better results than pure strong flour (too chewy) or just plain flour (too cakey).
Having just ordered some t55, I look forward to testing it out!
Weekend Bakers says
Yes, just like we said, the mix will be a very good thing to try 🙂
Minerva says
Another recipe of yours that is great, i just baked this today and it taste amazing. Thank you once again.
Question, if i lower the butter content, will it change the cosistency of the the finish product?
Weekend Bakers says
Hello Minerva,
Thank you so much. With how much do you want to lower the content?
Minerva says
Let say, instead of 100g to 70 grams of butter.
Weekend Bakers says
Hello Minerva,
That is no problem, it will just be a bit more like bread.
Merida says
Hello
Does 110 g eggs include shells or without the shells?
I use 110g eggs without the shell and seem that the dough is quite wet.
Weekend Bakers says
Hello Merida,
110 grams without the shells and yes the dough is very wet, but that is the way it is supposed to be and what makes the end result very nice. You will see later on you can still handle the dough because it will be very cold from the fridge when you shape it. Of course you must handle the dough a bit quick and decisive otherwise your hands and room temperature will warm it up and it will feel quite sticky again.
Hope it will be great.
Thais says
I have made this recipe twice and have shared it with many whom have texted me back thanking me for sharing it. So thank you for developing such an easy and beautiful loaf of brioche for us to make and savour!
Weekend Bakers says
Thank you Thais, for your enthusiasm and the spreading of the recipe. Have you seen the mini version too?
www.weekendbakery.com/posts…arl-sugar/
Enjoy the baking and all the best,
Marieke & Ed
Jeanette T Gates says
I am baking this recipe for the 4th time tomorrow. Everyone loves it. I use KAF French type flour. The large eggs I get here in AL weigh what your medium eggs weigh. Maybe grading standards are different?
I learned after my first batch which pan to use. I use a loaf pan that has inside measurements of 4.5 x 7.75 x 4 inches high. The loaf comes out very nicely. Another recipe you guys nailed. Thanks
Weekend Bakers says
Thanks again for being such a loyal fan of our recipes Jeanette. And we know that there can be differences in the ‘egg size indication systems’ between countries, so you are probably right. That is why we also state the weight of egg needed.
Greetings,
Marieke
Kay says
Hi! I made this with dried rosemary and it just sets off the honey so well! Thank you for the recipe :):):):)
Weekend Bakers says
Hi Kay,
Thank you, for sharing your enthusiasm and for inspiring us with a rosemary version. Wonderful!
MS G Kagee says
I Made it and it came out beautiful and taste delicious.I would like to know can a person make it a sweeter like adding suger also to it and raisins to give a different taste
Weekend Bakers says
Hello MS G Kagee,
Thank you, great you liked the recipe. Yes, you can add some more sugar or substitute the honey with sugar if you like. You can make all kinds of versions with added raisins and other fruits and flavors. We think around 150 grams to 200 grams would be a good amount. Maybe also top the brioche with pearl sugar for extra sweetness. We are sure the internet will give you lots of inspiration for different versions.
Enjoy and let us know your favorite version!
Joseph Falcone says
XLNT
Weekend Bakers says
TNX! 🙂
Joseph Falcone says
Excellent Recipe. I can’t stop making this bread. It’s Soooooo good.
Thank Guys.
🙂
Weekend Bakers says
We love the process and result ourselves too and it’s also great for french toast and bread pudding with leftovers.
Lydia says
Thank you for your great tips. Have now made it several times. Love the recipe.
Weekend Bakers says
Great to read it’s a favorite Lydia!
Kathy Kartsonis says
Is 3 gr yeast 1 teasp, and 250 gr flour 2 cups. Also can I use all-purpose flour.
Weekend Bakers says
Hello Kathy,
Yes, you can use 1 teaspoon of instant dry yeast for this recipe.
250 grams of all-purpose flour is about 1 and a halve cups plus 1 tablespoon plus slightly over 1 and a halve teaspoons.
For more easy conversions see our page:
www.weekendbakery.com/cooki…nversions/
But we keep saying it: Scales are the only way to get it exactly right and consistent with every bake 🙂