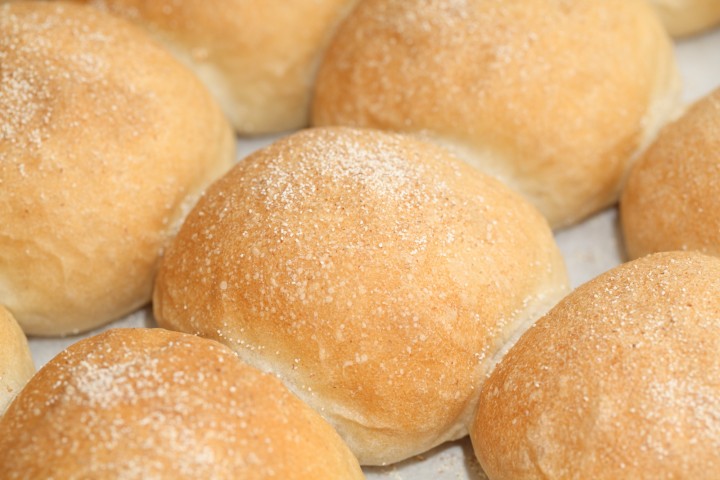
Buns with poolish: use less yeast, get more flavor and good texture
For this recipe we are going to make a starter named a Poolish. A Poolish is a type of wet sponge usually made with an equal weight of water and flour and an extremely small amount of yeast and NO salt. Making a Poolish helps bring more taste and strength to your bread while using less yeast. For this bun recipe we make a Poolish of 100 grams of bread flour and 100 grams of water with 1 gram of dry yeast. We do this 4-6 hours before we start making the actual dough.
Making the Poolish
In a bowl stir together 100 grams bread flour with 100 grams water at room temperature and 1 gram instant yeast. Mix it well until you have a homogeneous slurry that looks like very thick batter. Cover the bowl and let the prefermenting begin. After 4-6 hours it is ready for use.
Ingredients for White Buns
makes 12 buns
The prepared Poolish (see explanation above)
400 g fine bread flour / all purpose flour/ French Type 55 / Manitoba
24 g fresh yeast / 8 g instant yeast
10 g honey
8 g salt (I would use 7 which works for me but 8 is more standard)
200 g / ml water
20 g fresh butter
Making the White Buns
In a mixing bowl scoop the Poolish, then add the flour, salt, yeast and honey and 150 ml of the water. Gradually add the rest of the water while mixing and when the dough comes together and starts forming a ball, add the butter. If you use a KitchenAid type mixer, knead for about 8 to 10 minutes, longer by hand, so you get good gluten development. Make sure the dough is not too sticky or too dry. Aim for a bit tacky, which means that when you poke the dough with your dry finger it should stick for a second but then peel of as you remove your finger. So if you need a bit more water to achieve this, just add a few ml more. Leave to rest for 15 minutes.
Now divide the dough into 12 equal pieces of about 75 grams and preshape into balls. Again leave to rest for 10 minutes. Press the balls with your hand until slightly flat and round them again into smooth balls. You can lightly dust your work surface with flour but do not use too much or it will be very hard to shape them (it has to be a bit sticky).
Place the buns on a baking tray lined with a baking sheet or baking paper.
During the final proof, preheat your oven to 230º C /454º F conventional setting or 200º C /390º F convection. At what stage you preheat your oven depends on how long it takes for your oven to heat through, some take 30 minutes, some, like ours, with stone floors take a lot longer, up to two hours.
Now the rolls are ready for their final proofing. Loosely cover them with floured clingfilm until proofed to perfection. Depending on your room temperature this should take about 1.5 to 2 hours. Just be patient and check regularly. When you think it has risen enough, use your finger to make a small dent in the dough. If the dent remains, the bread is ready to bake, if the indentation disappears, the dough needs more time. When ready place the buns in the oven and bake for about 20 minutes, depending on your oven. They should have a nice light brown shine. Leave to cool on a wire rack.


Luke says
I’m confused by this recipe. Why does it require another 8 g of yeast if it already uses poolish?
Weekend Bakers says
Hello Luke,
The poolish part is relatively small and more to add taste than to be a big part of the proofing. To get light and airy buns and doing the final proofing at a reasonable pace we do want to use the 8 grams of yeast in the final dough. You could use less and proof for longer, but the type of bread, we think, is better suited to this slightly ‘faster pace’.
Jan says
Thank you for sharing your recipes. I made my first poolish, making these white buns. Oh my! They turned out very well, thanks to your great instructions. I made the poolish the night before after reading of another person asking about it, using about .2 gram of the yeast. I’ve made a few other recipes from this site and am always impressed.
Weekend Bakers says
Hello Jan,
Excellent, thank you for sharing. We want to show different methods also with the poolish, so you have options to do a two day or one day recipe.
We do have a handy table % for the amount of yeast with certain times and temperatures with our pizza recipe (if you have not seen it yet):
www.weekendbakery.com/posts…gh-recipe/
Lots of fun and success with the recipes and baking!
Jack says
Hello there!
I love baking bread and have been doing so for a short while. I seem to have success with nice wet doughs, seem to be able to handle them well with no extra flour, they rise nicely and look good enough but I seem to ALWAYS have the same problem that I just can’t get over:
The outside is dark but the middle always seems a little under – a bit doughy, heavy and not fluffy. I always end up cutting whatever I make in half and toasting or grilling it to get the middle cooked.
What am I doing wrong!? I’ve tried steam and no steam, flour dusting and no flour dusting, brushing with butter and not, brushing with egg and not. Always the same the outside is too dark before the middle is cooked.
HELP!
P.S. love your website and thanks a lot!!
Weekend Bakers says
Hello Jack,
Hope we can help you with that. First mission is to get the perfect level of proofing. So be bold and maybe take it a notch further than you would normally do. Then there’s the baking and the oven. You need to know the true temperature of your oven for it could well be that there is something not quite right with the indication of the temp and the true temp. You can do this by using a ‘true temp’ oven thermometer (they will cost about 5 to 10 euro or dollar). If possible, the (top of the) buns should be further removed from the heat source. Make sure your oven is well enough preheated, avoid opening the door during baking and try to create steam so the buns can also expand in the oven during the first stage of baking. Always bake them for the full amount of time, but as soon as they have a good golden color, turn down your oven temp to 180C for the remainder of the cooking time, but leave them in the oven.
You can also measure the core temp of your bun with a digital probe thermometer. The ideal average bread core temperature should read 93.3C / 200F at the end of the cooking time.
Hope we gave you something to work with and you will see improved results soon.
Enjoy your Easter baking too!
Jack says
Thank you so much! This was more than helpful!! I followed all of your advices and had a HUGE improvement!!! My oven is quite difficult to work with – turning the temp down once the colour was there was a genius suggestion – previously I’d always taken them out for fear of a burnt top.
Thank you again SO much, can’t tell you how helpful!
Weekend Bakers says
Great Jack, very happy you could improve with a bit of help from our tips.
Ash says
Hi,
Would love to do the poolish to leave overnight and then bake in the morning so I have rolls for lunch. How should I adjust the recipe?
Weekend Bakers says
Hello Ash,
For this you need a very small amount of yeast, you can use about one tenth to one fifth of the amount given in the recipe (depending on the room temp), so 0.1 to 0.2 grams of yeast. You can see what that looks like here: www.weekendbakery.com/posts…lish-biga/
Your poolish can be a bit under-proofed when you use it, that is no problem (much better than over-proofed of course because then the gluten will be damaged).
Hope it will turn out great!
Linda says
Is de hoeveelheid instant gist van 2% niet veel naast een poolish? Dat is toch al standaard? Ik ben een beginner, maar ik snap dan het effect van de poolish niet. Bij een poolish gebruik je toch minder gist?
Weekend Bakers says
Hallo Linda,
Ja je vraag is heel goed. Het klopt helemaal dat je minder gist kunt toevoegen bij het gebruik van een poolish, maar je kijkt bij het recept ook naar hoeveelheden en tijden. In dit geval hebben we gekozen voor een een-daags recept met een poolish met een relatief korte fermentatietijd. Daarbij is het percentage poolish ook wat kleiner. In het uiteindelijke deeg hebben we om deze reden en om de eind-rijstijd niet te lang te laten zijn, ook een wat grotere hoeveelheid gist.
Het zijn allemaal keuzes, gebaseerd op effect, snelheid, smaak et cetera.
Je kunt ook een poolish maken met minder gist en deze een hele nacht laten ontwikkelen. Of minder gist in het einddeeg doen en langer laten rijzen. Je moet altijd wel beseffen dat er dan uiteindelijk niet minder gist in je brood zit, want de gisten ontwikkelen / vermeerderen zich weer met meer tijd. Je gebruikt alleen initieel minder gist.
We laten zien met verschillende recepten dat je deze keuzes kunt maken.
Kijk maar eens naar dit brood: www.weekendbakery.com/posts…same-loaf/
Daar zie je weer langere tijden en minder gist bv.
Linda says
Helemaal duidelijk dank je wel.
Pearlans says
I’m just curious, do you think I could opt out the instant yeast in my final dough and use only the pre-ferment sponge? If yes, how much approximately bakers percentage sponge would I need to alternate instant yeast into a sponge?
Weekend Bakers says
Hello Pearlans,
We would advice never to go over 50% for the stability of the end product. We cannot give you the exact percentages based on experience, but you could also try a version where you would make the entire dough the day before with low yeast and let it develop in the fridge overnight. This way you would also use a small amount of yeast and develop good taste. You would have to experiment with the amount, also depending on time and fridge temperature.
Enjoy the baking and experimenting!
Bhavana says
Hello,
I m from India n was keen on making dinner rolls with poolish method.I came across ur recipe n using ur method while making minor changes as per my taste I have got the best homemade dinner rolls ( paav we call in India ). They are very very soft n airy n really good to taste far better than bakery ones.
Thanks a tonnes for giving detailed recipe n proper explanation. U can plz check the images on Instagram as bhavanaashah Thanks a lot.
Weekend Bakers says
Hello Bhavana,
Thank you for sharing and lovely to hear you are so happy with the method and your results. We saw the picture and they indeed look extremely fluffy!
If you ever want to share some pictures with us and other bakers on our website you can do so here too: www.weekendbakery.com/send-…your-loaf/
Happy baking and sharing from Holland to India 🙂
Marieke & Ed
Bhavana shah says
Thanks once again n surely I’ll share my bakes.
Lol!! Bhavana
John Caremark says
The instructions are unclear. You ask bakers to preheat the oven and then let the final proof rise for 1.5 hours? You also talk about shaping the buns but don’t mention if they are flattened for final proofing, rounded for final proofing, or what have you.
Weekend Bakers says
Hello John,
Thank you for your comment. The second sentence we always add to our recipes was somehow missing: “At what stage you preheat your oven depends on how long it takes for your oven to heat through, some take 30 minutes, some, like ours, with stone floors take a lot longer, up to two hours”.
We added this sentence right away. We preshape and then round the balls then proof them, but do not flatten them, like it says above. But of course you could flatten them if you prefer. If it is still unclear, please just let us know and thank you again for pointing this out.
Enjoy the baking,
Marieke
Shirley says
Hi Marieke & Ed,
Just wondering if I can fill these buns? For instance with tuna or sausage or vegie curry. If possible, kindly suggest at whAt stage & amount.
Looking forward to your reply & as always, thank you so much!
-Shirley.
Weekend Bakers says
Hello Shirley,
Thank you for your kind comment and question. Yes it is possible to fill these buns, you need to do this after the preshaping stage, so when you shape the actual buns. After that they can proof with the filling until it is time for the oven. The amount we would suggest will be somewhere between 25 and 35 grams, depending on shape and size of the ingredients. Just judge what seems right to you. Hope it will be delicious.
Happy baking weekend!
Marieke
SeaCottage says
Hi Marieke,
Followed your recipes to a T except water. My first attempt and the bread came out gorgeously nice and fluffy!
Much thanks.
Weekend Bakers says
Hi there SeaCottage,
Thank you very much for your fluffy feedback 🙂
It is also great fun to make 24 tiny buns and put them snug together and bake for about 15 minutes. Great to accompany a meal and to pass around the table.
Happy baking!
Marieke
Helen says
dear Ed and Marieke,
Tried the recipe yesterday and they came out perfect – the second time round. I over proofed the previous batch and the plastic wrap stuck to all the dough which was another lesson! Thanks again!
Weekend Bakers says
A regular check, taking the wrap (with enough flour dusting on it) off and carefully placing it over the buns again, might also help. A little sprinkle with semolina or rice flour also works and makes for a nice change.
Happy bun baking!
Kholy says
Hi Marieke,
Thank you for your reply, yes you are right the 80% hudration needs lots of training.
The starter is working now, it started double in size at day 7, I will share my experience there.
I am baking another batch of buns today, I will put them into the oven now!
Have a nice weekend baking.
Kholy
Kholy says
Hi Marieke,
Let me first thank you for this great website, really useful work, I’ve tried the Fluffy White Buns, the result was amazing, but the buns stick to the paper baking sheet, next time I will try to dust it with little flour I think, but anyway the buns comes out very nice.
I’ve also tried the 80% hydration Baguette, the result was good but I still need to work on my handling & shaping the high hydration dough.
For the sourdough starter I am facing some problems but still trying, I think i will drop you a comment there soon 🙂
Have a nice day
Kholy
Weekend Bakers says
Hi Kholy,
Thank you for your feedback! Yes, the 80% dough is a challenge but as you work with it more often you will quickly get used to it. Otherwise you can start at a slightly lower hydration (75%) and work up from that.
And a lot of people need a few ‘start overs’ with their starter to get going, so do not give up! And there are a lot of good tips from other bakers too in the comments that might help you too: www.weekendbakery.com/posts…asy-steps/
Good luck with everything and happy baking!
Marieke
Ibrahim says
Thanks for sharing this great recipe.. I tried to bake these nice fluffy buns, but mine were slightly crunchy on the outside and less fluffy than expected inside. What might have gone wrong??
Weekend Bakers says
Hello Ibrahim,
To get the fluffiness with these buns it is very important that they get their full rising time. Even more important is the temperature of the dough (it has to be at least 24 C) and the proofing is done in a warm room, so conditions are optimal. You can read our tips on this subject here: www.weekendbakery.com/posts…mperature/
The crunchy crust has a lot to do with steam or in this case, lack of steam. To get soft buns it is best to create steam in your oven and make sure it stays in there right until the end of the baking process. You can do this by putting a small metal baking tray on your oven floor when you preheat the oven. Pour a quarter of a cup of hot water in the small baking tray immediately after putting the bread in the oven.
Another thing you can try is brushing the top and sides of the buns with soft butter. It seals in the moisture and prevents the crust from drying. Wrapping warm bread in a tea towel or putting the buns in a plastic bag when they are almost cooled will also help.
Happy baking,
Marieke
Ibrahim says
Hi Marieke,
I appreciate your tips. I just noted everything down and take them into consideration the next time I will try out this recipe. Now I have to try the Naan bread recipe you shared over here :). Thanks again!!
All best!!
Weekend Bakers says
I hope you will love the naan recipe. It also has the wrapping in a towel and brushing with butter part I suggested with the buns, they stay lovely soft and warm that way.