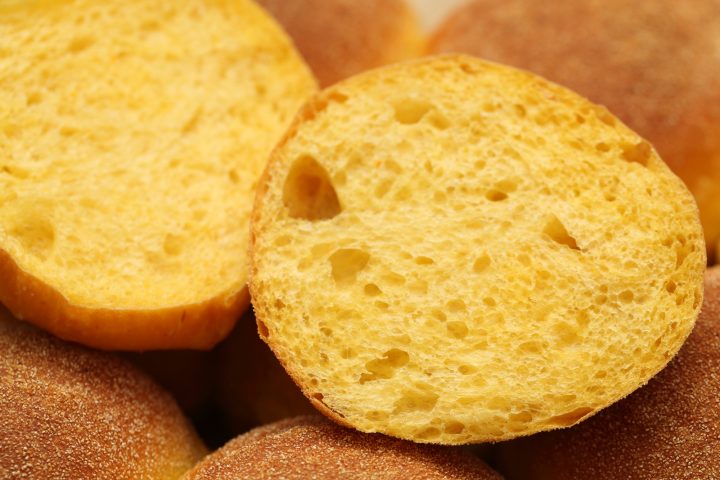
‘Tis the season to use pumpkin! It really does something wonderful to the texture of the buns


After recent successful pizza baking with new pizza flour we thought lets see what the results will be if we use this same flour for some bun baking. So we also used the Caputo blue pizza flour for this recipe, but of course you can use any good quality (bread) flour that you like, as long as the protein content is 12% or more.
This recipe offers yet another method for you to try and hopefully like. The bulk dough is made one day in advance in the evening. The buns are shaped and proofed the next morning. Note that they do need quite some time for the final proofing, so take the morning to proof to perfection and they will be ready for lunch. The small amount of yeast used in the dough allows for a slow development of the bulk dough during the night in the fridge. But this process, with the smaller amount of yeast, the added vitamin C and slightly longer final proofing, gives the buns its lovely extra fluffy texture.
Enjoy!
| Ingredients for the fluffy pumpkin buns | ||||
|---|---|---|---|---|
| makes 10 buns | ||||
| 500 | g | bread (wheat) flour* | ||
| 135 | g | water | ||
| 8 | g | (sea) salt | ||
| 2 | g | instant yeast | ||
| 200 | g | pumpkin puree | ||
| 20 | g | olive oil | ||
| 20 | g | honey | ||
| 0.5 | g | ground vitamine C** | ||
*We use wheat flour with around 12% protein for this recipe. We had very good results using the Italian Caputo blue flour for these buns, that we also use for our pizza dough.

Vitamin C in bread baking**
Next to being a well known food supplement, vitamin C, also known as ‘ascorbic acid’ can also used in baking as a bread enhancer. So, what does it do?
Due to the properties of vitamin C, it can be used as a dough (gluten) strengthener during fermentation, helping to improve the structure of the dough.
We use half of a 1000mg tablet for this recipe, ground to a fine powder.


Making the pumpkin puree
Cut the pumpkin in halve and scrape out all the seeds with the help of a spoon. Depending on the size of the pumpkin one halve of the pumpkin will be enough. Cut the pumpkin in strips and then in little pieces. Cook the pieces of the orange pumpkin with the skin still on, in a bit of water (one centimeter of water is enough) with just a hint of salt (no salt is fine too), like you would potatoes. We cook them until soft (about 15 minutes), drain them, leave them in the pan without the lid to cool and blend them into a smooth puree with our stick blender. If you do not have the time and are able to use tinned pumpkin puree, you can use that too of course. In Holland they do not sell canned pumpkin puree (yet), but you can never go wrong with fresh of course.
Adding the pumpkin puree to the recipe also adds the small challenge of how much extra water to add to get the right dough consistency. The pumpkin puree contains water of its own and you need to take this into account. The amount of water given in this recipe is a good starting point. We suggest to add some of it and see how the dough comes together, then add more if needed. You may need a few runs to get it right.
The amount you need for this recipe is 200 grams. So you will be left with some puree which can easily be used in another bake or dish of course.
Day 1: Making the dough
In the bowl of your standing mixer, combine the flour with the salt, then add the instant yeast, the powdered vitamin C, the measured amount of pumpkin puree, honey and olive oil. Now add most of the water, but hold back around 30 grams. Start mixing at low speed and when the dough comes together, slowly add the rest of the water (or as much as needed, this is your chance to play with the right amount). This way the flour at the bottom will be picked up and your bowl will be nice and clean. Knead for 8 minutes on a low to medium speed. If you knead by hand it takes about 15 to 20 minutes, depending on your technique. Cover and leave to rest for 20 minutes.
Now turn out the dough onto your work surface and stretch and fold, doing one full set letter fold (one set = right over left, left over right, bottom over top, top over bottom). If you are not familiar with it, check out how this technique works in this video first.
After the stretching and folding to help develop the dough, shape into a ball, cover and leave to rest for another 20 minutes.
Now do a second full set of stretch and folds to further develop the dough. By now you will have seen a change in the dough to the point where it becomes smooth and silky and shiny. This stretching and folding is great for good dough development. Plus, as a baker, you really get a feel for the dough as it goes through your hands and you can judge if you are satisfied with it or give it a few extra stretches if needed.
Shape your dough into a ball, place it in an airtight container and put it in the fridge till the next day. The indication we can give you for the fridge time is around 12 hours. It can be shorter or longer, just make sure your dough does not over-proof. This also depends on the temperature of your fridge. Our fridge has an average temperature of 5 Celsius, and for us 12 hours fridge time is just about perfect.
Day 2: Fluffy bun shaping and proofing
Take the dough from the fridge and optionally leave it to warm up a little for 30 to 60 minutes at room temperature.
Now divide the dough into 10 equal pieces and pre-shape these into balls.
Cover and let the balls rest for 10 minutes.
Now slightly flatten the balls and shape them again, neatly, into balls. Make sure to get some tension on the dough as you round them.
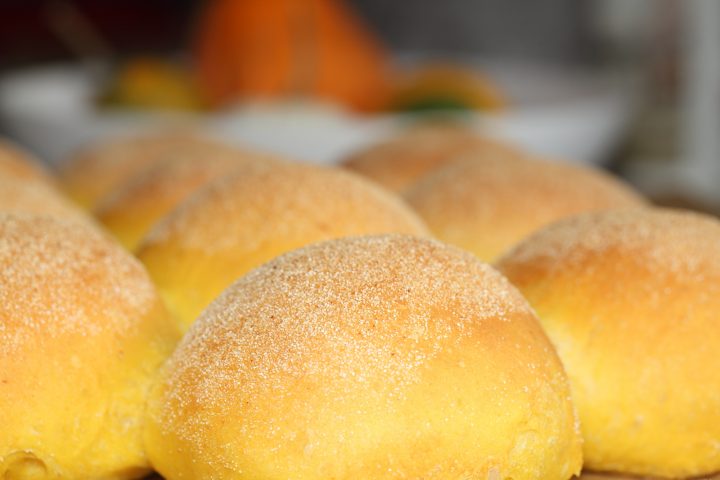
Press the tops of the balls into some flour. We use semolina flour for this. It makes them less sticky as you cover them and it gives a very nice taste.


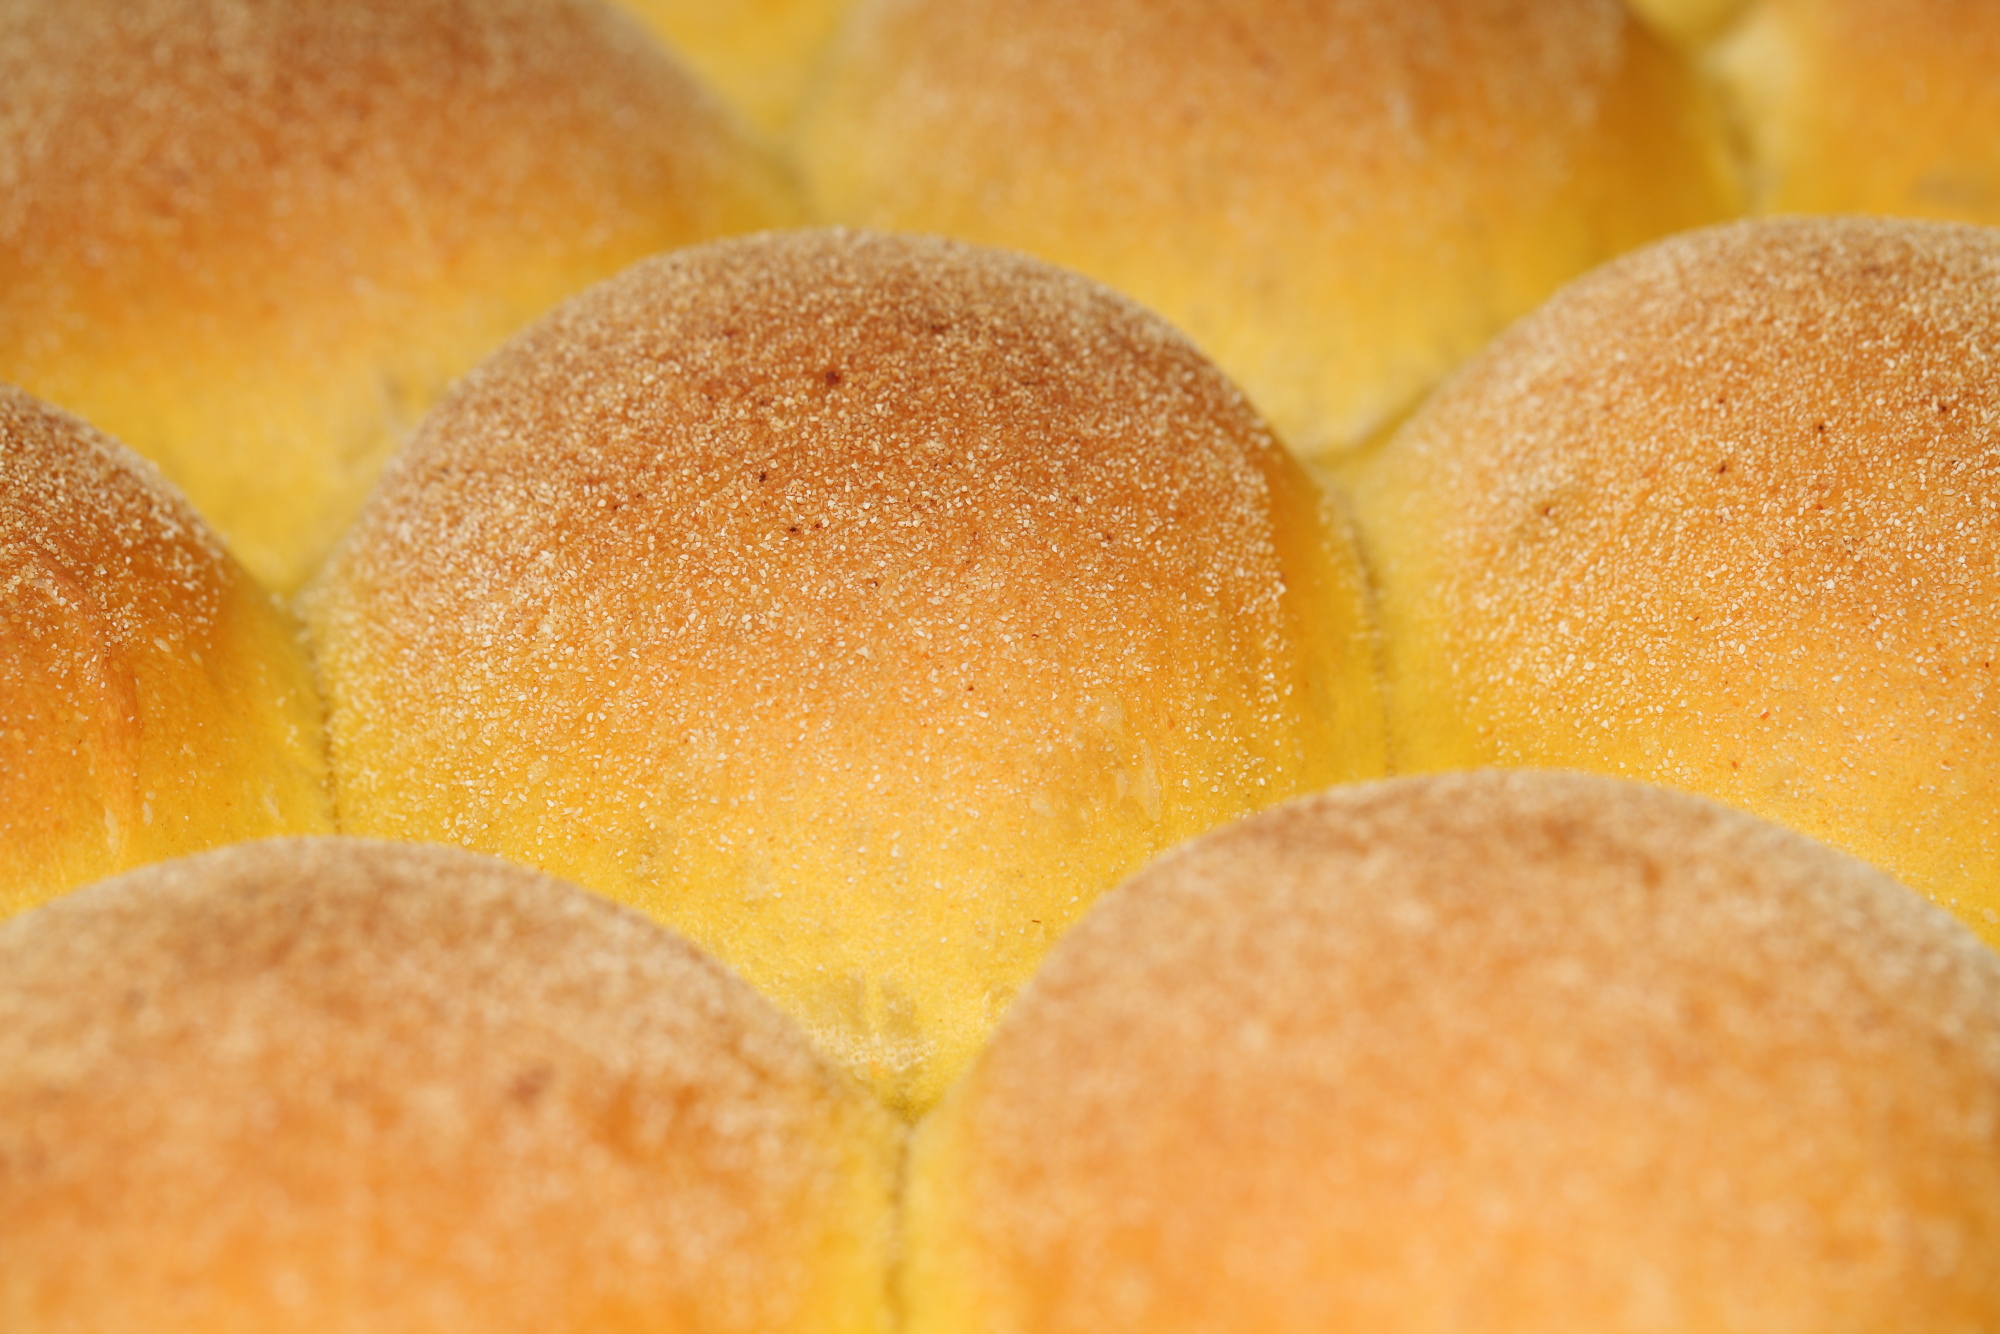
See how the buns start out very small and grow to pretty impressive buns that press up against each other!
Place the balls on a baking tray (see gallery above for spacing), lined with baking paper or a baking mat. Cover them and let them proof for at least 3 hours, possibly 4 if needed. These buns love it when you give them a nice draft free and cozy warm environment to proof. So, for this recipe it works really well to use your oven as a proofing cabinet by preheating it for a minute to 30 to 35 ºC / 85 to 95 ºF and then turning it off when you put the buns in to proof. Take them out when they approach their optimal proofing point and you also reach the point where you need to heat up your oven before baking.
When you think the dough has risen enough, use your finger to carefully make a small dent in the bun. If the dent pops half way back out: proofing is just right, the buns are ready to bake, if the indentation disappears, the dough needs more time. Give it another 15 to 30 minutes, then check again.
Day 2: Fluffy bun baking
Preheat your oven to 210 ºC / 410 ºF.
If you want to use steam during baking, read our tips on the subject here.
We introduce steam during the first 5 minutes of baking for this recipe, then turn it off.
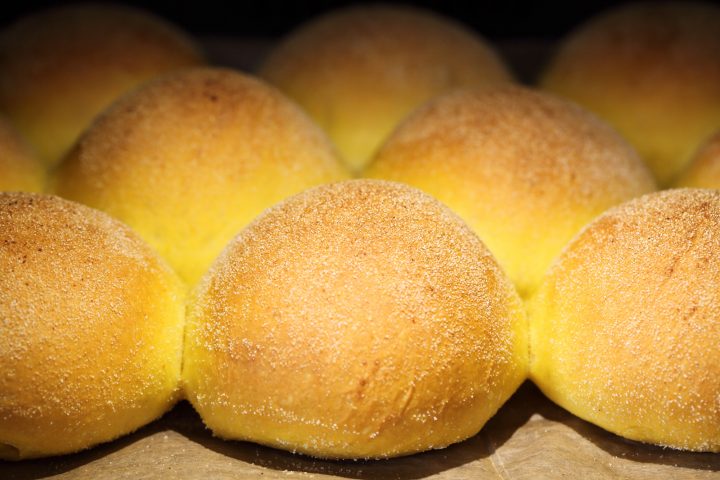
Buns in the oven nearly ready
Place the tray in the oven and bake the buns for around 18 minutes, depending on the working of your oven. Keep an eye on the buns. If you like the color and do not want them to turn any darker, you can temper your oven to 180 ºC / 355 ºF for the remainder of the baking time. We temper our oven after about 12 minutes.
When ready, turn off the oven, take out the tray and transfer the baking paper with the buns to a wire rack. Leave to cool. You can eat them fresh of course, but you can also put them in a bag while still slightly warm. This way they will stay lovely and moist and soft. They also keep well in your freezer for up to one month.
I made it with sweet potato purée. My dough asked me for a bit more water (≈20 ml) It also works very well. Thank you for sharing this recipe with others.
Hi Iza,
Thank you for sharing your experience. With our baking of breads and also cakes, we find that sweet potato needs a bit more water than pumpkin. Pumkins contain almost 95% water (that’s why we need to give them buckets of water in the summer to make them grow!) and sweet potato contains around 75% water, which I guess explains the difference. As sweet potato is more nutritious, maybe for that reason it is the best option to use in this and other recipes.
Enjoy your baking in the New Year!
Hi..
This pumpkin buns recipe is so interesting! I have a go to pumpkin buns recipe in hand, however still using egg, milk, and butter. And when I saw your recipe, i was intrigued with no use of dairy and egg and looks so fluffy.
I do have a couple of question.
1. Is the stretching and folding method necessary step to do? Or if I can make my dough past the windowpane, it’s good to go?
2. I understand this recipe is made for buns, but can I use this recipe for loaf? Just a thought.
Thanks so much!
Hello,
I bumped into this recipe but I wasn’t in the mood to cut the pumpkin. But I had baked sweet potatoes at home and tried to do use them instead. I actually needed more water since I didn’t cook them in water. The buns went great considering it was my first time with the recipe and I have changed a main ingredient. But I have two question though.
1) If I had cooked the sweet potatoes in water, do you think it would be ok to use only the 135g of water as in the original recipe?
2) Have you already tried to make these buns using baked pumpkin instead? Do you have any idea of the amount of water needed in the dough on this case?
Thanks! 🙂
Hello Pedro,
We have not used sweet potato with this recipe ourselves but we would use the same method to start with if we tried. But we always look at the dough when it comes together, hold some liquid back and see if it needs more water. The dough should be slightly sticky, so aim for that.
We have not tried baked pumpkin, but it could be a great idea. We think the pumpkin will lose some moisture this way and you ill need to add more water to the dough, but again look at what the dough needs to become slightly (post-it note) sticky.
Let us know how it goes!
Ed & Marieke
Hi, I am going to bake these soon as they sound yummy. Can I point out a minor mistake in your English? One half, two halves. So your sentence should read …..
We use half of a 1000mg tablet for this recipe, ground to a fine powder.
Best Wishes
Carol
Thanks you Carol,
Oops and corrected! We always appreciate these tips so we can correct our spelling.
And we love to hear if and how the bun recipe works for you too.
Greetings from Holland,
Marieke & Ed
Nice recipe,the buns came out beautifully and soft.opt out vitamin c as I don’t have them in hand and yet still taste great.Thks for sharing.
Thank you for your excellent feedback Victoria. Great to read about your result and you are right, you do not need vitamin C, it is just an optional extra that can give the crumb this added ‘woolly’ quality, but without it you will still end up with yummy buns!
Another nice recipe from my favorite bakers, thanks again!
The dough is now sleeping in the fridge. I see forward to baking these buns!
And just between the first and second stretch and fold a green fresno pepper spontaneous drops on the floor (I’m growing them myself in my living). I REALLY tried holding on to your recipe but this had to be! I allways wanted to combine bread and peppers and was looking for ideas. This one volunteered and it allready joined the dough.
Beautiful to see, if the taste is just as good… send you a photo!
Ben (fan 😉 Amsterdam.
So great to read your comment again Ben. Hope they turned out a triumph. Nothing like growing your own greens and using them in your own bread!
Marieke & Ed
Came out a treat! At first I was nervous with just 2 grams of yeast. But they came out big and fluffy! Gone in an hour at my house.
Thank you Slf, for taking the time to share your experience with the fluffy bun recipe. Wonderful to read about your result.
Enjoy the baking and sharing and for Christmas we can really recommend these Stollen Bollen (buns that are a fun version of the classic Dutch Christmas bread / stollen):
www.weekendbakery.com/posts...en-bollen/
Do you have a suggestion for the internal temperature one wants to reach for these rolls?
Hello Steve,
For us, after 18 minutes of baking it is around 97 to 98 Celsius, which is quite high, but the buns are perfect.
Enjoy your bun baking!
Lovely recipe, the buns come out a beautiful saffron colour. I used Manitoba flour. One very minor point, in the process you don’t say when to add the vitamin C but I’m sure I was right to include it with all other ingredients in the first stage of making the dough.
Hi Nigel,
So glad to read the recipe worked out for you too with the Manitoba. Will correct the recipe regarding the vitamin C immediately, thanks for noticing!
Enjoy your autumn baking 🙂
Marieke