Klik hier voor Nederlandse versie
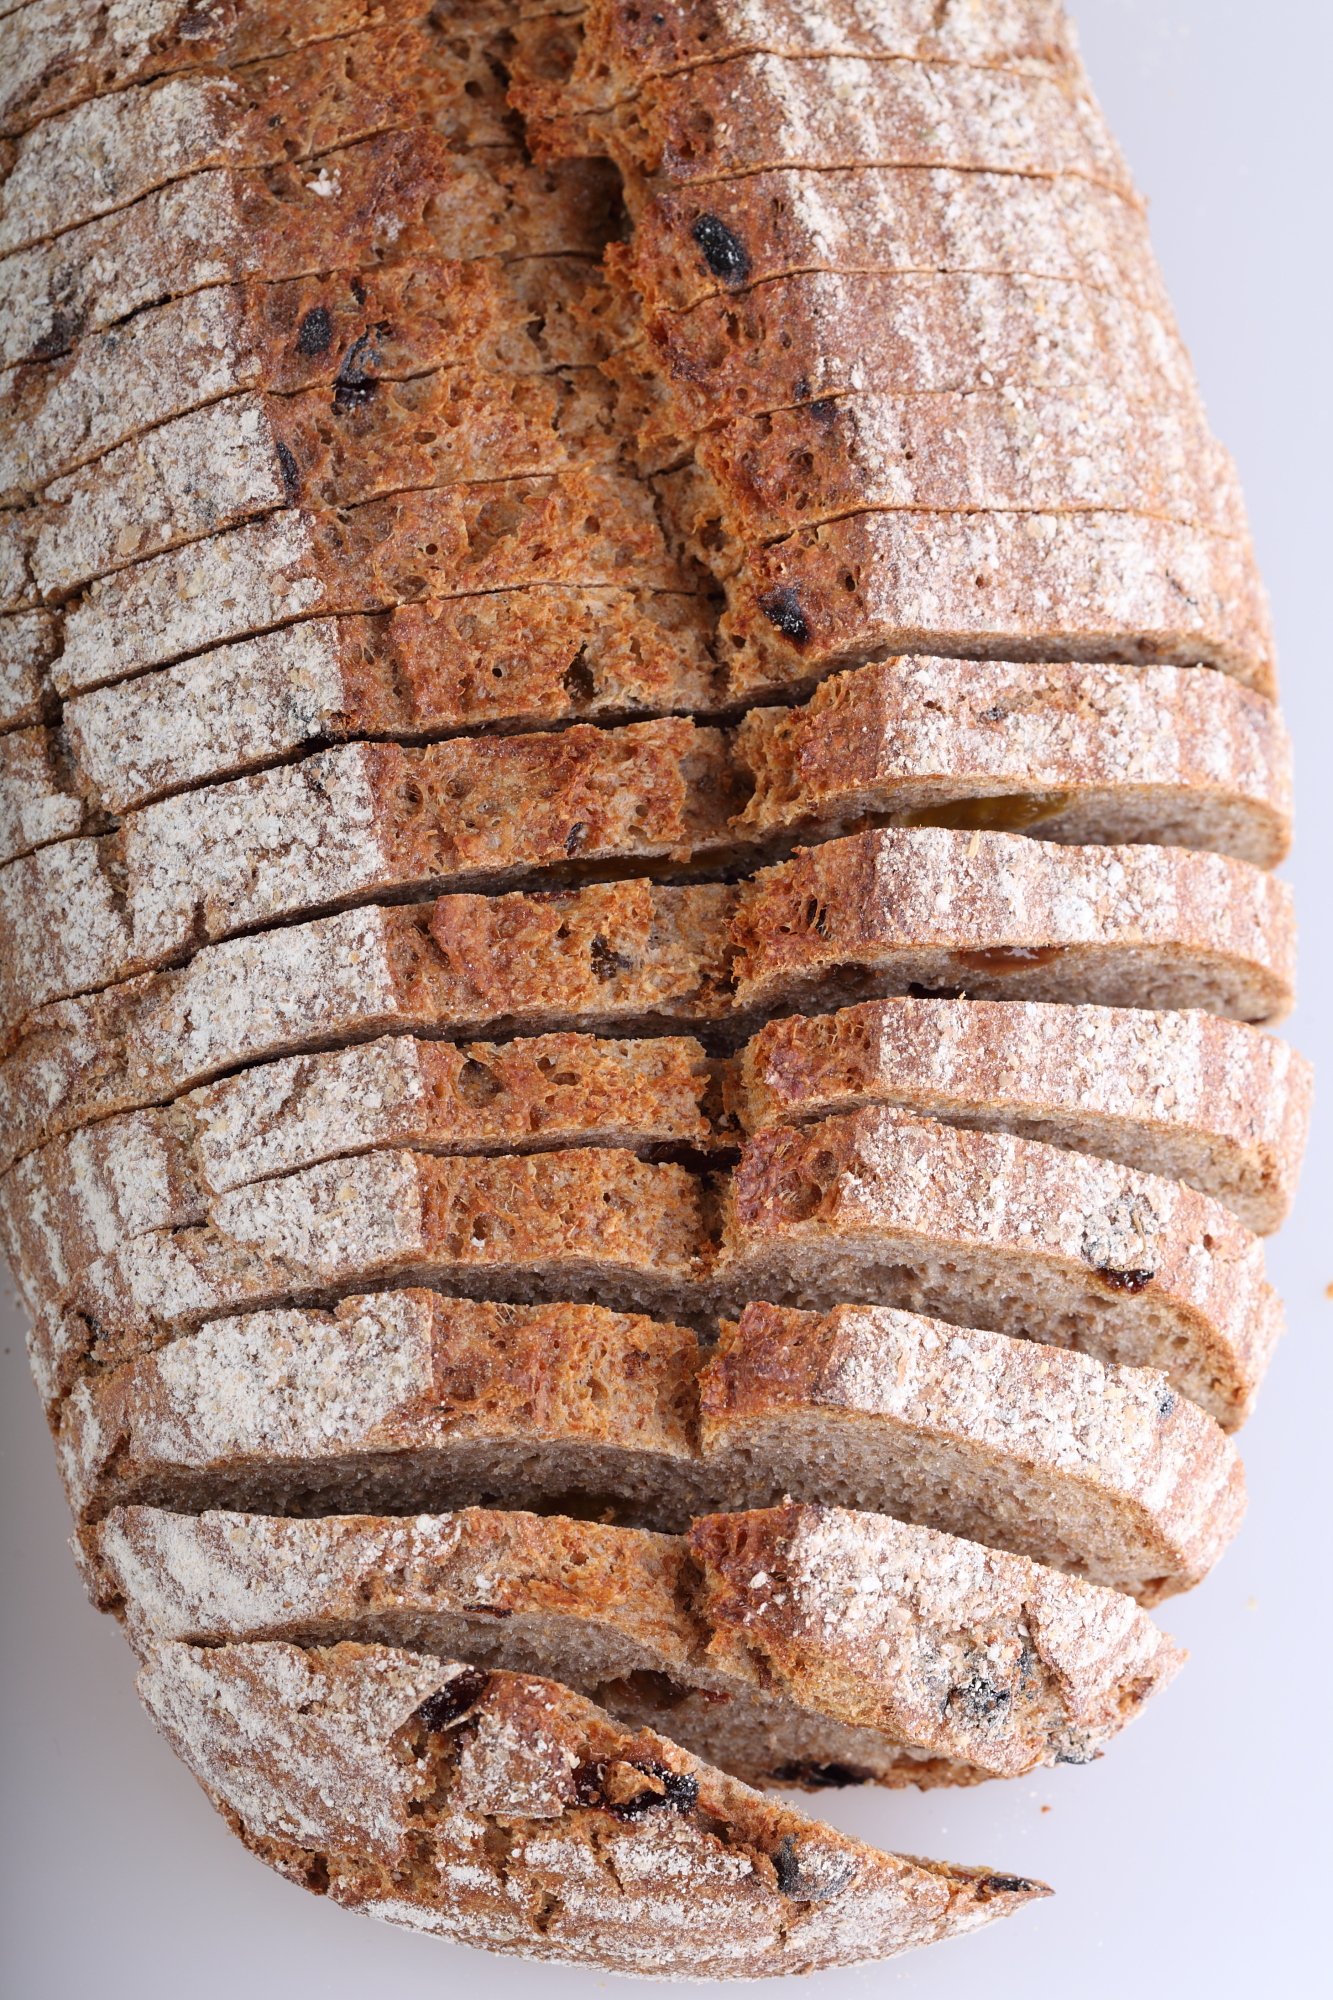
And they said it wasn’t possible to stuff 70% rye in one bread and get a good loaf…
This bread has such great taste and such a nice bite plus, combined with the scattered sweetness of the big raisins, every bite is a delight.
I strongly recommend that every home baker and fan of the rye makes this bread. It is one of my top 3 favorite breads. Shaping it feels a bit like working with clay, as you can see in the pictures. It is on the other side of the spectrum compared with making 80% hydration baguettes for instance.
For the starter in this recipe I also use a sourdough culture which is made with 100% whole grain rye flour. A sourdough culture based on rye flour is easier to maintain, it does not transform into a slurry when you forget about it, it is easier to stir because it has almost no gluten and it smells very very nice, a bit like fruit. I maintain the starter as an ‘almost’ stiff starter. This way it stirs easy but does not add as much water to the dough as a poolish starter. It is also very forgiving in the amount you feed it. As I am a bit lazy in feeding, normally I only feed it once a week, after my weekend baking. I just give it a few table spoons of water and rye flour, stir, and ready!
This recipe consists of 3 stages spread over 2 days, one evening for the initial starter and the next day for the second stage starter and the making of the bread.
Note: For this recipe we use whole grain rye flour. You can also use medium or fine rye flour or a combination of different rye flours. Just be sure to adjust the amount of water you add to the recipe. Using finer flour means adding less water, because it absorbs less moisture (indication: somewhere between 3 to 5% less water).


Ingredients for the First Stage
15 g rye flour sourdough culture
35 g water
45 g whole rye flour
Ingredients for the Second Stage
the starter from stage 1
110 g water (warm)
110 g whole rye flour
Ingredients for the Third Stage
the starter from stage 2
190 g water
155 g whole rye flour
135 g wheat / bread flour
7,5 g salt
1,4 g instant yeast
110 g raisins of choice (soaked and drained)


Making the Loaf
Stage 1 – Start on day one with the making of the initial starter. Yes, this is a small amount to make a first stage starter, but the amounts are correct for one loaf. Just double or triple the ingredients if you want to or can make more breads in one go. Put the rye sourdough culture* and water in a bowl and stir so the culture dissolves a bit, add the rye flour and bring it all together, forming a sticky and rather stiff dough ball. Leave this to rest at room temperature for at least 15 hours to up to 24 hours at most. I usually make it at 17.00 hours on day one and go on with the next stage the following morning at 09.00 hours.
*You can also use a whole wheat culture if you do not have a rye culture ready (yet) but I would suggest you make one, they are my favorite sourdough cultures both to use and maintain.
Stage 2 – First soak your raisins in hot water for about 30 minutes, rinse in a colander, let them drain and cover until needed (stage 3).
The water you are going to add at this stage has to be warm enough to get your dough to a temperature of about 29ºC / 84ºF. This temperature and the wetter dough promotes the production of lactic acid which will be reflected in a mild sourness in the final bread. Now take the starter from day one, add the warm water and loosen it a bit, then add the rye flour and mix until you have a dough. This dough is a bit wetter than the dough from stage one. Leave to rest for 3 hours at room temperature.
Preheat your oven at 225ºC / 435ºF. Make sure it is well heated when you put in the loaf.
Stage 3 – Making the final dough and baking the bread. Take the dough from stage 2 and, in your mixing bowl, add the other ingredients, except the raisins, to form the final dough. Mix for 7 minutes. The dough will still be very stiff and sticky at this stage. This can be rather heavy duty work for your mixer, so keep a close eye on it, so it will not overheat. Add the raisins after the mixing by pinching them through the dough by hand. If you have a spiral mixer, it can do the work for you. Leave the dough, covered, to rest for 20 minutes at room temperature.
You can also leave out the little bit of instant yeast we add at stage three, but you have to allow for a longer final proofing time, probably 2 to 3 times longer.
Shape the dough (it’s a bit like working with clay I guess) into the desired shape. I always make this bread a batard/oval shape, because that way I get nice same size slices when I cut it. Proof the loaf for 60 minutes in a proofing basket.
Now your loaf is ready for the oven. Please be careful in handling the proofed loaf. This type of bread has almost no oven spring, so it is important to keep as much air in the bread as possible. Slash/score the top of the loaf with a lame or bread scoring knife.
Bake for 45 minutes and leave to cool completely on a wire rack. Before you cut this bread it needs to rest at least 6 hours so the crumb can set and loose its initial stickiness. If you are keeping it overnight you can put the loaf in a paper bag (after it has completely cooled). This rye bread keeps wonderfully well in the freezer. I always cut it in thin slices before I freeze it. A minute in the microwave and your lovely slice of rye bread is ready to eat.


70% Rye Bread Time Table
day 1 Make the stage 1 starter and let ferment for 15 (minimal) up to 24 hours (maximum)
day 2 Mix the starter from day 1 with water+ flour from stage 2 and leave to rest for 3 hours
- Mix starter from day 2 + rest of ingredients, except the raisins, for 7 minutes
- Pinch or mix in the raisins
- Rest for 20 minutes
- Shape
- Proof for 60 minutes
- Bake in oven at 225ºC / 435ºF for 45 minutes
Hi!
Very good bread, fantastic and clear receip. I would like to make a bigger loaf ( 50% bigger) so pls tell me how long I should bake it.
I made it twice ( was excellent!!!)
Thank you for your blog – I came back after 2 years – my first work was croissant bakeing that time. My family cannot wait them again!!!!
Hello Hanna,
Thank you for trying and liking this recipe too! If you want to bake your bigger loaf the indication for the baking time is around 60 to 65 minutes depending on your oven.
Hope it will be great, together with the croissants you will have something more healthy and something just plain delicious to indulge!
Greetings,
Ed & Marieke
WKB
Very good! Love it. I used the rye flour I happened to have at home. I have no idea if it counts as “whole.” Used the recipe amounts of flour and water. Did not add any instant yeast and just let it rise a little longer as you suggested. Great loaf with great taste.
Thank you SLF for the excellent feedback, ‘sounds’ like you will bake some more. If you want to try a totally different rye recipe, take a look at this one:
www.weekendbakery.com/posts...rye-bread/
Hi!! I am confused regarding the type of flours for rye… currently I could only find pumpernickel flour, from what I read is that it is the wholest rye flour.. so which one should I use for this recipe? Light, dark , or pumpernickel? Thank you!!!
Hello Dani,
In Holland we do not make this distinction, we only have whole rye and light rye. We can say that our whole rye flour is made by milling the whole rye grain into flour, so that would come closest to the pumpernickel we guess.
Hope it will be good!
Thank you! I live in the USA, and want to try it.. will let you know what comes out!
Always happy to ‘hear’ about the results!
Fantastic! I found a bit of wheta flour, so I think I´ll add a bit of the wheat one as your recipe
CHEERS! I´ll share the result
Great Bea, always want to see results. If you want you can also share pics here:
www.weekendbakery.com/send-...your-loaf/
Enjoy your baking and the Easter weekend!
can We make this with home made yeast ?
Hello Colleen,
Can you explain with what method you make your own yeast? If it is suitable for bread baking then it will be for this recipe too.
Hello weekend bakers!
I wonder if it´s possible to make this recipe full rye flower.
Thanks for this recipes! My sourdough is on the go!
Cheers,
B
Hello Bea,
Yes that is possible, but the texture will be different, more dense and heavy. The wheat is added to get a good crumb and bite, but although it will be different does not mean it will not be tasty and to your liking. Keep in mind that you might need to add some extra water, but we cannot tell you exactly how much, because we have not made the all rye version ourselves. Let us know how you like it.
Take care and enjoy your baking!
Hi Ed and Marieke, I hope you are keeping safe during these times. We are in lock down here in New Zealand, only allowed out of the house to exercise or buy food. Lots of time to bake bread however!!
With high rye content doughs like this one, what is a good method of checking the proof of the dough during the final stage, should one’s dough not be at the right temperature to prove in the specified 60 minutes? Given the stickiness of the dough is the usual finger press test an OK method?
Also have you tried adding citric acid to your high rye content doughs? I read on the net that, in the book “Le Gout du Pain (the taste of bread)” by Raymond Calvell et al, he suggests using up to 5 g of citric acid per kg of flour in rye and whole wheat and rye doughs to reduce stickiness and improve cohesion. I use it in my 90% whole meal, 10% rye breadmaker loaf with some benefits, seems to aid rising.
Love your website, my “got to” place for bread info and recipes, thank you.
Regards Tony
Hello Tony,
Yes, you are right the finger poking test is not really working with this bread. So you have to judge by how your basket is being filled by a regular bread of the same weight, if it is close to this size in your basket it should be ready for the oven. Also if your room is colder, you should of course allow for more proofing time than stated in the recipe. But with this eye and experience based method you need a few turns to know what it should look like.
We have never tried citric acid in the way you describe. Would be interesting for us too to compare the with and without version. But we have to wait, because most flour is sold out at the moment, we only have a very limited quantity of rye to feed our culture.
We are in a sort of similar situation in Holland, but lets call it a semi-lock down, with slightly less restrictions. But it is kindly asked of us to stay at home and only go out for groceries and work from home et cetera and after some hick ups almost everybody is now doing their part. It is good to see the cooperation, kindness and inventiveness of people. Hope we learn a lot and adapt our lives in a good way once this is all behind us.
Thank you so much for your kind words and we love that our recipes bring you joy and yield great bread in these times and hopefully better times to come.
Enjoy your baking and sharing,
Ed & Marieke
Weekend Bakery
1.5 grams yeast????
Just want to make sure that tiny amount is correct. Hope to start this tonight 2/27/2019.
Thanks!
PS: Still loving the Pain Rustique
Hello Craig,
Yes, it is correct. The small amount is enough as it is a hybrid recipe with sourdough and long fermentation times.
Hope you will like it!
Thank you very much! Started it last night.
Let us know how it went Craig!
I baked this bread for the first time yesterday, and thought I would share my results for other bakers:
1. In general the bread was as advertised — good taste, good crust , good, crumb, just sour enough.
2. Using the stated recipe produced a “small” boule – 7.5″ diameter, 2″ height, 760 g (including raisins). OK for breakfast and snacking, but not large enough for sandwich bread. Next time I bake this I’ll aim for something a bit larger. I’ll be scaling up all ingredients (in Stage 1,2,3) up by about 25%. Make sense?
3. Using recipe as stated produced a very slack dough — almost like an oatmeal. Needed to add about 2-3 tbsp of flour to produce a workable dough. Probably related to the flour I used — 100% organic whole grain rye flour (Arrowhead Mills). Also added about 1.5 tbsp of honey, resulting in a less bitter, but slightly sour taste to my liking.
4. Chose to shape as a boule because the dough was sticky and difficult to work with. Minimal shaping used. Baked in a Dutch Oven at 430F – 20 min with cover on, then another 15 min until interior bread temp reached 205F. Then allowed to rest overnight.
5. Seems like the sour flavor comes from fermentation in Step 2. So what does Step 1 add, since not much yeast action required ?
On balance — a good bread — turned out better than I thought it would. I’ll be baking this again. Any interesting variants (i.e. addition of walnuts, caraway seeds, anything else? ) .
Thanks for the recipe, and for your excellent web site.
Thank you Gerald for your elaborate feedback. You are right, you could make this loaf in two stages. There are many roads that lead to a good loaf and this first stage and the timing and kick starting of the sourdough count for something, but we must confess we cannot compare based on experience.
Making bigger loaves is no problem of course, but also adjust baking time probably.
We love a version with caraway seeds, but we only add a very small amount, otherwise it can be overpowering. We also love pecans, but to be honest the taste of rye with the sweetness of the raisins does not ask for much else, only a bit of very good cheese and maybe some fig jam or quince jelly to go with it.
Thank you again and enjoy your rye baking!
3 stage 70% Rye Bread with Raisins
Looks like a good recipe for me to try. Couple of questions —
1. Have only starter made from 1:1 APF and Whole Wheat Flour; 100% hydration. OK to use 15g of this in Stage 1?
2. OK to bake as a boule in a 5 qt Dutch Oven? Suggested bake time?
Hello Gerald,
Yes, no problem at all to use your starter for this recipe or any of our other recipes where we use the rye starter.
We have never baked this recipe in a Dutch oven, but in general, if you stick to the same amount, you can also stick to the indicated baking time of 45 minutes.
Enjoy the baking!
Dear, Weekend bakery
I have tried two or three times to bake rye bread your way every step I did accordingly. But every time bread came out moist half like brick.The taste is ok, but I think there is some thing is wrong.
First of all I am using 24 chromosome old rye flour, that is the old wheath and they have been milled in stone mills. Meanning whole of the wheat is being used.
Secondly the oven at 235 C 45 minutes. And it is a stone oven. After 45 min they reach the temperature according my measurment.
The oven is 235 C
The dough has been done according to the three stages as I red at the rye bread section. Second time I tried it at the second stage I used 110 gr of water %5 less
And the third stage 190 gr %5 less of water also and this time they were again less but moist again. Which ever receit I fallow I end up moist bread.
This time I will bake them up to 1 hr.
Or maybe the warmth of the stones should be more.
Thank you
Hello Salur,
With this bread it is really important to let it rest (preferably overnight and in a paper bag or at least 6 hours like we say) so the crumb can set, before you cut it. If you cut it sooner it will feel wet and sticky. So you have to be patient. Also because we use the whole rye, the crumb is very different, more dense and compact, from a wheat loaf. So you need the moisture in the bread, but you need to let it rest so the crumb can retake the moisture.
Hope it will work. Good luck with it!
Greetings Ed & Marieke
Since I haven’t had a reply, I baked it on a stone, with steam, and pulled it when the internal temp exceeded 200 degree F. That was 35 minutes in my oven. I got more oven spring than expected. The loaf is dark brown (a lot darker than your photos) and smells of rye and raisins. Will have to wait until tomorrow to see how it tastes. Jim
Hello James,
Hope it turned out well enough to taste good. Our suggestion would be to try and temper your oven (to around 350 F) after the crust has a slightly lighter brown color than you see in the pictures and bake further towards the 45 minutes and see how that goes. Our internal temp for this loaf is around 204F.
The bread tastes pretty good. The crumb is probably the best of any rye bread I’ve made to date. I think I’ll add a little molasses in the next bake to sweeten it just a bit. (I’ve been trying to duplicate the taste of a raisin rye bread my grandmother used to make when I was a kid, for 20 years now. This is close)
I’ll try and reduce the heat in the oven midway through the bake to lighten the crust. Thanks for the help. Jim
The molasses should work very well. We use a date syrup for this other dark rye bread recipe, that is also typical Dutch / Frysian and very different from the 3-stage rye, but oh so good too:
www.weekendbakery.com/posts...rye-bread/
Happy rye baking!
I don’t see a “baked” internal temperature anywhere. My oven seems to bake at a different rate than most, so I rely on internal temp rather than time. I have the loaf proofing as I write, so if someone could give me advice right away it would be appreciated. Thanks. Jim
You don’t mention creating steam in the oven for this recipe. Is that because the lack of an oven spring from this dough makes using steam pointless?
This recipe does indeed do not have much oven spring, but steam will certainly help to get a nice golden shine crust. So when you can create steam, we advice it to use it!
I made this bread over the weekend, and it turned out well (though much flatter – more like a ciabatta shape – than what I see in the photos). I did have one puzzling issue, which perhaps you can give advice on. When I went to add the raisins – which I had soaked, and then drained for almost an hour – they added a great deal of moisture to the dough, so much that I found I needed to add more flour in order to get the dough back to its “sticky” consistency.
I had tried to dry the raisins by patting them with a paper towel, but they had a lot of moisture inside as well as on the outside, so that didn’t help much.
Is the additional moisture to be expected, and should I have just let the dough rise in that more moist/wet state? If not, what do you do to keep the raisins from changing the consistency of the dough?
Could I just add the raisins in their natural state, without soaking them first?
Thanks for your advice – I really want to bake this bread again, but I would like to have a bit more success the next time.
Hi Wendy,
Thank you for your comment. We do not know exactly how to answer your question. We soak and then drain the raisins as you can read at stage 2 and leave them to dry till stage 3, which gives them around 3 hours to drain. We then add them to the dough. We cannot say if a few extra hours of draining would make that much difference. It could well be that the flour you use, also just needs a bit less moisture than ours, because there can be a difference for various reasons. If the raisins are too wet, you can sprinkle some flour on them before adding them to the dough, that will help without adding too much flour. Otherwise soak and drain the raisins a day in advance.
But overall, with every recipe you have to make it a few times to find out what the optimum hydration is for your ingredients and situation / climate too.
Hope this helps you. Happy baking and good luck with it!
Hi,
Made it again, this time instead of leaving the raisins in the colander to drain I spread them on paper towels, and then put them in a low oven for a bit, which removed the extra moisture. Thanks for getting back to me!
Happy to help, enjoy your baking weekend!
How do you keep the flour from the proving basket from browning on your loafs? If looks so nice when it is is still white against the outside crust. Can I cover my loafs after a certain point in the oven to stop it from browning?
Hi Douglas,
Yes you can cover the loaves, but you can also make sure the bread is as far away from the radiating elements of your oven as possible and you can also temper your oven as soon as you have reached your desired browning.
Happy rye baking!
Hi,
Haven’t tried your recipes yet but all look great and thanks for sharing all that.
Can I use spelt flour instead of wheat for this recipe? Would that work? I’m very new to breadmaking. So I really don’t know. How substitutes work in breads
Cigdem
Hello Cigdem,
Keep in mind that every change you make will lead to a different result. Using spelt instead of wheat will be different, because spelt has less and different gluten than wheat.
We will always advice to make our or any recipe the first time exactly like it is written down. After that, know what to change and why you want to do this and write it down.
But because the wheat is a percentage of this recipe, you can use spelt instead of wheat without too much alteration we think. Keep in mind, depending on the flour you use, that especially the amount of water is something that almost always needs to be fine-tuned for your situation.
You can find all of our best bread baking tips here:
www.weekendbakery.com/posts...king-tips/
Happy baking!
Ed & Marieke
Hello Ed and Marieke,
Thank you for the recipe above. It is so delicious.
I do not use a proofing basket, instead I let it prove
in the baking tray with a piece of cloth on it.
In this way I do not have to worry about handling
the proofed loaf. Is there an advantage
of using a proofing basket?
I wonder about your other top two recipes.
Thank you,
Oguz.
Hi Oguz,
Thank you that sounds great! A proofing basket supports your dough during the final proof, gives it a certain shape and provides your loaf with the characteristic spiral pattern for example, which many bakers like. But it is perfectly alright not to use it and use some other form of support, a tray or tin for example. Most of our other loaves are made with high(er) hydration dough and also need a form of support, but again you can use either a basket or another tin or tray to make sure the loaf can hold shape during the final proof.
Happy baking,
Ed & Marieke
A short loaf!
Hi guys, thank you for the recipe above, which I assume was supposed to be for 2 loaves. I tripled the recipe hoping to make six breads but when I measured the dough I got substantially less dough than I usually get for such a batch. I went back to your recipe and discovered why. Turns out that raisins aside the ingredients above just add up to 795 gms of dough minus the raisins. You mentioned in the comments that the total weight of the dough is about 900 gms including the raisins. Was my mistake in assume the recipe above is for two loaves? Thanks so much!
Hi David,
The recipe is for one loaf, which also corresponds with the baking time given of around 45 minutes. Of course you can also triple the recipe and also make six smaller loaves and adjust the baking time.
But it’s one loaf, made in two days and in three stages.
Hello Ed and Marieke,
Thank you so much for your wonderful website, I have thoroughly enjoyed using it over the past few weeks to make lovely tasting rye bread, which I love. I have made two batches and doubled the quantities to make two loaves each time.
The first time was an experiment and so I let them prove in ordinary oblong bread tins; the crust on top was good, but I was disappointed with the sides and base. So, second time round I invested in some proving baskets in order to bake them free in the oven. This time, I found it almost impossible to knead the dough before the shaping stage; the first time it was hard too, but not impossible. The consistency seemed really wet and sticky (I don’t have a mixer so expect to hand knead), so much so that it wouldn’t lift from the bowl to work at all. Should I add flour at this stage to make a workable dough? The loaves proved really well in the baskets, but when I carefully transferred them onto the baking sheets, they flattened out, again as if too wet. The finished products look and taste good, though the crumb is a bit too doughy; the crusts were excellent all round.
This is my stage 3 ratio, doubled up: starter – 190g / water – 380g / rye flour – 310g / wheat flour – 270g / salt 15g / no yeast as starter seems very good and have developed it over several weeks. Can you please advise me? Is the dough meant to be so wet and sticky that hand-kneading is out of the question?
Many thanks,
Sandhya
Hello Sandhya,
First of all it is a real challenge to knead this dough by hand. We would advice you to knead it on your work surface instead of in a bowl. You say the second time was harder than the first attempt. Did you change anything the second time, like the flour or brand of flour perhaps? Like we say in the note above:
For this recipe we use whole grain rye flour. You can also use medium or fine rye flour or a combination of different rye flours. Just be sure to adjust the amount of water you add to the recipe. Using finer flour means adding less water, because it absorbs less moisture (indication: somewhere between 3 to 5% less water).
But the dough is indeed supposed the be quite wet and sticky and because of the lack of gluten in the rye flour your dough will feel more like wet clay than a pliable dough.
We would also advice to bake the loafs maybe a bit longer (try 5 minutes) and make sure to let the finished cooled off loaf rest in a paper bag until the next day before you cut it because fresh rye bread crumb needs to stabilize.
Hope this helps,
Ed & Marieke
Hello Ed and Marieke,
I made this wonderful bread last weekend and had a very good result even without a mixer (I just did stretch and fold for about 20 minutes, which was sticky but rather enjoyable). I just have one question: should I be aiming to maintain the temperature of the dough at 29ºC throughout the whole process? My dough was exactly 29ºC at the end of stage 2, but I wasn’t sure if I should have added warm water again at stage 3 in order to maintain the temperature after the stage 3 ingredients had been added. When I make your Sourdough Pain Naturel and Wholewheat Levain, I usually try and keep the dough at 24/25ºC until it goes into the oven.
This bread is delicious with mature cheddar cheese, homemade jam or marmalade and is equally good toasted.
Thank you for this wonderful website. I am entirely converted to high-hydration dough and find your site the best baking resource online and beyond. I am planning to try the Rye Lovers Dark Rye Bread as soon as I manage to get hold of the broken wholegrain rye.
Many thanks,
Hannah
Hello Hannah, thank you very much for your kind words. We aim at a temperature of about 24/25ºC in stage 3 to get a good average speed of proofing. The ‘Rye Lovers Dark Rye Bread’ is very much worth the search, we love this bread! Happy baking!
I have rye starter in the refrigerator as I love sour ryes. I would like to try your raisin rye but can skip the starter making steps. So how much rye starter should I scoop out the crock in the refrigerator and use?
Hello Karen,
For reasons of taste and temperature you should still start with stage one and scoop the small amount of stage 1 from your starter and take it from there. Hope you will give it a try.
Happy rye bread baking,
Ed
I certainly try this one.
I love Rye bread, but I think I let the raisins out as my kids and my hubby do not like raisins.
Maybe I can put some nuts in.
I have been using a number of your recipes with great success.
When I make the 3 stage rye, it turns out delicious but while baking it cracks and deforms a great deal.
Would you happen to know why?
Thanks!
Hi Itamar,
Some cracks in the bread are normal with this loaf. You can see in our pictures that there are cracks in the bread too. We are not sure about the deforming part. Hard to say. We would begin by checking your oven and the temperature, maybe it needs some adjusting. Also see our tips: www.weekendbakery.com/posts...your-oven/
Also make sure the temperature of your dough is correct so it corresponds with the times given in the recipe. (www.weekendbakery.com/posts...mperature/).
But good to hear it is still delicious!
Greetings and good luck with the baking,
Ed & Marieke
The taste of this bread wasn’t as sour as expected. However I have a major problem. I realized usually my bread ended up in hard crust but dense texture inside, and the inner part looks different from your pictures. I’m not sure is it because I’m using a small oven to bake my bread. In such case, is there any remedies to it? Shall I bake my bread in lower temperature but longer time?
Hello Gigi,
You are right, our version is also not overly sour, because of the way it is made, with both culture and yeast, that is also the way it should be. We suggest you look at two things to improve your bread: first the temperature of the dough (see our tips www.weekendbakery.com/posts...mperature/) so the bread is properly proofed and ready for the oven. The second is the workings of your oven (see our tips here: www.weekendbakery.com/posts...your-oven/). We would not advice lowering the temperature because the temperature maybe is already too low. With small household ovens you lose a lot of heat already simply by opening the oven door and putting in a big lump of cold dough. So you would need more heat, not less! Because you use different ingredients and equipment and made the recipe for the first time, you always need some adjustments and practice to get it right.
Good luck with it and happy baking,
Ed & Marieke
Thank you! I will try this recipe again on a bigger oven.
Hello Marie,
You can use a basket of 750 g dough capacity. The total weight of a loaf is around 900 g including the raisins, plus the bread does not increase in volume like a more standard bread, so a basket of 750 g works very well.
Happy Baking,
Ed & Marieke
what size proofing basket do you use for this recipe?
thanks
I made this bread. Mine had so many cracks in the dough during proofing. Any suggestions for what I can do different to make it more uniform like yours. Thank you in advance.
Hello Nelya,
Try to limit the use of flour during shaping so not too much is added to the dough. It could also be that the rye flour you use acts a bit different from ours and that the absorption of moisture is different too. You can try and add a few % more water maybe. Also make sure to cover the loaf(s) while proofing so they do not dry out (we usually cover our dough with some floured or oiled cling film).
Good luck with it and happy baking!
Marieke & Ed
Hello Marieke,
I made stage 1 of this recipe 20 hours ago; can I progress to stage two and leave in the fridge overnight?
It is now 1700 hours and I will be unable to complete stage 3 until tomorrow morning.
Thank-you,
Elaine.
Yes that is possible. Just allow the dough to get to the right temperature again before proceeding with the recipe.
Good luck with it!
You are so right about the smell of the rye culture! Much fruitier and more stable than the wheat ones.
The bread looks fabulous 🙂 What a lovely post!
Oh, thank you so much Joanna!
It’s the rye bread we make the most. Just love it with cheese. A very different rye bread but very much worth a try if you are a rye lover is this one: www.weekendbakery.com/posts...rye-bread/
10 hours in the oven overnight, wonderful wafts of rye filling the house :O
Marieke
PS: We entered the Mamalade competition again this year. Wait and see if we improved compared to last year…
Did you send a jar?
Hoi Marieke en Ed,
Ik heb gisteren dit brood gemaakt, en ik denk dat het redelijk goed gelukt is. Ik was even in lichte paniek toen mijn laatste deeg iets te nat was, maar dat is met toevoegen van een handje bloem bijna goed gekomen. Ik weet niet waarom het bij mij aan de natte kant was, ik heb jullie desemstarter gebruikt en roggebloem.De vorm is ook niet perfect, maar al met al ben ik niet ontevreden. Ik heb hem op 200 C hetelucht gebakken (heb alleen maar een heteluchtstand), op een pizzasteen. De smaak is erg goed.Ik heb een foto van het resultaat op mijn blogje gezet, met een verwijzing naar jullie site.Ik ga zeker nog meer recepten van jullie proberen!
Gebruiken jullie trouwens roggebloem of roggemeel voor dit recept? Nog een vraagje, er zijn recepten voor desembrood waarbij soms meer dan 200 ml desem gebruikt wordt. Hoe maak ik van mijn nu redelijk kleine hoeveelheid zoiets, gewoon voeden met bijv. 150 bloem en 150 water?
Bedankt,
Monique
Hoi Monique,
Wij maken het brood eigenlijk altijd met (volkoren) roggemeel, ik zal het nog duidelijker aangeven in het recept. Natuurlijk kun je het ook maken met roggebloem of een combinatie van beide, maar aangezien bloem wat minder water opneemt moet je de hoeveelheid vocht wat naar beneden bijstellen (ongeveer 5% minder). Je brood ziet er overigens echt heerlijk uit, wat lichter natuurlijk, maar heel aantrekkelijk.
En inderdaad het antwoord op je laatste vraag is gewoon 10 tot 20 gram desem nemen, door bloem en water roeren en 8 tot 12 uur laten staan om te rijpen en dan gewoon gebruiken. Niet langer dan 12 uur, want dan worden je gluten weer kapot gemaakt door de desem en krijg je een slechtere broodstructuur. Dit komt overeen met wat je in veel recepten ziet staan, namelijk dat je je zuurdesem moet verversen (in het Engels heeft men het dan over ‘refreshing your starter’).
Het grote voordeel van het aanhouden van een kleine hoeveelheid desem is dat je niet continue grote hoeveelheden hoeft weg te gooien tijdens het verversen en als je meer nodig hebt kun je makkelijk binnen 12 uur een grotere hoeveelheid opkweken.
Heel veel bakplezier,
Ed en Marieke
PS: Wij gaan je Peruaanse kip met avocadosalade zeker proberen. Wat ziet die er watertandend lekker uit!!
A great tasting loaf and one that has been given a thumbs up by my 5 year old grand-daughter. Many thanks for the accurate recipe. Another one to make again.
Hi Derrick,
So happy it went this well. Isn’t it great when children love food that is healthy for them?! Neigbours kids eat our Pain rustique for dessert, they ask for it themselves, can you believe it. They call it Marieke bread…poor Ed, he’s the one that makes most of it.
Happy baking!
Today’s the day! Stage 2 just started. I’ll let you now how it turns out.
Dough from 1st stage seems to be very thick. Is this correct?
Derrick, Like it says in the recipe; the first stage is a ‘rather stiff dough ball’ to promote the production of acetic acid (taste like vinegar) , the second stage is more wet, this promotes the production of lactic acid (taste like yoghurt). Both acids give the bread a nice flavor and improve their keeping quality. Please let the bread cool completely before cutting, the crumb needs to stabilize or it will stick to your knife like glue!
Happy baking!
I’ll be giving this recipe a try later on this week, starting the first stage tomorrow (23rd February). One question, which is probably answered elsewhere on your site, is “what do you mean by instant yeast”? Is this dried yeast, in which case you don’t seem to reconstitute before use? Or do you mean the instant type that you add dry to the flour? Can you advise me? Many thanks.
Hi Derrick,
It is the instant one you just add dry to the flour. Hope it turns out great!
Many thanks. The starter is just being refreshed in preparation.