
Plus our tips on retarding and freezing your croissants!
With this fast version of our original croissant recipe we want to show you how to do it all in one day and still get a very, very satisfying result. We want to stress that for novice croissant bakers it is a good idea to start with our original three day croissant recipe (perfect for weekend baking!) so you can concentrate on each stage and take your time with it to really learn the skills.
Remember, making croissants is one of the most challenging bakes to master, so follow our recipe, tips and directions carefully and only start experimenting when your croissants look a lot like the real deal.
At the bottom of this recipe we also share tips on how to retard and freeze your croissant dough.
Happy croissant baking!


Comparing the one day version and the original three day version, shows that taking less time yields a croissant that has a slightly less impressive honeycomb structure and is a bit less perky, but biting into one is still pure buttery joy!
Before you start we can recommend watching our croissant making video to get a general feel for the recipe.
The croissant recipe
READ THE ENTIRE RECIPE BEFORE YOU START!

Ingredients for the croissant dough
makes 15
500 g French Type 55 flour or unbleached all-purpose flour / plain flour (extra for dusting)
140 g water
140 g whole milk (you can take it straight from the fridge)
55 g sugar
40 g soft unsalted butter
11 g instant yeast
12 g salt
Other ingredients
280 g cold unsalted butter for laminating
1 egg + 1 tsp water for the egg wash
Step 1
Making the croissant dough
Combine the dough ingredients and knead for 3 minutes until the dough comes together and you’ve reached the stage of low to moderate gluten development. You do not want too much gluten development because you will struggle with the dough fighting back during laminating. Shape the dough like a disc, not a ball, so it will be easier to roll it into a square shape later on. Place the disc on a plate, cover with clingfilm and leave to proof at room temperature for 60 minutes.
Step 2
Laminating the dough
Start this step 30 minutes into the 60 minute proofing period of step 1.
Cut the cold butter (directly from the fridge) lengthwise into 1,25 cm thick slabs. Arrange the pieces of butter on waxed paper to form a square of about 15 cm x 15 cm. Cover the butter with another layer of waxed paper and with a rolling pin pound the butter until it’s about 19 cm x 19 cm. Trim / straighten the edges of the butter and put the trimmings on top of the square. Now pound lightly until you have a final square of 17 cm x 17 cm. Wrap in paper and refrigerate the butter slab until needed.


After 60 minutes of proofing unwrap the dough. With a rolling pin roll out the dough disc into a 26 cm x 26 cm square. Try to get the square as perfect as possible and with an even thickness. Get the slab of butter from the fridge. Place the dough square so one of the sides of the square is facing you and place the butter slab on it with a 45 degree angle to the dough so a point of the butter square is facing you. Fold a flap of dough over the butter, so the point of the dough reaches the center of the butter. Do the same with the three other flaps. The edges of the dough flaps should slightly overlap to fully enclose the butter. With the palm of your hand lightly press the edges to seal the seams.
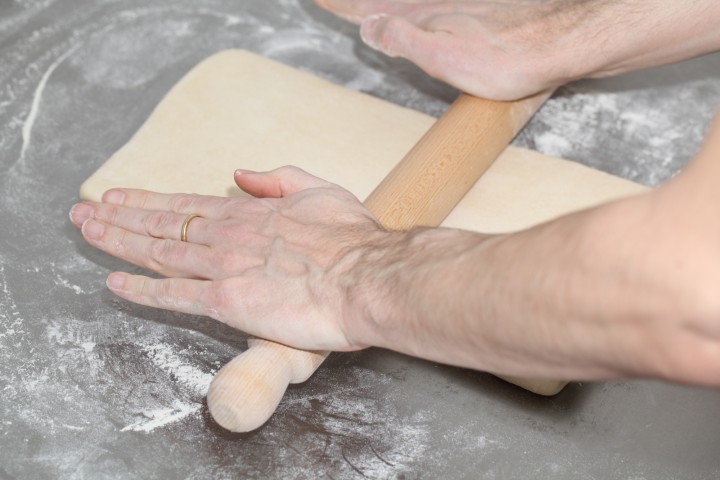
Now the dough with the sealed in butter needs to be rolled out. With a lightly floured rolling pin start rolling out, on a lightly flour dusted surface, the dough to a rectangle of 20 x 60 cm. Start rolling from the center of the dough towards the edges, and not from one side of the dough all the way to the other side. This technique helps you to keep the dough at an even thickness. You can also rotate your dough 180 degrees to keep it more even, because you tend to use more pressure when rolling away from you than towards yourself. You can use these techniques during all the rolling steps of this recipe. Aim at lengthening the dough instead of making it wider and try to keep all edges as straight as possible.
Fold the dough letter style, cover with clingfilm and refrigerate for 60 minutes to get the dough and butter to fridge temperature (fold one third of the dough on top of itself and then fold the other side over it). Repeat the rolling and folding two more times (ending up with 27 layers in total), each time rolling until the dough is about 20 cm x 60 cm. After each fold you should turn the dough 90 degrees before rolling again. The open ‘end’ of the dough should be towards you every time when rolling out the dough (you can see this in our croissant making video at around 3:40 minutes). After the second turn, give it a 30 minute rest in the fridge. After the third turn again give it a 30 minute rest.
- Roll out to 20 cm x 60 cm
- Refrigerate 60 minutes
- Rotate 90 degrees
- Roll out to 20 cm x 60 cm
- Refrigerate 30 minutes
- Rotate 90 degrees
- Roll out to 20 cm x 60 cm
- Refrigerate 30 minutes
- Rotate 90 degrees
- Roll out to 20 cm x 110 cm


Step 3
Dividing the dough
Take the dough from the fridge. Lightly flour your work surface. Now very gently roll the dough into a long and narrow strip of 20 cm x 110 cm. If the dough starts to resist too much or shrink back during this process you can fold it in thirds and give it a rest in the fridge for 10 to 20 minutes before continuing. This will relax the gluten and make rolling out the dough easier. Do not fight the dough, when the dough refuses to get any longer, rest it in the fridge!
When your dough has reached its intended shape and length, carefully lift it a few centimeters to allow it to naturally shrink back from both sides. This way it will not shrink when you cut it. Your strip of dough should be long enough to allow you to trim the ends to make them straight and still be left with a length of about 100 cm.


Shaping the croissants
For the next stage you will need a tape measure and a pizza wheel. Lay a tape measure along the top of the dough. With the wheel you mark the top of the dough at 12,5 cm intervals along the length (7 marks total). Now lay the tape measure along the bottom of the dough and make a mark at 6,25 cm. Then continue to make marks at 12,5 cm intervals from this point (8 marks total). So the bottom and the top marks do not align with each other and form the basis for your triangles.
Now make diagonal cuts starting from the top corner cutting down to the first bottom mark. Make diagonal cuts along the entire length of the dough. Then change the angle and make cuts from the other top corner to the bottom mark to create triangles. Again repeat this along the length of the dough. This way you will end up with 15 triangles and a few end pieces of dough.
Using your pizza wheel, make 1.5 cm long notches in the center of the short side of each dough triangle.
Now very gently elongate each triangle to about 25 cm. This is often done by hand, but we have found that elongating with a rolling pin, very carefully, almost without putting pressure on the dough triangle, works better for us. You can try both methods and see what you think gives the best result.
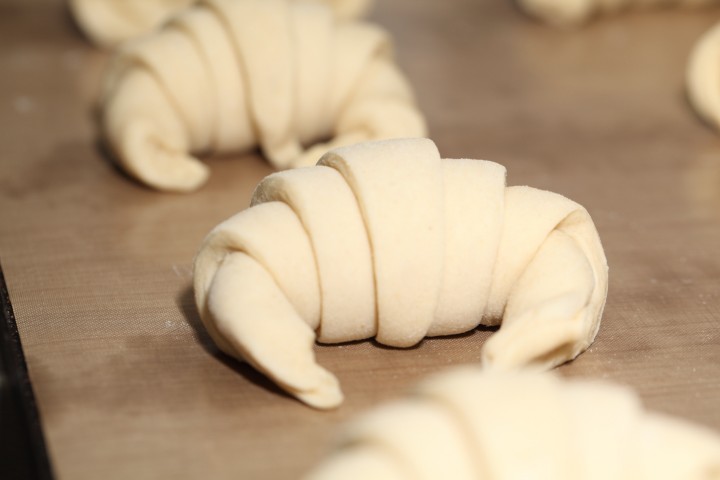
After you cut a notch in the middle of the short end of the triangle, try and roll the two wings by moving your hands outwards from the center, creating the desired shape with a thinner, longer point. Also try and roll the dough very tightly at the beginning and put enough pressure on the dough to make the layers stick together (but not so much as to damage the layers of course).
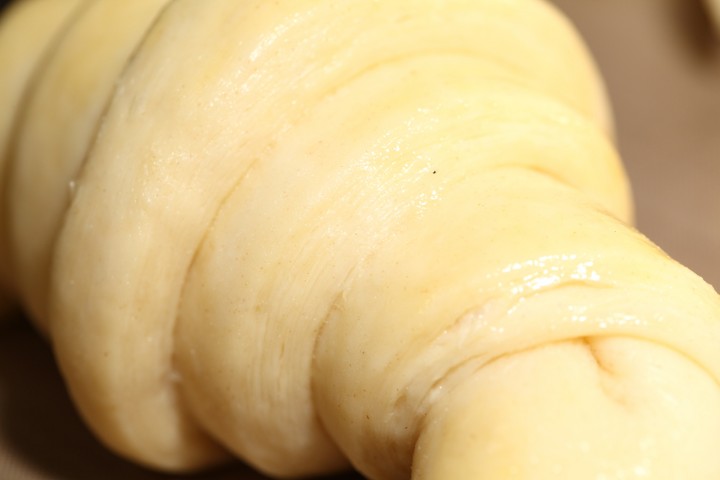
Check out the layers…
Proofing and baking
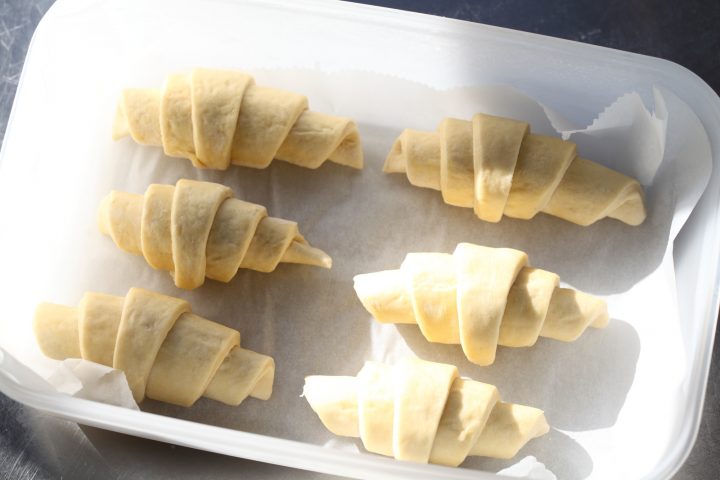
Arrange the shaped croissants on baking sheets, making sure to keep enough space between them so they will not touch when proofing and baking. Combine the egg with a teaspoon of water and whisk until smooth. Give the croissants their first thin coating of egg wash.
Proof the croissants draft-free at an ideal temperature of 24ºC to 26.5ºC (above that temperature there is a big chance butter will leak out!). We use our small Rofco B20 stone oven as a croissant proofing cabinet by preheating it for a minute to 25ºC / 77ºF. It retains this temperature for a long time because of the oven stones and isolation. The proofing should take about 3 hours, it takes longer than the 3 day recipe as the dough still needs to develop. You should be able to tell if they are ready by carefully shaking the baking sheet and see if the croissants slightly wiggle. You should also be able to see the layers of dough when looking at your croissants from the side.


Preheat the oven at 200ºC / 390ºF convection or 220ºC / 430ºF conventional oven.

Right before baking, give the croissants their second thin coat of egg wash. We bake the croissants in our big convection oven for 6 minutes at 195ºC, then lowering the temperature to 165ºC, and bake them for another 9 minutes. Hamelman suggest baking the croissants for 18 to 20 minutes at 200ºC, turning your oven down a notch if you think the browning goes too quickly. But you really have to learn from experience and by baking several batches what the ideal time and temperature is for your own oven. Take out of the oven, leave for a few minutes on the baking sheet, then transfer to a cooling rack.
Our current way of baking in our big double fan convection oven: We preheat at 200ºC, when heated put the croissants in the oven and directly lower it to 175ºC. We bake them for 10 minutes at 175ºC, they will have a nice brown color by now, then lower the temperature to 150ºC, and bake them for another 6 minutes.
Retarding & freezing your croissants
If you want to postpone your croissant baking by retarding your dough in the fridge, or storing the unbaked croissants in the freezer to bake at a later stage, follow these instructions for best results:


Retarding
After shaping leave your croissants to proof for one hour at room temperature to kick start the proofing process. Then place them in the fridge overnight. Make sure no air can reach the croissants, otherwise they will dry out! It is best to place them in an airtight container on a piece of baking paper. Make sure the container is big enough to allow the croissants to expand without touching each other.
Practice and experience will teach you the optimum fridge time for the croissants to develop and proof (also depends on your fridge temperature). Always make sure the croissants are proofed to perfection before you bake them. This could often mean, allowing them extra time at room temperature after the night in the fridge. If you want perfect croissants, the right proofing stage is key, otherwise you could end up with croissants that are flat, butter leaking out, no beautiful layers and so on. When you are absolutely sure the croissants are ready for the oven, give them a thin coat of egg wash or brush with milk and bake them using the instructions from the recipe above.
Freezing
Storing your unbaked croissants in the freezer, again will result in a little bit of quality loss, but this is outweighed by the practicality of being able to decide for yourself when to bake the croissants.
We recommend the following method: Place the shaped croissants on a sheet of baking paper in a container and make sure they do not touch each other. Cover and proof croissants for one hour at room temperature to kick start the proofing process. Now place the container in the freezer.
When you want to bake them, plan ahead. It takes quite a while for the croissants to thaw. There are a few methods you can try out. The first is to take them out of the freezer and leave them to thaw in the fridge overnight. This way you can easily control the process. The next morning you can be sure the croissants will still be very cold. It will take at least three hours before they are ready for the oven. If you have a proofing cabinet you can use this to proof the croissants at around 24ºC to 26.5ºC, or you can use your slightly warmed oven (check the temperature with a thermometer) to use as a make shift proofing cabinet. See our tips and instructions on proofing and baking above.
Alternatively you can take them from the freezer and leave them to proof overnight at (cool) room temperature. There is a slight risk of over-proofing here, so for a first attempt we recommend taking them out late at night and checking them very early in the morning. Again practice and experience will lead you to the optimum time for your situation and to the optimum result. When you are absolutely sure the croissants are ready for the oven, give them a thin coat of egg wash or brush with milk and bake them using the instructions from the recipe above.
Advantage of developing your own optimum method will allow you to have super fresh croissants ready early in the morning, for brunch or any time you like!
Happy croissant baking!
I always follow the steps but I still don’t understand why all over a sudden my croissants started shrinking from the inside when fully baked and then collapses,help me out.
Hello Nelson,
Did you maybe do something different like use a different flour (giving it a less stable structure than before)?
I am really helped alot by this version, am now confidence enough to go tackle my fears with the croissants. Thanks
Hi I am not sure if it was the flour I used to make the crossiant, this was the third time I made the crossiant looked a bit flat like your one day crossiant version and no open crumb although I am doing the 3 days crossiant version. I am using 250g brown flour and 250g plain flour.
Hello Kathy,
The answer to your question is definitely the use of the brown flour. The fibers in the flour (bran, germs) make the dough less light and able to rise. Compare the look of a brown whole wheat loaf with a fluffy white loaf. There is a definite difference in height. Where there are fibers there are also less gluten, also a reason why the end result is denser and heavier. The use of these flours (without any additives for a lighter result like you see in a store bought one) is definitely a challenge on the height and structure.
Hi! thanks for your recipe … a question … which is an internal temperature of croissants at the end?
Hello Adrian,
Because of the structure of the dough, we find it hard to measure, so we basically never do this and take all the other factors into account as mentioned in the recipes. But it should be in the high 90ties.
Enjoy your pastry baking!
Thank you so much for your recipe and detailed method. I recently tried your recipe for croissants in half batch size. I did both the 3 day and the 1 day method and found that I actually prefer the 1 day method as the dough-butter packet doesn’t have a chance to ferment in the fridge overnight (I think perhaps my fridge is a higher temp than yours!) So these are the things that I’ve done differently that worked for me:
1) not mix the dough until fully smooth
2) ferment for 2 hrs at RT and then chill in fridge (this step seems to develop the gluten without making it too tight to roll out)
3) chill in freezer until dough temp is 10C before lamination
4) butter for lamination is 1cm thick
5) I use a double fold (rolled out to 12×50cm) then a single fold rather than 3 single folds (the texture seems more open with less layers)
Hope these notes maybe useful for other bakers!
Thank you for your inspiring posts!
Hello Karen,
Read your comment with interest and we are sure your notes will inspire others to follow you if they encounter similar challenges.
Great we you were able to use our recipe as a starting point to make your own excellent version!
I have made this recipe a few times, and I have finally started to get good results!! Here are my suggestions:
– If you are using active dry yeast, proof it first by using some of the water and sugar that you would normally use in the recipe, this only takes 5 minutes.
– Get the dough consistency correct. This takes practice. I had to go too long in the mixer before I knew where it needed to be. When I let too much gluten form I could barely roll out the dough, and I had to throw it out.
– When you are making the butter slab just start with a block and beat it between two sheets of parchment paper. I read somewhere online that beating the butter will make it more pliable, and it does. You want to be able to fold the slab in half without it breaking apart (or come close to this). You will know what I am talking about immediately if you try to fold an unbeaten slab.
– Use enough flour on the counter when you roll out the dough. I did not have enough and it caused the middle layers to separate because the top layers would roll, but the bottom would not roll out as much.
– Proof the croissants long enough (mine usually take over two hours)
– I found that between 425 degrees F and 450 degrees F in a non-convection oven worked best. The croissants had a nice oven spring, and the exterior was a nice dark color.
Lastly, as the recipe stated, keep practicing. I have made these (or the three-day version) at least 10 times. When I started out they looked bad, butter was running all over the cooking sheet, and they tasted more like biscuits (layers were combining and butter was melting). Make notes on what works better and try to continuously improve your process.
The dough consistency needs to be correct because otherwise the layers do not work and the crumb is flat.
If you are in the US, make sure you use European-style butter, it has a higher fat content that other butter typically found in the US.
I just thought I would add these details!!
-Bob
Hello Bob,
Thank you so much for sharing your very helpful insights and suggestions based on your experience with both our recipes. The one about the flour use on the counter top is also very valuable. The amount needs to aid the dough rolling process without adding too much or too little. Again and indeed practice makes perfect croissants!
This will be very helpful for other bakers too of course.
Enjoy your pastry baking!
Ed & Marieke
Is it possible to freeze the dough before shaping after the final turn? I usually freeze them after shaping and they turn out great but I want to take them on a trip and this will be easier. Don’t want to ruin my beautiful croissant dough if it’s wrong!!
Hello Al,
Although we have not done this ourselves, we know it to be possible. We cannot advice on the best method or best result, because we only use the methods described, but we do know you need to carefully wrap the dough and make sure the dough is at well thawed but still cold before cutting (this is often done overnight in the fridge). Hope it works out well!
Hi I did with 2/3 of my batch. The evening before I put it in the fridge to defrost. The proofing needs a bit longer. But they turned out nearly as good as the 1/3 which were proofed directly. Cees Holtkamp, probably the best known Dutch baker, also says in his Dutch YouTube-tutorials you can freeze puffy pastry slabs directly after the last turn.
Thanks Mirjam, great to read your experience with the freezing of the dough.
Is it okay if instead of the 3 hour proofing at the end I leave it in the fridge for the night (like from 6 pm til 3 am) and bake it afterwards? Also if yes how much before baking should I take it out?
Yes, you can do this. Just somehow make sure the dough does not over-proof. After fridge time check how the dough is doing and if it needs more time at room temperature to further proof to perfection. As soon as you are confident they are ready, you can take them to the oven. This is a learning process, based on the temperature of your dough, fridge and room it is different for everybody and you need to figure out the optimum conditions and time needed for your situation.
Hope it will work out well!
Hallo Ed & Marieke,
Many times I followed your original three day croissant recipe with great success every time. So I tried the one day croissant recipe the other day. The croissants looked perfect when baked but did not taste like anything close to the croissants of the orginal recipe. They kinda tasted like store bought croissants, very bland.
I followed the one day recipe to the letter except that the proffing time was about 40 minutes short of the three hours.
I guess time really does develop flavour!
So vandaag terug naar het originele recept!
Fijne feestdagen toegewenst en mijn waardering voor het uitstekende website.
Groetjes vanuit Edmonton in Canada.
Hello Charles,
Thank you for sharing your experience. Yes the three day version dough is developed a bit further and can have some additional depth in taste. When we compare we do not have a very big difference in taste, more in structure and height. But you are right, you do need to let them proof to perfection for a good result. You can also work out a two day version and see how that goes.
And yes, the original 3 days recipe is a winner for us too, it’s a longer period, but quite relaxed to execute, and if you plan ahead it should be no problem.
Dankjewel voor de aardige woorden! Een hele fijne kerst en een goed uiteinde van fantastisch begin van het nieuwe jaar met heel veel mooie (bak)momenten!
Groetjes uit het kleine Nederland,
Marieke & Ed
If you can’t get french type 55 flour, would pastry flour be better than all purpose?
Hello Tyro,
We would advice to use the all purpose flour if this flour has a higher protein content than the pastry flour. You can hopefully check in the bag and see which one comes closer to the 11% in the type 55.
We recently also tried the Italian caputo blue flour typo 00 long fermentation, which has 12.5% protein, but the right kind that give extensibility without too much elasticity. Also good results with that type of flour if this would be an option you can get your hands on.
“First time croissant baker? Choose a cold day with a room temperature below 20 ºC / 68 ºF. ”
I am from Saudi Arabia, will never get this day to make a croissant. But among all the recipes I checked before deciding which one to make, I loved this one.
Is it ok if I added 280g of whole milk rather than 140 milk/ 140 water?
Hello Dalia,
Yes you can use only milk if you want. There can be a slight difference in rise, texture and color (more milk solids) but you can see how you like the result.
An if you scroll down the comment section just a little bit you can read some useful tips from us and other bakers about making pastry under warm conditions.
One other bakers wrote us about a big stone tile he places in the fridge overnight and uses to roll out the pastry the next day.
Hello,
Firstly, thank you for your recipe. I have made these a few times now and have started experimenting with different flours available in my area. They are delicious and the recipe is very clear, well written and achievable! The video is very helpful too!
Secondly, are you able to offer any advice on how long you can retard the shaped croissants in the fridge before baking? Is it ok to leave them in the fridge for around 36 hours before bringing them out to proof and bake? Or would I need to freeze them if I want to keep them this long?
Thank you again 🙂
Hello Naz,
First of all thank you for sharing your experience with the recipe and for your very kind feedback. About the retarding:
It’s like we say in the post: Practice and experience will teach you the optimum fridge time for the croissants to develop and proof (also depends on your fridge temperature). You are asking about retarding for 36 hours and this is about 3 times as long as we normally take or would initially suggest. Not to say it will not work at all, but there is a chance of deteriorating of the dough (drying out, damaging the layers, over-proofing). So, if possible, for starters, the first time make it shorter and see at what stage the dough is (or at least check if you want to or need to take longer).
Good luck with it and enjoy your pastry baking!
Do you have any suggestion for baking croissant during summer?
Hello Wan,
If I am correct I think we gave you these tips in a comment with the other recipe. But just to be sure:
Cool ingredients and even utensils in the fridge before use, and use the fridge a lot to cool your dough and cool for longer if needed.
Roll the dough at night, when it is cooler. Check the weather reports and choose the coolest period possible.
For other croissant making and baking tips also see this page:
www.weekendbakery.com/posts...questions/
Happy pastry baking!
Hi There,
I really like how you explained recipe and I would like to try it.
Since it will be my first time, I have a couple of question:
– can I use half of all ingredients?
– and if yes, do I have to take the same measurements for the squares and the rectangles?
thank you very much
(sorry for my English , it is not my native language.
Hello Alessandra,
Yes you can take halve. Here are the measurements if you use halve the ingredients:
If you halve the recipe, the dough square should be 18.4 x 18.4 cm and the butter slab 12 x 12 cm. The same for the laminated dough, you must shorten only one side (otherwise you get a quarter of the original), so you end up with a 20 x 30 rectangle. The size of the final dough, right before cutting, should be 20 x 55 cm.
If you are new to croissant baking this information can also be useful for you:
www.weekendbakery.com/posts...questions/
Enjoy and hope it will be great!
For a “very lazy baker”, is it possible to make a croissant 🥐 using puff pastry from the supermarket?
Hi Kirk,
You will get something ‘croissant shaped’ but it will definitely not be a croissant. Puff pastry does not contain any yeast or sugar, the laminated dough for this recipe does.
Fantastic recipe!
With 110cm snow and counting I guess the Norwegian climate is perfect for making croissants
Hi Thomas,
Great to hear from a pastry baker up north and thank you for trying and liking the recipe. That’s a lot of snow, hope you will see spring soon too.
Happy baking in your amazing country!
Hilsen fra / Groetjes,
Ed & Marieke
Hei! I live in Norway as well. Do you Know where to buy the french flour? ID IT is not available here, which flour so you USE then? I have looked everywhere but can’t find it.
Hello Jessica,
I googled for you and with my limited knowledge of Norwegian I did find something that might be just the right one, not French, but Italian. Lots of choice here and hopefully you can get it this way too:
www.okoland.no/produ...no-grassi/
They have lots more choice but this one would be a good candidate to start with.
Excellent recipe
Thank you chef!
Hi there!
I was wondering if it’s possible to over-roll the dough?? Sometimes I forget how many times I’ve rolled it!! LOL
Hi Fiona,
Yes that is possible, if you do an extra turn you get 3 times as many layers, this would not be a problem, but the challenge with extra layers is they get thinner and more delicate and easily damaged, so you possibly end up with a brioche dough instead of a layered croissant. So if possible stick to the recipe.
Good luck and happy pastry baking this festive season!
I do, on recommendation from a pastry chef, put small dents in the number of turns with my finger in the dough before putting it in the fridge so when it comes out I know how many turn it had. The dents disappear in the rolling out.
Such an excellent tip Mirjam, which will help us and many pastry bakers. Thanks for sharing!
Hi I am wondering if the amount of butter /40g / on your web site is correct or just misprint.
Yes, 40 grams of butter in the initial dough and in the second ingredients list you see 280 grams of butter for the laminating.
AMAZING AMAZING AMAZING 👏 👏 👏 👏 👏 👏 👏
Thank you for the applause 🙂
Good day…wen making the should the water be warm or cold or slightly hot … since yeast is added to the recepi… n I’m not sure how my dough came out very tough and is lil crumbly
Hello Warda,
You can take water straight from the tap (never hot because this would kill the yeast!). You aim for the dough to stay cool at the first stages, until the proofing, when you ideally should aim for a proofing temp of 24ºC to 26.5ºC.
Hello,
We only have two people. Can you let me know if I can make croissant dough for two servings?
Many thanks
Hello Sunny,
We would never advice to make croissants for only 2 people. To go true the whole process and to handle such a small quantity of dough will not be rewarding in terms of yield, result and quality. If you want to make less we would suggest making halve the recipe. If you halve the recipe, next to using halve of all the ingredients, the dough square should be 18.4 x 18.4 cm and the butter slab 12 x 12 cm. The same for the laminated dough, you must shorten only one side (otherwise you get a quarter of the original), so you end up with a 20 x 30 rectangle. The size of the final dough, right before cutting, should be 20 x 55 cm.
The croissants you do not eat on baking day you put in the freezer, after they have cooled. For extra flakiness and ‘almost as good as freshly baked’ you can put them into an oven for about 8 minutes at 175°C / 345°F, straight from the freezer.
Good luck with it!
Excellent recipe–thanks.
One suggestion, to keep the dough and butter layer cold while rolling it out:
I keep a baking stone in the freezer, returning it to the freezer whenever the dough is resting in the refrigerator, and use the smooth side of the cold stone, lightly floured, on which to roll out the dough each time. When the dough gets longer than the stone, just let some of the dough hang off the end, supported on the counter if necessary, while rolling the other part on the cold stone.
Afterwards, the residual flour on the stone is easily removed with a light scrub with warm soapy water, and the stone is again ready for the oven.
Thanks for the excellent site.
Hello Crile,
Thank you so much for kind words and this excellent tip. We are sure pastry bakers in warmer climes are going to follow your advice!
Happy croissant baking,
Ed & Marieke
Well done! This is exactly how Bernard, a French Master baker, and v good friend, taught me how to make great croissants. Your method is almost exactly the same to the letter. As you say, practice makes perfect, and it took me a few goes to get to My Eureka moment! Croissants, much like Macarons are part Science part Culinary Art and very difficult to get absolutely perfect. The annoying thing is that one day they come out absolutely bloody amazing and another day, crap! Is it me having an off day ?, the weather? The moon? Nobody knows. One of life’s many mysteries. Very disappointing and frustrating when they don’t come out well after all that hard work, BUT, Wow! When they come out brilliant there is nothing better!
Don’t ever be discouraged though! You will have great fun and learn new things with every attempt!
What a wonderful comment to read Ian! Could not agree more with what you say, all very recognizable for every (home) baker. Never to be discouraged is the best advice, learn from baking mistakes, back to the oven the next day and start again.. you will be rewarded 🙂
Greetings and happy pastry baking!
Marieke & Ed
These are the best croissants! I made them last night and I love everything about them, so much layers, so great taste, mmmm, they are awesome! Thank you for this recipe and instructions, they are so acurate and valuable! I now oficially claim that next time I’ll make a three day version. Wish you all the best!
Hi Marija,
Thrilled to hear the one day croissants turned out so excellent. The three day version should be even better and also a bit more relaxed. It is great to be able to choose and work around your other activities if necessary.
Enjoy the pastry baking!
thank you so much, one of the most detailed, well explained article about croissants!
Much appreciated Yaron!
If you are looking for more inspiration to use this dough we can recommend:
www.weekendbakery.com/posts...x-raisins/
and
www.weekendbakery.com/posts...y-caramel/
Happy croissant baking
I just wanted to thank you.
I tried your one-day croissant recipe and they came out super!.
thank you again for the wonderful recipe and such a perfect step-by-step description.
Hi Lauretana,
Thank you very much, so great the recipe worked for you too.
Enjoy the pastry baking!
I have now tried freezing 2 ways: 1) formed croissants, defrosted and proofed as you describe above and 2) freezing the sheet of dough after all proofing and before any forming. I found the second method produced croissants equally as good as not freezing. The first rose well, but didn’t reach that wobbly, gel-like stage. Method 2- I wrapped the sheet of laminated dough in floured plastic & placed in a ziplock bag, expelling as much air as possible before freezing. I defrosted the dough in the fridge overnight in the sealed bag, then followed the rest of your recipe. Perfect.
I found baking 1 baking sheet at a time, on a high up oven rack produces the most even browning, as well as using a silpat mat under the croissants. They browned too much on the bottom using parchment, and were too light on the bottom when I doubled the baking sheets, which I always do for cookies.
I am getting very fat now…
Thank you Hilary for your excellent feedback and very useful tips, for us and other bakers!
Ik ben ontzettend fan van de site, ik heb de laatste jaren verschillende recepten geprobeerd en elke was weer een succes!
Ik blijf alleen moeite hebben met de croissants.. bij de laatste rijs en het bakken worden de croissantjes plat en niet mooi hoog. Hoe kan dit komen? Ik zou heel graag wat tips krijgen om het nog eens te proberen!
Hallo Eva,
Op basis van wat je beschrijft zouden wij willen voorstellen te kijken naar de bloem die je gebruikt en eens andere bloem te proberen (een witte bloem maar wel met een juist eiwit-gehalte van rond de 11% zoals de Franse bloem die wij gebruiken). Als de croissants al tijdens de laatste rijs platter worden dan kan er sprake zijn van een type bloem die wat zwaarder is, of van over-rijzen, of beide. Dat zet zich dan door in de oven, over-rezen deeg komt niet meer mooi omhoog). Ook de oven zelf kan een rol spelen. De temperatuur is heel belangrijk. Wij hebben wat tips die hierbij kunnen helpen: www.weekendbakery.com/posts...your-oven/
Hopelijk heb je hier wat aan. Croissants blijven een uitdaging, een van de moeilijkere baksels, waarbij je echt nauwkeurig moet werken en de tijd moet nemen voor het beste resultaat.
Succes ermee!
Bedankt voor de tips!
Ik blijf het proberen 🙂
This is such a timesaver. I cannot wait to try this and see how they turn out. Thanks for the inspiration!
Thank you Remy,
Let us know about your results!
two questions: How thin should the dough be after the final rolling and if you can’t reach the desired length is there a problem?
Hi Lauri,
It is only a few millimeters, best judged maybe by looking at our video:
www.weekendbakery.com/posts...roissants/
Of course the measurements and thickness reaching the desired length are related to each other, so it is important to try and reach the indicated 20 cm x 110 cm. Not reaching this length will of course have an impact on the end result (as with everything with croissant baking, work precise for the best results).
As we say in the recipe:
Sometimes the dough will resist to get any longer than for example 45 cm, stop rolling and pressing the dough, it will only hurt your layers. At any stage when the rolling of the dough gets harder, you can cover the dough and let the gluten relax for 10 to 20 minutes in the fridge before continuing.
It is important to use the right flour for this recipe too, some flour may give too much elasticity and not enough extensibility, so make sure to use flour that is best for croissant baking.
Good luck with it!
Thanks for this amazing recipe. I tried out but the center of the croissant looks raw and compact. No flakiness at all. I left the croissants in the oven the mentioned time in the recipe. What could be the problem? Maybe that the dough not rest enough in the fridge after each folding?
Thanks for the feedback and congratulations for your amazing work.
Hi James,
Yes, the baking times (though adjustments can still be necessary based on the working of your oven) work as a rule when the dough is properly laminated. So, could be that the layers are somehow damaged during the process.
Give it some more time and practice, and above all work precise and carefully build up the layers.
Good luck with it!
Mine also turned out thesame, I used 100g flour because 500g would be too much for me so I divided all the ingredients by five. My problem was the layering. I didn’t know how much I needed to roll, I had the butter leaking out and I didn’t think it was necessary for 100g to stay 60 mins in the fridge. And my proofing was slow. It’s my first attempt. Hope to try again although in scared to.
Hello Jaymee,
We would not advice making such a small amount of dough, it is really hard to work with it. Please read our most important tips before you start on how the butter should be and how to use the fridge if the butter gets too soft. We would advice to, at least, make half the dough for a good result.
If I halve the recipe, the dough should be 18.4 x 18.4 and the butter about 12 x 12. Same for the laminated dough, you should always only make one side shorter to get half, so end up with a 20 x 30 rectangle. Then for the cutting a width of 20 cm to get a nice plumb croissant and with 55 cm length you of course get half the amount of croissants of the original recipe.
Good luck with it.
For a first time baker the instructions were very precise and I could bake a perfect batch of croissants .
Thank you
Thank you Sajs, very happy with your feedback!
Wow. I never thought that there was so much to baking croissants! Thanks for the tips.We will wait until the weather gets alittle bit cooler before trying this.
Thank you Lucy, a wise decision, giving you more time to get familiar with the recipe and the different proceedings.
Enjoy the baking!
Thank you for the recipe! I will try to make croissants following to your advices.
Let us know about your experiences!
Happy croissant baking