

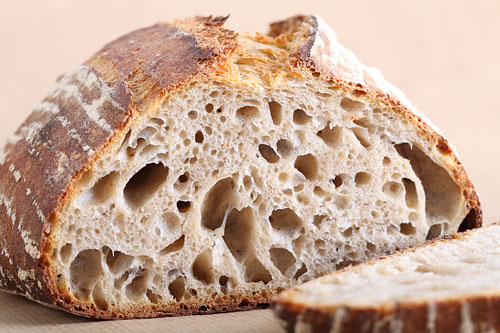
SF Sourdough: Time, Patience and Planning Skills!
His recipe intrigued me when I first read it; the use of the refrigerator, the promised taste and sourness, and the sheer amount of steps and time. These kind of recipes always trigger my interest. Plan ahead for this recipe because it is going to take 4 days from start to finish. Perfect to incorporate in a very long weekend of baking. This recipe is based on the San Francisco Sourdough recipe from Peter Reinhart’s latest book ‘Artisan breads every day’. But of course, as you may know by now, I have made my own version (which comes with exact measurements and a time table!).
The trick of this recipe is to fit it in with other activities like sleep and work. The times given in the time table at the bottom of the recipe keep this in mind. Of course you can be a bit flexible with the time table, especially with the 34 and 15 hour periods the dough spends in the fridge. But alterations can have an effect on taste and texture. For example if you extent the time in the fridge the bread will become more sour, but the gluten strength will weaken, so you probably get a flatter, denser bread. If you want to make more than one loaf, just double or triple or quadruple the ingredients. We usually make 6 breads in one batch. That’s the maximum our spiral mixer can handle.


For the starter in this recipe I use a sourdough culture which is made with 100% whole grain rye flour. A sourdough culture based on rye flour is easier to maintain, it does not transform into a slurry when you forget about it, it is easier to stir because it has almost no gluten and it smells very very nice, a bit like fruit. I maintain the starter as a ‘almost’ stiff starter. This way it stirs easy but does not add as much water to the dough as a poolish starter. It is also very forgiving in the amount you feed it. As I am a bit lazy in feeding, normally I only feed it once a week, after my weekend baking. I just give it a few table spoons of water and rye flour, stir, and ready!
| Ingredients for the Starter | ||||
|---|---|---|---|---|
| 126 | g | bread flour | ||
| 83 | g | water (room temperature) | ||
| 24 | g | sourdough culture | ||
| Ingredients for the SF Style Sourdough | ||||
|---|---|---|---|---|
| makes 1 loaf | ||||
| the starter from step 1 | ||||
| 264 | g | bread flour | ||
| 50 | g | spelt flour (pref. whole grain) | ||
| 204 | g | water (room temperature) | ||
| 9 | g | (sea) salt | ||
Making the Starter
In a bowl stir together 126 grams of bread flour with 83 grams of water at room temperature with 24 grams of the (rye) sourdough culture. Mix it well for about 1 minute until all the ingredients have been combined and you have a dough like ball. It is not a problem if your dough still looks a bit rough. Cover the bowl with clingfilm and let it preferment. After a minimum of 9 hours at room temperature it is ready for…the fridge. It will stay there for the next 34 hours! This means that on the morning of day 2 you put it in the fridge and in the late afternoon of day 3 you take it out again (see time table at bottom of recipe).


Making the Loaf
So, it is now probably somewhere in the afternoon on day 3 of the recipe (17.00 h if you stick to my time table). Take the starter out of the fridge and immediately start making the dough. Combine the starter with the 204 g water and stir for 1 minute to loosen the stiff starter. Add the flour and salt and knead (we use a spiral mixer) for 3 minutes. Cover the mixer bowl and leave to rest for 15 minutes.
Take the dough out of the mixer bowl and onto a floured work surface and do one stretch and fold (a full letter fold, left over right, right over left, bottom over top, top over bottom; see our bread movie to observe this technique if you are not familiar with it). Leave covered to rest for 15 minutes on your bench. Do a second stretch and fold. Return to the (greased) bowl, cover and leave to rest for 40 minutes at room temperature. Now put the dough in your fridge and leave it there for the next 15 hours (yes you can go to sleep, the yeast cells in your dough probably will do a bit of hibernating of their own in the fridge, the bacteria stay more active in this colder climate and tend to produce acetic acid, which, if all goes well, will give your bread the sour taste of the sourdough.
It is now day 4 of the SF sourdough making process: Baking Day! In my time table it’s now 10.00 in the morning.
Take the dough out of the fridge and let it acclimatise for 2 hours at room temperature.
Now it’s time to shape. You can make a batard/oval loaf or a round one for around 750 grams of dough. I like to use the batard shape for this bread, it’s also good for a more even bake. I also use floured proving baskets/bannetons. Transfer the shaped dough in a proofing basket or baking pan, dust a bit with flour, cover and leave to proof for 2,5 – 3 hours (at room temperature which is about 21 ºC). When you think it has risen enough, use your finger to carefully make a very small dent in the dough. If the dent remains, the bread is ready to bake, if the indentation disappears, the dough needs a little bit more time.

Preheat your oven to 235 ºC / 455 ºF (at what stage you preheat your oven depends on how long it takes for your oven to heat through, some take 30 minutes, some, like ours, with stone floors take a lot longer, up to two hours. The preparation time from this point until the bread actually goes into the oven is 3 hours.
Now your loaf is ready for the oven. Slash the top of the loaf with a lame or bread scoring knife. To get a nice crust, try to create some steam in your oven by putting a small metal baking tray on your oven floor when you preheat the oven and pouring a half cup of hot water immediately after putting the bread in the oven. Release some steam by setting your oven door ajar (perhaps with the help of a wooden spoon or oven mitt) 5 minutes before the bread is ready. If you are going to create steam with a baking tray, you maybe also want to turn your oven temperature a bit higher, because you are going to lose some heat in the process.
After 45 minutes of baking your loaf should be ready. Transfer onto a rack and leave to cool. This loaf also keeps very well in the freezer. But please make sure to eat at least some of it while fresh!
Note: We use European flour which absorbs a few % less water than American type flour. People using this type of flour should add 3-8 ml water to the final dough. If you dare you actually make the dough a few percentages wetter to get bigger ‘holes’ in your crumb. I lowered the amount of water in this recipe to make the dough easier to handle.

SF Sourdough Time Table
day 1 23.00 h Make starter let ferment for 9 hours at room temperature
day 2 0.800 h Put the starter in the fridge for approx 34 hours!
day 3 17.00 h – 18.40 h Making the dough
- Starter + water 1 minute stirring
- Add flour + salt 3 minute kneading
- 15 minutes rest
- Stretch and fold
- 15 minutes rest
- Stretch and fold
- 40 minutes rest at room temperature
day 3 18.40 h Put dough in fridge for 15 hours
day 4 10.00 h Take dough from fridge and leave at room temperature for 2 hours
day 4 12.00 h Shape the loaf and leave to proof for about 2,5 – 3 hours
day 4 14.30 – 15.00 h Bake for 45 minutes at 235 ºC / 455 ºF


Aytekin says
Hallo,
Kan het zijn dat rijzen langer kan duren dan 3 uur.
Ik vind dat het bij dag 4 niet genoeg in volume is gerezen.
Ook bij vingertest is het niet gerezen na 3 uur. Gelukkig beetje nagerezen in oven.
MAAR BROOD WAS HEERLIJK MIJN DOCHTER VOND
DAT DE BROOD UIT DE HEMEL KWAM..
Weekend Bakers says
Hallo Aytekin,
Jazeker, dat ligt helemaal aan de temperatuur van het deeg.
Kijk eens naar onze tips over dit onderwerp (Engels) www.weekendbakery.com/posts…mperature/
Het is altijd belangrijker te kijken naar het deeg en wat het nog nodig heeft, de rijstijd is een indicatie op basis van de temperatuur. Als deze wat lager is, kan dat een groot verschil maken. Mocht je het proces willen versnellen, dan kun je bv de oven tijdelijk als rijskast gebruiken door deze heel even iets te verwarmen en weer uit te schakelen. Het is wel handig om de temperatuur te kunnen meten met een infrarood thermometer bv, want je moet zeker niet te hoog zitten, daar kan de gist niet tegen. Maar als het bv 20 of 21 graden is en je gaat naar rond de 24/ 25 dan is dat perfect.
Veel plezier met het bakken.
Michael Zdyrko says
Used whole wheat as I didn’t have spelt flour. Everything looked great until the final mix. I swear I got the measurements right, but the final dough came out much too wet, and I had to add at least 2 cups of flour to get it to not be soupy. About to go into the fridge for the last 15 hours. Do you think I just mixed it with the wrong amounts?
Michael Zdyrko says
I measured incorrectly. Will try again.
Weekend Bakers says
No worries, we all recognize these things and have made the same mistakes. Next time you will definitely do better!
Aytekin says
Hallo.
Bedankt voor het delen van de geweldige stukken.
Ik ben bezig met mijn eerste brood, moet de gewicht van de starter 126 gram 83 gram 24 gram exact worden.
Is het heel erg als ik het afrond.
Weekend Bakers says
Hallo Aytekin,
Je mag best 125 gram gebruiken ipv 126, maar verder zouden wij zeggen, als je toch een weegschaal gebruikt, houd je dan aan de aangegeven gewichten voor het beste resultaat. Bakken is wel een ‘exacte wetenschap’ dus de verhoudingen kloppen, die moet je vooral niet veranderen (zonder dat je weet wat je doet).
Hopelijk wordt het een heel mooi en lekker brood.
Geniet van het bakken!
Ben says
Hello,
I made the preferment but realized I messed up the timing. Could I delay the preferment by putting it in the fridge for 6-8 hours and then leave it overnight at room temperature?
Love the website!
Ben
Weekend Bakers says
Hi Ben,
Yes you can use the fridge and you do have a bit of leeway, but by now you have probably already done so. Hope it still turned out OK. It also helps to make your own time table before you start.
Britt says
Thank you for sharing this recipe. I made a single batch loaf and also doubled the amounts. For the single I used hard whole wheat and in the double I used hard white. I didn’t have spelt and substituted rye.
Both were very good. Lots of oven spring, a super moist and tangy crumb. Not dense at all.
When it came to shaping I found that no light dusting of flour on the work surface was required. The dough was not sticky at all. Nor was any pre-shaping required. It formed perfect balls right away. Is that unusual (not complaining, it was great to work with)?
I’m going to start experimenting with hydration levels and dough combinations. But so far this has been the best base recipe for SF style sourdough I’ve come across.
Weekend Bakers says
Hello Brit,
Thank you for sharing. If it works it works and it sounds like it does, so that is great. Could be that the combination of your specific flour, hydration and other conditions are just right to get the perfect result. The dough is expected to be slightly sticky at 65% hydration, so it would be interesting in your case to indeed experiment a bit with a few % more and see if you still can improve on something already good.
Just have fun with it and enjoy your baking and sharing and stay safe and healthy in these challenging times!
Greetings,
Marieke & Ed
Sara says
Hi
Really the best recipe for SF sourdough I have come across. Great taste and great texture. I always work with a week old starter straight from the fridge and only use stainless utensils. Never failed me….
Thanks again and happy baking holidays!
Weekend Bakers says
Thank you so much Sara, lovely to read your experience with the SF recipe.
Wishing you a wonderful Holiday period with friends and family and a very happy and healthy 2020 with lots of baking joy!
Marieke & Ed
Jason says
I LOVE this method!!! Thank you so much for sharing in such detail!!! I’ve been using this not only to keep the loaves coming, but also as a way of maintaining my starter. After the 34 hours in the fridge, I empty my jar into a bowl, then replace some of the starter back into my jar, and add in the flour and water for the starter and voila starter is fed and next loaf has begun. This produces a loaf every 2 days, and can easily be modified to make more. My starter consists of 50g original culture, 50g bread and 50g whole wheat flour and I keep it at 100% hydration. Then after the long fridge proof, I add in another 50g Whole wheat and 350g Bread flour, 40ml Olive Oil, roughly 200ml Water, and of course 10g Salt… Such a perfect taste after my initial starter matured. Also best pizza dough ever!!!
Weekend Bakers says
Hello Jason,
Thank you for sharing. You are on a baking roll! So glad we can be part of your baking success and we are sure others will profit from your comment and enthusiasm and are inspired by your version of the SF.
Thank you for taking the time to share and wishing you many crusty loaves, delicious pizza and a long life for your starter!
Greetings from Holland,
Ed & Marieke
Amanda says
Thanks for the recipe! I’m looking forward to trying this weekend. I’m wondering if it’s possible to leave the dough refrigerated longer than just overnight? For instance, I’ve heard gluten content is reduced by 97% when dough sits for 72 hours and would like to try that as I have gluten sensitivity. What are your thoughts on that?
Weekend Bakers says
Hello Amanda,
We would not advice this, we do not have the ultimate knowledge on gluten-free baking but we do know that if this is based on the gluten structure breaking down it will not yield a good loaf. Plus you cannot be sure the gluten will not hurt you in any way, based on reading this information, without making sure with somebody really knowledgeable and trustworthy on the subject. In your case we would feel more comfortable baking a gluten-free or low in gluten bread (with rye for instance and buckwheat) to begin with.
Hope you will be able to enjoy your baking and eating
Mieke says
Have you writing down the timings for this to have a loaf ready for lunch? If I bake according to your schedule I’ll have a loaf for dinner but I don’t really like eating bread in the evenings and it seems sad if I bake it and then leave it till the next day.
Weekend Bakers says
Hello Mieke,
The easiest way would be to take 30 hours on day 2 instead of 34. Then start making the dough 4 hours earlier on day 3. Then on day 4 get up at 6 to take the dough out and leave it for two hours (get back to bed till 8 🙂 and continue with the shaping and start baking at around 11, still with some leeway before lunch if you need longer proofing.
Hope it will be great!
Oliver says
Hi,
thanks for the recipe! It was exciting and great fun making the bread and this is first time I have made a loaf without using any (added) yeast.
I doubled the amounts and made two loaves. My oven is limited and doesn’t have circulating air (i.e. just top and bottom heat) so I put one loaf on the bottom shelf and one on the top shelf and swapped them around about halfway through baking. The one that started on the bottom shelf developed a lovely cracked crust with different shades of brown. The loaf that started on the top, however, just became flat and a dark brown on the upper surface. Do you know what contributes to these differences? Is it too hot at the top, thereby baking the crust before it’s formed? Is there more humidity in the lower section allowing the crust to form properly? Would aluminium foil somehow help on the upper shelf maintain the humidity?
Nevertheless, both loaves were delicious and I’m definitely adding the recipe to my favourites/standard bakes 🙂
Thanks again
Oliver
Weekend Bakers says
Hello Oliver,
Sorry for the late reply, we are o so busy, but we think your assessment of your oven is very possibly right. Too close to the heating element and no time and room to expand with the crust immediately forming. Humidity depends on how it was and is introduced in the oven too, but the most important reason is definitely the place in your oven. With this type of oven it would be best to bake only one at a time and if needed slow the proofing of the second one down a bit (fridge) so it does not over-proof.
Still glad you were left with two very edible loaves and thank you for commenting and your kind words.
Greetings,
Ed & Marieke
Oliver Leys says
Hi,
thanks for your reply. I like the idea of putting one on hold in the fridge. I will keep experimenting 🙂
Best regards
Oliver
Weekend Bakers says
Let us know how it goes!
Sarah says
Hi there, this is the best SD recipe I’ve come across. Everyone was so impressed and the loaf is simply beautiful – thank you.
I have a rookie question for you: for the 24 grams of sourdough culture, does that have to be ripe culture? Or can it come directly from the fridge? Most blogs I read state that you have to take the starter out of the fridge and feed it three times before it’s ready to use, but that seems wasteful to me. It sounds like you’ve really worked out how to be minimally wasteful, so I wanted to see if you’d be willing to clarify this. Thank you so much for your time.
Weekend Bakers says
Hello Sarah,
Sorry for the late reply, but thank you very much for your comment and wonderful to read your enthusiasm about the recipe and result.
About your question:
In general we advice the following:
In between baking or when not baking for longer periods of time it is indeed best to store your culture in the fridge like you do.
If your culture has been left in the fridge for a week or more you need to refresh it first so it will be ready and active the following day (so not three times, but once is enough for us).
Normally you also feed your culture after baking to replenish your stock (you put back in what you took out). You keep it at room temperature for about 12 hours so it can double or triple in size again, then you store it in the fridge till the next bake.
Within a week of the previous bake, we always use the culture directly from the fridge without refreshing /feeding first and this works fine for us. But when in doubt, feeding first will never be wrong.
Hope this helps you and hope you will enjoy your baking and sharing with many more loaves!
Bryan Barry says
So does that mean the culture has to be ripe or can you use a culture that has been in a fridge for a week i.e. not yet active?
Weekend Bakers says
Hi Bryan,
So, if the culture has been in the fridge less than a week, we always use it straight from the fridge, without first refreshing it, and that works well for us. Longer than that, we would always advice to refresh the culture first (a day in advance) before use in the preferment / starter of your recipe. When in doubt, it will never be wrong to refresh your culture before use, so you can see / judge it is active before using it.
Nicholas says
Wow! I have just tasted a slice of this, and it’s safe to say it’s one of my favourite sourdough’s. I think the extra fermentation gives the loaf a really mellow rounded flavour, not at all the astringent over-sour flavour I was expecting. The dough was really easy to work too.
I doubled the recipe and made an extra loaf and put it in the fridge for tomorrow after the proof after shaping(day 4, is a five day ferment going to be too much?
Cheers
Nicholas.
Weekend Bakers says
Thanks Nicholas, love your comment because it describes so well what this loaf gives you taste wise the way we experience it too.
Really hard to say how the dough (and your particular sourdough) is going to react to further fermentation..we would not ‘stretch’ it too far, but this experimenting is exactly what is needed sometimes to discover limitations (or something wonderful).
Good luck with it!
Yusra Yusoff says
Just made two loaves of this today! (Tweaked the flour slightly; added in some wholewheat & rye, and topped the loaves with poppy & flaxseed each ). Love the slight sour taste and relatively open crumb which has amazing texture <3 half a loaf has already disappeared… Thanks for the amazing recipe!!!
Weekend Bakers says
Thanks for the wonderful feedback Yusra, great the recipe turned out so well for you. Exactly what we like about it, the crumb texture and not too in your face sour taste (also depends on your own culture how it turns out of course)!
Enjoy the sourdough baking!
Roger M. Zander says
My refrigerator is around 40-41ºF / 4-5ºC for storing starter and later the dough. What is the temperature of your refrigerator in this recipe for SF sourdough bread?
This is day 4, baking day for me. Excited I am.
Thank y’all for the good details in this recipe.
RMZ
Weekend Bakers says
Hello Roger,
Our fridge is 5 to 6 Celsius. Hope the result was great and thank you for trying and hopefully liking the recipe!
Ed & Marieke
ewa noah says
hello
my name is ewa
i will tray this recipe for first time
thanks
Weekend Bakers says
We always love to hear about your results Ewa!
Ike says
Love your site!
You guys are the best.
Question:
I thought sourdough did not fair well when being mixed/proofing etc in a stainless steel bowl.
Is this true?
Thank you again for all the fantastic information you provide
Ike C
South Carolina
Weekend Bakers says
Hi Ike,
Thanks for the kind words.
There are stories to be found about organisms in the culture being killed and it affecting the taste, but we have not found this to be true. Many people, including professional bakers and chefs, use stainless steel bowls and utensils all the time (health and sanitation regulations). Metals that react like aluminum and copper are not a good paring with sourdough and acid. As far as we know and the experience we have and have heard from others, is that it is no problem at all to use stainless steel bowls and spoons when mixing and proofing.
Hope this helps.
Greetings from Holland,
Ed & Marieke
Rita says
Hello,
You say to use “bread flour” – which one should it be?
Thank you
Weekend Bakers says
Hi again Rita,
For this recipe we use an organic stone ground wheat flour from Holland. We think the closest type for you to look for is Strong white flour with an extraction rate 72-75% and 12 to 13% protein.
Enjoy your baking!
kristen says
Does it matter if the start is not put in fridge before starting making this? thanks
Weekend Bakers says
Hello Kristen,
We do not know what you mean with ‘the start’ but we advice you to stick to the recipe and use the fridge to slow down the fermentation process. If you change the balance of this recipe, there is more you have to change.
E. Foster says
Is this bread suitable for diabetics
Weekend Bakers says
Hello,
We always advice people on a special diet to consult their doctor when in doubt. We can tell you that this bread consists of 4 ingredients, water, flour, sourdough culture and salt, with no added sugar or anything else. If needed you can always reduce the salt too.
leon shaddick says
diabetics shouldn’t consume too much carbs, I suggest learning what you can and can not eat, it could harm you a lot!
Lujain says
Hi!
So I tried this recipe and it was fantastic! It turned out 1 beautiful loaf. I am wondering if doubling the recipe in order to get 2 loaves would work? Is there something I should do differently?
Weekend Bakers says
Hi Lujain,
You can just double everything and make two loaves no need to change anything.
Enjoy your two loaf baking!
David Dixon says
Using a ‘Dutch Oven’ – in my case a 22cm Le Crueset lidded casserole pot I find a total loading of 700g of dough is just right. I preheat oven and pot to 225-230C. I am still unsure about how far to allow the final rise contained in ‘1kg’ fibre plain banneton – tipping into the hot pot from a peel. 225/230 for 25mins then top off down to 200C for 8-12 mins. Maybe achieve best results baking earlier in the rise. Any Comments please on best approach
Weekend Bakers says
Thank you for sharing David, sounds like it is just a bit of fine-tuning for you.
We are not Creuset bakers, but we do have a few tips for you when it comes to your dough and proofing. If you stabilize your dough temperature, proofing times are more or less the same each time and this takes the guessing out of proofing- and bulk fermentation times. So, don’t know if you already own a digital thermometer but it would be a great thing to have. This way you can play with varying the times and better judge the results. You can read more and get some tips here: www.weekendbakery.com/posts…e-in-size/
It could be that slightly under-proofed would give a very good oven-spring when using the Dutch oven, but again, we are no experts on this method.
Hope some other bakers can add to this.
Enjoy your casserole baking!
IvyBe says
I bake in le creused pot and I don’t preheat my pot anymore. Sometimes I preheat oven and sometimes not-this is suitable for underproved dough. The way to know when yr dough is proved and ready to bake is to do finger test-when you poke yr finger into the dough on the outer edge and the hole will slowly fill up but only about half way. This test apparently only applies to dough that prove outside the fridge
Weekend Bakers says
Thank you for sharing Ivy, and yes you are right, dough from the fridge acts differently because of the cold.
Read more on the finger poking test and the myth of double in size in this post on our website: www.weekendbakery.com/posts…e-in-size/
Ivy says
Just want to say what a great recipe. Makes very nice tasting bread. Made it 3 times in last 3 weeks and I have another this time double amount in the fridge! I also add bit of plain yogurt in. My 3yrs old toddler likes it too 😉
Weekend Bakers says
Thank you Ivy, for trying and liking the recipe. I remember years ago I was sort of surprised that the neighbors toddlers kept asking for ‘Marieke bread’ and I thought small children would not like it that much (too crusty and chewy) but I was very wrong!
Enjoy your baking and sharing with your family,
Greetings from Holland
Marieke
Eva Clary says
I like the batard shape, as you have. What size banneton would you use for this shape if using approximately 750 to 800 gram dough?
My family loves your Tartine Version. Thank you. Eva👍
Weekend Bakers says
Hi Eva,
If you look at this page :www.weekendbakery.com/websh…neton-cane
You can see the bannetons for 750 grams oval and oval long shaped with their measurements and get an idea of the measurements that you could use.
These are also the baskets we use ourselves for the recipe.
Enjoy your baking and sharing!
Justin says
Or perhaps a combination of whole grain dark rye and some other whole grain?
Weekend Bakers says
Hi Justin,
We must say we have never made this recipe that way and cannot speak from experience on how a 100% whole grain version would turn out. We would always advice to go there gradually and adjust as needed. Of course you must expect the result to be more dense and flat. The bread flour we use is stone milled and organic and not as ‘white’ as factory bleached plain flour for example, there’s still fiber in it. But using 100% whole rye is yet again another matter, it would mean you will be making a rye loaf, which has to be handled differently and would feel more like shaping clay, because of the lack of gluten compared to using wheat. We would advice to take a look at a rye bread recipe for this:
www.weekendbakery.com/posts…h-raisins/
Good luck with it and happy whole grain baking.
Justin says
Probably a loaded question here, but is it possible to use this recipe with just whole grain flour, perhaps a whole grain dark rye? What modifications might need to be made? I’m just very adverse to using “white” flour.
Thanks!
Joseph says
In more detail, I have a sourdough starter indeed weekly made as a poolish. Usually 300g is sitting in the fridge and refreshed weekly. I was wondering if it’s possible to make this recipe by skipping the preferment and using the freshened poolish directly into the flour mix. I’d use 233g and adjust the water to achieve the right hydration. Or would you advise against it and preparing a fresh preferment?
Much thanks
Joseph
Weekend Bakers says
Hello Joseph,
Yes, the way you describe it sounds like something you could give a try and indeed adjust the water. Just make sure it is nice and active when you use it. We presume you have made recipes in a similar way before. We like doing it this way because using a small amount of sourdough culture you can create a fully active sourdough preferment overnight which you then use to build the final dough. This way you can maintain a small starter culture and still have the full sourdough flavor. Big advantage for home and hobby bakers is you are wasting far less precious flour when refreshing your culture than you would maintaining a big one. More on this here:
www.weekendbakery.com/posts…ough-tips/
Happy SF baking!
Joseph Chiha says
Hello
What an amazing recipe
My sourdough starter is 100 percent hydration. I have 100g water and 100g flour.
Can I use this instead of making the preferment? Or do I need to adjust the hydration?
Much thanks
Joseph
Sharon Rossy says
How much latitude is there in the 9 hour initial rest? Can that be extended. I started mine this morning at 8 am and now trying to figure out the rest. Also if it stays in longer than 34 hours for the second step, will that degrade the gluten?
Thanks,
Sharon
Weekend Bakers says
Hello Sharon,
Both can be extended or shortened a bit, but you should think of one hour more of less. If you want or need to add much more to the 9 hours, put it in the fridge. And you are right if you go way over the 34 hours it will weaken the gluten, so we would not advice this. When in doubt it is always better to use under-proofed than over-proofed because you can always add extra proofing time but your dough will not recover well with the use of weak gluten preferment.
rest assured, we always make a recipe at least 5 to 10 times before we make it our own and are truly happy with it. And still you will have to make small adjustments from time to time, using new bag of flour, influence of the weather etc.
Enjoy the process!
Sharon Rossy says
Hi there! Just wanted to let you know that today (the 4th) the bread was baked. Not sure how to post photos. I must say that I was initially worried but it had a really nice rise. The crumb isn’t as open as I would have liked, but that probably is the result of too long in the fridge. However the taste is fantastic and the bread is moist, so I’ll take that.
Thank you for this recipe. One thing I would like to mention is that mine was baked in a Dutch oven so I baked it for 25 minutes with the lid on and about 12 minutes with the lid off, no extra steam added.
I love this recipe so much, I’m making it again this time following your timeline so I don’t run into the same issue. But again – thanks for working this out so home bakers can manage these recipes. I love your calculator!
Weekend Bakers says
Hi Sharon, great to read about your results. We are sure the next time you will only improve. The Dutch oven method is just excellent, it indeed needs no steam.
If you want to share pictures with us and other bakers you can do so here:
www.weekendbakery.com/send-…your-loaf/
We will add the to our gallery: www.weekendbakery.com/your-loafs/
Thank you for mentioning the calculator, so glad you find it useful too!
Sharon Rossy says
Me again. I’m working up the courage to make this bread considering the time involved, although there are long stretches of time when it’s in the fridge or the counter. I’ve made bread with spelt and if I were to bake this bread, my inclination is to leave it out and stick with the bread flour. Actually speaking of flour, the flour I am using is an all purpose unbleached organic flour made from hard red wheat, equivalent T55. This is Canadian flour and from what I can discern, it’s a flour with a high gluten and high protein content and is for bread and baguette. I’m still new to this an am learning about water retention with various flours and high and low extraction flours, not sure what it all means – so although my starter is usually maintained with a rye/ all purpose mix, I’m going with organic all purpose. Any advice? It’s all confusing at this point.
Weekend Bakers says
Hello Sharon,
You should not be confused, because to us it seems you already know a lot. The flour you want to use, seems perfect for the job (it would be good to know the % of the protein, we can tell you our flour has around 12.5%). Leaving out the spelt is no problem at all too. A different starter like the one you mention is OK too. As for the hydration there is always a difference between flours, especially between European and US and Canadian. In general European flours absorb a few % less water than American type flour. We normally advice people using this type of flour to add 3-8 ml water to the final dough. But it is best to just make the recipe, be prepared to having to make it a few times to get it right for your conditions and above all make notes of what works and what not for each next bake.
Good luck with it and happy SF baking!
matze says
i’ve been looking for a way to get a more sour taste into my loaf and came across this recipe, so i tried it…ok, i modified it a bit, like i always do, then i tried it.
-i increased the hydration to 70%
-i doubled the recipe
-i used 50g of spelt flour, 50g rye flour, 80 g of semolina di grano duro rimacinata (rest was bread flour)
-i added a dash of olive oil
-and i baked at 250°c for the first 13 minutes with steam, then lowered the temp to about 220 and opened the door for a moment to let the steam escape…..
it has turned out beautiful! great, even bake. wonderful, dark brown, crispy crust, chewy yet tender, aromatic crumb! GREAT oven spring, even more volume than yours if i dare say so….
the flavour of this bread is amazing, seriously one of the best tasting loafs of bread i’ve ever made…BUT….IT’S NOT SOUR AT ALL! not even mildly sour. i’ll have to check again tomorrow but i think i could make you believe it was made with a yeast poolish if you tasted it.
idk why but i just can’t get my bread to taste sour, why? i’ve tried a variety of recipes, i’m not new to baking bread and i’m successful more times than not, but i just can’t get that tangy taste into my bread. i’m starting to think it’s my sour dough culture, should i start a new one? i even fed my starter with rye flour for 3 days before i made the sour dough for this recipe bc you guys suggested it in the recipe…..and it works…except for the sour taste 😀
any ideas?
ps: yes, i followed all other instructions (36 hours in the fridge, 15 hours in the fridge etc) exactly!
pps: great blog, love your stuff, thanks! 🙂
greetings from austria
Sharon Rossy says
Hi Matze,
I haven’t tried this recipe yet and I’m new to the site, but my son tells me my sourdough bread is fairly sour in general, which personally I like. My starter is fed with organic rye flour, and I think that is what lends the sour taste. Not sure what your starter is maintained with. For my next bake, I’m going to feed it for a few days with all purpose to cut down on the sour taste and see how that goes. Can’t please everyone! But man oh man this is quite the recipe!
matze says
hi sharon,
thanks for the tip, i will definitely try that!
normally i feed my starter with wheat bread flour, this time i fed it with rye flour, not the organic kind though.
it’s weird, isn’t it? one achieves accidentally what the next dabbler can’t do however hard he tries 😀
Weekend Bakers says
Hi Matze,
Hope you will achieve more sour. Sometimes it pays to start up a second culture (with different flour (brand, organic) you never know what you are going to catch that will give you sour. Next to this you can check out our tips for more sour in this posting (see under ‘more sour please’):
www.weekendbakery.com/posts…ough-tips/
Happy sourdough baking!
Carol says
I’ve made this bread several times with beautiful result (of which I am thrilled because this is all new to me). The top of the loaf has a great crust, but the bottom is often pretty difficult to cut through. I use a preheated Dutch oven (455 F) and bake 30 minutes with lid on, then 10-15 minutes with lid off. Am I baking too long? I’m never sure if I should give it a few more minutes, so maybe I’m baking it too long? I hesitate to bake for a shorter time because I really don’t know what the internal temp of a finished loaf shoul be … can you also tell me that? Thanks!
Weekend Bakers says
Hi Carol,
It is indeed a very good idea to measure the core temperature with a digital probe thermometer. For wet dough and also this loaf the core bread baking temperature should be close to 96C/ 205F (The ideal average bread core temperature should read 93.3C / 200F).
Next to this it is important to proof the loaf to perfection before baking, so maybe your loaf could use just a bit of extra proofing time. And lastly make sure you know the true temperature of your oven. How accurate does it indicate the temperature? If you have not already done so is can be wise to find out what the real temperature of your oven is compared to the temperature indicated on the settings. You can do this by using a ‘true temp’ oven thermometer (they will cost about 5 euro or dollar).
Hope this helps you to perfect your results!
Cathy says
I tried this recipe and am very happy with how it turned out. I would however like to have the bread with more wholewheat. How should I increase the wholewheat to maybe 50%.
Thank you
Weekend Bakers says
Hi Cathy,
That is no problem, but it can be a big change in terms of end result. We would suggest to do this in stages. So start with 20% and see how much adjustment it needs in terms of additional water, then increase it the next bake if you like the result.
Happy baking!
Patricia Quek says
Hello.
Thank you for sharing this recipe
The sour flavour is fabulous, my husband and I love it!
I made SF sourdough twice with this recipe, first time I used normal bread flour and my Kitchenaid, the sourdough bread hardly rise and was heavy.
Second time I used Rye flour for the starter. Like you said the Rye starter is definitely very active. As your recipe I used Rye flour and replaced 64 gm of bread flour with high protein Wholewheat flour. I soaked the Rye and Wholewheat flour overnight in part of the required water in the fridge before used and added 9 gm more water for a single recipe. Hand kneaded the dough; stretch and fold, it was easy and the dough developed very well. The SF sourdough bread was light, good crumbles although wasn’t as airy as yours.
I am making this in Malaysia, room temp 28 deg C with high humidity. I used cold water, flour from the fridge, used of the fridge for resting time and reduce the final proofing time. I also put the dough in the fridge for 15 – 20 mins before baking as it was easier to transfer the dough for baking.
Please advise what can I do to have the crumble as airy as your photos.
Thanks
Patricia
Weekend Bakers says
Hello Patricia,
Thank you for your comment. You are already doing very well, our compliments. Your conditions are very different to ours so indeed you have to adapt. You are experimenting with different flour and that is good, because the key to a good result could lie in the right flour. next time try some more of the high protein flour. Depending on the workings of your culture (very hard to determine, because they all act differently) it could also be that your dough was even a bit too cold with all the cooling and cold ingredients and needed more proofing or a bit less cold to develop well. It would be good to have a dough thermometer and be able to measure your dough temperature and make sure the dough proofs at around 25 C.
Good luck with and happy baking from Holland,
Ed & Marieke
Patricia says
Hi Ed and Marieke
Thank you. Shall definitely take note of your comments and keep trying
Best regards
Patricia
Nikki Brunsvik says
Is it OK to usae metal during this process? My kitchenaid bowl and my batteton are both metal. THANKS!
Weekend Bakers says
Hello Nikki,
If you say metal we assume you mean stainless steel and this is not a problem, you can use the bowls for this and other recipes. Only with very poor quality steel you can get rust when in contact with moisture and acid for longer.
Alberto Laposse says
Hello, on a continuous day to day production which would be the best way to keep a starter. Many thanks
Weekend Bakers says
Hi Alberto,
This is a good option hopefully: Maintain two containers and use them on alternating days. For example container A on even days and container B on uneven days. So you use one container to make your preferment (poolish / biga) feed them and leave a day to get active, having the other one active at hand to use etc..
You could of course use a big container of say poolish, but that would mean with this you can only make the type of bread that requires exactly such a preferment while you have other recipes that probably require other types of preferment.
Hope this helps!
Claudia says
Hi,
I just made the SF sourdough (only substituting spelt for rye flour as I didn’t have any).
Bread turned out well, good bake/cust/bottom etc – the only thing is that it’s got hardly any ‘holes’, ie it’s quite dense. What did I do wrong?
(Also worth mentioning that I don’t have a spiral mixer to mixed by hand..)
I’m fairly new to baking and know that there’ll be a lot of trial and error but any comments and pearls of wisdom would be greatly appreciated.
Thanks so much!
(love your site! You really help all our armatures -speaking for myself – a great deal along the way!)
Weekend Bakers says
Hi Claudia,
Thank you for your kind comment. The key to holes in your loaves is in the hydration of the dough and the (not to much) kneading. Top on the list is trying to avoid adding more and more flour as you are kneading and handling the dough!
We have some useful tips on both subjects that you might want to read:
www.weekendbakery.com/posts…gh-mixing/
+
www.weekendbakery.com/posts…ion-dough/
Happy SF baking from Holland!
Marieke & Ed