

Last week we tried out the San Francisco Sour Dough recipe from Peter Reinhart’s latest book ‘Artisan breads every day’. We used our home made local Amsterdam rye sourdough culture because we believe our bread thrives on it (rather then buying and shipping a sourdough culture from halfway across the globe that maybe would not feel at home here).
We made it during the weekend because to make these breads you have to have time and patience and planning skills!
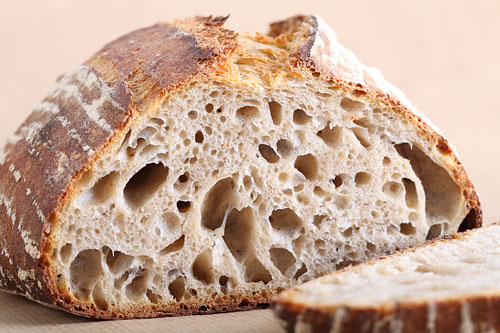
First there is the starter stage , 8 hours of fermenting at room temperature, then 10 hours in the fridge. After that making the full dough with the starter: 2x stretch&fold with a 10 minute interval and 2 hours of fermentation at room temperature. Then it’s back to the fridge for 15 hours! Take from the fridge and let it get up to room temperature again, 2 hours. Divide and shape, proof 1-1,5 hours. And finally! the baking itself, 44 minutes in our Rofco bread oven. First result: see picture.
We think it’s worth it!
All these stages are necessary to build up the sourness in the dough. As the yeast is normally more active in sourdough than the bacteria which produces the sourness, in the form of lactic-acids, you need to stretch time to give the bacteria more time to do there job. Using the refrigerator is an excellent way to stretch time without the problem of the yeast eating up all the ‘food’ in the dough and ruining your gluten chains which makes the dough gloopy and soft. The cold of the fridge puts the yeast into a dormant state and gives more time to the bacteria to make the lactic-acids.
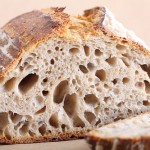
When the dough went in the oven we were not sure at all about the result. It looked like something between a pancake and a deflated balloon. The dough wasn’t easy to handle, it looked flabby. But the oven spring was enormous, as you can see by the final result in the picture. The bread has a pleasant light sour smell, crusty crust and full bread flavour. This first attempt has room for improvement: the crust was a little too dark and the shaping is a challenge. We also adapted the original recipe, used a little less water and added an extra stretch and fold and bench-rest during shaping. However we still need to perfect the recipe because the dough is still very soft and sloppy and hard to work with. The margin of error during shaping is very small, and sometimes the breads turn out as flat kind of pancakes which erupt in the center. But the taste is still very good!


Peter Werner says
Speaking as someone from San Francisco, one of the keys to getting a good SF-style sourdough is to make sure to use very strong bread flour, on the order of 14-15% protein, which is common in the US and Canada, but may not be the case in many other countries. I don’t know about the Netherlands, but when I was living in Ireland, “strong flour” was still only around 11% protein, which is why Ireland specializes in soda breads rather than yeast ones. You can tell SF sourdough is made from a high-gluten flour, because it has a really nice chewiness to it.
The other key, as you’ve noted, is to give sufficient fermentation time for the lactic acid to build up. A good San Francisco sourdough is pleasantly tart, and that’s something not even all SF bread bakeries get right.
Peter Werner says
Pardon me, 12.5-13% protein. I had overestimated the protein content in typical American bread flours. But that and sufficient working to build all of the potential gluten is essential. As I said, real SF sourdough has a really nice bite to it, and insufficient chewiness or sourness are the two most common flaws I’ve seen where this style isn’t done right.
Gordon Wolffe says
Hello there,
I am using your recipe following the instructions as exactly as possible. I have now arrived at the stretch and fold stage and the dough is very wet and sticky and very hard to handle. It is now in the fridge. I am a bit worried that tomorrow I will not be able to shape it and it will end up a flat splodge. Any suggestions?
Thanks
Gordon.
Weekend Bakers says
Hi Gordon,
Take a look at our tips on handling high hydration dough:
www.weekendbakery.com/posts…ion-dough/
This dough is supposed to be wet and sticky, and most people need at least a few turns to get used to the sticky. Next to this it is important you use the right bread flour with a protein content of around 12 to 13%, for a good gluten structure and a strong dough. If you think your dough is very slack you can try and do a few extra stretch and folds.
Good luck with it!
Gordon Wolffe says
Thanks for the comments and help – the flour has 12% protein. It certainly rose in the fridge overnight to twice the volume! I will let you know the result
Gordon.
Gordon Wolffe says
Well the bread was hard to get out of the baton – came out quite flat as a result but tastes ok. I think my poolish was a bit wetter than average so I might try a little less water next time. Thanks for all your help
Gordon.
Weekend Bakers says
Maybe our video on how to prep a banneton will help you with that:
www.weekendbakery.com/posts…-banneton/
Be generous with flour in basket and on bread when putting it in the basket, you can always brush off excess flour.
Susan says
Hi Ed and Marieke,
Can you please advise me how to create loads of holes in your SD bread? The holes in my SD bread are not big, but there are quite a few of them. My bread seems to have a tight even crumb. I like the great big holes and plenty of them.
Please help me with this, as the main reason why I am learning to make SD bread is its texture.
Thanks,
Susan
Weekend Bakers says
We think the first few tips in this post can help you with that: www.weekendbakery.com/posts…eful-tips/
Plus: Try not to work too much flour in your dough from your bench, while handling it. Some people keep adding flour because the dough is sticky, this way altering the dough. You have to get used to the sticky and the handling of it.
Also see our tips for handling sticky dough: www.weekendbakery.com/posts…ion-dough/
Kevin Christie says
Hi There I tried your “Four Day” recipe, I have not started the loaf yet, but, it appears “Burnt” my domestic oven goes up to 240
degrees and I turned it to the mark just before 240, to be certain I confirmed the temperatue with an infrared thermometer
could you please advise. Kevin Christie
Weekend Bakers says
Sorry Kevin,
We do not fully understand your question…you say your loaf is burned but you have not started it yet?
Kevin Christie says
Hi Sorry, about confusion,but, I said it appears “on the outside” to be burned, but I have now eaten the loaf and it was really good. The burnt appearance was only skin deep. I have since baked a second loaf and tried my “Kenwood Chef”, but it was much better kneading by hand. Kevin Christie
Weekend Bakers says
Hi Kevin,
Good to hear. It always takes at least a few baking rounds to get a recipe right for your conditions but it seems you are very much on the right track already.
Lots of loaves!
Marieke & Ed
Marieke says
Hello Marcelo
The Rofco oven has 3 floors of brick, you can bake 6 breads in one go. The oven takes about 2 hours to heat up. The first hour it heats continuous and the second hour the heat spreads evenly through the bricks and the oven only heats for a minute every 5 minutes or so. It is a Belgium handmade oven made by a small family owned company for over 20 years (see www.rofco.be for more information).
The Fresh Loaf forum recently started a topic on the Rofco in reaction to our bread movie
(see www.thefreshloaf.com/node/…bread-oven).
The mixer is of German making. It’s a Häussler Alpha mixer with a 6 kilo dough capacity and removable dough hook and removable bowl.
(see www.haeussler-gmbh.de/de/pr…n.php?id=3)
Happy Holidays!
Marieke
marcelo mintz says
hello,great work,i would like to find here you bougth the small bread mixer and the oven you used on your youtube video also the brand name,thanks happy hollidays
Marieke says
Hi Jill,
Yes, it is worth it. Time = Taste!
Good luck with the starter. Don’t be discouraged if at first your starter isn’t ‘living up’ to it’s promise. Just try again and you will see it will turn out OK!
Marieke
Jill says
That sounds like a lot of time to make bread. I hope it is going to be worth it. I am just begining my first starter. Thanks for sharing.