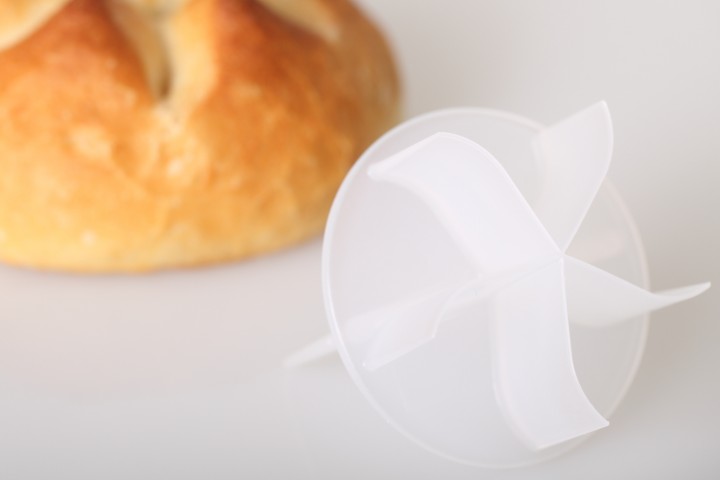
The Kaiser roll is also called a Vienna roll or Semmel or Kaisersemmel or kaiserbroodje in Dutch
Think sweet smelling soft crumb and thin crispy crust, these rolls are on the other side of the artisan bread baking spectrum. But they deserve their place in your warm, fresh-out-of-the-oven home-baked bread repertoire!
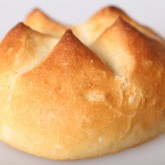
Everybody, in Holland for sure, knows these rolls with the characteristic star shape, made by hand or with a stamp. When you buy these rolls they usually do not seem to have much weight or taste. But, as so often with home baking, making them yourself changes everything. You use the right (and probably much less) ingredients, you give it time and suddenly it is very rewarding to make these adorable little rolls. They go with any meal, are great at a traditional family dinner or a summer picknick or just with a bowl of homemade soup.
Lets get baking!
Ingredients for the Kaiser rolls
makes 12 rolls
500 g German 550 /French type 55 / all purpose flour
8 g salt
7 g instant yeast
160 g water
150 g milk
1 tsp / 7 g honey
Before you start
Making this dough is pretty straightforward, combining, kneading, resting, shaping and final proofing, but for a good baking result it is important to use the right (quality) ingredients and also keep your dough under optimum conditions during the whole making and baking process. If you want to learn more please check out these tips:
–Tips on dough temperature
–Tips on the use of your oven for splendid results
Note: We use European flour which absorbs a few % less water than American type flour. People using American type flour should add 4-9 ml water to the dough.
Making the Kaiser rolls
In a mixing bowl of a standing mixer with a dough hook attached, combine the flour with the salt. Add the yeast, water, milk and honey and knead for 7 minutes. If you are kneading by hand it will take a bit longer, between 12 and 15 minutes depending on your kneading. You are aiming for an elastic dough that is ever so slightly sticky. Leave to rest for 2 hours in a bowl, sprayed with some oil, and cover with clingfilm.
Now divide the dough into 12 equal pieces of just about 70 g each. Shape the dough pieces into balls, place them on the baking sheet or tray you are also going to use to put them in the oven, cover (we do this with a floured piece of clingfilm) and let them relax for 10 minutes.
Preheat your oven to 220ºC / 430ºF. The preparation time from this point until the bread actually goes into the oven is about 1 hour.
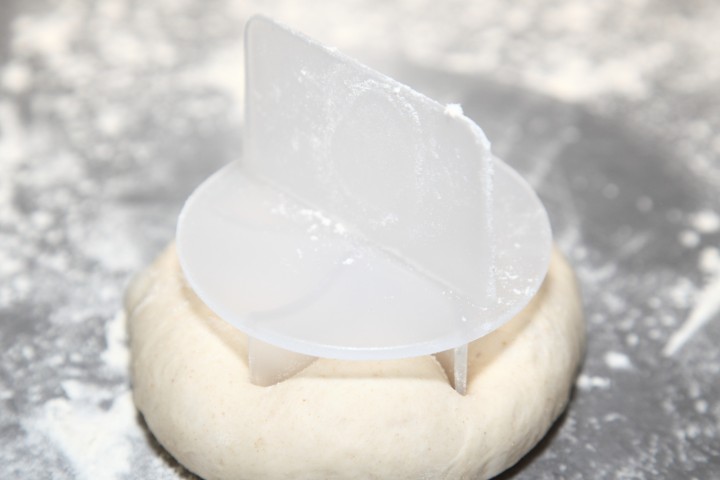
Continue by pressing the kaiser roll stamp into each ball of dough like you see in the picture to get the 5 pointed star pattern. Cover them and leave to proof for around 1 hour. When you think the rolls have risen enough, use your floured finger to carefully make a very small dent in the dough. If the dent remains, the bread is ready to bake, if the indentation disappears, the dough needs a little bit more time. Check again after 15 minutes.
You can also decorate your rolls with sesame seeds or poppy seeds before they go into the oven. Spray with some water and sprinkle on the seeds.
Try to create some steam in your oven by putting a small metal baking tray on your oven floor when you preheat the oven and pour in half a cup of hot water immediately after putting the bread in the oven. Release some steam by setting your oven door ajar 5 minutes before the bread is ready. If you are going to create steam with a baking tray, you maybe also want to turn your oven temperature a bit higher, because you are going to lose some heat in the process.
Bake in the preheated oven for 20 minutes and leave to cool on a rack.



Hanna says
Very easy receip and fantastic 15 minutes training for body and soul.. I left the dough in the fridge for overnight baking the next day. Great result confirmed by my neighbors:)
Weekend Bakers says
Thanks for the feedback Hanna! Great to read the overnight method worked well too.
Happy brötchen baking and enjoy the sharing!
Joseph Kadlec says
I’m wondering about 15 minutes of steam. Is that correct? Steam usually is less extended even in formulas for home baking. I will try both and send my results.
Weekend Bakers says
Hello Joseph,
In the recipe we refer to using steam for around 5 minutes. It also depends on the recipe and the load of the oven how much and how long you want to use steam or ‘run out of steam’ or want to release it.
Joseph Kadlec says
This link has some interesting refinements as to cornmeal and inverted proof after the rolls are cut. Also, flouring the Kaiser punch/cutter. I’ve heard of using corn starch for this purpose as well.
youtu.be/OVhYhFsc9oo
Weekend Bakers says
Hello Joseph,
That sounds excellent. We have not used cornmeal this way for this recipe but it can have a nice effect on the crust and makes lifting the rolls easier too. Thank you for sharing.
Kristina says
Do you knead after the first rising? Or just separate into balls? I apologize, I’m completely new to bread baking.
Weekend Bakers says
Hello Kristina,
You just follow the recipe exactly, so after the first rise of 2 hours you do not knead the dough, but just separate it in twelve equal pieces and shape them into balls.
Good luck with it and enjoy the process!
Paul Sterling says
Followed your recipe here (in the USA) and added an extra 5g of water as suggested. The rolls taste great, super texture but no points on the top. I used a steaming method in my home oven as recommended by Thomas Keller and the crust was perfect…just no “pointed crown” as your picture shows. Is the dough too wet or dry? Or should I have put more than a half cup of water into the steaming unit?
Thanks for your awesome site! I am getting totally into bread baking and your recipes and instructions are so helpful.
Weekend Bakers says
Hi Paul,
Thank you for your comment. To be honest we do not know. The buns you see in the picture where made in a household oven without the use of steam. We can tell you that several factors can play a role and one that could be key is the type of flour you use. So you could try different (brands of) flours and compare the result. Also see the experiments we have done on the subject: www.weekendbakery.com/posts…nt-part-1/
Also the proofing and at what point you take the rolls to the oven can make a difference. So see if you can play with that and hopefully you get your crown on top of the tasty rolls!
Good luck with it and happy baking this December
Gerry Oakley says
Finally a recipe in grams …not cups and spoons ..noticed some recipes have butter but no butter here .. going to try this one ..
Weekend Bakers says
Hi Gerry,
Big believers in scales, also for the home baker!
We hope the recipe turns out well. If you want to enrich this dough with some butter, we would suggest adding around 20 grams, but no more. Hope you like it as is!
Happy baking
Illa says
You have one use different measurements for liquids ml or liter but not g. Gramm is for weight only 😜
Weekend Bakers says
Hello Illa,
Bakers actually do weigh their liquids, also water, to be accurate every time and get a consistent baking result. Measuring is less precise.
Daniela Bauernfeind says
Hallo,
Can I have this recipes, in german please.
Weekend Bakers says
Hi Daniela,
Our German translation skills are not that good, but maybe google translate can help you.
Happy baking
Luke Smith says
This recipe for kaiser rolls looks amazing, and I especially love your advice to sprinkle them with poppy seeds before they go in the oven! I have always loved fresh baked rolls, but I don’t have a lot of time these days to make them. Reading about them right now though made me determined to have some…
Rocky says
I would like to do this over two days. Can I do the first resting of 2 hours in the fridge overnight? Do you guys have any idea if this would this be equivalent to 12 or 24 hours at 3C?
Thanks for a great website.
Weekend Bakers says
Hi, you will be fine. Let the dough develop for 1 hour before putting it in the fridge to give it a head start.
Lynn Macdonald says
Greetings! I want to make these for a lunch soon, but we don’t have the Kaiser Stamp. Would these be ok to just roll and score the top? Also, after mixing the flour, water etc., how would it affect the final product if I had to leave it in the cold room overnight?
Many thanks
Lynn
Weekend Bakers says
Hi Lynn, no problem using a knife, you end up with great tasting white rolls! About the cold room; I do not really understand what you mean by that! Sorry!
Dennis Shinn says
I live in Zirndorf Germany for 16 years and still today love my German rolls,i thank you so much for the recipe for the Kaiser,but as you know there are others.I would like know how to make there one other i like don’t know the name but they were shaped like a football and had a spit down the top,but were very good as well.thanks for any help on these rolls a photo would help thanks your weekend baker..
Dennis
Weekend Bakers says
Hello Dennis, thanks you for comment. We do not know this type of roll. We will have a look, but we only have one German bread book and this roll is not in this book. When we find something we will post a recipe.
Tom says
Hi, I think he means the Deutsche Schnit brotchen.
www.bakkerijdobbelsteen.nl/uploa…oodjes.jpg
Randy Jones says
possibly meant Rogen brötchen
Randy Jones says
possibly meant Laugenbroetchen
Kelli says
I tried to follow the recipe exactly but I don’t have a standing mixer and I have been kneading the dough by hand for about an hour to no avail. It is still super sticky and not very elastic at all. Quite frustrating. Any advice?
Tina C Millard says
Stop! People have made bread for centuries without stand mixers; it can be done. You do not need (pun intended) to knead the dough for an hour. It sounds to me, from what you say, as if you should be adding flour by the tablespoon until the dough is not so sticky. A little sticky is fine; so sticky you can’t get it off your hands is too wet. Fifteen minutes kneading should be adequate. If at all possible, find someone locally to show you once what the texture of unbaked bread dough should look and feel like. You won’t forget and will know in future what to aim for. You can do it.
Weekend Bakers says
Very good advice Tina, thank you for your comment!
Rob says
Thank you guys for another great recipe! Tried it for the first time today and they came out looking great, popped them straight from the cooling rack into the freezer and will be tasting them next thing in the morning. Would it be possible to use wholewheat flower instead of the all purpose flower, or would you have to make changes in measurements?
Keep up the great work!
Weekend Bakers says
Hi Rob, first of all with whole wheat flour the rolls will be much less fluffy. You will need more water as all the fibres in the whole wheat flour do absorb a lot of water. So add about 30g to 40g of water to be get up to about 68% of hydration. Happy baking!
Randy Jones says
Tried your recipe and they turned out beautifully. Very light on the inside and just as you described tender slightly crunchy crust. Served ’em up with soft boiled eggs and Langnese honey and Nutella. My wife was raised in Nurnberg area and she was “One Happy Girl”, have tried several recipes trying to get it right and this one was the best.
Thanks for posting!!!!!
Weekend Bakers says
Hi Randy,
Always nice to get such wonderful feedback. Sounds exactly right! We are guessing you are going to bake some more in the near future…
Happy Brötchen Baking!
Ed & Marieke
Gerdina Schwab says
I just tasted one of these wonderful rolls that I baked today. It is the kaiser roll recipe I have been looking for a very long time. They will become a staple in my house and will be made weekly. The only thing I will change is the size since we use them as sandwich rolls. So the recipe will make 6 instead of 12. BTW I am a Dutch woman living in the US and your tips for adding just a little more water makes perfect sense and worked very well.
I can’t wait to try the other artisan bread recipes you have here.
Weekend Bakers says
Hi Gerdina,
How wonderful to hear you made the kaiser rolls in America and you like them so much! Great idea to make 6 bigger ones, that will be no problem indeed, (maybe a few minutes more oven time).
If and when you make some of our other recipes, would love to hear about your results too.
Happy baking!
Marieke
Denny says
Weet iemand of je ze voor het afbakken ook kunt invriezen of heel even afbakken en dan de vriezer in.
Does anyone know if you can put them into the freezer before baking, perhaps baking them shortly?
Weekend Bakers says
Hoi Denny,
Ja dat kan. Je kunt het beste tot ongeveer 2/3 van de tijd afbakken, afkoelen en dan snel invriezen.
Afbakken kan dan in 7 tot 10 minuten (beetje afhankelijk van oven).
Succes ermee!
Miki says
Great project: fast, easy and satisfying. My only diversion from the recipe was that I added a tad butter. I read in a number of German recipes that they add butter, so I did too. Without the mold, I folded the dough to get a shape that remotely resembles the iconic form.
Weekend Bakers says
Thanks Miki,
Nothing wrong with adding a bit of butter I think!
Greetings and happy weekend baking,
Marieke
Zaidi says
your recipes is good
Sylvia Vervest says
Made these today with the French 55, they are delicious (I sneaked one before they cooled off) thanks for the recipe. Btw is the Zandhaas Tarwebloem ok to use to make them.
Regards
Sylv
Claartje in UK says
Another perfect recipe from WKB! Since I don’t have a stamp (yet) I ‘knotted’ the dough and the result is stunning!! Thanks again, especially on behalf of my OH who thinks this is my best homemade bread I ever baked ….. (Why bother doing multi day sourdough projects, using different heritage flours, etc.)
Weekend Bakers says
Hoi Claartje,
I know what you mean. My parents and my neighbors just returning from a German Holiday were more than pleased with the Kaiser rolls. It is just nice to mix it up ones in a while. ‘Verandering van spijs doet eten’!
The knotting gave a fine result too I must say!
Have a great (baking) weekend,
Marieke
PS: You can see Claartjes Kaiser rolls and lovely Baguette Boule on our ‘Your Loaves’ page: www.weekendbakery.com/your-loafs/
Pieter says
Net deze broodjes gemaakt. Zien er prachtig uit. Nog even tip voor als het deeg te plakkerig is om te stempelen. Duw de stempel voor elk broodje even in wat bloem. Werkt perfect.
Gr.,
Pieter
Weekend Bakers says
Dank je voor deze zeer handige toevoeging en geniet van de broodjes!
Marieke