

SF Sourdough: Time, Patience and Planning Skills!
His recipe intrigued me when I first read it; the use of the refrigerator, the promised taste and sourness, and the sheer amount of steps and time. These kind of recipes always trigger my interest. Plan ahead for this recipe because it is going to take 4 days from start to finish. Perfect to incorporate in a very long weekend of baking. This recipe is based on the San Francisco Sourdough recipe from Peter Reinhart’s latest book ‘Artisan breads every day’. But of course, as you may know by now, I have made my own version (which comes with exact measurements and a time table!).
The trick of this recipe is to fit it in with other activities like sleep and work. The times given in the time table at the bottom of the recipe keep this in mind. Of course you can be a bit flexible with the time table, especially with the 34 and 15 hour periods the dough spends in the fridge. But alterations can have an effect on taste and texture. For example if you extent the time in the fridge the bread will become more sour, but the gluten strength will weaken, so you probably get a flatter, denser bread. If you want to make more than one loaf, just double or triple or quadruple the ingredients. We usually make 6 breads in one batch. That’s the maximum our spiral mixer can handle.


For the starter in this recipe I use a sourdough culture which is made with 100% whole grain rye flour. A sourdough culture based on rye flour is easier to maintain, it does not transform into a slurry when you forget about it, it is easier to stir because it has almost no gluten and it smells very very nice, a bit like fruit. I maintain the starter as a ‘almost’ stiff starter. This way it stirs easy but does not add as much water to the dough as a poolish starter. It is also very forgiving in the amount you feed it. As I am a bit lazy in feeding, normally I only feed it once a week, after my weekend baking. I just give it a few table spoons of water and rye flour, stir, and ready!
| Ingredients for the Starter | ||||
|---|---|---|---|---|
| 126 | g | bread flour | ||
| 83 | g | water (room temperature) | ||
| 24 | g | sourdough culture | ||
| Ingredients for the SF Style Sourdough | ||||
|---|---|---|---|---|
| makes 1 loaf | ||||
| the starter from step 1 | ||||
| 264 | g | bread flour | ||
| 50 | g | spelt flour (pref. whole grain) | ||
| 204 | g | water (room temperature) | ||
| 9 | g | (sea) salt | ||
Making the Starter
In a bowl stir together 126 grams of bread flour with 83 grams of water at room temperature with 24 grams of the (rye) sourdough culture. Mix it well for about 1 minute until all the ingredients have been combined and you have a dough like ball. It is not a problem if your dough still looks a bit rough. Cover the bowl with clingfilm and let it preferment. After a minimum of 9 hours at room temperature it is ready for…the fridge. It will stay there for the next 34 hours! This means that on the morning of day 2 you put it in the fridge and in the late afternoon of day 3 you take it out again (see time table at bottom of recipe).


Making the Loaf
So, it is now probably somewhere in the afternoon on day 3 of the recipe (17.00 h if you stick to my time table). Take the starter out of the fridge and immediately start making the dough. Combine the starter with the 204 g water and stir for 1 minute to loosen the stiff starter. Add the flour and salt and knead (we use a spiral mixer) for 3 minutes. Cover the mixer bowl and leave to rest for 15 minutes.
Take the dough out of the mixer bowl and onto a floured work surface and do one stretch and fold (a full letter fold, left over right, right over left, bottom over top, top over bottom; see our bread movie to observe this technique if you are not familiar with it). Leave covered to rest for 15 minutes on your bench. Do a second stretch and fold. Return to the (greased) bowl, cover and leave to rest for 40 minutes at room temperature. Now put the dough in your fridge and leave it there for the next 15 hours (yes you can go to sleep, the yeast cells in your dough probably will do a bit of hibernating of their own in the fridge, the bacteria stay more active in this colder climate and tend to produce acetic acid, which, if all goes well, will give your bread the sour taste of the sourdough.
It is now day 4 of the SF sourdough making process: Baking Day! In my time table it’s now 10.00 in the morning.
Take the dough out of the fridge and let it acclimatise for 2 hours at room temperature.
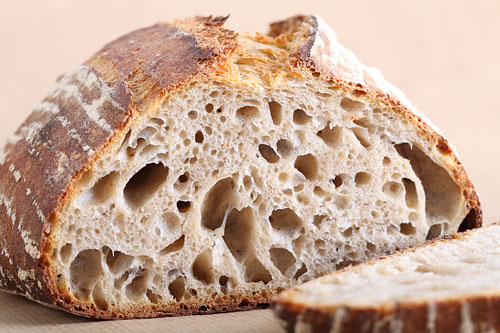
Now it’s time to shape. You can make a batard/oval loaf or a round one for around 750 grams of dough. I like to use the batard shape for this bread, it’s also good for a more even bake. I also use floured proving baskets/bannetons. Transfer the shaped dough in a proofing basket or baking pan, dust a bit with flour, cover and leave to proof for 2,5 – 3 hours (at room temperature which is about 21 ºC). When you think it has risen enough, use your finger to carefully make a very small dent in the dough. If the dent remains, the bread is ready to bake, if the indentation disappears, the dough needs a little bit more time.

Preheat your oven to 235 ºC / 455 ºF (at what stage you preheat your oven depends on how long it takes for your oven to heat through, some take 30 minutes, some, like ours, with stone floors take a lot longer, up to two hours. The preparation time from this point until the bread actually goes into the oven is 3 hours.
Now your loaf is ready for the oven. Slash the top of the loaf with a lame or bread scoring knife. To get a nice crust, try to create some steam in your oven by putting a small metal baking tray on your oven floor when you preheat the oven and pouring a half cup of hot water immediately after putting the bread in the oven. Release some steam by setting your oven door ajar (perhaps with the help of a wooden spoon or oven mitt) 5 minutes before the bread is ready. If you are going to create steam with a baking tray, you maybe also want to turn your oven temperature a bit higher, because you are going to lose some heat in the process.
After 45 minutes of baking your loaf should be ready. Transfer onto a rack and leave to cool. This loaf also keeps very well in the freezer. But please make sure to eat at least some of it while fresh!
Note: We use European flour which absorbs a few % less water than American type flour. People using this type of flour should add 3-8 ml water to the final dough. If you dare you actually make the dough a few percentages wetter to get bigger ‘holes’ in your crumb. I lowered the amount of water in this recipe to make the dough easier to handle.

SF Sourdough Time Table
day 1 23.00 h Make starter let ferment for 9 hours at room temperature
day 2 0.800 h Put the starter in the fridge for approx 34 hours!
day 3 17.00 h – 18.40 h Making the dough
- Starter + water 1 minute stirring
- Add flour + salt 3 minute kneading
- 15 minutes rest
- Stretch and fold
- 15 minutes rest
- Stretch and fold
- 40 minutes rest at room temperature
day 3 18.40 h Put dough in fridge for 15 hours
day 4 10.00 h Take dough from fridge and leave at room temperature for 2 hours
day 4 12.00 h Shape the loaf and leave to proof for about 2,5 – 3 hours
day 4 14.30 – 15.00 h Bake for 45 minutes at 235 ºC / 455 ºF


TONYK says
IF I WISH TO DOUBLE OR TRIPLE THE RECIPE MUST I DO THE SAME FOR STARTER OR WILL THE ORIGINAL AMOUNT WORK AS WELL?
THANKS,
TONYK
Weekend Bakers says
Hi Tony,
Yes, you must also double or triple your starter, more ingredients and more dough means also more work to be done to get the whole thing going!
TONYK says
I HAVE FOUND YOUR WEBSITE AND WILL TRY THE SF SOURDOUGH SOON — I LOVE YOUR TIME TABLE FOR MAKING THE BREAD — I AM A MATH ENGINEER AND REALLY APPRECIATE YOUR PLANNING — I DO THE SAME THING WITH A NEW RECIPE — LAY OUT A PLAN SO I KNOW WHEN THINGS NEED TO HAPPEN — I DO HAVE REINHART’S BOOK AND REALLY LIKE IT —
THANKS FOR THE INSTRUCTIONS,
TONYK
Weekend Bakers says
You’re welcome Tony,
Hope the recipe will give excellent results for you too. Let us know how it turns out?
Happy baking!
Marieke & Ed
cookandbaker says
Hey, great list of instructions and pictures. Makes the task less daunting. I love a good elastic sourdough bread and it’s on my list of to-do things to get it absolutely right for once. I’ll give it a go after the inspiration you’ve provided.
I was wondering whether there’s a way to follow your blog through my wordpress account. I have my own blog too and I usually get the option to ‘like’ and ‘follow’ other wordpress blogs I visit, but I haven’t been able to locate the options on your pages.
Thanks,
cookandbaker 😉
Weekend Bakers says
Hello there Cookandbaker,
Thank you very much. I am sorry to say we have a self hosted wordpress environment for our website so we cannot use the share and follow facilities and accounts of the wordpress.com environment (wordpress.com is a different company to the one who makes wordpress (wordpress.org). If you have an RSS reader you can use our RSS feed.
Hope this makes sense.
Wishing you fun and success with your baking and cooking project,
Ed and Marieke
Corrie de Jong says
Wil graag het San Fransisco zuurdesem brood gaan bakken. Is het mogelijk om de 50 gram speltmeel te vervangen door 50 gram volkorenmeel?
Vast dank voor jullie antwoord.
Corrie
Weekend Bakers says
Hallo Corrie,
Ja hoor, dat is geen enkel probleem, dat kun je rustig doen. Het zal ook niet veel uitmaken voor het eindresultaat, behalve een licht verschil in smaak.
Veel plezier met het recept,
Marieke
Apa.Faina.Sare. says
Good news. The bread is excellent. Good oven spring, nice holes in the crumb, crackling crust, wonderful smell and a rewarding taste… absolutely fabulous. I’ll post about it on my romanian blog, with link here, of course, and then you can see the pictures if you like.
Thank you so much for inspiration, quality in baking and assistance. All best wishes, Codruta
Weekend Bakers says
Wonderful to hear Codruta! Make sure to let us know as soon as your posting is ready, very curious to see the lovely loafs!
Happy baking,
Marieke
Apa.Faina.Sare. says
thank you, again. I’ll keep you posted on how my bread (in fact breads, cause I doubled the formula) turns out. If it is ok, I’ll take pictures and I’ll post about it. This formula really makes an amazing bread, I hope I won’t fail this second time.
Good wishes, Codruta
Weekend Bakers says
We would suggest using the first option, retard 18 hours. But we have to add that we do not have experience with your second option of retarding in bannetons.
Good luck with it,
Ed & Marieke
PS: Your breads all look very impressive!
Apa.Faina.Sare. says
dear Ed & Marieke. Thank you for your quick reply. I’m using it imediatelly… but I must figure a way to delay everything and bake tomorrow morning. What do you suggest: to retard the dough 18 hours after mixing (instead of 15 hours) from now till tomorrow morning, or to retard the dough 8 hours (from now till evening), then shape it and retard it again (in bannetons) for 8 hours?
All best wishes,
codruta
Apa.Faina.Sare. says
Hi. I’m Codruta. I wrote you a comment above a while back. Since then, I started my own adventure in blogging 🙂 I made this recipe two weeks ago, with wonderful results. I used mixed SD cultures (white and rye) for the starter and the flavor of the bread was incredible and unique. The starter stood in the fridge for 34 hours without collapsing (maybe just 1cm, at the end of time)
I’m doing the bread again, as we speak, this time using only rye SD culture for the starter. The rye culture is very active, and after 24 hours in the fridge it already collapsed (~ 5cm)… I’m wondering, should I wait another 10 hours, or should I deviate from your time schedule and use it right away? When you are making the bread, the starter stays at its peak the whole time, or it colapses after a while?
Hope you’ll be able to reply in time.
Thanx guys, you are the very best!
codruta
Weekend Bakers says
Hello Codruta,
You are doing great! We suggest you do not wait and use it right away. Hope we are still in time for you to get a great result again!
Happy baking and a wonderful day to you,
Ed and Marieke
Jane says
Hi Marieke & Ed,
Oh my! I made this bread exactly to you directions with your starter – thank you soooo much for the timetable both, they were brilliant. We’re Australians living in Japan so you are truly global!! Thank you so much for sharing the recipe, time and videos – all of which helped me. The bread was delish.. mmmwah!!
Regards, Jane
Weekend Bakers says
Hello Jane,
I woke up this morning and the first thing I read was your wonderful comment. I could not have asked for a better start of the day 🙂 Very happy you like our recipes and the fact that they work so well for you!
Lots of loaf,
Marieke
Weekend Bakers says
Always happy to help if and when possible 🙂
We use an organic wheat flour with a protein content of about 13% .
This table shows the equivalents for different countries, but in Holland we do not have these type names.
en.wikipedia.org/wiki/…pe_numbers
The flour we use would come close either to your 812 or 1600 type.
The flour you use now, the 550, is lower in protein and could very easily be a big part of the problem. So this is definitely the first thing I would change when trying the recipe again (always change one thing at a time, otherwise it will be harder to pinpoint the problem).
Good luck!
Marieke
colin sneller says
Hi Marieke
I baked this bread today with my baking stone in at 235° and after 20 Minutes it was already very brown. So I put some alu foil over it and turned the oven down to 190°. After 35 minutes I took it out and it was obviously ready – in fact a bit too dark. Do you bake your loaves for the full 45 minutes at 235°? Maybe my oven is hotter than it says on the regulator and I’ll perhaps have to bake at a lower temperature. Apart from that the bread was great and tasted fantastic like always.
Greetings from Colin
Weekend Bakers says
Hi Colin,
We have a Rofco bread baking oven with chamotte stones, so it is a bit different from the regular oven most people use, but we bake on ‘falling temperature’. You can try this too, especially when your heating system is too close to your bread (e.g. if your oven is quite small). Like you said your loaf could burn and you have to adjust your temperature, or make sure that you turn your oven temp down after about 10 minutes so the spirals stop heating. The closer the top of your oven is to your bread the more heat will get transferred fast and this means quicker browning and potential burning. In this case I would turn the oven to about 200°C the moment your bread has gotten a nice golden brown color, depending on your oven this will be after about 10 minutes, maybe a few minutes more. You will quickly get the hang of it as you try it a few times.
Hope it works and hope the lame will arrive soon now!
Marieke
colin sneller says
Hi Marieke
thanks for the tip – I tried it this second time and the crust was much better. But I do have another problem with this loaf which is that both times it didn’t rise anything like as much as yours has in the photo. Yours looks so high and round whereas mine looks more like a flying saucer ( it’s the same too when I bake the sourdough soft rolls – they stay very flat in comparison to yours). Have you any ideas? Could it be my culture? When I feed it, it always makes lots of bubbles and smells sweet and fruity but I must say it has never really doubled – at the best three quarters. Also the second time I made the san francisco loaf I mixed the dough with my stand mixer that time and the dough came out extremely soft – when I tipped them out of the proofing baskets onto the paddle they spread so incredibly it was hard to keep them on and I had to really push them off onto the stone.
Weekend Bakers says
Hi Colin,
We think there are a few things not going as they should from your description, resulting in the ‘sci fi’ version. Firstly your starter may not be active enough to get enough rise in your dough. Make sure you use organic whole rye with enough life yeast to get a really active starter. Check out our posting on sourdough starter with recent tips and comments here www.weekendbakery.com/posts…asy-steps/ .
Another thing could be the type/brand of flour you are using has a low protein content and is not developing (strong) enough gluten to get a strong elastic dough. You could try switching flour. Another but less likely problem can be over-mixing or over-proofing, either one or a combination of both will break down the gluten in the dough. With over proofing you usually see a sort of well risen loaf that will however collapse at the slightest touch. This seems not to be the case with your loaf.
So in short, a combination of the starter and flour used with also possible over mixing.
Hope this helps and just keep at it. At one point you get the recipe that works perfectly for you and you will be a happy baker for life. A lot of the recipes we start out with need up to ten tries to get it perfect for our ingredients, equipment and hands.
Marieke
PS:
Also of use maybe: www.weekendbakery.com/posts…ion-dough/
www.weekendbakery.com/posts…mperature/
colin sneller says
Hi Marieke
thanks a lot for your reply. As far as the starter goes, I’ve always used organic whole rye so that doesn’t seem to be the problem. The white flour I use is called type 550 here in Germany. Which sort do you use? Should I try a higher extraction – maybe type 1050 ? I’ve always kept to the mixing times you’ve given and was wondering myself if the dough was undermixed so that the gluten was not activated enough. Anyway I’ll keep trying and I love the way your are always so ready to be involved-
Colin
Salomé says
Hi! I’ve included your amazing bread in my post Mis Favoritas – Especial Pan, you can see it here:
blocderecetas.blogspot.com/2011/…l-pan.html
I hope you to like it!
Weekend Bakers says
Thank you Salomé,
I see we are in good company!
Marieke
Irene says
Hello Ed and Marieke,
I was looking through your recipes and I noticed that several times you use words “whole wheat rye flour” – i am a little confused by that (maybe a language problem, english is not my native) but how can wheat be rye? I probably am making a stupid mistake but I just got so curious: I understand that wheat and rye are both types of the grain. maybe you mean whole grain rye flour?
Could you explain this please?
Weekend Bakers says
Hi Irene,
You are right. This is our mistake, we just mean whole rye or whole grain rye, not wheat. So no language problem for you but something we did wrong and will correct very soon.
Thank you for pointing it out!
Marieke
LucMartin says
I have a starter that lives in the fridge and has almost the same properties as the starter made on day one of this recipe. I’ve just added it (cold from the fridge) to the rest of the ingredients listed for day three in the recipe, and i will pick it up tomorrow and see how it comes out.
Luc Martin says
This made for a fascinating read. I had a slight obsession with this bread for a while and spent some very frustrating weekends trying to get it right. I was following the method from Baking with Passion and over time adapted it to what worked best for me, in the end i made the process longer but certainly not as long as yours!
What flour do you use for this (and in general)? In the south of Holland supermarkets don’t sell strong bread flour other than mixes for bread machines and these are loaded with various flour improvers and gluten powder. I’ve recently started buying from a local windmill; they sell 14 different flours but they don’t have any strong flours, weirdly they do sell big sacks of gluten powder, but i really don’t want to add this to the bread…
Greetings
Luc
Weekend Bakers says
Hoi Luc,
Welcome to our little website! The SFS is a favorite but we do not make it every week. I hope you will give our version a try, we have gotten favorable feedback from other bakers about their results.
We also go to a windmill near Haarlem called ‘De Zandhaas’ in Santpoort. We buy organic wheat, rye and spelt there. The organic ‘tarwebloem’ is our most used. It is a wonderful flour, yellowish in color, full of plant flavor and sort of buttery silky smooth. As I understand these organic flours are usually strong by nature. Nobody, not us and not the miller, knows or is busy with the gluten content of the flour here. We do get these questions about it, people wanting to know percentages, but we have to disappoint. All we know is this flour makes for great tasting bread.
And I do not have to tell you that we agree to the staying away from the mixes and ‘improvers’ and supermarket flours.
So suggestion: good quality, fresh organic tarwebloem, volkoren tarwemeel (whole wheat) rogge (rye) and spelt.
May I ask do you use a domestic oven or also a special bread oven? Your bread looks good!
Happy baking!
Marieke
LucMartin says
Sound flour advice; i’ve suspected for a while that the millers in Holland don’t look at gluten in the flour. I don’t know how it works in the north, but most bakeries in N.Brabant buy their bread in from a regional bakery, so its difficult to even find someone who bakes to ask them where they get their flour or if they use a flour improver. This is why i was so happy/surprised to find someone else baking at home in NL and actually doing so on a fairly large scale!
I have a domestic oven which according to my temp probe can reach 233 degrees. I recently bought an enormous granite stone which now sits in the oven, but i’m still working out the best way to use it so no real great improvement yet. I alternate between mixing dough by hand and in a KitchenAid, depending on how much time i have.
Weekend Bakers says
Hee Luc,
I am afraid that there are very few ‘warm bakers’ left in Holland. Most bakeries are just stores that sell bread that is delivered from a bigger baking plant. I was afraid that the craft of my grandfather was dying out, but I am hopeful that people are rediscovering the true value of real bread. We get such wonderful reactions to our bread baking, it is a reward in itself.
We both looked at your website and we seem to have a lot of interest in common (Macaron! for example, brewing stuff). Not afraid to try something yourself and getting to the bottom of a subject!
If you are ever in the neighborhood give us a shout, you are welcome to visit our little bakery.
Have a nice weekend,
Marieke
LucMartin says
That sounds great; i’d love to see your bakery! i’ll need to check when i have time and i’ll contact you via Twitter.
LucMartin says
By the way the butteryness you describe with your white flour i have with my local spelt flour; it’s very dense and actually almost oily.
Gill says
Hi,
I baked 2 loaves at the weekend. To fit in with my schedule the starter had a few hours longer in the fridge at Day 2 and the dough also had longer at Day 3, so I could time it to go into the fridge at about 8pm for an overnight prove. I took it out at 7am on Day 5 and it went in oven at 8.40am. I decided to try the dutch oven method which I have not done before, so one loaf went in a Le Creuset (knob removed and hole stuffed with tin foil) and the other was straight onto a stone, with oven misted. I could not believe the difference the pot makes. I’m probably going to do all my loaves in this way now to get achieve the best possible crust. The other loaf is fine, but nowhere near as impressive. thanks for posting all your recipes. I have been recommending your site to everyone I know that bakes. Not sure if this will work but here is a public link to couple of photos I uploaded to facebook.
www.facebook.com/media…8fbfc27d83
KR
G
Weekend Bakers says
Hi Gill,
The bread looks absolutely super! Before we had our Rofco oven we baked in a Dutch oven now and then and got some great results, although yours looks even better. We just had to remind ourselves to be very careful with the hot pan, going in and out of the oven I remember. Pan hot, hot we used to should to each other.
Thank you so much for recommending our site, it is much appreciated and thank you for sharing your fine results!
Marieke
PS: Busy with new recipe posting on whole wheat levain…coming soon
Gill says
hi,
Have you tried an overnight retarded final prove in the fridge with this recipe at all? I’d like to try and do the bake first thing in the morning, so I can take it fresh to a friend’s house. I should have time to bring it up to room temp. before baking. Not to worry if not, I might just give it a go and see how it turns out.
thanks.
Weekend Bakers says
Hi Gill,
We have not tried it, but I can see it working. Curious to know how it works out, taste and texture also.
Will you let us know?
Marieke
Gill says
Hi,
Yep will do. I’m planning to bake this weekend. I baked your mini sourdough rolls a few weeks ago, which were fantastic, so really looking forward to getting my teeth into this!
G
Fran says
Dear Weekend Bakers:
I love love love this bread. Super for sandwiches, outstanding for toast and it stays so fresh for days. Terrific texture, wonderful taste. Not to mention how proud of myself I am for making bread with my own wild yeast! That said, I am not getting any sourdough flavour – is that because my starter is still young?
BTW I have not remembered to buy any spelt flour yet. I remember only when I get to that part of the recipe and so I’ve been substituting whole wheat instead. Does this make any difference to the chemistry or is it simply taste?
Regards,
Fran.
Weekend Bakers says
Great to hear Fran! Could be what you say about the starter, but with the SF the dough gets a lot of fridge time and this is particularly good to develop the sour taste, so I do not know exactly what’s happening. You should wait at least 24 hours after refreshing before using the culture to give it the chance to become fully active again.
We too have the experience that we get different levels of sourness, using the same starter, but never overly sour. Luckily we are no fans of very sour bread, we like it subtle. But the quality and taste of the bread is always great.
Using the spelt or whole wheat is indeed a matter of taste and not so much of chemistry, so as far as we know it will not have much impact on the sourness.
Good luck and keep on baking and using the starter 🙂
Brandon says
Sorry this is really late to the game. Sourdough cultures not only produce acetic acid, but also lactic acid. These two acids give different tastes to a bread. Basically acetic acid gives more of the sour vinegary taste. This is achieved by lower a hydration starter culture and fermentation times (long) and temps (colder). Lactic acid produces more of a “buttery” flavor and is much more subtle. A starter that has high hydration levels and warmer fermentation temperatures will achieve this. Obviously the warmer temp means shorter time as well.
I love this recipe! This and your pain rustique are my staples!
Weekend Bakers says
Thank you for your addition Brandon! And thank you for liking our pain rustique.
Happy baking!
More on this subject also on our sourdough tips page: www.weekendbakery.com/posts…ough-tips/
codruta says
hi! the hydration is 65.2? I’m a bit confused, cause i calculated 66,1 (299g water, 452g flour). it is not a big difference, but if you’re correct, then i’m afraid i’ve got it all wrong… 🙁
thank you. codruta
Weekend Bakers says
Hello Codruta,
You are right because Ed just recalculated it and the difference is he didn’t count the starter culture. But he says he always does this because of the very small amount of culture we use. You could call it a bit lazy…
Thank you for noticing, your calculation is the 100% correct one.
Marieke
Mike says
Hi there,
I know that i am almost a year late to to post something here, but to be honest i couldn’t resist the temptation of writing here, b’cus i tried to figure out out o earth Codruta calculated determined the rate of hydration of the amount of flour versus the amount of water?!!! i played with it in many different ways, still i found nothing but what you guys mentioned in your initial recipe. Flour (dough+starter)= 440 gr.
Water (dough+starter)= 287 gr. So the rate of hydration flour vs. water is 287/440= %65.2 exactly as you mentioned in your recipe. So how did Codruta get those numbers from? And i don’t know if you guys going with this based on an error that you made and i can’t see it, or you just being kind?
However, and in either case, you are doing a great job…so keep it up 😀
Mike.
Weekend Bakers says
Hello Mike,
Both our calculations are correct, but Codruta incorporated the 24 g of the sourdough culture, so this gives us an additional 12 grams of water and 12 g of flour extra. So that is 440 flour +12= 452 g flour and 287 water+12=299 g water . 299/4.52 = 66,15% hydration. Codruta is right to also include the flour and water from the culture in the calculation to get it exactly right. But like we said we were a bit ‘lazy’ and left the 24 g of culture out of our calculation. Usually we use a tiny amount of starter culture (10 g per bread) and we also use a rather stiff rye culture, with even less water so we do not incorporate this in our calculations. With this bread with 24 g of culture it does make a difference of almost 1% so it would be correct to take it into account.
Apart from that, the recipe is still producing a fine loaf, worth the effort we think.
Thanks for your comment and happy baking!
Ed and Marieke
Mike says
Thanks Ed for your answer, though i’m late for these discussions. Well i guess you are right, Codruta got it right, where i failed. Anyway, Ed since last night there has been something in my mind concerning this bread which i love. Since i have successfully managed to make a really active sourdough culture from both Wheat flour and another one from Whole Wheat Flour (Rye i don’t have :(), my question is:
Can i use my sourdough culture instead of making your sourdough starter? I.E: adding 233 gr. of my sourdough? and if yes what do you think the bread will look like in terms of texture, crumb, crust?
Thanks Ed,
Mike
Mike says
Oh Ed, it’s me again.
I have a suggestion:
why don’t you allow people here interested in your recipes such as me to post pictures of their baking endeavors and discuss it here to see what is right and what is wrong, so everybody would benefit of that and avoid mishaps?
Weekend Bakers says
If you use a recently refreshed starter with the same hydration then of course it is not a problem and I think the result would not be that different in terms of the end result.
Ed
Weekend Bakers says
PS: At the moment we are looking into the possibility to incorporate pictures or other ways to share baking information between us bakers.
Mehded says
Gary, if you ever get to the point of deciding to do the market-bake please let me know. I am just learning about production at the moment and it would be great to corespond with you. Thanks a lot!
Mehded
Gary Cook says
Hi Mehded
Sounds interesting. Are you in the UK?
Best
Gary
Gary Cook says
Thanks Ed! I’m starting to think again, knowing that even experts such as yourselves think it’s a very large undertaking. Perhaps I’ll sit the first market out or make something a bit easier.
Gary Cook says
Hi Weekend Bakery
Umm, just wondering something.
I’ve been asked to make a BIG batch of these loaves for a market. If I use my rye starter to make the preferment and presumably scaling up as much as I can, as quick as I can, how can I get to a stage where I can make 100 loaves?! Do I need to scale everything up by x100 through the whole recipe, or can my starter ‘activate’ larger quantities of dough?
Thanks
Gary
Weekend Bakers says
yes, it is basically scaling everything up so also the amount of rye starter. When you do not do this you risk that your timings will be off because everything will go slower with less active sourdough starter. Honestly I never made this amount of bread, the most I have baked on one day is 18 loaves in 3 batches of 6.
At least a day (perhaps even 2) in front you need to seed a large amount of rye flour with your current rye starter. What happens is at first your current starter, rye flour and water make what they call a preferment. But when your preferment gets ‘over the top’ by letting it rest longer it turns again into a full active starter and with this larger amount of starter you can make a much bigger preferment and the circle is closed. You can speed up the process of making a bigger starter by using luke warm water 30-32 degrees Celsius because the higher temperature speeds up the multiplication of the yeast and bacteria in your new to make starter. You probably need very large tubs so all the dough can bulk ferment in two or three large chunks.
Much success,
Edwin
Gary Cook says
It did! Thanks Ed.
twitpic.com/45pa3j
Gary Cook says
Hey Ed.
So pleased with this. Your recipe is fantastic. twitpic.com/42a46v
Lovely nutty taste, moist inside and great crust, (I tried it in the cast-iron combo cooker, as
I would have done the Tartine loaf.) A bit dark, as I couldn’t resist opening the cooker a bit
early, will leave it inside to get more steam next time.
Cheers!
Gary
Weekend Bakers says
Hey Gary,
How great is that! I am sure it will only get better as you make it more often.
Happy baking!
Gary Cook says
Hi Ed,
Yes, I spent the best part of a weekend making it, with poor results. My dough was (very) wet when I put it into a box within
a box and kept the heat around the suggested 78F-82F. After the stretches and folds in the box, in the final hour the whole thing went crazy bubbly and nearly erupted out of the box. Turning it out for the bench rest it was still very, very wet and although the bread tasted nice and had a good crust, it hardy rose at all.
In retrospect, I think I started out too wet, I don’t think I managed to really strengthen the dough with the folds and maybe all the bubbling in the final hour of the bulk rise showed that I over-proofed it?? But I only had it in the box for three hours.
Maybe you can suggest how to get a better result if I ever do the Tartine method again?
Will let you know I get on with your recipe. (My rye starter instantly looked very grey when mixed with water, not white-ish??)
Gary
Weekend Bakers says
The rye starter is very gray at start, it is a bit hard to capture on photo what it looks like. When the starter gets ‘older’, more active and sour it turns to a more beige color.
Did you notice the ‘fault’ in the tartine recipe where you make twice the amount of preferment poolish than you use in the final dough? So if you like me throw in the lot of the poolish instead half of it your dough will turn out much wetter!
Ed
Gary Cook says
Ok Ed, I’m 15 hrs into the ‘starter in the fridge’ stage. Will let you know how it goes. Starter in bowl has
got a lot larger and has a nice, creamy, bubbly appearance? Like an idiot I started the procedure 2pm yesterday, so 34hrs from fridge internment should see me baking loaf at some crazy hour, as usual!
Gary Cook says
Hi Marieke
I’m definitely going to try this, it sounds a bit easier and a bit more likely to be successful, than my attempts at the Tartine method.
Gary
Weekend Bakers says
We baked Tartine breads three times but although the bread tasted nice it takes just too long to make it as our staple bread. Doing stretch and folds every 30 minutes for 3 to 4 hours is just too time and labor intensive and it seems too temperature sensitive during bulk fermentation with the very low active preferment/starter.
Although the San Francisco style bread takes a long time, it is less labor active and still yields a nice bread. We love to hear about your result!
Enjoy baking,
Ed
Weekend Bakers says
Thanks Mike!
If you have any more remarks or questions, do not hesitate to let us know. I hope the bread will turn out great!
Mike D. says
OK, I am going to make this this weekend. The pinch of yeast reminded me of your pain rustique, so I did not want to skip it if it was helpful. I have a whole wheat starter I captured and have been developing since last September and I leave it out on my bench as I make a loaf of no knead sourdough every night baked in a cast iron pot with lid, but I started a rye starter to play with and see if I like it better. I sure am enjoying all your hard work and help on this site!
Weekend Bakers says
Hi Mike,
I am afraid we made a mistake! We do not use yeast in this recipe, that is why it is not in the instructions, but it was somehow added in the ingredients list. I have taken it out already so the recipe is now as it should be. There is a version of SF sourdough that uses a small amount of yeast, but we have never made that version.
Thanks for pointing it out and we will check and double check to make sure the recipes are correct.
Marieke
Mike D. says
In the recipe above you have 2,3 grams of instant yeast listed as an ingredient for the dough but never say when to add it in the step by step instructions.
gbuckley says
I lovethe picture and want my bread to look like that and taste like sourdough. I notice you talk about the sourdough culture is this something you make or purchase?
Marieke says
Hi there,
Added some more pics to the recipe, hope you like it! We make the starter ourselves, have never yet bought anything. You can read how you can make a (Rye( sourdough starter here: www.weekendbakery.com/posts…asy-steps/
Let us know how you get on!
Marieke
gbuckley says
Thanks