

SF Sourdough: Time, Patience and Planning Skills!
His recipe intrigued me when I first read it; the use of the refrigerator, the promised taste and sourness, and the sheer amount of steps and time. These kind of recipes always trigger my interest. Plan ahead for this recipe because it is going to take 4 days from start to finish. Perfect to incorporate in a very long weekend of baking. This recipe is based on the San Francisco Sourdough recipe from Peter Reinhart’s latest book ‘Artisan breads every day’. But of course, as you may know by now, I have made my own version (which comes with exact measurements and a time table!).
The trick of this recipe is to fit it in with other activities like sleep and work. The times given in the time table at the bottom of the recipe keep this in mind. Of course you can be a bit flexible with the time table, especially with the 34 and 15 hour periods the dough spends in the fridge. But alterations can have an effect on taste and texture. For example if you extent the time in the fridge the bread will become more sour, but the gluten strength will weaken, so you probably get a flatter, denser bread. If you want to make more than one loaf, just double or triple or quadruple the ingredients. We usually make 6 breads in one batch. That’s the maximum our spiral mixer can handle.


For the starter in this recipe I use a sourdough culture which is made with 100% whole grain rye flour. A sourdough culture based on rye flour is easier to maintain, it does not transform into a slurry when you forget about it, it is easier to stir because it has almost no gluten and it smells very very nice, a bit like fruit. I maintain the starter as a ‘almost’ stiff starter. This way it stirs easy but does not add as much water to the dough as a poolish starter. It is also very forgiving in the amount you feed it. As I am a bit lazy in feeding, normally I only feed it once a week, after my weekend baking. I just give it a few table spoons of water and rye flour, stir, and ready!
| Ingredients for the Starter | ||||
|---|---|---|---|---|
| 126 | g | bread flour | ||
| 83 | g | water (room temperature) | ||
| 24 | g | sourdough culture | ||
| Ingredients for the SF Style Sourdough | ||||
|---|---|---|---|---|
| makes 1 loaf | ||||
| the starter from step 1 | ||||
| 264 | g | bread flour | ||
| 50 | g | spelt flour (pref. whole grain) | ||
| 204 | g | water (room temperature) | ||
| 9 | g | (sea) salt | ||
Making the Starter
In a bowl stir together 126 grams of bread flour with 83 grams of water at room temperature with 24 grams of the (rye) sourdough culture. Mix it well for about 1 minute until all the ingredients have been combined and you have a dough like ball. It is not a problem if your dough still looks a bit rough. Cover the bowl with clingfilm and let it preferment. After a minimum of 9 hours at room temperature it is ready for…the fridge. It will stay there for the next 34 hours! This means that on the morning of day 2 you put it in the fridge and in the late afternoon of day 3 you take it out again (see time table at bottom of recipe).


Making the Loaf
So, it is now probably somewhere in the afternoon on day 3 of the recipe (17.00 h if you stick to my time table). Take the starter out of the fridge and immediately start making the dough. Combine the starter with the 204 g water and stir for 1 minute to loosen the stiff starter. Add the flour and salt and knead (we use a spiral mixer) for 3 minutes. Cover the mixer bowl and leave to rest for 15 minutes.
Take the dough out of the mixer bowl and onto a floured work surface and do one stretch and fold (a full letter fold, left over right, right over left, bottom over top, top over bottom; see our bread movie to observe this technique if you are not familiar with it). Leave covered to rest for 15 minutes on your bench. Do a second stretch and fold. Return to the (greased) bowl, cover and leave to rest for 40 minutes at room temperature. Now put the dough in your fridge and leave it there for the next 15 hours (yes you can go to sleep, the yeast cells in your dough probably will do a bit of hibernating of their own in the fridge, the bacteria stay more active in this colder climate and tend to produce acetic acid, which, if all goes well, will give your bread the sour taste of the sourdough.
It is now day 4 of the SF sourdough making process: Baking Day! In my time table it’s now 10.00 in the morning.
Take the dough out of the fridge and let it acclimatise for 2 hours at room temperature.
Now it’s time to shape. You can make a batard/oval loaf or a round one for around 750 grams of dough. I like to use the batard shape for this bread, it’s also good for a more even bake. I also use floured proving baskets/bannetons. Transfer the shaped dough in a proofing basket or baking pan, dust a bit with flour, cover and leave to proof for 2,5 – 3 hours (at room temperature which is about 21 ºC). When you think it has risen enough, use your finger to carefully make a very small dent in the dough. If the dent remains, the bread is ready to bake, if the indentation disappears, the dough needs a little bit more time.

Preheat your oven to 235 ºC / 455 ºF (at what stage you preheat your oven depends on how long it takes for your oven to heat through, some take 30 minutes, some, like ours, with stone floors take a lot longer, up to two hours. The preparation time from this point until the bread actually goes into the oven is 3 hours.
Now your loaf is ready for the oven. Slash the top of the loaf with a lame or bread scoring knife. To get a nice crust, try to create some steam in your oven by putting a small metal baking tray on your oven floor when you preheat the oven and pouring a half cup of hot water immediately after putting the bread in the oven. Release some steam by setting your oven door ajar (perhaps with the help of a wooden spoon or oven mitt) 5 minutes before the bread is ready. If you are going to create steam with a baking tray, you maybe also want to turn your oven temperature a bit higher, because you are going to lose some heat in the process.
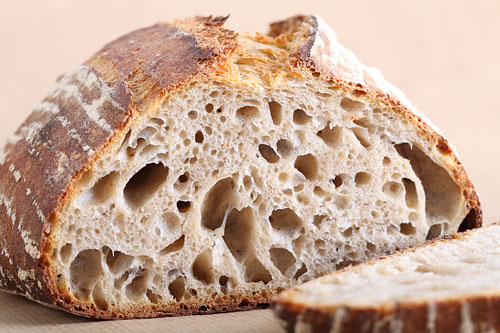
After 45 minutes of baking your loaf should be ready. Transfer onto a rack and leave to cool. This loaf also keeps very well in the freezer. But please make sure to eat at least some of it while fresh!
Note: We use European flour which absorbs a few % less water than American type flour. People using this type of flour should add 3-8 ml water to the final dough. If you dare you actually make the dough a few percentages wetter to get bigger ‘holes’ in your crumb. I lowered the amount of water in this recipe to make the dough easier to handle.

SF Sourdough Time Table
day 1 23.00 h Make starter let ferment for 9 hours at room temperature
day 2 0.800 h Put the starter in the fridge for approx 34 hours!
day 3 17.00 h – 18.40 h Making the dough
- Starter + water 1 minute stirring
- Add flour + salt 3 minute kneading
- 15 minutes rest
- Stretch and fold
- 15 minutes rest
- Stretch and fold
- 40 minutes rest at room temperature
day 3 18.40 h Put dough in fridge for 15 hours
day 4 10.00 h Take dough from fridge and leave at room temperature for 2 hours
day 4 12.00 h Shape the loaf and leave to proof for about 2,5 – 3 hours
day 4 14.30 – 15.00 h Bake for 45 minutes at 235 ºC / 455 ºF


Michael Dodson says
I just tried this and am delighted with the result.
I followed the timings slavishly .
I wish I could post a photo.
Weekend Bakers says
Thank you Michael, excellent to read the recipe turned out so well.
Posting photo’s with comments is unfortunately not possible with this application, but we have created a special section where you can showcase your results if you want:
www.weekendbakery.com/send-…your-loaf/
Enjoy your SF baking!
Michael Dodsob says
Looks good, I’ll try this
Get back to you when iv done so
Weekend Bakers says
Thank you Michael,
Always good to get feedback.
Enjoy your SF baking!
David Huntington says
My only wish is that it comes out with a crunchy crust, Years ago, I remember reading about a government study to find out why San Francisco french bread was so crunchy. Don’t remember the reason.
Weekend Bakers says
Hello David,
Very interesting to read your comment. We have not heard about this study. We can only assume the crustiness comes from the lengthy and cold proofing process. But things like using the right type of flour and using a good quantity of steam also play their part in the end result.
Happy SF baking!
MaryJo says
Hello any chance of using my bread flour starter for this recipe? Or I could cheat and add a little rye to my starter for a couple of days? Just wondering. Thank you! My bread flour starter is about two months old and triples in about 4-5 hours.
Weekend Bakers says
Yes, you can use your own starter, that is no problem at all. We use a small amount of starter for this recipe, so the rye % is also very small. We use rye because a sourdough culture based on rye flour is easier to maintain, it does not transform into a slurry when you forget about it, it is easier to stir because it has almost no gluten and it smells very very nice, a bit like fruit. But your bread flour culture will do the job just as well we think.
Lucy Lucas says
If you have already made your starter well before you start this recipe & dont keep it in the fridge, do you still to put it in fridge for this recipe to work?
Dr David Dixon says
Epicurious have Reinharts original full recipes and procedures for mother starter and bake fully accredited
Andrea Segat MacMillian says
Thank you for your detailed information! I can’t wait to try the SF Sourdough recipe.
Kika says
I made this over the last few days. Shaping and final rise in an oval banetton, it had risen beautifully and came out easily. But as soon as it hit the pizza stone (preheated in the oven) it just spread out flat. What a shame. I am sure it’s going to taste very nice and a joy to eat, but just too flat.
What is the reason for this? Any help appreciated. Thanks a lot
Andy banks says
Just to say, this worked fantastically for me.
Thanks for sharing!
Anna says
I am currently making my 7th loaf since finding this recipe. I share it with family and friends. Some are intimidated, but I urge them on and they will see the tutorial is so perfect it is only a matter of buying the ingredients and having the patience . I did replace a good quality white with wheat for the pool portion and found it to be a nice change that I really enjoyed. This way I can now enjoy two forms of the same recipe with only a slight change and the texture is not too dense and the sourness comes through… The only thing I do is keep it out longer than 9 hours- I do 12 with the wheat and refrigerate for one extra day before making the loaf recipe, so at least 50+ hours instead of 34 hours…then continue with the instructions as usual… I tried following the same timeline with my first attempt and also noticed the wheat required an additional gram of salt for some reason…. I am trying the extended timeline with your original recipe to see if it adds any flavor or improves the outcome any more…curiosity more than anything. Your recipe is exquisite on it’s own! Many thanks and prayers for your family… I am a bit of a health seeker and do not know if this applies to your family, but if they are having ANY health issues I highly recommend this site to learn about MMS on Telegram…MMS Drinking Buddies. They will teach you how to cure most issues in the most cost saving and effective way… You have to see the site and listen to their podcasts to believe what it is capable of…Life saving for 95% of ALL illnesses… many that doctors send home to die get cured and you can learn and do it yourself for pennies…MMS stands for Mineral Miracle Solution and it is truly just that… Hope you look into it either way to have in your health arsenal… I can testify it is helping serious conditions in my loved ones. Take care and stay hope this gets read and helps someone.
Kai Ludwig says
The FDA warns you not to drink sodium chlorite products such as Miracle Mineral Solution. These products can make you sick.
Anna says
So far your exact recipe wins, but I am now replacing white flour with wheat for the pool-before making the loaf recipe…I have some wheat flour to use up so a little at a time, but your recipe is the clear winner. I will let you know how the rye starter/wheat pool, spelt with white flour turns out…baking day is tomorrow, but sometimes I let it sit an extra day in the fridge for a full flavor. The sour flavor is getting only better the older my starter is getting. Thanks again
Anna says
I am attempting this recipe after trying one using whole wheat… It was okay with the wheat, but very dense… I will let you know how it turns out… one more day to go… Thank you for an excellent platform to learn how to make bread…I used machines with instant kits years ago, but it has been a while since I attempted to make it from scratch and this is by far the most time consuming recipe…waiting that is… not time consuming in the working sense…This site is very well thought out and makes learning a pleasure… like having a one on one tutor…The anticipation is terrible;-D
Kai Ludwig Kirkeby says
Proably the best sourdough bread ever.
Definitely my new best reciepy I love it.
Nicole says
Made this for the first time and it’s the best bread I’ve made yet, thank you for the detailed recipe. The texture and flavor is wonderful, although still not “San Francisco” sourdough in that I’m not getting that wonderfully obvious tang in flavor or scent. I was hoping for a Boudin sourdough flavor. What could I be doing wrong?
Anna says
My starter, made from rye flour, took a while before the flavor developed into a tangy, sour one…about a month or more.
Keith McNenly says
Just tasted my first try at San Francisco style sourdough bread. Four day resting, folding counter and fridge fermenting process but well worth it. A nice caramelized crispy crust, great chewy texture and perfect sourdough flavour and distribution of small and large yeasty bubbles. I guess it’s all in the time and process of slow fermentation to get the flavour, but the exquisite moist chewy texture was totally unexpected and a very pleasant surprise. I tasted that flavour and texture at a fine dining restaurant where I had the opportunity to sample their range of house baked breads decades ago and not since. Baked it in a Dutch oven with lid using parchment under it to move it.
Eva Mullendore says
why don’t the recipes for sourdough bread use cups as measurements instead of grams? It is so hard to figure out the conversions from grams to cups.
Ross Phillips says
because baking is science and needs to be accurate………….
Martin says
Absolutely. Cups DO vary, and in something as finely balanced as Sourdough bread you need accuracy. Cups won’t work
Anna says
Once you start baking with a scale, you will never want to rely on cups…You can pack the flour too densely and change the recipe…and not for the better…I found a cheap scale at a yard sale and another at a thrift store and use them for all sorts of uses…only $12 dollars on amazon otherwise.
Tove Gisselbæk says
I bake this bread again and again. It’s the Best 🤩🤩🤩
… Now i only need to make myself a betyder sourdough culture, it’s not always strong enough to rise the dough 🤦♀️😀
Denmark🇩🇰
Christa says
Thank you for sharing this process. I am a culinary student working on my Independent Study Project and writing a paper on sourdough bread. I found this site through a link and read it over many times. Being from the S.F. Bay Area and now living further away…this truly brings me back home. My first loaf came out of the oven this evening and it was a game changer.
Thank you!
Kaye Ferguson says
Hello,
Where do you get the culture for the starter or can you make it? Thanks, I am new to this.
Christine K says
They have clear instructions put up in here below.
Foolproof if followed exactly.
www.weekendbakery.com/posts…asy-steps/
Deb says
I am confused about making the starter, the directions are not clear
Fero says
You need to have your sourdough mother first feed it when fed and bubbly take 24g add flour and water mix well cover with cling film and leave it to rest for min 9 hours
Christine K says
They have put in clear instructions below.
Absolutely love their details on every step.
www.weekendbakery.com/posts…asy-steps/
Heather says
When using a Dutch oven how do you keep your bread from burning on the bottom, I always have a problem with that and then the bread is really hard to cut through the bottom
Annemiek van Moorst says
Try with a lower temperature Heather (I had the same); like for example not 235 Celsius but 225 or 230. Depending on your Dutch oven – do not overdo the preheating.
Most breads do well in my Dutch oven with oven temp. 30 min. on 230/225 and 15 minutes without cover on 225/220 when indications are slightly higher (235 for 45 minutes).
Fero says
I have got same issue with my Rofco B20. Bread on boytom shelf is almost always burnt.Any suggestion how to avoid it please??
Dawna K says
Ive had great luck placing a trivet in the bottom of my Dutch oven (i use one that came with my old pressure cooker). You can also put a layer of rice or cornmeal between your parchment paper and the Dutch oven.
The last helpful hint i just received is to fold a large square of parchment paper into fourths and place that under your loaf -I haven’t yet tried this one but sounds promising, you can reuse parchment paper for this.
Peter says
I always put a backing stone on the shelf below my Dutch oven !
Angelika says
I used to have the same issue but came across someone using ceramic pie weights in the bottom of the Dutch oven. Heather, it works like a charm, fill the whole bottom of your Dutch oven with a single layer of ceramic pie weights and you will not have a burned bottom crust again.
Annette says
I have tried your ceramic beads tip. Worked brilliantly! Crusty on top but sliced through easily at the bottom. A £5 well invested. Thank you.
Nestor Holynskyj says
I cut out a circle of parchment to line the bottom of the Dutch oven. I’ve used it over and over again with no problem.
Petra says
Amazing recipe, thank you 🙏🏻
I live in a country where spelt flour, or other specialty flours, are not always available. With what type of flour can I replace the spelt flour when I run out of stock? For the bread flour I normally use 00 flour.
Heather says
New to baking trying to get myself prepared. I have a rye starter 50 % flour 50 % water that’s 40 years old I bought from a bakery, it’s been fed for 3 days I now have way too much! I also have two round 10″ bannetons and a scraper and a blade for slashing the bread. In your recipe you say sourdough culture. Does that mean mix 24g of my starter with flour and water to make the first step that you call starter, or what I have is already ready to bake with and I skip ahead? Bit confused. Also I’ve read a lot about ‘autolease’ which doesn’t seem to be referenced. Total confused novice, help!
Rene S says
What you got is a sourdough culture and you can get you the base sourdough from it as explained (called starter here). If you have too much after feeding, you can bake directly with it aka skip the starter step and go to the main dough part directly BUT you might not get the same result, because it has fermented differently. That is rather for the expert in you… after more training. Stick to the recipe first.
Autolyse is a way to let the dough gain structure by letting it rest without salt for about 30 min. That helps to save on kneading. Not required. Just a technique you can use. Folding later does the same. Experiment with that.
Tabitha says
What would be the max time that I can leave my starter out of the fridge before putting it in the fridge for the 34 hours? Could I possible leave it out for say 19 hours lol?
Rene S says
It will be probably overfermented and hence not good for baking anymore. Stick to the times and start experiments later. Every 5C up or down increase or decreases the time for the dough/sourdough by factor 2.
Dhanoutie singh says
Hello
Thank you for the starter and
What is the best flour.( all purpose,
Bread flour or all purpose bleached flour. For the starter what is the best flour to use.
Also can you kindle send me a recipe.
Thank you
Dhanoutie singh
Richard says
I had high hopes with this recipe, it works well around my working hours. Everything went fine, but the dough did not rise as expected, despite being extra careful while folding.
Maybe you have a few tips for me.
Thanks
Weekend Bakers says
Hi Richard,
Make sure your sourdough culture is up to the task and refreshed / fed the day before use.
Also make sure the dough has the right temperature and the room is not too cold for the final proofing.
Hope you will give it a few more tries, it is worth it in the end.
Rene S says
When you don’t get the volume in the last 2-3h phase, just extend it. As long as the dough comes back fully when pushing in gently, you can extend the fermentation time. If a small dent remains and does not go away, it is time for the oven.
Silvia says
Hi Ed & Marieke.
Best recipe ever! Brings me back to my years in SF. Baking it for the 4th week in a row now. I use a Dutch oven to get the crunchy crust. Next challenge is to make breadbowls with this recipe to fill with clamchowder. I think one loaf is around 3 bowls, don’t you think?
Thanks!