

This Pain Rustique has become our daily bread
Klik hier voor de Nederlandse versie
After baking hundreds of pains rustiques you could say this recipe of our version of this rustic bread has been tweaked to the max. Of course the tweaking has been done to accommodate our equipment and ingredients and above all our taste. And I believe that the end result also has a lot to do with the hands of the maker (watch Ed’s hands at work making Pain Rustique). Give six people the same recipe and they all come up with very different loaves. So like with all other recipes, you have to make this one your own. But I believe this recipe can be a good starting point.
The recipe is very loosely based on Hamelman’s Pain Rustique but can actually be seen as a hybrid, sometimes also called ‘levain-levure’. It has sourdough in the preferment and yeast in the final dough. This way you get the best of both worlds: the extra flavor of the sourdough and the ‘speed advantage’ of a yeast based bread. Another point of difference is the shaping. Pain rustique usually has no preshaping or final shaping. Our version does have shaping and the final fermentation is done in bannetons.


For this recipe we are going to make a starter named a poolish. A poolish is a type of wet sponge usually made with an equal weight of water and flour and an extremely small amount of yeast or sourdough culture and NO salt. Making a poolish helps bring more taste and strength to your bread while using less yeast.
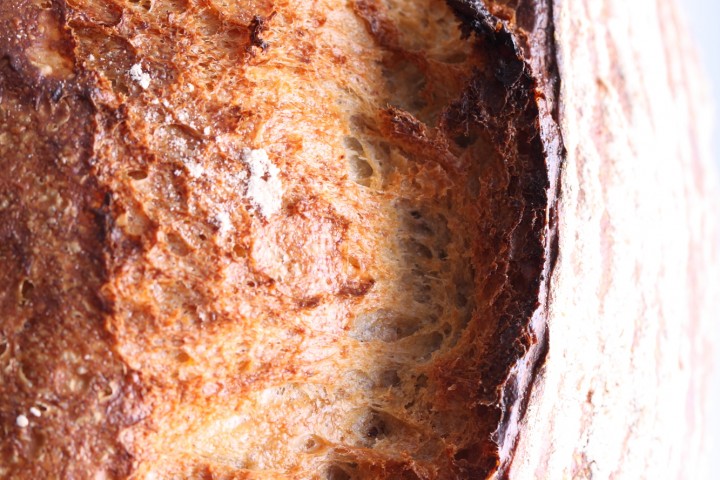
Note: We use European flour which absorbs a few % less water than American type flour. People using this type of flour should add 3-8 ml water to the final dough. If you dare, you can actually make the dough a few percentages wetter to get bigger ‘holes’ in your crumb. We lowered the amount of water in this recipe to make the dough easier to handle. Currently we are baking this recipe with about 67.5% hydration; so we use 80g water per loaf in the final dough.
Making the poolish
In a bowl stir together 180 grams of bread flour, 45 grams of whole wheat flour with 225 grams of water at room temperature with 10 grams of sourdough culture. Mix it well until you have a homogeneous slurry that looks like very thick batter. Cover the bowl with clingfilm and let the prefermenting begin. After 12 hours at room temperature it is ready for use. So if you want to begin your bread making in the morning, you make your poolish at 9 in the evening.
Our sourdough starter is not very sour by nature, it gives a very mellow sour note to the bread and we like it that way. We have found that the sourness depends on the ripeness of the poolish. This means that using an under-ripe poolish gives you the flavor advantages but not the added sourness. We tend to use the poolish before they peak out and collapse. When this points is reached all depends on ambient temperature and sourdough culture activity. An over-ripe poolish has a weaker gluten structure which will result in a weaker dough and less oven spring.
We use a sourdough culture which is made with 100% whole grain rye flour. A sourdough culture based on rye flour is easier to maintain, it does not go into a slurry when you forget about it, it is easier to stir because it has almost no gluten and it smells very very nice, a bit like fruit. It is also very forgiving in the amount you feed it. Normally we only feed it once a week, after the weekend baking, we just give it a few table spoons of water and rye flour, stir and ready!
If you want to make more than one loaf, just double or triple or quadruple the ingredients. We usually make 6 in one batch. That’s the maximum our bread mixer can handle.
| Ingredients for the poolish | ||||
|---|---|---|---|---|
| 180 | g | wheat (bread) flour | ||
| 45 | g | whole wheat flour | ||
| 225 | g | water (room temperature) | ||
| 10 | g | sourdough culture | ||
| Ingredients for the pain rustique | ||||
|---|---|---|---|---|
| makes 1 loaf | ||||
| the poolish from step 1 | ||||
| 225 | g | wheat (bread) flour | ||
| 70 | g | water | ||
| 7.5 | g | (sea) salt | ||
| 2.3 | g | instant yeast | ||
Making the loaf
Preheat your oven to 235 ºC / 455 ºF conventional setting (at what stage you preheat your oven depends on how long it takes for your oven to heat through, some take 30 minutes, some, like ours, with stone floors take a lot longer, up to two hours. The preparation time from this point until the bread actually goes into the oven is a little under 2.5 hours.
Ideally the temperature of your dough after mixing should be around 24-25 ºC / 75ºF. You should adjust the temperature of the water you add to reach this temperature of the total dough. For us this means in summer adding cold water to this recipe and in winter (when our little bakery can get much colder then the rest of our house) adding water up to 50ºC /122 F. You can measure the temperature of water and dough with a food thermometer. These measurements are important because they correspond with the proving times in the recipe.
Put the poolish starter and flour (no salt and yeast yet!) in the mixing bowl of your standing mixer and add 2/3 of the water. Now start mixing and gradually add the rest of the water and let the dough come together. Knead for only 1 minute until you have a shaggy mass (as Hamelman calls it). Leave it in your mixing bowl, cover and rest for 30 minutes. This process is called ‘autolyse’.

After the autolyse phase you now add the yeast and the salt and knead the mass for another 5 minutes (we use a spiral mixer for this job) and watch it turn into something a little bit more bread doughy. Cover and leave to rest for 40 minutes.
Take the dough out of the bowl and onto a floured work surface and do one stretch and fold (a full letter fold, left over right, right over left, bottom over top, top over bottom; see our bread movies to observe this technique if you are not familiar with it). Transfer to the bowl, cover and again leave to rest for 25 minutes.
Repeat the stretch and fold (full letter fold) part one more time (so 2 times in total) and again leave to rest for 25 minutes.
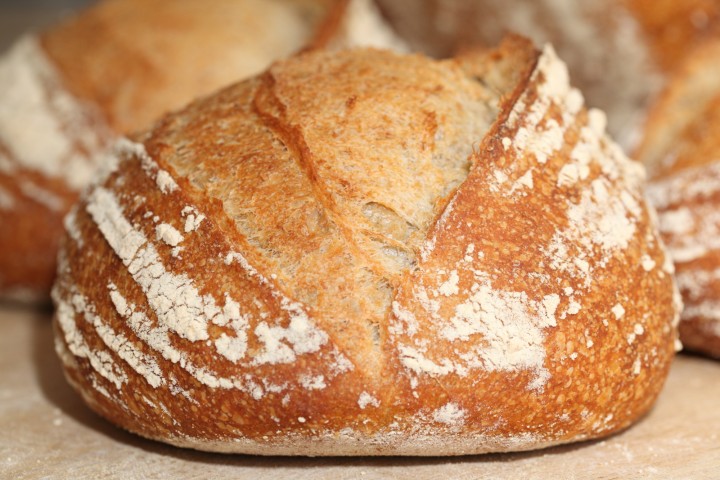
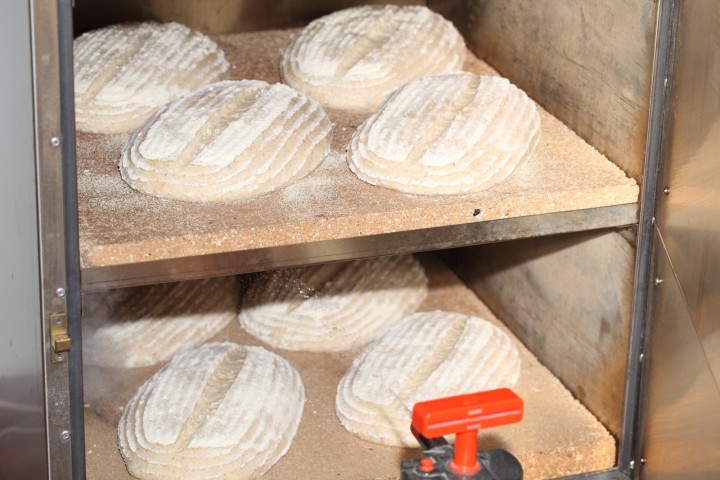
Now it’s time to shape. Shaping is a tricky subject. It’s something for which everybody develops his or her own technique over time. You can make a batard or loaf shape or a boule (ball). If necessary you can learn more on shaping from a good bread book, like the ones by Hamelman or Reinhart. We usually make batard shaped (oval) pains rustiques and use proving baskets/bannetons made of wicker.
Transfer the shaped dough in a proofing basket or baking pan, cover and leave to proof for 30 minutes. When you think it has risen enough, use your finger to carefully make a very small dent in the dough. If the dent remains, the bread is ready to bake, if the indentation disappears, the dough needs a little bit more time.
Now your loaf is ready for the oven. Slash the top of the loaf with a lame or bread scoring knife. To get a nice crust, try to create some steam in your oven by putting a small metal baking tray on your oven floor when you preheat the oven and pouring in half a cup of hot water immediately after putting the bread in the oven. Release some steam by setting your oven door ajar (perhaps with the help of a wooden spoon or oven mitt) 5 minutes before the bread is ready. If you are going to create steam with a baking tray, you maybe also want to turn your oven temperature a bit higher, because you are going to lose some heat in the process. During the baking process, as soon as the crust has the desired browning or you think the browning is going too fast, you can lower your oven temperature for the remainder of the baking time. Also check during baking, if your bread crust has the desired color or your loaf is very close to a heating element you can always temper your oven temperature during the baking process.
After 45 minutes of baking your loaf should be ready. Transfer onto a rack and leave to cool. This loaf also keeps very well in the freezer. But please make sure to eat at least some of it while fresh!
Pain rustique time table
day 1 21.00 h Make starter let ferment for 12 hours at room temperature
day 2 09.00 h Make final dough
- 09:00 h – Add flour and water to starter, mix for 1 minute
- 30 minutes autolyse
- 09:30 h – Add salt and yeast
- Knead for 5 minutes
- Rest for 40 minutes
- 10:15 h – First stretch and fold
- Rest for 25 minutes
- 10:40 h – Second stretch and fold
- Rest for 25 minutes
- 11:05 h – Shape
- 11:10 h Final proofing 30 minutes
- 11:40 h – Bake for 45 minutes at 235ºC / 455ºF
- 12:25 h – Your loaf is ready!
Note: If you like this type of hybrid method bread also check out the recipe for our Fluitje with Spelt


jeannine van steenbergen says
Geweldig lekker!
Randy says
Have you tried baking the rustique in a dutch oven? I was thing 30 minutes covered and 10 – 15 minutes uncovered.
Jamie says
Hi,
Just wondering if I can use starter from the fridge?
Annemiek van Moorst says
Yes you can. WB states this on their site: they do the same. Use starter directly from fridge. But after feeding your starter, wait till activity has started again and put next day – or after baking days – back in fridge.
Annemiek van Moorst says
Foregt to mention that I always do this (I bake this bread 2- 3 times a week).
Khalid Khan says
I found a crumb shot ! Thanks. No need to respond to my earlier post.
Khalid Khan says
Does anyone have a crumb shot of this pain rustique !
Thank you.
David says
Lovely bread recipe. I made it with WW spelt, and the taste is very satisfying with modest sour but delicious flavor. Only modest oven spring from my 5 qt dutch oven and crumb a little tight for an “artisan” bread. I placed shaped loaf in fridge (retarded?) for 3 hours while away from the house and then at room temp while waiting for oven to preheat. Seemed maybe a little over-proofed since finger dimple did not recover. Could that explain lack of oven spring?
Kathleen Louise Powell says
When you resume answering questions, I would like suggestions for using your recipes in a bread machine. They are great recipes that turn out nearly perfect every time but I would love to try in my bread machine using poolish.
Wendy says
I have made this bread dozens of times, and one thing I love about it is that it is extremely “forgiving” – I have forgotten to set timers on multiple occasions and allowed it to rest too long between stretch and folds or done too many stretches (or too few, LOL) and yet somehow this bread never seems to fail for me.
One modification I regularly make is to add 10-20g of ground flax seed to the flour before mixing it with the poolish and water; it gives the bread a nutty flavor and adds healthy fats to the bread; I suspect it also makes it stay fresh a little longer…. but that’s never an issue in my house, the bread is always gobbled up the day I bake it.
If you haven’t tried this loaf yet – it is maybe the most dependable and foolproof bake in my repertoire. (Although, superstitiously, I am always careful to say aloud, as I put the loaf in the oven, “I don’t know if this one is going to work!” It’s my incantation to the baking deities).
Enjoy! And thank you to the Weekend Bakers – your site gives me endless baking pleasure! I hope all is well in your world.
Henry Setzer says
What a great recipe. I used 30 grams of starter in the poolish and jumped up the water to 80 grams in the dough. My proof time was almost 90 min. I baked it in a dutch oven at 495 f or 20min; then at 450 for 20 more and cure time of 5 min. with the oven door cracked. Came out perfect.
Tom says
Would it be possible to make this recipe with only white bread flour? If so would I need to change the amount of water?
Weekend Bakers says
Hello Tom,
Yes that is no problem. Depending on the absorption level of your flour (they all are different) you would maybe need a few % less water, but we think it would be OK the use the amount from the recipe.
Just give it a go and see how the dough comes together, before adding the last bit of water.
Hope it will be great!
Bärbel Adcock says
Hi,
I have just baked your version of the Pain Rustique. In fact there were a lot of firsts today. I never had much success preparing a sourdough starter from books that I have and yours worked first time and in the time frame you discribed. I did wonder whether such a small amount of starter would actually do anything when I made the poolish last night, but this morning it was nicely bubbling away (oh ye of little faith :)). In fact the whole process worked from start to finish in the given time frame.
I don’t have a proofing basket, so lined a shallow bowl with the approx measurements with a tea towel and rubbed a generous amount of flour into it. Then folded the towel over the top to cover. My only issue was with the slashing of the dough. I don’t have a lame (yet), so used a razor blade, but I think I either didn’t cut deep enough or at the wrong angle, as after baking I have a ‘smile’ rather than an ‘ear’. Any tips?
All in all I am very happy with the result and will have a few more practise runs with this loaf and also try some other of your recipes.
Weekend Bakers says
Hello Bärbel,
So great to get your comment with this positive feedback. We can point you to our tips for scoring if you have not seen them yet:
www.weekendbakery.com/posts…onfidence/
Also, the type and brand of flour makes a huge difference in the ‘ear’ department, see it might pay off to experiment a bit with that. We do have our own favorite wheat / bread flour that works very well, other flour we tried did sometimes not even give much of an ear too. Also the amount of steam you are able to create and actual temperature of your oven play their part, as does the moment after the final proof you bring your bread to the oven. Make sure it is well proofed but not over-proofed of course, sometimes the slightest but of under-proofing will give you a nice oven spring. Baking your loaf in a Dutch oven (oven in an oven method) might also give you a better rise and ear.
Thank you again and enjoy your baking and sharing!
Oxana Matthey says
Hi, I have not stuck to the recipe BUT the reason it worked beautifully is due to your explanation of the bakers percentage and your magical calculator. THANK YOU. I knew my Am made « French type 80 » flour can take more hydration, so I used your calc to bump it to 80%. I also keep a lot of starter culture and it is stiff. so I used 150g of starter in the poolish and calculated the necessary water/flour to end up with your totals. My flour loved the extra water in the poolish stage. I fumbled a bit when putting my oval loaf into the round 500 F hot round dutch oven and prob degassed the dough a little, however still had a beautiful spring and made my first « ear »! The holes in my bread are not as big as yours but they are respectably big and a lot of them. The taste is beautifully sour. I feel very encouraged with the use of the calculator. Thank you for your patience and sharing the knowledge.
Weekend Bakers says
You did well! Thank you for sharing your experience and enthusiasm Oxana.
Keep on baking and you will get more and more comfortable with the recipe(s) and sourdough baking.
Leslie Valmadre says
I bake several different bread types and have lots of joy doing that. My goto everyday bread however is this hybrid pain rustique with some minor variations. I have baked Hamelmans version and find it excellent also but this WKB formula with a SD starter in the poolish dramatically improves flavour. My current variation is for 2 batches from which i bake 3 x 500g+ loaves. These work well for our two person household. I increase final hydration to 75% and use 50g sd starter in the poolish. 30min autolyse, 90-100min ferment depending on temp on the day. Dough after autolyse and addition of salt and yeast is mixed in my Kitchenaid for 3 mins on speed 3. If the dough climbs over the dough hook top stop mixing. The mixed dough then gets two stretch and folds on the bench before resting for 30 mins then another single s&f followed 30 mins later by another. Dough is checked and if necessary (rarely needed) it gets another s&f. Preshape, form and 30-35min proof then slash and sole back in 230c fan forced oven with lots of steam.
From this i get a lovely flavourful loaf with beautiful open crumb and crackly crust. My flour is Australian grown and milled bread flour. My wholewheat flour is australian organic flour.
I love your bread calculator but only wish i could somehow save the formula for later use or variation but that is like asking for bells on a ferrari!
Thank you for a great bread baking web site. I tell all my friends about you and how good your formulas and explanations are.
Weekend Bakers says
Hi Leslie,
Thank you so much, first of all for sharing your version and method of the recipe and also for your very kind words. Much appreciated!
We find your remark on the calculator very valid of course and we will see if something like this would be possible. It may take a while, because there’s so much to do and not enough time, as always.
Enjoy your baking and recipe enhancing and the upcoming weekend!
Greetings from the Low Countries and stay safe!
Ed & Marieke
WKB
Lilian says
Hello Marieke & Ed –
I’d like to try this recipe but as my scales are unable to weigh less than 1 gram I don’t know how I would measure the 2.3 g of yeast! Any ideas? Weigh out 23 g and divide into 10 piles?
Many thanks.
Weekend Bakers says
Hello Lilian,
You can always look it up in our baking ingredients converter at the top of this page:
www.weekendbakery.com/cooki…nversions/
If you choose yeast you can see you need just about 3/4 teaspoon yeast to get close to the 2.3 grams.
Hope the bread will be to your liking!
Ed & Marieke
WKB
Lilian says
Thank you very much! I’ll have a go and let you know how it turns out.
Lilian says
Hello Ed and Marieke –
After several distractions (you have too many interesting recipes!), I finally made this. It’s a great recipe & produced a good crust, nice bouncy crumb, and not too enormous holes (husband complains that it’s too difficult to butter bread with huge holes). I’ll definitely be making it again.
Thanks again!
Weekend Bakers says
Great Lilian! We understand the holes dilemma. It is great being able to get this structure, but it is not the end all and as for a sandwich there is a lot to say for a tighter and more regular crumb when butter and jam are involved!
Enjoy the baking!
Marion Sengers says
Hoi Marieke en Ed, zojuist heb ik het filmpje bekeken en zag dat er 2 minuten gekneed wordt, in het recept staat 5 minuten. Is het toch gewoon 5 minuten.
Moet de poolish verdubbelen, bij mij kleine bubbeltjes maar verder niets. Ik heb dit steeds, alleen de eerste keer was er meer activiteit geloof ik maar weet niet zeker…..
Weekend Bakers says
Hallo Marion,
Beide zijn valide, maar het recept zoals beschreven zouden wij aanhouden. Korter kneden betekent ook vaak dat je de S&F ‘s wat uitgebreider zou moeten doen, afhankelijk van de gluten in je bloem. Om ervoor te zorgen dat het recept voor meer mensen met verschillende bloemsoorten werkt hebben we het aantal minuten wat opgevoerd.
De poolish hoeft niet te ‘verdubbelen’ (dit is ook een heel lastig begrip zoals je kunt lezen in onze post over dit onderwerp: www.weekendbakery.com/posts…e-in-size/)
Die kleine bubbeltjes zijn ook oké en een teken dat er iets gebeurt. Als je de poolish in je kom doet dan zie je hopelijk ook de structuur, lichte ‘dradigheid’ die aangeeft dat ontwikkeling heeft plaatsgevonden in de poolish. Kijk anders ook eens naar de temperatuur van je poolish en gebruik indien nodig iets minder koud water.
Succes ermee!
Rajh says
Thanks iam interest get super knownnolege thanks
Chris says
Hallo Ed en Marieke, I have one question. After some brain staggering mathematical calculations it seems that the 2.3g dried active yeast added to the main flour rustique above is equivalent to 60g of my rye culture. So I was wondering why one could not use this instead of the active dried yeast? Is there a reason please?
I intend to bake this in the morning using white Spelt to replace the 45g whole wheat and malthouse to replace the 225g wheat bread flour since Ireland has been empty of all bread flours for weeks now, impossible to find. I have plenty of wholemeal rye, white and wholemeal spelt, chickpea flour and Doves malthouse bread flour. Funny that these flours are plentiful here. I will definitely let you know how this one goes, unless you send me a red flag and warning sirens beforehand! Thanks.
chris says
Hallo Ed en Marieke, it turned out much better than I had imagined. It worked! The only things I changed were increasing the hydration to 68%, one extra stretch and fold with a 20 min rest then a final envelope fold and into the tin for 90 minute proof time. That was it. It was delicious. A nice thin crust and medium crumb density.
chris says
Ed en Marieke, sorry, I did change one ingredient, here is a final summary. Water 68%; Malthouse 51%; wholemeal spelt 10%; Plain white flour 38% (9.6% protein); other ingredients remained the same.
Weekend Bakers says
Hi Chris,
So glad you already had such success with making the recipe your own under these circumstances. Giving it a try and just bake is the way to find out if things work. And if they do, make notes! So you can repeat a good result.
Enjoy your baking journey.
Jess says
Hello!
I just made this bread and cannot tell you how great it is! I am so excited to try out more of your recipes. Thank you so much for all of the useful information and for your wonderful recipes!
Weekend Bakers says
Hello Jess,
Great to get your comment. Glad you had such satisfying results with the recipe. Maybe try a 100% sourdough next like this one?
www.weekendbakery.com/posts…n-naturel/
or the mini boules for instance:
www.weekendbakery.com/posts…i-boulles/
But choose what you like! Hope you will have many more excellent bakes and happy times baking!
Ed & Marieke
WKB
Jenna says
Hi,
Is there a method to make this bread where I use starter instead of dry yeast in the second stage (not the poolish)?
Thanks!
Weekend Bakers says
Hi Jenna,
You cannot change this recipe by putting starter in the second stage, you would have to change the process, the times do not correspond. It would be a totally different loaf. So if you are looking to make a 100% sourdough loaf and not a hybrid version like this PR recipe, maybe take a look at our pain naturel: www.weekendbakery.com/posts…n-naturel/
Or the SF sourdough for instance:
www.weekendbakery.com/posts…ugh-bread/
Enjoy your baking
Jenna Dahl says
Thanks so much for the suggestions! I’m excited to try them 🙂
PJ says
What is the easiest way to add more sourness to this excellent bread? Longer and cooler poolish? More starter – then I read less is more when it comes to sourness?
I follow the recipe and get a nice loaf with good mild, crumb. I’d liker a bit more oomph please.
Weekend Bakers says
Hello PJ,
You can try to get more sour by retarding the dough in the fridge. This could be during the bulk rise or after shaping. Your starter culture can also play a roll, by keeping it at a lower hydration level for instance. Other tips for more sour in your bread can be found here with our sourdough tips:
www.weekendbakery.com/posts…ough-tips/
Alternatively why not try a 100% sourdough bread like our pain naturel: www.weekendbakery.com/posts…n-naturel/
Also lookt at our SF sourdough bread for inspiration for a prolonged poolish fermentation.
www.weekendbakery.com/posts…ugh-bread/
Enjoy your baking!
Stu says
Hi,
I don’t have a sourdough starter ready, but would like to make a poolish with yeast just this once. You say a very small amount… Any ideas of how much? I don’t want to lose too much oven spring, so don’t want it too go over during an overnight ‘rest’.
Many thanks.
Weekend Bakers says
Hello again Stu,
We can help you with that:
For the poolish of this recipe you can use 0.5 grams , so halve a gram of instant yeast. If you are not able to measure this you should take 1/4, so a quarter of a teaspoon with a dent in the middle, so it is about 2/3 of a quarter of a teaspoon. Always better to use a little less when in doubt, it can always be corrected in the final dough plus it is better to use an under-ripe poolish than over-ripe.
Hope you will love this loaf too, and it will be fun to compare it with the hybrid version with later on because it does give a different result.
Enjoy your baking!
Marieke & Ed
WKB
Lore says
Hi,
Thanks for the recipe! Love your website!!
My poolish is almost ready and i will soon start with the rest of the recipe.
I was wondering though whether i could put the shaped r proofed loaf in the fridge after the last rise and bake in the morning? That’s what I often do with full sourdough loafes but not sure about this one.
Thanks for your advice.
Weekend Bakers says
Hello Lore,
Thank you for your kind comment. Yes you could do that but it is hard for us to say if you should adjust the amount of yeast in the final dough and what the best fridge time would be for you. It also depends on your fridge time, but above all we would suggest to take a look at how the loaf is doing very early in the morning so you know where you stand. So, try to shorten the fridge time, because you can always compensate in the final proofing but you can never correct over-proofing.
Hope it will be great!
Greetings,
Ed & Marieke