

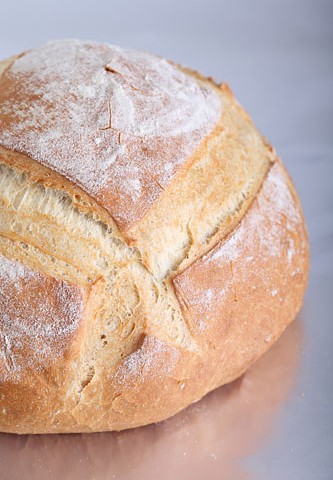
I believe there are few things more rewarding than baking bread. The dough, the smell, the cracking of the crust, the warm oven. Eat this loaf while it’s still warm with fresh dairy butter and soft dark brown sugar. I love making this bread with fresh yeast. Use 20 grams of fresh instead of the 7 grams instant yeast, if you can get it.
Happy baking!
| Ingredients for the Crusty White Loaf | ||||
|---|---|---|---|---|
| makes 1 bread | ||||
| 500 | g | white wheat (bread) flour | ||
| 275 | g | luke warm water | ||
| 8 | g | (sea) salt (1.4 tsp) | ||
| 7 | g | instant yeast (2 1/4 tsp)/ or 21 grams fresh yeast | ||
| 10 | g | honey (1.5 tsp) | ||
| 20 | g | soft butter | ||
Making the Crusty White Loaf
Note: We use European flour which absorbs a few % less water than American type flour. People using this type of flour should add 3-8 g water to their dough.
Mix flour and salt. Add yeast and honey to the flour mixture and add the the water to make a nice dough (not too dry, not too wet, ever so slightly sticky). If you use fresh yeast, first dissolve it in some of the water before adding it, however if you use instant yeast you can add it directly to the flour. Add the butter when the dough is starting to form a ball. Knead for approximately 10 minutes with a KitchenAid or Kenwood type mixer or about 15 minutes by hand (for you (semi)professional standing mixer owners I would recommend 6 to 7 minutes kneading time).
Cover and let it rest in a warm place for an hour. Gently knock it back, shape and let proof for (at least) one hour. Check regularly. When you think it has risen enough, use your finger to make a small dent in the dough. If the dent remains, the bread is ready to bake, if the indentation disappears, the dough needs more proofing time.
Tip: also check out our advise and tips on the right dough temperature
Bake in a preheated oven 230º C / 445º F for 40 to 45 minutes. Make sure to keep an eye on it during baking. If it browns too quickly you can set the oven at around 200º C but make sure you get a full bake otherwise your bread will not be cooked properly. Try to create some steam in your oven by putting a small metal baking tray on your oven floor and pouring a cup of hot water onto it just before baking. Release some steam by setting your oven door ajar 5 minutes before the bread is ready. That way the chance of getting a crusty crust increases. Slashing the dough with a lame or bread scoring knife in a nice pattern also helps with your oven spring and crust. Leave to cool on a wired rack.


Ella says
Hi there, just a quick note to say thank you so much for this wonderful recipe. It made an absolutely delicious loaf! I followed the recipe pretty much exactly as you had indicated but added a bit more water. I used the proofing setting on my oven for the first time and set it to 30degrees and it worked a charm for both provings. I didn’t have a lame so had to use a small sharp kitchen knife. I think I might have slashed it a little too deeply as it widened out in baking but didn’t rise that much between the seams. The baking times were perfect and the whole thing worked a treat. I’ve been able to serve up a lovely fresh loaf to my happy little family!
My next project is your croissant recipe 😉 And if you had a cheese bread recipe that would be amazing! Thank you for demystifying bread making and making the whole process so accessible, instructive and rewarding.
Cheers, Ella
Weekend Bakers says
Hello Ella,
Your comment gives us plenty of joy 🙂 You successfully made a delicious loaf, already made it your own and obviously enjoyed the whole process. Of course you can add cheese to lots of bread recipes (we are not sure what form of cheese bread you refer to) but meanwhile why not take a look at our veggie danish. You can easily make your own favorite version chock-full of cheese: www.weekendbakery.com/posts…ie-danish/
Happy baking and sharing!
Marieke & Ed
Weekend Bakers
Scott says
I’ve just made this bread and it came out absolutely lovely,a nice crunchy crust and soft in the middle.i haven’t tasted bread like this in years when my man used to bake it.
Weekend Bakers says
Hello Scott,
Thank you so much for letting us know. Home made real bread, made with your own hands, baked in your own oven, it’s just the best.
Enjoy your baking, sharing and of course this Holiday season!
Greetings from Holland,
Marieke & Ed
Weekend Bakers
nija says
hi, you have mentioned about american and european flour. in IndiA, we dont have any different bread flour available. its just maida – refined wheat flour that we use to bake. also, temperature here is about 30 – 35 in morning with 79% humidity. please help me how to bake . My bread always comes out dense – and feels very heavy – never like the store bought. please guide me further.
Thanks.
Weekend Bakers says
Hello Nija,
We cannot guide you from our own experience but we can give you some good tips.
First try and do your baking during the coolest part of the day and use your fridge to help you. Try and experiment with making your dough late in the evening, using only one gram of yeast (try it out) and do the final proofing in the fridge. Take it out early next morning and see how it developed. Depending on this, you can either take it straight to the oven, or give it some time before you do. Another thing to try is to use very cold water in your dough. See how temperature affects the working of yeast here:
www.weekendbakery.com/posts…mperature/
Also see our other top tips to help you with your baking in general:
www.weekendbakery.com/posts…king-tips/
Good luck with it!
Martin Turner says
I struggle to make this one. I’ve managed other loaves that take a lot longer than this but i was looking for a quicker loaf. Every time I try this it gets very little rise and not much oven spring. Should I be leaving it for longer? The finger dent test suggests that it’s ready but I’m not sure. Thanks.
Weekend Bakers says
Hello Martin,
With a straight loaf like this that has to develop in a shorter time, it is very important to know and keep an eye on the dough temperature, to get the proofing process off to a good start and get a good rise. We have several tips to help you with this, the most important one is to make a dough that is around 24ºC/75ºF and proof the loaf in a warm place too. You can find much more tips on the how and why here:
www.weekendbakery.com/posts…mperature/
We hope and expect this can make a difference.
Good luck with it!
Martin says
Thank you I’ll give it a go. I think it was quite cold in the kitchen that day. I’ll try again.
Weekend Bakers says
Let us know how it goes Martin!
Martin says
Perfect. I allowed myself a bit more time on this attempt and left it in a warmer place for the initial stage and proof and it came out so much better. Great oven spring. Thanks so much.
Weekend Bakers says
So great to hear Martin, keep up the good baking!
Emily says
What kind of baking vessel/tray?
Weekend Bakers says
Hello Emily,
The bread is baked ‘free standing’ so you place it in the oven directly on a tray or maybe a baking stone and bake it that way.
Shirley says
Made this & halved the recipe, using olive oil instead of butter. It came out great, but a bit dry. Is it meant to be that way, or is there any suggestion to get it more moist?
Thank you for sharing this recipe.
Weekend Bakers says
Hello Shirley,
Thank you for your comment. Each flour brand and type can act differently in how much moisture it absorbs. So it almost always needs some adjustment. You can add some more next time you make this recipe. Our suggestion would be to add around 300 grams of water and see how that goes.
Happy baking!
Shirley says
Thank you for this recipe, really. I’ve been playing with combining different flours (wheat, rye, semolina & bread) & they were just delicious.
My go-to are: bread & semolina; and bread, wheat & semolina.
Again, thank you & cheers!
Weekend Bakers says
Thank you for the Feedback and inspiration Shirley.
Maybe we can also inspire you with this recipe: www.weekendbakery.com/posts…same-loaf/
Happy baking!
Shirley says
Btw, what do you think of making this loaf with a mixture of sun dried tomato & olive, substituting butter with the oil from sun dried tomato?
Any suggestions on the amount of sun dried tomato & olive?
Thank you.
Weekend Bakers says
Hi Shirley,
That sounds very nice, you can use 20 g of the oil instead of the butter, no problem for this recipe. As for the amount of tomato and olive, there is a limit for filling, but it is quite high, so you would not want to add that much anyway, because you still want to see and taste the crumb. We would suggest a maximum of 100 grams of each.
Hope it turns out great.
Fede Pastabites says
Made this yesterday. While my yeast didn’t work so well, the bread still came out really nice, as my husband likes. That you!
Weekend Bakers says
Thank you, happy bakers and happy eaters, the best combination. Next time with fresh yeast maybe, it will be even better!
Cher says
hello, would it be okay to bake this in a loaf pan (like a pain de mie?)
Weekend Bakers says
Hello Cher,
Yes that is perfectly alright and will give good result.
Colin says
Hello! I practically never comment on blogs but I just wanted to say that I tried this recipe, following a number of failed attempts at baking and it worked like a dream first time. Many, many thanks for this 🙂
Your site now sits in my bookmarks list and I will definitely be trying some more of your recipes in the future.
Hartelijk dank voor het herstellen van mijn geloof in het bakken!
PS – quick spelling check; it’s ‘kneading’ 🙂
Weekend Bakers says
Hello Colin,
Thank you so much for your kind words and glad you are one happy baker again!
And thank you for pointing out the mistake, always appreciated and (hopefully) already corrected.
Wishing you many tasty loaves and a good (baking) weekend,
Marieke & Ed
Conor says
Hi guys!! Great site!! Love the recipes!!! Was just wondering if you could use Olive oil instead of butter in this recipe in the same quantities to achieve the same results!!
Thanks!!
Conor!!!
Weekend Bakers says
Hi Conor,
Yes that is no problem. We know people that use olive oil for this recipe with very good results. Because flours of different types, brands and countries have different absorption capabilities, it is always advisable to keep some water back, see how the dough comes together and check if you need to add more. This way you can also use the 20 grams of olive oil and then maybe for the best result use more or less water. Like the recipe says, aim for slightly sticky (post-it memo sticky).
Good luck and happy loaf baking!
Kirsche says
Hello, I love love this recipe and i’ve made this a couple of times! Question, I would like to add King Arthur Flour’s harvest grain blend to it, how do i change the recipe to accommodate this? I really appreciate your feedback on this. Thank you!
Weekend Bakers says
Hello Kirsche,
Thank you very much.
We do not know this blend. If it contains a lot of whole wheat you should compensate by adding 10 to 40 ml of extra water because this blend will absorb more water. The result will also be different of course, so maybe start out with a small amount (10-20%) and take it from there.
Good luck with it and happy baking!
Marieke
simone says
Thank-you weekend bakers, that worked very well – i used Demerara sugar.
May I ask another question please 🙂 if I used 60 / 40 wholemeal / white flour by how much would I need to increase the water?
Weekend Bakers says
When you use a combination of these flours, you will of course get a very different result than when using 100% white flour.
This will be a heavier, denser loaf. We would suggest to add an extra of between 25 and 40 grams of water. You have to experiment a bit and see what works best, because the absorption of flour can differ.
Happy baking!
simone says
Hello,
Is it possible to replace the honey with sugar?
Many thanks,
Simone
Weekend Bakers says
Simone, short answer; it is no problem to replace the honey with some sugar. Happy baking!
Hugo says
Ha die bakkers,
Ik ben ontzettend blij met deze website van u (beiden).
Er was een moment dat ik wilde opgeven en toen ik deze website vond met alle vragen en antwoorden, toen ging het vuurtje weer aan het branden.
Waarschijnlijk heb ik naast al mijn handicaps (haha) een hele grote op broodbak gebied. Ik woon in een zeer warm land en alles wat je weet of dacht te weten gaat helemaal naar de achtergrond.
Relatieve vochtigheid en meelsoorten is nog wel te behappen, maar de temperatuur is de duivel. Ik kan er ‘de’ formule op loslaten voor de berekening van deegtemperatuur versus water temperatuur. Er klopt geen jota meer van.
Stel even dat ik een deegtemp wil hebben van 25 C omdat het al zo warm is hier.
Dan heb ik een formule als voor deegtemp 25C * 3 ===75 -/- meel 30C -/- omgeving 30C /–wrijving12C = 3C oftewel 3 keer de watertemp.
Nou, met ijswater van 1C kom ik bij lange niet uit. Ik moet zwaar onder nul om na 10 – 15 minuten machinaal kneden nog in de buurt van 27C te komen.
Hetzelfde geld voor de rijstijden. Ook al is de omgevingstemp ideaal (zie 30C omgeving), rijstijden zijn zowat 50%. Dus wat denk je dat ik had in het begin. Ja, natuurlijk overgerezen deeg. Dat was ook wel te bewijzen met de vingerprik test. Insnijden was alsof je een soufflée aan het verzieken was.
Nou, om het ff op een kort rijtje te zetten. Mogelijk is dit klimaat dermate anders dat ook mogelijk gist, gluten en dergelijke anders reageert dan bijvoorbeeld in koudere landen zoals Nederland. Ik wil hier maar mee zeggen dat het dus nog niet zo eenvoudig is.
Het is me gelukt om Baquette Boule te maken en normaal Nederlands bus brood, maar ik kan niet verwachten dat het de volgende keer hetzelfde uitpakt.
Natuurlijk weet ik dat uw recepten in Nederland zijn uitgetest en ik twijfel niet aan het vakmanschap. Ik wil alleen maar aangeven dat alle aspirant bakkers wel degelijk rekening moeten houden met de omstandigheden en wat ik lees in de reacties hier en daar zijn er veel ‘gelovigen’ die uit verschillende landen komen.
Ik ga gewoon door. Ook al lukt het niet altijd…meestal is het nog wel eetbaar.
Groet,
Hugo
Hugo says
Het was vandaag slechts 35 graden in de keuken. Kejje nagaan.
Weekend Bakers says
Als je een brood onder die omstandigheden kunt bakken dan lukt het daarna echt overal!
Weekend Bakers says
Hallo Hugo,
Helemaal waar wat je zegt, een heel juiste analyse en een hele uitdaging om onder deze condities te bakken. Onze koudste en warmste condities waren tussen de 13 en de 27 graden en dat ging met aanpassing van watertemperatuur heel aardig. Boven de 30 en zelfs 35 graden zie je dat je andere ‘trucs’ uit de kast moet trekken.
Gaaf dat je zo enthousiast door gaat en wie weet welke coole uitvindingen je nog doet die het bakleven toch wat makkelijker maken.
Dank voor je analyse die andere bakkers ook kan helpen.
Happy baking!
Ed & Marieke
Barry says
Hi,
When leaving the dough to rest for 1 hour, does it need covering?
Thanks
Weekend Bakers says
Hi Barry,
Yes, it is always a good idea to cover your dough when it is resting or proofing to prevent the skin from drying out. You can leave it in your mixing bowl and cover that with clingfilm.
We also use clingfilm that we coat with a thin layer of flour (shake off excess flour) to cover the shaped loaves that are proofing. It works very well for us.
Happy baking!
Marieke
Cher says
I followed the instruction to the letter. Everything went perfectly until I opened the oven door after 40 mins at 230c as instructed, to find a burnt loaf. This was my first attempt at making bread and I was most upset that it was ruined. I will try the recipe again but will have to half the baking time I think.
Weekend Bakers says
Hello Cher,
If you are a novice baker and also new to a recipe it is good to take into account that your conditions can differ. So a lot of things, from ingredients and surroundings and climate to equipment to your own hands can all lead to a different result. So you always have to make a recipe your own. In this case we would guess that it could be the case that you bake in a smaller oven and that the heating element (spiral) is very close to the surface of the bread, causing it to brown (too) quick. It is important not to half the baking time because then your bread will absolutely not be cooked and ready! Around 750g of loaf needs around 40 to 45 minutes to be baked properly. We suggest you check on your loaf next time and temper the oven when the crust has a nice golden color (to 180 to 200 C).
Before you bake again we have some tips for you to make the best use of your oven when baking bread.
You can find them here: www.weekendbakery.com/posts…your-oven/
Happy baking!
Ed & Marieke
Petra3d says
I have to use 200 C for 30 Minutes in my Oven or my bread would burn.
A great Recipe and I love the addition of honey:)
Ada says
Tried your recipe todayn smells delicious. Waiting for them to cool down so we can test them!
Dave says
Try substituting ’00’ grade Durum wheat flour (Semolina) for the French type 55 in this recipe, it makes superb tasting loaf, which is fabulous when toasted. You won’t regret it.
Weekend Bakers says
Thanks for this great addition Dave! We also experimented a bit with adding a percentage of semolina to cheap supermarket flour and the baking results definitely improved (see: www.weekendbakery.com/posts…nt-part-1/).
Tom says
Hey,
the 10 minute kneeding, is that manual or with a machine? Because I would like to try this bread and I don’t want to overkneed.
Kind regards,
Tom
Weekend Bakers says
hi Tom,
Sorry for the lack of information. The 10 minutes is done with a machine like a KitchenAid type mixer on a low speed. By hand you would probably go up to 15 minutes for good gluten development.
I will add it to the recipe.
Thanks and happy baking!
Marieke
Philippa says
Tried this today as getting frustrated with my LAZY sourdough starter! Lovely crusty but tender bread. Made it with 10% wholemeal rye flour for added depth of flavour. Gorgeous. But somehow my oven seems to run seriously hot as, even checking with accurate oven thermometer, the bread was more than ready (and just starting to burn) after 30 mins. A little careful experimentation is called for!
Your site is turning into my new obsession – thank you so much.
Weekend Bakers says
Hi Philippa,
Maybe the space between the bread and the heat source is also not so big in your oven, that can be a reason for quick burning. After the bread crust has the right colour (usually after 10 to 15 minutes), you could turn down the heat a bit for the rest of the baking period. Another option would be to cover the top of the loaf with some alu foil.
Happy Baking,
and thanks for being pleased with our website!
Marieke
Nancy says
Thank you Marieke.
I will follow the recipe for the Crusty White Loaf
Nancy says
Hello Marieke,
Can I make this Crusty White Loaf with sourdough instead of yeast? How much sourdough do I need?
Today I made the whole wheat loaf and it tasted wonderful, can’t wait to make the white loaf.
Kind regards,
Nancy
Weekend Bakers says
Hello Nancy,
The fact is, you would have to change the recipe and the end result will also be different.
This is a ‘straight dough’ recipe. Using a large amount of active sourdough starter (in the region of 200 g) has the same effect on the dough as using a poolish. This way it would not be a straight dough anymore.
Using a small amount of starter would mean fermenting and proofing times will be way longer plus the taste and the structure will be very different (it will not be the same crusty loaf). I have never made this loaf this way and cannot advise you correctly on how to change it so the loaf will be perfect or resembling the loaf you see above.
So what I am basically trying to say is that you cannot change yeast for a certain amount of sourdough and keep the rest of the recipe the same.
I would rather advise to use a different recipe, already based on using sourdough, with matching amounts and times.
Good luck with it,
Marieke
Alexey says
I ran across this website by chance and am glad i found it! I made this recipe when I wanted a quick bread, usually I
let ferment at least overnight. I made a couple of changes:
Potato water: 280g
Instant Yeast: 5.5g [7g seemed huge! and I get distracted easily so I wanted extra time 🙂 ]
Salt: 10g
Olive Oil: 10g
I used organic unpasteurized raw honey
I also ended up using a bit less flour, I had 51g left over after measuring out 500g
I have to say I was expecting a loaf very similar to what I normally buy, but it actually had a very nice nutty flavour!
The crumb was very soft, even, and delightful! It’s good to know that I can now make a bread in only a few hours that
tastes great!
I still need practice scoring, but here is a picture (taken with my phone):
Weekend Bakers says
Hello Alexey,
Thank you for your very intriguing addition and your version of the recipe. I must try it out myself. I have never used potato water in baking, only roasted potatoes that went into a recipe for a ‘potato bread’.
Sorry we cannot see your picture. The only way at the moment for us to see them is for you to post a link to a site where the picture is already posted (like Flickr for example).
Happy baking,
Marieke
Don says
Hi Marieke, Sea salt; here we go. Malta desalinates water for the small island as no/ not enough fresh available. The by product of any desalination is— da da, sea salt. This was dumped. Someone then came up with the bright idea of packaging it, selling it at sky high prices. Why? well come on, there are always folks out there who will fall for it.
ALL salt is sea salt. It comes from no-where else but the sea. What package should say is “This salt has recently been extracted from the sea. This is full of oil contaminants, fish poop and all sorts” That should be near enough.
Salt we normally buy has been extracted from long dead seas. Hence is clean, and probably contains lots of good minerals that, over the years have filtered through. Nothing wrong with good old salt. You are being conned if you believe the word “sea” makes it a better product.
BTW. Love your site. Tried the 80% hydration, lost my cool a wee bit. Ended up dumping dough on baking tray and stuffing it in oven. So ended up with an abstract lump of bread that tasted superb. Not trying it again though, just could not handle the dough. I will stick to my usual 62% hydration, this is just nicely managable using Allinsons bread flour and is not too dry.
Weekend Bakers says
Hi Don,
Thanks for your salty addition. Isn’t it terrible that almost every (food related) subject and product you dive into ends up being about deceit and quick money. Especially when something ‘catches on’ with the public.
Maybe you can give the slightly less wet baguette dough a chance some time – see: www.weekendbakery.com/posts…e-bb-loaf/
Happy Baking,
Marieke
Don says
Marieke, I do like the look of that one but being the chicken I am for gooey wet horrible sticky dough can I reduce water to about 62% and for it still to work? I must be the only person who bakes bread etc. that will not delve into dough. Just something horrid about it–lol
Weekend Bakers says
Hello Don,
No I’m afraid the techniques will not work very well with that percentage (the stretching and folding) you will end up with a standard loaf shaped a bit differently…
Maybe just stick to your bread or take baby steps to overcome your aversion to the sticky ;
Cynthia says
Hello Marieke,
I did use organic wheat flour and the starter is working ! Its size was doubled over the last 12 hours ! I was excited to see it this morning ! Can’t wait to use it for my bread soon. Thanks for sharing your recipes and tips 🙂
Cynthia
Weekend Bakers says
Your welcome 🙂 Hope the starter will lead a long, happy and healthy baking life!
Cynthia says
I am a beginner in bread making. Started to bake 3 months ago. The bread I baked by following this recipe is completely different from the bread I’ve baked before. It tastes so good ! My oven is also small so I will adjust the temperature next time to avoid browning too quick. I want to make my own sourdough starter too but I only have plain wheat flour in hand. Is it possible to make the sourdough starter with plain wheat flour ? Anyway, I tried it last night and will see if it works. If not, I will use the rye flour next time.
Weekend Bakers says
Hello Cynthia,
Good idea to adjust your oven! Making a starter with (preferably organic, because the chance of a good starter with bleached plain flour is very slim, not enough natural yeast) wheat flour is entirely possible. We just use organic rye because we find it easier to maintain. Wheat based starter goes off and sloppy more quickly and needs a more regular maintenance scheme. The gluten in wheat break down faster, rye has very little gluten to begin with.
Hope your starter will ‘flourish’ and otherwise hope you will give the rye a chance, we get lovely breads with it.
Guessing you have seen our posting on the subject : www.weekendbakery.com/posts…asy-steps/
Happy baking!
Marieke
John Radford says
hopeless
at that temperature“““`(thermometer in oven)
burning within ten minutes
have tried for too long (about eight months)
am going back to my bread machine,,,, John
Weekend Bakers says
If your heating system is too close to your bread (e.g. if your oven is quite small) it could burn and you have to adjust your temperature, or make sure that you turn your oven temp down after about 10 minutes so the spirals stop heating. The closer the top of your oven is to your bread the more heat will get transferred fast and this means quicker browning and potential burning.
Yury says
Marieke, thanks a lot! Very lovely and useful site! Good luck))
Yury says
Hello! looking very nice! how many grams is weight of ready loaf?
Weekend Bakers says
Hello Yury,
The weight of the dough is about 830 grams in total. With a loaf like this, also depending on how long you bake it (how much moisture you are left with), you will lose between 10 and 15% of the weight, so you will end up with a loaf that weighs somewhere between 700 and 745 grams.
Happy baking,
Marieke
Barb says
This recipe seems like a good basic bread for newbies to start with. Getting used to the feel of working with flours, yeast, etc takes a bit of practice. But like the saying goes, practice makes perfect….and in this case -great tasting breads.
Len says
Your proprtions for the crusty white loaf seem to be at 55% hydration…..is that not a little too dry?
Thanks
Weekend Bakers says
Hi Len,
Taking into account the moisture in the butter and honey it is probably a little bit higher, but there is no reason not to add a little more water. This is a basic recipe and the moisture absorption also depends on the flour used, so just feel the dough and add some water if you think it feels a bit dry.
Happy baking!