

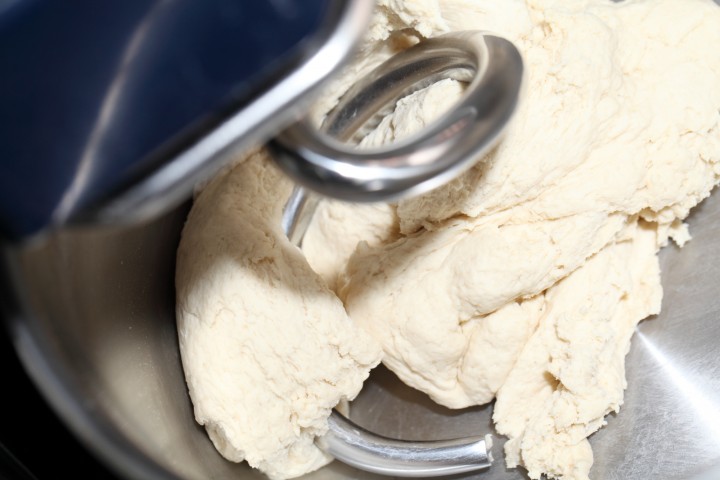
DDT, friction, gluten development, under- and over mixing…there’s a lot going on when your hands or hooks get to grips with your dough.
Properly mixed dough is the first critical step to achieving great bread. Understanding what happens during the mixing / kneading process helps to determine if you are on the right track.
So, based on our own baking experience, here are our most important tips on the subject hopefully helping you off to a good start.
- We know some people are really devoted to their cups and teaspoons but we also know great and famous bakers have our backs when we say: please, please measure your ingredients with a proper scale by weight instead of volume! This is the only way to know your ingredients are measured right and one of the most important steps in achieving consistency in baking.
- Whenever possible control the temperature of your dough. For home bakers the easiest element to control is the temperature of the water to get to the right DDT (Desired Dough Temperature). Also read up on our tips on dough temperature!
- Kneading dough with a mixer gives friction and the temperature of your dough will increase because of it (on average 1°C per minute of mixing). There are friction factors for different types of mixers but for home bakers this can all get too complicated. The most important factors under your control are the temperature of your room, flour and water. Most of our bread recipes have a build-in dough calculator that allows you to calculate the final dough temperature by filling in the correct temperatures for your room, flour and water.
- Get all your ingredients weighed and ready. When adding the salt or yeast at a later stage, put it in plain sight, so you will not forget to add it!
- As a rule, always begin with putting the flour and possibly the poolish in your mixing bowl first. We put the flour on top of the poolish and then add 3/4 of the water on the flour. When you start adding the rest of the water you can still hold some of it back (especially with new recipes) and see how the dough comes together. Working the other way around you might end up having to add flour and this possibly changes the whole balance of the recipe.
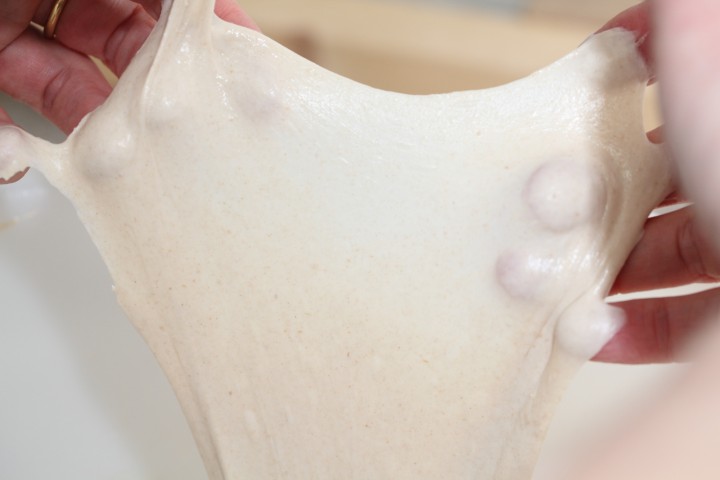
Example of a full window pane. Artisan bread doesn’t need dough to get to this stage most of the time
- The different proteins in your flour are responsible for the development of gluten during mixing. In general longer mixing means a more developed gluten structure. It is possible to over-mix dough at which point the gluten chains can break, but from our experience home bakers are more prone to under-mix their dough, not building up enough strength and elasticity. It is very hard to over-mix a dough without professional spiral mixers. Experience and handling lots of dough will best teach you how your dough should look and feel at any stage of a recipe.
- Rule of thumb; longer mixing gives a tight and more regular crumb structure, shorter mixing (with help of stretch and folds) give a more irregular open crumb structure.
- If, like us, you are a fan of artisan bread with creamy crumb, open structure and lots of flavor, opt for short mixing by hand or low speed, longer fermentation times and added bread development techniques like stretch & fold and autolyse
- Take note of the fact that in the first stages of mixing the flour absorbs water and dough can feel dry(er) but in a later stage a part of the water is released back by the flour so the dough feels a bit wetter again. This is a subtle effect but it is important not to act directly by adding water or flour in these first minutes of mixing.
- During the bulk fermentation and stretch and folds the dough firms up and absorbs the water a little bit. During each stretch and fold (which is also a kind of mixing!) the dough becomes a little bit less sticky. So anticipate a little bit for this effect by keeping you dough a little bit wetter than you like it to be during shaping.
- Wetter doughs (> 64%) also give a more open irregular structure in comparison to dryer doughs, but handling these wetter doughs can be a bit daunting the first few times.
- Also note that each type and brand and even batch of flour can act different when it comes to water absorption. So even when you bake the same recipe, adjustments may be necessary. With each new bag of flour we see small differences and need to adjust the water by plus or minus 1 to 2 %.
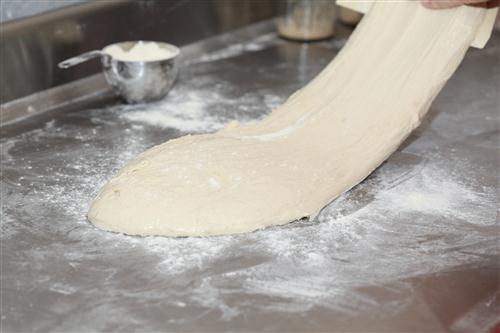
Stretching and folding dough is a gentle technique that, together with time, allows you to develop the dough, building good gluten structure without intensive mixing
- Be aware that adding extra ingredients in the form of fat or sugar can have an effect on the development of your dough. Depending on the quantities used it is important to add them at the right stage of the mixing process. In general very small quantities can be added at the beginning of the process but larger quantities are best added later in the mixing process when the dough is (almost) developed.
- When adding extra ingredients like dried fruits and nuts to your dough do this very gently, either by hand or on a low mixing speed, and at the end of the mixing process. This way both the extra ingredients and the gluten structure of the dough will stay intact.
Want to experiment with different mixing and folding techniques and see how they influence your dough and bread making? Try our Hybrid Pain Rustique or Sourdough Pain Naturel recipe next to our version of a Tartine style bread recipe. A great example of the effect of a more intense mixing technique on dough is our Ciabatta-Focaccia recipe.


Hank Mirtl says
New at sourdough and have been using planetary. Lately i have used my spiral Mixer for pizza dough and have had failure People on FB have given advise that made me investigate more on How to use spiral Mixer. Mine id one speed only. I look forward to gaining knowledge from your posts
Nana says
i think we better use stand mixer because for people who don’t know how to knead properly or not strong enough the dough will become stiff
Marco says
Hallo Ed en Marieke,
Ik ben wildenthousiast over stretch ‘n fold en daar heb ik een vraag over. Op jullie filmpje zie ik Ed vier keer stretchen en folden. Ooit zag ik een filmpje van een Deense bakker en die bleef maar stretchen en folden. Nou is mijn ervaring dat het deeg een soort van ‘samenbalt’ na vier keer stretchen; het is dan veel moeilijker uit elkaar te rekken. Na een halfuurtje is het weer soepel en kun je weer stretchen. Zo pak ik het aan, en dat bevalt prima. Maar wat gebeurt er nou precies in dat deeg als het zo samenbalt, en wat zou het resultaat zijn als ik toch doorga, net als die Deense chef?
Ik geniet enorm van jullie site. Ik leer heel veel en jullie recepten zijn altijd weer bingo! Precies in de roos. Heel hartelijk dank dat jullie dit allemaal delen.
Weekend Bakers says
Hallo Marco,
Dank voor je comment. Het antwoord is een verhaal van diverse factoren. Het heeft bovenal te maken met gluten (ook de soort) en gluten-ontwikkeling. Zie ook (Engels): www.weekendbakery.com/posts…ut-gluten/
Afhankelijk van de bloem/ het meel en het eiwitgehalte daarvan, het recept, de hydratatie (hoeveel vocht je gebruikt) temperatuur en hoe je het deeg behandelt en ontwikkelt, heeft het meer of minder elasticiteit en ‘uitrekbaarheid’. Daarom kan er veel verschil zitten tussen het ene en andere deeg in termen van hoe vaak en ver je het kunt en moet stretchen en folden.
Als je kijkt in dit filmpje naar het S&F proces dan zie je ook dat dit veel langer door gaat. Dit is met een deeg van 80% hydratatie en bloem met een eiwitgehalte van boven de 12%. Dat kan bv bij jouw Deense chef ook het geval zijn.
Dat ‘samenballen’ betekent dat er geen rek meer zit in de gluten en dat je inderdaad een teken krijgt dat je moet stoppen en het deeg moet laten rusten. Tijdens het rusten ontwikkelt het deeg en de gluten zich verder en zo kun je na een tijdje het deeg toch weer stretchen.
Als je doorgaat met jouw deegje terwijl het niet meer wil zul je merken dat het scheurt en in feite beschadig je het dan alleen maar.
Dank voor je aardige woorden en fijn dat onze recepten je bevallen.
Enjoy the baking and learning!
Ed & Marieke
John Nicklin says
That is really well expressed and helpful, thank you. My questions today were when is it best to add e.g. fruit, nuts or other to the dough and here you suggest at the end of the mixing process. These days (on sourdough) I use a mixer to thoroughly lend all the components (1-2 minutes) then use the stretch and fold technique says three times over one and a half hours, then let nature do its or keep in my cool kitchen. The other point I would like to raise is about any additives that contain moisture. For example I have concluded that as beetroot is approx 80/85% by weight water this has to be taken into account in the mix I.e. overall hydration (I aim for around 65), so have a spreadsheet for this. Same thing applies to chillis aand anything else really. I have never seen anything about this so would be interested in your comments, regards martleypfo
Weekend Bakers says
Hello John,
Thank you for your comment and sharing your thoughts and knowledge.
There’s some info on the web about how much moisture a fruit or vegetable contains in general. So you have a starting point, but because every beet and pumpkin (species) can be different, it is still a matter of keeping your eye on the dough and keeping some water / liquid behind and adding as needed, seeing how the dough comes together. Plus the amount needed can also change with the seasons and flour that is used. Also a matter of experience with the recipe to get it right. Making your own spreadsheet for this is the most excellent way to go about it.
Enjoy your baking with all the bounties of the garden!
Ed & Marieke
Lee says
Question is it to late to add for more rise, or is it the amount of sugar retarding the rise, messing up the consistency.
I forgot to add 1/3 cup sugar for the second rise, saw the sugar on the lazy susan.
the total amount of flour with the first starter and the second batch of flour to be included was about 350 grms. I realized after the 1.5 hours, it was on the table. I added it directly to the dough and the sugar made the dough in the mixture like sticky paste after kneading, folding,about 5 times. finaly firm up. came out tough.
2nd can you fold dough like strudle, many times and steam. will it be denser or lighter. then just lightly knead after second rise and shape into ball and steam, and get a lighter and softer weight. trying to get a light soft moist spidery web feel in the steam bread.
3rd. It probably is best to start over if forgot to add a 1/3 cup of sugar to the dough if allready risen.
Weekend Bakers says
Can you tell us what recipe you are trying to make? Large amounts of sugar do take up water and reduces the amount of activity of yeast. Adding basic ingredients after proofing is not a good idea, however sometimes great things are invented by mistake!
Evren says
I have been trying to achieve open crumb with a rich dough like brioche or panettone. I thinks it is against the DNA of a rich dough to have open crumb or at least I though that way until I saw www.thisisfromroy.com/
So it is doable. Does all the points you mentioned above works for rich dough.
There are so many parameters with panettone from ph level of Biga to flour type.
Do you have and suggestions?
Should I use strong flour or AP.? Mix on slow ? add candied stuff during S&F?
I make my biga with 3 feedings 3 hours apart. Then make first dough and ferment 12 hours and make the second dough, ferment, bench rest , preshape, rest, shape, proof, bake.
Would you recommend changing flour type as you move along between stages? Like use Strong for biga(protein might degrade over time) , mix of strong and AP for first dough and only AP for the last dough. ?
Or maybe just follow a country loaf like recipe with liquid starter, 70% hydration plus 10% yolk which contributes 5% towards hydration which brings around %75 and butter, sugar, salt
thanks and anything helps at this point.
Weekend Bakers says
Hello Evren,
Yes we know and have seen the panettones from Roy and they look amazing. We are sorry we cannot help you with all your questions from our own limited experience with the art of making panettone. We think it took Roy probably quite a while to reach this level of perfection and we are impressed by his results. When you look at a picture of a great achievement, it does not automatically mean you can do the same, without putting in the hours and understanding all the science.
So, we would suggest trying different routes and make lots of notes and build on that.
Lots of luck with it and enjoy your baking in the new year!
George Wolff says
This article is ABSOLUTELY GREAT. It gives insight on what to do and what not to do in attempting to make a rustic loaf. Much of what Ihave read elsewhere focuses primarily on HIGH HYDRATION. I have pursued that–and with a not previously heated dutch oven–and have not yet obtained the desired LARGE CRUMB. Yesterday I saw an internet post from a person who claimed to get the same results, until kneading the dough for 15 seconds before the shaping.My concern with that is possible deflation, but will try anything. In a YouTube posting Trevor Wilson maintains that the initial mixing needs to be by hand, but with me, more dough stuck on my hand than remained in the bowl. With the dutch oven, I did get a better rise than by putting the bead on some CHICACO METALIC PERFORATED BREAD TRAYS, placed on a preheated baking stone. I have been unsuccessfully searching for an elongated CAST IRON encloseable bread baking utensil–do not like the boule shape, ANY SUGGESTIONS WOULD BE WELCOMED..
Weekend Bakers says
Hi George,
Thanks for your comment. Why not try the recipe for our pain rustique (with your Dutch oven). www.weekendbakery.com/posts…-rustique/
Also our Sourdough pain naturel is a good one for the Dutch oven. You can see results from other bakers here: www.weekendbakery.com/your-loafs/
The recipe you can find here: www.weekendbakery.com/posts…n-naturel/
Many ways to a good loaf and nice crumb and many factors to consider. But we have never ever read or heard that kneading before shaping is done to obtain large crumb (maybe Stretch and Fold 10 minutes before) we would say you very likely get the opposite result.
Hope other bakers can help you with suggestions for your utensil.
Happy baking
jon smith says
hello i have a question. i started making churros for a profession and my dough is to hard. i don’t know if im over mixing or adding to much sugar or wrong kind of oil or to much salt. my churros taste good and look good but after 2 hours i am physicaly done and have been going through your website looking for answers. i dont know if you can help but maybe you can and i need to think of something before this saterday. Thank you
Weekend Bakers says
Hi Jon,
We do not eat much fried food, so we do not have any experience with churros. If it is too hard we would firstly suggest to add more liquid to your dough.
Good luck with it!
Susi Gilbert says
I discovered your site a few weeks ago, and am loving it. I’m a baker for a local farmers market, and learning every day. I just discovered bread making a few years ago, still consider myself “new”. Hoping you can help me solve a couple of problems. Long post!
One of my “go to” breads is a great Honey-Wheat-Oatmeal bread. It’s a generic recipe, may have found it on the “Taste of Home” site, or one similar. I make the dough in my bread machine, then pull it out and form the dough into a loaf, put it in the bread pan, then bake, cool, slice, package and sell. It makes a Large, 2lb loaf, is delicious, but each slice is VERY fragile. They are great, toasted, but I’m worried they won’t hold up to sandwich makings, and, because it is a big and tender loaf, it’s hard to slice it into thin slices.. The basic recipe is 1.5 cups Bread Flour, 1.5 cups Whole Wheat, 1 cup Dry Oats, 1 tsp salt, 1 and 1/4 cup water, 2 TBSP oil, 1/2 cup honey, 2 1/4 tsp yeast, and I add in 1 to 1-1/2 TBSP of Vital Wheat Gluten into the mix. Standard dough making time for the machines is one hour 20 minutes to one hour thirty minutes, depending on the machine. I’ve been baking the loaf in the oven at 375 degrees for 30-35 minutes, but I increased that time to 40 minutes the last time, and the texture is still fragile. Sooo, I’m wondering what might be making it so delicate..
(I make a fairly basic “White Bread” recipe, same method, dough in the bread machine, then the rest as above, and it turns out very nice, if eventually, a little dry. Ditto, a whole wheat bread with added nuts and dried fruit, and it comes out fine, too.)
Concurrently, I was making another bread recipe, which called for a BUNCH of flour to make 4-5 one-pound loaves, (mix of nearly 7 cups all purpose flour, 3 cups wheat flour) was not able to finish working on it at midnight, so (quickly) learned about refrigerating the dough, which I did for that batch. It turned out fine, though during the mixing process, and then trying to divide it into the five loaves, the dough was a tough, gummy, mess!.
So, I’m wondering if refrigerating the Honey-Wheat-Oatmeal bread after the dough making time might help its structure? If so, for how long? Or….?
And, when using nearly 10 cups of flour for the five-loaf recipe, is there some method which can avoid having it become tough-gummy, and trying to lunge out of the mixing bowl? (a 300 Watt Kitchen Aid Mixer w/ dough hook.). This recipe also calls for adding 2 cups various chopped vegies, but their addition didn’t help the consistency of the dough very much.
(The final product was great, and I sold out easily yesterday afternoon! Will be making it again.)
I know these are long, complicated questions. I appreciate any help you can (are willing to) give. Thank you for the fabulous info and recipes you have on this site. Oh yes, off to go look at the recipes you linked to, above.
Susi.
James Bergman says
This is a great article for everything you need to know about dough. I think I have been leaving my bread in the mixer too long. I normally end up with the fine crumb structure when I have been looking for the more open structure. I will try to slow down and try using wetter dough. It is harder to work with, but if I have a mixer and plenty of butter on my hands I shouldn’t have a problem.
Aaron Stephens says
Thanks for the tip about controlling the water temperature. I’ve just recently started baking breads, and I have a lot to learn still. It’s fun, but it seems like I need a lot of experience. My family enjoys tasting my new creations on Sunday. I hope my next batch will be even better with the great tips you posted.
kurtney says
Hi.my no knead bread is light with big holes but has no elasticity its like schewing gum ,any sugestion?plz
Weekend Bakers says
Hi, this is because of the no knead process, this will give a more gum like texture. Try a more ‘regular’ bread recipe like our Pain Rustique (is on this website), this process (a two step process, polish the day before and a final dough) gives a much less gum like texture.
Motlalepula Winsome Nefolovhodwe says
could you please advice me on how to use bread premix when i mix with my hands cause i do not have bread machine mixer nor proover.
i’ll really appreciate your help.
if i may ask don’t you teach baking and cooking.
Weekend Bakers says
Sorry, but we do not understand your questions. Kind regards.
Stacy Thomas says
I bet that the increasing temperature from the mixer can mess up a lot of recipes. Bread is so picky that I am surprised that a good solution is to just cool down the room and raw ingredients. What sort of issues would this cause?
Weekend Bakers says
Hello Stacy, not problem at all. Professional bakers with big spiral mixers tend to use water from water coolers. It is a professional device which cools down the water will measuring the amount while directly going into the 120+ liter mixer bowls. Happy baking!
Pankaj Bhatia says
Dear Ed and Marieke,
It’s a great collection of baking information. The details covered by you guys are exactly what an amateur baker would be looking for. Thanks for sharing all this and in fine details.
I would like to know the time of fermentation between mixing and stretch & Fold. I suppose it should vary based on the flour and product you want to make. Eg. how much time gap should be there for an 1) all purpose flour dough 2) multi grain flour dough before it’s taken out for stretch & fold.
Thanks
Pankaj
Weekend Bakers says
Hello Pankaj,
Thank you for your compliment, much appreciated! In general 30 minutes and 90 minutes between a stretch and fold is a good rule of thumb but it very much depends on the amount of yeast, sourdough, strength of flour and the hydration. If you want to build strength by stretching and folding you take a shorter waiting period and do more S&F, if your dough already has some strength and you just want to aerate and distribute temperature you do less S&F and take longer fermentation time. So, many factors to consider and understand. Good recipes take all these things into account.
Lots of loaves,
Ed & Marieke
Martin says
I really like your site!
Very interesting what you write about longer kneading giving a more even crumb structure. It explains why I don’t get those nice big holes – I knead too much! 🙂
When hand kneading I think the salt plays a big part too. After adding the salt the dough becomes more “rubbery” – feels almost like chewing gum in texture. I suspect the salt makes the gluten or dough absorb water. I’ve read that salt inhibits the forming of the gluten structure, so I try to add it late in the process.
Do you know what actually happens in the dough when you add salt?
/Martin
Weekend Bakers says
Hello Martin,
Yes you are right in your assumptions about kneading and salt. Salt is responsible for quite a lot in dough, both as a preserving agent, a strengthener and one that also retards the working of yeast for example and flavor of course.
You can find some more about the subject here: www.kingarthurflour.com/profe…/salt.html
Happy baking!
Ed & Marieke
Pauli says
A great article again! Thanks!
Weekend Bakers says
Thanks Pauli, hope you are still enjoying the baking!
Marieke
David says
So true, Ed and Marieke.
I always thought that doing things by hand first and mechanize it after understanding the process is very important.
I tried the strech and fold technique “tartine style” and I was very impressed with the result, and gave me an idea of how much I could hydrate a flour.
I have been told by a fork mixer owner that when the dough makes a “pop!” sound when it is kneaded by machine it kinds of tell you that kneading is almost done… I guess it’s the air finding a way out in the tighten up gluten structure.
Weekend Bakers says
Hi David,
Very interesting, never heard that ‘pop’ sound but also never used a fork mixer either for that matter. Still, like you amazed at what these techniques by hand can do to develop your dough and what wonderful loaves you get as a result.
Happy Baking and a great weekend!
Marieke & Ed
RVW says
Greetings!
Have you considered turning your dough calculator into an “app” for ease of use on mobile/tablet devices? I think that would be very handy in the kitchen!
RVW
Weekend Bakers says
Yes, thanks for that, it is something to consider but it does mean some extra time and effort of course.